towing Citroen JUMPY 2013 2.G Owner's Manual
[x] Cancel search | Manufacturer: CITROEN, Model Year: 2013, Model line: JUMPY, Model: Citroen JUMPY 2013 2.GPages: 248, PDF Size: 8.07 MB
Page 5 of 248

CONTENT
S
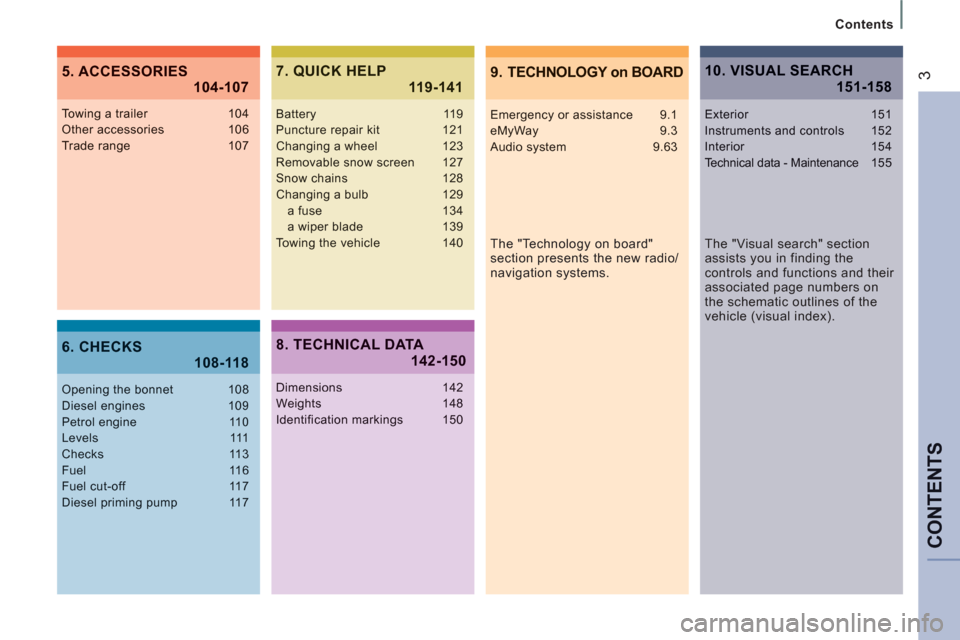
Contents
39. TECHNOLOGY on BOARD5. ACCESSORIES
104-107
6. CHECKS 108-118
7. QUICK HELP 119-141
The "Technology on board"
section presents the new radio/
navigation systems.
Towing a trailer 104Other accessories 106Trade range 107
Opening the bonnet 108Diesel engines 109Petrol engine 110Levels 111Checks 113Fuel 116Fuel cut-off 117Diesel priming pump 117
Battery 119Puncture repair kit 121Changing a wheel 123Removable snow screen 127Snow chains 128Changing a bulb 129a fuse 134
a wiper blade 139Towing the vehicle 140
8. TECHNICAL DATA142-150
Dimensions 142Weights 148Identification markings 150
10. VISUAL SEARCH 151-158
Emergency or assistance 9.1eMyWay 9.3Audio system 9.63
The "Visual search" section
assists you in finding the
controls and functions and their
associated page numbers on
the schematic outlines of the
vehicle (visual index).
Exterior 151Instruments and controls 152Interior 154Technical data - Maintenance155
Page 10 of 248

6
7
6
6
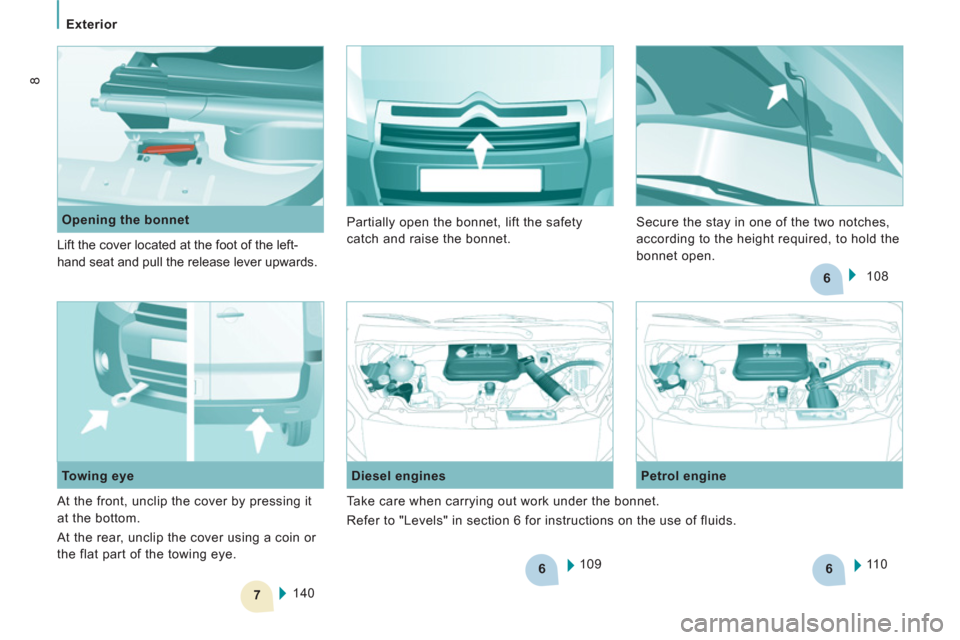
Exterior
8
109
Diesel engines
Petrol engine
11 0
140
Towing eye
Opening the bonnet
Lift the cover located at the foot of the left-
hand seat and pull the release lever upwards.
At the front, unclip the cover by pressing it
at the bottom.
At the rear, unclip the cover using a coin or
the flat part of the towing eye. 108 Partially open the bonnet, lift the safety
catch and raise the bonnet. Secure the stay in one of the two notches,
according to the height required, to hold the
bonnet open.
Take care when carrying out work under the bonnet.
Refer to "Levels" in section 6 for instructions on the use of fluids.
Page 18 of 248

5
333
Interior
16
Location for stowing rail
Lashing rings
Interior rack
106
Vertical partition
77
76
76
You are advised to immobilise the load by
securing it firmly using the lashing rings on
the floor.
LOAD SPACE
Page 106 of 248

104
Towing a trailer
For more information about weights,
refer to the administrative documents
(registration document, ...) or to the
"Weights" section of chapter 8.
TOWING A TRAILER, CARAVAN, BOAT, ETC...
Distribution of loads
Distribute the load in the trailer so that the
heaviest objects are as close as possible
to the axle and the nose weight is close to
the maximum authorised without, however,
exceeding it.
Cooling
Towing a trailer on a slope increases the
coolant temperature.
As the fan is electrically controlled, its
cooling capacity is not dependent on the
engine speed.
Driving advice
A towed vehicle must free wheel: gearbox in
neutral.
Page 107 of 248

105
Towing a trailer
ACCESSORIE
S
5
You should therefore use a high gear to
lower the engine speed and reduce your
speed.
In all cases, pay attention to the coolant
temperature.
Ty r e s
Check the tyre pressures of the towing
vehicle (see the "Identification markings"
section of chapter 8) and of the trailer,
observing the recommended pressures.
Towbar
We recommend the use of genuine
CITROËN towbars and their harnesses,
which have been tested and approved from
the design stage of your vehicle, and that
you entrust the fitting of this equipment to a
CITROËN dealer.
If this equipment is not fitted by a CITROËN
dealer, it is imperative that it is fitted using
the electrical pre-equipment installed at the
rear of the vehicle and in accordance with
the manufacturer's instructions.
In accordance with the general instructions
a reminder of which has been given above,
we draw your attention to the risk associated
with fitting a towbar or electrical accessory
not recommended by CITROËN. Fitting such
equipment could result in the failure of your
vehicle's electronic system. Please obtain
information from the Manufacturer before
fitting this type of equipment.
See the "Levels" section of chapter 6.
Good Practice
In certain cases of particularly arduous
use (towing the maximum load up a steep
slope in high temperatures), the engine
automatically limits its power. In this
case, the air conditioning is automatically
cut off to save engine power.
If the coolant temperature warning
lamp comes on, stop the vehicle
and switch off the engine as soon
as possible.
Brakes
Towing increases the braking distance. Drive
at a moderate speed, change down early
and brake gradually.
Side wind
Sensitivity to side wind is increased. Drive
smoothly and at a moderate speed.
ABS/DSC
The ABS or DSC systems only control the
vehicle, not the trailer or caravan.
Rear parking sensors
The parking sensors system does not
function while the vehicle is towing.
Page 111 of 248

10
9
Under the bonnet
CHECK
S
6
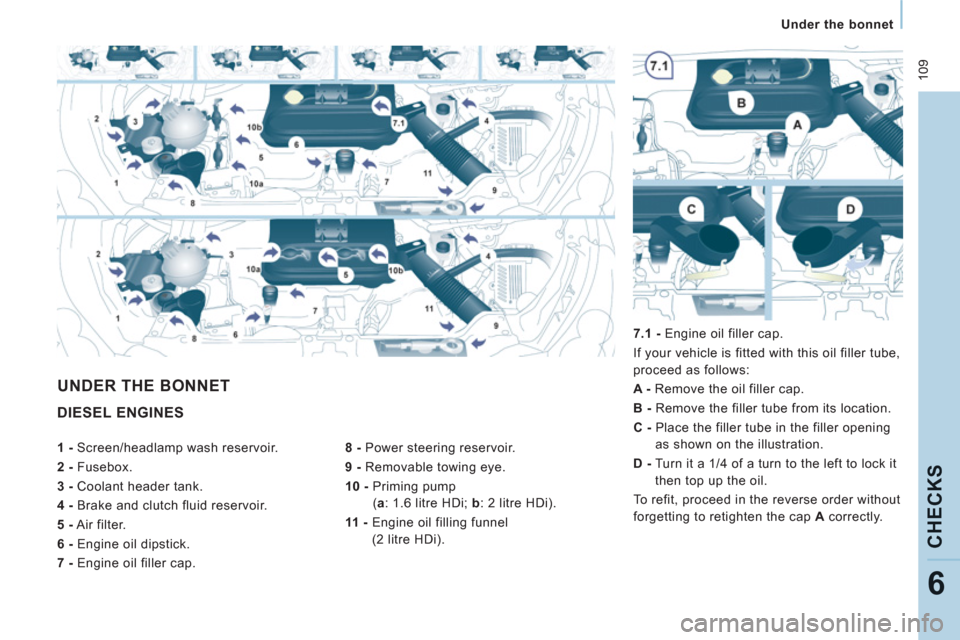
DIESEL ENGINES
8 -
Power steering reservoir.
9 -
Removable towing eye.
10 -
Priming pump
( a
: 1.6 litre HDi; b
: 2 litre HDi).
11 -
Engine oil filling funnel
(2 litre HDi).
7.1 -
Engine oil filler cap.
If your vehicle is fitted with this oil filler tube,
proceed as follows:
A -
Remove the oil filler cap.
B -
Remove the filler tube from its location.
C -
Place the filler tube in the filler opening
as shown on the illustration.
D -
Turn it a 1/4 of a turn to the left to lock it
then top up the oil.
To refit, proceed in the reverse order without
forgetting to retighten the cap A
correctly.
UNDER THE BONNET
1 -
Screen/headlamp wash reservoir.
2 -
Fusebox.
3 -
Coolant header tank.
4 -
Brake and clutch fluid reservoir.
5 -
Air filter.
6 -
Engine oil dipstick.
7 -
Engine oil filler cap.
Page 112 of 248

11 0
Under the bonnet
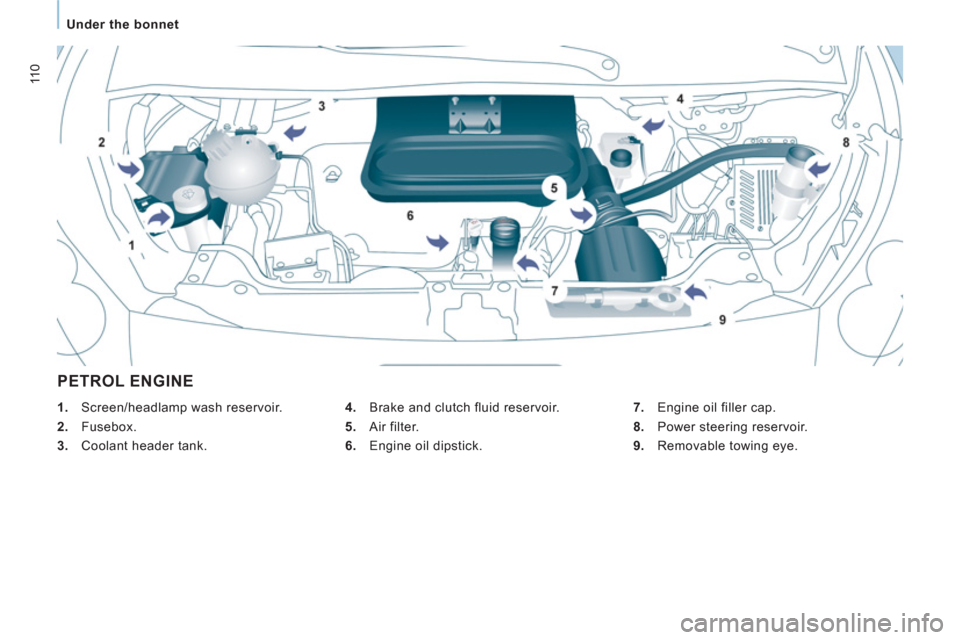
PETROL ENGINE
4.
Brake and clutch fluid reservoir.
5.
Air filter.
6.
Engine oil dipstick.
7.
Engine oil filler cap.
8.
Power steering reservoir.
9.
Removable towing eye.
1.
Screen/headlamp wash reservoir.
2.
Fusebox.
3.
Coolant header tank.
Page 125 of 248

12
3
Changing a wheel
QUICK HEL
P
7
CHANGING A WHEEL
If your vehicle is equipped with a spare
wheel located underneath the vehicle, follow
these instructions.
1. PARKING THE VEHICLE
- You must ensure that the occupants
get out of the vehicle and wait in a safe
location.
- If possible, park the vehicle on level,
stable and non-slippery ground.
- Apply the parking brake, switch off the
ignition and engage first or reverse gear.
- If available, place a chock under the
wheel diagonally opposite the one to be
changed.
On certain types of ground and/or if heavy
loads are being transported, the vehicle
must be raised in order to disengage
the spare wheel from the carrier. Call a
CITROËN dealer or a qualified workshop.
If your vehicle is fitted with suspension
with pneumatic height correction,
please deactivate the system. Refer to the
"Rear suspension" section of chapter 3.
2. TOOLS
- If fitted on your vehicle, open the
plastic flap located at the rear left of the
vehicle.
- Unscrew the nut then take out the jack
and the wheelbrace.
1.
Wheelbrace.
2.
Jack.
3.
Towing eye.
The jack and the tool kit are specific to
your vehicle. Do not use them for other
purposes.
Page 127 of 248

125
Changing a wheel
QUICK HEL
P
7
4. OPERATING PROCEDURE
- Place the jack in contact with the
locating point provided, the one which is
closest to the wheel to be changed.
Ensure that the jack is straight and that
the base of the jack is fully in contact
with the ground.
- Extend the jack to lift the wheel clear of
the ground.
- Resume and complete the unscrewing of
the wheel bolts.
- Remove the bolts and remove the wheel.
- Remove the trim pulling it using the
towing eye.
- Loosen the wheel bolts and start
unscrewing them. Do not extend the jack until you have
started unscrewing the bolts on the
wheel to be changed and have placed the
chock under the wheel diagonally opposite.
Page 129 of 248

12
7
Snow screen
QUICK HEL
P
7
REMOVABLE SNOW SCREEN
According to country, the removable snow
screen is installed on the lower part of the
front bumper to prevent the accumulation of
snow at the radiator cooling fan.
FITTING
- Offer up the snow screen facing its
centring pin A
on the front bumper.
- Put it in place by pressing at each clip B
located in the four corners.
Do not forget to remove the snow screen
when the exterior temperature is higher than
10°C (no risk of snowfall) and when towing.
REMOVAL
- Pass a screwdriver into the hole located
near each of the clips.
- Use the screwdriver as a lever to unclip
the four clips B
in turn.
6. REFITTING THE REPAIRED
WHEEL
The wheel is refitted as described in step 5,
not forgetting to refit the wheel trim.
Refer to the "Identification markings"
section of chapter 8 to locate the tyre
label.
The spare wheel is not designed to be
used over long distances. Have the
tightening of the bolts and the tyre pressure
checked by a CITROËN dealer or a qualified
workshop as soon as possible. Also, have
the original wheel repaired and refitted by a
CITROËN dealer or a qualified workshop as
soon as possible.