air condition Citroen JUMPY 2016 2.G User Guide
[x] Cancel search | Manufacturer: CITROEN, Model Year: 2016, Model line: JUMPY, Model: Citroen JUMPY 2016 2.GPages: 595, PDF Size: 12.47 MB
Page 134 of 595

132
Jumpy _en_Chap03_ergonomie-et-confort_ed01-2016
Front demist - defrost
These markings on the control panel indicate the control positions for rapid demisting or
defrosting of the windscreen and side windows.
Manual heating/ventilation
or air conditioning
With Stop & Start, when demisting has
been activated, the STOP mode is not
available.
Dual-zone digital air
conditioning
F Put the air flow, temperature and distribution controls to the dedicated
marked position. The system automatically manages the air
conditioning, air flow and air intake, and
provides optimum distribution towards the
windscreen and side windows.
The system reverts to the previous settings. F
P
ress this button to demist or
defrost the windscreen and side
windows as quickly as possible.
F
T
o stop, press this button again
or on "AUTO".
F
F
or air conditioning, press
this button; its indicator lamp
comes
on. Heated windscreen and washer jets
For more information on the Wiper
control stalk
and in particular the
heated windscreen and washer jets,
refer to the corresponding section.
Ease of use and comfort
Page 137 of 595
135
Jumpy _en_Chap03_ergonomie-et-confort_ed01-2016
In order for these systems to be fully effective, follow the operation and maintenance
guidelines below:
F
T
o obtain an even air distribution, take care not to obstruct the exterior air intake grilles
located at the base of the windscreen, the nozzles, the vents and the air outlets, as well
as the air extractor located at the rear.
F
D
o not cover the sunshine sensor, located at the top of the windscreen; this is used for
regulation of the air conditioning system.
F
O
perate the air conditioning system for at least 5 to 10 minutes, once or twice a month
to keep it in per fect working order.
F
E
nsure that the passenger compartment filter is in good condition and have the filter
elements replaced regularly.
W
e recommend the use of a combined passenger compartment filter. Thanks to its
special active additive, it contributes to the purification of the air breathed by the
occupants and the cleanliness of the passenger compartment (reduction of allergic
symptoms, bad odours and greasy deposits).
F
T
o ensure correct operation of the air conditioning system, you are also advised to have
it checked regularly as recommended in the maintenance and warranty guide.
F
I
f the system does not produce cold air, switch it off and contact a CITROËN dealer or a
qualified workshop.
Recommendations for heating, ventilation and air conditioning
If after an extended stop in sunshine,
the interior temperature is very high, first
ventilate the passenger compartment for
a few moments.
Put the air flow control at a setting high
enough to quickly change the air in the
passenger compartment.
The air conditioning system does not
contain chlorine and does not present
any danger to the ozone layer.
The condensation created by the air
conditioning results in a discharge
of water under the vehicle which is
per fectly normal.
When towing the maximum load on a steep gradient in high temperatures, switching off the
air conditioning increases the available engine power and so improves the towing ability.
Stop & Start
The heating and air conditioning
systems only work when the engine is
running.
To maintain a comfortable temperature
in the passenger compartment, you can
temporarily deactivate the Stop & Start
system.
For more information on Stop & Star t ,
refer to the corresponding section.
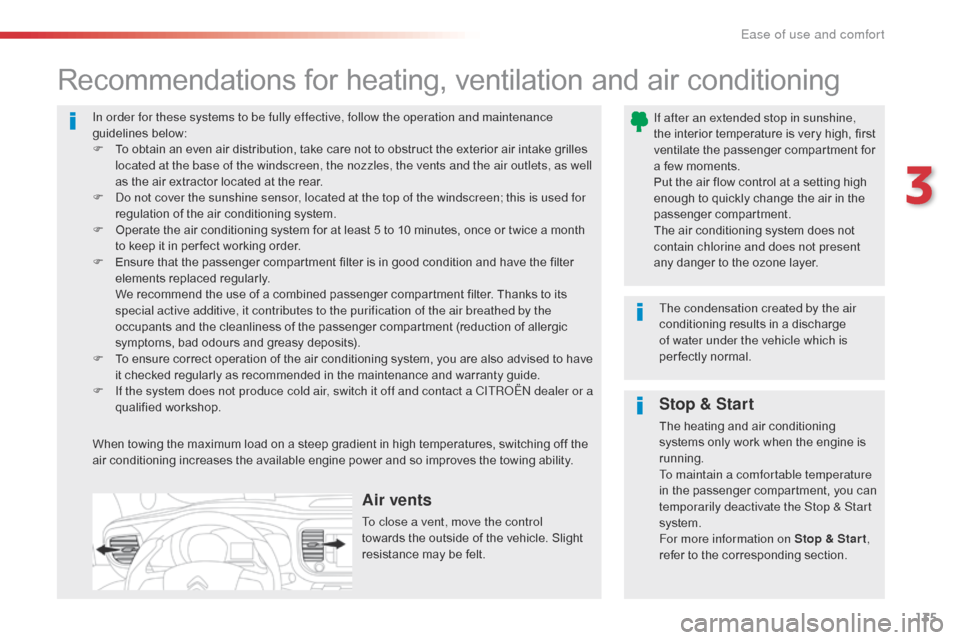
Air vents
To close a vent, move the control
towards the outside of the vehicle. Slight
resistance may be felt.
3
Ease of use and comfort
Page 138 of 595

136
Jumpy _en_Chap03_ergonomie-et-confort_ed01-2016
I require...Heating or Manual air conditioning
Air distribution Air flowRecirculation of interior air /
Intake of exterior air Temperature Manual AC
HOT
COLD
DEMISTING
DEFROSTING
Suggested interior settings
Dual-zone air conditioning: use the automatic mode in preference by pressing the "AUTO" button.
Ease of use and comfort
Page 139 of 595

137
Jumpy _en_Chap03_ergonomie-et-confort_ed01-2016
Rear Heating - Air conditioning
Activation/Deactivation
F Press this button to enable the rear controls, its indicator lamp
comes on.
F
P
ress this button again to inhibit
the rear controls, its indicator
lamp goes off.
Air flow
If your vehicle is fitted with a rear air
conditioning unit, located in the roof, this
system allows the distribution of air conditioned
and heated air via ducting and individual
outlets. F
T
urn the knob to increase or
decrease the air flow.
Temperature
- Turn the knob from blue (cold) to red (hot) to modulate the
temperature to your liking.
This button is accessible from the front, from
the air conditioning control panel.
This control simultaneously adjusts the
temperature and the location of the air
delivery:
-
a
t blue: the air is delivered mainly at
roof level,
-
a
t red: the air is delivered mainly
by the vent located in row 3 on the
right.
3
Ease of use and comfort
Page 148 of 595
146
Jumpy _en_Chap04_eclairage-et-visibilite_ed01-2016
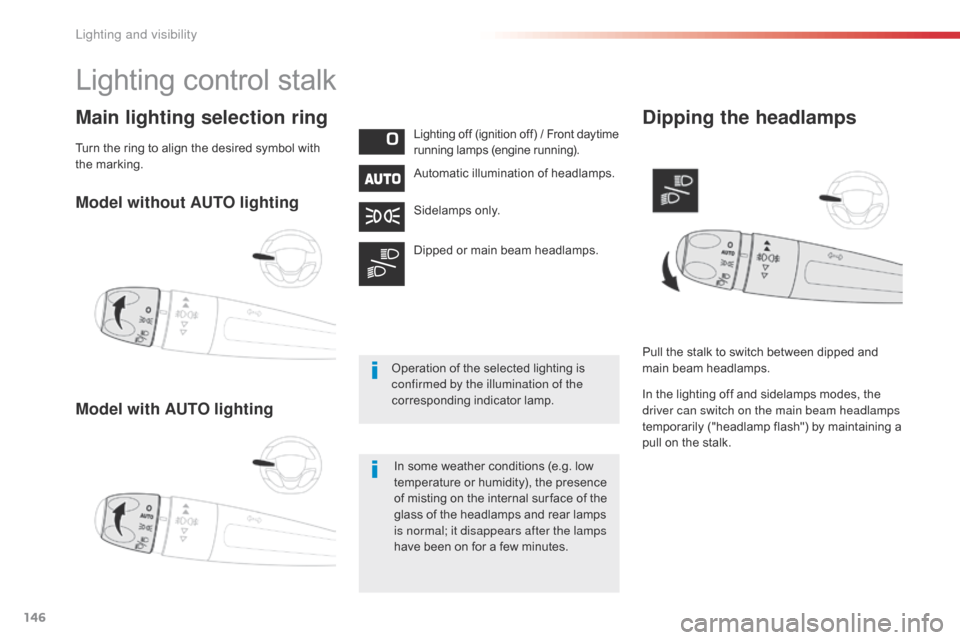
Model without AUTO lighting
Model with AUTO lighting
Main lighting selection ringLighting off (ignition off) / Front daytime
running lamps (engine running).
Automatic illumination of headlamps.
Sidelamps only.
Dipped or main beam headlamps.Dipping the headlamps
In the lighting off and sidelamps modes, the
driver can switch on the main beam headlamps
temporarily ("headlamp flash") by maintaining a
pull on the stalk.
Operation of the selected lighting is
confirmed by the illumination of the
corresponding indicator lamp.
Pull the stalk to switch between dipped and
main beam headlamps.
Lighting control stalk
In some weather conditions (e.g. low
temperature or humidity), the presence
of misting on the internal sur face of the
glass of the headlamps and rear lamps
is normal; it disappears after the lamps
have been on for a few minutes.
Turn the ring to align the desired symbol with
the marking.
Lighting and visibility
Page 150 of 595
148
Jumpy _en_Chap04_eclairage-et-visibilite_ed01-2016
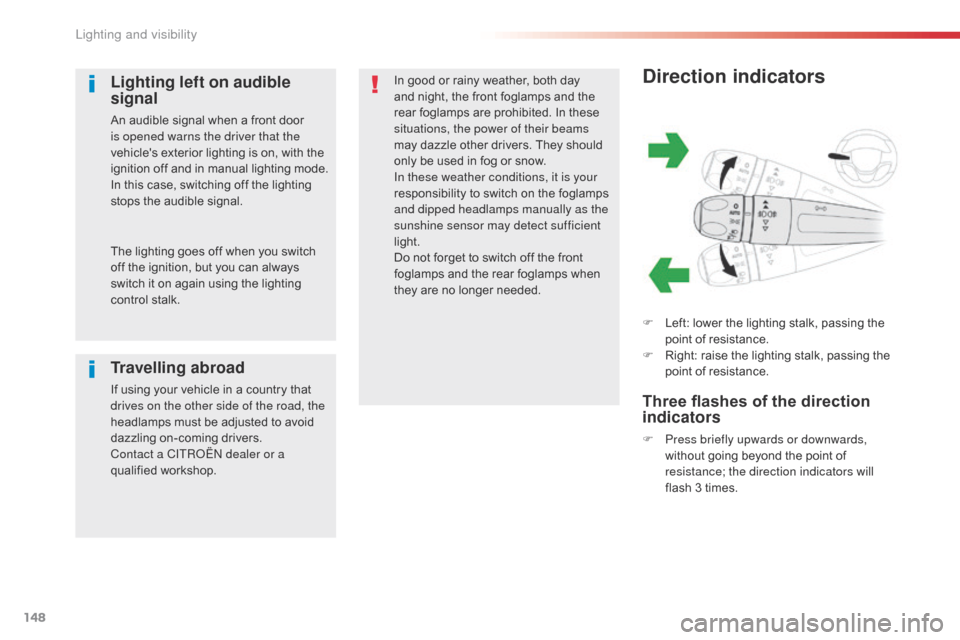
Direction indicators
F Left: lower the lighting stalk, passing the point of resistance.
F
R
ight: raise the lighting stalk, passing the
point of resistance.
Three flashes of the direction
indicators
F Press briefly upwards or downwards, without going beyond the point of
resistance; the direction indicators will
flash 3 times.
In good or rainy weather, both day
and night, the front foglamps and the
rear foglamps are prohibited. In these
situations, the power of their beams
may dazzle other drivers. They should
only be used in fog or snow.
In these weather conditions, it is your
responsibility to switch on the foglamps
and dipped headlamps manually as the
sunshine sensor may detect sufficient
light.
Do not forget to switch off the front
foglamps and the rear foglamps when
they are no longer needed.
Lighting left on audible
signal
An audible signal when a front door
is opened warns the driver that the
vehicle's exterior lighting is on, with the
ignition off and in manual lighting mode.
In this case, switching off the lighting
stops the audible signal.
Travelling abroad
If using your vehicle in a country that
drives on the other side of the road, the
headlamps must be adjusted to avoid
dazzling on-coming drivers.
Contact a CITROËN dealer or a
qualified workshop. The lighting goes off when you switch
off the ignition, but you can always
switch it on again using the lighting
control stalk.
Lighting and visibility
Page 155 of 595
153
Jumpy _en_Chap04_eclairage-et-visibilite_ed01-2016
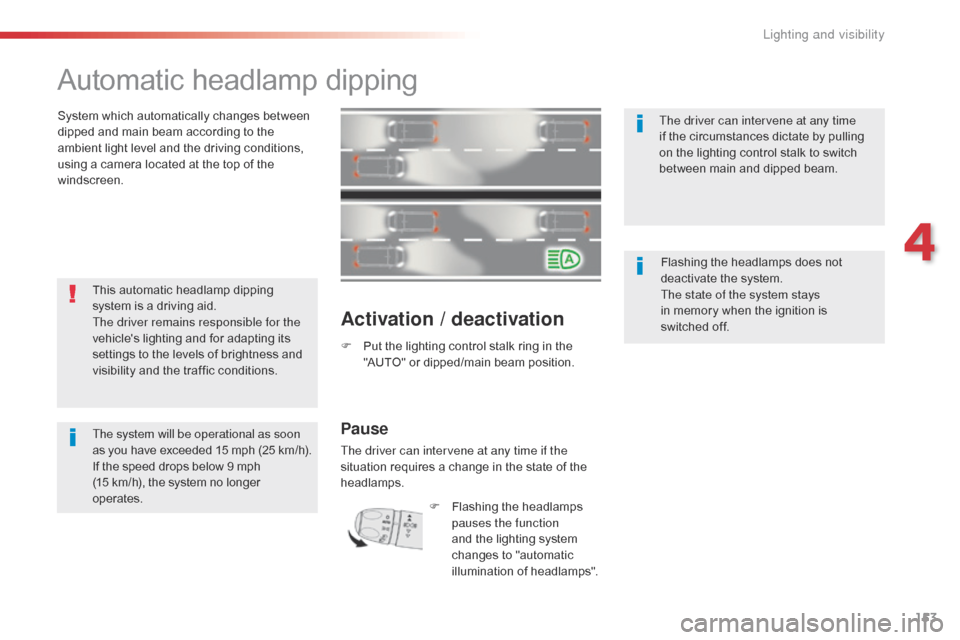
Automatic headlamp dipping
System which automatically changes between
dipped and main beam according to the
ambient light level and the driving conditions,
using a camera located at the top of the
windscreen.
Activation / deactivation
F Put the lighting control stalk ring in the "AUTO" or dipped/main beam position.
This automatic headlamp dipping
system is a driving aid.
The driver remains responsible for the
vehicle's lighting and for adapting its
settings to the levels of brightness and
visibility and the traffic conditions.
The system will be operational as soon
as you have exceeded 15 mph (25
km/h).
If the speed drops below 9 mph
(15
km/h), the system no longer
operates. The driver can intervene at any time
if the circumstances dictate by pulling
on the lighting control stalk to switch
between main and dipped beam.
Flashing the headlamps does not
deactivate the system.
The state of the system stays
in memory when the ignition is
switched off.
Pause
The driver can intervene at any time if the
situation requires a change in the state of the
headlamps.
F
F
lashing the headlamps
pauses the function
and the lighting system
changes to "automatic
illumination of headlamps".
4
Lighting and visibility
Page 156 of 595

154
Jumpy _en_Chap04_eclairage-et-visibilite_ed01-2016
In the Driving menu, activate/deactivate
" Automatic headlamp dip ".
With the touch screen With / Without audio system
To deactivate the system:
To activate the system:
F
P
ress on this buttton, its
indicator lamp comes on, the
system is activated.
F
P
ress on this buttton, its indicator
lamp goes off, the system is
deactivated. The system may suffer interference or
not work correctly:
-
u
nder conditions of poor visibility
(for example, snowfall, heavy rain
or thick fog...),
-
i
f the windscreen is dirty, misted or
obscured (by a sticker...) in front of
the camera,
-
i
f the vehicle is facing highly
reflective signs.
If the fog is too dense, the system is
automatically deactivated.
The system is not able to detect:
-
r
oad users that do not have their
own lighting, such as pedestrians,
- r oad users whose lighting is
obscured, such as vehicles running
behind a safety barrier (on a
motor way, for example),
-
r
oad users at the top or bottom of
a steep slope, on twisty roads, on
crossroads.
Lighting and visibility
Page 158 of 595
156
Jumpy _en_Chap04_eclairage-et-visibilite_ed01-2016
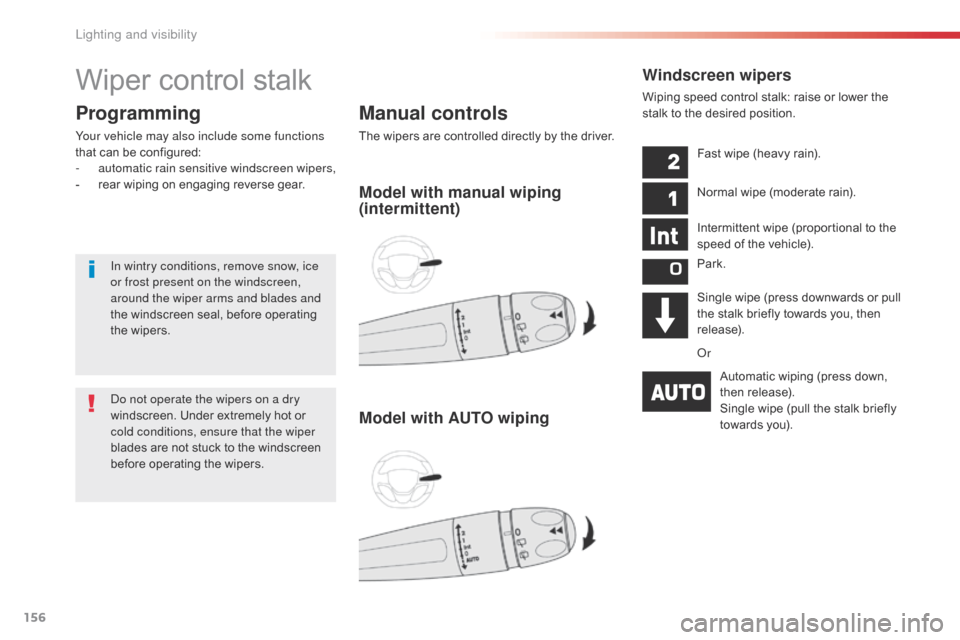
Wiper control stalk
Manual controls
The wipers are controlled directly by the driver.
Programming
Your vehicle may also include some functions
that can be configured:
-
a
utomatic rain sensitive windscreen wipers,
-
r
ear wiping on engaging reverse gear.
Windscreen wipers
Wiping speed control stalk: raise or lower the
stalk to the desired position.
Model with manual wiping
(intermittent)
Model with AUTO wiping
Fast wipe (heavy rain).
Normal wipe (moderate rain).
Intermittent wipe (proportional to the
speed of the vehicle).
Park.
Single wipe (press downwards or pull
the stalk briefly towards you, then
release).
OrA
utomatic wiping (press down,
then release).
Single wipe (pull the stalk briefly
towards you).
Do not operate the wipers on a dry
windscreen. Under extremely hot or
cold conditions, ensure that the wiper
blades are not stuck to the windscreen
before operating the wipers.
In wintry conditions, remove snow, ice
or frost present on the windscreen,
around the wiper arms and blades and
the windscreen seal, before operating
the wipers.
Lighting and visibility
Page 160 of 595
158
Jumpy _en_Chap04_eclairage-et-visibilite_ed01-2016
If a significant accumulation of snow or
ice is present, or when using a bicycle
carrier on the boot, deactivate the
automatic rear wiper. This function is activated by default.
Reverse gear
When reverse gear is engaged, the rear wiper
will come into operation automatically if the
windscreen wipers are operating.
In the vehicle settings menu, activate/
deactivate "Rear wiper in reverse ".
With the audio system
In the "Personalisation-configuration " menu,
activate/deactivate " Rear wipe in reverse
gear ".
With the touch screen Activation / Deactivation
Activation or deactivation of the function is
done in the vehicle configuration menu.
F
P
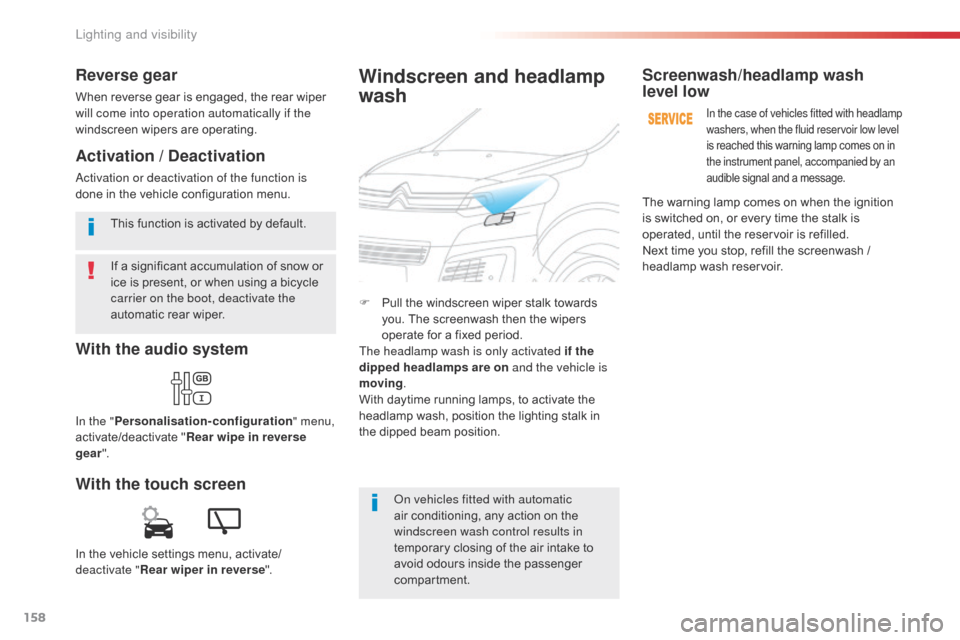
ull the windscreen wiper stalk towards
you. The screenwash then the wipers
operate for a fixed period.
The headlamp wash is only activated if the
dipped headlamps are on and the vehicle is
moving .
With daytime running lamps, to activate the
headlamp wash, position the lighting stalk in
the dipped beam position.
Windscreen and headlamp
wash
On vehicles fitted with automatic
air conditioning, any action on the
windscreen wash control results in
temporary closing of the air intake to
avoid odours inside the passenger
compartment.
Screenwash/headlamp wash
level low
In the case of vehicles fitted with headlamp
washers, when the fluid reservoir low level
is reached this warning lamp comes on in
the instrument panel, accompanied by an
audible signal and a message.
The warning lamp comes on when the ignition
is switched on, or every time the stalk is
operated, until the reservoir is refilled.
Next time you stop, refill the screenwash /
headlamp wash reservoir.
Lighting and visibility