size Citroen JUMPY 2016 2.G Owner's Manual
[x] Cancel search | Manufacturer: CITROEN, Model Year: 2016, Model line: JUMPY, Model: Citroen JUMPY 2016 2.GPages: 595, PDF Size: 12.47 MB
Page 111 of 595

109
Jumpy _en_Chap03_ergonomie-et-confort_ed01-2016
Work tableIf fitted to your vehicle, the backrest of the
bench centre seat tips for ward to form a
pivoting work table, creating a mobile office
(when stationary).
F
P
ull the grip at the top of the backrest. Never use the table while driving.
An object on the table could turn in to
a projectile and cause injuries under
heavy braking or in the event of an
impact.
Centre seat storage
F Pull the strap for ward to tip the seat cushion.
Ensure that the size, shape and volume
of loads carried are compatible with
the driving and safety regulations and
do not compromise the driver's field of
vision.
Lash all loads appropriately, to prevent
or limit their movement and avoid the
risk of injury.
Install the non-slip net (supplied with
the vehicle) every time the seat is raised
and the partition flap removed.
Do not use the net for other purposes.
Check the condition of the non-slip
net regularly. Replace it when it shows
signs of wear or tears, going to a
CITROËN to obtain a replacement
non-slip net to the specification and
quality defined by CITROËN for your
vehicle.
Refit the flap in the partition when no
longer carrying a long load.
3
Ease of use and comfort
Page 171 of 595
169
Jumpy _en_Chap05_securite_ed01-2016
Advice
In the event of an impact
Depending on the nature and
seriousness of the impact, the
pretensioning device may be deployed
before and independently of the airbags.
Deployment of the pretensioners is
accompanied by a slight discharge of
harmless smoke and a noise, due to the
activation of the pyrotechnic cartridge
incorporated in the system.
In all cases, the airbag warning lamp
comes
on.
Following an impact, have the seat belts
system checked, and if necessary replaced,
by a CITROËN dealer or a qualified
workshop.
In order to be effective, a seat belt must:
-
b
e tightened as close to the body as
possible,
-
b
e pulled in front of you with a smooth
movement, checking that it does not
twist,
-
b
e used to restrain only one person,
-
n
ot bear any trace of cuts or fraying,
-
n
ot be converted or modified to avoid
affecting its performance.
In accordance with current safety
regulations, for all repairs on your vehicle's
seat belts, go to a qualified workshop with
the skills and equipment needed, which a
CITROËN dealer is able to provide.
Have your seat belts checked regularly by
a CITROËN dealer or a qualified workshop,
particularly if the straps show signs of
damage.
Clean the seat belt straps with soapy
water or a textile cleaning product, sold by
CITROËN dealers.
After folding or moving a seat or rear bench
seat, ensure that the seat belt is positioned
and reeled in correctly.
Recommendations for
children
Use a suitable child seat if the passenger is
less than 12 years old or shorter than one
and a half metres.
Never use the same seat belt to secure more
than one person.
Never allow a child to travel on your lap.
For more information on Child seats , refer
to the corresponding section.
The driver must ensure that passengers use
the seat belts correctly and that they are all
fastened before setting off.
Wherever you are seated in the vehicle,
always fasten your seat belt, even for short
journeys.
Do not interchange the seat belt buckles as
they will not fulfill their role fully.
The seat belts are fitted with an inertia reel
permitting automatic adjustment of the
length of the strap to your size. The seat belt
is stowed automatically when not in use.
Before and after use, ensure that the seat
belt is reeled in correctly.
The lower part of the strap must be
positioned as low as possible on the pelvis.
The upper part must be positioned in the
hollow of the shoulder.
The inertia reels are fitted with an automatic
locking device which comes into operation in
the event of a collision, emergency braking
or if the vehicle rolls over. You can release
the device by pulling the strap firmly and
then releasing it so that it reels in slightly.
5
Safety
Page 189 of 595
187
Jumpy _en_Chap05_securite_ed01-2016
ISOFIX child seats recommended by CITROËN
CITROËN offers a range of ISOFIX child seats listed and type approved for your vehicle.
Refer also to the child seat manufacturer's fitting instructions for information on installing and removing the seat.
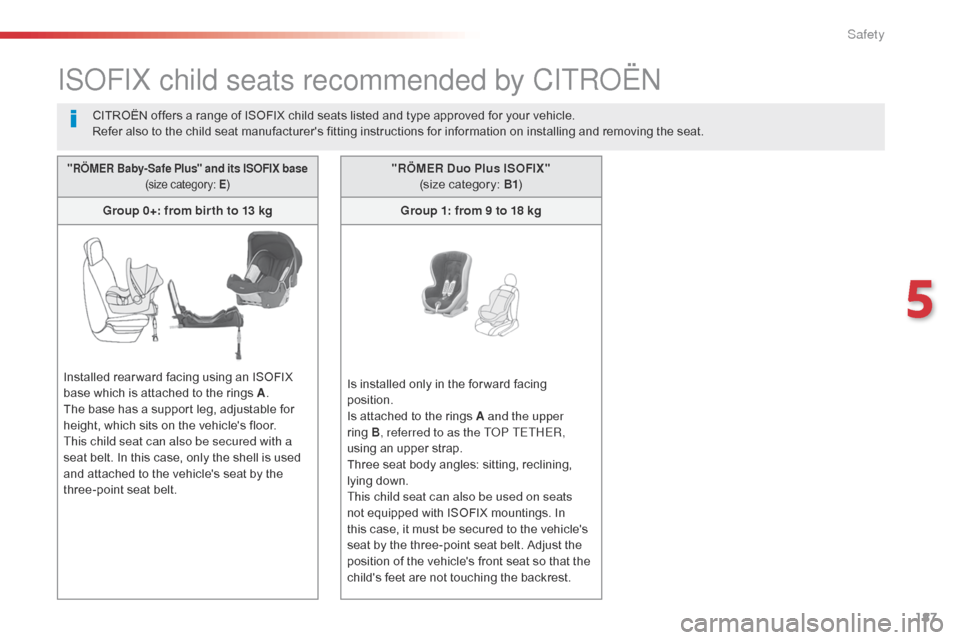
"RÖMER Baby- Safe Plus" and its ISOFIX base
(size category: E )
Group 0+: from bir th to 13 kg
Installed rear ward facing using an ISOFIX
base which is attached to the rings A .
The base has a support leg, adjustable for
height, which sits on the vehicle's floor.
This child seat can also be secured with a
seat belt. In this case, only the shell is used
and attached to the vehicle's seat by the
three-point seat belt. "RÖMER Duo Plus ISOFIX"
(size category: B1 )
Group 1: from 9 to 18 kg
Is installed only in the for ward facing
position.
Is attached to the rings A and the upper
ring
B, referred to as the TOP TETHER,
using an upper strap.
Three seat body angles: sitting, reclining,
lying down.
This child seat can also be used on seats
not equipped with ISOFIX mountings. In
this case, it must be secured to the vehicle's
seat by the three-point seat belt. Adjust the
position of the vehicle's front seat so that the
child's feet are not touching the backrest.
5
Safety
Page 190 of 595

188
Jumpy _en_Chap05_securite_ed01-2016
In line with European legislation, this table indicates the options for installing ISOFIX child seats on seats in the vehicle fitted with ISOFIX
mountings.
In the case of universal and semi-universal ISOFIX child seats, the ISOFIX size category, determined by a letter from A to G, is indicated
on the child seat next to the ISOFIX logo.
Weight of the child / indicative age
Less than 10 kg (group 0)
Up to approx. 6
monthsLess than 10 kg
(group 0)
Less than 13 kg (group 0+)
Up to approx. 1 year From 9 to 18 kg (group 1)
From approx. 1 to 3 years
Type of ISOFIX child seat Cotrearward facing rearward facing forward facing
ISOFIX size categor y F G C D E C D A B B1
Row 1 2-seat bench seat
Not ISOFIX
Individual seat Not ISOFIX
Row 2
with 2-seat
bench seat in row 1 Left-hand
outer seat -
*
Centre seat Not ISOFIX
Right-hand outer seat -
*
Locations for ISOFIX child seats
Safety
Page 191 of 595
189
Jumpy _en_Chap05_securite_ed01-2016
Weight of the child / indicative age
Less than 10 kg (group 0)
Up to approx. 6 months Less than 10 kg
(group 0)
Less than 13 kg (group 0+)
Up to approx. 1 year From 9 to 18 kg (group 1)
From 1 to 3 years approx.
Type of ISOFIX child seat Cotrearward facing rearward facing forward facing
ISOFIX size categor y F G C D E C D A B B1
Row 2
with individual seats
in row 1 Left-hand
outer seat -*
Centre seat Not ISOFIX
Right-hand outer seat -*
IUF
S
eat suitable for the installation of an I sofix
U niversal seat, F or ward facing secured
using the upper strap.
IL
S
eat suitable for the installation of an I sofix
semi-universa L seat either:
-
r
ear ward facing fitted with an upper
strap or a support leg,
-
f
or ward facing fitted with a support leg,
-
a c
ot fitted with an upper strap or a
support leg. * Submitted for type approval. For more information on the ISOFIX
mountings
and the upper strap, refer to
the corresponding section.
Refit the head restraint when the child
seat is removed.
X
S
eat not suitable for the installation of
an ISOFIX child seat or cot of the weight
group indicated.
5
Safety
Page 192 of 595

190
Jumpy _en_Chap05_securite_ed01-2016
In line with European legislation, this table indicates the options for installing ISOFIX child seats on seats in the vehicle fitted with ISOFIX
mountings.
In the case of universal and semi-universal ISOFIX child seats, the ISOFIX size category, determined by a letter from A to G, is indicated on
the child seat next to the ISOFIX logo.
Weight of the child / indicative age
Under 10 kg
(group 0)
Up to approx. 6 months Less than 10 kg
(group 0)
Less than 13 kg (group 0+)
Up to approx. 1 year From 9 to 18 kg (group 1)
From approx. 1 to 3 years
Type of ISOFIX child seat Cot (1) rearward facing rearward
facing forward facing
ISOFIX size categor y F G C D E C D A B B1
Row 1 (a) Individual
seat or 2-seat bench seat with passenger airbag
deactivated " OFF" Not ISOFIX
with passenger airbag activated " ON" Not ISOFIX
Row 2 Left-hand outer seat
XIL (3) IL (2) IL IL (2) I U F, I L
Centre seat (b) XIL (3) IL (2) IL IL (2) I U F, I L
Right-hand outer seat XIL (3) IL (2) IL IL (2) I U F, I L
Safety
Page 193 of 595

191
Jumpy _en_Chap05_securite_ed01-2016
Weight of the child / indicative age
Less than 10 kg (group 0)
Up to approx. 6 months Less than 10 kg
(group 0)
Less than 13 kg (group 0+)
Up to approx. 1 year From 9 to 18 kg (group 1)
From 1 to 3 years approx.
Type of ISOFIX child seat Cot (1) rearward facing rearward facingforward facing
ISOFIX size categor y F G C D E C D A B B1
Row 3 Left-hand
outer seat X
XXI U F, I L
Centre seat (b) XXXI U F, I L
Right-hand outer seat XXXI U F, I L
(a)
C
onsult the legislation in force in your
country before installing a child seat on this
seat.
(b)
T
he seat can be installed centrally in the
vehicle; it then prevents the use of the
outer seats. (1)
T
he installation of a cot on this seat may
prevent the use of one or both of the other
seats in this row.
(2)
I
nstallation possible only behind the
driver's seat.
(3)
I
nstallation possible only behind the
driver's seat with individual passenger
seat.
5
Safety
Page 270 of 595

268
Jumpy _en_Chap07_info-pratiques_ed01-2016
Snow chains
In wintry conditions, snow chains improve
traction as well as the behaviour of the vehicle
when braking.The snow chains must be fitted only to
the front wheels.
Take account of the legislation in force
in your country on the use of snow
chains and the maximum running speed
authorised.Avoid driving with snow chains on roads
that have been cleared of snow, to
avoid damaging your vehicle's tyres and
the road sur face. If your vehicle is fitted
with alloy wheels, check that no part of
the chain or its fixings is in contact with
the wheel rim.
Use only the chains designed to be fitted to the
type of wheel fitted to your vehicle:
You can also use snow socks.
For more information, contact a CITROËN
dealer or a qualified workshop.
Advice on installation
F If you have to fit the chains during a
journey, stop the vehicle on a flat sur face
on the side of the road.
F
A
pply the parking brake and position any
wheel chocks to prevent movement of
your vehicle.
F
F
it the chains following the instructions
provided by the manufacturer.
F
M
ove off gently and drive for a few
moments, without exceeding 30 mph
(50 km/h).
F
S
top your vehicle and check that the snow
chains are correctly tightened.
Original
tyre size Type of chain
215/65 R16 12 mm links
215/60 R17 KONIG K-SUMMIT
VAN K84
225/55 R17
It is strongly recommended that before
you leave, you practise fitting the snow
chains on a level and dry sur face.
Practical information
Page 275 of 595
273
Jumpy _en_Chap07_info-pratiques_ed01-2016
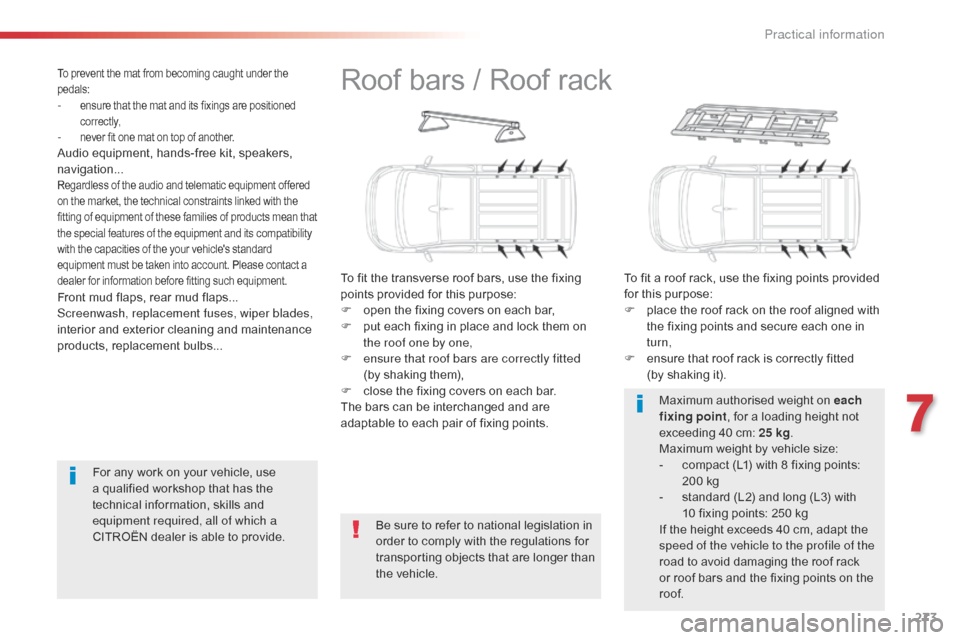
Roof bars / Roof rack
To fit the transverse roof bars, use the fixing
points provided for this purpose:
F
o
pen the fixing covers on each bar,
F
p
ut each fixing in place and lock them on
the roof one by one,
F
e
nsure that roof bars are correctly fitted
(by shaking them),
F
c
lose the fixing covers on each bar.
The bars can be interchanged and are
adaptable to each pair of fixing points. To fit a roof rack, use the fixing points provided
for this purpose:
F
p
lace the roof rack on the roof aligned with
the fixing points and secure each one in
turn,
F
e
nsure that roof rack is correctly fitted
(by shaking it).
Be sure to refer to national legislation in
order to comply with the regulations for
transporting objects that are longer than
the vehicle. Maximum authorised weight on each
fixing point
, for a loading height not
exceeding 40 cm: 25 kg.
Maximum weight by vehicle size:
-
c
ompact (L1) with 8 fixing points:
200 kg
-
s
tandard (L2) and long (L3) with
10 fixing points: 250 kg
If the height exceeds 40 cm, adapt the
speed of the vehicle to the profile of the
road to avoid damaging the roof rack
or roof bars and the fixing points on the
roof.
Front mud flaps, rear mud flaps...
Screenwash, replacement fuses, wiper blades,
interior and exterior cleaning and maintenance
products, replacement bulbs...
To prevent the mat from becoming caught under the
pedals:
- ensure that the mat and its fixings are positioned
c o r r e c t l y,
- never fit one mat on top of another.Audio equipment, hands-free kit, speakers,
navigation...
Regardless of the audio and telematic equipment offered
on the market, the technical constraints linked with the
fitting of equipment of these families of products mean that
the special features of the equipment and its compatibility
with the capacities of the your vehicle's standard
equipment must be taken into account. Please contact a
dealer for information before fitting such equipment.
For any work on your vehicle, use
a qualified workshop that has the
technical information, skills and
equipment required, all of which a
CITROËN dealer is able to provide.
7
Practical information
Page 339 of 595
337
Jumpy _en_Chap09_caracteristiques-techniques_ed01-2016
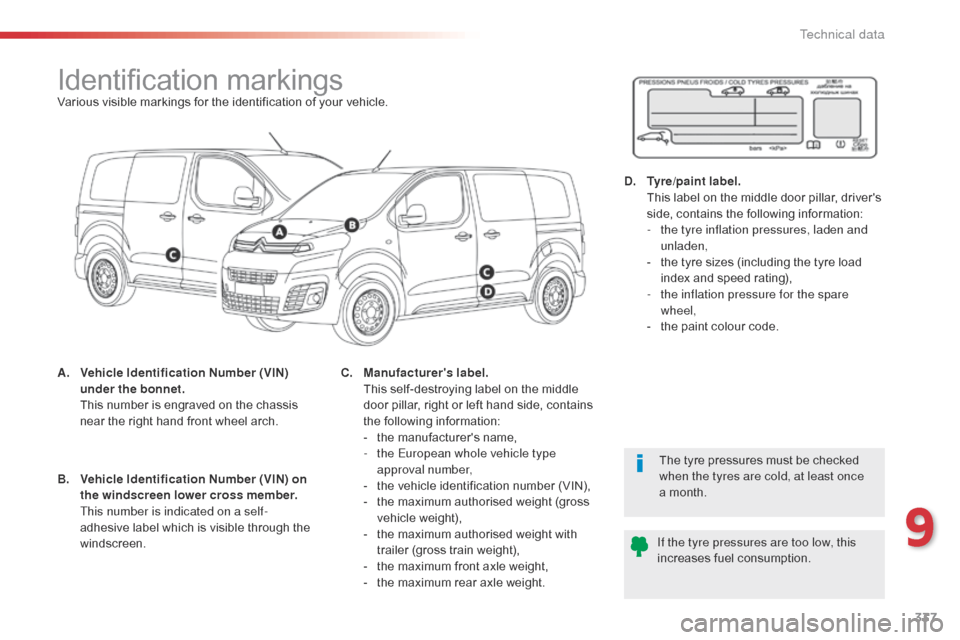
Identification markingsVarious visible markings for the identification of your vehicle.
A.
V
ehicle Identification Number (VIN)
under the bonnet.
T
his number is engraved on the chassis
near the right hand front wheel arch.
The tyre pressures must be checked
when the tyres are cold, at least once
a month.
If the tyre pressures are too low, this
increases fuel consumption.
B.
V
ehicle Identification Number (VIN) on
the windscreen lower cross member.
T
his number is indicated on a self-
adhesive label which is visible through the
windscreen. C.
M
anufacturer's label.
T
his self-destroying label on the middle
door pillar, right or left hand side, contains
the following information:
-
t
he manufacturer's name,
-
t
he European whole vehicle type
approval number,
-
t
he vehicle identification number (VIN),
-
t
he maximum authorised weight (gross
vehicle weight),
-
t
he maximum authorised weight with
trailer (gross train weight),
-
t
he maximum front axle weight,
-
t
he maximum rear axle weight.D.
T
yre/paint label.
T
his label on the middle door pillar, driver's
side, contains the following information:
-
t
he tyre inflation pressures, laden and
unladen,
-
t
he tyre sizes (including the tyre load
index and speed rating),
-
t
he inflation pressure for the spare
wheel,
-
t
he paint colour code.
9
Technical data