ECO mode CITROEN JUMPY 2021 Service Manual
[x] Cancel search | Manufacturer: CITROEN, Model Year: 2021, Model line: JUMPY, Model: CITROEN JUMPY 2021Pages: 324, PDF Size: 10.05 MB
Page 185 of 324

183
Practical information
7Standard charging, mode 2
Domestic socket
(standard charging - alternating current (AC))
Mode 2 with a standard socket: 8 A maximum
charging current.
Mode 2 with a Green'Up socket: 16 A
maximum charging current.
To have this type of socket installed, call a professional installer.
Specific domestic charging cable - mode 2 (AC)
Identification label C on the charging
connector (vehicle side).
Specific domestic charging cable
(mode 2)
You must not damage the cable.
In the event of damage, do not use it and
contact a CITROËN dealer or a qualified
workshop to replace it.
Control unit (mode 2)
POWER
Green: electrical connection established;
charging can begin.
CHARGE
Flashing green: charging in progress or
temperature pre-conditioning activated.
Fixed green: charging complete.
FAULT
Red: fault; charging not permitted or must
be stopped immediately. Check that everything
is connected correctly and that the electrical
system is not faulty. If the indicator lamp does not go off, contact a
CITROËN dealer or a qualified workshop.
Upon plugging the charging cable into a
domestic socket, all of the indicator lamps come
on briefly.
If no indicator lamps come on, check the
domestic socket's circuit-breaker:
–
If the circuit-breaker has tripped, contact a
professional to check that the electrical system
is compatible and/or carry out any necessary
repairs.
–
If the circuit-breaker has not tripped, stop
using the charging cable and contact a
CITROËN dealer or a qualified workshop.
Control unit label - Recommendations
Refer to the handbook before use.
1. Incorrect use of this charging cable may
result in fire, property damage and serious
injury or death by electrocution!
2. Always use a correctly earthed power
socket, protected by a 30
mA residual
current device.
3. Always use an electrical socket protected
by a circuit-breaker appropriate for the
electrical circuit’s current rating.
Page 187 of 324

185
Practical information
7POWERCHARGE FAULT SymbolDescription
(green)
(green)
Connected to the power supply and to the Electric
Vehicle (EV).
The EV is on charge or in a temperature pre-
conditioning sequence.
(green)
(green)
Connected to the power supply and to the Electric
Vehicle (EV).
The EV is waiting for charging or the charging of
the EV is completed.
(red)
Control unit malfunction. No charging allowed.
If an error indicator reappears after a manual reset,
the control unit must be checked by a CITROËN
dealer before the next charge.
(green)
(green)
(red)
The control unit is in diagnostic mode.
Manual reset procedure
The control unit can be reset by simultaneously disconnecting the chargi\
ng connector and the wall socket.
Then, reconnect the wall socket first. For more information, refer to the handbook.
Page 189 of 324

187
Practical information
7For a full charge, follow the desired charging
procedure without pausing it, until it ends
automatically. Charging can be either immediate
or deferred (except fast public charger, mode 4).
You can stop domestic or accelerated charging
at any time by unlocking the vehicle and
removing the nozzle. For superfast charging,
refer to the fast public charger.
For more information on the charging displays
on the Instrument panel and the Touch screen,
refer to the corresponding section.
It is also possible to monitor the charging
progress using the MyCitroën App
application.
For more information on Remote functions,
refer to the corresponding section.
As a safety measure, the engine will not start if the charging cable is plugged into
the connector on the vehicle. A warning is
displayed on the instrument panel.
Cooling the traction battery
The cooling fan in the engine
compartment comes on during charging to
cool the on-board charger and the traction
battery.
Low load / Driving
Driving when the charge level of the
traction battery is too low can lead to the
vehicle breaking down and can lead to
accidents or serious injuries. ALWAYS make
sure the traction battery has a sufficient
charge level.
Low load / Parking
If the outside temperature is negative,
it is recommended not to park your vehicle
outside for several hours at a low load (less
than 20%).
Vehicle immobilised for 1 to 12
months
Discharge the traction battery down to 2 or
3 bars on the charge level indicator on the
instrument panel.
Do not connect the charging cable.
Always park the vehicle in a place with
temperatures between -10°C and 30°C
(parking in a place with extreme temperatures
can damage the traction battery).
Disconnect the cable from the (+) terminal
of the accessory battery in the engine
compartment.
Connect a 12 V battery charger to the (+)
and (-) terminals of the accessory battery
about every 3 months in order to recharge the
accessory battery and maintain an operating
voltage.
Precautions
Our electric vehicles have been developed in
accordance with the recommendations on the
maximum limits for electromagnetic fields, as
issued by the International Commission on Non-
Ionizing Radiation Protection
(ICNIRP - 1998
Guidelines).
Wearers of pacemakers or equivalent
devices
Ask your doctor about what precautions you should take, or ask the manufacturer
of your implanted electro-medical device about
whether its operation is guaranteed in an
environment which complies with the ICNIRP
recommendations.
If in doubt
Domestic or accelerated charging: do
not remain inside or near the vehicle, or near
the charging cable or charging unit, even for
a short time.
For domestic or accelerated charging
Before charging
Depending on the context:
►
Have a professional check that the
electrical system to be used complies with
applicable standards and is compatible with
the vehicle.
►
Have a professional electrician install
a dedicated domestic power socket or
accelerated charging unit (W
allbox)
compatible with the vehicle.
You should preferably use the charging cable
available as an accessory.
Page 190 of 324

188
Practical information
For more information, contact a CITROËN
dealer or a qualified workshop.
During charging
While charging is in progress, unlocking
the vehicle will cause the charging to stop.
If no action is taken on one of the openings
(door or boot) or on the charging nozzle, the
vehicle will lock again after 30 seconds and
charging will resume automatically.
Never work under the bonnet:
–
Some areas remain very hot, even an hour
after charging ends - risk of burns!
–
The fan may start at any time - risk of cuts
or strangulation!
After charging
Check that the charging flap is closed.
Do not leave the cable connected to the
domestic power socket - risk of short-circuit
or electrocution in the event of contact with or
immersion in water!
For superfast charging
Before charging
Check that the fast public charging
station and its charging cable are compatible
with the vehicle.
If the exterior temperature is below:
–
0°C, charging times may be extended.
– -20°C, charging is still possible, but
charging times may be extended even further
(the battery has to be heated first).
After charging
Check that the charging flap is closed.
Connection
► Before charging, check that the drive selector
is in mode P, otherwise charging is not possible.
►
Open the charging flap by pressing the
push-button, and check that there are no foreign
bodies on the charging connector
.
Domestic charging, mode 2
► Connect the charging cable from the control
unit to the domestic socket.
When the connection is made, all of the indicator
lamps on the control unit light up, then only the
POWER indicator lamp remains on in green.
►
Remove the protective cover from the
charging nozzle.
►
Insert the nozzle into the charging connector
.
The start of charging is confirmed by the flashing
green CHARGE indicator lamps in the flap, then
those on the control unit.
If this is not the case, charging has not
started; restart the procedure, ensuring that all
connections are properly established.
The red indicator lamp in the flap comes on to
indicate that the nozzle is locked.
When charging is complete and while the
charging cable is still connected, opening
the driver's door will display the charge level
on the instrument panel for about 20 seconds.
Accelerated charging, mode 3
► Follow the accelerated charging unit
(W allbox) user instructions.
►
Remove the protective cover from the
charging nozzle.
►
Insert the nozzle into the charging connector
.
Page 191 of 324
189
Practical information
7The start of charging is confirmed when the
charging indicator lamp in the flap flashes green.
If this is not the case, charging has not started;
restart the procedure, ensuring that the
connection has been properly established.
The red indicator lamp in the flap comes on to
indicate that the nozzle is locked.
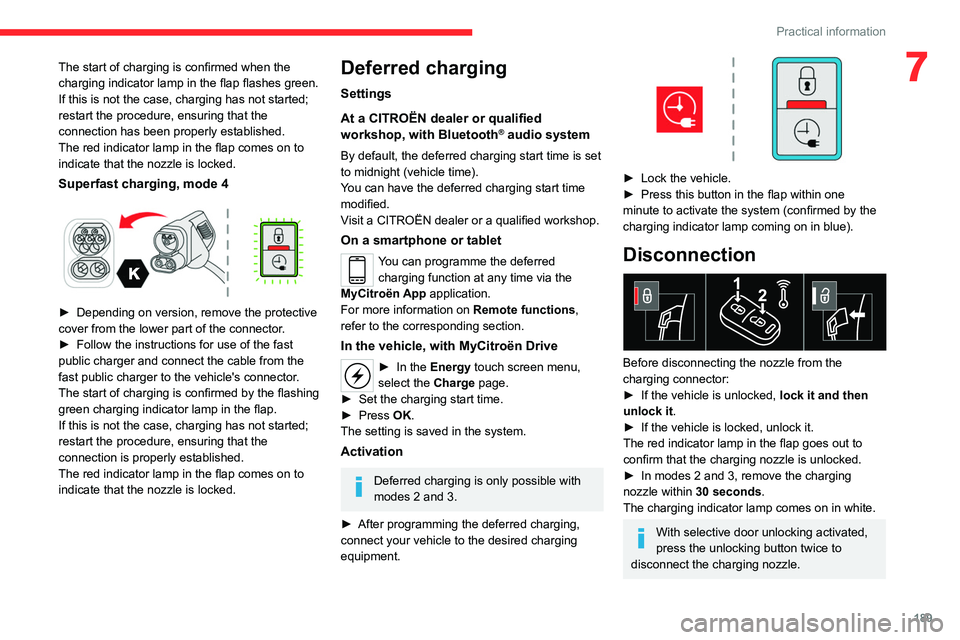
Superfast charging, mode 4
► Depending on version, remove the protective
cover from the lower part of the connector .
►
Follow the instructions for use of the fast
public charger and connect the cable from the
fast public charger
to the vehicle's connector.
The start of charging is confirmed by the flashing
green charging indicator lamp in the flap.
If this is not the case, charging has not started;
restart the procedure, ensuring that the
connection is properly established.
The red indicator lamp in the flap comes on to
indicate that the nozzle is locked.
Deferred charging
Settings
At a CITROËN dealer or qualified
workshop, with
Bluetooth
® audio system
By default, the deferred charging start time is set
to midnight (vehicle time).
You can have the deferred charging start time
modified.
Visit a CITROËN dealer or a qualified workshop.
On a smartphone or tablet
You can programme the deferred charging function at any time via the
MyCitroën App application.
For more information on Remote functions,
refer to the corresponding section.
In the vehicle, with MyCitroën Drive
► In the Energy touch screen menu,
select the Charge page.
►
Set the charging start time.
►
Press
OK.
The setting is saved in the system.
Activation
Deferred charging is only possible with
modes 2 and 3.
►
After programming the deferred charging,
connect your vehicle to the desired charging
equipment.
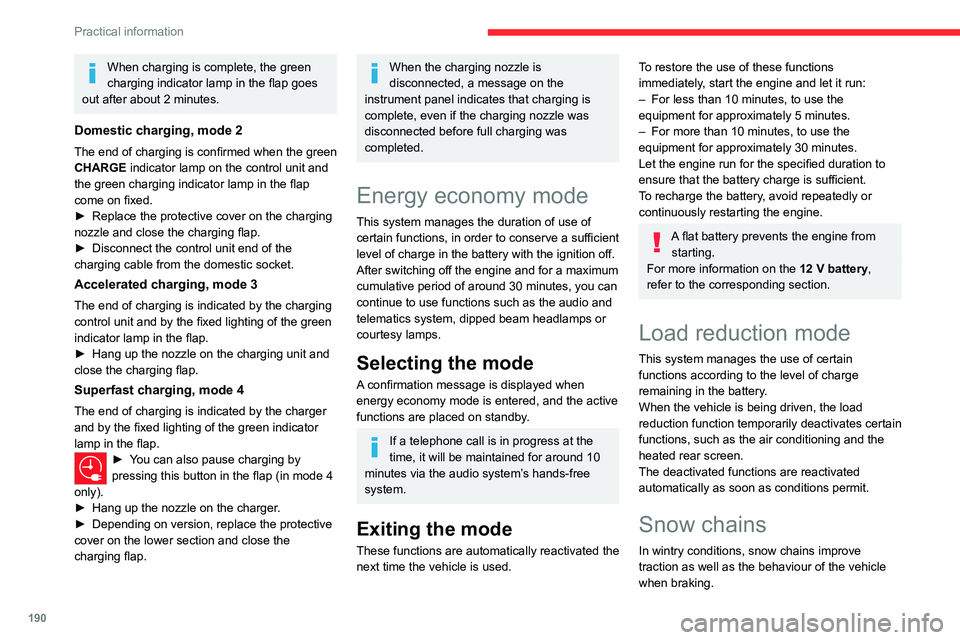
► Lock the vehicle.
► Press this button in the flap within one
minute to activate the system (confirmed by the
charging indicator lamp coming on in blue).
Disconnection
Before disconnecting the nozzle from the
charging connector:
►
If the vehicle is unlocked, lock it and then
unlock it .
►
If the vehicle is locked, unlock it.
The red indicator lamp in the flap goes out to
confirm that the charging nozzle is unlocked.
►
In modes 2 and 3, remove the charging
nozzle within 30 seconds
.
The charging indicator lamp comes on in white.
With selective door unlocking activated,
press the unlocking button twice to
disconnect the charging nozzle.
Page 192 of 324
190
Practical information
When charging is complete, the green
charging indicator lamp in the flap goes
out after about 2 minutes.
Domestic charging, mode 2
The end of charging is confirmed when the green
CHARGE indicator lamp on the control unit and
the green charging indicator lamp in the flap
come on fixed.
►
Replace the protective cover on the charging
nozzle and close the charging flap.
►
Disconnect the control unit end of the
charging cable from the domestic socket.
Accelerated charging, mode 3
The end of charging is indicated by the charging
control unit and by the fixed lighting of the green
indicator lamp in the flap.
►
Hang up the nozzle on the charging unit and
close the charging flap.
Superfast charging, mode 4
The end of charging is indicated by the charger
and by the fixed lighting of the green indicator
lamp in the flap.
► You can also pause charging by
pressing this button in the flap (in mode 4
only).
►
Hang up the nozzle on the charger
.
►
Depending on version, replace the protective
cover on the lower section and close the
charging flap.
When the charging nozzle is
disconnected, a message on the
instrument panel indicates that charging is
complete, even if the charging nozzle was
disconnected before full charging was
completed.
Energy economy mode
This system manages the duration of use of
certain functions, in order to conserve a sufficient
level of charge in the battery with the ignition off.
After switching off the engine and for a maximum
cumulative period of around 30 minutes, you can
continue to use functions such as the audio and
telematics system, dipped beam headlamps or
courtesy lamps.
Selecting the mode
A confirmation message is displayed when
energy economy mode is entered, and the active
functions are placed on standby.
If a telephone call is in progress at the
time, it will be maintained for around 10
minutes via the audio system’s hands-free
system.
Exiting the mode
These functions are automatically reactivated the
next time the vehicle is used.
To restore the use of these functions
immediately, start the engine and let it run:
–
For less than 10 minutes, to use the
equipment for approximately 5 minutes.
–
For more than 10 minutes, to use the
equipment for approximately 30 minutes.
Let the engine run for the specified duration to
ensure that the battery charge is sufficient.
T
o recharge the battery, avoid repeatedly or
continuously restarting the engine.
A flat battery prevents the engine from starting.
For more information on the 12
V battery,
refer to the corresponding section.
Load reduction mode
This system manages the use of certain
functions according to the level of charge
remaining in the battery.
When the vehicle is being driven, the load
reduction function temporarily deactivates certain
functions, such as the air conditioning and the
heated rear screen.
The deactivated functions are reactivated
automatically as soon as conditions permit.
Snow chains
In wintry conditions, snow chains improve
traction as well as the behaviour of the vehicle
when braking.
Page 202 of 324
200
Practical information
be excluded: do not inhale the fluid. Ammonia
vapours have an irritant effect on mucous
membranes (eyes, nose and throat).
Store AdBlue® out of the reach of
children, in its original container.
Procedure
Before starting the top-up procedure, ensure that
the vehicle is parked on a flat and level surface.
In wintry conditions, ensure that the temperature
of the vehicle is above -11°C. Otherwise the
AdBlue
® may be frozen and so cannot be poured
into the tank. Park the vehicle in a warmer area
for a few hours to allow the top-up to be carried
out.
Never pour the AdBlue® into the Diesel
fuel tank.
If any AdBlue® is splashed, or if there are
any spillages on the bodywork, rinse
immediately with cold water or wipe with a
damp cloth.
If the fluid has crystallised, clean it off using a
sponge and hot water.
Important: in the event of a top-up after
a breakdown because of a lack of
AdBlue, it is essential to wait around 5
minutes before switching on the ignition,
without opening the driver’s door,
unlocking the vehicle, inserting the key
into the ignition switch, or bringing the
key for the "Keyless Entry and Start"
system into the passenger compartment.
Switch on the ignition, then wait for 10
seconds before starting the engine.
►
Switch off the ignition and remove the key
from the switch to switch off the engine.
or
►
With Keyless Entry and Start, press the
"
START/STOP" button to switch off the engine.
Accessing the AdBlue® tank
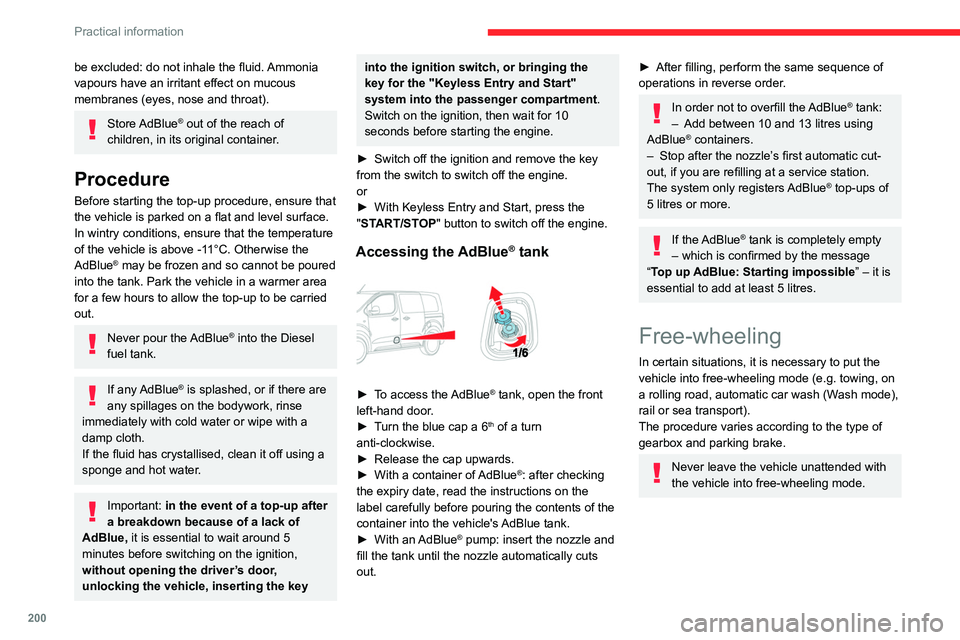
► To access the AdBlue® tank, open the front
left-hand door.
►
T
urn the blue cap a 6
th of a turn
anti-clockwise.
►
Release the cap upwards.
►
With a container of
AdBlue
®: after checking
the expiry date, read the instructions on the
label carefully before pouring the contents of the
container into the vehicle's AdBlue tank.
►
With an
AdBlue® pump: insert the nozzle and
fill the tank until the nozzle automatically cuts
out.
► After filling, perform the same sequence of
operations in reverse order .
In order not to overfill the AdBlue® tank:
–
Add between 10 and 13 litres using
AdBlue® containers.
–
Stop after the nozzle’ s first automatic cut-
out, if you are refilling at a service station.
The system only registers AdBlue
® top-ups of
5
litres or more.
If the AdBlue® tank is completely empty
– which is confirmed by the message
“Top up
AdBlue: Starting impossible ” – it is
essential to add at least 5 litres.
Free-wheeling
In certain situations, it is necessary to put the
vehicle into free-wheeling mode (e.g. towing, on
a rolling road, automatic car wash (Wash mode),
rail or sea transport).
The procedure varies according to the type of
gearbox and parking brake.
Never leave the vehicle unattended with
the vehicle into free-wheeling mode.
Page 203 of 324

201
Practical information
7With manual or automatic
gearbox and manual parking
brake
/
To release them
► With the vehicle stationary and engine
running, depress the brake pedal.
►
With a manual gearbox, place the gear lever
into neutral.
►
With an automatic gearbox, place the gear
selector to mode
N.
►
Release the parking brake.
►
Release the brake pedal, then switch off the
engine.
Reverting to normal operation
► Apply the parking brake.
► With an automatic gearbox, place the gear
selector to mode
P.
With a manual gearbox and
electric parking brake
/
To release them
► With the engine running and while depressing
the brake pedal, move the gear selector to the
neutral position. ►
While depressing the brake pedal, switch off
the engine.
►
Release the brake pedal, then switch on the
ignition.
►
While depressing the brake pedal, press the
control to release the parking brake.
►
Release the brake pedal, then switch off the
ignition.
Reverting to normal operation
► While depressing the brake pedal, restart the
engine and apply the parking brake.
With an automatic gearbox
and electric parking brake
/
To release them
► With the engine running and while depressing
the brake pedal, set the gear selector to N
.
►
While depressing the brake pedal, switch off
the engine.
►
Release the brake pedal, then switch on the
ignition again.
►
While depressing the brake pedal, press the
control lever to release the parking brake.
►
Release the brake pedal, then switch off the
ignition.
Reverting to normal operation
► While depressing the brake pedal, restart the
engine and select mode P .
With drive selector and
electric parking brake
/
Release procedure
► With the vehicle stationary and the engine
running, depress the brake pedal and select
mode
N.
Within 5
seconds:
►
Depress and hold the brake pedal, then
observe this order: switch off the engine and
move the push selector forwards or backwards.
►
Release the brake pedal, then switch on the
ignition.
►
Place your foot on the brake and press the
electric parking brake control to release it.
►
Release the brake pedal, then switch off the
ignition.
A message is displayed on the instrument panel to confirm the unlocking
of the wheels for 15
minutes.
When the vehicle is free-wheeling, the
audio system cannot be updated (message
displayed on the instrument panel).
After 15 minutes or reverting to normal
operation
► While depressing the brake pedal, restart the
engine and select mode P .
Page 213 of 324
2 11
In the event of a breakdown
8Refit the spare wheel in the carrier
► Position the wheel facing the carrier.
► Progressively return the wheel to the carrier
by pushing alternately at the left and right until it
is clear of the hook fixing area.
►
Engage the carrier on the hook, then tighten
the bolt using the wheelbrace
until the bolt is fully
tightened.
Tyre in the carrier
You can change the size of the tyre on the spare
wheel by following the instructions below.
Original tyre
size XS-M
XL
215/65 R16 Placing a 225 wheel in the carrier is prohibited. There is no
restriction.
215/60 R17
215/60 R17
M&S
225/55 R17 Placing a 215 wheel in the
carrier is not
recommended (risk of noise).
A punctured tyre of size 215 or 225 can be placed in the carrier.
Removing a wheel
Parking the vehicle
Immobilise the vehicle where it does
not obstruct traffic: the ground must be level,
stable and non-slippery.
With a manual gearbox, engage first gear
then switch off the ignition to block the
wheels.
With an automatic gearbox, place the gear
selector in position P then switch off the
ignition to block the wheels.
With a drive selector, place the gear selector
in position P then switch off the ignition to
block the wheels.
Apply the parking brake, unless it is
programmed to automatic mode (for an
electric parking brake), and check that the
indicator lamp lights up on
the instrument
panel.
Ensure that the occupants have left the
vehicle and are located in a safe place.
Never go underneath a vehicle raised using a
jack; use an axle stand.
With an electric parking brake, place a chock
against the wheel diagonally opposite to the
one being replaced.
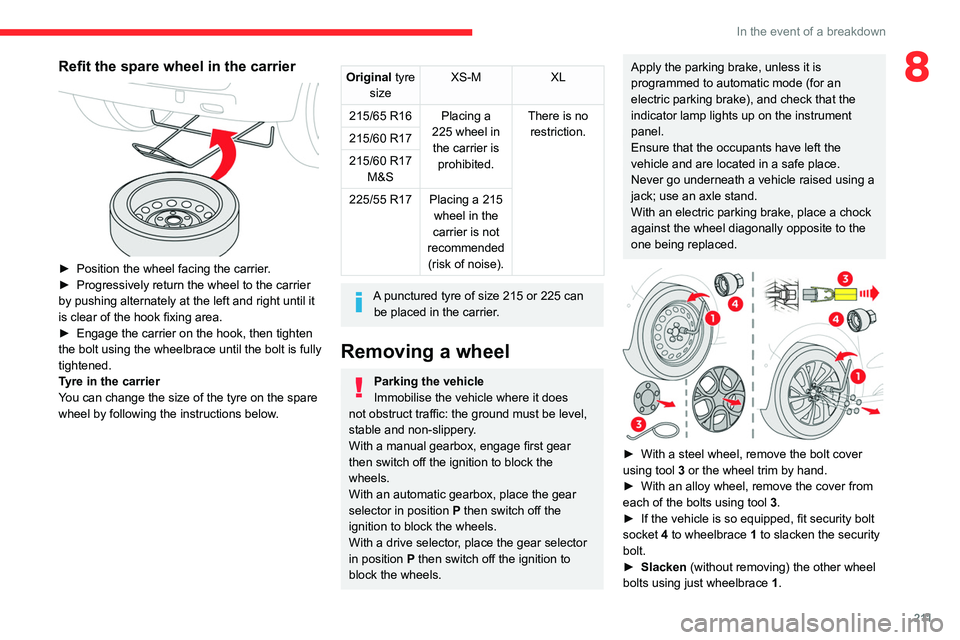
► With a steel wheel, remove the bolt cover
using tool 3
or the wheel trim by hand.
►
With an alloy wheel, remove the cover from
each of the bolts using tool 3
.
►
If the vehicle is so equipped, fit security bolt
socket
4 to wheelbrace 1 to slacken the security
bolt.
►
Slacken
(without removing) the other wheel
bolts using just wheelbrace 1.
Page 220 of 324
218
In the event of a breakdown
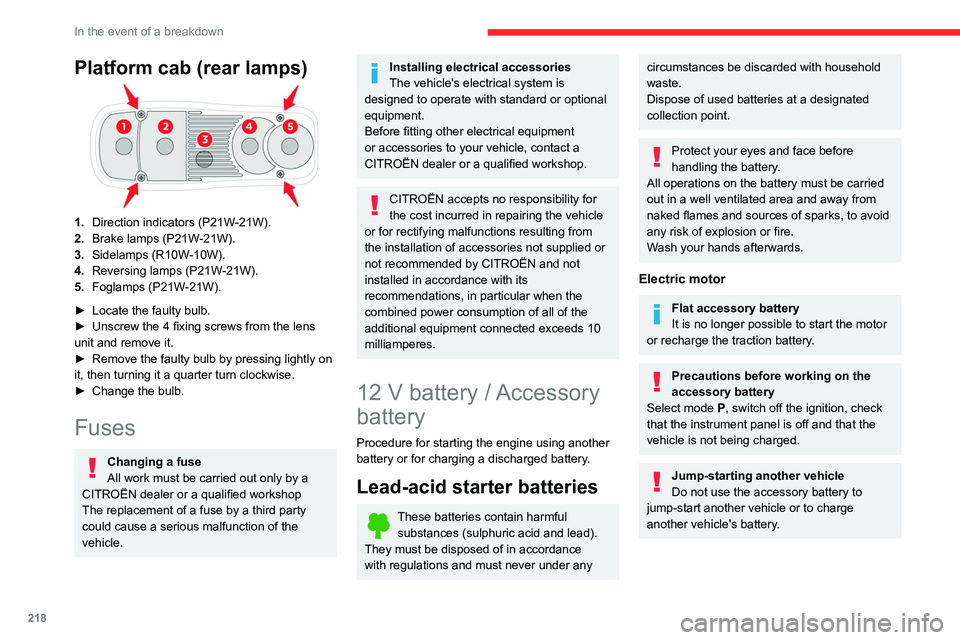
Platform cab (rear lamps)
1.Direction indicators (P21W-21W).
2. Brake lamps (P21W-21W).
3. Sidelamps (R10W-10W).
4. Reversing lamps (P21W-21W).
5. Foglamps (P21W-21W).
►
Locate the faulty bulb.
►
Unscrew the 4 fixing screws from the lens
unit and remove it.
►
Remove the faulty bulb by pressing lightly on
it, then turning it a quarter turn clockwise.
►
Change the bulb.
Fuses
Changing a fuse
All work must be carried out only by a
CITROËN dealer or a qualified workshop
The replacement of a fuse by a third party
could cause a serious malfunction of the
vehicle.
Installing electrical accessories
The vehicle's electrical system is
designed to operate with standard or optional
equipment.
Before fitting other electrical equipment
or accessories to your vehicle, contact a
CITROËN dealer or a qualified workshop.
CITROËN accepts no responsibility for
the cost incurred in repairing the vehicle
or for rectifying malfunctions resulting from
the installation of accessories not supplied or
not recommended by CITROËN and not
installed in accordance with its
recommendations, in particular when the
combined power consumption of all of the
additional equipment connected exceeds 10
milliamperes.
12 V battery / Accessory
battery
Procedure for starting the engine using another
battery or for charging a discharged battery.
Lead-acid starter batteries
These batteries contain harmful
substances (sulphuric acid and lead).
They must be disposed of in accordance
with regulations and must never under any
circumstances be discarded with household
waste.
Dispose of used batteries at a designated
collection point.
Protect your eyes and face before
handling the battery.
All operations on the battery must be carried
out in a well ventilated area and away from
naked flames and sources of sparks, to avoid
any risk of explosion or fire.
Wash your hands afterwards.
Electric motor
Flat accessory battery
It is no longer possible to start the motor
or recharge the traction battery.
Precautions before working on the
accessory battery
Select mode
P, switch off the ignition, check
that the instrument panel is off and that the
vehicle is not being charged.
Jump-starting another vehicle
Do not use the accessory battery to
jump-start another vehicle or to charge
another vehicle's battery.