change wheel CITROEN JUMPY 2022 User Guide
[x] Cancel search | Manufacturer: CITROEN, Model Year: 2022, Model line: JUMPY, Model: CITROEN JUMPY 2022Pages: 324, PDF Size: 10.05 MB
Page 160 of 324
158
Driving
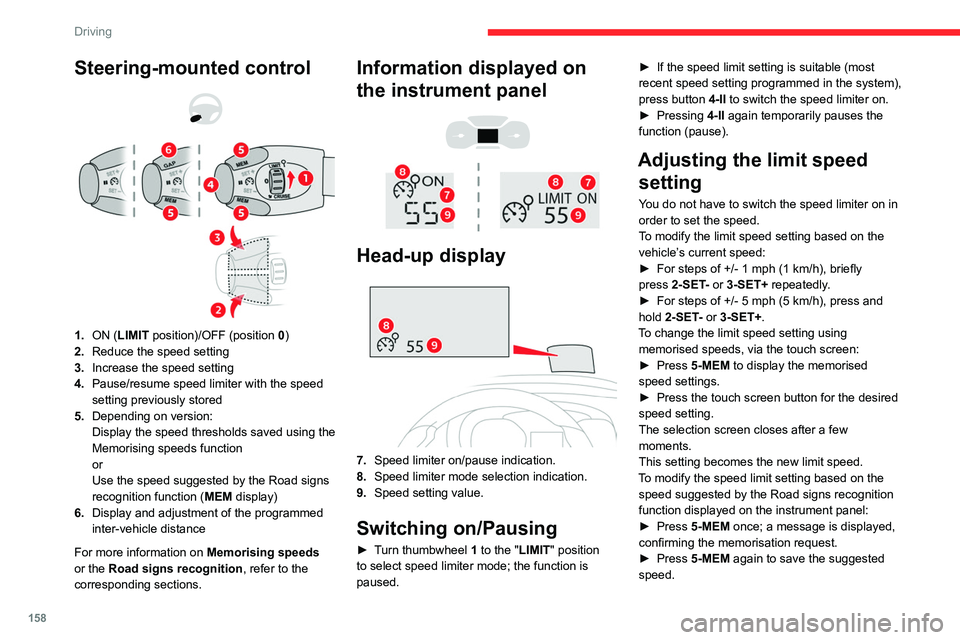
Steering-mounted control
1. ON (LIMIT position)/OFF (position 0)
2. Reduce the speed setting
3. Increase the speed setting
4. Pause/resume speed limiter with the speed
setting previously stored
5. Depending on version:
Display the speed thresholds saved using the
Memorising speeds function
or
Use the speed suggested by the Road signs
recognition function ( MEM display)
6. Display and adjustment of the programmed
inter-vehicle distance
For more information on Memorising speeds
or the Road signs recognition , refer to the
corresponding sections.
Information displayed on
the instrument panel
Head-up display
7. Speed limiter on/pause indication.
8. Speed limiter mode selection indication.
9. Speed setting value.
Switching on/Pausing
► Turn thumbwheel 1 to the "LIMIT" position
to select speed limiter mode; the function is
paused. ►
If the speed limit setting is suitable (most
recent speed setting programmed in the system),
press button
4-II to switch the speed limiter on.
►
Pressing
4-II again temporarily pauses the
function (pause).
Adjusting the limit speed setting
You do not have to switch the speed limiter on in
order to set the speed.
To modify the limit speed setting based on the
vehicle’s current speed:
►
For steps of +/- 1
mph (1 km/h), briefly
press
2-SET- or 3-SET+ repeatedly.
►
For steps of +/- 5
mph (5 km/h), press and
hold
2-SET- or 3-SET+.
To change the limit speed setting using memorised speeds, via the touch screen:
►
Press
5-MEM to display the memorised
speed settings.
►
Press the touch screen button for the desired
speed setting.
The selection screen closes after a few
moments.
This setting becomes the new limit speed.
T
o modify the speed limit setting based on the
speed suggested by the Road signs recognition
function displayed on the instrument panel:
►
Press
5-MEM once; a message is displayed,
confirming the memorisation request.
►
Press
5-MEM again to save the suggested
speed.
Page 161 of 324
159
Driving
6The new speed setting value is displayed on the
instrument panel.
Temporarily exceeding the
programmed speed
► To temporarily exceed the programmed
speed threshold, fully depress the accelerator
pedal.
The speed limiter is deactivated temporarily and
the displayed programmed speed flashes.
If it is exceeded for a prolonged period of time,
an audible warning is triggered.
Simply release the accelerator pedal to return to
below the programmed speed.
When the limit speed is exceeded but this is not
due to action by the driver (in case of a steep
slope, for example), an audible signal triggers
immediately.
Once the speed of the vehicle returns to the
programmed setting, the speed limiter functions
again: the display of the programmed speed
setting becomes fixed again.
Switching off
► Turn the thumbwheel 1 to the "0" position:
the display of information on the speed limiter
disappears.
Malfunction
In the event of a malfunction, dashes are
displayed flashing and then fixed instead of the
speed setting.
Have it checked by a CITROËN dealer or a
qualified workshop.
Cruise control - Specific
recommendations
The cruise control function does not guarantee compliance with the maximum
authorised speed and the safety distance
between vehicles, the driver remains
responsible for their driving.
In the interest of public safety, only use cruise
control if the traffic conditions enable vehicles
to drive at a steady speed and maintain an
adequate safety distance.
Remain vigilant while cruise control is
activated. If you press and hold one of the
speed setting modification buttons, your
vehicle may change speed very abruptly.
When descending a steep hill , the cruise
control system cannot prevent the vehicle
from exceeding the set speed. Brake if
necessary to control the vehicle speed.
On steep climbs or when towing, the set
speed may not be reached or maintained.
Exceeding the programmed speed
setting
You can temporarily exceed the speed
setting by pressing the accelerator pedal (the
programmed speed flashes).
To return to the speed setting, release the
accelerator pedal (when the set speed is
reached again, the displayed speed stops
flashing).
Operating limits
Never use the system in the following
situations:
–
In an urban area with the risk of
pedestrians crossing the road.
–
In heavy traffic.
–
On winding or steep roads.
–
On slippery or flooded roads.
–
In poor weather conditions.
–
In the event of restricted visibility for the
driver
.
–
Driving on a speed circuit.
–
Driving on a rolling road.
–
When using snow chains, non-slip covers
or studded tyres.
Cruise control
For more information, refer to the
General recommendations on the use
of driving and manoeuvring aids and the
Page 163 of 324
161
Driving
6► Press button 2-SET- or 3-SET+ to activate
cruise control and save a speed setting when
the vehicle has reached the desired speed; the
vehicle’s current speed is saved as the speed
setting.
►
Release the accelerator pedal.
►
Pressing button 4-II
temporarily pauses the
function (pause).
►
Pressing button 4-II
again resumes operation
of the cruise control (ON).
Cruise control can also be paused
temporarily:
–
by pressing the brake pedal.
–
by pressing the clutch pedal with a manual
gearbox (depending on the engine fitted).
–
automatically
, if the electronic stability
control (ESC) system is triggered.
Changing the cruise speed
setting
The cruise control must be active.
To change the cruise speed setting, based on
the vehicle’s current speed:
►
For steps of +/- 1
mph (1 km/h), briefly
press
2-SET- or 3-SET+ repeatedly.
►
For steps of +/- 5
mph (5 km/h), press and
hold
2-SET- or 3-SET+.
Pressing and holding 2-SET - or 3-SET+
results in a rapid change in the speed of
the vehicle.
As a precaution, we recommend setting a cruise speed fairly close to the current
speed of your vehicle, to avoid any sudden
acceleration or deceleration of the vehicle.
To change the cruise speed setting using memorised speed settings and from the touch
screen:
►
Press
5-MEM to display the memorised
speed settings.
►
Press the touch screen button for the desired
speed setting.
The selection screen closes after a few
moments.
This setting becomes the new cruise speed.
T
o change the cruise speed setting using the
speed suggested by the Road signs recognition
function displayed on the instrument panel:
►
Press
5-MEM once; a message is displayed,
confirming the memorisation request.
►
Press
5-MEM again to save the suggested
speed.
The new speed setting value is displayed on the
instrument panel.
Temporarily exceeding the
programmed speed
If needed (when overtaking, for example),
it is possible to exceed the programmed
speed by pressing the accelerator pedal.
Cruise control is temporarily deactivated and the
programmed speed displayed flashes.
To return to the programmed speed, simply
release the accelerator pedal.
Once the vehicle has returned to the
programmed speed, cruise control takes over
again and the programmed speed setting stops
flashing.
When descending a steep hill, the cruise
control system cannot prevent the
vehicle from exceeding the programmed
speed.
You may have to brake to control the speed of
your vehicle. In this case, the cruise control is
automatically paused.
To activate the system again, with the vehicle
speed above 25 mph (40
km/h), press button
4.
Switching off
► Turn the thumbwheel 1 to the "0” position: the
cruise control information disappears from the
screen.
Malfunction
In the event of a malfunction, dashes are
displayed flashing and then fixed instead of the
speed setting.
Have it checked by a CITROËN dealer or a
qualified workshop.
Page 171 of 324
169
Driving
6With touch screen
The settings are changed via the vehicle configuration menu.
Malfunction
Depending on the vehicle’s equipment:The indicator lamp in this button flashes.
or
/The button flashes and a fault appears.
Contact a CITROËN dealer or a qualified
workshop.
Detection may be impeded:
– If the markings on the ground are worn
and not clearly contrasted against the road
surface.
–
If the windscreen is dirty
.
–
In certain extreme weather conditions:
fog, heavy rain, snow
, shade, bright sunlight
or direct exposure to the sun (e.g. low sun,
leaving a tunnel).
Distraction detection
For more information, refer to the
General recommendations on the use
of driving and manoeuvring aids .
Depending on version, the function consists of
either the "Coffee Break Alert" system alone or
combined with the "Driver Attention Warning"
system.
These systems are in no way designed to keep the driver awake or to prevent
the driver from falling asleep at the wheel.
It is the driver’s responsibility to stop if feeling
tired.
Take a break if you are feeling tired or at least
every 2 hours.
Activation/Deactivation
This function is set via the vehicle configuration menu.
The function is activated by default when the
ignition is switched on.
Coffee Break Alert
The system triggers an alert when it detects that the driver has not taken a
break after two hours of driving at a speed above
43 mph (70
km/h).
This alert is issued via the display of a message
encouraging the driver to take a break,
accompanied by an audible signal.
If the driver does not follow this advice, the alert
is repeated hourly until the vehicle is stopped.
The system resets itself if one of the following
conditions is met:
–
With the engine running, the vehicle has been
stationary for more than 15 minutes.
– The ignition has been switched off for a few
minutes.
–
The driver's seat belt is unfastened and their
door is opened.
As soon as the speed of the vehicle drops below 43 mph (70 km/h), the
system goes into standby.
Driving time starts being counted again once
the speed reaches above 43
mph (70 km/h).
Driver Attention Warning
Depending on version, the Coffee Break Alert
system may be combined with the Driver
Attention Warning system.
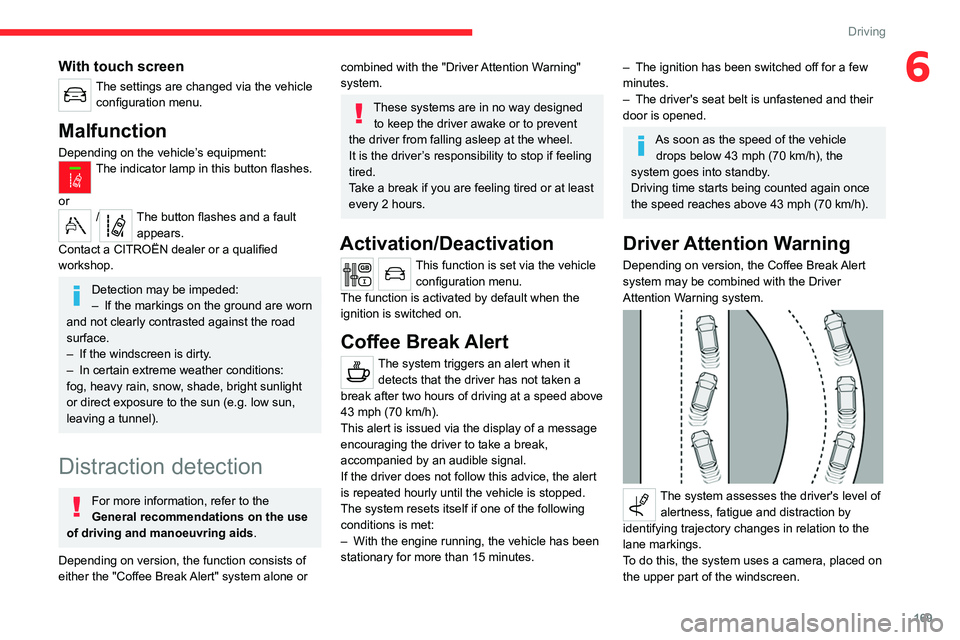
The system assesses the driver's level of alertness, fatigue and distraction by
identifying trajectory changes in relation to the
lane markings.
To do this, the system uses a camera, placed on
the upper part of the windscreen.
Page 176 of 324
174
Driving
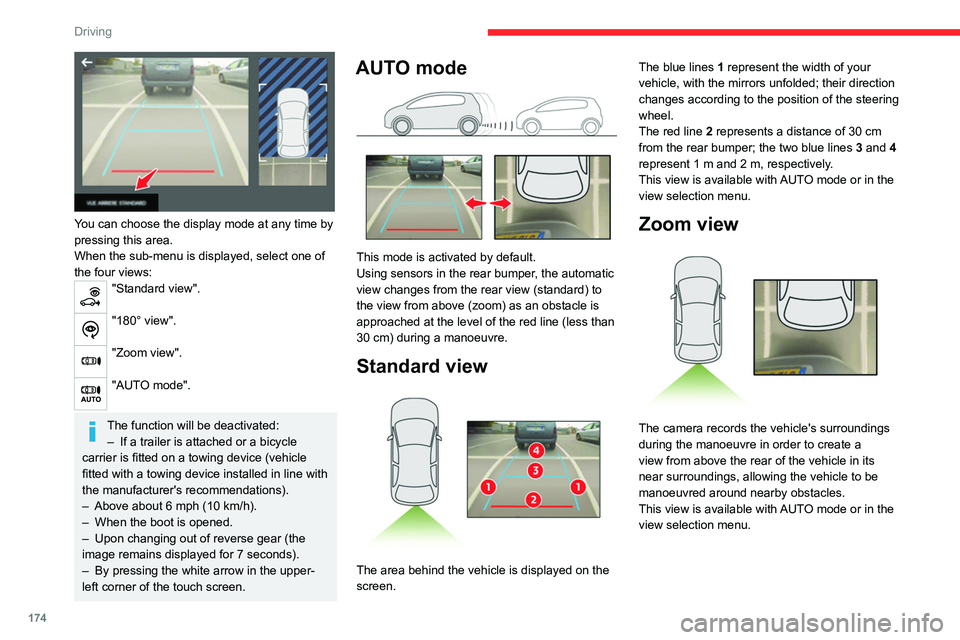
You can choose the display mode at any time by
pressing this area.
When the sub-menu is displayed, select one of
the four views:
"Standard view".
"180° view".
"Zoom view".
"AUTO mode".
The function will be deactivated:– If a trailer is attached or a bicycle
carrier is fitted on a towing device (vehicle
fitted with a towing device installed in line with
the manufacturer's recommendations).
–
Above about 6
mph (10 km/h).
–
When the boot is opened.
–
Upon changing out of reverse gear (the
image remains displayed for 7
seconds).
–
By pressing the white arrow in the upper-
left corner of the touch screen.
AUTO mode
This mode is activated by default.
Using sensors in the rear bumper, the automatic
view changes from the rear view (standard) to
the view from above (zoom) as an obstacle is
approached at the level of the red line (less than
30
cm) during a manoeuvre.
Standard view
The area behind the vehicle is displayed on the
screen. The blue lines
1 represent the width of your
vehicle, with the mirrors unfolded; their direction
changes according to the position of the steering
wheel.
The red line 2 represents a distance of 30 cm
from the rear bumper; the two blue lines 3 and 4
represent 1 m and 2 m, respectively.
This view is available with AUTO mode or in the
view selection menu.
Zoom view
The camera records the vehicle's surroundings
during the manoeuvre in order to create a
view from above the rear of the vehicle in its
near surroundings, allowing the vehicle to be
manoeuvred around nearby obstacles.
This view is available with AUTO mode or in the
view selection menu.
Page 212 of 324

210
In the event of a breakdown
2.Jack.
Used to raise the vehicle.
3. Wheel bolt cover/wheel trim removal tool.
Depending on the vehicle's equipment, this is
used to remove the wheel bolt covers on alloy
wheels or the wheel trim on steel wheels.
4. Socket for "anti-theft" wheel bolts.
Used to adapt the wheelbrace to the special
"anti-theft" bolts.
5. Towing eye.
For more information on Towing, please
refer to the corresponding section.
These tools are specific to the vehicle and may vary according to the level of
equipment.
Do not use them for any other purpose.
The jack must only be used to change a wheel with a damaged or punctured tyre.
Do not use any jack other than the one
supplied with the vehicle.
If the vehicle does not have its original jack,
contact a CITROËN dealer or a qualified
workshop to obtain the one that was intended
by the manufacturer.
The jack meets European standards, as
defined in the Machinery Directive 2006/42/
CE.
The jack does not require any maintenance.
Accessing the spare wheel
► Access to the spare wheel is from the rear .
► Depending on version, open the side-hinged
doors or the tailgate.
To avoid any unwanted opening of the electric side door(s), deactivate the
Hands-Free Tailgate Access function in the
vehicle configuration menu.
For more information on the Hands-free
sliding side door , refer to the corresponding
section.
► If the vehicle is fitted with a towbar , raise
the rear of the vehicle using the jack (must be
at jacking point B) to allow sufficient space to
remove the spare wheel.
Remove the spare wheel from the
carrier
► Access the carrier bolt, located on the rear
door sill.
►
Slacken the bolt using the wheelbrace (about
14 turns) until the carrier is low enough to allow
the carrier hook to be disengaged.
► Release the carrier from the hook, take the
spare wheel and place it next to the wheel to be
changed.
Page 213 of 324
2 11
In the event of a breakdown
8Refit the spare wheel in the carrier
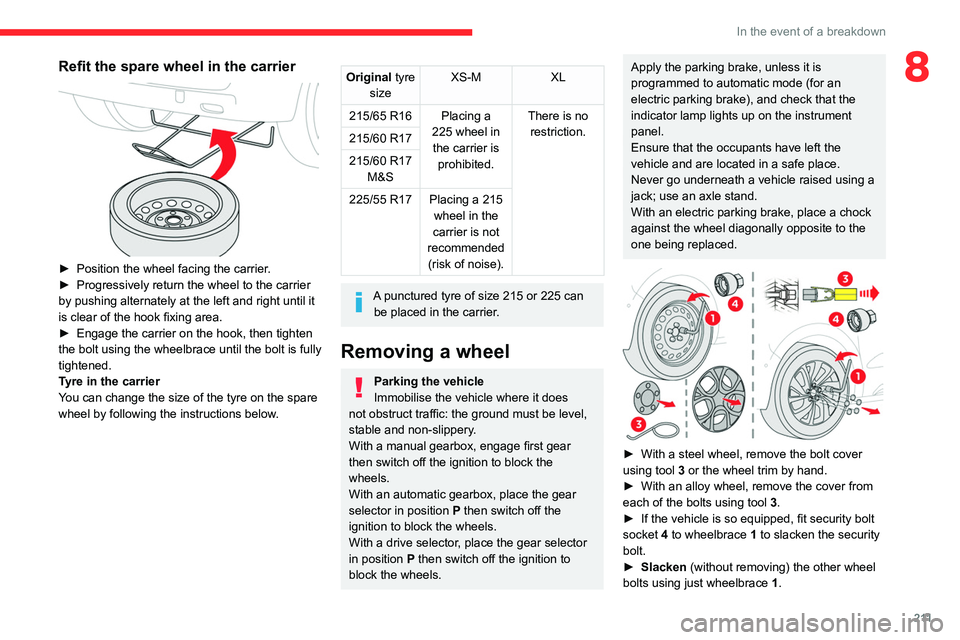
► Position the wheel facing the carrier.
► Progressively return the wheel to the carrier
by pushing alternately at the left and right until it
is clear of the hook fixing area.
►
Engage the carrier on the hook, then tighten
the bolt using the wheelbrace
until the bolt is fully
tightened.
Tyre in the carrier
You can change the size of the tyre on the spare
wheel by following the instructions below.
Original tyre
size XS-M
XL
215/65 R16 Placing a 225 wheel in the carrier is prohibited. There is no
restriction.
215/60 R17
215/60 R17
M&S
225/55 R17 Placing a 215 wheel in the
carrier is not
recommended (risk of noise).
A punctured tyre of size 215 or 225 can be placed in the carrier.
Removing a wheel
Parking the vehicle
Immobilise the vehicle where it does
not obstruct traffic: the ground must be level,
stable and non-slippery.
With a manual gearbox, engage first gear
then switch off the ignition to block the
wheels.
With an automatic gearbox, place the gear
selector in position P then switch off the
ignition to block the wheels.
With a drive selector, place the gear selector
in position P then switch off the ignition to
block the wheels.
Apply the parking brake, unless it is
programmed to automatic mode (for an
electric parking brake), and check that the
indicator lamp lights up on
the instrument
panel.
Ensure that the occupants have left the
vehicle and are located in a safe place.
Never go underneath a vehicle raised using a
jack; use an axle stand.
With an electric parking brake, place a chock
against the wheel diagonally opposite to the
one being replaced.
► With a steel wheel, remove the bolt cover
using tool 3
or the wheel trim by hand.
►
With an alloy wheel, remove the cover from
each of the bolts using tool 3
.
►
If the vehicle is so equipped, fit security bolt
socket
4 to wheelbrace 1 to slacken the security
bolt.
►
Slacken
(without removing) the other wheel
bolts using just wheelbrace 1.
Page 214 of 324
212
In the event of a breakdown
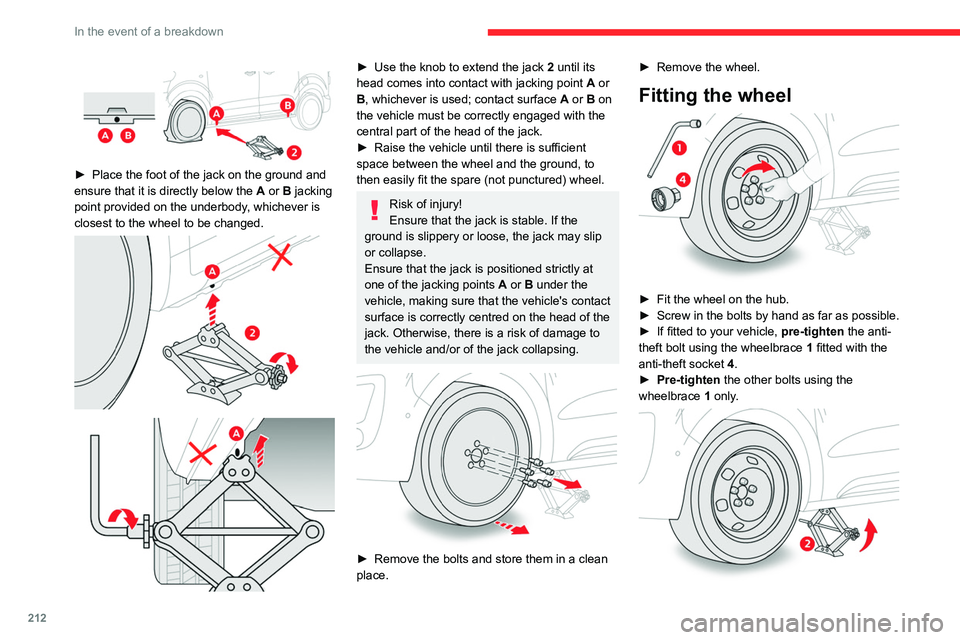
► Place the foot of the jack on the ground and
ensure that it is directly below the A
or B jacking
point provided on the underbody, whichever is
closest to the wheel to be changed.
► Use the knob to extend the jack 2 until its
head comes into contact with jacking point A or
B, whichever is used; contact surface A or B on
the vehicle must be correctly engaged with the
central part of the head of the jack.
►
Raise the vehicle until there is sufficient
space between the wheel and the ground, to
then easily fit the spare (not punctured) wheel.
Risk of injury!
Ensure that the jack is stable. If the
ground is slippery or loose, the jack may slip
or collapse.
Ensure that the jack is positioned strictly at
one of the jacking points A or B under the
vehicle, making sure that the vehicle's contact
surface is correctly centred on the head of the
jack. Otherwise, there is a risk of damage to
the vehicle and/or of the jack collapsing.
► Remove the bolts and store them in a clean
place. ►
Remove the wheel.
Fitting the wheel
► Fit the wheel on the hub.
► Screw in the bolts by hand as far as possible.
►
If fitted to your vehicle,
pre-tighten the anti-
theft bolt using the wheelbrace 1 fitted with the
anti-theft socket 4.
►
Pre-tighten
the other bolts using the
wheelbrace
1
only.
Page 252 of 324
250
MyCitroën Play
In the "Settings" menu, it is possible to
create a profile for an individual or for a
group of people with shared interests, and
configure a wide range of settings (radio
presets, audio settings, ambiences, etc.).
Settings are applied automatically.
In very hot conditions, the volume may
be limited to protect the system. It may
enter standby mode (with the screen and
sound off) for 5 minutes or more.
The system will resume normal operation
when the temperature in the passenger
compartment has dropped.
Steering-mounted
controls
Steering mounted controls -
Type 1
Radio:
Select the previous/next preset radio
station.
Select the previous/next item in a menu or a list.
Media:
Select the previous/next track.
Select the previous/next item in a menu or a list.
Radio:
Short press: display the list of radio
stations.
Long press: update the list.
Media:
Short press: display the list of folders.
Long press: display the available sorting options.
Change audio source (radio; USB; AUX if
equipment connected; CD; streaming).
Confirm a selection.
Increase volume.
Decrease volume.
Mute/restore sound by simultaneously
pressing the increase and decrease
volume buttons.
Steering mounted controls -
Type 2
Voice control:
This control is located on the steering
wheel or at the end of the lighting control stalk
(depending on equipment).
Short press: smartphone voice commands via
the system.
Increase volume.
Decrease volume.
Mute by pressing the volume increase
and decrease buttons simultaneously
(depending on equipment).
Restore the sound by pressing one of the two
volume buttons.
Media (short press): change the
multimedia source.
Telephone (short press): start telephone
call.
Call in progress (short press): access
telephone menu.
Telephone (long press): reject an incoming call,
end call; when no call is in progress, access
telephone menu.
Page 265 of 324
263
MyCitroën Drive
12– Media player connected via the auxiliary
socket (depending on equipment).
–
V
ideo (depending on equipment).
In the "Settings" menu, it is possible to
create a profile for an individual or for a
group of people with shared interests, and
configure a wide range of settings (radio
presets, audio settings, navigation history,
favourite contacts, etc.). Settings are applied
automatically.
In very hot conditions, the volume may
be limited to protect the system. It may
enter standby mode (with the screen and
sound off) for 5 minutes or more.
The system will resume normal operation
when the temperature in the passenger
compartment has dropped.
Steering-mounted
controls
Voice control:
This control is located on the steering
wheel or at the end of the lighting control stalk
(depending on equipment).
Short press, system voice control.
Long press, voice commands from smartphone
or CarPlay
®, Android Auto via the system.Increase volume.
Decrease volume.
Mute by pressing the volume increase
and decrease buttons simultaneously
(depending on equipment).
Restore the sound by pressing one of the two
volume buttons.
Media (short press): change the
multimedia source.
Telephone (short press): start telephone
call.
Call in progress (short press): access
telephone menu.
Telephone (long press): reject an incoming call,
end call; when no call is in progress, access
telephone menu.
Radio (rotate): automatic search for the
previous/next station.
Media (rotate): previous/next track, move
through a list.
Short press: confirm a selection; if nothing
selected, access presets.
Radio: display the list of stations.
Media: display the list of tracks.
Radio (press and hold): update the list of
detected stations.
Menus
Connected navigation
Enter navigation settings and choose a
destination.
Use real-time services, depending on equipment.