check oil CITROEN JUMPY 2022 Owners Manual
[x] Cancel search | Manufacturer: CITROEN, Model Year: 2022, Model line: JUMPY, Model: CITROEN JUMPY 2022Pages: 324, PDF Size: 10.05 MB
Page 9 of 324
7
Eco-driving
Eco-driving
Eco-driving refers to a range of everyday
practices that allow the motorist to optimise
the vehicle's energy consumption (fuel and/or
electricity) and CO
2 emissions.
Optimise your use of the gearbox
With a manual gearbox, move off gently and
change up promptly. While accelerating, change
up early.
With an automatic gearbox, favour automatic
mode. Do not depress the accelerator pedal
heavily or suddenly.
The gear shift indicator prompts you to engage
the most suitable gear. Whenever this indication
is displayed on the instrument panel, follow it
straight away.
With an automatic gearbox, this indicator
appears only in manual mode.
Drive smoothly
Maintain a safe distance between vehicles, use
engine braking rather than the brake pedal and
press the accelerator gradually. These practices
help to save on energy consumption, reduce
CO
2 emissions and decrease general traffic
noise.
When the traffic is flowing smoothly, select the
cruise control.
Control the use of electrical equipment
Before moving off, if the passenger compartment
is too warm, ventilate it by opening the windows
and air vents before using the air conditioning.
At speeds above 31
mph (50 km/h), close the
windows and leave the air vents open.
Consider using equipment that can help keep
the temperature in the passenger compartment
down (e.g.
sunroof blind, window blinds).
Unless automatically regulated, switch off the air
conditioning as soon as the desired temperature
has been reached.
Switch off the demisting and defrosting functions,
if they are not managed automatically.
Switch off the heated seat as soon as possible.
Adapt your use of the headlamps and/or
foglamps to the level of visibility, in accordance
with current legislation in the country in which
you are driving.
Avoid running the engine before moving off,
particularly in winter (other than in severe wintry
conditions: temperature below -23°C). The
vehicle will warm up much faster while driving.
As a passenger, avoid connecting your
multimedia devices (e.g.
film, music, video
game) to help reduce the consumption of energy.
Disconnect all portable devices before leaving
the vehicle.
Limit the causes of excess consumption
Spread loads throughout the vehicle. Place the
heaviest items in the boot as close as possible to
the rear seats. Limit the loads carried in the vehicle and
minimise wind resistance (e.g.
roof bars, roof
rack, bicycle carrier, trailer). Preferably, use a
roof box.
Remove roof bars and roof racks after use.
At the end of winter, remove snow tyres and refit
summer tyres.
Comply with the servicing instructions
Check tyre pressures regularly, with the tyres
cold, referring to the label in the door aperture on
the driver's side.
Carry out this check in particular:
–
before a long journey
.
–
at each change of season.
–
after a long period out of use.
Do not forget the spare wheel and, where
applicable, the tyres on your trailer or caravan.
Have your vehicle serviced regularly (e.g.
engine
oil, oil filter, air filter, passenger compartment
filter, etc.). Observe the schedule of operations in
the manufacturer's service schedule.
With a BlueHDi Diesel engine, if the SCR system
has a fault, your vehicle will emit pollution. Visit
a CITROËN dealer or a qualified workshop
as soon as possible to restore your vehicle's
nitrogen oxide emissions to legal levels.
When filling the fuel tank, do not continue after
the third cut-out of the nozzle, to avoid overflow.
You will only see the fuel consumption of your
new vehicle settle down to a consistent average
after the first 1,900 miles (3,000 kilometres).
Page 20 of 324

18
Dashboard instruments
Checking
After driving for a few minutes, the temperature
and pressure in the cooling system increase.
To top up the level:
►
wait at least one hour for the engine to cool,
►
unscrew the cap by two turns to allow the
pressure to drop,
►
when the pressure has dropped, remove the
cap,
►
top up the level to the "MAX" mark.
For more information on Checking levels
, refer
to the corresponding section.
Be aware of the risk of scalding when
topping up the coolant. Do not fill above
the maximum level (indicated on the
reservoir).
Engine oil level indicator
(Depending on version)
On versions fitted with an electric gauge, the
engine oil level status is displayed on the
instrument panel for a few seconds when the
ignition is switched on, at the same time as the
servicing information.
The level read will only be correct if the vehicle is on level ground and the engine
has been off for more than 30 minutes.
Oil level correct
This is indicated by a message on the instrument
panel.
Low oil level
This is indicated by a message on the instrument
panel.
If a low oil level is confirmed by a check using
the dipstick, the level must be topped up to avoid
damage to the engine.
For more information on Checking levels, refer
to the corresponding section.
Oil gauge malfunction
This is indicated by the display of a message on
the instrument panel.
Contact a CITROËN dealer or a qualified
workshop.
In the event of a malfunction of the
electric gauge, the oil level is no longer
monitored.
If the system is faulty, you must check the
engine oil level using the manual dipstick
located in the engine compartment.
For more information on Checking levels,
refer to the corresponding section.
AdBlue® range indicators
(BlueHDi)
The Diesel BlueHDi engines are equipped with
a system that associates the SCR (Selective
Catalytic Reduction) emissions control system
and the Diesel particle filter (DPF) for the
treatment of exhaust gases. They cannot
function without AdBlue
® fluid.
When the level of AdBlue® falls below the
reserve level (between 1,500 and 0 miles (2,400
and 0
km)), a warning lamp lights up when
the ignition is switched on and an estimate
of the distance that can be travelled before
engine starting is prevented is displayed in the
instrument panel.
The engine starting prevention system required by regulations is activated
automatically once the AdBlue
® tank is empty.
It is then no longer possible to start the
engine until the minimum level of AdBlue
® has
been topped up.
Page 102 of 324

100
Safety
reduction in the resistance of the pedal and an
increase in braking efficiency.
Anti-slip regulation (ASR)/Dynamic stability control
(DSC)
Anti-slip regulation (or traction control) optimises
traction by using engine braking and by applying
the brakes on the driving wheels to avoid one
or more wheels spinning. It also enhances the
vehicle's directional stability.
If there is a difference between the vehicle’s
trajectory and the path desired by the driver, the
dynamic stability control system automatically
uses engine braking and the brakes on one or
more wheels to return the vehicle to the desired
path, within the limits of the laws of physics.
These systems are activated automatically every
time the vehicle is started.
These systems are activated in the event of a problem with grip or trajectory
(confirmed by this warning lamp flashing on the
instrument panel).
Deactivation/Reactivation
In exceptional conditions (moving a vehicle that
is bogged down in mud, stuck in snow, on loose
soil, etc.), it may prove useful to deactivate the
DSC/ASR systems, so that the wheels can move
freely and regain grip.
However, it is recommended that the systems be
reactivated as soon as possible.
Only the ASR system can be deactivated
from the touch screen.
Deactivating using the button or Advanced
Grip Control
Press this button or turn the thumbwheel
to this position.
The indicator lamp in the button or thumbwheel
comes on: the DSC/ASR systems no longer
have an effect on engine operation.
Deactivating using the touch screen
In the "Driving/Vehicle" menu, deactivate
the ASR system.
A confirmation message is displayed and this warning lamp on the instrument panel
comes on.
The ASR system no longer acts on the operation
of the engine.
Reactivating using the button or Advanced
Grip Control
Press this button.
Or
Turn the thumbwheel to this position.
The indicator lamp in the button or thumbwheel
goes off.
Reactivating using the touch screen
In the "Driving/Vehicle" menu, activate
the ASR system.
A confirmation message is displayed and this warning lamp on the instrument panel
goes off.
These systems are reactivated automatically
every time the ignition is switched off, or at
speeds over 31 mph (50
km/h).
Below 31 mph (50
km/h), these systems must be
reactivated manually.
Malfunction
In the event of a malfunction, this warning
lamp lights up on the instrument panel,
accompanied by the display of a message and
an audible signal.
Have it checked by a CITROËN dealer or a
qualified workshop.
ASR/DSC
These systems enhance safety during
normal driving, but should not encourage
the driver to take extra risks or drive at high
speed.
It is in conditions of reduced grip (rain, snow,
ice) that the risk of loss of grip increases. It
is therefore important for your safety to keep
these systems activated in all conditions, and
particularly in difficult conditions.
Correct operation of these systems depends
on compliance with the manufacturer's
recommendations relating to the wheels
(tyres and rims), braking and electronic
components, as well as the assembly and
repair procedures provided by CITROËN
dealers.
In order to ensure that these systems remain
effective in wintry conditions, the use of snow
Page 195 of 324

193
Practical information
7or in certain moving components - risk of
strangulation and serious injury!
Electric motor
Take care with objects or clothing that
could be caught in the blades of the cooling
fan or in certain moving components - risk of
strangulation and serious injury!
Before carrying out any work under the
bonnet, you must switch off the ignition, check
that the READY indicator lamp is off on the
instrument panel and disconnect the nozzle
from the charging connector if it is connected.
The location of the interior bonnet release lever prevents the bonnet being
opened when the left-hand front door is
closed.
When the engine is hot, handle the
exterior safety catch and the bonnet stay
with care (risk of burns), using the protected
area.
When the bonnet is open, take care not to
damage the safety catch.
Do not open the bonnet under very windy
conditions.
Cooling of the engine when stopped
The engine cooling fan may start after
the engine has been switched off.
Take care with objects or clothing that
could be caught in the blades of the fan!
Opening
► Open the door .
► Pull the release lever 1 , located at the bottom
of the door frame, towards you.
►
T
ilt the safety catch 2 upwards, then raise the
bonnet.
►
Unclip the stay
3 from its housing and place it
in the support slot to hold the bonnet open.
Closing
► Hold the bonnet and pull out the stay from the
support slot.
►
Clip the stay in its housing.
►
Lower the bonnet and release it near the end
of its travel.
►
Pull on the bonnet to check that it is locked
correctly
.
Because of the presence of electrical
equipment under the bonnet, it is strongly
recommended that exposure to water (rain,
washing, etc.) be limited.
Engine compartment
The engine shown here is an example for
illustrative purposes only.
The locations of the following components may
vary:
–
Air filter
.
–
Engine oil dipstick.
–
Engine oil filler cap.
–
Priming pump.
Page 196 of 324
194
Practical information
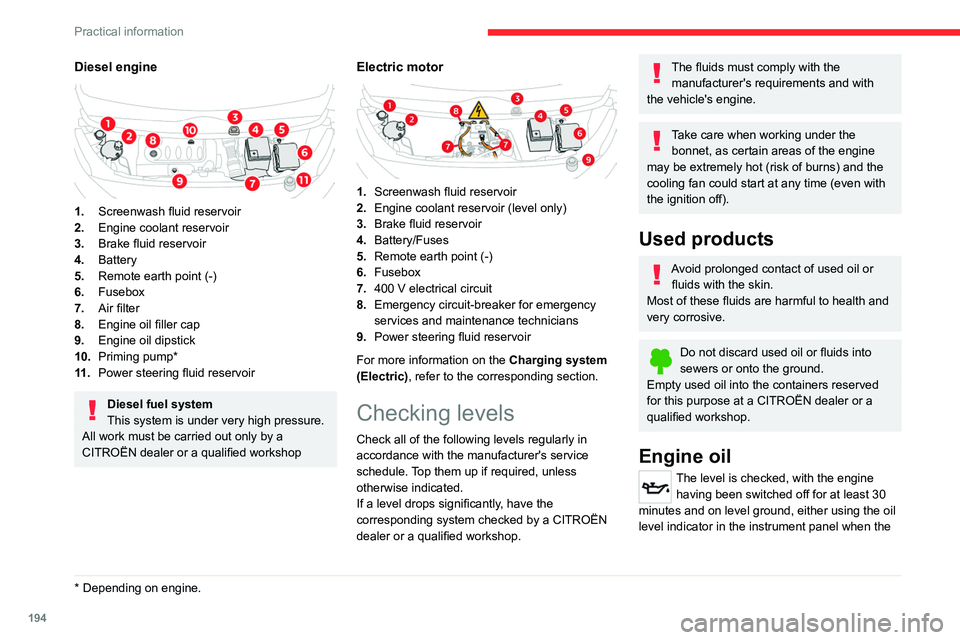
Diesel engine
1.Screenwash fluid reservoir
2. Engine coolant reservoir
3. Brake fluid reservoir
4. Battery
5. Remote earth point (-)
6. Fusebox
7. Air filter
8. Engine oil filler cap
9. Engine oil dipstick
10. Priming pump*
11 . Power steering fluid reservoir
Diesel fuel system
This system is under very high pressure.
All work must be carried out only by a
CITROËN dealer or a qualified workshop
* Depending on engine.
Electric motor
1. Screenwash fluid reservoir
2. Engine coolant reservoir (level only)
3. Brake fluid reservoir
4. Battery/Fuses
5. Remote earth point (-)
6. Fusebox
7. 400
V electrical circuit
8. Emergency circuit-breaker for emergency
services and maintenance technicians
9. Power steering fluid reservoir
For more information on the Charging system
(Electric), refer to the corresponding section.
Checking levels
Check all of the following levels regularly in
accordance with the manufacturer's service
schedule. Top them up if required, unless
otherwise indicated.
If a level drops significantly, have the
corresponding system checked by a CITROËN
dealer or a qualified workshop.
The fluids must comply with the manufacturer's requirements and with
the vehicle's engine.
Take care when working under the bonnet, as certain areas of the engine
may be extremely hot (risk of burns) and the
cooling fan could start at any time (even with
the ignition off).
Used products
Avoid prolonged contact of used oil or fluids with the skin.
Most of these fluids are harmful to health and
very corrosive.
Do not discard used oil or fluids into
sewers or onto the ground.
Empty used oil into the containers reserved
for this purpose at a CITROËN dealer or a
qualified workshop.
Engine oil
The level is checked, with the engine having been switched off for at least 30
minutes and on level ground, either using the oil
level indicator in the instrument panel when the
Page 197 of 324
195
Practical information
7ignition is switched on (for vehicles equipped
with an electric gauge), or using the dipstick.
It is normal to top up the oil level between two
services (or oil changes). It is recommended
that you check the level, and top up if necessary,
every 3,000 miles (5,000 km).
In order to maintain the reliability of the
engine and emissions control system,
never use additives in the engine oil.
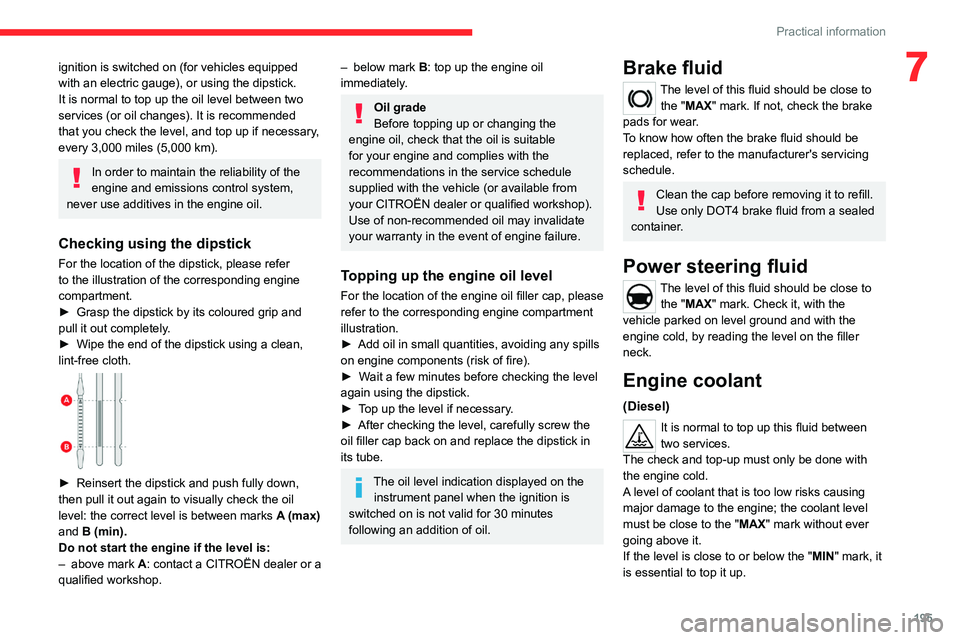
Checking using the dipstick
For the location of the dipstick, please refer
to the illustration of the corresponding engine
compartment.
►
Grasp the dipstick by its coloured grip and
pull it out completely
.
►
Wipe the end of the dipstick using a clean,
lint-free cloth.
► Reinsert the dipstick and push fully down,
then pull it out again to visually check the oil
level: the correct level is between marks
A
(max)
and
B (min).
Do not start the engine if the level is:
–
above mark
A: contact a CITROËN dealer or a
qualified workshop.
– below mark B : top up the engine oil
immediately.
Oil grade
Before topping up or changing the
engine oil, check that the oil is suitable
for your engine and complies with the
recommendations in the service schedule
supplied with the vehicle (or available from
your CITROËN dealer or qualified workshop).
Use of non-recommended oil may invalidate
your warranty in the event of engine failure.
Topping up the engine oil level
For the location of the engine oil filler cap, please
refer to the corresponding engine compartment
illustration.
►
Add oil in small quantities, avoiding any spills
on engine components (risk of fire).
►
W
ait a few minutes before checking the level
again using the dipstick.
►
T
op up the level if necessary.
►
After checking the level, carefully screw the
oil filler cap back on
and replace the dipstick in
its tube.
The oil level indication displayed on the instrument panel when the ignition is
switched on is not valid for 30 minutes
following an addition of oil.
Brake fluid
The level of this fluid should be close to
the "MAX" mark. If not, check the brake
pads for wear.
To know how often the brake fluid should be
replaced, refer to the manufacturer's servicing
schedule.
Clean the cap before removing it to refill.
Use only DOT4 brake fluid from a sealed
container.
Power steering fluid
The level of this fluid should be close to the "MAX" mark. Check it, with the
vehicle parked on level ground and with the
engine cold, by reading the level on the filler
neck.
Engine coolant
(Diesel)
It is normal to top up this fluid between
two services.
The check and top-up must only be done with
the engine cold.
A level of coolant that is too low risks causing
major damage to the engine; the coolant level
must be close to the "MAX" mark without ever
going above it.
If the level is close to or below the " MIN" mark, it
is essential to top it up.
Page 199 of 324
197
Practical information
7Versions equipped with Stop & Start are
fitted with a 12 V lead-acid battery with
special technology and specifications.
Its replacement should be carried out only by
a CITROËN dealer or a qualified workshop.
Passenger compartment
filter
Depending on the environment and the
use of the vehicle (e.g. dusty atmosphere,
city driving), change it twice as often, if
necessary .
A clogged passenger compartment filter
can adversely affect air conditioning
system performance and generate
undesirable odours.
Air filter
Depending on the environment and the
use of the vehicle (e.g. dusty atmosphere,
city driving), change it twice as often, if
necessary .
Oil filter
Change the oil filter each time the engine
oil is changed.
Particle filter (Diesel)
/ The start of clogging of the
particle filter is indicated by the
temporary lighting of this warning lamp,
accompanied by an alert message.
As soon as traffic conditions allow, regenerate
the filter by driving at a speed of at least 37
mph
(60
km/h), with an engine speed above 2,500
rpm, for about 15 minutes (until the warning lamp
goes out).
If it is not possible to reach 37
mph (60 km/h),
leave the engine running at idle for about 15
minutes, then drive with an engine speed
above
2,500 rpm for 15 minutes.
Do not switch off the engine until the filter
is fully regenerated; repeated intervals
can degrade the engine oil prematurely.
Regenerating the filter while the vehicle is
stationary is not recommended.
Following prolonged operation of the
vehicle at very low speed or at idle, you
may, in exceptional circumstances, notice
water vapour coming from the exhaust while
accelerating. These emissions have no
impact on the vehicle’s behaviour and the
environment.
New vehicle
During the first few particle filter
regeneration operations, you may notice a
"burning" smell. This is perfectly normal.
Manual gearbox
The gearbox does not require any maintenance (no oil change).
Automatic gearbox
The gearbox does not require any maintenance (no oil change).
Drive selector
The drive selector does not require any maintenance.
Manual parking brake
If you notice excessive brake lever travel
or decreased effectiveness, the parking
brake must be adjusted, even between two
services.
This system must be checked by a CITROËN
dealer or a qualified workshop.
Electric parking brake
This system does not require any routine servicing. However, in the event of a
problem, do not hesitate to have the system
checked by a CITROËN dealer or a qualified
workshop.
For more information on the Electric
parking brake, refer to the
corresponding section.
Page 209 of 324
207
In the event of a breakdown
8
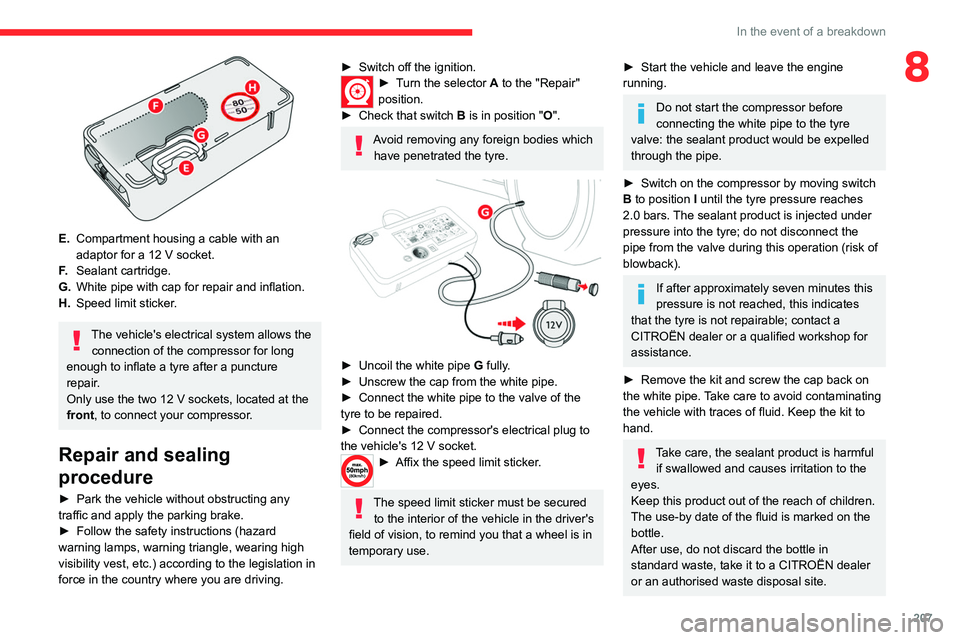
E.Compartment housing a cable with an
adaptor for a 12
V socket.
F. Sealant cartridge.
G. White pipe with cap for repair and inflation.
H. Speed limit sticker.
The vehicle's electrical system allows the
connection of the compressor for long
enough to inflate a tyre after a puncture
repair.
Only use the two 12 V sockets, located at the
front, to connect your compressor.
Repair and sealing
procedure
► Park the vehicle without obstructing any
traffic and apply the parking brake.
►
Follow the safety instructions (hazard
warning lamps, warning triangle, wearing high
visibility vest, etc.) according to the legislation in
force in the country where you are driving.
► Switch off the ignition.► Turn the selector A to the "Repair"
position.
►
Check that switch
B is in position " O".
Avoid removing any foreign bodies which
have penetrated the tyre.
► Uncoil the white pipe G fully.
► Unscrew the cap from the white pipe.
►
Connect the white pipe to the valve of the
tyre to be repaired.
►
Connect the compressor's electrical plug to
the vehicle's 12 V socket.
► Affix the speed li mit sticker.
The speed limit sticker must be secured
to the interior of the vehicle in the driver's
field of vision, to remind you that a wheel is in
temporary use.
► Start the vehicle and leave the engine
running.
Do not start the compressor before
connecting the white pipe to the tyre
valve: the sealant product would be expelled
through the pipe.
►
Switch on the compressor by moving switch
B
to position I until the tyre pressure reaches
2.0 bars. The sealant product is injected under
pressure into the tyre; do not disconnect the
pipe from the valve during this operation (risk of
blowback).
If after approximately seven minutes this
pressure is not reached, this indicates
that the tyre is not repairable; contact a
CITROËN dealer or a qualified workshop for
assistance.
►
Remove the kit and screw the cap back on
the white pipe.
Take care to avoid contaminating
the vehicle with traces of fluid. Keep the kit to
hand.
Take care, the sealant product is harmful if swallowed and causes irritation to the
eyes.
Keep this product out of the reach of children.
The use-by date of the fluid is marked on the
bottle.
After use, do not discard the bottle in
standard waste, take it to a CITROËN dealer
or an authorised waste disposal site.
Page 210 of 324

208
In the event of a breakdown
Do not forget to obtain a new bottle of
sealant, available from a CITROËN dealer or
a qualified workshop.
► Drive immediately for approximately three
miles (five kilometres), at reduced speed
(between 12 and 37
mph (20 and 60 km/h)), to
plug the puncture.
►
Stop to check the repair and measure the
tyre pressure using the kit.
Inflating, adjusting and
checking tyre pressures
► Turn selector A to the "Inflation"
position.
►
Uncoil the white pipe G
fully.
►
Connect the white pipe to the valve on the
repaired tyre.
►
Reconnect the compressor's electric plug to
the vehicle's 12
V socket.
►
Start the vehicle and leave the engine
running.
Go to a CITROËN dealer or a qualified
workshop as soon as possible.
You must tell the technician that the kit has
been used. After inspection, the technician
will advise you on whether the tyre can be
repaired or if it must be replaced.
►
Adjust the tyre pressure using the
compressor (to inflate: set switch
B to position
"I"; to deflate: set switch B to position "O" and
press button C), according to the vehicle's tyre
pressure label located by the driver's door.
A subsequent loss of pressure indicates that the
puncture has not been fully sealed; contact a
CITROËN dealer or a qualified workshop to have
your vehicle repaired.
►
Remove the kit and stow it.
► Drive at reduced speed (50 mph
(80 km/h) max.), limiting the distance
travelled to approximately 125 miles
(200
km).
The compressor can also be used, without injecting sealant, to check and
adjust the tyre pressures.
If after approximately 7 minutes the
required pressure is not reached, this
indicates that the tyre is irreparably damaged;
contact a CITROËN dealer or a qualified
workshop for assistance.
Do not drive more than 125 miles (200
km) with a repaired tyre; see a CITROËN
dealer or a qualified workshop to have the
tyre changed.
Page 293 of 324
291
Alphabetical index
Changing a fuse 218
Changing a wheel
209
Changing a wiper blade
94–95
Changing the remote control battery
36
Changing to free-wheeling
200, 222
Charge level indicator (Electric)
20
Charging cable
183
Charging cable (Electric)
182
Charging connector (Electric)
181, 186, 188–189
Charging flap (Electric)
181, 186, 188–189
Charging system (Electric)
5, 8, 25, 179, 194
Charging the traction battery
(Electric)
20, 179, 186, 188–189
Checking the engine oil level
18
Checking the levels
194–196
Checking tyre pressures (using the kit)
206,
208–209
Checks
194, 196–198
Checks, routine
196–198
Child lock
132–133
Child lock on rear windows
133
Children
105, 112, 120–121, 127, 130, 130–131
Children (safety)
132
Child seats
105, 108–112, 118, 118–119, 130
Child seats, conventional
111–112,
118, 118–119
Child seats, i-Size
130
Child seats, ISOFIX
120–121, 127, 130, 130–131
Cleaning (advice)
180, 202–203Closing the boot 44
Closing the doors
28, 33, 43–44
Collision Risk Alert
165–166
Compressor, tyre inflation
206
Configuration, vehicle
24–25
Connected applications
274
Connection, Bluetooth
244, 257–258,
274–275, 279–280
Connection, Wi-Fi network
275
Connectivity
273
Consumption figures
25
Container, AdBlue®
199
Control, emergency boot release
35
Control, emergency door
28, 34–35
Control, heated seats
51
Control stalk, lighting
88
Control stalk, wipers
92–94
Control unit
182–183
Courtesy lamp
86
Courtesy lamp, front
86–87, 217
Courtesy lamp, rear
86–87, 217
Courtesy lamps
86–87, 217
Cover, load space
71
Crew cab, fixed
65–67
Crew cab, folding
67
Cruise control
154–157, 159–161
Cruise control, adaptive
157, 162–165
Cruise control by speed limit
recognition
156–157
Cruise control, dynamic with
Stop function
156–157D
DAB (Digital Audio Broadcasting) -
Digital radio
240–241, 254, 277
Date (setting)
26, 260, 282
Daytime running lamps
89, 214–215
Deactivating the passenger airbag
106, 110
Deactivation of DSC (ESC)
100
Deadlocking
33–34
Deferred charging
26
Deferred charging (Electric)
25–26, 181, 186, 189
Defrosting
53, 81
Demisting
81
Demisting, rear
82
Demisting, rear screen
82
Dimensions
233
Dipstick
18, 194
Direction indicators
89, 214–216, 218
Display, head-up
153–154
Domestic charging
183
Domestic charging (Electric)
187–189, 231
Door pockets
69
Doors, rear
43–44
Doors, side
39
Doors, side-hinged
33–34, 43–44, 216
Driver’s attention warning
169
Drive selector (Electric)
147, 197
Driving
134–135
Driving aids camera (warnings)
152
Driving aids (recommendations)
152
Driving economically
7