key CITROEN JUMPY 2023 Owner's Guide
[x] Cancel search | Manufacturer: CITROEN, Model Year: 2023, Model line: JUMPY, Model: CITROEN JUMPY 2023Pages: 324, PDF Size: 10.05 MB
Page 157 of 324
155
Driving
6Programming
The speed thresholds can be set in the vehicle configuration menu using the
touch screen.
►
Select the system for which you want to
memorise new speed settings:
– speed limi ter
or
– cruise con trol.
► Press the button corresponding to the speed
setting you want to change.
►
Enter the new value using the numerical
keypad and confirm.
►
Confirm to record the changes and quit the
menu.
Memorised speeds are recalled
by pressing this button.
Road signs recognition
For more information, refer to the
General recommendations on the use
of driving and manoeuvring aids .
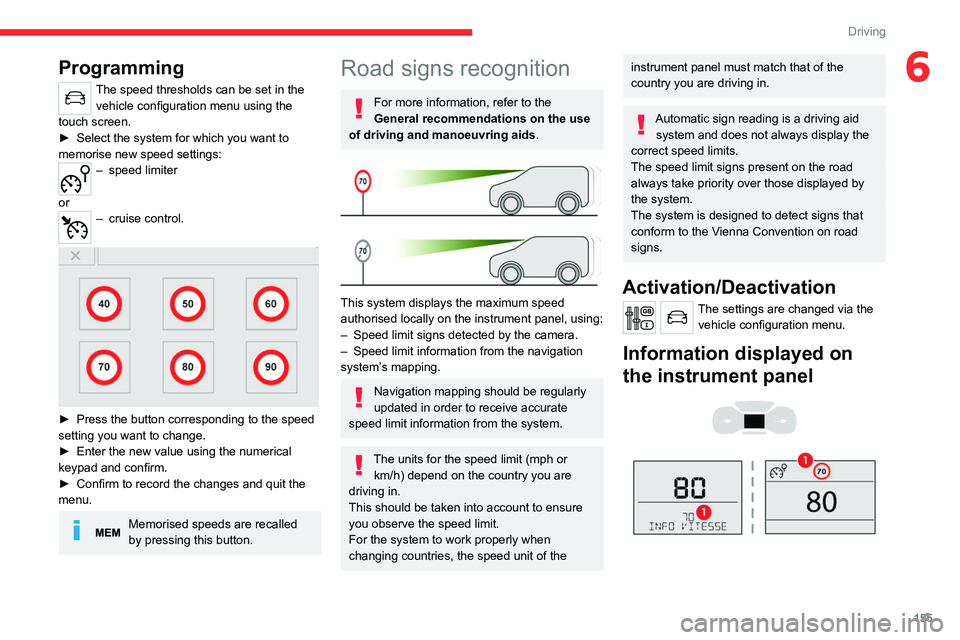
This system displays the maximum speed
authorised locally on the instrument panel, using:
–
Speed limit signs detected by the camera.
–
Speed limit information from the navigation
system’
s mapping.
Navigation mapping should be regularly
updated in order to receive accurate
speed limit information from the system.
The units for the speed limit (mph or km/h) depend on the country you are
driving in.
This should be taken into account to ensure
you observe the speed limit.
For the system to work properly when
changing countries, the speed unit of the
instrument panel must match that of the
country you are driving in.
Automatic sign reading is a driving aid system and does not always display the
correct speed limits.
The speed limit signs present on the road
always take priority over those displayed by
the system.
The system is designed to detect signs that
conform to the Vienna Convention on road
signs.
Activation/Deactivation
The settings are changed via the vehicle configuration menu.
Information displayed on
the instrument panel
Page 179 of 324
177
Practical information
7
FILL UP WITH
CONFIDENCE
WITH QUARTZ LUBRICA\BNT\f
* 1L & 5L produced in Europe
Part\bers for more tha\b 50 years, Citroën &
TotalEnergies share \fommon values\b te\fhnology,
\freativity, innovation. TotalEnergies equips Citroën
vehi\fles with Quartz lubrica\bts from their first filling
in the fa\ftory to approved maintenan\fe networks to
guarantee them optimal performan\fe on a daily basis.
Espe\fially designed for Citroën vehi\fles, Quartz
lubri\fants make them even more powerful, more fuel
effi\fient and more environmentally friendly. For your
\far maintenan\fe, fill up with \fonfiden\fe with Quartz
lubri\fants !Keep your e\bgi\be you\B\bger for lo\bger !
Quartz I\beo Xtra First 0W-20 is a very high
performan\fe lubri\fant resulting from the joint work of
the Citroën and TotalEnergies R&D teams. Its innovative
te\fhnology extends your engine’s life while rea\fhing
signifi\fant fuel savings and thus limiting CO
2 emissions.
The produ\ft is now available in new pa\fkaging* made
of 50% re\fy\fled mate\hrial and 100% re\fy\fl\hable.
Compatibility of fuels
Diesel fuels conforming to the EN590, EN16734
and EN16709 standards and containing up to
7%, 10%, 20% and 30% fatty acid methyl ester
respectively. The use of B20 or B30 fuels, even
occasionally, imposes special maintenance
conditions referred to as "Arduous conditions".
Paraffinic Diesel fuel conforming to the EN15940
standard.
The use of any other type of (bio) fuel
(e.g. pure or diluted vegetable or animal
oils, domestic fuel) is strictly prohibited - risk
of damaging the engine and fuel system!
The only Diesel fuel additives authorised for use are those that meet the B715000
standard.
Diesel at low temperature
At temperatures below 0 °C (+32 °F), the
formation of paraffins in summer-type Diesel
fuels could prevent the engine from operating
correctly
. In these temperature conditions, use
winter-type Diesel fuel and keep the fuel tank
more than 50
% full.
At temperatures below -15 °C (+5 °F) to avoid
problems starting, it is best to park the vehicle
under shelter (heated garage).
Travelling abroad
Certain fuels could damage your vehicle’s
engine.
In certain countries, the use of a particular
fuel may be required (specific octane rating,
specific trade name, etc.) to ensure correct
operation of the engine.
For all additional information, consult a dealer.
Refuelling
Fuel tank capacity: approximately 69 litres.
Reserve level: approximately 6 litres.
Low fuel level
When the low fuel level is reached,
one of these warning lamps lights
up on the instrument panel, accompanied by the
display of a message and an audible signal.
When it first comes on, about 8 litres of fuel
remain.
You must refuel as soon as possible to avoid
running out of fuel.
For more information on Running out of fuel
(Diesel), refer to the corresponding section.
A small arrow by the warning lamp indicates which side of the vehicle the
fuel filler flap is located on.
Stop & Start
Never refuel with the engine in STOP
mode; you must switch off the ignition.
Refuelling
At least 8 litres of fuel must be added, in order to
be registered by the fuel gauge.
Opening the filler cap may create a noise caused
by an inrush of air. This is entirely normal and
results from the sealing of the fuel system.
To refuel in complete safety:
►
Always switch off the engine.
►
Unlock the vehicle using the Keyless Entry
and Start.
► Open the fuel filler flap.
Page 180 of 324

178
Practical information
► With a conventional key, insert the key into
the filler cap, then turn the key to the left.
► Unscrew and remove the filler cap, then
place it on the holder located on the fuel filler
flap.
►
Insert the nozzle and push it in fully (while
pushing on the metal valve A
).
►
Fill the tank. Do not continue past the
third cut-off of the nozzle, as this may cause
malfunctions.
► Put the filler cap back in place and close it by
turning to the right.
►
Push the fuel filler flap to close it (your
vehicle must be unlocked).
If the vehicle is equipped with a sliding
door on its left-hand side, do not open it
while the fuel filler flap is open (risk of
damaging the fuel filler flap and the sliding
door and risk of injuring the person filling up).
If the fuel filler flap is open and you try to
open the left-hand side door, a
mechanism prevents it from being opened.
The door can be opened half-way, however.
With a mechanical door, close the fuel filler
flap to regain use of the door.
With an electric door, to be able to use it
correctly, close the fuel filler flap and then
press an opening control.
The vehicle is fitted with a catalytic converter,
which helps to reduce the level of harmful
emissions in the exhaust gases.
If you have put in the wrong fuel for
your vehicle, you must have the fuel
tank drained and filled with the correct fuel
before starting the engine.
Fuel cut-off
Your vehicle is fitted with a safety system that
cuts off the supply of fuel in the event of an
impact.
Diesel misfuel prevention
Mechanical device which prevents filling the tank
of a Diesel vehicle with petrol. It helps avoid the
risk of engine damage that can result from filling
with the wrong fuel.
Located in the filler neck, the misfuel prevention
device appears when the filler cap is removed.
When a petrol filler nozzle is introduced into the
fuel filler neck of your Diesel vehicle, it comes
into contact with the flap. The system remains
closed and prevents filling.
Page 183 of 324

181
Practical information
7In the event of damage to the traction
battery
It is strictly prohibited to work on the vehicle
yourself.
Do not touch liquids coming from the battery,
and in the event of skin contact with these
products, wash abundantly with water and
contact a doctor as soon as possible.
Contact a CITROËN dealer or a qualified
workshop to have the system checked.
Disposal of the traction battery
The traction battery is designed for the life of the
vehicle if the recommendations of CITROËN are
followed.
If it becomes necessary to replace the battery,
contact the CITROËN dealer for instructions on
its disposal. Improper disposal carries the risk of
severe burns, electric shock, and damage to the
environment.
In accordance with regulations, CITROËN
ensures a second life or recycling of this
component in collaboration with qualified
operators.
Charging connectors and
indicator lamps
1. Charging connectors (Electric)
2. Deferred charging activation button
3. Nozzle locking indicator lamp
Fixed red: nozzle positioned correctly and
locked in the connector.
Flashing red: nozzle incorrectly positioned or
locking not possible.
4. Charging indicator lamp
State of charging
indicator lamp Meaning
Fixed white Welcome lighting on
opening the flap and
disconnecting the
charging cable.
Fixed blue Deferred charging.
Flashing green Charging.
Fixed green Charging complete.
The charging
indicator lamp goes
off after about 2
minutes as the
vehicle's functions go
into standby.
The indicator lamp
comes on again
when the vehicle is
unlocked with the
Keyless Entry and
Start system or when
a door is opened
to indicate that
the battery is fully
charged.
Fixed red Malfunction.
Page 186 of 324

184
Practical information
4.The weight of the control unit must not be
borne by the electrical socket, plug and
cables.
5. Never use this charging cable if it is
defective or in any way damaged.
6. Never attempt to repair or open this
charging cable. It contains no repairable
parts - replace the charging cable if it is
damaged.
7. Never immerse this charging cable in water.
8. Never use this charging cable with an
extension cable, a multi-plug socket, a
conversion adaptor or on a damaged
electrical socket. 9.
Do not unplug the plug from the wall as a
means of stopping charging.
10. Immediately stop charging, by locking and
then unlocking the vehicle using the remote
control key, if the charging cable or wall
socket feel burning hot to the touch.
11 . This charging cable includes components
liable to cause electrical arcing or sparks.
Do not expose to flammable vapours.
12. Only use this charging cable with CITROËN
vehicles.
13. Never plug the cable into the wall socket (or
unplug it) with wet hands.
14. Do not force the connector if it is locked into
the vehicle.Control unit label - State of indicator
lamps
State of the
indicator lamp
Off
On
Flashing
POWER CHARGE FAULT SymbolDescription
Not connected to the power supply or power is not
available from the infrastructure.
(green)
(green)
(red)
The control unit is currently performing a self-test.
(green)
Connected only to the infrastructure or to the
infrastructure and to the Electric Vehicle (EV) but
no charging in progress.
Page 202 of 324
200
Practical information
be excluded: do not inhale the fluid. Ammonia
vapours have an irritant effect on mucous
membranes (eyes, nose and throat).
Store AdBlue® out of the reach of
children, in its original container.
Procedure
Before starting the top-up procedure, ensure that
the vehicle is parked on a flat and level surface.
In wintry conditions, ensure that the temperature
of the vehicle is above -11°C. Otherwise the
AdBlue
® may be frozen and so cannot be poured
into the tank. Park the vehicle in a warmer area
for a few hours to allow the top-up to be carried
out.
Never pour the AdBlue® into the Diesel
fuel tank.
If any AdBlue® is splashed, or if there are
any spillages on the bodywork, rinse
immediately with cold water or wipe with a
damp cloth.
If the fluid has crystallised, clean it off using a
sponge and hot water.
Important: in the event of a top-up after
a breakdown because of a lack of
AdBlue, it is essential to wait around 5
minutes before switching on the ignition,
without opening the driver’s door,
unlocking the vehicle, inserting the key
into the ignition switch, or bringing the
key for the "Keyless Entry and Start"
system into the passenger compartment.
Switch on the ignition, then wait for 10
seconds before starting the engine.
►
Switch off the ignition and remove the key
from the switch to switch off the engine.
or
►
With Keyless Entry and Start, press the
"
START/STOP" button to switch off the engine.
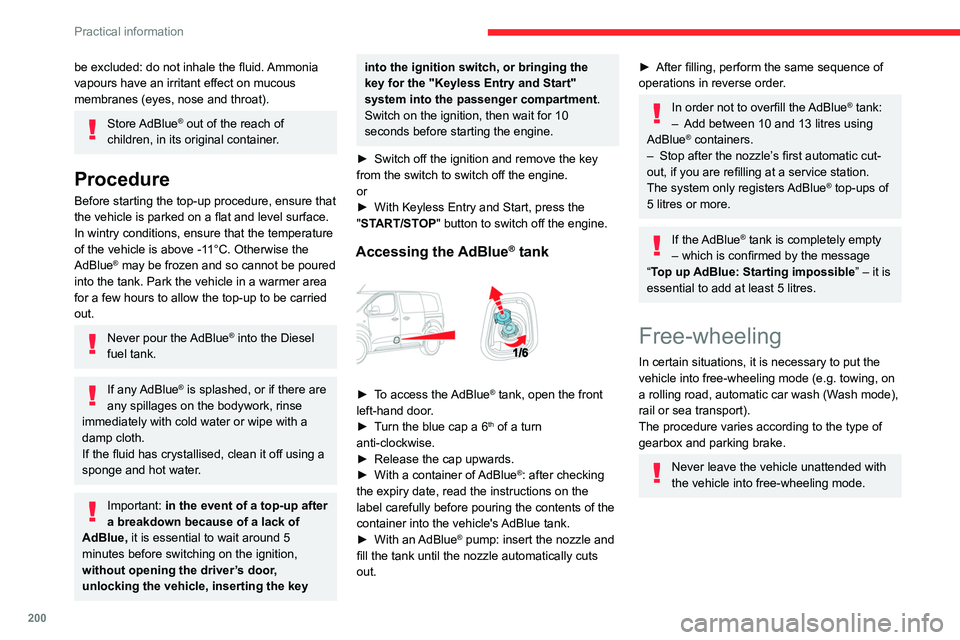
Accessing the AdBlue® tank
► To access the AdBlue® tank, open the front
left-hand door.
►
T
urn the blue cap a 6
th of a turn
anti-clockwise.
►
Release the cap upwards.
►
With a container of
AdBlue
®: after checking
the expiry date, read the instructions on the
label carefully before pouring the contents of the
container into the vehicle's AdBlue tank.
►
With an
AdBlue® pump: insert the nozzle and
fill the tank until the nozzle automatically cuts
out.
► After filling, perform the same sequence of
operations in reverse order .
In order not to overfill the AdBlue® tank:
–
Add between 10 and 13 litres using
AdBlue® containers.
–
Stop after the nozzle’ s first automatic cut-
out, if you are refilling at a service station.
The system only registers AdBlue
® top-ups of
5
litres or more.
If the AdBlue® tank is completely empty
– which is confirmed by the message
“Top up
AdBlue: Starting impossible ” – it is
essential to add at least 5 litres.
Free-wheeling
In certain situations, it is necessary to put the
vehicle into free-wheeling mode (e.g. towing, on
a rolling road, automatic car wash (Wash mode),
rail or sea transport).
The procedure varies according to the type of
gearbox and parking brake.
Never leave the vehicle unattended with
the vehicle into free-wheeling mode.
Page 204 of 324
202
Practical information
Keyless Entry and Start
You must not depress the brake pedal
while switching the ignition on again, then
switching it off. If you do, the engine will start,
requiring you to restart the procedure.
Advice on care and maintenance
General recommendations
Observe the following recommendations to avoid
damaging the vehicle.
Exterior
Never use a high-pressure jet wash in
the engine compartment - risk of
damaging the electrical components!
Do not wash the vehicle in bright sunshine or
extremely cold conditions.
When washing the vehicle in an
automatic roller-brush car wash, be sure
to lock the doors and, depending on version,
move the electronic key away and deactivate
the "hands-free" function (Hands-Free
Tailgate Access).
When using a pressure washer, keep the jet
nozzle at a minimum distance of 30 cm from
the vehicle (particularly when cleaning areas
containing chipped paint, sensors or seals).
Promptly clean up any stains containing
chemicals liable to damage the vehicle's
paintwork (including tree resin, bird
droppings, insect secretions, pollen and tar).
Depending on the environment, clean the
vehicle frequently to remove salty deposits
(in coastal areas), soot (in industrial areas)
and mud/salts (in wet or cold areas). These
substances can be highly corrosive.
Contact a CITROËN dealer or a qualified
workshop for advice on removing stubborn
stains requiring special products (such as tar
or insect removers).
Preferably, have paint touch-ups performed
by a CITROËN dealer or a qualified
workshop.
Interior
When washing the vehicle, never use a
water hose or high-pressure jet to clean
the interior.
Liquids carried in cups or other open
containers can spill, presenting a risk of
damage to the instruments and controls and
the controls located on the centre console. Be
vigilant!
To clean instrument panels, touch screens
or other displays, wipe gently with a soft,
dry cloth. Do not use products (e.g. alcohol,
disinfectant) or soapy water directly on these
surfaces - risk of damage!
Bodywork
High-gloss paint
Do not use abrasive products, solvents,
petrol or oil to clean the bodywork.
Never use an abrasive sponge to clean
stubborn stains - risk of scratching the
paintwork!
Do not apply polish in strong sunshine, or to
plastic or rubber parts.
Use a soft cloth and soapy water or a pH
neutral product.
Gently wipe the bodywork with a clean
microfibre cloth.
Apply polish with the vehicle clean and dry.
Comply with the instructions for use stated on
the product.
Textured paint
This type of paint reacts under the effect of
light, through variations in appearance and
finish that highlight the lines and contours of the
vehicle. Its varnish is enriched with particles that
remain visible and create a unique satin effect
with relief. Its slightly granular texture gives it a
surprising touch.
Never attempt to clean without water.
Never clean your vehicle in an automatic
roller-brush car wash.
Page 224 of 324
222
In the event of a breakdown
Referring to the relevant section, reinitialise
certain equipment:
–
Remote control key or electronic key
(depending on version).
–
Electric windows.
–
Date and time.
–
Preset radio stations.
The Stop & Start system may not be operational during the trip following the
first engine start.
In this case, the system will only be available
again after a continuous period with the
vehicle immobilised, the duration of which
depends on the exterior temperature and the
state of charge of the battery (up to about 8
hours).
Towing the vehicle
Procedure for having your vehicle towed or
for towing another vehicle using a removable
mechanical device.
General recommendations
Observe the legislation in force in the
country where you are driving.
Check that the towing vehicle is heavier than
the towed vehicle.
The driver must remain at the wheel of the
towed vehicle and must have a valid driving
licence.
When towing a vehicle with all four wheels on
the ground, always use an approved towbar;
ropes and straps are prohibited.
The towing vehicle must move off gently.
When the vehicle is towed with its engine
off, there is no longer braking and steering
assistance.
A professional recovery service must
be called in the following cases:
–
broken down on a motorway or main road;
–
not possible to put the gearbox into neutral,
unlock the steering, or release the parking
brake;
–
not possible to tow a vehicle with an
automatic gearbox, with the engine running;
– towing with only two wheels on the ground;
– four-wheel drive vehicle;
–
no approved towbar available.
Before towing the vehicle, it is essential
to put the vehicle in free-wheeling mode.
For more information on Free-wheeling, refer
to the corresponding section.
Electric motor
An electric vehicle cannot under any
circumstances be used to tow another
vehicle.
However, it may be used, for example, to exit
a rut.
With a manual gearbox, place the gear
lever in neutral.
With an automatic gearbox, place the gear
selector in position N.
Failure to adhere to this instruction may lead
to damage to some braking components and
the lack of braking assistance on restarting
the engine.
Page 245 of 324
243
Bluetooth® audio system
10Press and hold one of these buttons for
fast forward or rewind.
Bluetooth® audio streaming
Streaming allows music files on the telephone to
be played via the vehicle's speakers.
Connect the telephone.
(Refer to the "Pairing a Bluetooth® telephone"
section).
Activate the streaming source by pressing SOURCE.
In certain cases, playback of the audio files must
be initiated from the keypad.
Audio files can be selected using the buttons on
the audio system control panel and the steering-
mounted controls. The contextual information
can be displayed on the screen.
If the telephone supports the function. The audio
quality depends on the quality of transmission by
the telephone.
Connecting Apple® players
Connect the Apple® player to the USB socket
using a suitable cable (not supplied).
Play starts automatically.
Control is via the audio system.
The classifications available are those of the
portable device connected (artists / albums /
genres / playlists).
The version of software in the audio system may
not be compatible with the generation of your
Apple
® player.
Information and advice
The CD player can play audio files with “.mp3”,
“.wma”, “.wav” and “.aac” file extensions, with a
bit rate of 32 to 320 Kbps.
It also supports TAG mode (ID3 tag, WMA TAG).
No other file types (".mp4", etc.) can be read.
Files of the ".wma" type should be to the wma 9
standard.
The sampling rates supported are 11, 22, 44 and
48 kHz.
Via the USB socket, the system can play audio
files with the extension “.mp3”, “.wma”, “.wav”,
“.cbr”, “.vbr" with a bit rate of 32 to 320 Kbps.
No other file types (".mp4", etc.) can be read.
Files of the ".wma" type should be to the wma 9
standard.
The sampling rates supported are 11, 22, 44 and
48 kHz.
File names should have fewer than 20
characters, avoiding special characters (e.g.
«
? ; ù) so as to avoid any reading or display
problems.
In order to be able to play a burned CDR or
CDRW, select ISO 9660
standards level 1, 2, or
Joliet, if possible, when burning the CD.
If the disc is burned in another format, it may not
be played correctly.
It is recommended that the same burning
standard always
be used on an individual disc,
with the lowest speed possible (4x maximum) for
the best acoustic quality.
In the particular case of a multi-session CD, the
Joliet standard is recommended.
To protect the system, do not use a USB hub.
Only use USB memory sticks formatted
to FAT 32 (File Allocation Table).
It is recommended that you use genuine
Apple® USB cables to guarantee correct
operation.
Telephone
Pairing a Bluetooth®
telephone
As a safety measure and because it
requires sustained attention by the driver,
the pairing of a Bluetooth
® mobile telephone
with the Bluetooth® hands-free system of your
audio system must be done with the vehicle
stationary and the ignition on.
Activate the telephone's Bluetooth®
function and ensure that it is "visible to
all" (telephone configuration).
Page 248 of 324
246
Bluetooth® audio system
Interactive voice response
From the contextual menu, select "DTMF
tones" and confirm to use the digital
keypad to navigate in the interactive voice
response menu.
Confirm with OK.
Consultation call
From the contextual menu, select
"Switch" and validate to return to a call
left on hold.
Confirm with OK.
Directory
To access the directory, press and hold SRC/TEL.
Select "Directory" to see the list of
contacts.
Confirm with OK.
To modify the contacts saved in the system, press MENU then select
"Telephone" and confirm.
Select "Directory management " and confirm.
You can:
–
"Consult an entry",
–
"Delete an entry",
–
"Delete all entries".
The system accesses the telephone's contacts directory, depending on its
compatibility, and while it is connected via
Bluetooth.
With certain telephones connected by
Bluetooth you can send a contact to the
directory of the audio system.
Contacts imported in this way are saved in a
permanent directory visible to all, whatever the
telephone connected.
The menu for the directory is not accessible if it
is empty.
Voice recognition
This function allows you to use your
smartphone's voice recognition via the system.
To start voice recognition, depending on the type
of steering mounted controls:
Make a long press on the end of the lighting
control stalk.
OR
Press this button.
Voice recognition requires the use of a
compatible smartphone first connected to
the vehicle by Bluetooth.
Frequently asked
questions
The following information groups together the answers to the most frequently asked questions
concerning your audio system. With the engine off, the audio system
switches off after a few minutes of use.
When the engine is switched off, the audio
system operating time depends on the state of
charge of the battery.
The switch-off is normal: the audio system
switches to economy mode and switches off to
avoid discharging the vehicle's battery.
►
Start the vehicle’
s engine to increase the
charge of the battery.
The message "the audio system is
overheated" is displayed onscreen.
To protect the installation if the ambient
temperature is too high, the audio system
switches to an automatic thermal protection
mode, in which the volume may be decreased or
the CD player stopped.
►
Switch the audio system off for a few minutes
to allow the system to cool.
Radio
There is a difference in sound quality
between the different audio sources (radio,
CD, etc.).
For optimal listening quality, the audio settings
(Volume, Bass, Treble, Ambience and Loudness)
can be adjusted to different audio sources,
resulting in audible differences when switching
between sources (radio, CD, etc.).
►
Check that the audio settings (V
olume, Bass,
Treble, Ambience and Loudness) are appropriate
to the sources being listened to. We recommend
setting the audio functions (Bass, Treble, Fr-Re