steering Citroen JUMPY DAG 2009.5 2.G Owner's Guide
[x] Cancel search | Manufacturer: CITROEN, Model Year: 2009.5, Model line: JUMPY DAG, Model: Citroen JUMPY DAG 2009.5 2.GPages: 221, PDF Size: 11.09 MB
Page 75 of 221

86
Air bags Disarming
The passenger's front air bag alone can be
disarmed:
- With the ignition switched off , insert
the key into the passenger air bag
disarming switch,
- turn it to the "OFF" position,
- then remove the key keeping the slot in this position.
Front air bags
The front air bags are incorporated in the
centre of the steering wheel for the driver
and in the fascia for the front passenger.
Reactivation
In the
"OFF" position, the passenger air
bag will not be triggered in the event of an
impact.
As soon as the child seat is removed, turn
the air bag slot to the "ON" position to
re-activate the air bag and thus ensure the
safety of your passenger in the event of an
impact. To ensure the safety of your child, it
is essential to disarm the passenger
air bag when you install a rear-facing child
seat on the front passenger seat. Otherwise,
the child would risk being killed or seriously
injured if the air bag were to inflate.
The air bag warning light on the
instrument panel is lit throughout
the period of disarming.
Activation
They are deployed simultaneously, unless the
passenger's front air bag has been disarmed,
in the event of a serious front impact applied
to all or part of the front impact zone
A in the
longitudinal centreline of the vehicle on a
horizontal plane directed from the front towards
the rear of the vehicle.
The front air bag inflates between the front
occupant of the vehicle and the fascia to
cushion his forward movement. If this warning light comes on,
accompanied by an audible signal
and a message on the display,
contact a CITROËN dealer to
have the system checked.
Front air bag fault
If the two air bag warning lights are lit
continuously, do not install a rear-
facing child seat. Consult a CITROËN
dealer.
Page 77 of 221

84
Air bags
Good practice
Sit in a normal upright position.
Wear a correctly adjusted seat belt.
Do not leave anything between the
occupants and the air bags (a child, pet,
object...). This could hamper the operation
of the air bags or injure the occupants.
After an accident or if the vehicle has been
stolen or broken into, have the air bag
systems checked.
All work on the air bag system is strictly
forbidden unless it is carried out by qualified
personnel of the CITROËN network.
Even if all of the precautions mentioned are
observed, a risk of injury or of minor burns
to the head, chest or arms when an air bag
is triggered cannot be ruled out. In fact, the
bag inflates almost instantly (within a few
milliseconds) then deflates within the same
time discharging the hot gas via openings
provided for this purpose. Side air bags
Only put recommended covers on the seats.
These will not hinder inflation of the side air
bags. Consult a CITROËN dealer.
Do not fix or glue anything to the seat backs.
This could cause injury to the chest or arms
when the side air bag inflates.
Do not sit with the upper part of the body
any nearer to the door than necessary.
Front air bags
Do not drive holding the steering wheel
by its spokes or resting your hands on the
centre part of the wheel.
Do not allow passengers to place their feet
on the fascia, they risk serious injury if the
air bag is triggered.
Smoke as little as possible as deployment of
the air bags can cause burns or the risk of
injury from a cigarette or pipe.
Never remove or pierce the steering wheel
or hit it violently.
Page 90 of 221

96
Under the bonnet
DIESEL ENGINES
8 - Power steering reservoir.
9 - Removable towing eye.
10 - Repriming pump
( a : 1.6 litre HDi; b : 2 litre HDi).
11 - Engine oil filling funnel (2 litre HDi).
7.1 - Engine oil filler cap.
If your vehicle is fitted with this oil filler tub e,
proceed as follows:
A - Remove the oil filler cap.
B - Remove the filler tube from its location.
C - Place the filler tube in the filler opening
as shown on the illustration.
D - Turn it a 1/4 of a turn to the left to lock it
then top up the oil.
To refit, proceed in the reverse order without
forgetting to retighten the cap A correctly.
UNDER THE BONNET
1 - Windscreen/headlamp wash reservoir.
2 - Fuse box.
3 - Coolant reservoir.
4 - Brake and clutch fluid reservoir.
5 - Air filter.
6 - Dipstick.
7 - Engine oil filler cap.
Page 91 of 221

97
Under the bonnet
CHECKS
6
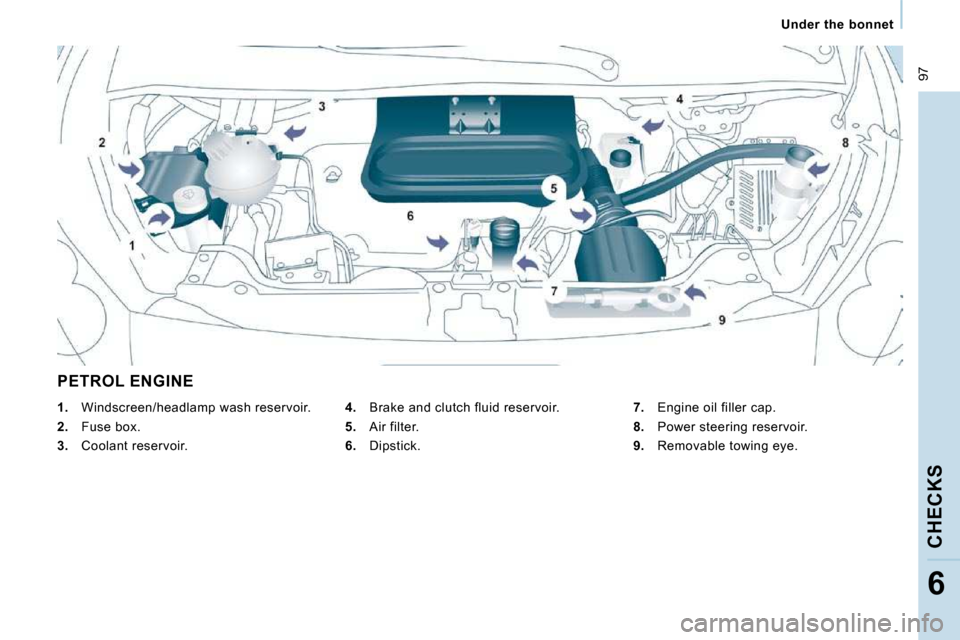
PETROL ENGINE
4. Brake and clutch fluid reservoir.
5. Air filter.
6. Dipstick.
7. Engine oil filler cap.
8. Power steering reservoir.
9. Removable towing eye.
1. Windscreen/headlamp wash reservoir.
2. Fuse box.
3. Coolant reservoir.
Page 93 of 221

99
Levels
CHECKS
6
Cooling system
Only use the fluid recommended by the
manufacturer.
Otherwise, you risk seriously damaging your
engine.
When the engine is warm, the temperature
of the coolant is controlled by the engine
fan. As this fan can operate with the ignition
key removed and because the cooling
system is pressurised, wait for at least one
hour after the engine has stopped before
carrying out any work.
Slacken the cap by 1/4 of a turn to release
the pressure to prevent any risk of scalding.
When the pressure has dropped, remove the
cap and top up the level with coolant.
If fluid has to be added frequently, this
indicates a failure which must be checked by
a CITROËN dealer as soon as possible. Power steering fluid level
The vehicle must be parked on level ground
with the engine cold. Unscrew the cap
integrated with the gauge and check the
level which must be between the MIN and
MAX marks.
When this occurs with the engine running it
is due to the start of saturation of the particle
emission filter (exceptionally prolonged
urban type driving conditions: low speed,
long traffic jams, ...).
In order to regenerate the filter, you are
advised to drive at a speed higher than
40 mph (60 km/h) for at least five minutes
as soon as possible, when traffic conditions
permit (until the message disappears and
the service warning light is switched off).
During regeneration of the particle emission
filter, relay noise may be heard under the
fascia.
If the message is still displayed and if the
service warning light remains on, contact a
CITROËN dealer.
Topping up
The level must be between the MIN and
MAX marks on the expansion bottle. If
more than 1 litre of fluid is required to top
up the level, have the system checked by a
CITROËN dealer. Windscreen wash and headlamp
wash level
For best quality cleaning and for your safety,
we would advise that you use products of
the CITROËN Universal range.
Capacity of the screenwash reservoir:
approximately 4.5 litres.
If your vehicle is fitted with headlamp
washers, the capacity of the reservoir is
7.5 litres.
To guarantee optimum cleaning and prevent
freezing, this fluid must not be topped up or
replaced with water.
Diesel additive level (Diesel
with particle emission filter)
The minimum level of this additive
is indicated by lighting of the
service warning light, accompanied by
an audible signal and a message on the
display. Topping up
It is imperative that this additive is topped up
by a CITROËN dealer without delay.
Page 136 of 221

01
9.5
FIRST STEPS
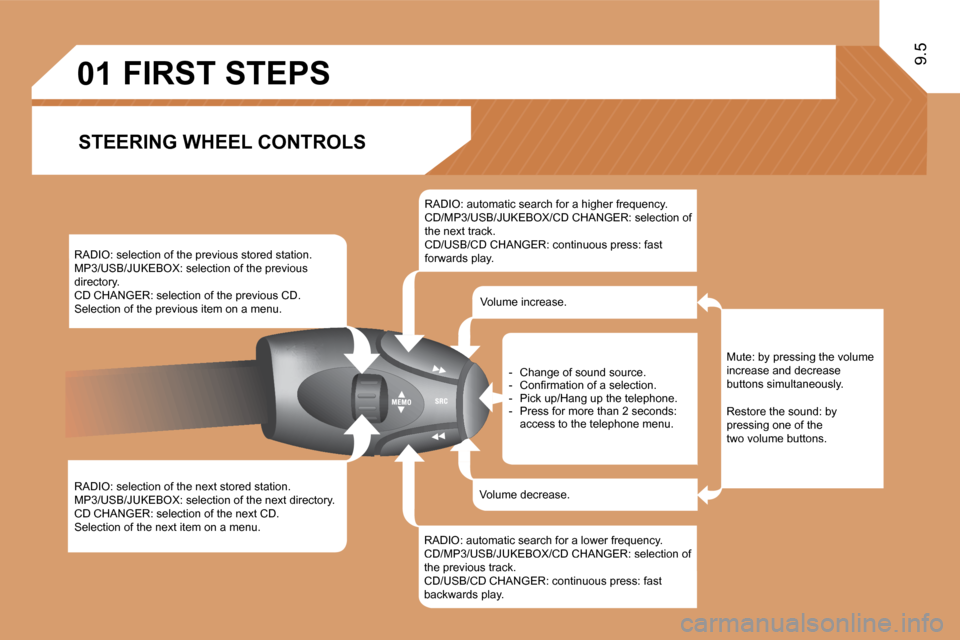
STEERING WHEEL CONTROLS
RADIO: selection of the previous stored station. MP3/USB/JUKEBOX: selection of the previous directory. CD CHANGER: selection of the previous CD. Selection of the previous item on a menu.
RADIO: selection of the next stored station. MP3/USB/JUKEBOX: selection of the next directory. CD CHANGER: selection of the next CD. Selection of the next item on a menu.
RADIO: automatic search for a higher frequency. CD/MP3/USB/JUKEBOX/CD CHANGER: selection of the next track. CD/USB/CD CHANGER: continuous press: fast forwards play.
RADIO: automatic search for a lower frequency. CD/MP3/USB/JUKEBOX/CD CHANGER: selection of the previous track. CD/USB/CD CHANGER: continuous press: fast backwards play.
- Change of sound source. � � �-� � �C�o�n�fi� �r�m�a�t�i�o�n� �o�f� �a� �s�e�l�e�c�t�i�o�n�.� - Pick up/Hang up the telephone. - Press for more than 2 seconds: access to the telephone menu.
Volume increase.
Volume decrease.
Mute: by pressing the volume increase and decrease buttons simultaneously.
Restore the sound: by pressing one of the two volume buttons.
Page 162 of 221

11
�2�2
�3�3
�5�5
�6�6
�4�4
�0�6
9.31
DIAL
MAKING TELEPHONE CALLS
CALLING A CONTACT
Turn the dial and select the DIAL function.
Press the PICK UP button to display the telephone short-cut menu.
� �P�r�e�s�s� �t�h�e� �d�i�a�l� �t�o� �c�o�n�fi� �r�m� �t�h�e� �s�e�l�e�c�t�i�o�n�.�
Dial the telephone number of your contact using the alphanumeric keypad.
Press the PICK UP button to call the number dialled.
Press the HANG UP button to end the call.
ACCEPTING OR REFUSING A CALL
Press the PICK UP button to accept a call.
Press the HANG UP button to refuse a call.
Press the end of the steering wheel stalk for more than 2 seconds to access the telephone menu: calls log, directory, voice mailbox.
To select the telephone used, press MENU, then select TELEMATICS, then BLUETOOTH FUNCTIONS, then BLUETOOTH ACTIVATION MODE. Then sel ect: - DEACTIVATED: to use the internal telephone, - ACTIVATED AND VISIBLE: to use the bluetooth telephone, visible to all telephones, - ACTIVATED AND NOT VISIBLE: to use the bluetoo th telephone, not visible to other telephones, it is not possible to match a new telephone.
Select CALL LIST or PHONE BOOK and press OK. Selec t the �n�u�m�b�e�r� �r�e�q�u�i�r�e�d� �a�n�d� �c�o�n�fi� �r�m� �t�o� �m�a�k�e� �t�h�e� �c�a�l�l�.�
Page 178 of 221

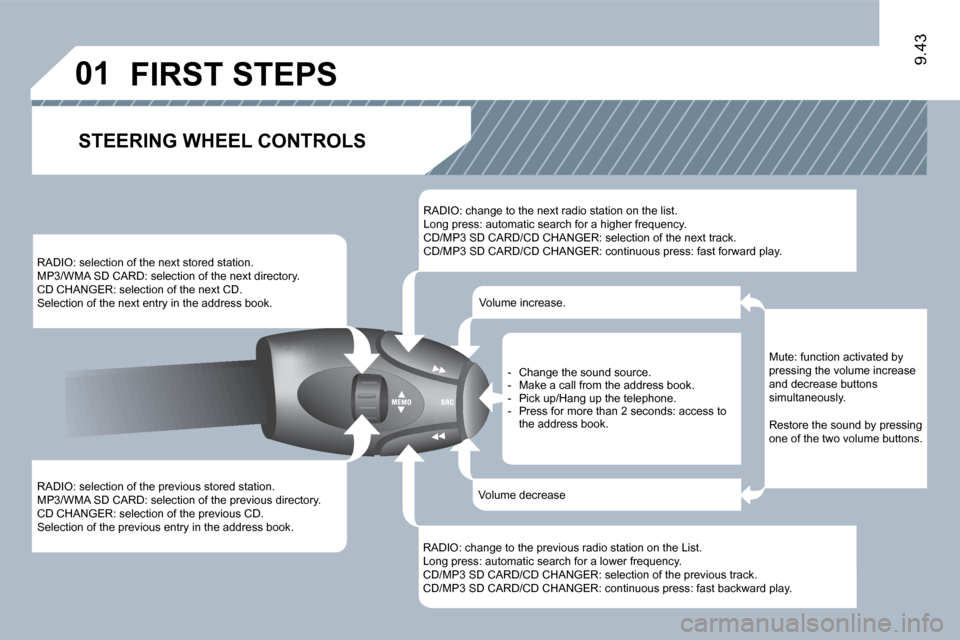
01
9.43
RADIO: selection of the previous stored station. MP3/WMA SD CARD: selection of the previous directory. CD CHANGER: selection of the previous CD. Selection of the previous entry in the address book.
RADIO: selection of the next stored station. MP3/WMA SD CARD: selection of the next directory. CD CHANGER: selection of the next CD. Selection of the next entry in the address book.
RADIO: change to the next radio station on the list. Long press: automatic search for a higher frequency. CD/MP3 SD CARD/CD CHANGER: selection of the next track. CD/MP3 SD CARD/CD CHANGER: continuous press: fast forward play.
RADIO: change to the previous radio station on the List. Long press: automatic search for a lower frequency. CD/MP3 SD CARD/CD CHANGER: selection of the previous track. CD/MP3 SD CARD/CD CHANGER: continuous press: fast backward play.
- Change the sound source. - Make a call from the address book. - Pick up/Hang up the telephone. - Press for more than 2 seconds: access to the address book.
Volume increase.
Volume decrease
STEERING WHEEL CONTROLS
Mute: function activated by pressing the volume increase and decrease buttons simultaneously.
Restore the sound by pressing one of the two volume buttons.
FIRST STEPS
Page 194 of 221

�2
�3
11
�2
�3
9.59
Press the end of the steering wheel control to accept the call or end the call in progress.
Select the "Yes" tab to accept or "No" �t�o� �r�e�f�u�s�e� �a�n�d� �c�o�n�fi� �r�m� �b�y� �p�r�e�s�s�i�n�g� �t�h�e� dial.
� � �R�E�C�E�I�V�I�N�G� �A� �C�A�L�L� MAKING A CALL
An incoming call is announced by a ring and a superimpperimposed display on the multifunction screen.
YES
To hang up, press the PHONE button or press the dial and select "End call" �t�h�e�n� �c�o�n�fi� �r�m� �b�y� �p�r�e�s�s�i�n�g� �t�h�e� �d�i�a�l�.�
END CALL
Press the PHONE button.
Press the end of the steering wheel control for more thare than two seconds to gain access to the address book.
It is also possible to select a number from the address bress book. You can select "Dial from address book". The MyWay permits theits the recording of up to 4 000 entries.
Select "Dial number", then dial the telephone number using the virtual keypad.
Select the "Phone" Menu function and �p�r�e�s�s� �t�h�e� �d�i�a�l� �t�o� �c�o�n�fi� �r�m�.�
DIAL NUMBER
"PHONE" MENU
The list of the last 20 calls made and received in the vehhe vehicle appears under "Phone" Menu. You can select a number and pre sd press the dial to make the call.
NO
Page 202 of 221

01
9.69
RADIO: selection of the next stored station. CD CHANGER: selection of the next CD. USB: selection of the next genre/artist/folder from �t�h�e� �c�l�a�s�s�i�fi� �c�a�t�i�o�n� �l�i�s�t�.� Selection of the next item on a menu.
RADIO: selection of the previous stored station. CD CHANGER: selection of the previous CD. USB: selection of the previous genre/artist/folder �f�r�o�m� �t�h�e� �c�l�a�s�s�i�fi� �c�a�t�i�o�n� �l�i�s�t�.� Selection of the previous item on a menu.
RADIO: automatic search for a higher frequency. CD/CD CHANGER/MP3/USB: selection of the next track. CD/CD CHANGER/USB: continuous press: fast forwards play. Selection of the previous item.
RADIO: automatic search for a lower frequency. CD/CD CHANGER/MP3/USB: selection of the previous track. CD/CD CHANGER/USB: continuous press: fast backwards play. Selection of the next item.
Volume increase.
Volume decrease.
FIRST STEPS
Mute: by pressing the volume increase and decrease buttons simultaneously.
Restore the sound: by pressing one of the two volume buttons.
- Change of sound source. � � �-� � �C�o�n�fi� �r�m�a�t�i�o�n� �o�f� �a� �s�e�l�e�c�t�i�o�n�.� - Pick up/Hang up the telephone. - Press for more than 2 seconds: access to the telephone menu.
STEERING WHEEL CONTROLS