ESP Citroen JUMPY MULTISPACE 2011 2.G Owner's Guide
[x] Cancel search | Manufacturer: CITROEN, Model Year: 2011, Model line: JUMPY MULTISPACE, Model: Citroen JUMPY MULTISPACE 2011 2.GPages: 268, PDF Size: 10.1 MB
Page 138 of 268
136
Changing a fuse
CHANGING A FUSE
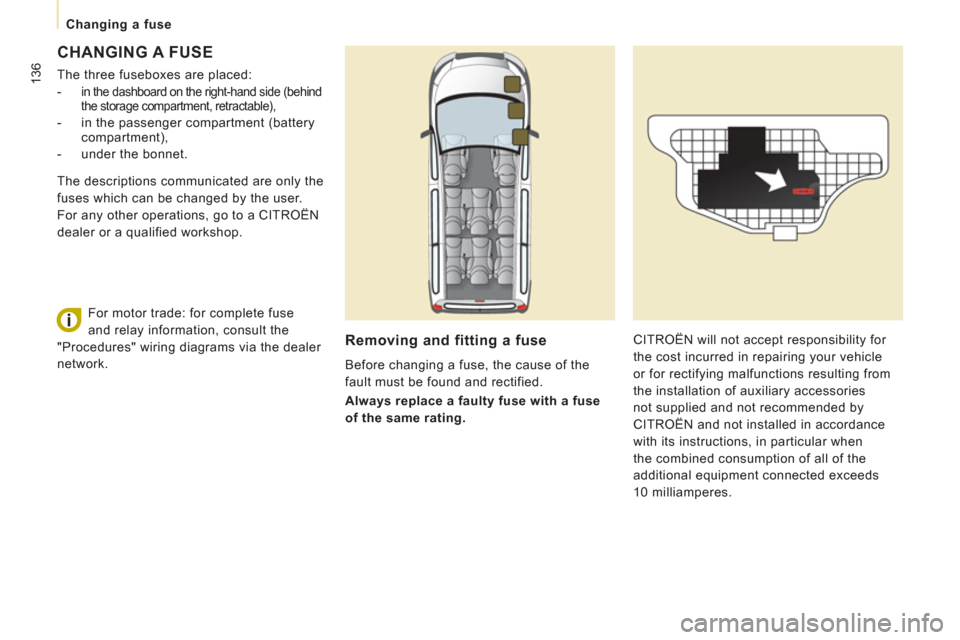
The three fuseboxes are placed:
-
in the dashboard on the right-hand side (behind
the storage compartment, retractable),
- in the passenger compartment (battery
compartment),
- under the bonnet.
Removing and fitting a fuse
Before changing a fuse, the cause of the
fault must be found and rectified.
Always replace a faulty fuse with a fuse
of the same rating. CITROËN will not accept responsibility for
the cost incurred in repairing your vehicle
or for rectifying malfunctions resulting from
the installation of auxiliary accessories
not supplied and not recommended by
CITROËN and not installed in accordance
with its instructions, in particular when
the combined consumption of all of the
additional equipment connected exceeds
10 milliamperes. The descriptions communicated are only the
fuses which can be changed by the user.
For any other operations, go to a CITROËN
dealer or a qualified workshop.
For motor trade: for complete fuse
and relay information, consult the
"Procedures" wiring diagrams via the dealer
network.
Page 139 of 268
137
Changing a fuse
QUICK HEL
P
7
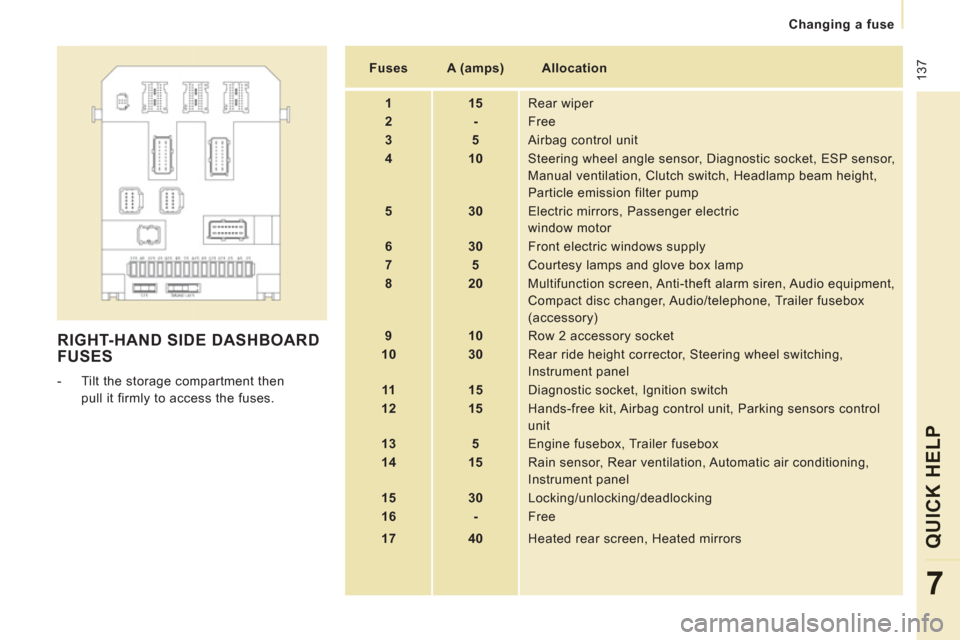
RIGHT-HAND SIDE DASHBOARD
FUSES
- Tilt the storage compartment then
pull it firmly to access the fuses.
Fuses
A (amps)
Allocation
1
15
Rear wiper
2
-
Free
3
5
Airbag control unit
4
10
Steering wheel angle sensor, Diagnostic socket, ESP sensor,
Manual ventilation, Clutch switch, Headlamp beam height,
Particle emission filter pump
5
30
Electric mirrors, Passenger electric
window motor
6
30
Front electric windows supply
7
5
Courtesy lamps and glove box lamp
8
20
Multifunction screen, Anti-theft alarm siren, Audio equipment,
Compact disc changer, Audio/telephone, Trailer fusebox
(accessory)
9
10
Row 2 accessory socket
10
30
Rear ride height corrector, Steering wheel switching,
Instrument panel
11
15
Diagnostic socket, Ignition switch
12
15
Hands-free kit, Airbag control unit, Parking sensors control
unit
13
5
Engine fusebox, Trailer fusebox
14
15
Rain sensor, Rear ventilation, Automatic air conditioning,
Instrument panel
15
30
Locking/unlocking/deadlocking
16
-
Free
17
40
Heated rear screen, Heated mirrors
Page 141 of 268
139
Changing a fuse
QUICK HEL
P
7
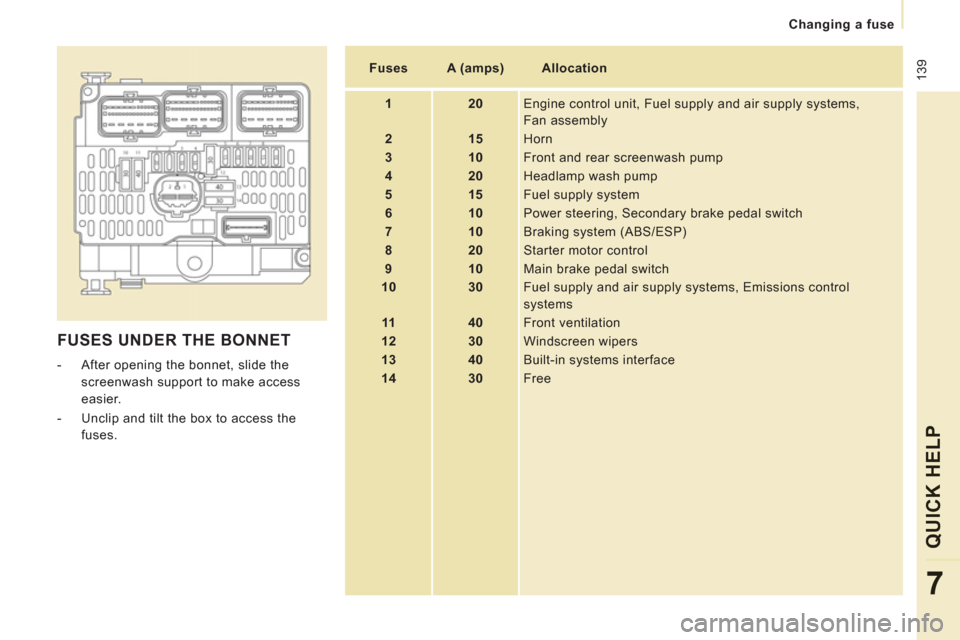
FUSES UNDER THE BONNET
- After opening the bonnet, slide the
screenwash support to make access
easier.
- Unclip and tilt the box to access the
fuses.
Fuses
A (amps)
Allocation
1
20
Engine control unit, Fuel supply and air supply systems,
Fan assembly
2
15
Horn
3
10
Front and rear screenwash pump
4
20
Headlamp wash pump
5
15
Fuel supply system
6
10
Power steering, Secondary brake pedal switch
7
10
Braking system (ABS/ESP)
8
20
Starter motor control
9
10
Main brake pedal switch
10
30
Fuel supply and air supply systems, Emissions control
systems
11
40
Front ventilation
12
30
Windscreen wipers
13
40
Built-in systems interface
14
30
Free
Page 178 of 268
9.26
06
1
2
4
3
5
1
2
3
AUDIO/VIDEO
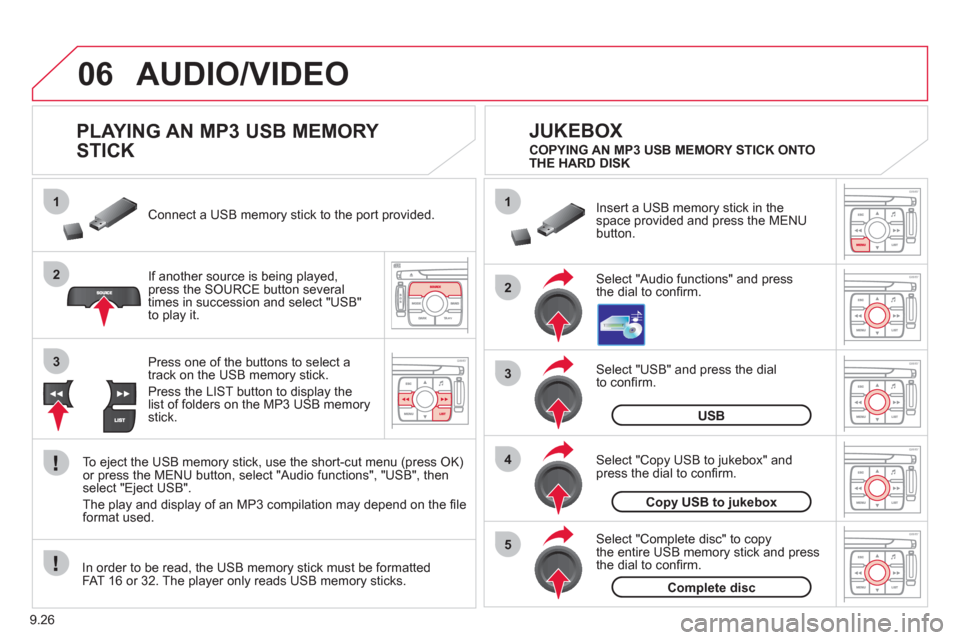
PLAYING AN MP3 USB MEMORY
STICK
If another source is being played,press the SOURCE button several
times in succession and select "USB"
to play it. Connect a USB memor
y stick to the port provided.
To e
ject the USB memory stick, use the short-cut menu (press OK)or press the MENU button, select "Audio functions", "USB", then
select "Eject USB".
The pla
y and display of an MP3 compilation may depend on the fi le
format used.
Select "USB" and press the dial
to confi rm.
Insert a U
SB memory stick in thespace provided and press the MENUbutton.
JUKEBOX
USB
Select "Complete disc" to copythe entire USB memory stick and press
the dial to confi rm.
Complete disc
Select "Copy USB to jukebox" andpress the dial to confi rm.
Copy USB to jukebox
Select "Audio functions" and press
the dial to confi rm.
Pr
ess one of the buttons to select atrack on the USB memory stick.
Press the LIST button to displa
y the list of folders on the MP3 USB memorystick. COPYING AN MP3 USB MEMORY STICK ONTO
THE HARD DISK
In order to be read, the USB memor
y stick must be formatted
FAT 16 or 32. The player only reads USB memory sticks.
Page 217 of 268
9.65
06
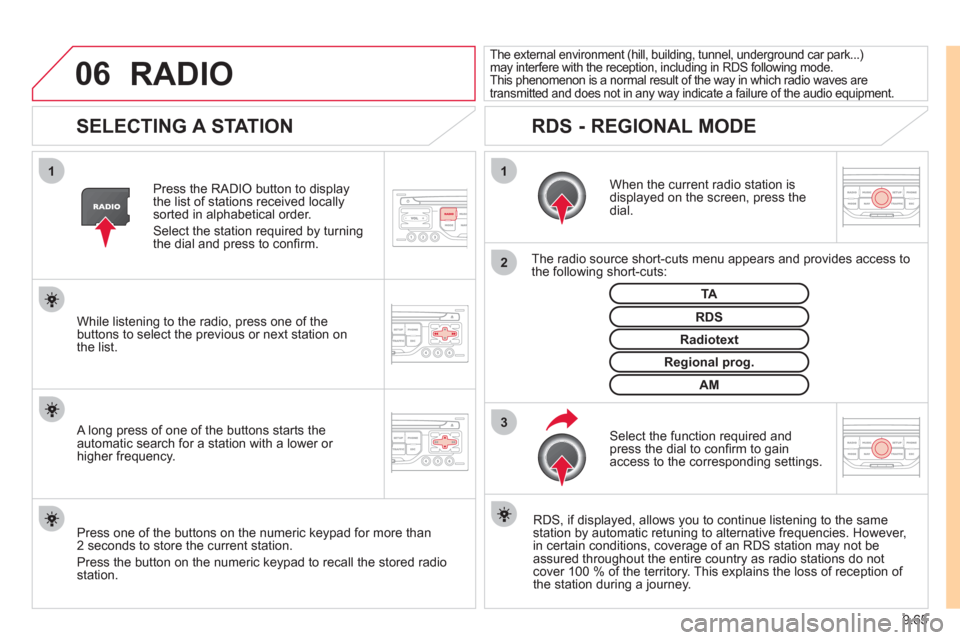
3 2 1 1
SELECTING A STATION
When the current radio station isdisplayed on the screen, press thedial.
The radio source short-cuts menu appears and provides access to
the following short-cuts:
Select the function re
quired and press the dial to confi rm to gain
access to the corresponding settings.
TA
RDS, if displayed, allows you to continue listening to the same station by automatic retuning to alternative frequencies. However,
in certain conditions, coverage of an RDS station may not be
assured throughout the entire country as radio stations do notcover 100 % of the territory. This explains the loss of reception of
the station during a journey.
The external environment (hill, building, tunnel, underground car park...)may interfere with the reception, including in RDS following mode.
This phenomenon is a normal result of the way in which radio waves are
transmitted and does not in any way indicate a failure of the audio equipment.
RDS - REGIONAL MODE
Press the RADIO button to display
the list of stations received locally sorted in alphabetical order.
Select the station required by turningthe dial and press to confi rm.
Re
gional prog.
Radiotext
RDSWhile listening to the radio, press one of the
buttons to select the previous or next station on
the list.
Press one o
f the buttons on the numeric keypad for more than
2 seconds to store the current station.
Press the button on the numeric keypad to recall the stored radio
station.
AM
A long press of one of the buttons starts theautomatic search for a station with a lower or
higher frequency.
RADIO
Page 228 of 268
9.76
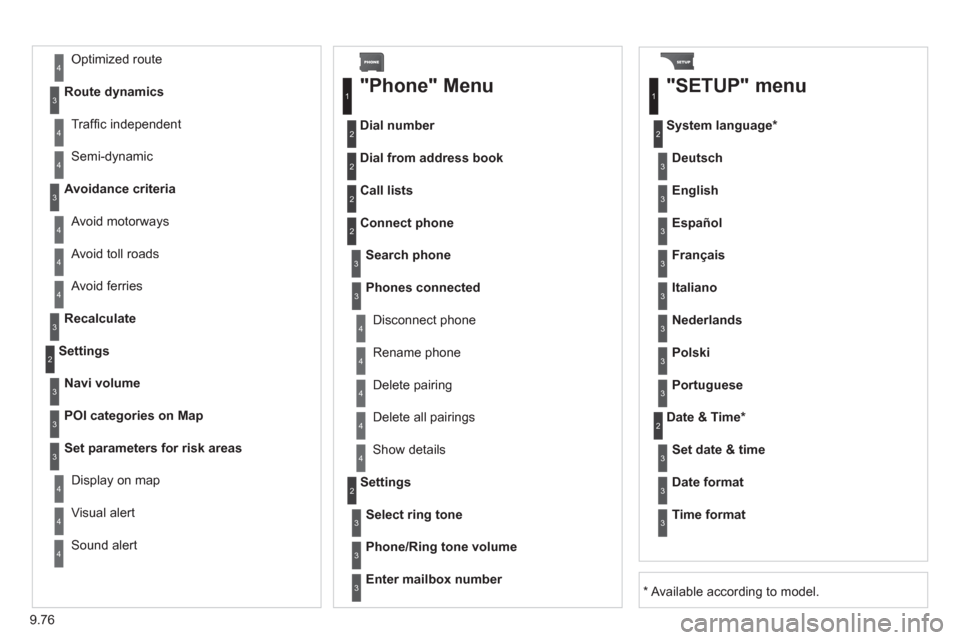
Avoid ferries
Recalculate
Settings
Navi volum
e
POI categories on Map
Set
parameters for risk areas
Displa
y on map
Vi
sual alert
Sound alert
3
2
4
3
3
3
4
4
Dial number
Dial from address book
"Phone" Menu
Search phone
Call lists
Connect
phone
Select rin
g tone
Phone/Ring tone volume
Phones connected
Enter mailbox number
Settin
gs Disconnect phone
Rename phone
Delete pairing
Delete all pairings
Show details
"SETUP" menu
System language *
English
Español
Deutsch
Italiano
Français
Nederlands
Polski
Portuguese
Date & Time *
Set date & tim
e
Date format
Time format
1
2
2
2
2
3
3
4
4
4
4
4
2
3
3
3
1
2
3
3
3
3
3
3
3
3
3
3
3
2
Avoid motorways Route d
ynamics
Traffi c inde
pendent
Semi-d
ynamic
Avoidance criteria
Avoid toll roads
Optimized route
3
3
4
4
4
4
4
*
Available according to model.
4
Page 232 of 268
9.80
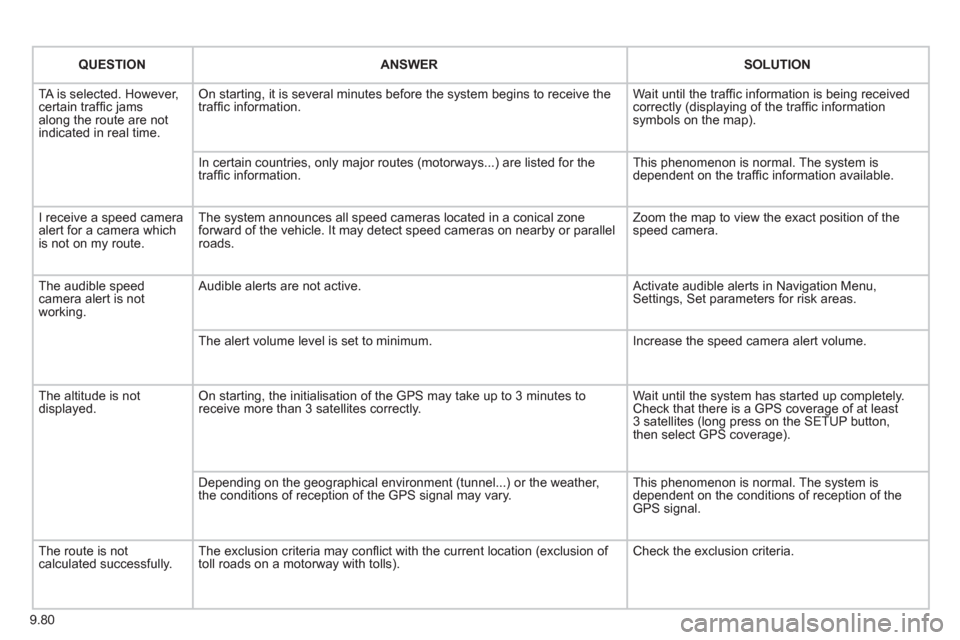
QUESTIONANSWER SOLUTION
TA is selected. However, certain traffi c jams
along the route are not
indicated in real time.
On starting, it is several minutes before the system begins to receive the
traffi c information. Wait until the traffi c information is being received correctly (displaying of the traffi c information symbols on the map).
In certain countries, onl
y major routes (motorways...) are listed for the
traffi c information. This phenomenon is normal. The system is
dependent on the traffi c information available.
I receive a speed camera
alert for a camera which
is not on my route.The system announces all speed cameras located in a conical zoneforward of the vehicle. It may detect speed cameras on nearby or parallel roads. Zoom the map to view the exact position o
f thespeed camera.
The audible speed
camera alert is not
working. A
udible alerts are not active. Activate audible alerts in Navigation Menu, Settings, Set parameters for risk areas.
Th
e alert volume level is set to minimum. Increase the speed camera alert volume.
Th
e altitude is not displayed. On starting, the initialisation of the GPS may take up to 3 minutes toreceive more than 3 satellites correctly. Wait until the system has started up completely.
Check that there is a GPS coverage of at least
3 satellites (long press on the SETUP button,
then select GPS coverage).
Dependin
g on the geographical environment (tunnel...) or the weather,
the conditions of reception of the GPS signal may vary. This phenomenon is normal. The system is
dependent on the conditions of reception of the
GPS signal.
The route is notcalculated successfully.The exclusion criteria may confl ict with the current location (exclusion of
toll roads on a motorway with tolls). Check the exclusion criteria.
Page 251 of 268

9.99
09
DISPLAY ADJUST
MONTH
DATE
HOUR
MINUTES
YEAR
12 H/24 H MODE
LANGUAGE
ITALIANO
NEDERLANDS
PORTUGUES
PORTUGUES-BRASIL
FRANCAIS
DEUTSCH
ENGLISH
ESPANOL
1
2
2
2
2
2
2
1
2
2
2
2
2
2
2
2
Page 257 of 268
15
1
Exterior
VISUAL SEARC
H
10
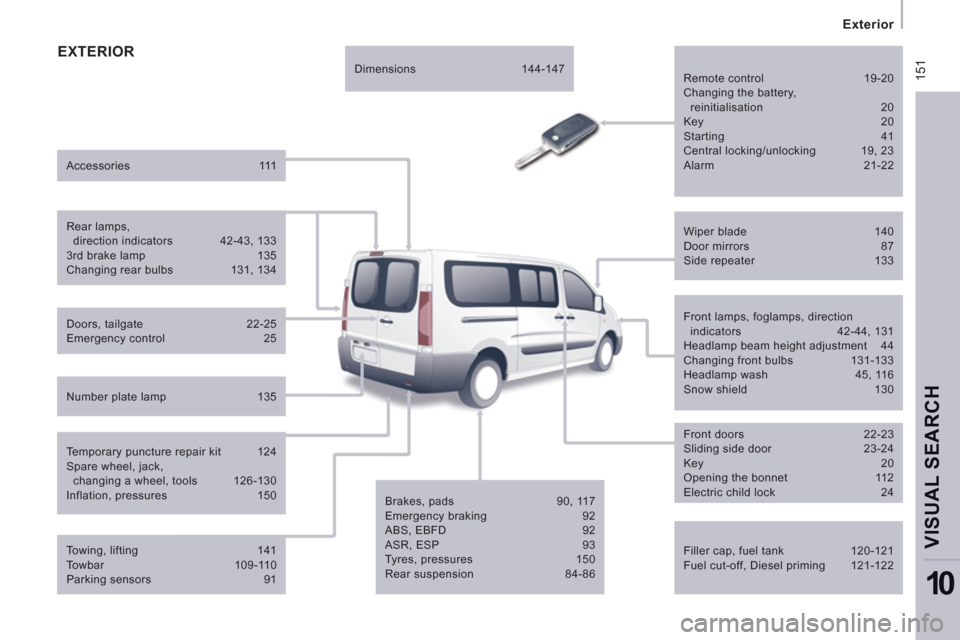
EXTERIOR
Filler cap, fuel tank 120-121
Fuel cut-off, Diesel priming 121-122
Wiper blade 140
Door mirrors 87
Side repeater 133
Front lamps, foglamps, direction
indicators 42-44, 131
Headlamp beam height adjustment 44
Changing front bulbs 131-133
Headlamp wash 45, 116
Snow shield 130
Front doors 22-23
Sliding side door 23-24
Key 20
Opening the bonnet 112
Electric child lock 24
Brakes, pads 90, 117
Emergency braking 92
ABS, EBFD 92
ASR, ESP 93
Tyres, pressures 150
Rear suspension 84-86
Doors, tailgate 22-25
Emergency control 25
Accessories 111
Number plate lamp 135
Dimensions 144-147
Temporary puncture repair kit 124
Spare wheel, jack,
changing a wheel, tools 126-130
Inflation, pressures 150
Remote control 19-20
Changing the battery,
reinitialisation 20
Key 20
Starting 41
Central locking/unlocking 19, 23
Alarm 21-22
Towing, lifting 141
Towbar 109-110
Parking sensors 91
Rear lamps,
direction indicators 42-43, 133
3rd brake lamp 135
Changing rear bulbs 131, 134
Page 259 of 268
15
3
Instruments and controls
VISUAL SEARC
H
10
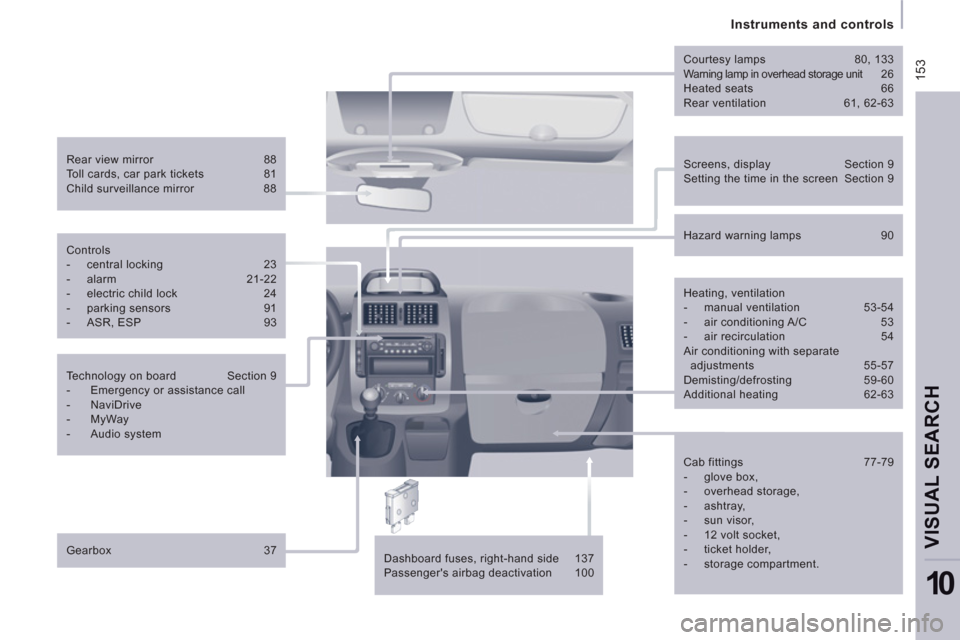
Screens, display Section 9
Setting the time in the screen Section 9
Rear view mirror 88
Toll cards, car park tickets 81
Child surveillance mirror 88
Courtesy lamps 80, 133
Warning lamp in overhead storage unit 2 6
Heated seats 66
Rear ventilation 61, 62-63
Dashboard fuses, right-hand side 137
Passenger's airbag deactivation 100
Controls
- central locking 23
- alarm 21-22
- electric child lock 24
- parking sensors 91
- ASR, ESP 93
Technology on board Section 9
- Emergency or assistance call
- NaviDrive
- MyWay
- Audio system
Gearbox 37
Hazard warning lamps 90
Heating, ventilation
- manual ventilation 53-54
- air conditioning A/C 53
- air recirculation 54
Air conditioning with separate
adjustments 55-57
Demisting/defrosting 59-60
Additional heating 62-63
Cab fittings 77-79
- glove box,
- overhead storage,
- ashtray,
- sun visor,
- 12 volt socket,
- ticket holder,
- storage compartment.