Charge Citroen JUMPY MULTISPACE 2011 2.G Owner's Manual
[x] Cancel search | Manufacturer: CITROEN, Model Year: 2011, Model line: JUMPY MULTISPACE, Model: Citroen JUMPY MULTISPACE 2011 2.GPages: 268, PDF Size: 10.1 MB
Page 2 of 268
YOUR HANDBOOK
ON THE INTERNET!
CITROËN lets you view your vehicle's
documentation on line, to see earlier versions
and the latest information, simply and free
of charge.
Connect to http://service.citroen.com
:
1|
Select your language and register,
click on the link in the "Private customer access" zone to consult the
vehicle documentation; a window opens providing access to all of the
handbooks,
select your vehicle, choose the body type then the date of issue of the
handbook,
fi nally, click on the heading of your choice.
2|
3 |
4 |
Page 32 of 268
30
Instruments and controls
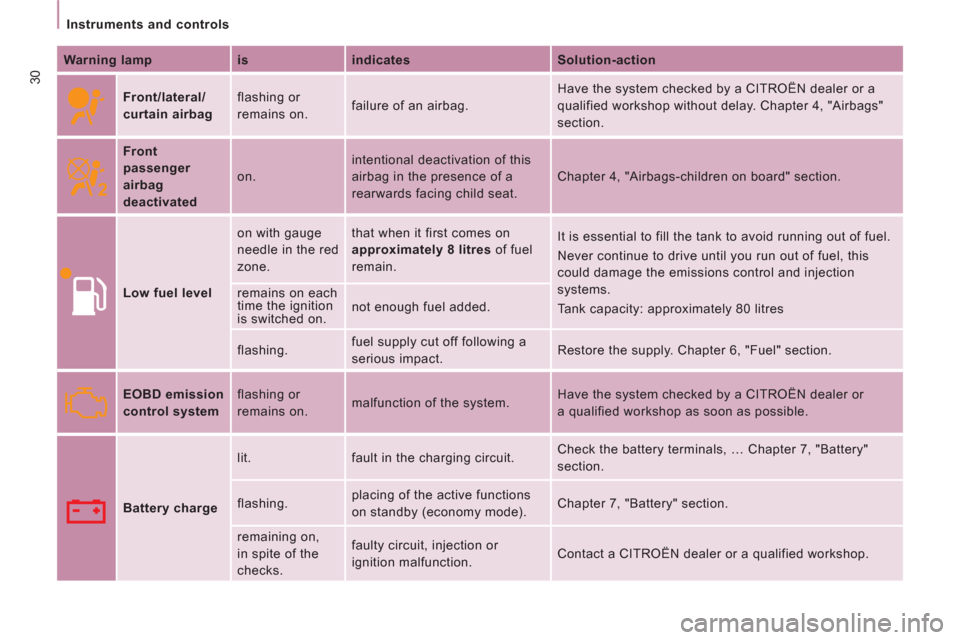
Warning lamp
is
indicates
Solution-action
Front/lateral/
curtain airbag flashing or
remains on. failure of an airbag. Have the system checked by a CITROËN dealer or a
qualified workshop without delay. Chapter 4, "Airbags"
section.
Front
passenger
airbag
deactivated on. intentional deactivation of this
airbag in the presence of a
rearwards facing child seat. Chapter 4, "Airbags-children on board" section.
Low fuel level on with gauge
needle in the red
zone. that when it first comes on
approximately 8 litres
of fuel
remain. It is essential to fill the tank to avoid running out of fuel.
Never continue to drive until you run out of fuel, this
could damage the emissions control and injection
systems.
Tank capacity: approximately 80 litres remains on each
time the ignition
is switched on. not enough fuel added.
flashing. fuel supply cut off following a
serious impact. Restore the supply. Chapter 6, "Fuel" section.
EOBD emission
control system flashing or
remains on. malfunction of the system. Have the system checked by a CITROËN dealer or
a qualified workshop as soon as possible.
Battery charge lit. fault in the charging circuit. Check the battery terminals, … Chapter 7, "Battery"
section.
flashing. placing of the active functions
on standby (economy mode). Chapter 7, "Battery" section.
remaining on,
in spite of the
checks. faulty circuit, injection or
ignition malfunction. Contact a CITROËN dealer or a qualified workshop.
Page 43 of 268
41
READY to GO
2
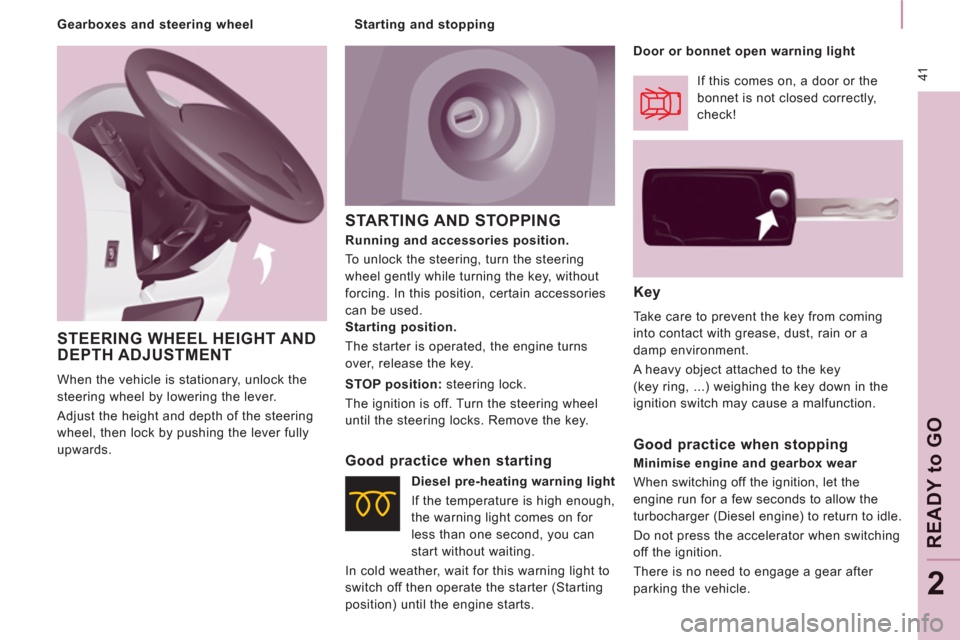
STARTING AND STOPPING
Key
Take care to prevent the key from coming
into contact with grease, dust, rain or a
damp environment.
A heavy object attached to the key
(key ring, ...) weighing the key down in the
ignition switch may cause a malfunction.
Starting position.
The starter is operated, the engine turns
over, release the key.
STOP position:
steering lock.
The ignition is off. Turn the steering wheel
until the steering locks. Remove the key.
Good practice when starting
If this comes on, a door or the
bonnet is not closed correctly,
check!
Diesel pre-heating warning light
If the temperature is high enough,
the warning light comes on for
less than one second, you can
start without waiting.
In cold weather, wait for this warning light to
switch off then operate the starter (Starting
position) until the engine starts.
Good practice when stopping
Minimise engine and gearbox wear
When switching off the ignition, let the
engine run for a few seconds to allow the
turbocharger (Diesel engine) to return to idle.
Do not press the accelerator when switching
off the ignition.
There is no need to engage a gear after
parking the vehicle.
Running and accessories position.
To unlock the steering, turn the steering
wheel gently while turning the key, without
forcing. In this position, certain accessories
can be used.
Door or bonnet open warning light
STEERING WHEEL HEIGHT ANDDEPTH ADJUSTMENT
When the vehicle is stationary, unlock the
steering wheel by lowering the lever.
Adjust the height and depth of the steering
wheel, then lock by pushing the lever fully
upwards.
Starting and stopping
Gearboxes and steering wheel
Page 87 of 268
85
Rear suspension
EASE OF USE and COMFOR
T
3
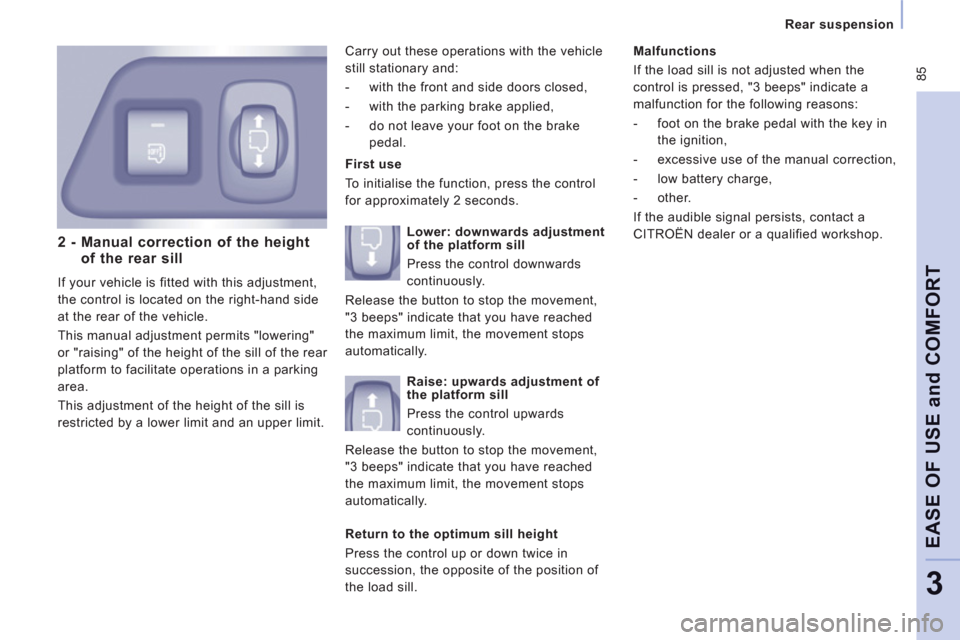
2 - Manual correction of the height of the rear sill
If your vehicle is fitted with this adjustment,
the control is located on the right-hand side
at the rear of the vehicle.
This manual adjustment permits "lowering"
or "raising" of the height of the sill of the rear
platform to facilitate operations in a parking
area.
This adjustment of the height of the sill is
restricted by a lower limit and an upper limit.
First use
To initialise the function, press the control
for approximately 2 seconds.
Malfunctions
If the load sill is not adjusted when the
control is pressed, "3 beeps" indicate a
malfunction for the following reasons:
- foot on the brake pedal with the key in
the ignition,
- excessive use of the manual correction,
- low battery charge,
- other.
If the audible signal persists, contact a
CITROËN dealer or a qualified workshop. Carry out these operations with the vehicle
still stationary and:
- with the front and side doors closed,
- with the parking brake applied,
- do not leave your foot on the brake
pedal.
Lower: downwards adjustment
of the platform sill
Press the control downwards
continuously.
Release the button to stop the movement,
"3 beeps" indicate that you have reached
the maximum limit, the movement stops
automatically.
Raise: upwards adjustment of
the platform sill
Press the control upwards
continuously.
Release the button to stop the movement,
"3 beeps" indicate that you have reached
the maximum limit, the movement stops
automatically.
Return to the optimum sill height
Press the control up or down twice in
succession, the opposite of the position of
the load sill.
Page 96 of 268
94
Seat belts
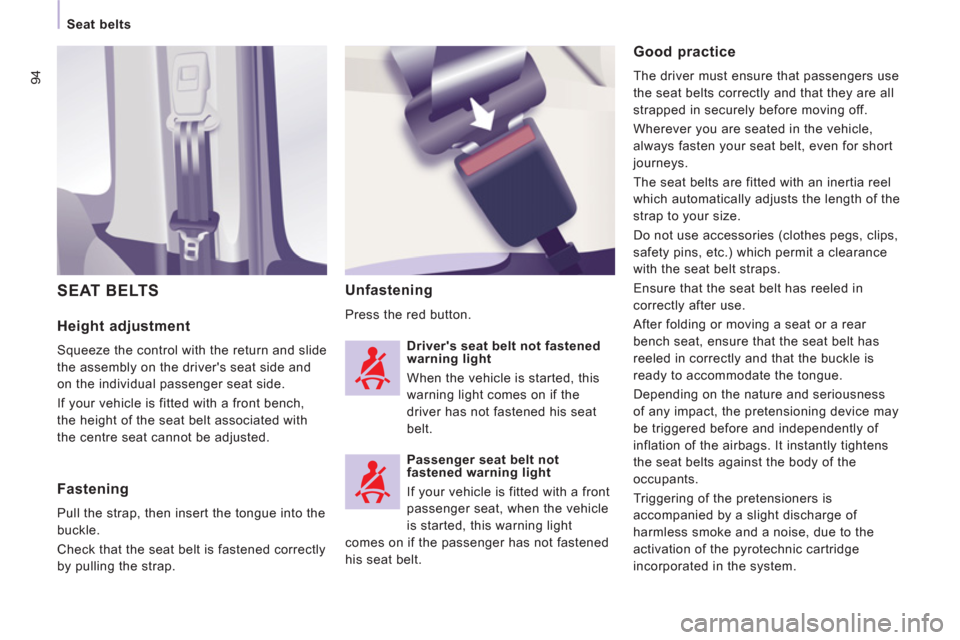
Height adjustment
Squeeze the control with the return and slide
the assembly on the driver's seat side and
on the individual passenger seat side.
If your vehicle is fitted with a front bench,
the height of the seat belt associated with
the centre seat cannot be adjusted.
Unfastening
Press the red button.
SEAT BELTS
Good practice
The driver must ensure that passengers use
the seat belts correctly and that they are all
strapped in securely before moving off.
Wherever you are seated in the vehicle,
always fasten your seat belt, even for short
journeys.
The seat belts are fitted with an inertia reel
which automatically adjusts the length of the
strap to your size.
Do not use accessories (clothes pegs, clips,
safety pins, etc.) which permit a clearance
with the seat belt straps.
Ensure that the seat belt has reeled in
correctly after use.
After folding or moving a seat or a rear
bench seat, ensure that the seat belt has
reeled in correctly and that the buckle is
ready to accommodate the tongue.
Depending on the nature and seriousness
of any impact, the pretensioning device may
be triggered before and independently of
inflation of the airbags. It instantly tightens
the seat belts against the body of the
occupants.
Triggering of the pretensioners is
accompanied by a slight discharge of
harmless smoke and a noise, due to the
activation of the pyrotechnic cartridge
incorporated in the system.
Fastening
Pull the strap, then insert the tongue into the
buckle.
Check that the seat belt is fastened correctly
by pulling the strap.
Driver's seat belt not fastened
warning light
When the vehicle is started, this
warning light comes on if the
driver has not fastened his seat
belt.
Passenger seat belt not
fastened warning light
If your vehicle is fitted with a front
passenger seat, when the vehicle
is started, this warning light
comes on if the passenger has not fastened
his seat belt.
Page 99 of 268
97
Airbags
SAFETY
4
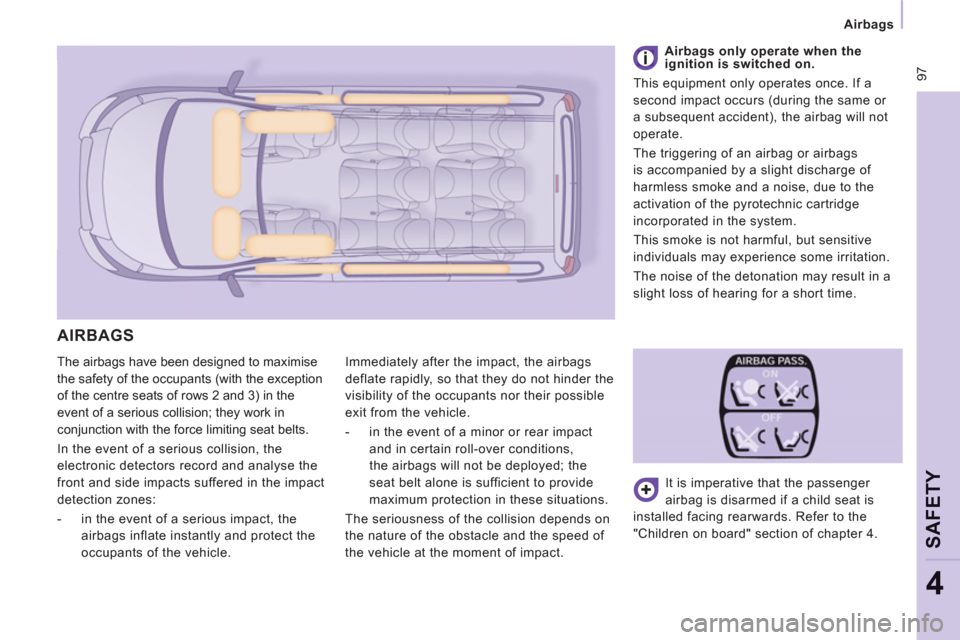
The airbags have been designed to maximise
the safety of the occupants (with the exception
of the centre seats of rows 2 and 3) in the
event of a serious collision; they work in
conjunction with the force limiting seat belts.
In the event of a serious collision, the
electronic detectors record and analyse the
front and side impacts suffered in the impact
detection zones:
- in the event of a serious impact, the
airbags inflate instantly and protect the
occupants of the vehicle. Immediately after the impact, the airbags
deflate rapidly, so that they do not hinder the
visibility of the occupants nor their possible
exit from the vehicle.
- in the event of a minor or rear impact
and in certain roll-over conditions,
the airbags will not be deployed; the
seat belt alone is sufficient to provide
maximum protection in these situations.
The seriousness of the collision depends on
the nature of the obstacle and the speed of
the vehicle at the moment of impact. It is imperative that the passenger
airbag is disarmed if a child seat is
installed facing rearwards. Refer to the
"Children on board" section of chapter 4.
Airbags only operate when the
ignition is switched on.
This equipment only operates once. If a
second impact occurs (during the same or
a subsequent accident), the airbag will not
operate.
The triggering of an airbag or airbags
is accompanied by a slight discharge of
harmless smoke and a noise, due to the
activation of the pyrotechnic cartridge
incorporated in the system.
This smoke is not harmful, but sensitive
individuals may experience some irritation.
The noise of the detonation may result in a
slight loss of hearing for a short time.
AIRBAGS
Page 125 of 268
123
Battery
QUICK HEL
P
7
BATTERY
This is housed in a compartment located
underneath the floor, in front of the front
right seat.
Before disconnecting the battery, you must
wait for 2 minutes after switching off the
ignition.
Never disconnect a terminal when the
engine is running.
Never charge a battery without first
disconnecting the terminals.
After every reconnection of the battery,
switch on the ignition and wait 1 minute
before starting to allow the electronic
systems to be initialised. If some problems
persist after this operation, please contact a
CITROËN dealer or a qualified workshop. It is advisable to disconnect the battery
if the vehicle is not to be used for a
period of more than one month. After the engine has stopped, with the key
in the ignition position, certain functions
(windscreen wiper, electric windows, courtesy
lights, audio equipment, etc.) can only be
used for a cumulative duration of thirty
minutes, to prevent discharging of the battery.
To charge the battery using a batterycharger
- Disconnect the battery,
- Follow the instructions for use given by
the battery charger manufacturer,
- Reconnect starting with the negative (-)
terminal,
- Check that the terminals and connectors
are clean. If they are covered with
sulphate (white or greenish deposit),
disconnect them and clean them.
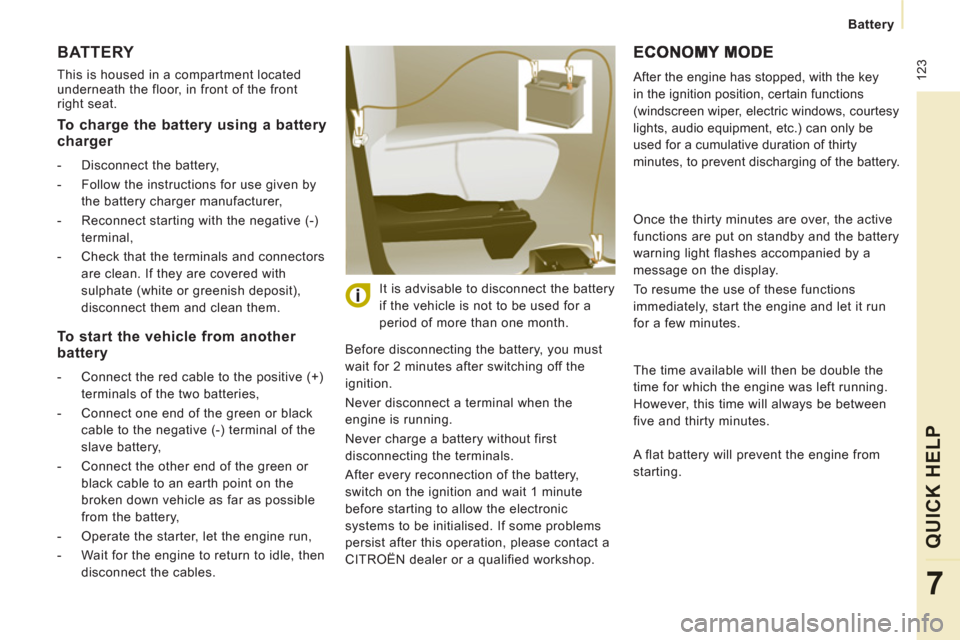
To start the vehicle from another battery
- Connect the red cable to the positive (+)
terminals of the two batteries,
- Connect one end of the green or black
cable to the negative (-) terminal of the
slave battery,
- Connect the other end of the green or
black cable to an earth point on the
broken down vehicle as far as possible
from the battery,
- Operate the starter, let the engine run,
- Wait for the engine to return to idle, then
disconnect the cables. Once the thirty minutes are over, the active
functions are put on standby and the battery
warning light flashes accompanied by a
message on the display.
To resume the use of these functions
immediately, start the engine and let it run
for a few minutes.
The time available will then be double the
time for which the engine was left running.
However, this time will always be between
five and thirty minutes.
A flat battery will prevent the engine from
starting.
Page 198 of 268
9.46
QUESTIONANSWERSOLUTION
The stored stations donot function (no sound, 87.5 Mhz is displayed...)
An incorrect waveband is selected. Press the BAND AST button to return to the waveband (AM, FM1, FM2, FMAST) on which thestations are stored.
The quality of receptionof the radio station listened to graduallydeteriorates or the stored stations do not function(no sound, 87.5 Mhz is displayed...).
The vehicle is too far from the transmitter used by the station listenedto or there is no transmitter in the geographical area through which the vehicle is travelling.
Activate the RDS function to enable the system to check whether there is a more powerful transmitter in the geographical area.
The environment (hills, buildings, tunnels, basement car parks...) block reception, including in RDS mode.
This phenomenon is normal and does not indicate a failure of the audio equipment.
The aerial is absent or has been damaged (for example when goingthrough a car wash or into an underground car park).
Have the aerial checked by a CITROËN dealer.
Sound cut-outs of 1 to2 seconds in radio mode.During this brief sound cut-out, the RDS searches for any frequency permitting better reception of the station.
Deactivate the RDS function if the phenomenon is too frequent and always on the same route.
With the engine off, the audio equipment switches off after a few minutes of use.
When the engine is switched off, the audio equipment operating timedepends on the battery charge.
The switch-off is normal: the audio equipment switches to economy mode and switches off to prevent discharging of the vehicle's battery.
Start the vehicle's engine to increase the batterycharge.
TRAFFIC INFO is selected. However,certain traffi c jams along the route are notindicated in real time.
On starting, it is several minutes before the system begins to receive thetraffi c information.
Wait until the traffi c information is being received correctly (displaying of the traffi c information symbols on the map).
In certain countries, only major routes (motorways, ...) are listed for thetraffi c information.
This phenomenon is normal. The system isdependent on the traffi c information available.
The time taken to calculate a route sometimes seems longer than usual.
The performance of the system may slow down temporarily if a CD is being copied onto the Jukebox at the same time as a route is being calculated.
Wait until the CD has been copied or stop the copying before starting the guidance function.
Page 231 of 268
9.79
QUESTIONANSWERSOLUTION
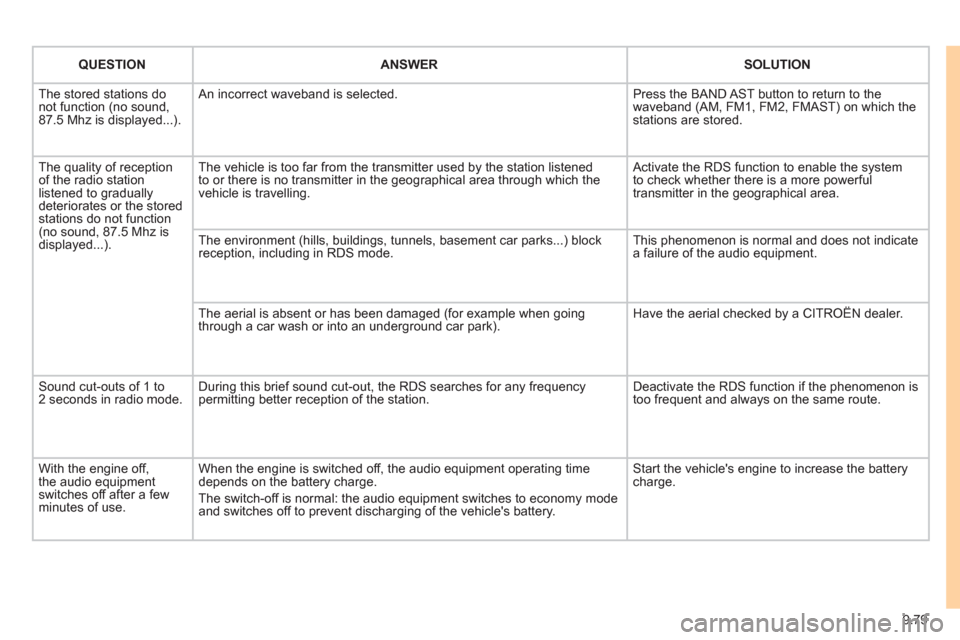
The stored stations donot function (no sound, 87.5 Mhz is displayed...).
An incorrect waveband is selected.
Press the BAND AST button to return to the waveband (AM, FM1, FM2, FMAST) on which thestations are stored.
The quality of receptionof the radio station listened to graduallydeteriorates or the stored stations do not function(no sound, 87.5 Mhz is displayed...).
The vehicle is too far from the transmitter used by the station listenedto or there is no transmitter in the geographical area through which the vehicle is travelling.
Activate the RDS function to enable the system to check whether there is a more powerful transmitter in the geographical area.
The environment (hills, buildings, tunnels, basement car parks...) block reception, including in RDS mode.
This phenomenon is normal and does not indicate a failure of the audio equipment.
The aerial is absent or has been damaged (for example when goingthrough a car wash or into an underground car park).
Have the aerial checked by a CITROËN dealer.
Sound cut-outs of 1 to2 seconds in radio mode.During this brief sound cut-out, the RDS searches for any frequency permitting better reception of the station.
Deactivate the RDS function if the phenomenon is too frequent and always on the same route.
With the engine off, the audio equipment switches off after a few minutes of use.
When the engine is switched off, the audio equipment operating timedepends on the battery charge.
The switch-off is normal: the audio equipment switches to economy mode and switches off to prevent discharging of the vehicle's battery.
Start the vehicle's engine to increase the batterycharge.
Page 255 of 268
9.103
FREQUENTLY ASKED QUESTIONS
QUESTIONANSWERSOLUTION
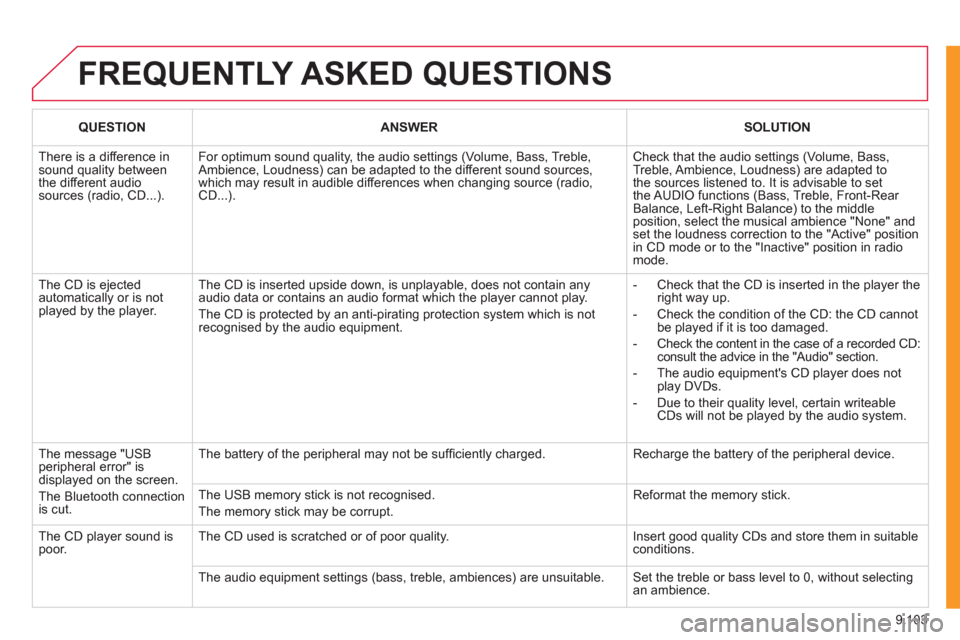
There is a difference in sound quality betweenthe different audiosources (radio, CD...).
For optimum sound quality, the audio settings (Volume, Bass, Treble, Ambience, Loudness) can be adapted to the different sound sources,which may result in audible differences when changing source (radio,CD...).
Check that the audio settings (Volume, Bass, Treble, Ambience, Loudness) are adapted tothe sources listened to. It is advisable to setthe AUDIO functions (Bass, Treble, Front-Rear Balance, Left-Right Balance) to the middle position, select the musical ambience "None" and set the loudness correction to the "Active" position in CD mode or to the "Inactive" position in radio mode.
The CD is ejected automatically or is not played by the player.
The CD is inserted upside down, is unplayable, does not contain any audio data or contains an audio format which the player cannot play.
The CD is protected by an anti-pirating protection system which is not recognised by the audio equipment.
- Check that the CD is inserted in the player the right way up.
- Check the condition of the CD: the CD cannot be played if it is too damaged.
- Check the content in the case of a recorded CD:consult the advice in the "Audio" section.
- The audio equipment's CD player does notplay DVDs.
- Due to their quality level, certain writeableCDs will not be played by the audio system.
The message "USB peripheral error" isdisplayed on the screen.
The Bluetooth connectionis cut.
The battery of the peripheral may not be suffi ciently charged.
Recharge the battery of the peripheral device.
The USB memory stick is not recognised.
The memory stick may be corrupt.
Reformat the memory stick.
The CD player sound ispoor.The CD used is scratched or of poor quality.
Insert good quality CDs and store them in suitable conditions.
The audio equipment settings (bass, treble, ambiences) are unsuitable. Set the treble or bass level to 0, without selectingan ambience.