display Citroen JUMPY MULTISPACE 2013 2.G User Guide
[x] Cancel search | Manufacturer: CITROEN, Model Year: 2013, Model line: JUMPY MULTISPACE, Model: Citroen JUMPY MULTISPACE 2013 2.GPages: 260, PDF Size: 8.79 MB
Page 97 of 260

95
Parking sensors
SAFETY
4
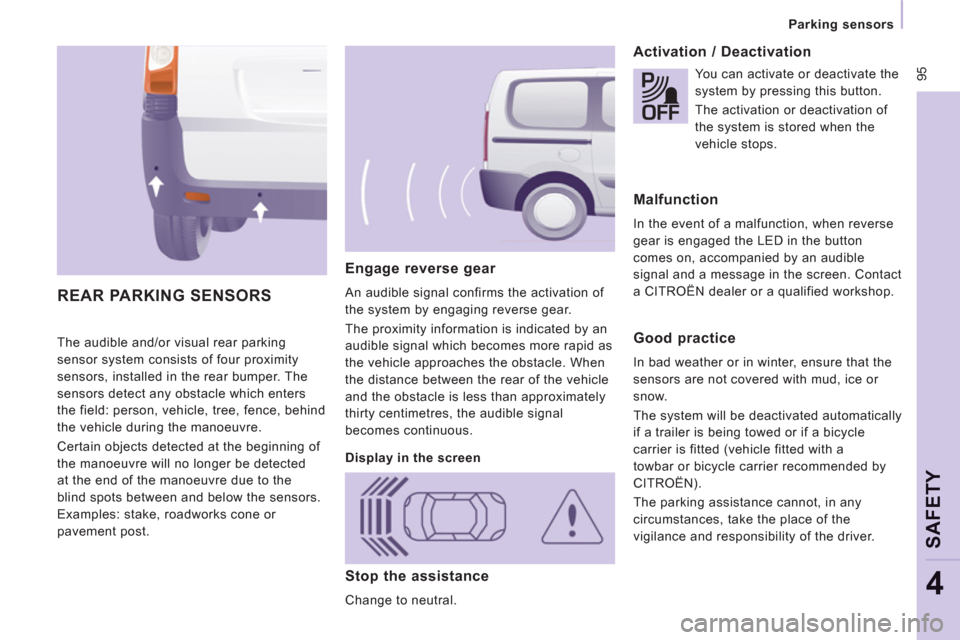
The audible and/or visual rear parking
sensor system consists of four proximity
sensors, installed in the rear bumper. The
sensors detect any obstacle which enters
the field: person, vehicle, tree, fence, behind
the vehicle during the manoeuvre.
Certain objects detected at the beginning of
the manoeuvre will no longer be detected
at the end of the manoeuvre due to the
blind spots between and below the sensors.
Examples: stake, roadworks cone or
pavement post.
Engage reverse gear
An audible signal confirms the activation of
the system by engaging reverse gear.
The proximity information is indicated by an
audible signal which becomes more rapid as
the vehicle approaches the obstacle. When
the distance between the rear of the vehicle
and the obstacle is less than approximately
thirty centimetres, the audible signal
becomes continuous.
Activation / Deactivation
REAR PARKING SENSORS
Display in the screen
You can activate or deactivate the
system by pressing this button.
The activation or deactivation of
the system is stored when the
vehicle stops.
Malfunction
In the event of a malfunction, when reverse
gear is engaged the LED in the button
comes on, accompanied by an audible
signal and a message in the screen. Contact
a CITROËN dealer or a qualified workshop.
Good practice
In bad weather or in winter, ensure that the
sensors are not covered with mud, ice or
snow.
The system will be deactivated automatically
if a trailer is being towed or if a bicycle
carrier is fitted (vehicle fitted with a
towbar or bicycle carrier recommended by
CITROËN).
The parking assistance cannot, in any
circumstances, take the place of the
vigilance and responsibility of the driver.
Stop the assistance
Change to neutral.
Page 126 of 260

124
Levels
Cooling system
Only use the fluid recommended by the
manufacturer.
Otherwise, you risk seriously damaging your
engine.
When the engine is warm, the temperature
of the coolant is controlled by the engine
fan. As this fan can operate with the ignition
key removed and because the cooling
system is pressurised, wait for at least one
hour after the engine has stopped before
carrying out any work.
Slacken the cap by 1/4 of a turn to release
the pressure to prevent any risk of scalding.
When the pressure has dropped, remove the
cap and top up the level with coolant.
If fluid has to be added frequently, this
indicates a fault which must be checked by a
CITROËN dealer or a qualified workshop as
soon as possible. The vehicle must be parked on level ground
with the engine cold. Unscrew the cap
integrated with the gauge and check the
level which must be between the MIN and
MAX marks.
Diesel additive level (Diesel
with particle emission filter)
The minimum level of this additive
is indicated by lighting of the
service warning light, accompanied by an
audible signal and a message in the screen.
When this occurs with the engine running it
is due to the start of saturation of the particle
emission filter (exceptionally prolonged
urban type driving conditions: low speed,
long traffic jams, ...).
In order to regenerate the filter, you are
advised to drive at a speed higher than
40 mph (60 km/h) for at least five minutes
as soon as possible, when traffic conditions
permit (until the message disappears and
the service warning lamp goes off).
During regeneration of the particle emission
filter, relay noise may be heard under the
dashboard.
If the message is still displayed and if the
service warning lamp remains on, contact a
CITROËN dealer or a qualified workshop.
Topping up
The level must be between the MIN and
MAX marks on the expansion bottle. If
more than 1 litre of fluid is required to top
up the level, have the system checked by a
CITROËN dealer or a qualified workshop.
Screenwash and headlamp wash level
For best quality cleaning and for your safety,
we would advise that you use products of
the CITROËN range.
Capacity of the screenwash reservoir:
approximately 4.5 litres.
If your vehicle is fitted with headlamp
washers, the capacity of the reservoir is
7.5 litres.
To ensure optimum cleaning and prevent
freezing, this fluid must not be topped up or
replaced with plain water.
Topping up
This additive must be topped up by a
CITROËN dealer or a qualified workshop
without delay.
Page 166 of 260

9.4
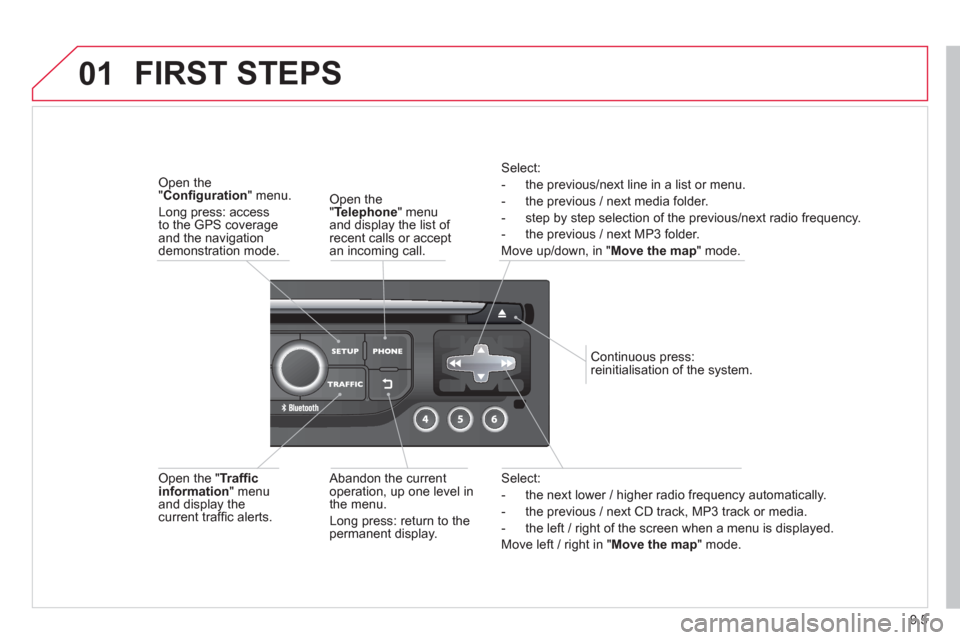
01 FIRST STEPS
Access to the" Navigation - guidance"menu and display the
recent destinations. Short
press without the engine running: on / off.
Short press with the engine
running: audio source off /
restore.
Short press: select pre-setradio station.
Lon
g press: pre-set the current station.MODE button:
Selection of the
type of permanent display.
Lon
g press: black screen(DARK).
A
ccess to the " MUSIC" menu, and display of the CD/MP3/Apple®
tracks and folders. ®
Long press: display the audio settings screen for the"MEDIA
(CD/USB/iPod/Streaming/AUX)" sources.
Long press: open the "Audio settings" menu: music ambience, bass, treble, loudness, left/right
balance, front/rear fader, automatic volume adjustment.
A
ccess to the " RADIO
" menu anddisplay the list of stations received.
Lon
g press: display the audio settingsscreen for the radio tuner source.
Selection and confi rmation OK dial:
Selection of an item on the screen or in a list or a menu, then confi rmation with a short press.
Other than for menus and lists, a short
press displays a contextual menu
depending on the current screen.
Rotation with map displa
yed: zoom the
map scale in and out.
Volume ad
justment (each
source is independent,
includin
g TA messages and
navigation instructions).
Page 167 of 260

9.5
01
Select:
- the next lower / hi
gher radio frequency automatically.
- the previous
/ next CD track, MP3 track or media.
- the le
ft / right of the screen when a menu is displayed.
Move le
ft / right in "Move the map
" mode.
Abandon the current
operation, up one level in
t
he menu.
Long press: return to thepermanent display.
Continuous
press:
reinitialisation of the system.
Open the" Telephone" menu
and display the list of recent calls or accept
an incoming call.
Open the "Confi guration
" menu.
Long press: access
to the GPS coverageand the navigation demonstration mode.
Open the "Traffi c information " menuand display thecurrent traffi c alerts.
Select:
- the previous
/next line in a list or menu.
- the previous
/ next media folder.
- step b
y step selection of the previous/next radio frequency.
- the previous / next MP3 folder.
Move up/down, in "
Move the map " mode.
FIRST STEPS
Page 168 of 260

9.6
02
For a detailed global view of the menus available, refer to the
"Screen menu map" section.
For cleaning the screen, the use of a soft, non-abrasive cloth (spectacles cloth) is recommended, with no additional product. "RADIO
"
"
TELEPHONE"
(If conversation in progress)
SETUP
: PARAMETERS
date and time, display con
fi guration, sound.
Changing the audio source:
RADIO:
RADIO broadcasts.
MUSIC: playing MUSIC. Pr
ess the MODE button several times in succession for access to the following displays:
GENERAL OPERATION
"FULL SCREEN MAP"
"MAP IN WINDOW"
(If navigation guidance in progress)
Page 169 of 260

9.7
02
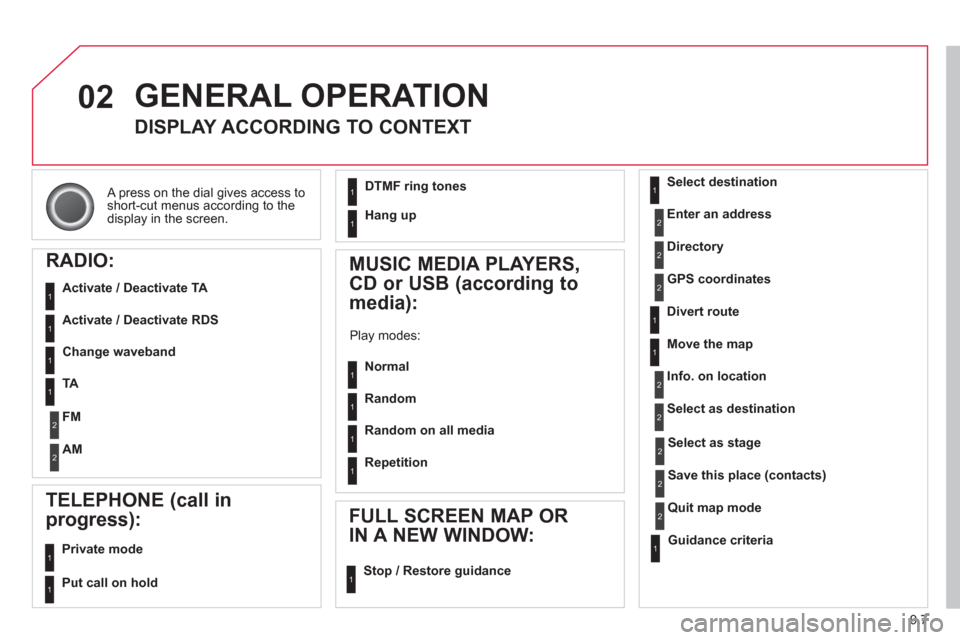
A press on the dial gives access to short-cut menus according to thedisplay in the screen.
GENERAL OPERATION
DISPLAY ACCORDING TO CONTEXT
RADIO:
Activate / Deactivate TA
Activate / Deactivate RDS
MUSIC MEDIA PLAYERS,
CD or USB
(according to
media):
Play modes:
Normal
Random
Random on all media
Repetition
TELEPHONE (call in
pro
gress):
Private mode
FULL SCREEN MAP OR
IN A NEW WINDOW:
Stop / Restore guidance Select destination
Enter an address
Directory
GPS coordinates
Divert route
Move the map
Info. on location
Select as destination
Select as sta
ge
Save this place (contacts)
Quit map mode
Guidance criteria
Put call on hold
DTMF ring tones
Hang up
1
1
1
1
1
1
1
1
2
2
2
2
2
1
2
2
2
1
1
1
1
1
1
Change waveband
F
M
AM
2
2
1
TA 1
Page 173 of 260

9.11
05
Press NAVto display the"Navigation - guidance " menu.
TOWARDS A NEW DESTINATION
NAVIGATION - GUIDANCE
SELECTING A DESTINATION
Select "Select destination
" and confi rm, then select " Enter an address"and confi rm.
Select the " Country
" function then confi rm.
Select "Town" function then confi rm to enter the destination town.
Select the letters in the name of the
town one at a time, confi rming each one
with the dial.
Selection the town from the list offered, then confi rm.
A pre-set list (by entering the fi rst few letters) of the towns in the country selected can be accessed directly by selecting and confi rming " List" on the screen. t
Turn the dial and select "OK" thenconfi rm.
If possible, enter the "
Road
" and "N°/X"
information in the same way.
Select "Archive
" to save the address entered in a contact fi le.
The s
ystem allows up to 400 contact fi les to be recorded.
Confi rm " OK
" to start guidance.
Select the guidance criteria: "Fastest
route", " Shortest route" or optimised "Distance/Time ", then select thedesired restriction criteria: "With tolls","With Ferry", or "Traffi c info" thenconfi rm "OK".
Page 174 of 260

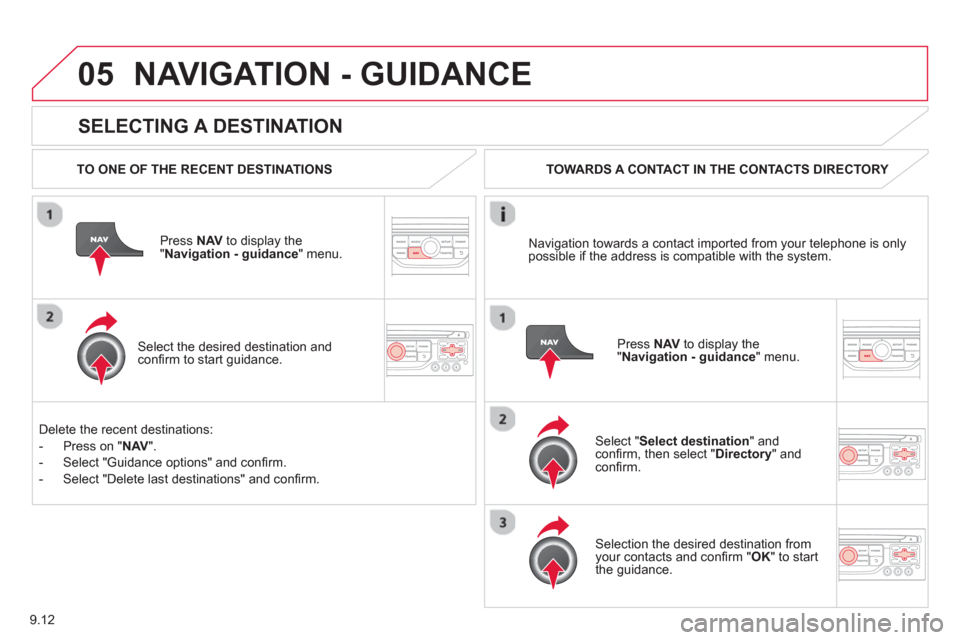
9.12
05
SELECTING A DESTINATION
NAVIGATION - GUIDANCE
TO ONE OF THE RECENT DESTINATIONS
Press NAV
to display the"Navigation - guidance" menu.
Select the desired destination and confi rm to start guidance. TOWARDS A CONTACT IN THE CONTACTS DIRECTORY
Select " Select destination" andconfi rm, then select " Directory " and confi rm.
Selection the desired destination from your contacts and confi rm " OK
" to start
the guidance.
Pr
ess NAVto display the"Navigation - guidance
" menu. Navi
gation towards a contact imported from your telephone is only
possible if the address is compatible with the system.
D
elete the recent destinations:
- Pr
ess on "NAV".
- Select "Guidance o
ptions" and confi rm.
-
Select "Delete last destinations" and confi rm.
Page 175 of 260

9.13
05
Select "Select destination" andconfi rm, then select " GPS coordinates
" and confi rm.
Enter the
GPS coordinates and confi rm "OK " to start the guidance. Pr
ess NAV
to display the
"Navigation - guidance" menu.
NAVIGATION - GUIDANCE
TOWARDS GPS COORDINATES TOWARDS A POINT ON THE MAP
With the map displa
yed, press OKto
display the contextual menu. Select"Move the map
" and confi rm.
Pr
ess OK
to display the contextual
menu for " Move the map " mode.
Select " Select as destination
" or "Select as stage" and confi rm. Move the cursor usin
g the control to
identify the desired destination.
Page 176 of 260

9.14
05
TOWARDS POINTS OF INTEREST (POI)
NAVIGATION - GUIDANCE
The points of interest (POI) indicate all of the service locations in the vicinity(hotels, various businesses, airports…).
Select the " Enter an address
" function
and confi rm, then select Select
destinationand confi rm.
To select a P
OI close to your currentlocation, select "POI" and confi rm, thenselect " Around the current place
" and confi rm.
To select a P
OI as a stage on the route,select " POI" and confi rm, then select " On
the route" and confi rm.
To select a P
OI as a destination, fi rst enter the country and town (see "Towards
a new destination"), select "POI" andconfi rm, fi nally select "Near" and confi rm.r
Search for POIs in the categories
suggested in the following pages.
Select " Search by Name
" to search for POIs by name and not byproximity.
Select the POI and confi rm " OK" to start
the guidance. Pr
ess NAV
to display the
"Navigation - guidance" menu.