light Citroen JUMPY MULTISPACE 2013 2.G Owner's Guide
[x] Cancel search | Manufacturer: CITROEN, Model Year: 2013, Model line: JUMPY MULTISPACE, Model: Citroen JUMPY MULTISPACE 2013 2.GPages: 260, PDF Size: 8.79 MB
Page 143 of 260
141
Changing a bulb
QUICK HEL
P
7
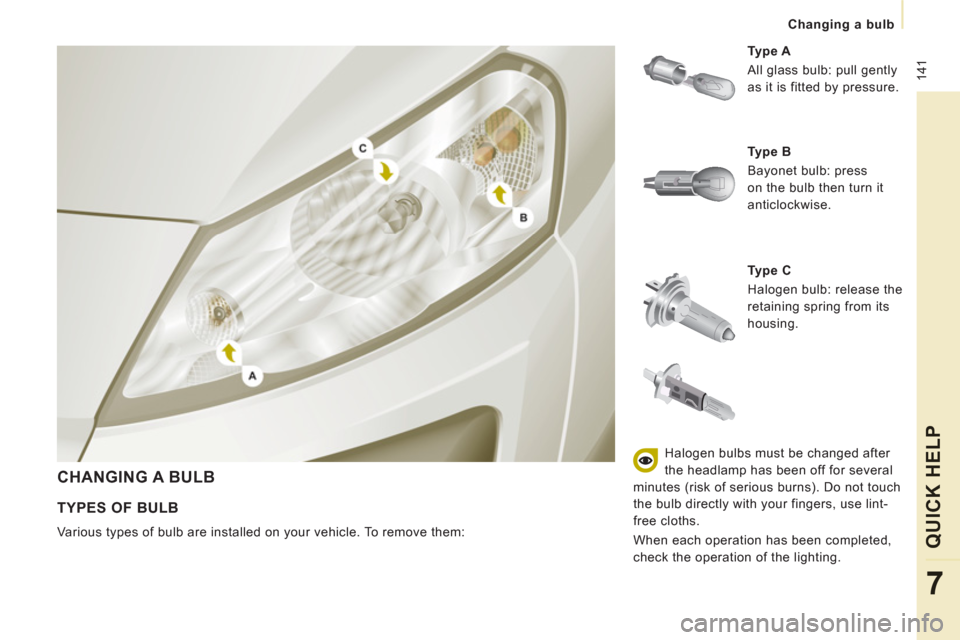
CHANGING A BULB
Ty p e C
Halogen bulb: release the
retaining spring from its
housing.
Ty p e A
All glass bulb: pull gently
as it is fitted by pressure.
TYPES OF BULB
Various types of bulb are installed on your vehicle. To remove them:
Ty p e B
Bayonet bulb: press
on the bulb then turn it
anticlockwise.
Halogen bulbs must be changed after
the headlamp has been off for several
minutes (risk of serious burns). Do not touch
the bulb directly with your fingers, use lint-
free cloths.
When each operation has been completed,
check the operation of the lighting.
Page 144 of 260
142
Changing a bulb
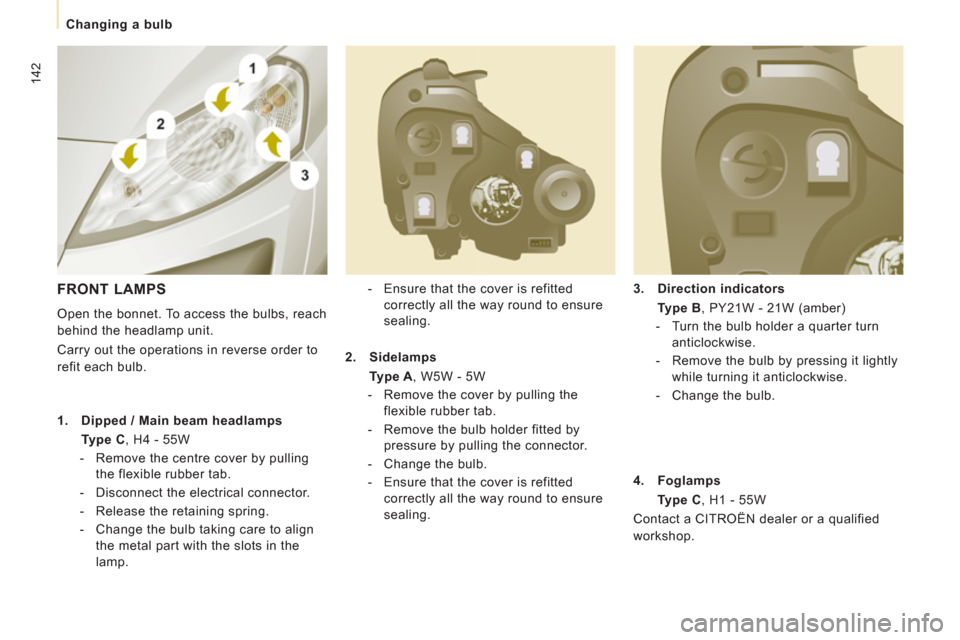
3.
Direction indicators
Type B
, PY21W - 21W (amber)
- Turn the bulb holder a quarter turn
anticlockwise.
- Remove the bulb by pressing it lightly
while turning it anticlockwise.
- Change the bulb.
- Ensure that the cover is refitted
correctly all the way round to ensure
sealing.
FRONT LAMPS
Open the bonnet. To access the bulbs, reach
behind the headlamp unit.
Carry out the operations in reverse order to
refit each bulb.
1.
Dipped / Main beam headlamps
Type C
, H4 - 55W
- Remove the centre cover by pulling
the flexible rubber tab.
- Disconnect the electrical connector.
- Release the retaining spring.
- Change the bulb taking care to align
the metal part with the slots in the
lamp.
2.
Sidelamps
Type A
, W5W - 5W
- Remove the cover by pulling the
flexible rubber tab.
- Remove the bulb holder fitted by
pressure by pulling the connector.
- Change the bulb.
- Ensure that the cover is refitted
correctly all the way round to ensure
sealing.
4.
Foglamps
Type C
, H1 - 55W
Contact a CITROËN dealer or a qualified
workshop.
Page 146 of 260
144
Changing a bulb
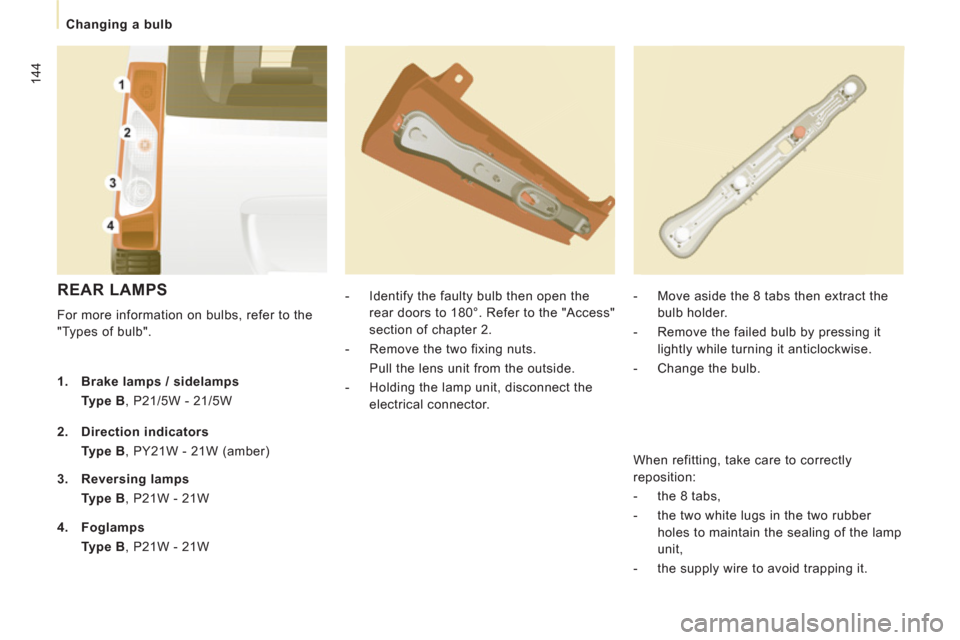
REAR LAMPS
For more information on bulbs, refer to the
"Types of bulb".
- Identify the faulty bulb then open the
rear doors to 180°. Refer to the "Access"
section of chapter 2.
- Remove the two fixing nuts.
Pull the lens unit from the outside.
- Holding the lamp unit, disconnect the
electrical connector.
- Move aside the 8 tabs then extract the
bulb holder.
- Remove the failed bulb by pressing it
lightly while turning it anticlockwise.
- Change the bulb.
1.
Brake lamps / sidelamps
Type B
, P21/5W - 21/5W
2.
Direction indicators
Type B
, PY21W - 21W (amber)
3.
Reversing lamps
Type B
, P21W - 21W
4.
Foglamps
Type B
, P21W - 21W When refitting, take care to correctly
reposition:
- the 8 tabs,
- the two white lugs in the two rubber
holes to maintain the sealing of the lamp
unit,
- the supply wire to avoid trapping it.
Page 147 of 260
Changing a bulb
QUICK HEL
P
7
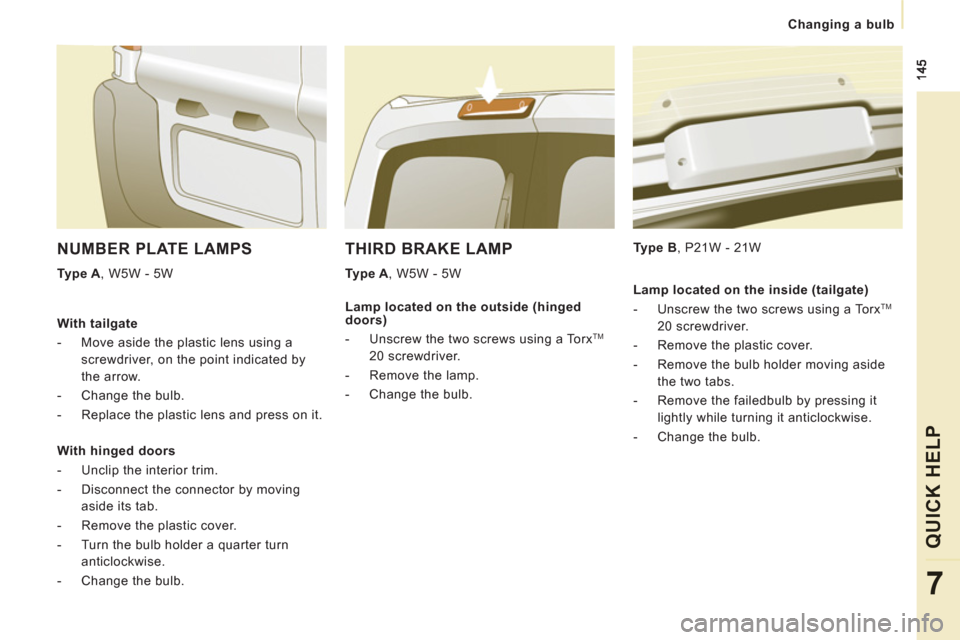
THIRD BRAKE LAMP
Type A
, W5W - 5W
Type B
, P21W - 21W
NUMBER PLATE LAMPS
Type A
, W5W - 5W
With tailgate
- Move aside the plastic lens using a
screwdriver, on the point indicated by
the arrow.
- Change the bulb.
- Replace the plastic lens and press on it.
With hinged doors
- Unclip the interior trim.
- Disconnect the connector by moving
aside its tab.
- Remove the plastic cover.
- Turn the bulb holder a quarter turn
anticlockwise.
- Change the bulb.
Lamp located on the outside (hinged
doors)
- Unscrew the two screws using a Torx
TM
20 screwdriver.
- Remove the lamp.
- Change the bulb.
Lamp located on the inside (tailgate)
- Unscrew the two screws using a Torx
TM
20 screwdriver.
- Remove the plastic cover.
- Remove the bulb holder moving aside
the two tabs.
- Remove the failedbulb by pressing it
lightly while turning it anticlockwise.
- Change the bulb.
Page 172 of 260

9.10
05
""""""""""""ggggggggggNavigation guidanceNavigation guidanceNavigation guidanceNavigation guidanceNavigation guidanceNavigation - guidanceNavigation - guidanceNavigation - guidanceNavigation - guidanceNavigation guidanceNavigation guidanceNavigation guidanceNavigation guidanceN i ti idN i ti idN i ti idN i ti idN i ti idN i ti idN i ti idN i ti idN i ti idNi i id""""""""""""
To delete the list of recent destinations, select "Guidance options" in the navigation menu then select "Delete last destinations" and confi rm. Select "Ye s" then confi rm.
Deleting just one destination is not possible.
Go from the list to the menu (left/right).
NAVIGATION - GUIDANCE
Access to the "NAVIGATION" menu
Press NAV.
or
Contact a CITROËN
dealer for mappingupdates.
A short press on the end of thelighting control stalk repeats the last navigation message.
Page 217 of 260
9.55
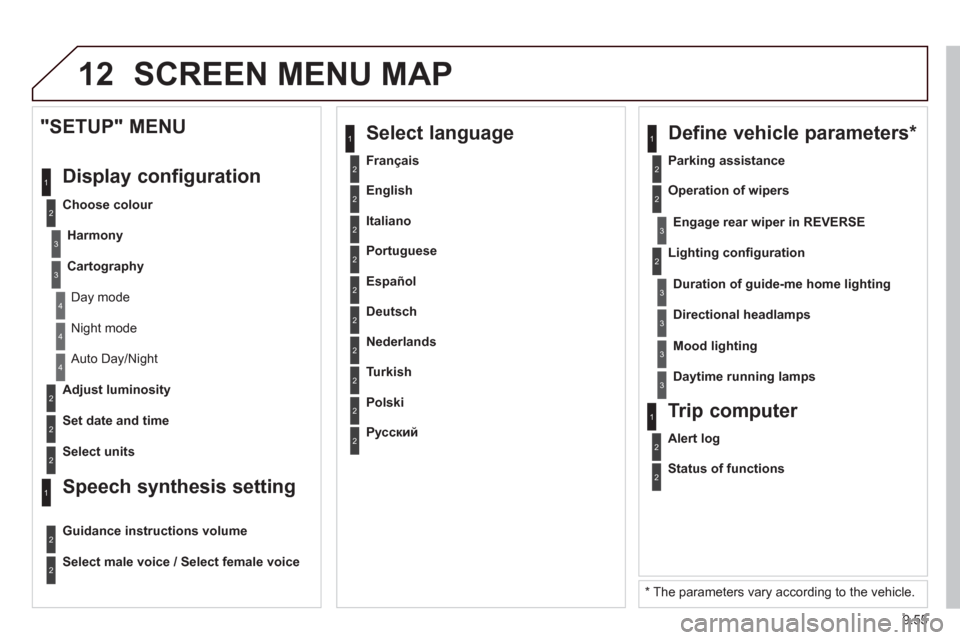
12 SCREEN MENU MAP
2
3
3
1
4
2
2
1
4
4
2
2
Night mode
Auto Day/Night
Ad
just luminosity
Set date and time
"SETUP" MENU
Displa
y configuration
Choose colour
Harmon
y
Cartography
Day mode
Speech synthesis setting
Guidance instructions volume
Select male voice / Select female voice
2
Select units
2
3
3
2
Lighting confi guration
Parkin
g assistance
Engage rear wiper in REVERSE
Duration of guide-me home lighting
1
Define vehicle parameters *
2
Operation of wipers
3Directional headlamps
3Mood lighting
3Daytime running lamps
*
The parameters vary according to the vehicle.
2Alert log
1Trip computer
2Status of functions
2
Français
1
Select language
2
English
2
Italiano
2
Portuguese
2
Español
2
Deutsch
2
Nederlands
2
Turkish
2
Polski
2
Русский
Page 248 of 260

162
Instruments and controls
Headlamp beam height adjustment 48
Starter, ignition switch 45
Wiper controls 49-50
Automatic wiping 49
Windscreen / headlamp wash 49
Trip computer Section 9
Cruise control 51-53
Fixed speed limiter 53
Speed limiter 54-56
Steering mounted controls:
- eMyWay Section 9
- Audio system Section 9
Lighting controls 46-47
Automatic illumination of headlamps 48
Foglamps 47
Daytime running lamps 47
Opening the bonnet 120
Parking brake 94
Electric windows,
electric mirrors 91-93
Instrument panels, screens,
speedometers 28-29
Warning lamps, indicator lamps 30-35
Indicators, gauge 36-39
Setting the time
in the instrument panel 29
Dashboard lighting dimmer 39
Gear shift indicator 41
Mat 85
Steering wheel adjustment 45
Horn 96
Page 251 of 260
165
Technical data - Maintenance
VISUAL SEARCH
10
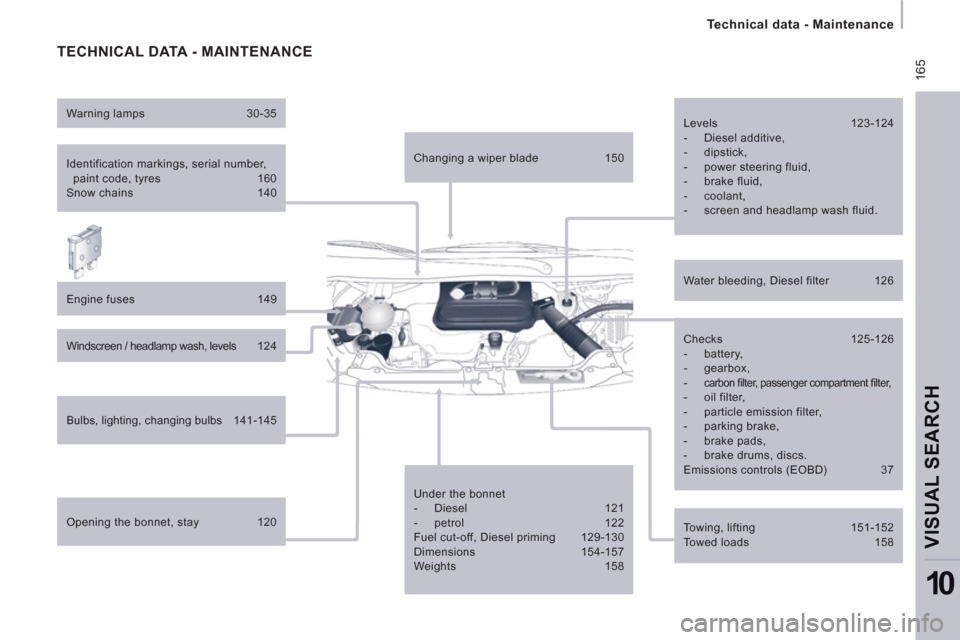
TECHNICAL DATA - MAINTENANCE
Identification markings, serial number,
paint code, tyres 160
Snow chains 140
Engine fuses 149
Windscreen / headlamp wash, levels 1 2 4
Bulbs, lighting, changing bulbs 141-145
Checks 125-126
- battery,
- gearbox,
-
carbon fi lter, passenger compartment fi lter,
- oil filter,
- particle emission filter,
- parking brake,
- brake pads,
- brake drums, discs.
Emissions controls (EOBD) 37
Water bleeding, Diesel filter 126
Under the bonnet
- Diesel 121
- petrol 122
Fuel cut-off, Diesel priming 129-130
Dimensions 154-157
Weights 158
Opening the bonnet, stay 120
Levels 123-124
- Diesel additive,
- dipstick,
- power steering fluid,
- brake fluid,
- coolant,
- screen and headlamp wash fluid.
Towing, lifting 151-152
Towed loads 158
Warning lamps 30-35
Changing a wiper blade 150