instrument panel Citroen JUMPY MULTISPACE 2013 2.G Owner's Manual
[x] Cancel search | Manufacturer: CITROEN, Model Year: 2013, Model line: JUMPY MULTISPACE, Model: Citroen JUMPY MULTISPACE 2013 2.GPages: 260, PDF Size: 8.79 MB
Page 4 of 260
2
Contents
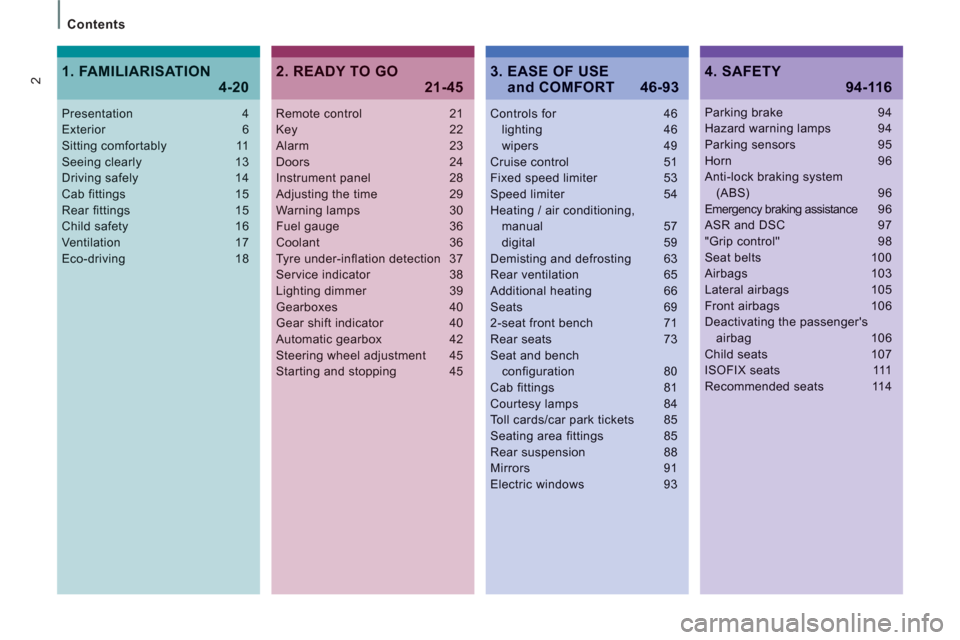
Remote control 21Key 22Alarm 23Doors 24Instrument panel 28Adjusting the time 29Warning lamps 30Fuel gauge 36Coolant 36Tyre under-inflation detection 37Service indicator 38Lighting dimmer 39Gearboxes 40Gear shift indicator 40Automatic gearbox 42Steering wheel adjustment 45Starting and stopping 45
Controls for 46lighting 46wipers 49Cruise control 51Fixed speed limiter 53Speed limiter 54Heating / air conditioning,manual 57digital 59Demisting and defrosting 63Rear ventilation 65Additional heating 66Seats 692-seat front bench 71Rear seats 73Seat and bench configuration 80Cab fittings 81Courtesy lamps 84Toll cards/car park tickets 85
Seating area fittings 85Rear suspension 88Mirrors 91Electric windows 93
Presentation 4Exterior 6Sitting comfortably 11Seeing clearly 13Driving safely 14Cab fittings 15Rear fittings 15Child safety 16Ventilation 17Eco-driving 18
Parking brake 94Hazard warning lamps 94Parking sensors 95Horn 96Anti-lock braking system(ABS) 96Emergency braking assistance96ASR and DSC 97"Grip control" 98Seat belts 100Airbags 103Lateral airbags 105Front airbags 106Deactivating the passenger'sairbag 106Child seats 107ISOFIX seats 111Recommended seats 114
2. READY TO GO
21-45
4. SAFETY
94-116
1. FAMILIARISATION
4-203. EASE OF USE and COMFORT 46-93
Page 11 of 260
9
Interior
FAMILIARISATIO
N
1
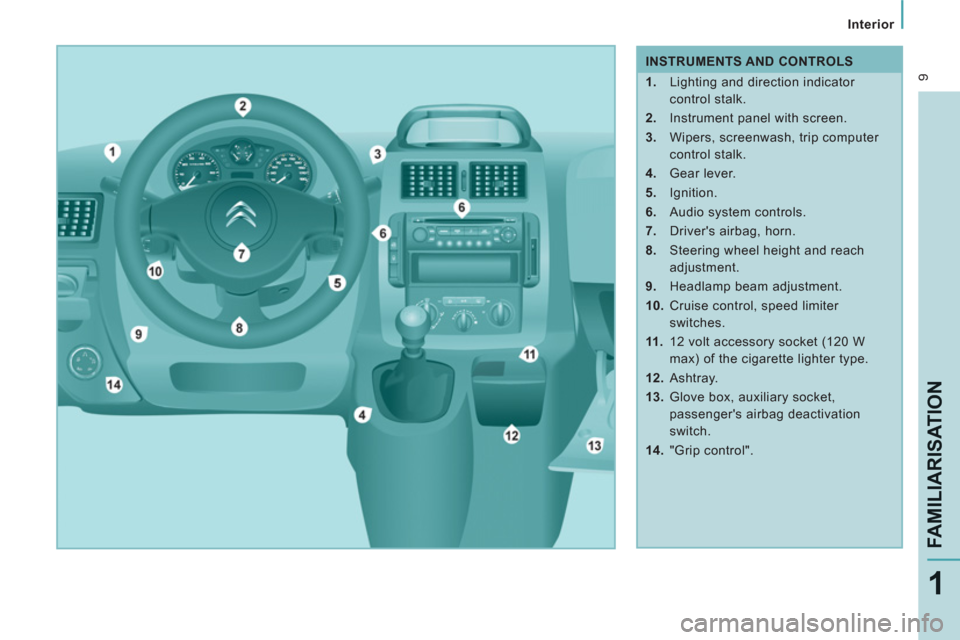
INSTRUMENTS AND CONTROLS
1.
Lighting and direction indicator
control stalk.
2.
Instrument panel with screen.
3.
Wipers, screenwash, trip computer
control stalk.
4.
Gear lever.
5.
Ignition.
6.
Audio system controls.
7.
Driver's airbag, horn.
8.
Steering wheel height and reach
adjustment.
9.
Headlamp beam adjustment.
10.
Cruise control, speed limiter
switches.
11 .
12 volt accessory socket (120 W
max) of the cigarette lighter type.
12.
Ashtray.
13.
Glove box, auxiliary socket,
passenger's airbag deactivation
switch.
14.
"Grip control".
Page 20 of 260
Interior
18ECO-DRIVING
Eco-driving is a range of everyday practices that allow the motorist to optimise their fuel
consumption and CO
2 emissions.
Optimise the use of your
gearbox
With a manual gearbox, move off gently,
change up without waiting and drive by
changing up quite soon. If your vehicle has
the system, the gear shift indicator invites
you to change up; it is displayed in the
instrument panel, follow its instructions.
With an automatic or electronic gearbox,
stay in Drive "D"
or Auto "A"
, according to
the type of gearbox, without pressing the
accelerator pedal heavily or suddenly.
Control the use of your
electrical equipment
Before moving off, if the passenger
compartment is too warm, ventilate it by
opening the windows and air vents before
using the air conditioning.
Above 30 mph (50 km/h), close the windows
and leave the air vents open.
Switch off the headlamps and front
foglamps when the level of light does not
require their use.
Avoid running the engine before moving
off, particularly in winter; your vehicle will
warm up much faster while driving.
Drive smoothly
Maintain a safe distance between vehicles,
use engine braking rather than the
brake pedal, and press the accelerator
progressively. These practices contribute
towards a reduction in fuel consumption and
CO
2 emissions and also helps reduce the
background traffic noise.
If your vehicle has cruise control, make
use of the system at speeds above 25 mph
(40 km/h) when the traffic is flowing well.
As a passenger, if you avoid connecting
your multimedia devices (film, music,
video game...), you will contribute towards
limiting the consumption of electrical
energy, and so of fuel.
Disconnect your portable devices before
leaving the vehicle.
Remember to make use of equipment
that can help keep the temperature in the
passenger compartment down (sunroof
and window blinds...).
Switch off the air conditioning, unless it
has automatic digital regulation, as soon
as the desired temperature is attained.
Switch off the demisting and defrosting
controls, if not automatic.
Switch off the heated seat as soon as
possible.
Page 30 of 260
28
Instruments and controls
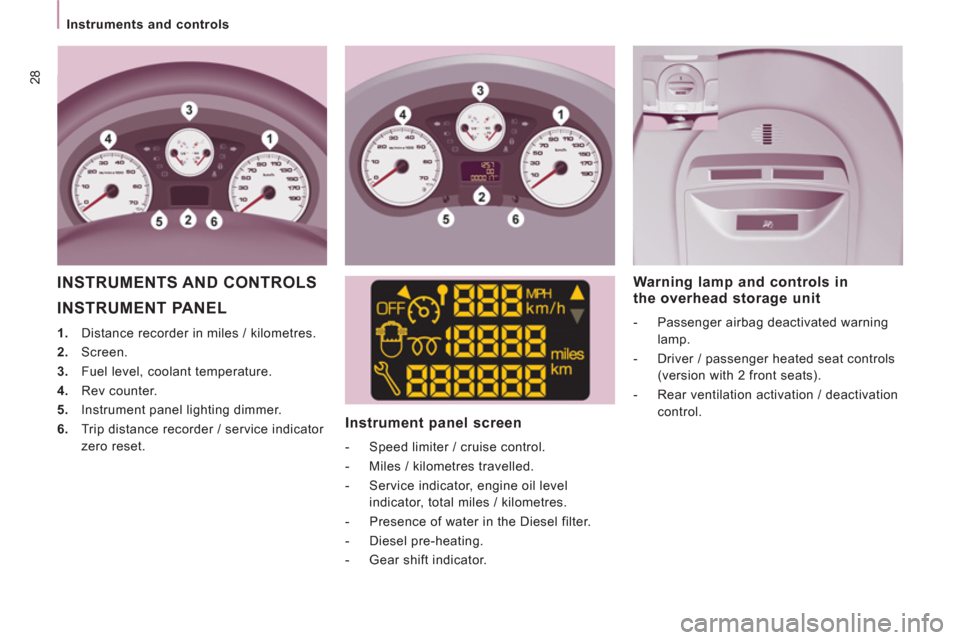
INSTRUMENT PANEL
1.
Distance recorder in miles / kilometres.
2.
Screen.
3.
Fuel level, coolant temperature.
4.
Rev counter.
5.
Instrument panel lighting dimmer.
6.
Trip distance recorder / service indicator
zero reset.
Instrument panel screen
- Speed limiter / cruise control.
- Miles / kilometres travelled.
- Service indicator, engine oil level
indicator, total miles / kilometres.
- Presence of water in the Diesel filter.
- Diesel pre-heating.
- Gear shift indicator.
Warning lamp and controls in
the overhead storage unit
- Passenger airbag deactivated warning
lamp.
- Driver / passenger heated seat controls
(version with 2 front seats).
- Rear ventilation activation / deactivation
control.
INSTRUMENTS AND CONTROLS
Page 31 of 260
29
Instruments and controls
REA
DY
TO GO
2
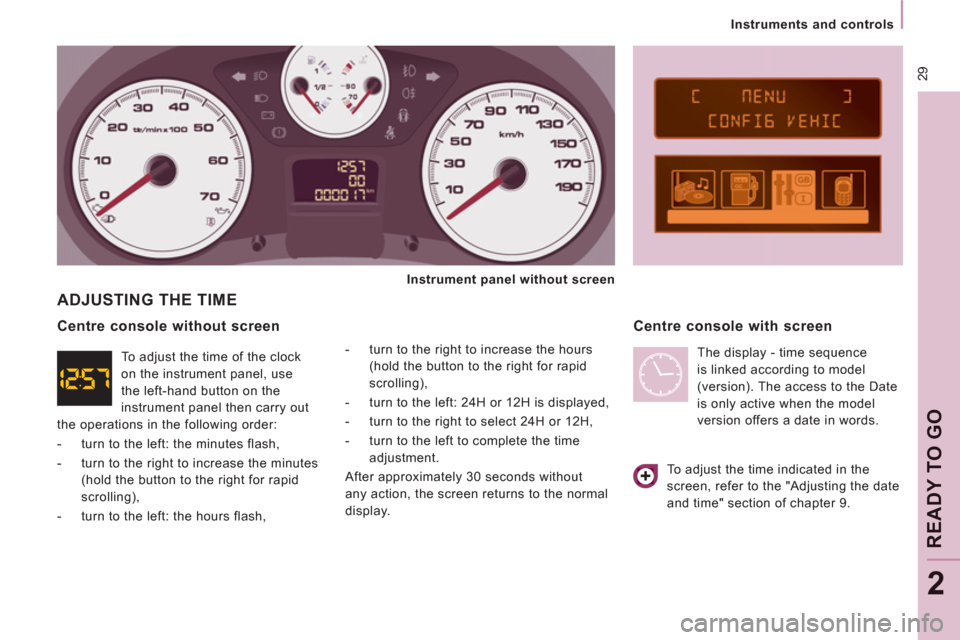
ADJUSTING THE TIME
- turn to the right to increase the hours
(hold the button to the right for rapid
scrolling),
- turn to the left: 24H or 12H is displayed,
- turn to the right to select 24H or 12H,
- turn to the left to complete the time
adjustment.
After approximately 30 seconds without
any action, the screen returns to the normal
display.
Centre console with screen
Centre console without screen
To adjust the time indicated in the
screen, refer to the "Adjusting the date
and time" section of chapter 9.
Instrument panel without screen
To adjust the time of the clock
on the instrument panel, use
the left-hand button on the
instrument panel then carry out
the operations in the following order:
- turn to the left: the minutes flash,
- turn to the right to increase the minutes
(hold the button to the right for rapid
scrolling),
- turn to the left: the hours flash, The display - time sequence
is linked according to model
(version). The access to the Date
is only active when the model
version offers a date in words.
Page 37 of 260
35
Instruments and controls
REA
DY
TO GO
2
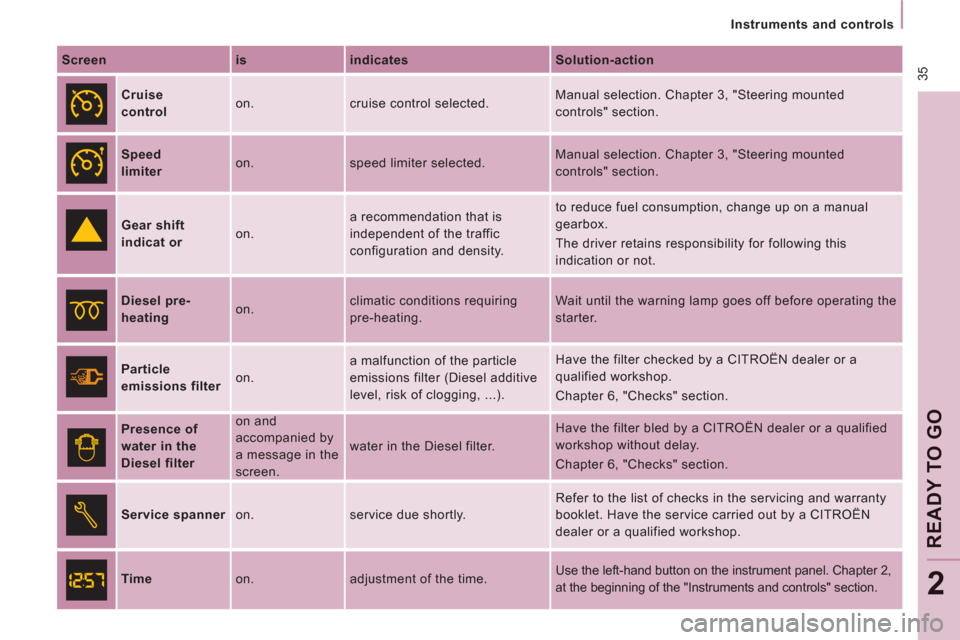
Screen
is
indicates
Solution-action
Cruise
control on. cruise control selected. Manual selection. Chapter 3, "Steering mounted
controls" section.
Speed
limiter on. speed limiter selected. Manual selection. Chapter 3, "Steering mounted
controls" section.
Gear shift
indicat
or on. a recommendation that is
independent of the traffic
configuration and density. to reduce fuel consumption, change up on a manual
gearbox.
The driver retains responsibility for following this
indication or not.
Diesel pre-
heating on. climatic conditions requiring
pre-heating. Wait until the warning lamp goes off before operating the
starter.
Particle
emissions filter on. a malfunction of the particle
emissions filter (Diesel additive
level, risk of clogging, ...). Have the filter checked by a CITROËN dealer or a
qualified workshop.
Chapter 6, "Checks" section.
Presence of
water in the
Diesel filter on and
accompanied by
a message in the
screen. water in the Diesel filter. Have the filter bled by a CITROËN dealer or a qualified
workshop without delay.
Chapter 6, "Checks" section.
Service spanner
on. service due shortly.
Refer to the list of checks in the servicing and warranty
booklet. Have the service carried out by a CITROËN
dealer or a qualified workshop.
Time on. adjustment of the time. Use the left-hand button on the instrument panel. Chapter 2,
at the beginning of the "Instruments and controls" section.
Page 39 of 260
37
Instruments and controls
REA
DY
TO GO
2
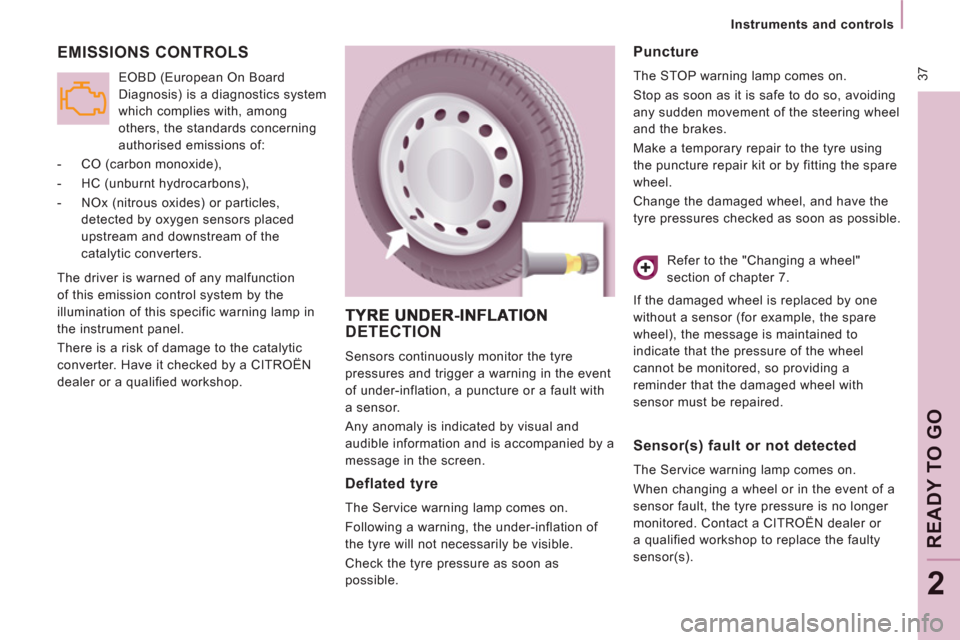
EMISSIONS CONTROLS
The driver is warned of any malfunction
of this emission control system by the
illumination of this specific warning lamp in
the instrument panel.
There is a risk of damage to the catalytic
converter. Have it checked by a CITROËN
dealer or a qualified workshop.
EOBD (European On Board
Diagnosis) is a diagnostics system
which complies with, among
others, the standards concerning
authorised emissions of:
- CO (carbon monoxide),
- HC (unburnt hydrocarbons),
- NOx (nitrous oxides) or particles,
detected by oxygen sensors placed
upstream and downstream of the
catalytic converters.
DETECTION
Sensors continuously monitor the tyre
pressures and trigger a warning in the event
of under-inflation, a puncture or a fault with
a sensor.
Any anomaly is indicated by visual and
audible information and is accompanied by a
message in the screen.
Deflated tyre
The Service warning lamp comes on.
Following a warning, the under-inflation of
the tyre will not necessarily be visible.
Check the tyre pressure as soon as
possible.
Puncture
The STOP warning lamp comes on.
Stop as soon as it is safe to do so, avoiding
any sudden movement of the steering wheel
and the brakes.
Make a temporary repair to the tyre using
the puncture repair kit or by fitting the spare
wheel.
Change the damaged wheel, and have the
tyre pressures checked as soon as possible.
Sensor(s) fault or not detected
The Service warning lamp comes on.
When changing a wheel or in the event of a
sensor fault, the tyre pressure is no longer
monitored. Contact a CITROËN dealer or
a qualified workshop to replace the faulty
sensor(s). Refer to the "Changing a wheel"
section of chapter 7.
If the damaged wheel is replaced by one
without a sensor (for example, the spare
wheel), the message is maintained to
indicate that the pressure of the wheel
cannot be monitored, so providing a
reminder that the damaged wheel with
sensor must be repaired.
Page 44 of 260
42
Gearboxes and steering wheel
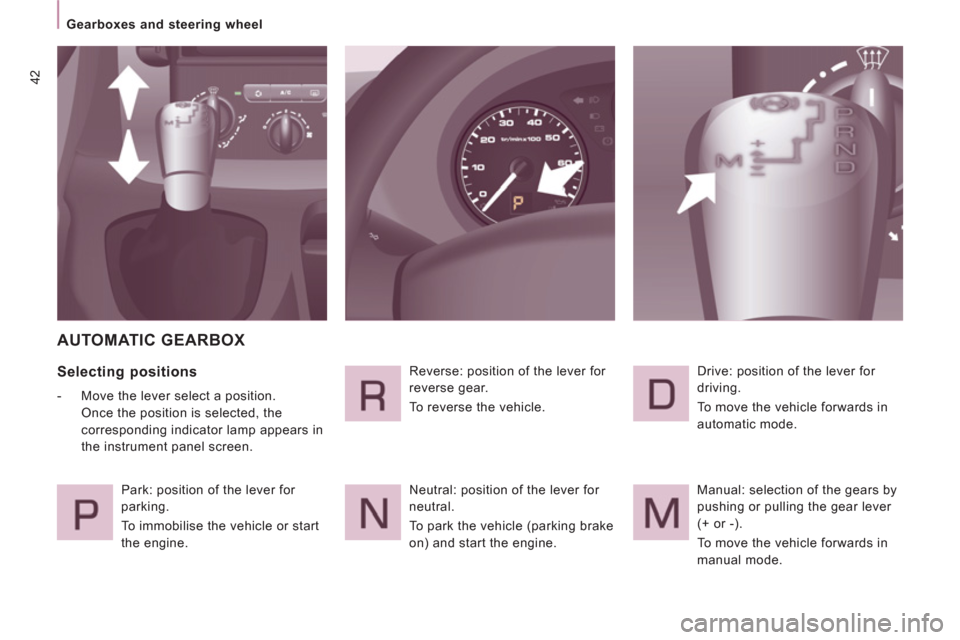
AUTOMATIC GEARBOX
Selecting positions
- Move the lever select a position.
Once the position is selected, the
corresponding indicator lamp appears in
the instrument panel screen.
Park: position of the lever for
parking.
To immobilise the vehicle or start
the engine. Reverse: position of the lever for
reverse gear.
To reverse the vehicle.
Neutral: position of the lever for
neutral.
To park the vehicle (parking brake
on) and start the engine. Drive: position of the lever for
driving.
To move the vehicle forwards in
automatic mode.
Manual: selection of the gears by
pushing or pulling the gear lever
(+ or -).
To move the vehicle forwards in
manual mode.
Page 48 of 260
46
Steering mounted controls
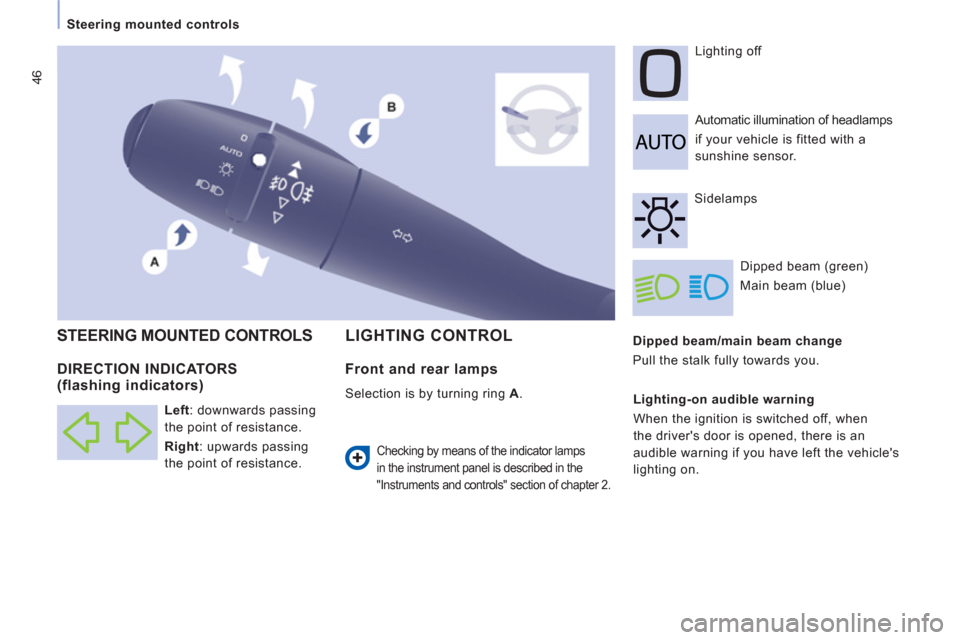
Dipped beam/main beam change
Pull the stalk fully towards you. Automatic illumination of headlamps
if your vehicle is fitted with a
sunshine sensor. Lighting off
Dipped beam (green)
Main beam (blue)
LIGHTING CONTROL
STEERING MOUNTED CONTROLS
Sidelamps
Lighting-on audible warning
When the ignition is switched off, when
the driver's door is opened, there is an
audible warning if you have left the vehicle's
lighting on.
DIRECTION INDICATORS (flashing indicators)
Left
: downwards passing
the point of resistance.
Right
: upwards passing
the point of resistance.
Front and rear lamps
Selection is by turning ring A
.
Checking by means of the indicator lamps
in the instrument panel is described in the
"Instruments and controls" section of chapter 2.
Page 49 of 260
47
Steering mounted controls
EASE OF USE and COMFOR
T
3
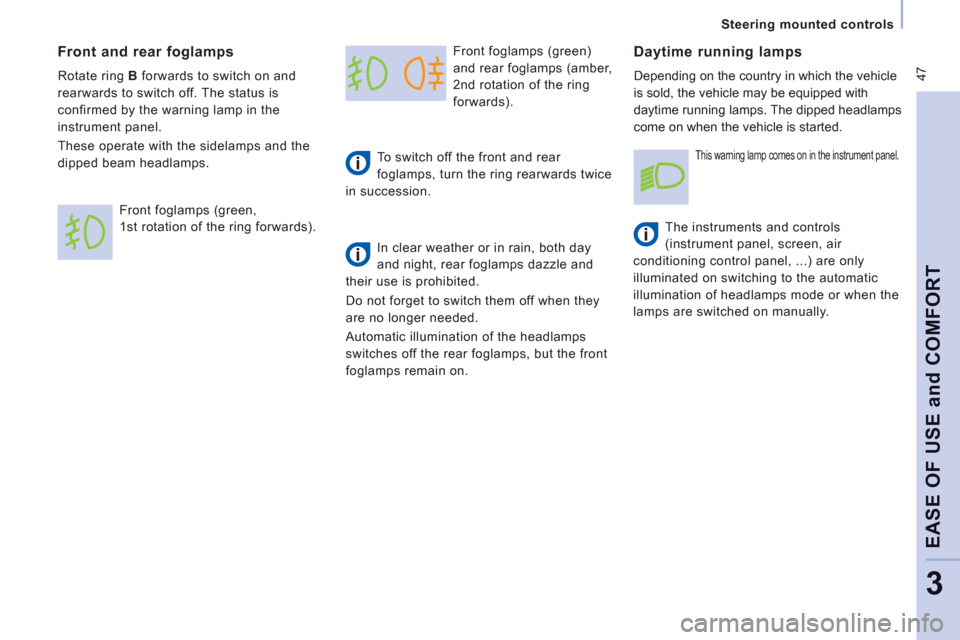
Front foglamps (green)
and rear foglamps (amber,
2nd rotation of the ring
forwards).
To switch off the front and rear
foglamps, turn the ring rearwards twice
in succession.
In clear weather or in rain, both day
and night, rear foglamps dazzle and
their use is prohibited.
Do not forget to switch them off when they
are no longer needed.
Automatic illumination of the headlamps
switches off the rear foglamps, but the front
foglamps remain on. Daytime running lamps
Depending on the country in which the vehicle
is sold, the vehicle may be equipped with
daytime running lamps. The dipped headlamps
come on when the vehicle is started.
The instruments and controls
(instrument panel, screen, air
conditioning control panel, ...) are only
illuminated on switching to the automatic
illumination of headlamps mode or when the
lamps are switched on manually.
Front and rear foglamps
Rotate ring B
forwards to switch on and
rearwards to switch off. The status is
confirmed by the warning lamp in the
instrument panel.
These operate with the sidelamps and the
dipped beam headlamps.
Front foglamps (green,
1st rotation of the ring forwards).
This warning lamp comes on in the instrument panel.