steering Citroen JUMPY MULTISPACE DAG 2009.5 2.G Owner's Manual
[x] Cancel search | Manufacturer: CITROEN, Model Year: 2009.5, Model line: JUMPY MULTISPACE DAG, Model: Citroen JUMPY MULTISPACE DAG 2009.5 2.GPages: 231, PDF Size: 11.46 MB
Page 16 of 231

Instruments and controls
WARNING LIGHTS
Each time the engine is started: a series of warning lights comes on applying a check auto-test. They are switched off almost immediately.
When the engine is running: the warning light becom es a warning if it remains on continuously or flashes. This initial warning may be
accompanied by an audible signal and a message on t he display.
Do not ignore these warnings
Warning light is indicates Solution-action
STOP lit, associated
with another
warning light and
accompanied by
a message on
the display. major faults linked with the
"Brake fluid level", "Engine oil
pressure and temperature",
"Coolant temperature",
"Electronic brake force
distribution" and "Power
steering" warning lights.
You must stop, park, switch off the ignition and ca ll
a CITROËN dealer.
Handbrake/
Brake fluid
level/EBFD lit.
handbrake applied or not
released correctly. Releasing the handbrake switches off the warning l
ight.
lit. low brake fluid level. Top up using a fluid recommended by CITROËN.
remaining on,
even though the
level is correct and
associated with the
ABS warning light. failure of the electronic brake
force distribution.
You must stop, park, switch off the ignition and ca ll
a CITROËN dealer.
Engine oil
pressure and
temperature lit while driving.
insufficient pressure or
temperature too high. Park, switch off the ignition and allow to cool. V
isually
check the level. Chapter 6, "Levels" section.
remaining on,
even though the
level is correct. major fault. Call a CITROËN dealer.
Page 19 of 231

ABS
ESP
29
Instruments and controls
READY TO SET OFF
2
Warning light is indicates Solution-action
Power steering lit. system malfunction. The vehicle retains conventional steering without
assistance.
Have the system checked by a CITROËN dealer.
Opening
detection lit and
accompanied by
a message on
the display.
access not closed correctly.
Check that the cab doors, the rear and side doors
and the
�b�o�n�n�e�t� �a�r�e� �c�l�o�s�e�d� �(�i�f� �y�o�u�r� �v�e�h�i�c�l�e� �i�s� �fi� �t�t�e�d� �w�i�t�h� �a �n� �a�l�a�r�m�)�.�
Rear
suspension
with pneumatic
compensation flashing.
abnormal difference between
the detected sill height and the
optimum sill height. In automatic correction mode: drive slowly (approximately
6 mph (10 km/h)) until the warning light is switched off.
In manual correction mode: return the sill which is still at th
e
upper or lower limit to an optimum height. Chapter 3, "Rear
suspension" section.
lit on starting or
while driving. failure of the pneumatic
compensation.
You must stop. Call a CITROËN dealer.
ABS remaining on. failure of the anti-lock braking
system. The vehicle retains conventional braking without
assistance but you are advised to stop. Call a CITR
OËN
dealer.
ESP flashing.
triggering of regulation by the
ESP. The system optimises drive and permits improvement
of
the directional stability of the vehicle. Chapter 4 , "Driving
safety" section.
remaining on. system malfunction. E.g.: under-
inflation of the tyres. E.g. Check the pressure of the tyres. Have them
checked by a CITROËN dealer.
remaining on
with the diode on
the button (on
the fascia) lit. deactivation of the system at the
request of the driver.
Operation of the system is deactivated.
Reactivation is automatic above 30 mph (50 km/h) o
r
after pressing the button (on the fascia).
Page 20 of 231
30
Instruments and controls
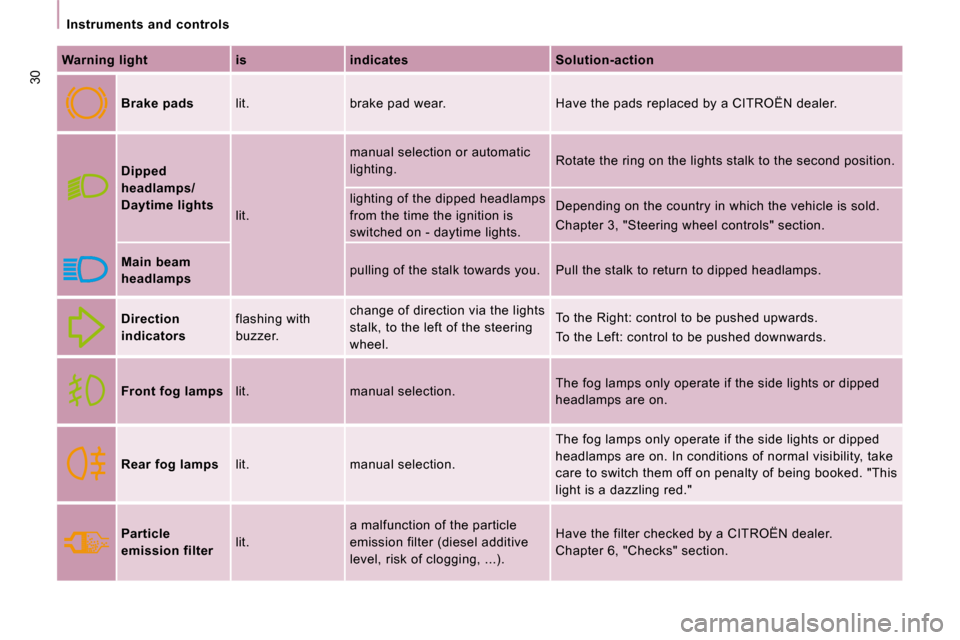
Warning light is indicates Solution-action
Brake pads lit. brake pad wear. Have the pads replaced by a CITROËN dealer.
Dipped
headlamps/
Daytime lights
lit. manual selection or automatic
lighting.
Rotate the ring on the lights stalk to the second
position.
lighting of the dipped headlamps
from the time the ignition is
switched on - daytime lights. Depending on the country in which the vehicle is s
old.
Chapter 3, "Steering wheel controls" section.
Main beam
headlamps pulling of the stalk towards you. Pull the stalk
to return to dipped headlamps.
Direction
indicators flashing with
buzzer. change of direction via the lights
stalk, to the left of the steering
wheel. To the Right: control to be pushed upwards.
To the Left: control to be pushed downwards.
Front fog lamps lit. manual selection. The fog lamps only operate if the side lights or d
ipped
headlamps are on.
Rear fog lamps lit. manual selection. The fog lamps only operate if the side lights or d
ipped
headlamps are on. In conditions of normal visibilit y, take
care to switch them off on penalty of being booked. "This
light is a dazzling red."
Particle
emission filter lit. a malfunction of the particle
emission filter (diesel additive
level, risk of clogging, ...). Have the filter checked by a CITROËN dealer.
Chapter 6, "Checks" section.
Page 21 of 231
31
Instruments and controls
READY TO SET OFF
2
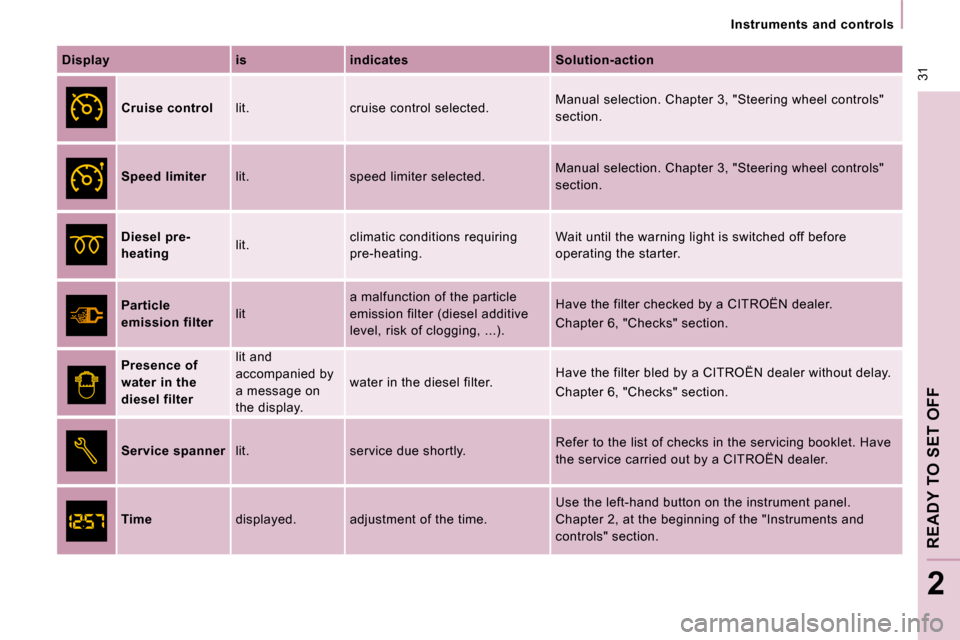
Display is indicates Solution-action
Cruise control lit. cruise control selected. Manual selection. Chapter 3, "Steering wheel contr
ols"
section.
Speed limiter lit. speed limiter selected. Manual selection. Chapter 3, "Steering wheel contr
ols"
section.
Diesel pre-
heating lit. climatic conditions requiring
pre-heating. Wait until the warning light is switched off befor
e
operating the starter.
Particle
emission filter lit a malfunction of the particle
emission filter (diesel additive
level, risk of clogging, ...). Have the filter checked by a CITROËN dealer.
Chapter 6, "Checks" section.
Presence of
water in the
diesel filter lit and
accompanied by
a message on
the display.
water in the diesel filter.
Have the filter bled by a CITROËN dealer without d
elay.
Chapter 6, "Checks" section.
Service spanner lit. service due shortly. Refer to the list of checks in the servicing bookl
et. Have
the service carried out by a CITROËN dealer.
Time displayed. adjustment of the time. Use the left-hand button on the instrument panel.
Chapter 2, at the beginning of the "Instruments and
controls" section.
Page 27 of 231
35
Gearboxes and steering wheel
READY TO SET OFF
2
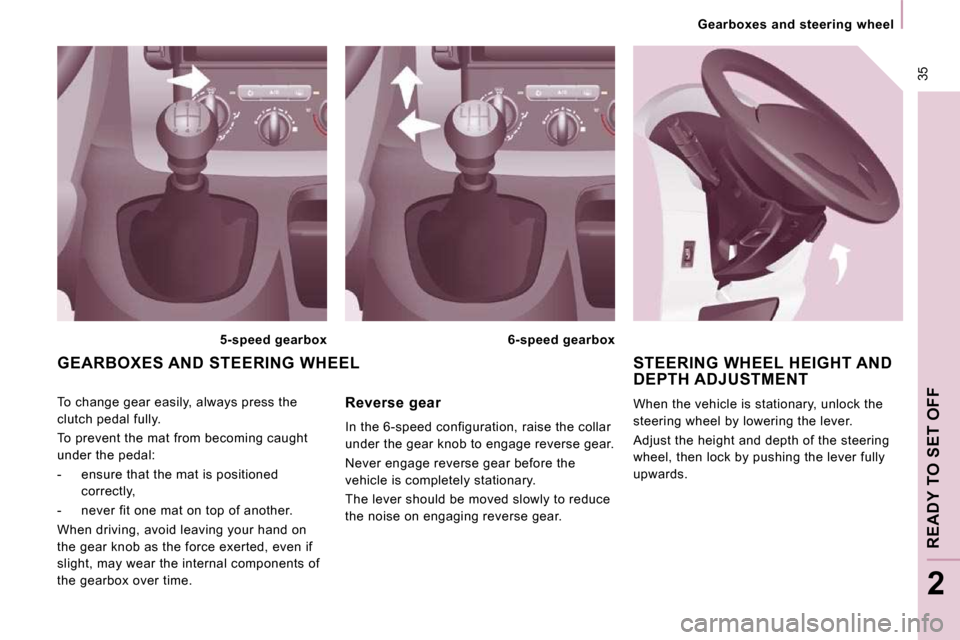
STEERING WHEEL HEIGHT AND DEPTH ADJUSTMENT
When the vehicle is stationary, unlock the
steering wheel by lowering the lever.
Adjust the height and depth of the steering
wheel, then lock by pushing the lever fully
upwards.
To change gear easily, always press the
clutch pedal fully.
To prevent the mat from becoming caught
under the pedal:
- ensure that the mat is positioned
correctly,
- never fit one mat on top of another.
When driving, avoid leaving your hand on
the gear knob as the force exerted, even if
slight, may wear the internal components of
the gearbox over time.
GEARBOXES AND STEERING WHEEL
5-speed gearbox 6-speed gearbox
Reverse gear
In the 6-speed configuration, raise the collar
under the gear knob to engage reverse gear.
Never engage reverse gear before the
vehicle is completely stationary.
The lever should be moved slowly to reduce
the noise on engaging reverse gear.
Page 28 of 231
Starting and stopping
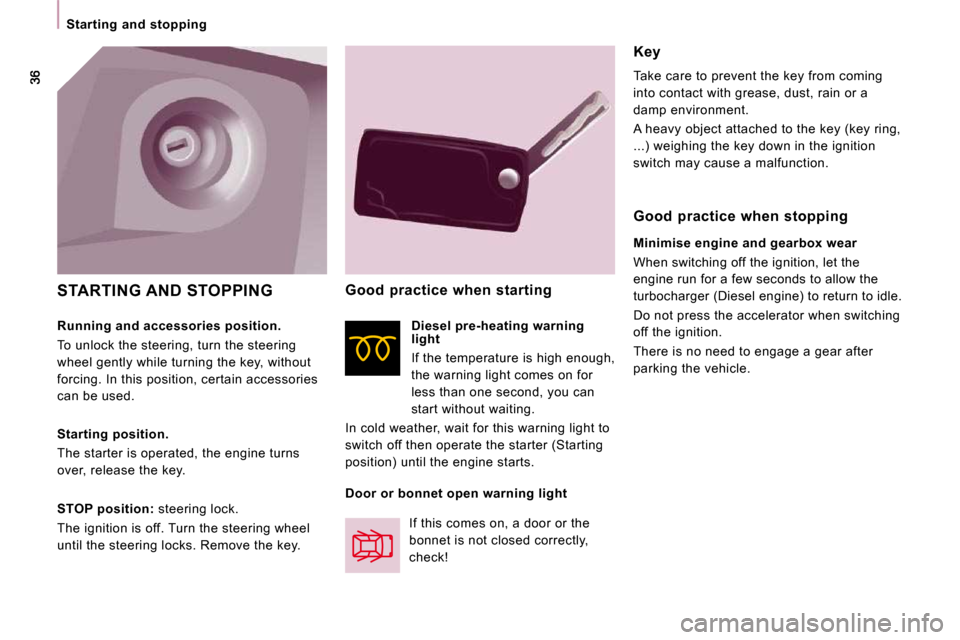
STARTING AND STOPPING
Key
Take care to prevent the key from coming
into contact with grease, dust, rain or a
damp environment.
A heavy object attached to the key (key ring,
...) weighing the key down in the ignition
switch may cause a malfunction.
Starting position.
The starter is operated, the engine turns
over, release the key.
STOP position: steering lock.
The ignition is off. Turn the steering wheel
until the steering locks. Remove the key. Good practice when starting
If this comes on, a door or the
bonnet is not closed correctly,
check! Diesel pre-heating warning
light
If the temperature is high enough,
the warning light comes on for
less than one second, you can
start without waiting.
In cold weather, wait for this warning light to
switch off then operate the starter (Starting
position) until the engine starts. Good practice when stopping
Minimise engine and gearbox wear
When switching off the ignition, let the
engine run for a few seconds to allow the
turbocharger (Diesel engine) to return to idle.
Do not press the accelerator when switching
off the ignition.
There is no need to engage a gear after
parking the vehicle.
Running and accessories position.
To unlock the steering, turn the steering
wheel gently while turning the key, without
forcing. In this position, certain accessories
can be used.
Door or bonnet open warning light
Page 29 of 231
37
Steering wheel controls
ERGONOMICS and COMFORT
3
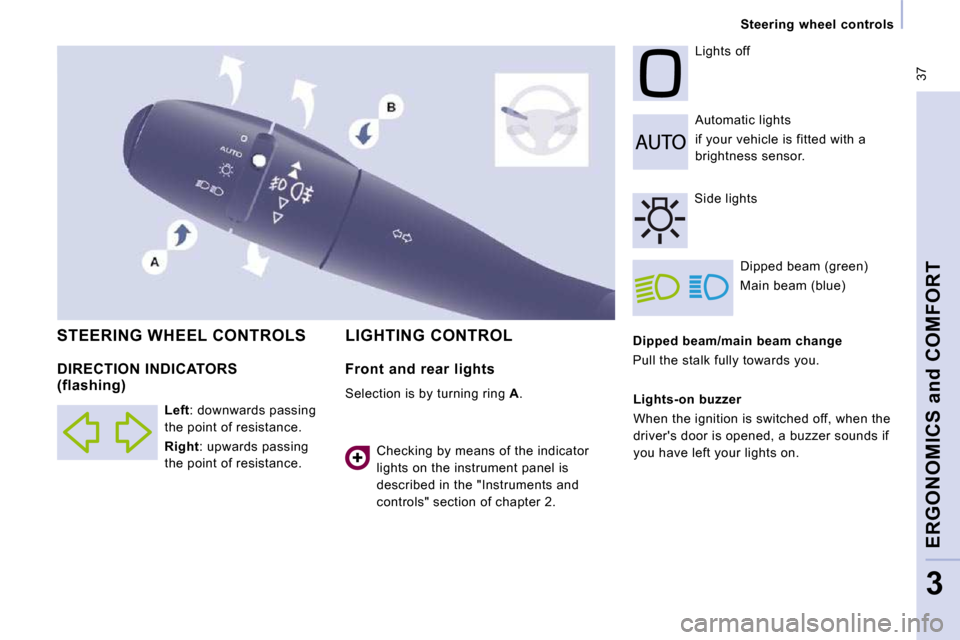
Dipped beam/main beam change
Pull the stalk fully towards you. Automatic lights
if your vehicle is fitted with a
brightness sensor.
Lights off
Dipped beam (green)
Main beam (blue) LIGHTING CONTROL STEERING WHEEL CONTROLS
Side lights
Lights-on buzzer
When the ignition is switched off, when the
driver's door is opened, a buzzer sounds if
you have left your lights on.
DIRECTION INDICATORS (flashing)
Left : downwards passing
the point of resistance.
Right : upwards passing
the point of resistance.
Front and rear lights
Selection is by turning ring A .
Checking by means of the indicator
lights on the instrument panel is
described in the "Instruments and
controls" section of chapter 2.
Page 30 of 231
37
Steering wheel controls
ERGONOMICS and COMFORT
3
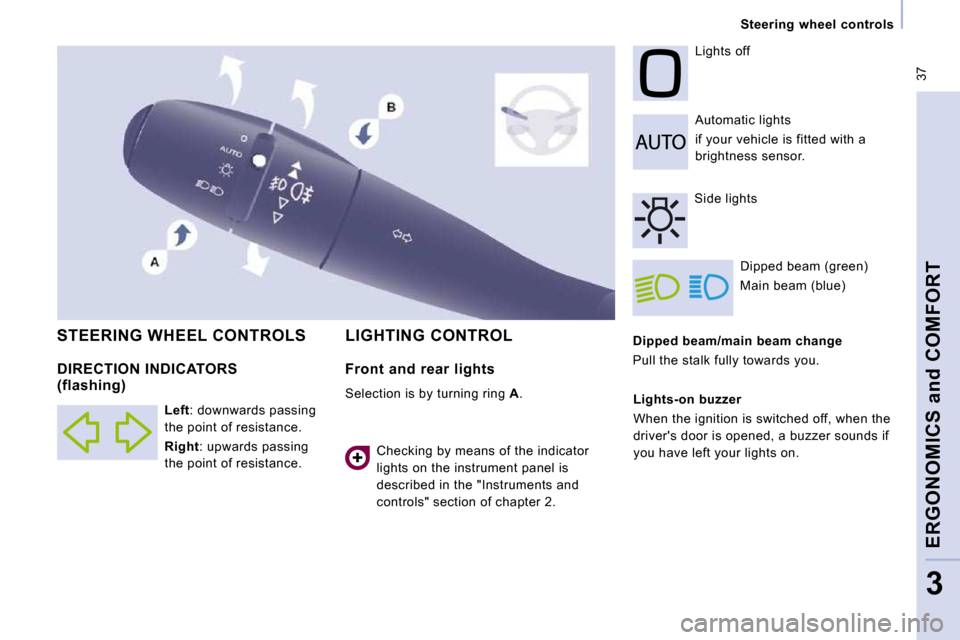
Dipped beam/main beam change
Pull the stalk fully towards you. Automatic lights
if your vehicle is fitted with a
brightness sensor.
Lights off
Dipped beam (green)
Main beam (blue) LIGHTING CONTROL STEERING WHEEL CONTROLS
Side lights
Lights-on buzzer
When the ignition is switched off, when the
driver's door is opened, a buzzer sounds if
you have left your lights on.
DIRECTION INDICATORS (flashing)
Left : downwards passing
the point of resistance.
Right : upwards passing
the point of resistance.
Front and rear lights
Selection is by turning ring A .
Checking by means of the indicator
lights on the instrument panel is
described in the "Instruments and
controls" section of chapter 2.
Page 31 of 231
38
Steering wheel controls
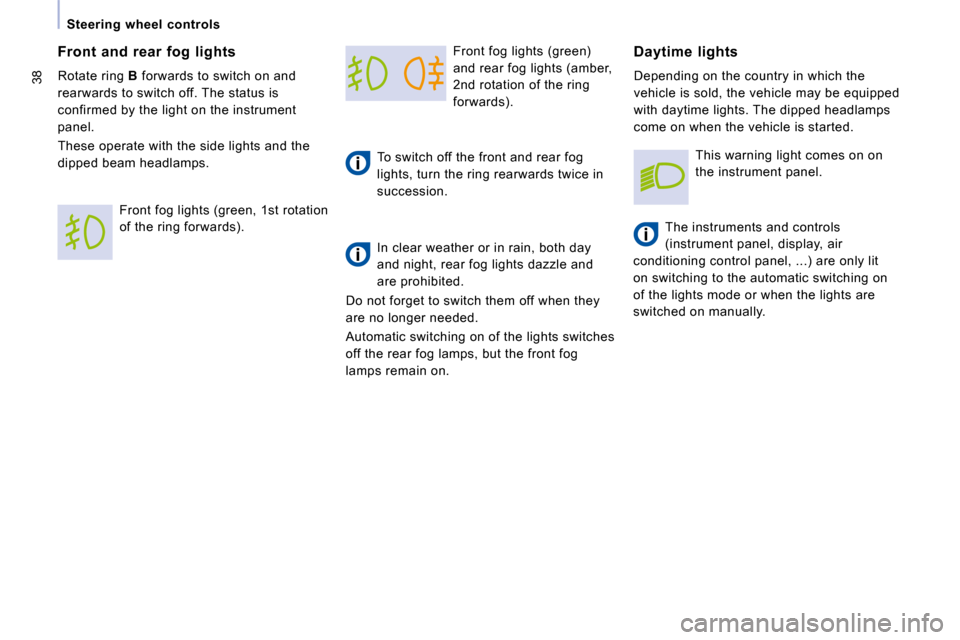
Front fog lights (green)
and rear fog lights (amber,
2nd rotation of the ring
forwards).
To switch off the front and rear fog
lights, turn the ring rearwards twice in
succession.
In clear weather or in rain, both day
and night, rear fog lights dazzle and
are prohibited.
Do not forget to switch them off when they
are no longer needed.
Automatic switching on of the lights switches
off the rear fog lamps, but the front fog
lamps remain on. Daytime lights
Depending on the country in which the
vehicle is sold, the vehicle may be equipped
with daytime lights. The dipped headlamps
come on when the vehicle is started.
The instruments and controls
(instrument panel, display, air
conditioning control panel, ...) are only lit
on switching to the automatic switching on
of the lights mode or when the lights are
switched on manually.
Front and rear fog lights
Rotate ring B forwards to switch on and
rearwards to switch off. The status is
confirmed by the light on the instrument
panel.
These operate with the side lights and the
dipped beam headlamps.
Front fog lights (green, 1st rotation
of the ring forwards). This warning light comes on on
the instrument panel.
Page 32 of 231

39
Steering wheel controls
ERGONOMICS and COMFORT
3
Automatic switching on of the lights Activation
Turn the ring to the AUTO position. The
activation of this function is accompanied by
a message on the display.
If the brightness sensor does not
function correctly , the lights come on
accompanied by the service warning light,
an audible signal and a message on the
display.
Consult a CITROËN dealer.
HEADLAMP BEAM
Depending on the load in your vehicle,
the beam setting must be adjusted.
0 - 1 or 2 people in the front seats.
1 - 5 people.
2 - 6 to 9 people.
3 - Driver + maximum authorised loads.
Do not cover the brightness sensor
located on the windscreen, behind the
mirror. It is used for the automatic switching
on of the lights and for the automatic wipers. The side lights and dipped
beam headlamps switch
on automatically if the light
is poor, or during operation
of the windscreen wipers. They switch off as
soon as the light becomes bright enough or
the windscreen wipers stop.
This function is not compatible with the
daytime lights. Deactivation
Turn the ring forwards or rearwards. The
deactivation of this function is accompanied
by a message on the display.
The function is deactivated temporarily when
you use the manual lights stalk.
Initial setting is position 0.
In foggy weather or in snow, the
brightness sensor can detect sufficient
light. As a consequence, the lights will
not come on automatically. If necessary,
you must switch on the dipped headlamps
manually.