lock Citroen JUMPY MULTISPACE RHD 2012 2.G User Guide
[x] Cancel search | Manufacturer: CITROEN, Model Year: 2012, Model line: JUMPY MULTISPACE RHD, Model: Citroen JUMPY MULTISPACE RHD 2012 2.GPages: 278, PDF Size: 10.34 MB
Page 31 of 278
29
Instruments and controls
READY TO GO
2
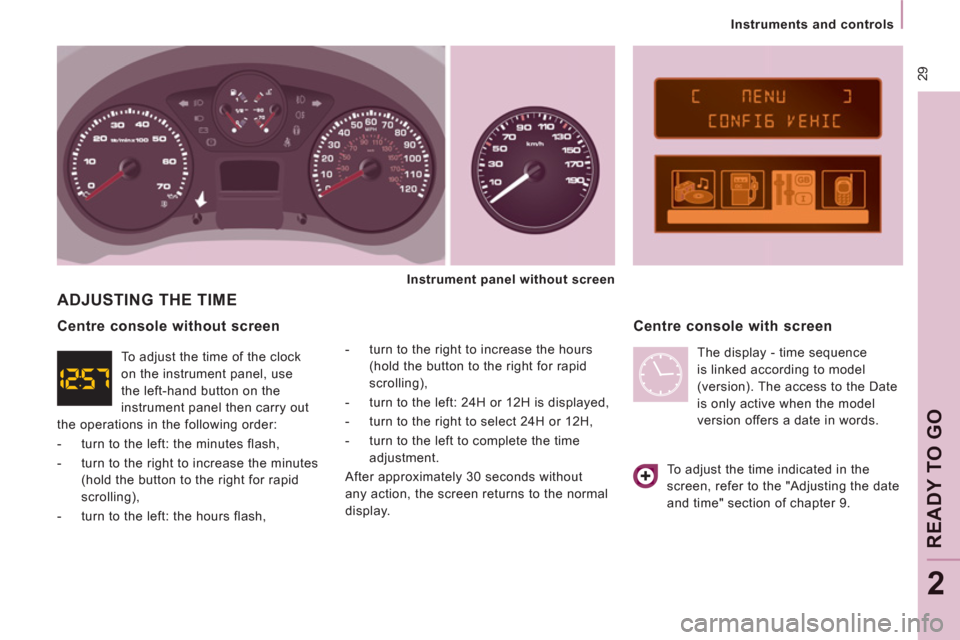
ADJUSTING THE TIME
- turn to the right to increase the hours
(hold the button to the right for rapid
scrolling),
- turn to the left: 24H or 12H is displayed,
- turn to the right to select 24H or 12H,
- turn to the left to complete the time
adjustment.
After approximately 30 seconds without
any action, the screen returns to the normal
display.
Centre console with screen
Centre console without screen
To adjust the time indicated in the
screen, refer to the "Adjusting the date
and time" section of chapter 9.
Instrument panel without
screen
To adjust the time of the clock
on the instrument panel, use
the left-hand button on the
instrument panel then carry out
the operations in the following order:
- turn to the left: the minutes flash,
- turn to the right to increase the minutes
(hold the button to the right for rapid
scrolling),
- turn to the left: the hours flash, The display - time sequence
is linked according to model
(version). The access to the Date
is only active when the model
version offers a date in words.
Page 35 of 278
ABS
ESP
33
Instruments and controls
READY TO GO
2
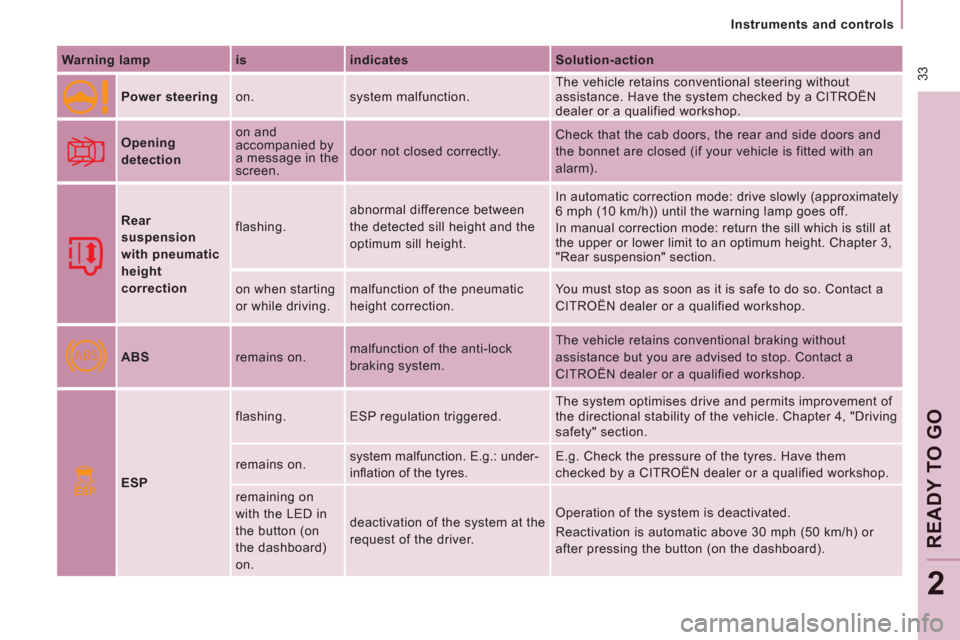
Warning lamp
is
indicates
Solution-action
Power steering on. system malfunction. The vehicle retains conventional steering without
assistance. Have the system checked by a CITROËN
dealer or a qualified workshop.
Opening
detection on and
accompanied by
a message in the
screen. door not closed correctly. Check that the cab doors, the rear and side doors and
the bonnet are closed (if your vehicle is fitted with an
alarm).
Rear
suspension
with pneumatic
height
correction flashing. abnormal difference between
the detected sill height and the
optimum sill height. In automatic correction mode: drive slowly (approximately
6 mph (10 km/h)) until the warning lamp goes off.
In manual correction mode: return the sill which is still at
the upper or lower limit to an optimum height. Chapter 3,
"Rear suspension" section.
on when starting
or while driving. malfunction of the pneumatic
height correction. You must stop as soon as it is safe to do so. Contact a
CITROËN dealer or a qualified workshop.
ABS remains on. malfunction of the anti-lock
braking system. The vehicle retains conventional braking without
assistance but you are advised to stop. Contact a
CITROËN dealer or a qualified workshop.
ESP flashing. ESP regulation triggered. The system optimises drive and permits improvement of
the directional stability of the vehicle. Chapter 4, "Driving
safety" section.
remains on. system malfunction. E.g.: under-
infl ation of the tyres. E.g. Check the pressure of the tyres. Have them
checked by a CITROËN dealer or a qualified workshop.
remaining on
with the LED in
the button (on
the dashboard)
on.
deactivation of the system at the
request of the driver. Operation of the system is deactivated.
Reactivation is automatic above 30 mph (50 km/h) or
after pressing the button (on the dashboard).
Page 41 of 278
39
Instruments and controls
READY TO GO
2
After this operation, if you wish to
disconnect the battery, lock the vehicle
and wait for at least five minutes, otherwise
the zero re-set will not be registered.
Zero re-set
Your CITROËN dealer or a qualified
workshop carries out this operation after
each service.
However, if you carry out the service
yourself, the re-set procedure is as follows:
- switch off the ignition,
- press and hold the trip recorder reset
button,
- switch on the ignition.
The display begins a countdown.
When the display shows "=0"
, release the
button; the spanner disappears.
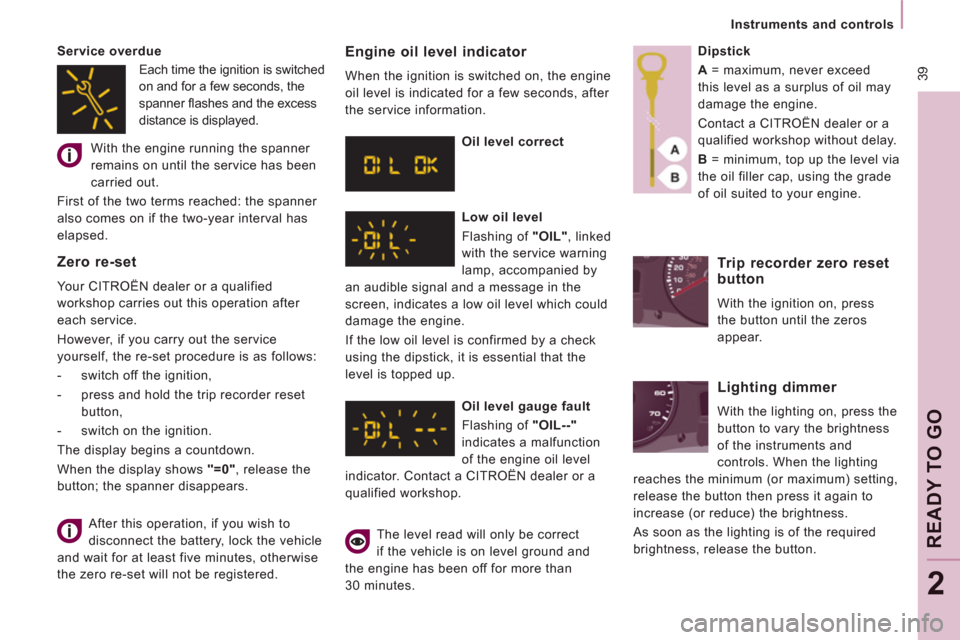
Engine oil level indicator
When the ignition is switched on, the engine
oil level is indicated for a few seconds, after
the service information.
Oil level correct
Low oil level
Flashing of "OIL"
, linked
with the service warning
lamp, accompanied by
an audible signal and a message in the
screen, indicates a low oil level which could
damage the engine.
If the low oil level is confirmed by a check
using the dipstick, it is essential that the
level is topped up.
Oil level gauge fault
Flashing of "OIL--"
indicates a malfunction
of the engine oil level
indicator. Contact a CITROËN dealer or a
qualified workshop.
The level read will only be correct
if the vehicle is on level ground and
the engine has been off for more than
30 minutes.
Dipstick
A
= maximum, never exceed
this level as a surplus of oil may
damage the engine.
Contact a CITROËN dealer or a
qualified workshop without delay.
B
= minimum, top up the level via
the oil filler cap, using the grade
of oil suited to your engine.
Trip recorder zero reset
button
With the ignition on, press
the button until the zeros
appear.
Lighting dimmer
With the lighting on, press the
button to vary the brightness
of the instruments and
controls. When the lighting
reaches the minimum (or maximum) setting,
release the button then press it again to
increase (or reduce) the brightness.
As soon as the lighting is of the required
brightness, release the button.
Service overdue
With the engine running the spanner
remains on until the service has been
carried out.
First of the two terms reached: the spanner
also comes on if the two-year interval has
elapsed.
Each time the ignition is switched
on and for a few seconds, the
spanner fl ashes and the excess
distance is displayed.
Page 45 of 278

43
Gearboxes and steering wheel
READY TO GO
2
Manual mode
Manual sequential gear changing.
- Select gear lever position M
,
- push the gear lever towards the + sign
to change up, from 1 through to 6,
- conversely, push the gear lever towards
the - sign to change down.
In manual mode, it is only possible to
change from one gear to another if the
vehicle speed and engine speed permit.
If they do not, the vehicle will operate
temporarily in automatic mode.
When the vehicle is stationary or moving
very slowly, the gearbox automatically
selects first gear. You can change from position D
(automatic mode) to position M
(manual mode) at any time.
Good practice
Never select position N
when the vehicle is
moving.
Never select positions P
or R
unless the
vehicle is stationary.
Never change between positions to optimise
braking on a slippery surface.
There is a risk of damage to the gearbox:
- if you press the accelerator and brake
pedals at the same time,
- if you force the gear lever from position P
to another position in the event of a
battery failure.
When the engine is at idle, brakes not
applied, if position R
, D
or M
is selected the
vehicle moves even without the accelerator
being pressed.
For this reason, do not leave children
unsupervised inside the vehicle, with the
engine running
.
Operating fault
Any operating fault is indicated by an
audible signal, accompanied by the
message "Automatic gear fault"
in the
screen.
In this situation the gearbox operates in
downgrade mode (locked in 3rd gear). You
may feel a substantial knock when changing
from P
to R
and from N
to R
(this will not
cause any damage to the gearbox).
Do not exceed 60 mph (100 km/h), keeping
within the limit of local speed restrictions.
Contact a CITROËN dealer or a qualified
workshop as soon as possible.
Page 46 of 278
44
Gearboxes and steering wheel
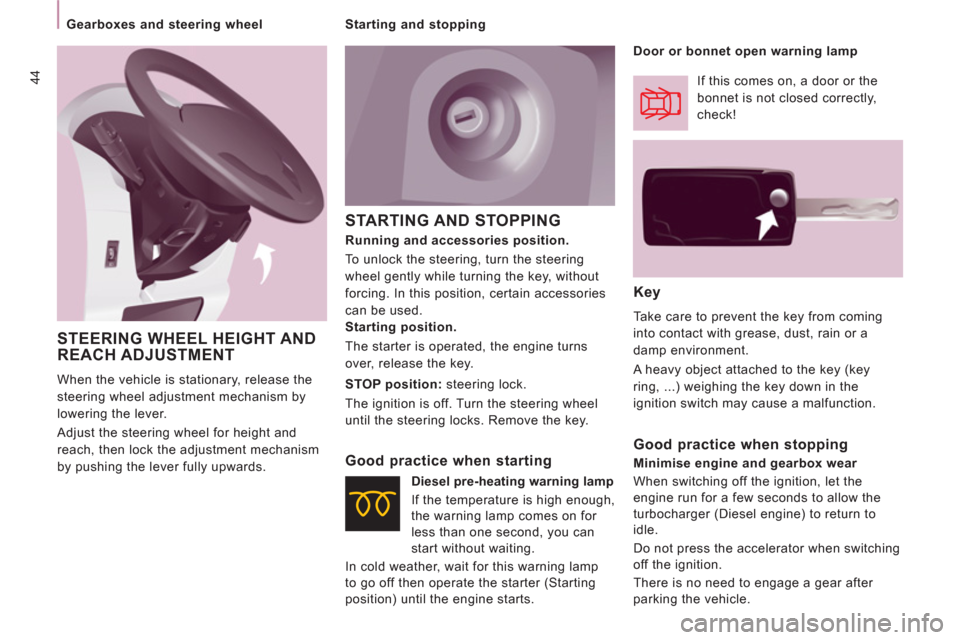
STARTING AND STOPPING
Key
Take care to prevent the key from coming
into contact with grease, dust, rain or a
damp environment.
A heavy object attached to the key (key
ring, ...) weighing the key down in the
ignition switch may cause a malfunction.
Starting position.
The starter is operated, the engine turns
over, release the key.
STOP position:
steering lock.
The ignition is off. Turn the steering wheel
until the steering locks. Remove the key.
Good practice when starting
If this comes on, a door or the
bonnet is not closed correctly,
check!
Diesel pre-heating warning lamp
If the temperature is high enough,
the warning lamp comes on for
less than one second, you can
start without waiting.
In cold weather, wait for this warning lamp
to go off then operate the starter (Starting
position) until the engine starts.
Good practice when stopping
Minimise engine and gearbox wear
When switching off the ignition, let the
engine run for a few seconds to allow the
turbocharger (Diesel engine) to return to
idle.
Do not press the accelerator when switching
off the ignition.
There is no need to engage a gear after
parking the vehicle.
Running and accessories position.
To unlock the steering, turn the steering
wheel gently while turning the key, without
forcing. In this position, certain accessories
can be used.
Door or bonnet open warning lamp
STEERING WHEEL HEIGHT AND
REACH ADJUSTMENT
When the vehicle is stationary, release the
steering wheel adjustment mechanism by
lowering the lever.
Adjust the steering wheel for height and
reach, then lock the adjustment mechanism
by pushing the lever fully upwards.
Starting and stopping
Page 78 of 278
76
Seats
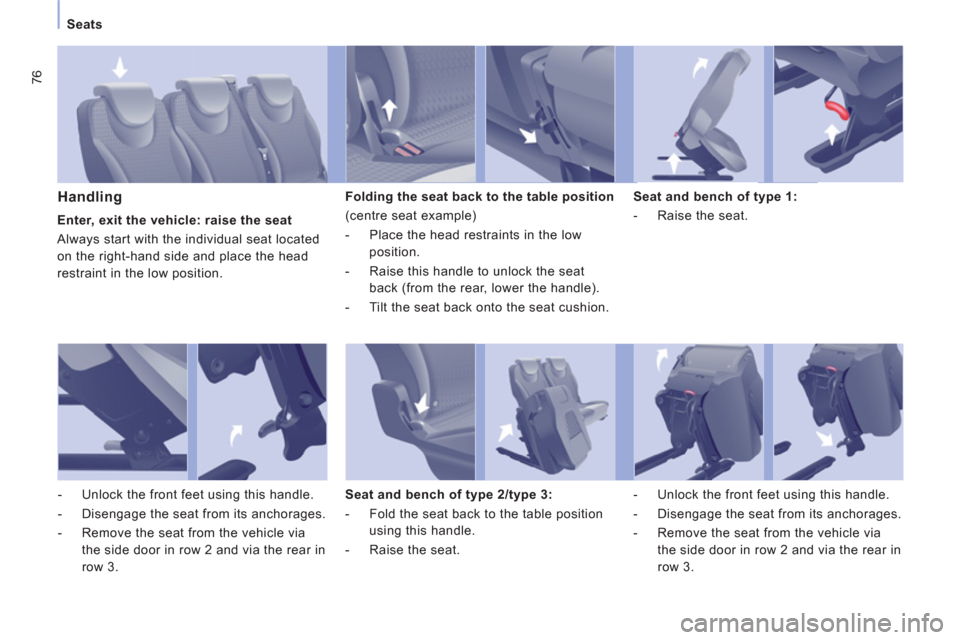
Handling
Folding the seat back to the table position
(centre seat example)
- Place the head restraints in the low
position.
- Raise this handle to unlock the seat
back (from the rear, lower the handle).
- Tilt the seat back onto the seat cushion.
Seat and bench of type 1:
- Raise the seat.
Seat and bench of type 2/type 3:
- Fold the seat back to the table position
using this handle.
- Raise the seat.
- Unlock the front feet using this handle.
- Disengage the seat from its anchorages.
- Remove the seat from the vehicle via
the side door in row 2 and via the rear in
row 3.
- Unlock the front feet using this handle.
- Disengage the seat from its anchorages.
- Remove the seat from the vehicle via
the side door in row 2 and via the rear in
row 3.
Enter, exit the vehicle: raise the seat
Always start with the individual seat located
on the right-hand side and place the head
restraint in the low position.
Page 79 of 278
77
Seats
EASE OF USE and COMFOR
T
3
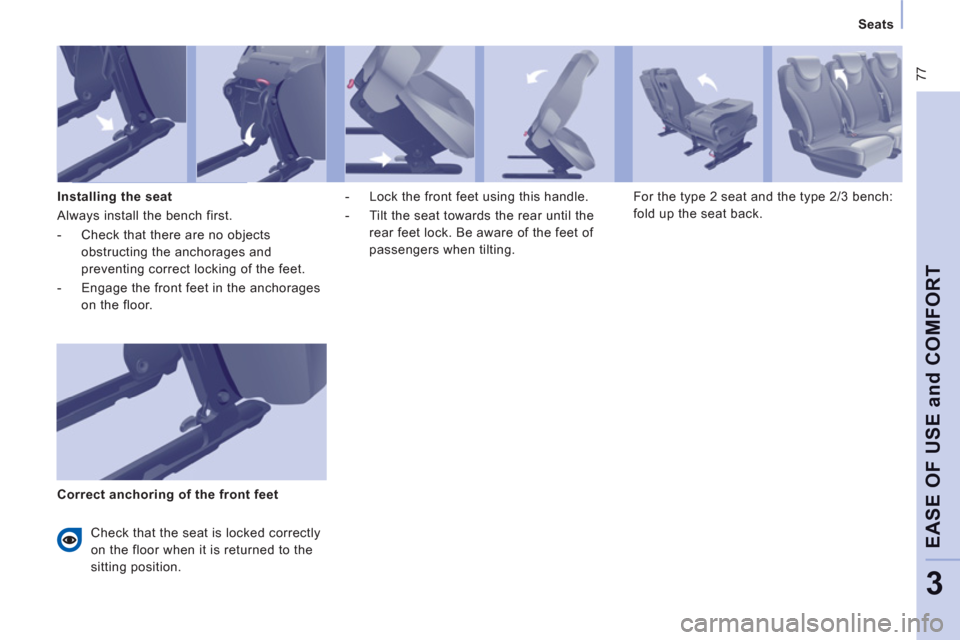
Installing the seat
Always install the bench first.
- Check that there are no objects
obstructing the anchorages and
preventing correct locking of the feet.
- Engage the front feet in the anchorages
on the floor.
- Lock the front feet using this handle.
- Tilt the seat towards the rear until the
rear feet lock. Be aware of the feet of
passengers when tilting. For the type 2 seat and the type 2/3 bench:
fold up the seat back.
Correct anchoring of the front feet
Check that the seat is locked correctly
on the floor when it is returned to the
sitting position.
Page 82 of 278
80
Practical information
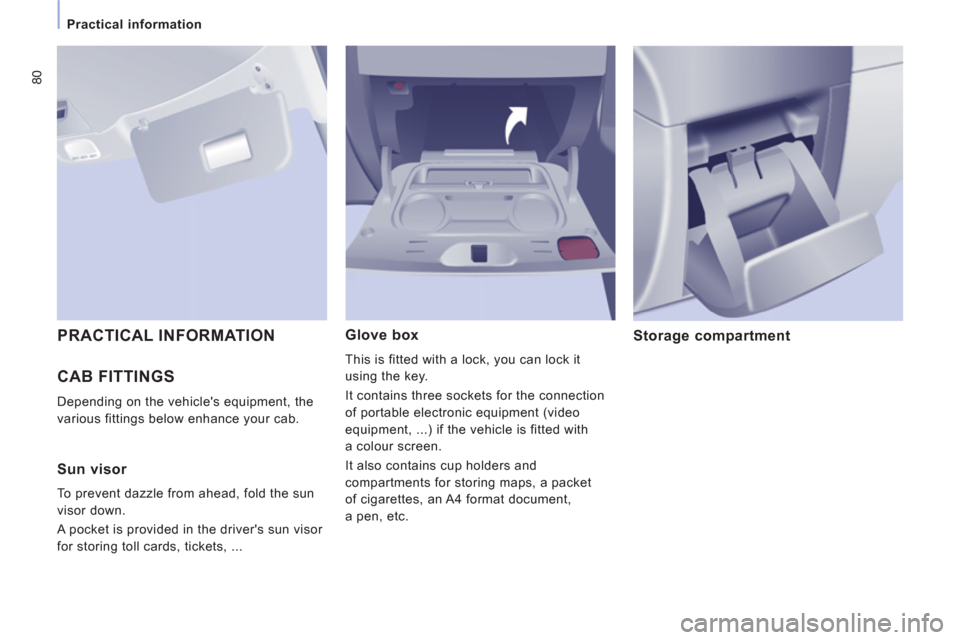
CAB FITTINGS
Depending on the vehicle's equipment, the
various fittings below enhance your cab.
Glove box
This is fitted with a lock, you can lock it
using the key.
It contains three sockets for the connection
of portable electronic equipment (video
equipment, ...) if the vehicle is fitted with
a colour screen.
It also contains cup holders and
compartments for storing maps, a packet
of cigarettes, an A4 format document,
a pen, etc.
Storage compartment
PRACTICAL INFORMATION
Sun visor
To prevent dazzle from ahead, fold the sun
visor down.
A pocket is provided in the driver's sun visor
for storing toll cards, tickets, ...
Page 85 of 278

83
Practical information
EASE OF USE and COMFOR
T
3
Permanently on, ignition on. Front: comes on when one of the
front or rear doors is opened.
Row 2 and row 3: comes on when
one of the rear doors or the boot
is opened, if fitted on your vehicle.
Permanently off.
Individual reading lamp
Rear courtesy lamp
If fitted on the vehicle, these are
switched on and off by means of a
manual switch, with the ignition on.
SEATING AREA COURTESY LAMPS
Automatic switching on/off
The front courtesy lamp comes on when the
key is removed from the ignition.
All of the courtesy lamps come on when
the vehicle is unlocked, when one of the
corresponding doors is opened and for
location of the vehicle using the remote
control.
They switch off gradually after the ignition is
switched on and when the vehicle is locked.
Front courtesy lamp
Page 91 of 278

89
Rear suspension
EASE OF USE and COMFOR
T
3
Deactivation of manual height correction Good practice
When stationary and with the ignition key
removed, excessive use of the system
consumes battery power.
Long term parking
Avoid parking for a long duration on ground
which could present a potential obstacle as
your vehicle could lower.
Following a long period out of use, the
height of the platform may change due to the
automatic height correction on unlocking or
on opening one of your vehicle's doors. With the vehicle stationary:
- press and hold,
- release the control.
Deactivation is confirmed by
the LED which is on. It remains on for
approximately 30 seconds.
Return to manual height correction
You must deactivate the manual height
correction in the following situations:
- when working underneath the vehicle,
- when changing a wheel,
- when the vehicle is being transported by
lorry, train, ferry, boat, ...
Driving with the height of the rear platform:
- too low, risks damaging the technical
components underneath the vehicle,
- too high, risks unstable driving.
If you start and the warning lamp flashes, to
switch it off:
- correct the position of the manual
control which is still at the lower or
upper limit,
- or drive slowly at above 6 mph
(10 km/h), until height correction returns
to automatic mode.
Warning lamp
Refer to the "Instruments and controls"
section of chapter 2. With the vehicle stationary:
- press and hold,
- release the control.
Return to manual correction is
confirmed by the LED which goes off.
According to the configuration, a beep may
be heard during these operations.