ESP Citroen JUMPY MULTISPACE RHD 2012 2.G Owner's Manual
[x] Cancel search | Manufacturer: CITROEN, Model Year: 2012, Model line: JUMPY MULTISPACE RHD, Model: Citroen JUMPY MULTISPACE RHD 2012 2.GPages: 278, PDF Size: 10.34 MB
Page 4 of 278
2
Contents
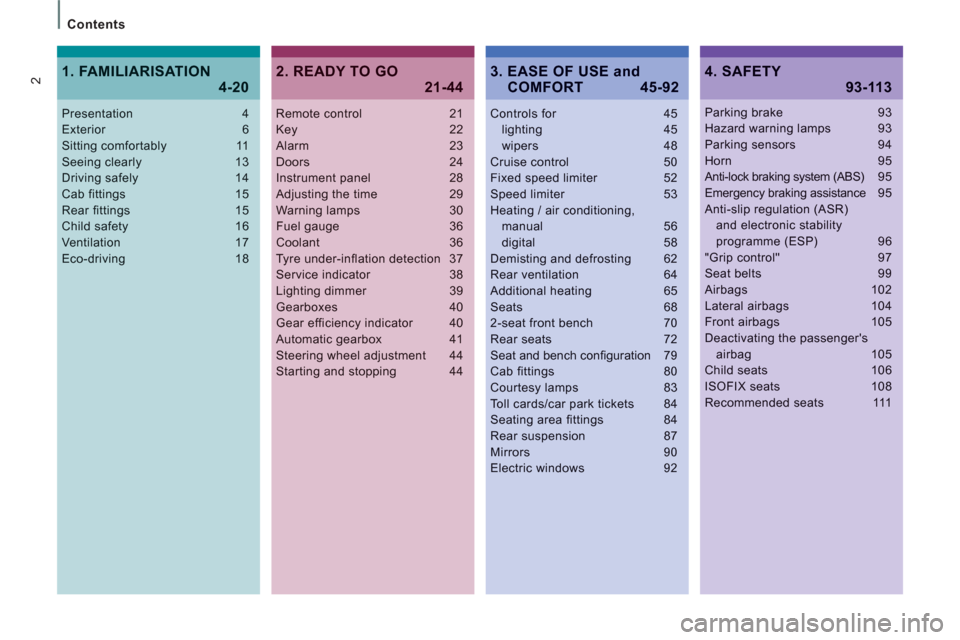
Remote control 21Key 22Alarm 23Doors 24Instrument panel 28Adjusting the time 29Warning lamps 30Fuel gauge 36Coolant 36Tyre under-inflation detection 37Service indicator 38Lighting dimmer 39Gearboxes 40Gear efficiency indicator 40Automatic gearbox 41Steering wheel adjustment 44Starting and stopping 44
Controls for 45lighting 45wipers 48Cruise control 50Fixed speed limiter 52Speed limiter 53Heating / air conditioning,manual 56digital 58Demisting and defrosting 62Rear ventilation 64Additional heating 65Seats 682-seat front bench 70Rear seats 72Seat and bench confi guration 79Cab fittings 80Courtesy lamps 83Toll cards/car park tickets 84Seating area fittings 84
Rear suspension 87Mirrors 90Electric windows 92
Presentation 4Exterior 6Sitting comfortably 11Seeing clearly 13Driving safely 14Cab fittings 15Rear fittings 15Child safety 16Ventilation 17Eco-driving 18
Parking brake 93Hazard warning lamps 93Parking sensors 94Horn 95Anti-lock braking system (ABS) 95Emergency braking assistance 95Anti-slip regulation (ASR) and electronic stability programme (ESP) 96"Grip control" 97Seat belts 99Airbags 102Lateral airbags 104Front airbags 105Deactivating the passenger'sairbag 105Child seats 106ISOFIX seats 108Recommended seats 111
2. READY TO GO
21-44
4. SAFETY
93-113
1. FAMILIARISATION
4-203. EASE OF USE and COMFORT 45-92
Page 12 of 278
Interior
10
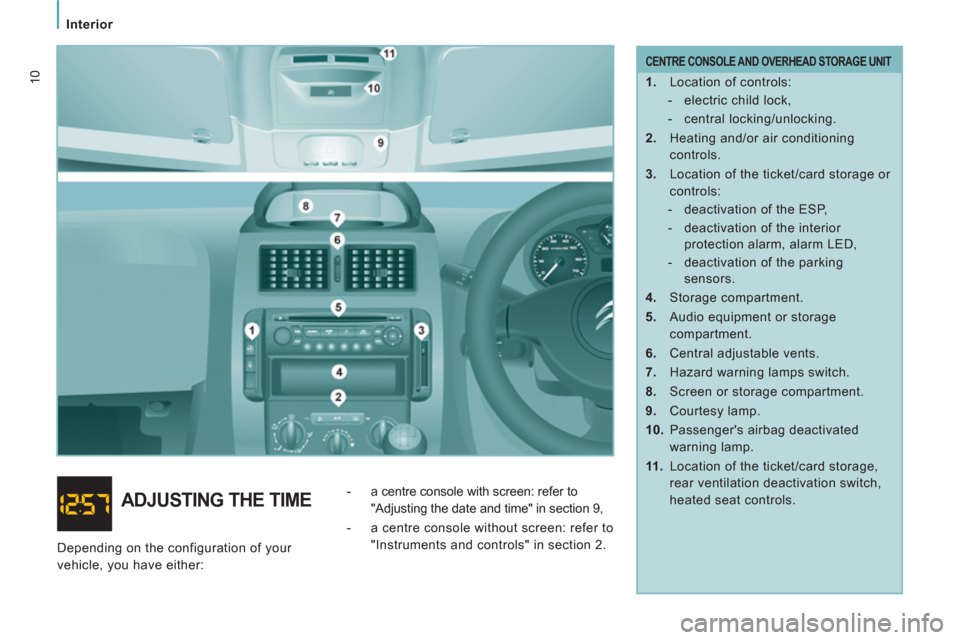
CENTRE CONSOLE AND OVERHEAD STORAGE UNIT
1.
Location of controls:
- electric child lock,
- central locking/unlocking.
2.
Heating and/or air conditioning
controls.
3.
Location of the ticket/card storage or
controls:
- deactivation of the ESP,
- deactivation of the interior
protection alarm, alarm LED,
- deactivation of the parking
sensors.
4.
Storage compartment.
5.
Audio equipment or storage
compartment.
6.
Central adjustable vents.
7.
Hazard warning lamps switch.
8.
Screen or storage compartment.
9.
Courtesy lamp.
10.
Passenger's airbag deactivated
warning lamp.
11 .
Location of the ticket/card storage,
rear ventilation deactivation switch,
heated seat controls.
ADJUSTING THE TIME
- a centre console with screen: refer to
"Adjusting the date and time" in section 9,
- a centre console without screen: refer to
"Instruments and controls" in section 2.
Depending on the configuration of your
vehicle, you have either:
Page 35 of 278
ABS
ESP
33
Instruments and controls
READY TO GO
2
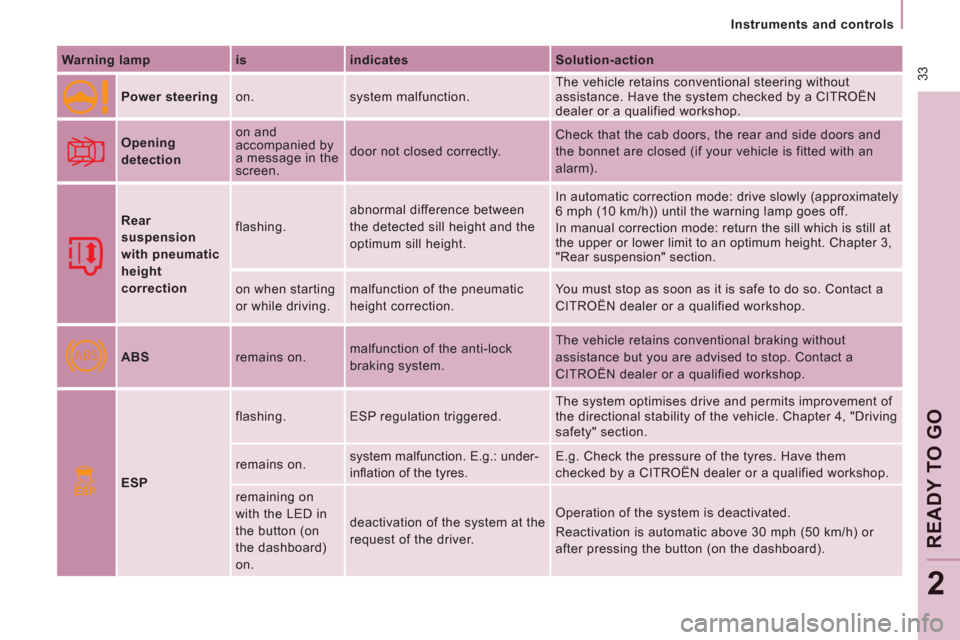
Warning lamp
is
indicates
Solution-action
Power steering on. system malfunction. The vehicle retains conventional steering without
assistance. Have the system checked by a CITROËN
dealer or a qualified workshop.
Opening
detection on and
accompanied by
a message in the
screen. door not closed correctly. Check that the cab doors, the rear and side doors and
the bonnet are closed (if your vehicle is fitted with an
alarm).
Rear
suspension
with pneumatic
height
correction flashing. abnormal difference between
the detected sill height and the
optimum sill height. In automatic correction mode: drive slowly (approximately
6 mph (10 km/h)) until the warning lamp goes off.
In manual correction mode: return the sill which is still at
the upper or lower limit to an optimum height. Chapter 3,
"Rear suspension" section.
on when starting
or while driving. malfunction of the pneumatic
height correction. You must stop as soon as it is safe to do so. Contact a
CITROËN dealer or a qualified workshop.
ABS remains on. malfunction of the anti-lock
braking system. The vehicle retains conventional braking without
assistance but you are advised to stop. Contact a
CITROËN dealer or a qualified workshop.
ESP flashing. ESP regulation triggered. The system optimises drive and permits improvement of
the directional stability of the vehicle. Chapter 4, "Driving
safety" section.
remains on. system malfunction. E.g.: under-
infl ation of the tyres. E.g. Check the pressure of the tyres. Have them
checked by a CITROËN dealer or a qualified workshop.
remaining on
with the LED in
the button (on
the dashboard)
on.
deactivation of the system at the
request of the driver. Operation of the system is deactivated.
Reactivation is automatic above 30 mph (50 km/h) or
after pressing the button (on the dashboard).
Page 37 of 278
35
Instruments and controls
READY TO GO
2
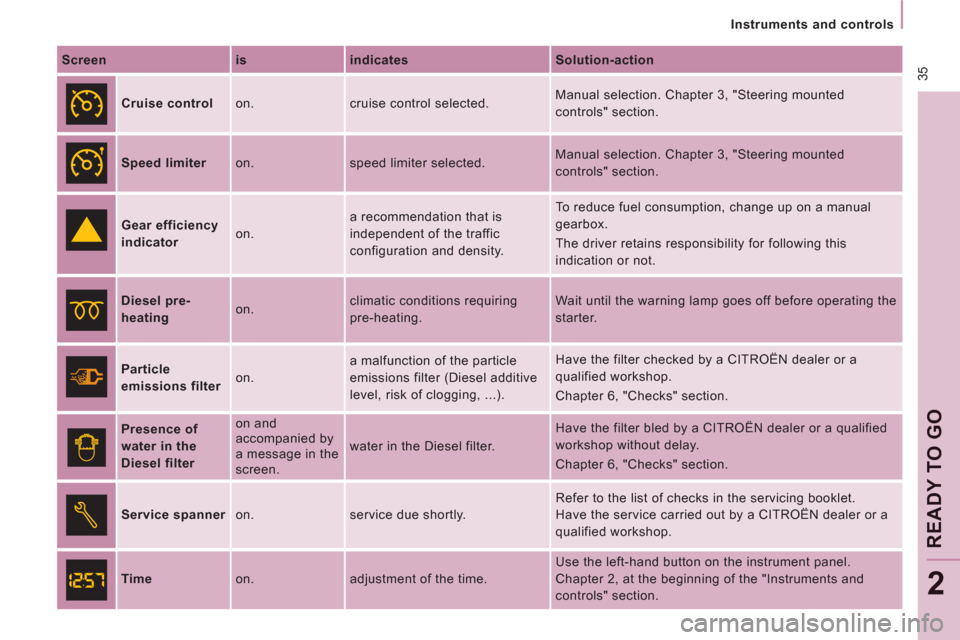
Screen
is
indicates
Solution-action
Cruise control on. cruise control selected. Manual selection. Chapter 3, "Steering mounted
controls" section.
Speed limiter on. speed limiter selected. Manual selection. Chapter 3, "Steering mounted
controls" section.
Gear efficiency
indicat
or on. a recommendation that is
independent of the traffic
configuration and density. To reduce fuel consumption, change up on a manual
gearbox.
The driver retains responsibility for following this
indication or not.
Diesel pre-
heating on. climatic conditions requiring
pre-heating. Wait until the warning lamp goes off before operating the
starter.
Particle
emissions filter on. a malfunction of the particle
emissions filter (Diesel additive
level, risk of clogging, ...). Have the filter checked by a CITROËN dealer or a
qualified workshop.
Chapter 6, "Checks" section.
Presence of
water in the
Diesel filter on and
accompanied by
a message in the
screen. water in the Diesel filter. Have the filter bled by a CITROËN dealer or a qualified
workshop without delay.
Chapter 6, "Checks" section.
Service spanner
on. service due shortly. Refer to the list of checks in the servicing booklet.
Have the service carried out by a CITROËN dealer or a
qualified workshop.
Time on. adjustment of the time. Use the left-hand button on the instrument panel.
Chapter 2, at the beginning of the "Instruments and
controls" section.
Page 40 of 278
Instruments and controls
The points at which a service is due are
calculated from the last indicator zero reset.
The point at which a service is due is
determined by two parameters:
- the distance travelled,
- the time which has elapsed since the
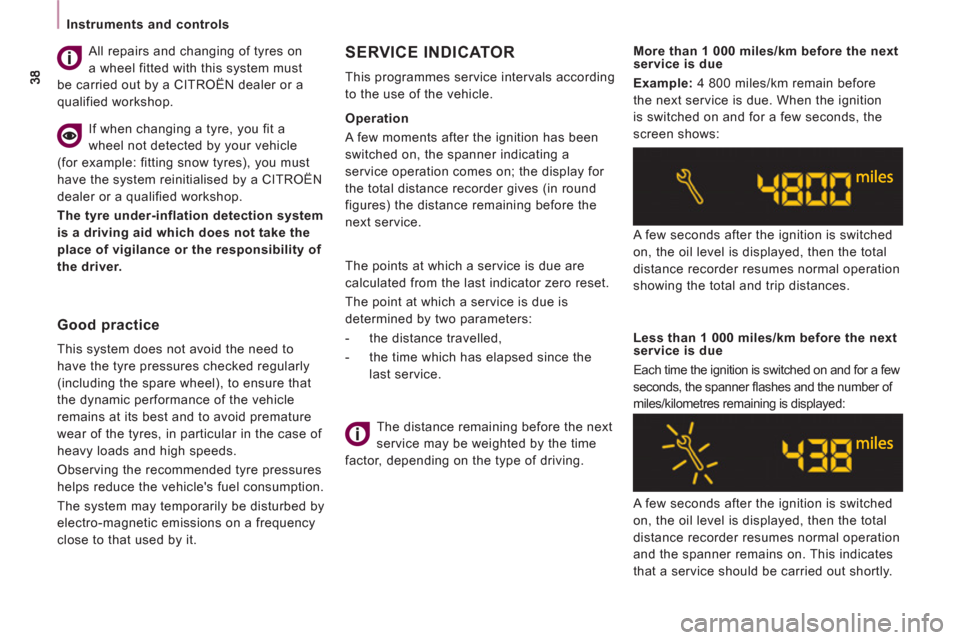
last service. A few seconds after the ignition is switched
on, the oil level is displayed, then the total
distance recorder resumes normal operation
showing the total and trip distances.
Less than 1 000 miles/km before the next
service is due
Each time the ignition is switched on and for a few
seconds, the spanner fl ashes and the number of
miles/kilometres remaining is displayed:
A few seconds after the ignition is switched
on, the oil level is displayed, then the total
distance recorder resumes normal operation
and the spanner remains on. This indicates
that a service should be carried out shortly. The distance remaining before the next
service may be weighted by the time
factor, depending on the type of driving.
More than 1 000 miles/km before the next
service is due
Example:
4 800 miles/km remain before
the next service is due. When the ignition
is switched on and for a few seconds, the
screen shows:
SERVICE INDICATOR
This programmes service intervals according
to the use of the vehicle.
Operation
A few moments after the ignition has been
switched on, the spanner indicating a
service operation comes on; the display for
the total distance recorder gives (in round
figures) the distance remaining before the
next service.
Good practice
This system does not avoid the need to
have the tyre pressures checked regularly
(including the spare wheel), to ensure that
the dynamic performance of the vehicle
remains at its best and to avoid premature
wear of the tyres, in particular in the case of
heavy loads and high speeds.
Observing the recommended tyre pressures
helps reduce the vehicle's fuel consumption.
The system may temporarily be disturbed by
electro-magnetic emissions on a frequency
close to that used by it. All repairs and changing of tyres on
a wheel fitted with this system must
be carried out by a CITROËN dealer or a
qualified workshop.
If when changing a tyre, you fit a
wheel not detected by your vehicle
(for example: fitting snow tyres), you must
have the system reinitialised by a CITROËN
dealer or a qualified workshop.
The tyre under-inflation detection system
is a driving aid which does not take the
place of vigilance or the responsibility of
the driver.
Page 42 of 278

40
Gearboxes and steering wheel
To change gear easily, always depress the
clutch pedal fully.
To prevent the mat from becoming caught
under the pedal:
- ensure that the mat is positioned
correctly,
- never fit one mat on top of another.
When driving, avoid leaving your hand on
the gear knob as the force exerted, even if
slight, may wear the internal components of
the gearbox over time.
GEARBOXES AND STEERING WHEEL
5-speed gearbox
6-speed gearbox
Changing into 5 th
or 6 th
gear
Move the gear lever fully to the right to
engage 5 th or 6 th
gear.
GEAR EFFICIENCY INDICATOR
In order to drive as fuel efficiently
as possible with a manual
gearbox, this indicator lamp
indicates to the driver when to
change up.
The driver remains responsible for deciding
whether or not to follow this indication, since
the indicator lamp comes on without taking
into account the configuration of the road,
the amount of traffic and safety factors.
The system cannot be deactivated.
When reverse gear is engaged
and when changing down whilst
decelerating, the function is not active.
Engaging reverse gear
In the 6-speed configuration, raise the collar
under the gear knob to engage reverse gear.
Never engage reverse gear before the
vehicle is completely stationary.
The lever should be moved slowly to reduce
the noise on engaging reverse gear.
Page 43 of 278

41
Gearboxes and steering wheel
READY TO GO
2
AUTOMATIC GEARBOX
Selecting positions
- Move the lever select a position.
Once the position is selected, the
corresponding indicator lamp appears in
the instrument panel screen.
Park: position of the lever for
parking.
To immobilise the vehicle or start
the engine. Reverse: position of the lever for
reverse gear.
To reverse the vehicle.
Neutral: position of the lever for
neutral.
To park the vehicle (parking brake
on) and start the engine. Drive: position of the lever for
driving.
To move the vehicle forwards in
automatic mode.
Manual: selection of the gears by
pushing or pulling the gear lever
(+ or -).
To move the vehicle forwards in
manual mode.
Page 54 of 278

52
Steering mounted controls
Switching the function off
- Place the dial in position 0
or switch off
the ignition to switch everything off.
Good practice
When changing the programmed reference
speed by means of a maintained press,
pay attention as the speed can increase or
decrease rapidly.
Do not use the cruise control on slippery
roads or in heavy traffic.
In the event of a steep slope, the cruise
control cannot prevent the vehicle from
exceeding the programmed speed.
In any event, the cruise control cannot
replace the need to observe the speed limits,
nor can it replace the need for vigilance and
responsibility on the part of the driver.
It is advisable to leave your feet near the
pedals.
To avoid any jamming under the pedals:
- ensure that the mat and its fixings on the
floor are positioned correctly,
- never place one mat on top of another.
The programmed speed is cleared then
replaced by three dashes. Contact a
CITROËN dealer or a qualified workshop to
have the system checked. Using the accelerator:
- exceed the memorised speed until the
speed required is reached,
- press the Set +
or Set -
button.
To memorise a speed lower than the
previous one:
- press the Set -
button.
A brief press decreases the speed by 1 mph (km/h).
A maintained press decreases the speed in
steps of 5 mph (km/h).
Cancelling the programmed reference speed
When the vehicle becomes stationary, after
switching off the ignition, the system no
longer memorises a speed.
FIXED SPEED LIMITER
If your vehicle is fitted with this function,
the speed of your vehicle can be limited to
a fixed speed of approximately 56, 60, 70
or 80 mph (90, 100, 110 or 130 km/h). The
fixed maximum speed cannot be changed.
The fixed speed limiter is not a function
of the cruise control type. It cannot be
activated or deactivated by the driver while
driving.
Page 55 of 278

53
Steering mounted controls
EASE OF USE and COMFOR
T
3
SPEED LIMITER "LIMIT"
However, pressing the pedal beyond this
point of resistance to the floor allows the
programmed speed to be exceeded. To
resume use of the limiter, simply reduce
the pressure on the accelerator pedal
gradually and return to a speed below that
programmed. Function selected,
displaying of the "Speed
Limiter" symbol.
Function deactivated,
last programmed
speed - OFF
(example at 65 mph (107 km/h)).
Function activated
(example at 65 mph (107 km/h)).
Vehicle speed above
(example 70 mph
(118 km/h)),
the programmed speed
is displayed flashing.
Operating fault detected,
OFF
- the dashes flash. This speed limiter shows the function
selection status in the instrument panel and
displays the programmed speed:
The operating actions may be carried out
when stationary, with the engine running,
or with the vehicle moving. "This is the selected speed which the driver
does not wish to exceed".
This selection is made with the engine
running while stationary or with the vehicle
moving. The minimum speed which can be
programmed is 20 mph (30 km/h).
The speed of the vehicle responds to the
pressure of the driver's foot as far as the
accelerator pedal point of resistance which
indicates that the programmed speed has
been reached.
Page 57 of 278

55
Steering mounted controls
EASE OF USE and COMFOR
T
3
Switching the function off
- Place the switch in position 0
or switch
off the ignition to switch the system off.
The last programmed speed remains in the
memory.
Exceeding the programmed speed
Pressing the accelerator pedal in order to
exceed the programmed speed will have
no effect unless you press the pedal firmly
beyond the point of resistance
.
The limiter is deactivated temporarily and
the programmed speed flashes.
Good practice
Operating fault
The programmed speed is cleared then
replaced by three dashes.
Contact a CITROËN dealer or a qualified
workshop to have the system checked.
Flashing of the speed
The speed flashes:
- following forcing of the accelerator point
of resistance,
- when the limiter cannot prevent an
increase in the vehicle speed due to the
profile of the road or on a steep descent,
- in the event of sharp acceleration.
To return to the limiter function, reduce your
speed to below the programmed speed. In any event, the speed limiter cannot
replace the need to observe speed limits,
nor can it replace the need for vigilance and
responsibility on the part of the driver.
Always pay attention to the profile of the
road and sharp acceleration and stay in
complete control of your vehicle.
To avoid any jamming under the pedals:
- ensure that the mat and its fixings on the
floor are positioned correctly,
- never place one mat on top of another.