window Citroen NEMO 2008 1.G Owner's Manual
[x] Cancel search | Manufacturer: CITROEN, Model Year: 2008, Model line: NEMO, Model: Citroen NEMO 2008 1.GPages: 131, PDF Size: 1.96 MB
Page 5 of 131
8
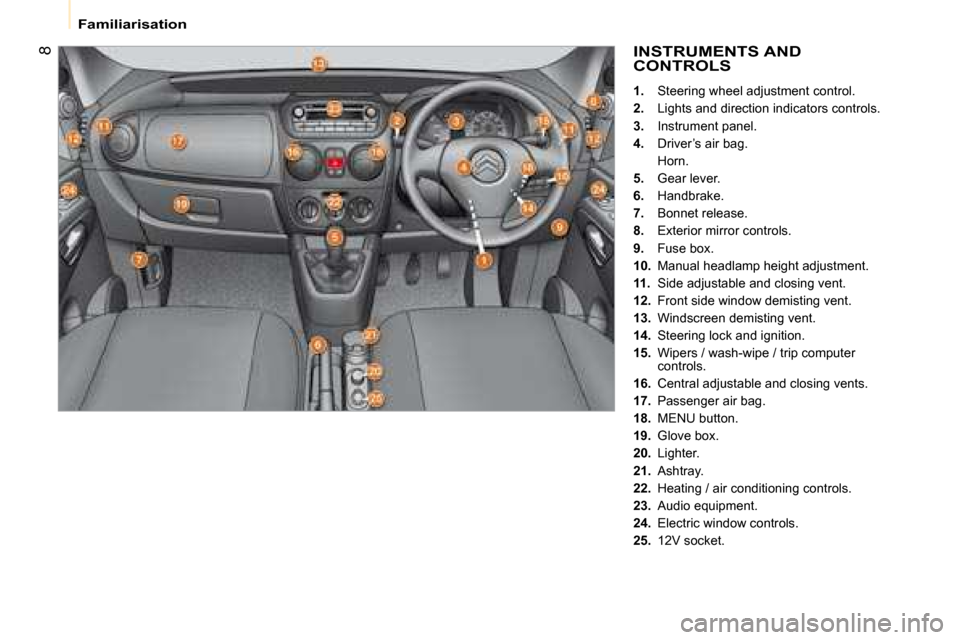
Familiarisation INSTRUMENTS AND
CONTROLS
1. Steering wheel adjustment control.
2. Lights and direction indicators controls.
3. Instrument panel.
4. Driver’s air bag.
Horn.
5. Gear lever.
6. Handbrake.
7. Bonnet release.
8. Exterior mirror controls.
9. Fuse box.
10. Manual headlamp height adjustment.
11. Side adjustable and closing vent.
12. Front side window demisting vent.
13. Windscreen demisting vent.
14. Steering lock and ignition.
15. Wipers / wash-wipe / trip computer
controls.
16. Central adjustable and closing vents.
17. Passenger air bag.
18. MENU button.
19. Glove box.
20. Lighter.
21. Ashtray.
22. Heating / air conditioning controls.
23. Audio equipment.
24. Electric window controls.
25. 12V socket.
Page 44 of 131
37
1
READY TO SET OFF
Steering wheel controls
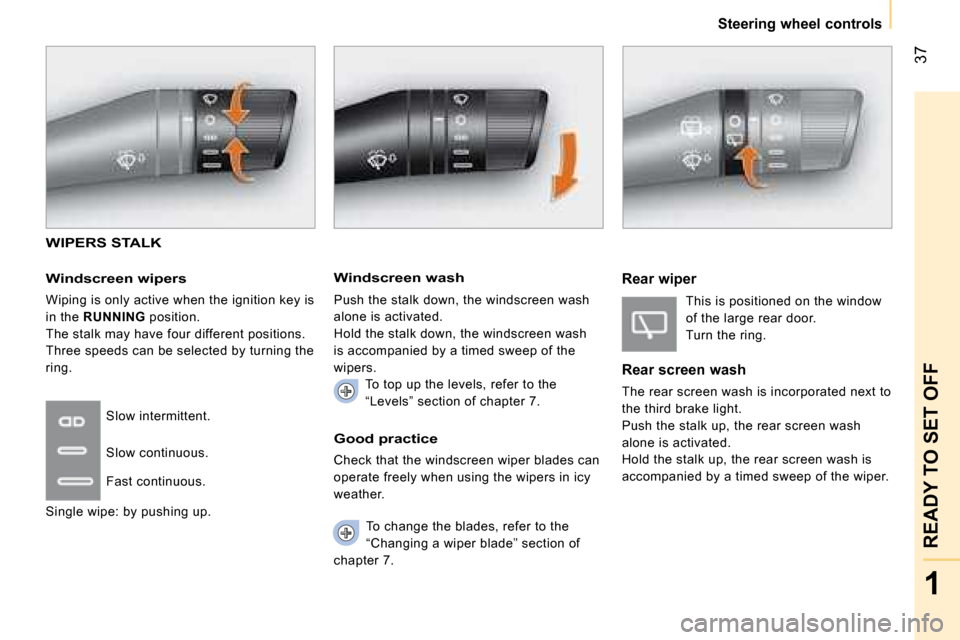
WIPERS STALK
Windscreen wipers
Wiping is only active when the ignition key is
in the RUNNING position.
The stalk may have four different positions.
Three speeds can be selected by turning the
ring.
To change the blades, refer to the
“Changing a wiper blade” section of
chapter 7.
Good practice
Check that the windscreen wiper blades can
operate freely when using the wipers in icy
weather.
Slow intermittent.
Slow continuous.
Fast continuous.
Single wipe: by pushing up.
Windscreen wash
Push the stalk down, the windscreen wash
alone is activated.
Hold the stalk down, the windscreen wash
is accompanied by a timed sweep of the
wipers. To top up the levels, refer to the
“Levels” section of chapter 7.
Rear wiper
This is positioned on the window
of the large rear door.
Turn the ring.
Rear screen wash
The rear screen wash is incorporated next to
the third brake light.
Push the stalk up, the rear screen wash
alone is activated.
Hold the stalk up, the rear screen wash is
accompanied by a timed sweep of the wiper.
Page 45 of 131
38
Mirrors and windows
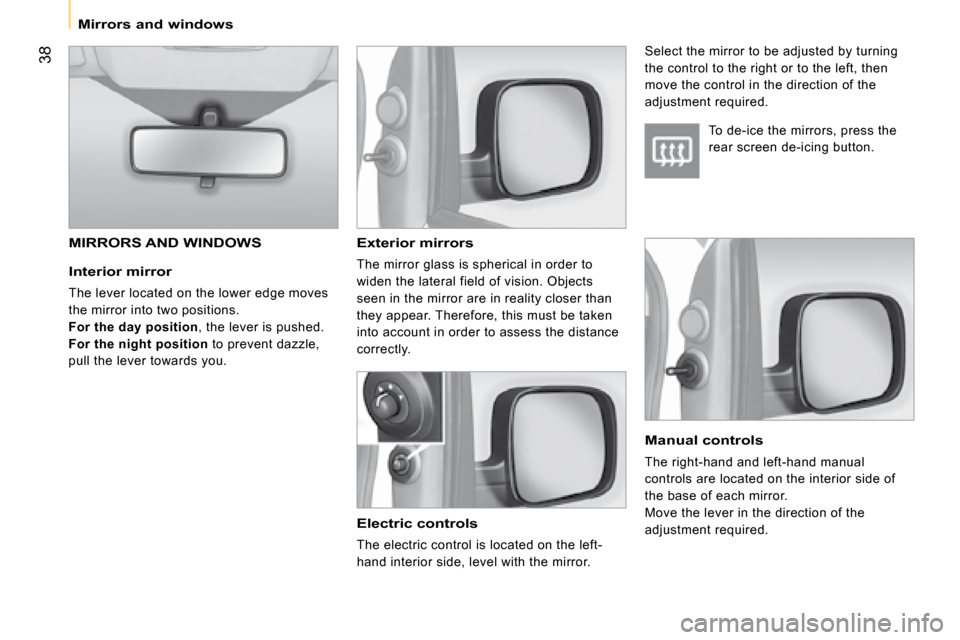
Interior mirror
The lever located on the lower edge moves
the mirror into two positions.
For the day position , the lever is pushed.
For the night position to prevent dazzle,
pull the lever towards you.
Exterior mirrors
The mirror glass is spherical in order to
widen the lateral field of vision. Objects
seen in the mirror are in reality closer than
they appear. Therefore, this must be taken
into account in order to assess the distance
correctly.
Electric controls
The electric control is located on the left-
hand interior side, level with the mirror.
MIRRORS AND WINDOWS
To de-ice the mirrors, press the
rear screen de-icing button.
Select the mirror to be adjusted by turning
the control to the right or to the left, then
move the control in the direction of the
adjustment required.
Manual controls
The right-hand and left-hand manual
controls are located on the interior side of
the base of each mirror.
Move the lever in the direction of the
adjustment required.
Page 46 of 131
39
1
READY TO SET OFF
Mirrors and windows
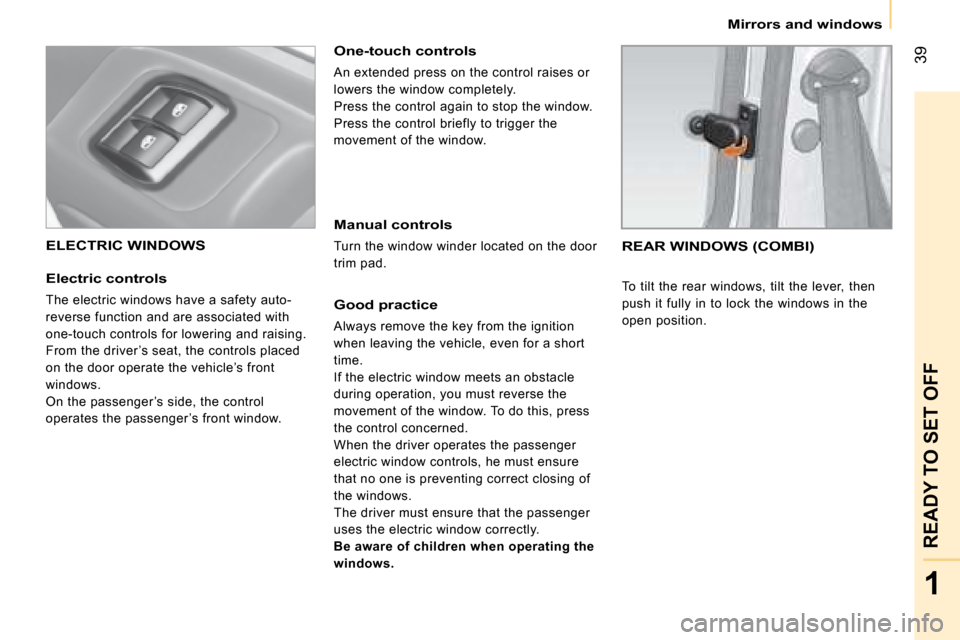
ELECTRIC WINDOWS
Electric controls
The electric windows have a safety auto-
reverse function and are associated with
one-touch controls for lowering and raising.
From the driver ’s seat, the controls placed
on the door operate the vehicle’s front
windows.
On the passenger ’s side, the control
operates the passenger ’s front window.
One-touch controls
An extended press on the control raises or
lowers the window completely.
Press the control again to stop the window.
Press the control briefly to trigger the
movement of the window.
Manual controls
Turn the window winder located on the door
trim pad.
Good practice
Always remove the key from the ignition
when leaving the vehicle, even for a short
time.
If the electric window meets an obstacle
during operation, you must reverse the
movement of the window. To do this, press
the control concerned.
When the driver operates the passenger
electric window controls, he must ensure
that no one is preventing correct closing of
the windows.
The driver must ensure that the passenger
uses the electric window correctly.
Be aware of children when operating the
windows.
REAR WINDOWS (COMBI)
To tilt the rear windows, tilt the lever, then
push it fully in to lock the windows in the
open position.
Page 74 of 131
68
Ventilation
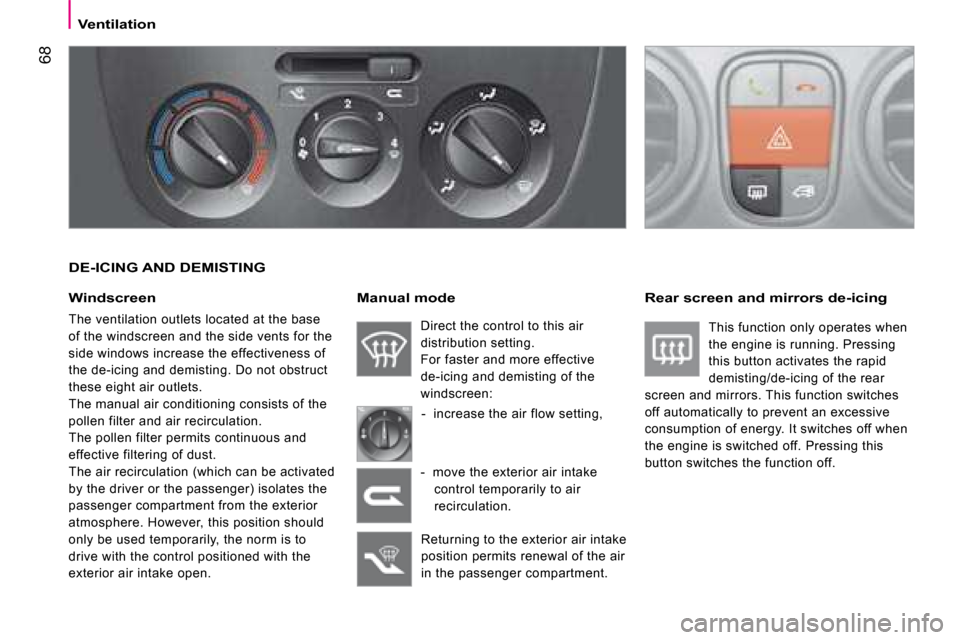
DE-ICING AND DEMISTING
Windscreen
The ventilation outlets located at the base
of the windscreen and the side vents for the
side windows increase the effectiveness of
the de-icing and demisting. Do not obstruct
these eight air outlets.
The manual air conditioning consists of the
pollen filter and air recirculation.
The pollen filter permits continuous and
effective filtering of dust.
The air recirculation (which can be activated
by the driver or the passenger) isolates the
passenger compartment from the exterior
atmosphere. However, this position should
only be used temporarily, the norm is to
drive with the control positioned with the
exterior air intake open.
Manual mode
Direct the control to this air
distribution setting.
For faster and more effective
de-icing and demisting of the
windscreen: - increase the air flow setting,
Returning to the exterior air intake
position permits renewal of the air
in the passenger compartment.
Rear screen and mirrors de-icing
This function only operates when
the engine is running. Pressing
this button activates the rapid
demisting/de-icing of the rear
screen and mirrors. This function switches
off automatically to prevent an excessive
consumption of energy. It switches off when
the engine is switched off. Pressing this
button switches the function off.
- move the exterior air intake
control temporarily to air
recirculation.
Page 75 of 131
69
4
ERGONOMICS and COMFORT
Ventilation
CORRECT USE OF THE AIR CONDITIONING
In order to be effective, the air conditioning
should only be used with the windows
closed. However, if the interior temperature
remains high after a prolonged period
parked in the sun, do not hesitate to
ventilate the passenger compartment for a
few minutes. For even air distribution, ensure that the
exterior air intake grille located at the base
of the windscreen is not obstructed and that
the side and central vents, the air outlets on
the floor and the air extractor at the rear are
open.
The air conditioning is useful in all seasons
as it eliminates condensation and air
humidity. Operate the air conditioning system for
5 to 10 minutes, once or twice a month,
to keep it in perfect working order.
Have the filter elements (air filter and
passenger compartment filter) replaced
regularly. If you drive in a dusty environment,
have them replaced twice as often.
It is normal that the condensation created by
the air conditioning system results in a flow
of water which may form a puddle under the
vehicle when parked.
If the system does not produce cold air, do
not use it and contact a CITROËN dealer . VENTS
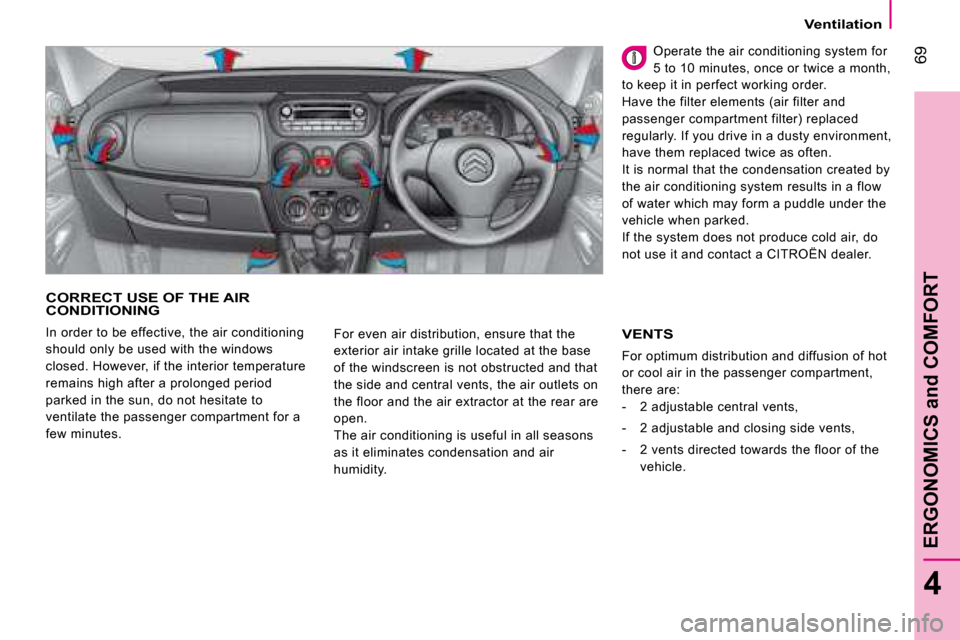
For optimum distribution and diffusion of hot
or cool air in the passenger compartment,
there are:
- 2 adjustable central vents,
- 2 adjustable and closing side vents,
- 2 vents directed towards the floor of the vehicle.
Page 76 of 131
70
Ventilation
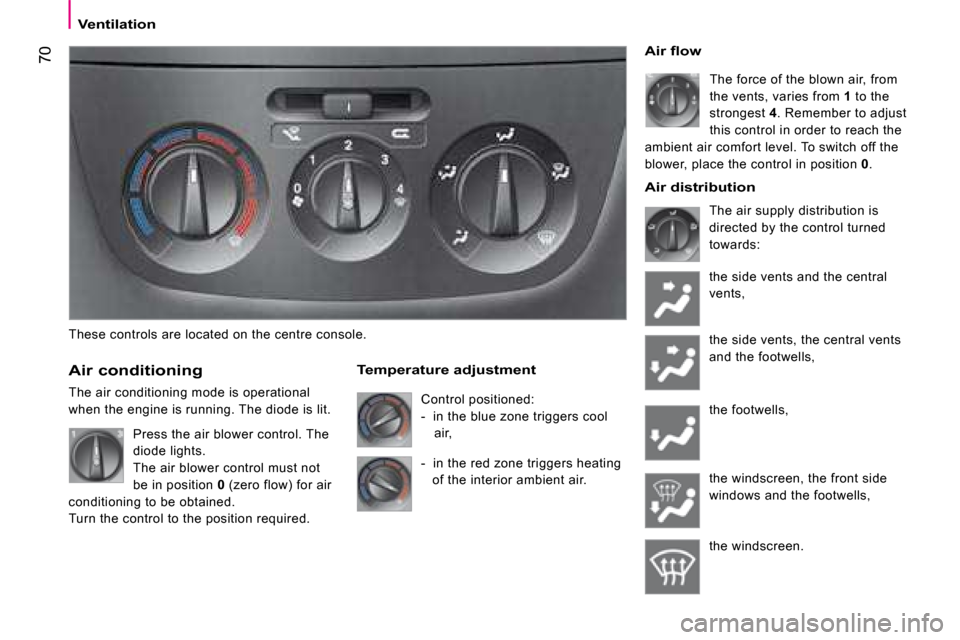
These controls are located on the centre console.
Air conditioning
The air conditioning mode is operational
when the engine is running. The diode is lit.
Temperature adjustment
Control positioned:
- in the blue zone triggers cool
air,
� � �A�i�r� �fl� �o�w�
The force of the blown air, from
the vents, varies from 1 to the
strongest 4 . Remember to adjust
this control in order to reach the
ambient air comfort level. To switch off the
blower, place the control in position 0 .
The air supply distribution is
directed by the control turned
towards:
the side vents and the central
vents,
the side vents, the central vents
and the footwells,
the footwells,
the windscreen, the front side
windows and the footwells,
the windscreen.
Press the air blower control. The
diode lights.
The air blower control must not
be in position
0 (zero flow) for air
conditioning to be obtained.
Turn the control to the position required. - in the red zone triggers heating
of the interior ambient air.
Air distribution
Page 99 of 131

90
Child safety
ADVICE ON CHILD SEATS
The incorrect installation of a child seat in a
vehicle compromises the child’s protection in
the event of an accident.
Remember to fasten the seat belts or the
child seat harnesses keeping the slack in
relation to the child’s body to a minimum ,
even for short journeys.
For optimum installation of the “forward
facing” child seat, ensure that the back of
the child seat is in contact with the back of
the vehicle’s seat and that the head restraint
does not cause any discomfort. Installing a booster seat
The chest part of the seat belt must be
positioned on the child’s shoulder without
touching the neck.
Ensure that the lap part of the seat belt
passes correctly over the child’s thighs.
CITROËN recommends the use of a booster
seat which has a back, fitted with a seat belt
guide at shoulder level.
As a safety precaution, do not leave:
- one or more children alone and unsupervised in a vehicle,
- a child or an animal in a vehicle which is exposed to the sun, with the windows
closed,
- the keys within reach of children inside the vehicle.
To prevent accidental opening of the doors,
use the “Child lock”.
To protect young children from the rays of
the sun, fit side blinds on the side windows.
If the head restraint has to be removed,
ensure that it is stored or attached securely
to prevent it from being thrown around the
vehicle in the event of sharp braking.
Children under the age of 10 must not travel
in the “forward facing” position on the front
passenger seat, unless the rear seats are
already occupied by other children, cannot
be used or are absent.
Disarm the passenger air bag when a “rear
facing” child seat is installed on the front
seat.
Otherwise, the child would risk being
seriously injured or killed if the air bag were
to inflate.
Page 104 of 131
95
6
ACCESSORIES
Equipment
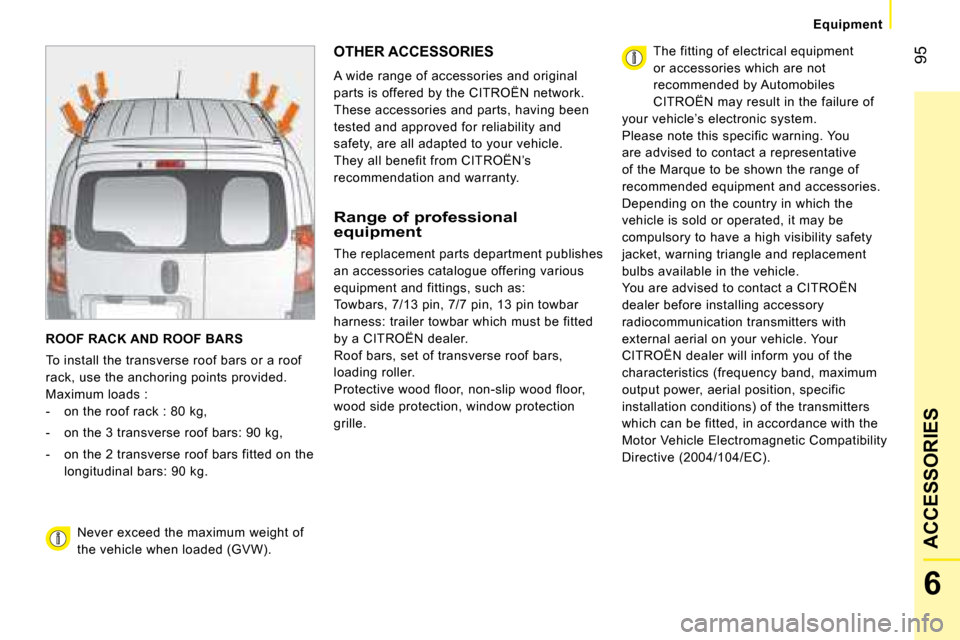
ROOF RACK AND ROOF BARS
To install the transverse roof bars or a roof
rack, use the anchoring points provided.
Maximum loads :
- on the roof rack : 80 kg,
- on the 3 transverse roof bars: 90 kg,
- on the 2 transverse roof bars fitted on the
longitudinal bars: 90 kg .
OTHER ACCESSORIES
A wide range of accessories and original
parts is offered by the CITROËN network.
These accessories and parts, having been
tested and approved for reliability and
safety, are all adapted to your vehicle.
They all benefit from CITROËN’s
recommendation and warranty.
Range of professional equipment
The replacement parts department publishes
an accessories catalogue offering various
equipment and fittings, such as:
Towbars, 7/13 pin, 7/7 pin, 13 pin towbar
harness: trailer towbar which must be fitted
by a CITROËN dealer.
Roof bars, set of transverse roof bars,
loading roller.
Protective wood floor, non-slip wood floor,
wood side protection, window protection
grille.
Never exceed the maximum weight of
the vehicle when loaded (GVW). The fitting of electrical equipment
or accessories which are not
recommended by Automobiles
CITROËN may result in the failure of
your vehicle’s electronic system.
Please note this specific warning. You
are advised to contact a representative
of the Marque to be shown the range of
recommended equipment and accessories.
Depending on the country in which the
vehicle is sold or operated, it may be
compulsory to have a high visibility safety
jacket, warning triangle and replacement
bulbs available in the vehicle.
You are advised to contact a CITROËN
dealer before installing accessory
radiocommunication transmitters with
external aerial on your vehicle. Your
CITROËN dealer will inform you of the
characteristics (frequency band, maximum
output power, aerial position, specific
installation conditions) of the transmitters
which can be fitted, in accordance with the
Motor Vehicle Electromagnetic Compatibility
Directive (2004/104/EC).
Page 106 of 131
98
Battery
The batteries contain harmful
substances such as sulphuric acid and
lead. They must be discarded in accordance
with the provisions of the law and must not,
in any circumstances, be discarded with
household waste.
Take used batteries to a special collection
point.
Before disconnecting the battery, you must
wait for 2 minutes after switching off the
ignition.
Never disconnect a terminal when the
engine is running.
Never charge a battery without first
disconnecting the terminals.
Close the windows and doors before
disconnecting the battery.
After every reconnection of the battery,
switch on the ignition and wait 1 minute
before starting to allow the electronic
systems to be initialised. If slight difficulties
are experienced after this, please consult a
CITROËN dealer . It is advisable to disconnect the battery
if the vehicle is not to be used for a
period of more than one month.
If the battery has been disconnected
for some time, it may be necessary to
reinitialise the following functions:
- the display parameters (date, time, language, distance unit and temperature
unit),
- the radio stations,
- the central locking.
Some settings are cleared and must be
reprogrammed, consult a CITROËN dealer .