brake CITROEN NEMO 2014 Handbook (in English)
[x] Cancel search | Manufacturer: CITROEN, Model Year: 2014, Model line: NEMO, Model: CITROEN NEMO 2014Pages: 192, PDF Size: 10.74 MB
Page 118 of 192

11 6
Driving safely
Emergency braking assistance *
System which, in an emergency, enables
you to reach the optimum braking pressure
more quickly, thus reducing the stopping
distance. The emergency braking assistance
is an integral part of the ESP system.
Activation
It is brought into play by the speed at which
the brake pedal is pressed.
The effect of this is a reduction in the
resistance of the pedal and an increase in
braking efficiency.
When braking in an emergency, press firmly
without releasing the pressure.
Good practice
This system cannot be deactivated by the
driver.
*
Depending on country of sale.
TRAJECTORY CONTROL SYSTEMS
Electronic stability programme (ESP)
The electronic stability programme acts on
the brake of one or more wheels and on the
engine to keep the vehicle on the trajectory
required by the driver, within the limits of the
laws of physics.
Activation
The ESP system is activated automatically
each time the vehicle is started and cannot
be deactivated.
It comes into operation in the event of a grip
or trajectory problem.
Illumination of this warning lamp
and the warning lamp in the
"ASR OFF"
button, accompanied
by a message in the instrument
panel screen, indicates a fault with the ESP
system, which is deactivated automatically.
Have it checked by a CITROËN dealer or a
qualified workshop.
Anti-slip regulation (ASR) and engine
control (MSR)
Anti-slip regulation (also known as traction
control) optimises traction, avoiding wheel
spin by acting on the brakes of the driving
wheels and the engine.
Engine control is an integral part of the ASR
system and intervenes when a sudden gear
change is made or of one of the driving
wheels looses grip, by reducing engine torque
to avoid loss of stability of the vehicle.
Activation
These systems are activated automatically
every time the vehicle is started.
In the event of a problem od adhesion or
trajectory, these systems come into play.
Deactivation
In exceptional conditions (starting a vehicle
which is bogged down, stuck in snow,
on soft ground...), it may be advisable to
deactivate the ASR system, so that the
wheels can spin freely and regain grip.
Press the "ASR OFF"
button, located in
the middle of the dashboard.
If the button's warning lamp comes
on, accompanied by a message in the
instrument panel screen, this indicates that
the ASR system is deactivated. This is indicated by flashing of this
warning lamp in the instrument
panel.
Operating fault
Page 140 of 192

138
Towing a trailer
In certain cases of particularly arduous
use (towing the maximum load up a steep
slope in high temperatures), the engine
automatically limits its power. In this case,
automatic cutting off of the air conditioning
allows the engine power to be saved.
If the coolant temperature
warning lamp comes on, stop the
vehicle and switch off the engine
as soon as possible.
See the "Levels" section of chapter 7.
Tyres:
check the tyre pressures of the
towing vehicle (see the "Identification
markings" section of chapter 7) and of
the trailer, observing the recommended
pressures.
Brakes:
towing increases the braking
distance. Drive at a moderate speed,
change down early and brake gradually.
Side wind:
sensitivity to side wind is
increased. Drive smoothly and at a
moderate speed.
ABS:
the system only controls the vehicle,
not the trailer.
Rear parking sensors:
the sensors
will be deactivated automatically
when an genuine CITROËN towbar is used
(see the "Rear parking sensors" section of
chapter 3).
Towbar
We recommend the use of genuine
CITROËN towbars and their harnesses,
which have been tested and approved from
the design stage of your vehicle, and that
the fitting of this equipment is entrusted to a
CITROËN dealer or a qualified workshop.
If this equipment is not fitted by a CITROËN
dealer, it is essential that it is fitted using
the electrical pre-equipment located at
the rear of the vehicle and following the
manufacturer's instructions.
The operation of the rear parking sensors is
deactivated automatically when the trailer
cable connector is inserted in the towbar
socket.
When the trailer cable is removed, the rear
parking sensors are re-activated.
Distribution of loads
Distribute the load in the trailer so that the
heaviest objects are as close as possible
to the axle and the nose weight is close to
the maximum authorised without, however,
exceeding it. The air density decreases with
altitude, so reducing the performance of
the engine. The maximum towed load must
be reduced by 10 % for each 1 000 metres
of altitude. Refer to the "Technical data"
chapter for details of the weights and
towed loads applicable to your vehicle
and also to the administrative documents
(V5 registration document, ...).
Page 146 of 192

144
Changing a wheel
CHANGING A WHEEL
Parking the vehicle
As far as possible, park the vehicle on level,
stable and non-slippery ground.
Apply the parking brake, switch off the
ignition and engage first gear (on a hill).
It is imperative that you ensure that the
occupants get out of the vehicle and wait in
a safe location.
If possible, place a chock under the
wheel diagonally opposite the wheel to be
changed.
Tools
The tools required are stored in a tool kit
located behind the driver's seat (Light van)
or behind the rear bench seat (Combi).
1.
Wheelbrace.
2.
Centring guide.
3.
Screwdriver.
4.
Jack with handle.
5.
Removable towing eye.
The jack and all of the tools are specific
to your vehicle. Do not use them for other
purposes.
Never go underneath the vehicle when it is
raised only by the jack; use an axle stand.
Taking out the spare wheel
The spare wheel retaining bolt is located on
the rear left part of the loading sill.
1.
Slacken the wheel retaining bolt using the
wheelbrace.
2.
Unscrew fully to unwind the winch cable.
3.
Take out the spare wheel using the
wheelbrace.
4.
Raise the cover A
.
5.
Remove the cable B
from its housing.
6.
Release the spare wheel and place it
near the wheel to be changed.
Page 147 of 192

145
7
QUICK HELP
Changing a wheel
Removing a wheel
1.
Park the vehicle on level, stable and non-
slippery ground. Apply the parking brake.
Switch off the ignition and engage first
gear or reverse, depending on the slope.
2.
Detach the wheel trim (large model) using
the wheelbrace 1
, pulling at the valve
passage hole.
Slide the screwdriver 3
into the notch on
the trim (small model) and use the tool as
a lever, pressing to unclip the trim.
3.
Slacken the wheel bolts using the
wheelbrace.
4.
Position the jack underneath the body,
in accordance with the illustration, at the
mark A
(on the sill) as close as possible
to the wheel to be changed.
5.
Extend the jack 4
until its base is in
contact with the ground. Ensure that the
centreline of the jack base is vertical in
relation to the location used.
6.
Raise the vehicle.
7.
Remove the bolts and detach the wheel.
Putting the wheel back in place
1.
Install the support on the wheel.
2.
Place the cable B
in position.
3.
Lower the cover A
.
4.
Position the wheel.
5.
Turn the wheelbrace clockwise to fully
raise the spare wheel.
Page 149 of 192

147
7
QUICK HELP
Changing a wheel
TEMPORARY PUNCTURE REPAIR KIT
This kit is located at the front of the
passenger compartment. It consists of:
- a repair cartridge A
, containing the
sealant, equipped with:
●
a fi lling pipe B
,
●
a sticker C
indicating "max. 80 km/h", which
the driver must affi x to the dashboard in a
visible position after repairing the tyre,
- a compressor D
equipped with a pressure
gauge and unions,
- adaptors for the inflation of various items,
- a pair of protective gloves,
- a quick guide to use of the temporary
puncture repair kit.
Repair procedure
- Apply the parking brake and place the
gear lever in neutral.
- Unscrew the valve cap of the tyre to be
repaired.
- Take out the filling pipe B
and screw the
ring E
onto the tyre valve.
- Check that the on/off switch F
on the
compressor is in position "0"
(off).
- Start the engine.
- Insert the connector G
in the nearest
12 V accessory socket in the vehicle.
- Place the compressor's on/off switch F
in
position "1"
(on).
- Inflate the tyre to a pressure of 3 bars.
To obtain a more accurate reading, you are
advised to check the pressure value on the
pressure gauge H
, with the compressor off. This temporary puncture repair kit is
available from CITROËN dealers.
It is provided for the repair of holes of
a maximum diameter of 4 mm, located
exclusively on the tread or side wall of the
tyre. Avoid removing any foreign bodies
which have penetrated into the tyre.
Page 151 of 192
149
7
QUICK HELP
Snow chains
SNOW CHAINS
In wintry conditions, snow chains improve
traction as well as the behaviour of the
vehicle when braking.
The snow chains must be fitted only to
the driving wheels. They must never be
fitted to "space-saver" type spare wheels.
Take account of the legislation in force
in your country on the use of snow
chains and the maximum running speed
authorised.
Advice on installation
If you have to fit the chains during a
journey, stop the vehicle on a flat surface
on the side of the road.
Apply the parking brake and position any
wheel chocks to prevent movement of
your vehicle.
Fit the chains following the instructions
provided by the manufacturer.
Move off gently and drive for a few
moments, without exceeding 30 mph
(50 km/h).
Stop your vehicle and check that the
snow chains are correctly tightened.
Avoid driving on roads that have been
cleared of snow, to avoid damaging
your vehicle's tyres and the road surface. It
is recommended that before you leave, you
practise fitting the snow chains on a level
and dry surface. If your vehicle is fitted with
alloy wheels, check that no part of the chain
or its fixings is in contact with the wheel rim.
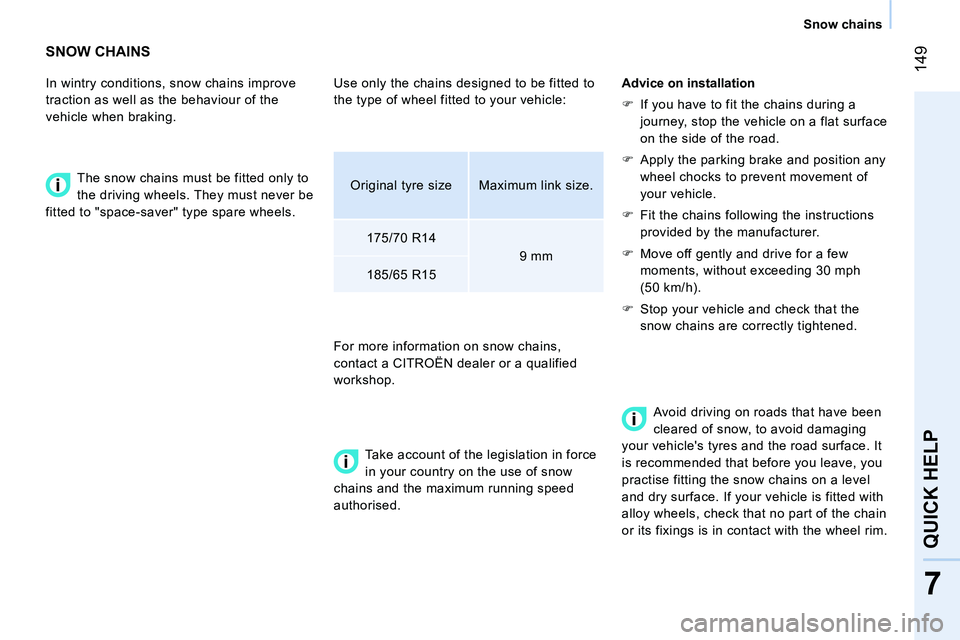
Use only the chains designed to be fitted to
the type of wheel fitted to your vehicle:
For more information on snow chains,
contact a CITROËN dealer or a qualified
workshop.
Original tyre size
Maximum link size.
175/70 R14
9 mm
185/65 R15
Page 155 of 192

153
7
QUICK HELP
Changing a bulb
Rear lamps
- Identify the faulty bulb then open the rear
doors.
- Unscrew the two screws using the
screwdriver supplied in the tool kit
(behind the driver's seat) and extract the
bulb holder.
- Release the lamp unit.
- Disconnect the electrical connector.
- Remove the support by moving aside
the tabs.
- Change the bulb.
Number plate lamps
Type A, C 5 W - 5 W
- Unclip the transparent cover using
the screwdriver supplied in the tool kit
(behind the driver's seat) and extract the
bulb holder.
- Change the bulb by moving aside the two
contacts.
- Ensure that the new bulbs are secured
correctly between the two contacts.
- Replace the plastic lens and press on it.
For further information concerning the bulbs,
refer to the table "Types of bulb".
1. Brake lamps
Type B, P21 W - 21 W
2. Direction indicators
Type B, PY 21 W - 21 W amber
3. Reversing lamps
Type B, P21 W - 21 W
4. Sidelamps/Foglamps
Type B , P4/21 W - 4 W/21 W
On the hinged rear doors
On the tailgate
Page 156 of 192

154
Changing a bulb
Third brake lamp
On the hinged rear doors
Type B
, W 5 W - 5 W (4 bulbs)
- Unclip the transparent cover using the
screwdriver located in the tool kit.
- Disconnect the electrical connector.
- Remove the bulb holder by squeezing the
two tabs.
- Remove the faulty bulb.
- Change the bulb.
On the tailgate
Type B,
W5W - 5W (5 bulbs)
- Open the tailgate.
- Remove the two cover retaining screws,
then the cover.
- Remove the bulb holder by squeezing the
two tabs.
- Remove the faulty bulb.
- Change the bulb.
If you encounter any difficulty, consult a
CITROËN dealer or a qualified workshop.
Page 159 of 192

157
7
QUICK HELP
Changing a fuse
Table of dashboard fuses, driver's side
Mark
ing
Rating
Functions
F12
7.5 A Right-hand dipped beam headlamp supply
F13
7.5 A Left-hand dipped beam headlamp supply - headlamp height
adjuster
F31
5 A Engine control unit supply switch
F32
7.5 A Front lamp - front courtesy lamp - rear courtesy light lamp
F36
10 A Audio system - mobile telephone pre-equipment - air
conditioning control panel - EODB diagnostic socket
F37
5 A Brake lamp - instrument panel
F38
20 A Door locking
F43
15 A Screenwash pump
F47
20 A Driver's electric window motor supply
F48
20 A Passenger's electric window motor supply
F49
5 A Parking sensors control unit - rear lighting switch -
electric door mirrors - volumetric alarm control unit
F50
7.5 A Airbags control unit
F51
7.5 A Switch on brake pedal - switch on clutch pedal -
door mirror controls - central Bluetooth system
F53
5 A
Instrument panel - rear foglamps
Page 163 of 192

161
7
QUICK HELP
Having your vehicle towed
BEING TOWED
The removable towing eye is located in the
tool kit behind the driver's seat (Light van) or
behind the rear bench seat (Combi).
From the front
In the front bumper, unclip the cover on the
right using a flat tool.
Screw the removable towing eye in fully.
Then hook the towbar on the towing eye.
Unlock the steering by turning the the
ignition key one notch and release the
parking brake.
Switch on the hazard warning lamps on both
vehicles.
Move off gently and drive slowly, towing for
a short distance only.
On the towed vehicle, the gear
lever must be put in neutral; failure
to observe this special condition
may result in damage to certain braking
components (brakes, transmission...) and
the absence of braking assistance when the
engine is started.
From the rear
In the rear bumper, unclip the cover at the
bottom using a flat tool.
Screw the removable towing eye in fully.
Then hook the towbar on the towing eye.
Switch on the hazard warning lamps on both
vehicles.
Move off gently and drive slowly, towing for
a short distance only.
General recommendations
Observe the legislation in force in your
country.
Ensure that the weight of the towing vehicle
is higher than that of the towed vehicle.
The driver must remain at the wheel of the
towed vehicle and must have a valid driving
licence.
When towing a vehicle with all four wheels
on the ground, always use an approved
towing bar; rope and straps are prohibited.
When towing a vehicle with the engine off,
there is no longer any power assistance for
braking or steering.
In the following cases, you must always call
on a professional recovery service:
- vehicle broken down on a motorway or
fast road,
- 4 wheel drive vehicle,
- when it is not possible to put the gearbox
into neutral, unlock the steering, or
release the parking brake,
- towing with only two wheels on the
ground,
- where there is no approved towing bar
available...