window Citroen NEMO 2015 1.G User Guide
[x] Cancel search | Manufacturer: CITROEN, Model Year: 2015, Model line: NEMO, Model: Citroen NEMO 2015 1.GPages: 192, PDF Size: 7.84 MB
Page 53 of 192

51
REAR VIEW MIRRORDOOR MIRRORS
Electric controls
The electric control is located on the interior
door trim, level with the mirror. To defrost the mirrors, press the
heated rear screen button.
Select the mirror to be adjusted by turning
the control to the right or to the left, then
move the control in the direction of the
adjustment required.
Manual controls
The right-hand and left-hand manual
controls are located inside the vehicle at the
base of each mirror.
Move the lever in the direction of the
adjustment required.
The lever located on the lower edge moves
the mirror into two positions.
For the day position, the lever is pushed
forwards.
For the night position to prevent dazzle,
pull the lever towards you.
The mirror glass is convex in order to widen
the lateral field of vision. Objects seen in the
mirror are in reality closer than they appear.
Therefore, this must be taken into account in
order to assess the distance correctly.
3
READY TO GO
Mirrors and windows
Page 54 of 192

52
ELECTRIC WINDOWS
Electric controls
on the driver's side, the electric window
has a safety anti-pinch function and is
associated with one-touch controls for
lowering and raising.
From the driver's seat, the controls placed
on the door operate the vehicle's front
windows.
On the passenger's side, the control
operates the passenger's front window.
One-touch control
an extended press on the control for the
driver's window raises or lowers the window
completely.
Press the control again to stop the window.
Press the control briefly to start the
movement of the window.
Manual controls
Turn the window winder located on the door
trim panel.
Good practice
Always remove the key from the ignition
when leaving the vehicle, even for a short
time.
If the electric window meets an obstacle
during operation, you must reverse the
movement of the window. To do this, press
the control concerned.
When the driver operates the passenger
electric window controls, they must ensure
that no one is preventing correct closing of
the windows.
The driver must ensure that the passenger
uses the electric window correctly.
Be aware of children when operating the
windows.
REAR WINDOWS (COMBI)
To partially open the rear windows, tilt the
lever and push it fully to lock the windows in
the open position.
Mirrors and windows
Page 73 of 192

71
DEMISTING AND DEFROSTING
Windscreen
The vents located at the base of the
windscreen and the side vents for the side
windows increase the effectiveness of the
demisting and defrosting. Do not obstruct
these eight vents.
The manual air conditioning includes a
pollen filter and air recirculation.
The pollen filter permits continuous and
effective filtering of dust.
a
ir recirculation (which can be operated by
the driver or the passenger) isolates the
passenger compartment from the exterior
atmosphere. However, this position should
only be used temporarily, you should
normally drive with the control in the exterior
air intake position. Manual mode
Turn the control to this air
distribution setting.
For faster and more effective
demisting and defrosting of the
windscreen:-
increase the air flow setting,
Return to the exterior air intake
position as soon as possible to
allow renewal of the air in the
passenger compartment. Rear screen and mirrors defrosting
This function only operates when
the engine is running. Pressing
this button activates the rapid
demisting/defrosting of the rear
screen and mirrors. This function switches
off automatically to prevent an excessive
consumption of energy. It switches off when
the engine is switched off. Pressing this
button switches the function off.
-
move the exterior air intake
control temporarily to air
recirculation.
4
EASE OF USE and COMFORT
Ventilation
Page 75 of 192

73
CORRECT USE OF THE AIR
CONDITIONING
Operate the air conditioning system for
5 to 10 minutes, once or twice a month,
to keep it in perfect working order.
Have the filter elements (air filter and
passenger compartment filter) replaced
regularly. If you drive in a dusty environment,
have them replaced twice as often.
It is normal that the condensation created by
the air conditioning system results in a flow
of water which may form a puddle under the
vehicle when parked.
If the system does not produce cold air, do
not use it and contact a CITR
o Ë n dealer or
a qualified workshop.VENTS
For optimum distribution and diffusion of hot
or cool air in the passenger compartment,
there are:
-
2 adjustable central vents,
-
2 adjustable and closing side vents,
-
2 vents directed towards the floor of
the
vehicle.
In order to be effective, the air conditioning
should only be used with the windows
closed. However, if the interior temperature
is high after a prolonged period parked
in the sun, first ventilate the passenger
compartment for a few minutes.
For even air distribution, ensure that the
exterior air intake grille located at the base
of the windscreen is not obstructed and that
the side and central vents, the air outlets on
the floor and the air extractor at the rear are
open.
The air conditioning is useful in all seasons
as it eliminates condensation and air
humidity.
4
EASE OF USE and COMFORT
Ventilation
Page 76 of 192
74
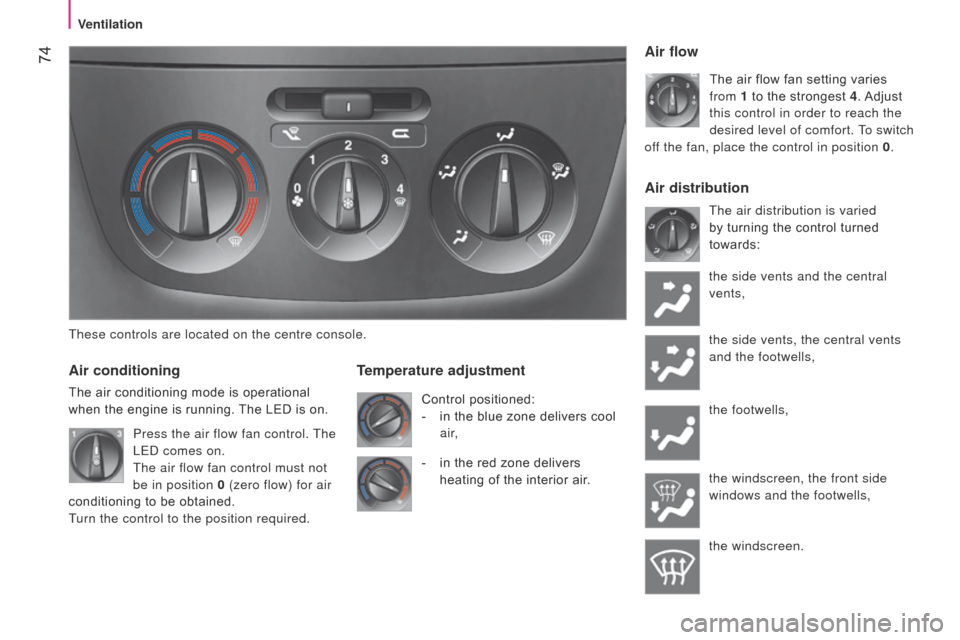
These controls are located on the centre console.
Air conditioning
The air conditioning mode is operational
when the engine is running. The LED is on.
Temperature adjustment
Control positioned:
-
in the blue zone delivers cool
air,
Air flow
The air flow fan setting varies
from 1 to the strongest 4 . Adjust
this control in order to reach the
desired level of comfort. To switch
off the fan, place the control in position 0 .
The air distribution is varied
by turning the control turned
towards:
the side vents and the central
vents,
the side vents, the central vents
and the footwells,
the footwells,
the windscreen, the front side
windows and the footwells,
the windscreen.
Press the air flow fan control. The
LE
d
comes on.
The air flow fan control must not
be in position 0 (zero flow) for air
conditioning to be obtained.
Turn the control to the position required. -
in the red zone delivers
heating of the interior air.
Air distribution
Ventilation
Page 135 of 192
133
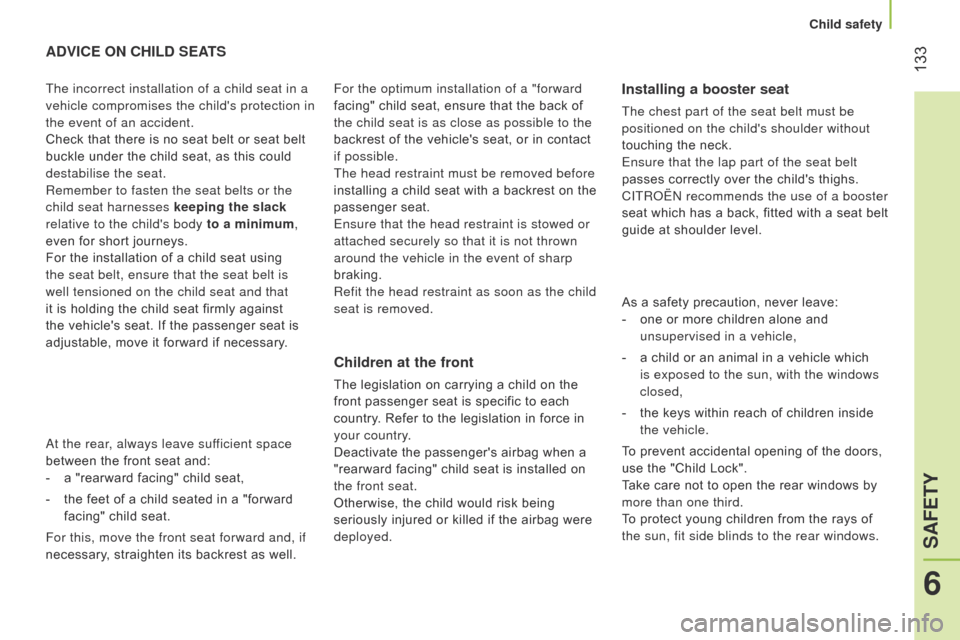
ADVICE ON CHILD SEATS
Children
at the front
The legislation on carrying a child on the
front passenger seat is specific to each
country. Refer to the legislation in force in
your country.
Deactivate the passenger's airbag when a
"rearward facing" child seat is installed on
the front seat.
Otherwise, the child would risk being
seriously injured or killed if the airbag were
deployed.
The incorrect installation of a child seat in a
vehicle compromises the child's protection in
the event of an accident.
Check that there is no seat belt or seat belt
buckle under the child seat, as this could
destabilise the seat.
Remember to fasten the seat belts or the
child seat harnesses keeping the slack
relative to the child's body to a minimum,
even for short journeys.
For the installation of a child seat using
the seat belt, ensure that the seat belt is
well tensioned on the child seat and that
it is holding the child seat firmly against
the vehicle's seat. If the passenger seat is
adjustable, move it forward if necessary.
Installing a booster seat
The chest part of the seat belt must be
positioned on the child's shoulder without
touching the neck.
Ensure that the lap part of the seat belt
passes correctly over the child's thighs.
CITR
o Ë n recommends the use of a booster
seat which has a back, fitted with a seat belt
guide at shoulder level.
For the optimum installation of a "forward
facing" child seat, ensure that the back of
the child seat is as close as possible to the
backrest of the vehicle's seat, or in contact
if possible.
The head restraint must be removed before
installing a child seat with a backrest on the
passenger seat.
Ensure that the head restraint is stowed or
attached securely so that it is not thrown
around the vehicle in the event of sharp
braking.
Refit the head restraint as soon as the child
seat is removed.
As a safety precaution, never leave:
-
one or more children alone and
unsupervised in a vehicle,
-
a child or an animal in a vehicle which
is exposed to the sun, with the windows
closed,
-
the keys within reach of children inside
the vehicle.
To prevent accidental opening of the doors,
use the "Child Lock".
Take care not to open the rear windows by
more than one third.
To protect young children from the rays of
the sun, fit side blinds to the rear windows.
a
t the rear, always leave sufficient space
between the front seat and:
-
a "rearward facing" child seat,
-
the feet of a child seated in a "forward
facing" child seat.
For this, move the front seat forward and, if
necessary, straighten its backrest as well.
6
SAFETY
Child safety
Page 142 of 192
140
Range of accessories for private vehicles
Another range is also available from
CITRo Ë n dealers.
"Comfort":
insulated module, coat hanger fixed to a
head restraint, reading lamp, rear parking
sensors...
"Transport solutions":
boot liner, rear door net, set of transverse
and longitudinal roof bars, roof boxes...
"Style":
embellishers, secure wheel embellishers... "Security and safety":
anti-intrusion alarm, window etching,
breathalyzer, first aid kit, high visibility vest,
warning triangle, child seats and booster
cushions, snow chains...
"Protection":
rubber mats, over-carpets, 3D mats, seat
covers compatible with lateral airbags, sets
of front and rear mudflaps...
"Multimedia":
audio systems, hands-free kit, speakers,
portable satellite navigation systems, speed
camera detectors, Wi-Fi on board...
By going to a CITROËN
dealer, you can also
obtain cleaning and maintenance products
(interior and exterior) - including ecological
products from the "TECHNATURE" range -
products for topping up (screenwash...),
touch-up pens and paint aerosols for the
exact colour of your vehicle, recharges
(cartridge for the temporary puncture
repair kit...), ...
To avoid any risk of jamming of the pedals:
-
ensure that the mat is positioned and
secured correctly,
-
never fit one mat on top of another
.
Equipment
Page 156 of 192
154
batteries contain harmful substances
such as sulphuric acid and lead. They
must be disposed of in accordance with the
law and must not, in any circumstances be
discarded with household waste.
Take used batteries to an authorised waste
disposal site.
It is advisable to disconnect the battery
if the vehicle is not to be used for a
period of more than one month. To do
this on models with Stop & Start:
-
press the release button
E
to
disconnect connector F ,
-
disconnect connector
F
of check
sensor G.
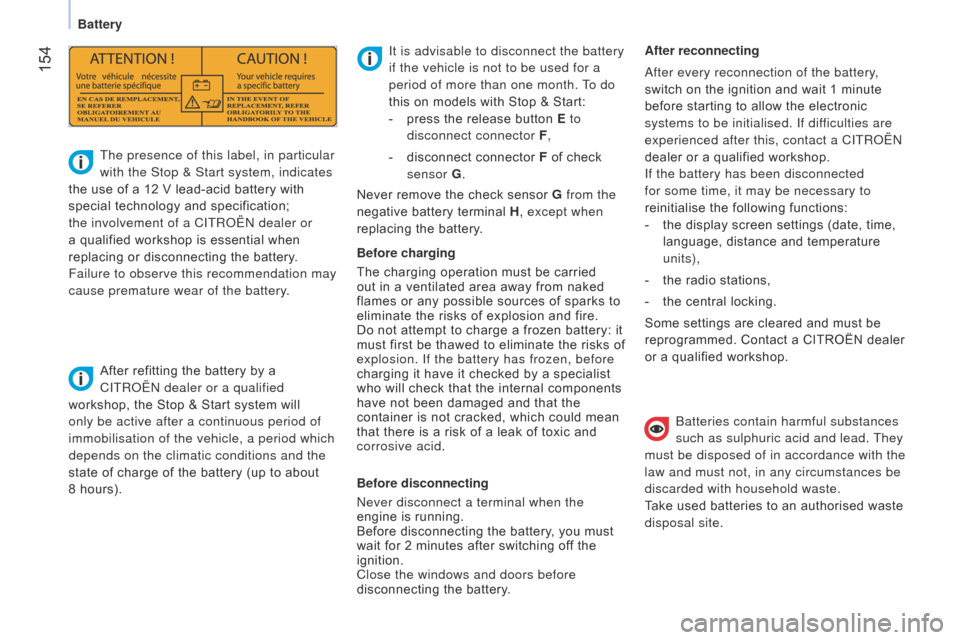
The presence of this label, in particular
with the Stop & Start system, indicates
the use of a 12 V lead-acid battery with
special technology and specification;
the involvement of a CITR
o
Ë
n
dealer or
a qualified workshop is essential when
replacing or disconnecting the battery.
Failure to observe this recommendation may
cause premature wear of the battery.
After refitting the battery by a
CITR
o
Ë
n
dealer or a qualified
workshop, the Stop & Start system will
only be active after a continuous period of
immobilisation of the vehicle, a period which
depends on the climatic conditions and the
state of charge of the battery (up to about
8 hours). Before charging
The charging operation must be carried
out in a ventilated area away from naked
flames or any possible sources of sparks to
eliminate the risks of explosion and fire.
Do not attempt to charge a frozen battery: it
must first be thawed to eliminate the risks of
explosion. If the battery has frozen, before
charging it have it checked by a specialist
who will check that the internal components
have not been damaged and that the
container is not cracked, which could mean
that there is a risk of a leak of toxic and
corrosive acid.
Before disconnecting
n
ever disconnect a terminal when the
engine is running.
Before disconnecting the battery, you must
wait for 2 minutes after switching off the
ignition.
Close the windows and doors before
disconnecting the battery. After reconnecting
a
fter every reconnection of the battery,
switch on the ignition and wait 1 minute
before starting to allow the electronic
systems to be initialised. If difficulties are
experienced after this, contact a CITR o Ë n
dealer or a qualified workshop.
If the battery has been disconnected
for some time, it may be necessary to
reinitialise the following functions:
-
the display screen settings (date, time,
language, distance and temperature
units),
-
the radio stations,
-
the central locking.
Some settings are cleared and must be
reprogrammed. Contact a CITROËN dealer
or a qualified workshop.
Never remove the check sensor G
from the
negative battery terminal H , except when
replacing the battery.
Battery
Page 170 of 192
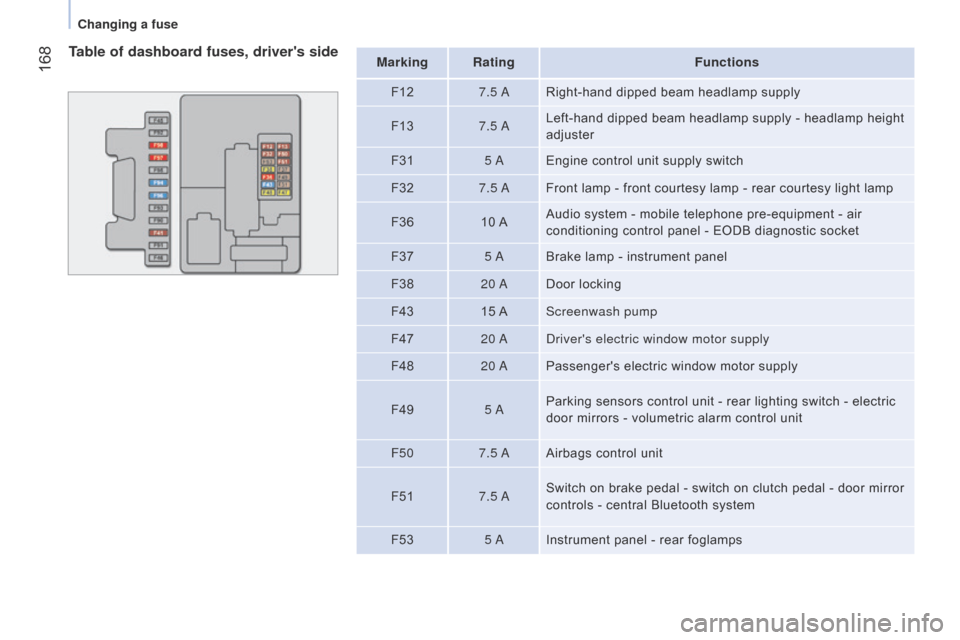
168
Table of dashboard fuses, driver's sideMarking RatingFunctions
F12 7.5
a
Right-hand dipped beam headlamp supply
F13 7.5
a
Left-hand dipped beam headlamp supply - headlamp height
adjuster
F31 5
a
Engine control unit supply switch
F32 7.5
a
Front lamp - front courtesy lamp - rear courtesy light lamp
F36 10
AAudio system - mobile telephone pre-equipment - air
conditioning control panel - EODB diagnostic socket
F37 5
a
Brake lamp - instrument panel
F38 20
a
Door locking
F43 15
AScreenwash pump
F47 20
ad
river's electric window motor supply
F48 20
a
Passenger's electric window motor supply
F49 5
a
Parking sensors control unit - rear lighting switch - electric
door mirrors - volumetric alarm control unit
F50 7.5
a
Airbags control unit
F51 7.5
a
Switch on brake pedal - switch on clutch pedal - door mirror
controls - central Bluetooth system
F53 5
a
Instrument panel - rear foglamps
Changing a fuse