lock Citroen NEMO 2015 1.G Owner's Guide
[x] Cancel search | Manufacturer: CITROEN, Model Year: 2015, Model line: NEMO, Model: Citroen NEMO 2015 1.GPages: 192, PDF Size: 7.84 MB
Page 68 of 192

66
FOLDING FRONT PASSENGER SEATTable position
Press the head restraint to place it in the
lowest position.
Push one of the controls rearwards, located
on each side of the seat back.
Lower the seat back onto the seat cushion
to the table position.
Folded position
After placing the seat back in the table
position, pull the seat's rear strap while
guiding the folded seat back forwards and
towards the floor.
Returning the seat to the sitting position
Pull the seat's rear strap to unlock the seat.
Lift the seat from the front and the rear
then guide it forwards to bring it to the table
position.
Push one of the controls, located on each
side of the seat back, rearwards while
pressing on the seat back, then place the
seat back in the upright position.
Press on the seat back firmly to trigger the
locking of the seat on the floor.
Adjust the head restraint using the button on
the side.
o
nly move the seat when the rear
seats are not occupied.
Before moving the seat backwards,
ensure that there is nothing that might
prevent the full travel of the seat, so as to
avoid the risk of of jamming the seat caused
by the presence of objects on the floor
behind the seat or rear passengers. If the
seat jams, stop the movement immediately.
Seats
Page 69 of 192

67
ONE-PIECE REAR BENCH SEAT
Table position
Press the head restraint and its lug
simultaneously to place the head restraint in
the low position.
Unlock the seat back by pushing the two
side controls. The red indicator becomes
visible.
Fold the seat back onto the seat cushion.
Fully folded position
After placing the seat back in the table
position, pull the central strap to unlock the
rear feet of the seat.
Lift the seat fully to secure it in the fully
folded position.
Removing the bench seat
After placing the bench seat in the fully
folded position, lower the transverse bar to
unlock the front feet of the seat.
Lift the bench seat to detach it from its front
anchorages.
When driving, to secure the bench,
detach the red retaining strap, located
on the back of the bench seat cushion, and
fix one end to a front head restraint spindle
and the other to the side of the seat cushion.
4
EASE OF USE and COMFORT
Seats
Page 70 of 192
68
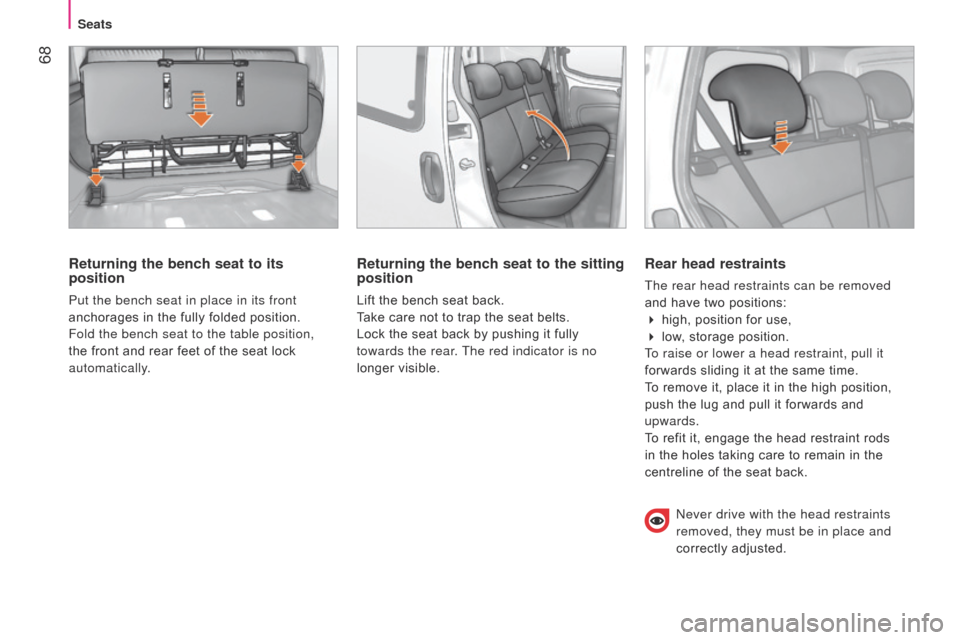
Returning the bench seat to its
position
Put the bench seat in place in its front
anchorages in the fully folded position.
Fold the bench seat to the table position,
the front and rear feet of the seat lock
automatically.
Returning the bench seat to the sitting
position
Lift the bench seat back.
Take care not to trap the seat belts.
Lock the seat back by pushing it fully
towards the rear. The red indicator is no
longer visible.
Rear head restraints
The rear head restraints can be removed
and have two positions:
4 high, position for use,
4 low, storage position.
To raise or lower a head restraint, pull it
forwards sliding it at the same time.
To remove it, place it in the high position,
push the lug and pull it forwards and
upwards.
To refit it, engage the head restraint rods
in the holes taking care to remain in the
centreline of the seat back.
n ever drive with the head restraints
removed, they must be in place and
correctly adjusted.
Seats
Page 71 of 192
69
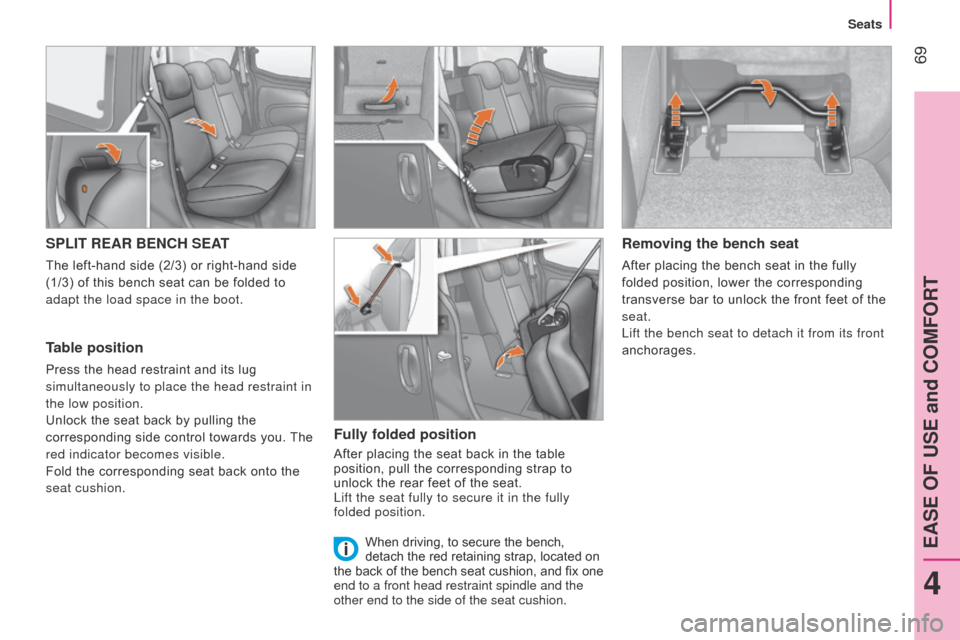
SPLIT REAR BENCH SEAT
The left-hand side (2/3) or right-hand side
(1/3) of this bench seat can be folded to
adapt the load space in the boot.
Table position
Press the head restraint and its lug
simultaneously to place the head restraint in
the low position.
Unlock the seat back by pulling the
corresponding side control towards you. The
red indicator becomes visible.
Fold the corresponding seat back onto the
seat cushion.
Fully folded position
After placing the seat back in the table
position, pull the corresponding strap to
unlock the rear feet of the seat.
Lift the seat fully to secure it in the fully
folded position.
Removing the bench seat
After placing the bench seat in the fully
folded position, lower the corresponding
transverse bar to unlock the front feet of the
seat.
Lift the bench seat to detach it from its front
anchorages.
When driving, to secure the bench,
detach the red retaining strap, located on
the back of the bench seat cushion, and fix one
end to a front head restraint spindle and the
other end to the side of the seat cushion.
4
EASE OF USE and COMFORT
Seats
Page 72 of 192

70
Returning the bench seat to its
position
Put the bench seat in place in its front
anchorages in the fully folded position.
Fold the bench seat to the table position,
the front and rear feet of the seat lock
automatically.
Returning the bench seat to the sitting
position
Lift the bench seat back.
Take care not to trap the seat belts.
Lock the seat back by pushing it fully
towards the rear. The red indicator is no
longer visible.
Repeat all of these operations for the other
part of the rear bench seat.
Seats
Page 84 of 192
82
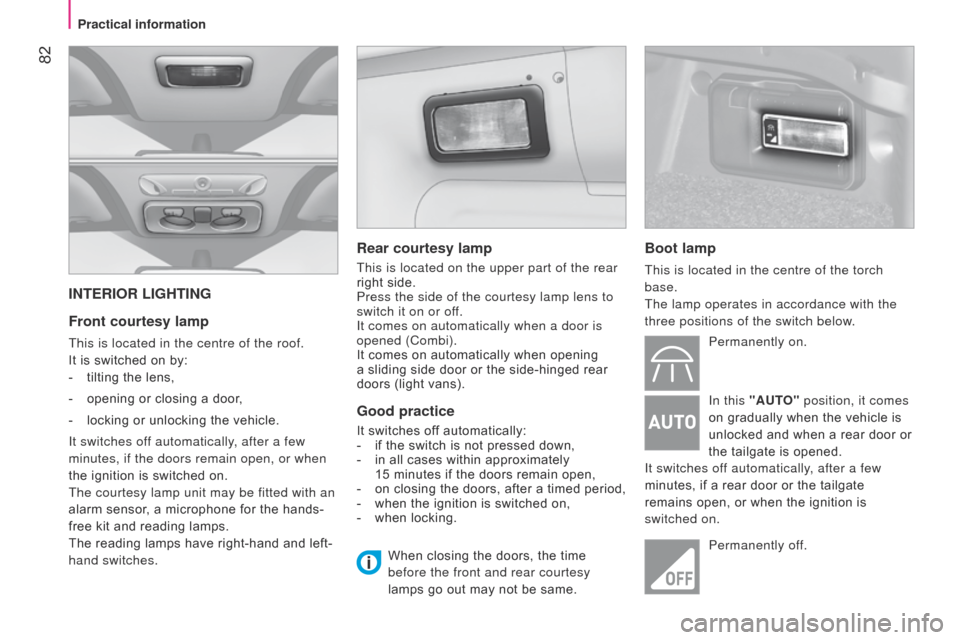
INTERIOR LIGHTING
Front courtesy lamp
This is located in the centre of the roof.
It is switched on by:
-
tilting the lens,
-
opening or closing a door
,
-
locking or unlocking the vehicle.
It switches of
f automatically, after a few
minutes, if the doors remain open, or when
the ignition is switched on.
The courtesy lamp unit may be fitted with an
alarm sensor, a microphone for the hands-
free kit and reading lamps.
The reading lamps have right-hand and left-
hand switches.
Rear courtesy lamp
This is located on the upper part of the rear
right side.
Press the side of the courtesy lamp lens to
switch it on or off.
It comes on automatically when a door is
opened (Combi).
It comes on automatically when opening
a sliding side door or the side-hinged rear
doors (light vans).
Good practice
It switches off automatically:
- if the switch is not pressed down,
-
in all cases within approximately
15 minutes if the doors remain open,
-
on closing the doors, after a timed period,
-
when the ignition is switched on,
-
when locking.
Boot lamp
This is located in the centre of the torch
base.
The lamp operates in accordance with the
three positions of the switch below. Permanently on.
In this "AUTO"
position, it comes
on gradually when the vehicle is
unlocked and when a rear door or
the tailgate is opened.
It switches off automatically, after a few
minutes, if a rear door or the tailgate
remains open, or when the ignition is
switched on.
Permanently off.
When closing the doors, the time
before the front and rear courtesy
lamps go out may not be same.
Practical information
Page 87 of 192
85
Menu...Press...Sub-
menu...Press... Select... Confirm
and exitEnables you to...
1 Speed beep
onIncrease
Activate/Deactivate the audible
signal indicating exceeding of the
programmed speed.
Modify the speed setting.
d
ecrease
o
FF
2
a
ctivate Trip
b on
a
ctivate
d
isplay a second trip, "Trip b ".
o
FF
d
eactivate
3 Set time Hours
Increase
Adjust the clock
d
ecrease
Format 24 h
Select the display mode for the
clock.
12 h
4 Set date Year /
Month /
d
ayIncrease
Adjust the date.
d
ecrease
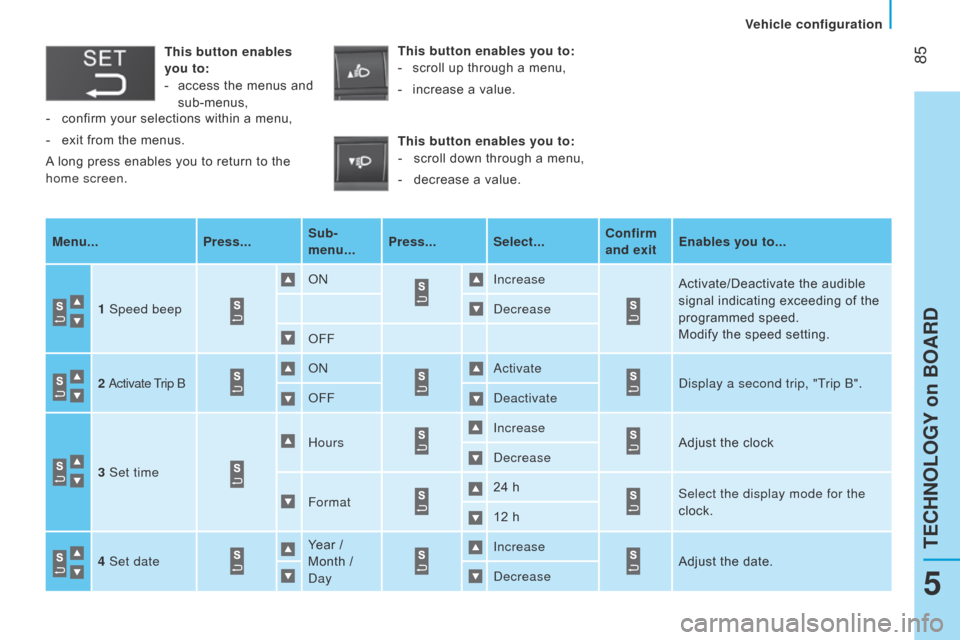
This button enables
you to:
-
access the menus and
sub-menus, This button enables you to:
-
scroll up through a menu,
-
increase a value.
This button enables you to: -
scroll down through a menu,
-
decrease a value.
-
confirm your selections within a menu,
-
exit from the menus.
A
long press enables you to return to the
home screen.
5
TECHNOLOGY on BOARD
Vehicle configuration
Page 88 of 192

86Menu...Press... Sub-menu... Press... Select... Confirm
and exitEnables you to...
5 See radio
on
d
isplay the name of the station.
Display the CD track number.
o
FF
6
a utoclose While moving
onActivate/Deactivate the
automatic locking of the doors
above 12
mph (20 km/h).
o
FF
7
Measurement
unit
d
istances
k
mSelect the distance display
unit.
Mi(les)
Temperature °C
Select the temperature display
unit.
°F
Consumption km/l
Select the fuel consumption
display unit.
l/100 km
8 Language List of
languages
availableSelect the display language.
9
Volume of
announcements
Increase Increase/Decrease the volume
of the signals and warnings
(the change is immediate when
the button is pressed).
d
ecrease
10
b
utton
volume Increase
Increase/Decrease the volume
for the buttons.
d
ecrease
Vehicle configuration
Page 113 of 192
111
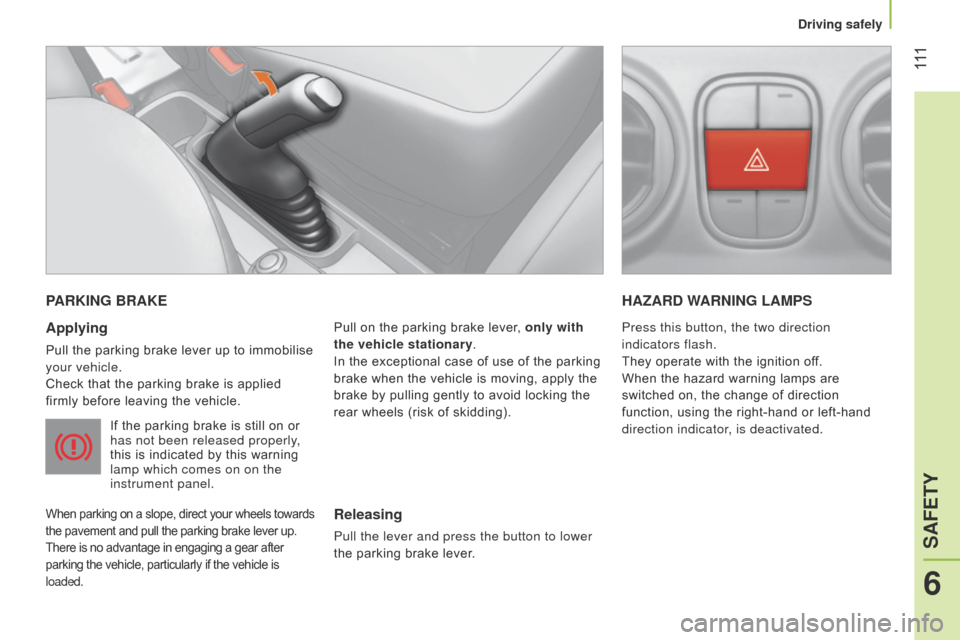
PARKING BRAKE
Applying
Pull the parking brake lever up to immobilise
your vehicle.
Check that the parking brake is applied
firmly before leaving the vehicle.
If the parking brake is still on or
has not been released properly,
this is indicated by this warning
lamp which comes on on the
instrument panel.
When parking on a slope, direct your wheels towards
the pavement and pull the parking brake lever up.
There is no advantage in engaging a gear after
parking the vehicle, particularly if the vehicle is
loaded.
Pull on the parking brake lever, only with
the vehicle stationary.
In the exceptional case of use of the parking
brake when the vehicle is moving, apply the
brake by pulling gently to avoid locking the
rear wheels (risk of skidding).
HAZARD WARNING LAMPS
Releasing
Pull the lever and press the button to lower
the parking brake lever. Press this button, the two direction
indicators flash.
They operate with the ignition off.
When the hazard warning lamps are
switched on, the change of direction
function, using the right-hand or left-hand
direction indicator, is deactivated.
6
SAFETY
Driving safely
Page 114 of 192
11 2
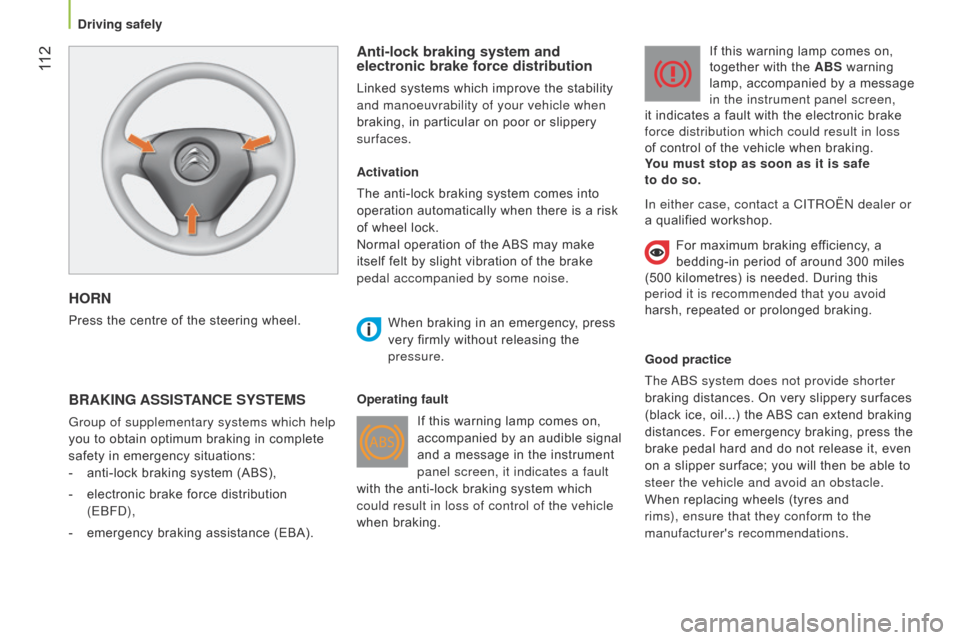
HORN
Press the centre of the steering wheel.
Anti-lock braking system and
electronic brake force distribution
Linked systems which improve the stability
and manoeuvrability of your vehicle when
braking, in particular on poor or slippery
surfaces.
BRAKING ASSISTANCE SYSTEMS
Group of supplementary systems which help
you to obtain optimum braking in complete
safety in emergency situations:
-
anti-lock braking system (ABS),
-
electronic brake force distribution
(E
b F d ),
-
emergency braking assistance (EBA). Activation
The anti-lock braking system comes into
operation automatically when there is a risk
of wheel lock.
Normal operation of the ABS may make
itself felt by slight vibration of the brake
pedal accompanied by some noise.
When braking in an emergency
, press
very firmly without releasing the
pressure.
Operating fault If this warning lamp comes on,
accompanied by an audible signal
and a message in the instrument
panel screen, it indicates a fault
with the anti-lock braking system which
could result in loss of control of the vehicle
when braking. If this warning lamp comes on,
together with the ABS warning
lamp, accompanied by a message
in the instrument panel screen,
it indicates a fault with the electronic brake
force distribution which could result in loss
of control of the vehicle when braking.
You must stop as soon as it is safe
to do so.
Good practice
The
ab
S system does not provide shorter
braking distances. On very slippery surfaces
(black ice, oil...) the ABS can extend braking
distances. For emergency braking, press the
brake pedal hard and do not release it, even
on a slipper surface; you will then be able to
steer the vehicle and avoid an obstacle.
When replacing wheels (tyres and
rims), ensure that they conform to the
manufacturer's recommendations. In either case, contact a CITR o Ë n dealer or
a qualified workshop.
For maximum braking efficiency, a
bedding-in period of around 300 miles
(500 kilometres) is needed. During this
period it is recommended that you avoid
harsh, repeated or prolonged braking.
Driving safely