tow bar CITROEN RELAY 2016 Handbook (in English)
[x] Cancel search | Manufacturer: CITROEN, Model Year: 2016, Model line: RELAY, Model: CITROEN RELAY 2016Pages: 308, PDF Size: 10.98 MB
Page 8 of 308

6
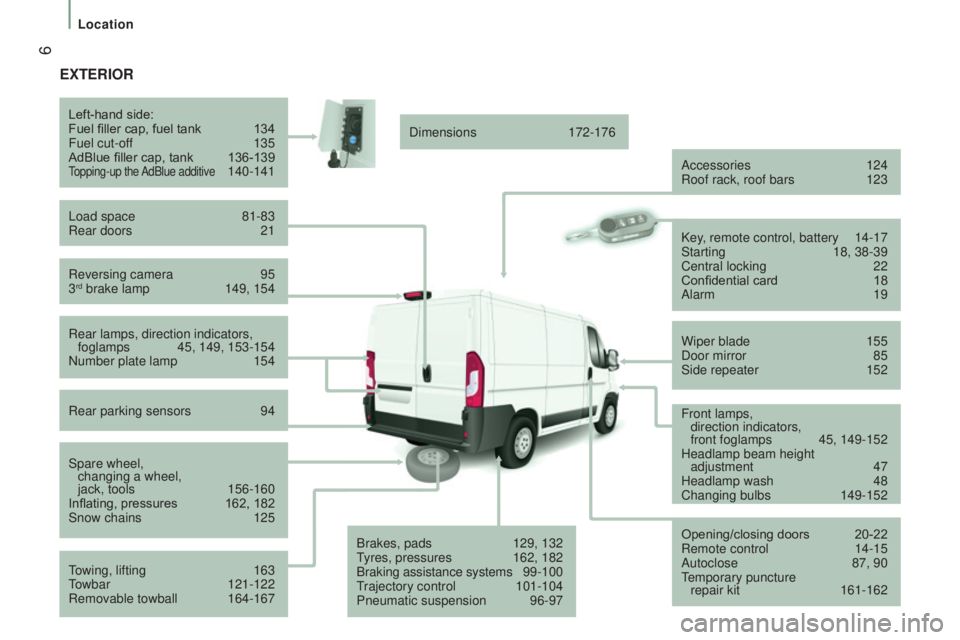
ExtErIOr
Reversing camera 95
3rd brake lamp 149, 154
Left-hand side:
Fuel filler cap, fuel tank
134
Fuel cut-of
f
135
AdBlue filler cap, tank
136-139Topping-up the AdBlue additive 140-141
Load space
81-83
Rear doors
21
Rear lamps, direction indicators, foglamps
45, 149, 153-154
Number plate lamp
154
Rear parking sensors
94
Spare wheel, changing a wheel,
jack, tools
156-160
Inflating, pressures
162, 182
Snow chains
125
T
owing, lifting
163
T
owbar
121-122
Removable towball
164-167 Dimensions
172-176
Accessories
124
Roof rack, roof bars 123
Brakes, pads
129, 132
T
yres, pressures
162, 182
Braking assistance systems
9
9-100
Trajectory control
101-104
Pneumatic suspension
96-97Key
, remote control, battery
14-17
Starting
18, 38-39
Central locking
22
Confidential card
18
Alarm
19
Wiper blade
155
Door mirror
85
Side repeater
152
Opening/closing doors
20-22
Remote control
14-15
Autoclose
87, 90
T
emporary puncture repair kit
161-162
Front lamps,
direction indicators,
front foglamps
45, 149-152
Headlamp beam height adjustment
47
Headlamp wash
48
Changing bulbs
149-152
Location
Page 22 of 308

20
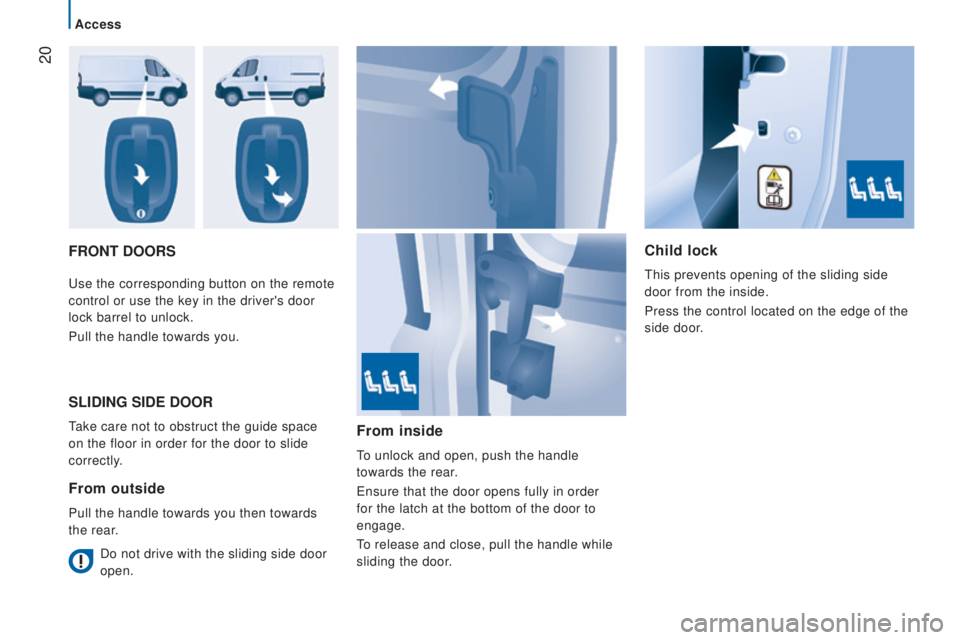
FrOnt dOOrSc hild lock
This prevents opening of the sliding side
door from the inside.
Press the control located on the edge of the
side door.
Use the corresponding button on the remote
control or use the key in the driver's door
lock barrel to unlock.
Pull the handle towards you.
SLIdInG SIdE dOOr
Take care not to obstruct the guide space
on the floor in order for the door to slide
correctly.
From outside
Pull the handle towards you then towards
the rear.
From inside
To unlock and open, push the handle
towards the rear.
Ensure that the door opens fully in order
for the latch at the bottom of the door to
engage.
To release and close, pull the handle while
sliding the door.
Do not drive with the sliding side door
open.
Access
Page 124 of 308

122
driving advice
distribution of loads: distribute the load in
the trailer so that the heaviest objects are as
close as possible to the axle and the nose
weight is close to the maximum authorised
without, however, exceeding it.
c
ooling: towing a trailer on a slope
increases the coolant temperature.
As the fan is electrically controlled, its
cooling capacity is not dependent on the
engine speed.
On the contrary, use a high gear to lower the
engine speed and reduce your speed.
In all cases, pay attention to the coolant
temperature.
tyres:
check the tyre pressures of the
towing vehicle and of the trailer, observing
the recommended pressures.
Fitting a towbar
We recommend the use of genuine
CITROËN towbars and their harnesses,
which have been tested and approved from
the design stage of your vehicle and that
the fitting of this equipment is entrusted to a
CITROËN dealer.
These genuine towbars are compatible with
the operation of the rear parking sensors
and the reversing camera, if fitted to your
vehicle.
If this equipment is not fitted by a CITROËN
dealer, it must be fitted in line with the
manufacturer's instructions.
Good practice
If the coolant temperature
warning lamp comes on, stop the
vehicle and switch off the engine
as soon as possible.
Refer to the "Checks - Levels and
checks" section.
Brakes: towing increases the braking
distance. Drive at a moderate speed,
change down early and brake gradually. Side wind: sensitivity to side wind is
increased. Drive smoothly and at a
moderate speed. ABS: the system only controls the vehicle,
not the trailer.
r
ear parking sensors: the system is
deactivated while the vehicle is towing with a
genuine CITROËN towbar fitted.
Refer to the "Technical data -
Identification markings" section.
Transport solutions
Page 126 of 308

124
OtHEr AccESSOrIES
These accessories and parts, having been
tested and approved for reliability and
safety, are all adapted to your vehicle. A
wide range of recommended and genuine
parts is available.
"c omfort":
Air deflectors, insulated module, scented air
fresheners, reading lamp, cigarette lighter,
portable ashtray, non-slip seat cushions,
rear parking sensors...
"Protection":
Mats, mudflaps, vehicle protective cover,
seat covers, security grills for rear door
windows, twin rear security doors with
security locks, paint touch-up... "Security":
Anti-intrusion alarm, vehicle tracking system,
snow chains, non-slip covers, child seats,
first aid kit, warning triangle, high visibility
vest, fire extinguisher, pet safety belt, seat
belt cutter / glass hammer...
"Style":
Alloy wheels...
"Multimedia":
CD player, Wi-Fi on Board, semi-integral
satellite navigation system, hands-free kits,
driving aids, rear multimedia support, DVD
player, navigation mapping update, portable
satellite navigation systems, telephone
carrier, aftermarket digital radio, audio
systems...
"
t
ransport solutions":
T
owbars, towbar wiring harness with 7/13
connector, 7/7 connector, 13 connector,
interior protection kits, non-slip floor, wheel
arch protector, cab dividers, transverse roof
bars, roof racks, ladder for roof rack, roof
loading runners, loading plate for roof rack... Installation of radiocommunication
transmitters
You are advised to contact a CITROËN
dealer before installing accessory
radiocommunication transmitters with
external aerial on your vehicle.
CITROËN dealers can advise you on
the specifications (frequency waveband,
maximum output power, aerial position,
specific installation conditions) of the
transmitters which can be fitted, in
accordance with the Vehicle Electromagnetic
Compatibility Directive (2004/104/EC).
The fitting of electrical equipment or
accessories which are not listed by
CITROËN may result in the failure of your
vehicle's electronic system.
We request that you take note of this point
and recommend that you contact a dealer
to be shown the range of recommended
equipment and accessories.
Depending on the country in which the
vehicle is sold or operated, it may be
compulsory to have a high visibility vest,
warning triangle, replacement bulbs and
breathalyzer in the vehicle.
To prevent the mat from becoming
caught under the pedals:
-
ensure that the mat and its fixings are
positioned correctly,
-
never fit one mat on top of another
.
Equipment
Page 158 of 308

156
Parking the vehicle
Where possible, park the vehicle on level,
stable and non-slippery ground.
Apply the parking brake, switch off the
ignition and engage first gear.
Wear a high visibility vest and position the
warning triangle on the road.
You must ensure that the occupants get out
of the vehicle and wait in a safe location.
tools
These are stowed in a box located under the
front passenger seat.
-
T
urn the button a quarter of a turn then
pull the box.
-
After use, press the button then turn it a
quarter of a turn to secure the box.
A.
Long socket.
B.
Bar.
c
. Jack.
d
. Wheelbrace.
E.
Screwdriver (handle and bits).
F.
Removable towing eye.
cHAnGInG A WHEELPneumatic suspension
If you vehicle is fitted with this system, you
must first activate vehicle lifting mode.
Press the two controls simultaneously
for at least 5 seconds; their indicator lamps
come on.
This mode is deactivated automatically after
changing a wheel, once the speed of the
vehicle has exceeded 3 mph (5 km/h).
The jack and the tool kit are specific to
your vehicle. Do not use them for other
purposes.
Never go underneath a vehicle supported
only by a jack (use an axle stand).
Puncture
Page 161 of 308

159
Fitting the spare wheelStowing the wheel
- Put the spare wheel in place on the hub
and fit the bolts by hand.
-
Pre-tighen the bolts using the
wheelbrace
d and the bar
B.
-
Lower the vehicle completely by folding
the jack
c
, then remove the jack.
-
T
ighten the bolts again using the
wheelbrace
d and the bar
B (tighten
them fully without forcing them). You must place the wheel to be repaired or
the spare wheel under the vehicle to secure
the carrier system.
-
Place the wheel at the rear of the vehicle.
●
For eversions with
steel wheels, hook
the carrier H on the outside.
●
Screw in the grip
G to secure the carrier
and wheel. ●
For versions with alloy wheels, position
the strap j
on the outside.
●
Fit the three strap fixing screws
I to the
alloy wheel.
QUICK HELP
8
Puncture
Page 162 of 308

160
Refer to the "Technical data -
Identification markings" section for the
location of the tyre pressure label.
-
Fit the long socket
A
, the wheelbrace
d
and bar B to the securing screw.
-
T
urn the assembly clockwise to fully
draw in the cable and raise the wheel
under the vehicle.
-
Check that the wheel is positioned
horizontally flat against the floor of the
vehicle and that the the cut-out for the
carrier system is visible.
-
Stow the tools and the trim (depending
on version).
refitting the repaired wheel
Refitting the repaired wheel is the same as
fitting the spare wheel; don't forget to refit
the wheel trim.
The spare wheel is not designed to be used
over long distances. Have the tightening of
the bolts and pressure of the spare wheel
checked by a CITROËN dealer or a qualified
workshop without delay.
Also, have the original wheel repaired and
refitted by a CITROËN dealer or a qualified
workshop as soon as possible.
Puncture
Page 163 of 308

161
PuncturE rEPAIr KItrepairing the tyre
- Apply the parking brake.
-
Unscrew the tyre valve cap, remove the
filling hose B and screw the ring E onto
the valve. -
Start the engine.
-
Insert the connector G
into the nearest
power socket on the vehicle.
-
Switch on the compressor by placing the
switch F in position "I" (on),
-
Inflate the tyre to a pressure of 5 bar
.
To obtain a more accurate reading, you are
advised to check the pressure value on the
pressure gauge H , with the compressor off.
-
Check that the switch
F on the
compressor is in position "0" (off).
This temporary puncture repair kit stowed
in a bag located in one of the front door
pockets.
It consists of:
-
a cartridge
A , containing the sealant
fluid, equipped with:
●
a filling hose
B ,
●
a sticker
c
indicating "max. 80 km/h",
which the driver must affix in full view
(on the dashboard) after repairing the
tyre,
-
a quick guide to use of the repair kit,
-
a compressor
d
equipped with a
pressure gauge and unions,
-
adaptors, for the inflation of various
items.
QUICK HELP
8
Puncture
Page 166 of 308

164
tOWBAr WItH QuIcKLY
d E t
A
c HABLE t
OWBALL
Presentation
This towball can be fitted and removed
quickly and easily without the use of tools. For information on the maximum
trailer weight and the recommended
nose weight, refer to the "Technical data -
Weights" section.
For information on safely towing a trailer,
refer to the "Accessories - Towing a trailer"
section.
1.
Carrier
2.
Connector socket.
3.
Safety eye.
4.
Detachable towball.
5.
Locking / unlocking wheel.
6.
Key lock.
7.
Key reference label. A.
Locked
position; the locking wheel is in
contact with towball (no gap).
B.
u
nlocked position; the locking wheel
and towball are no longer in contact
(gap of about 5 mm). Before each use
Check that the towball is correctly
locked and verify the following points:
- the green mark on the locking wheel
is in line with the green mark on the
towball,
-
the locking wheel is in contact with the
towball,
-
the key lock is on and the key removed;
the locking wheel can no longer be
operated,
-
the towball must no longer move at all in
its carrier; try to shake it by hand.
d
uring use
Never unlock the device when a trailer or
load carrier is fitted to the towball.
Never exceed the maximum authorised
weight for the vehicle (the Gross Vehicle
Weight - GVW), the trailer, or the sum of the
two (the Gross Train Weight - GTW).
Observe the legislation in force in the
country in which you are driving. After use
For journeys made without a trailer or load
carrier, the towball must be removed and
the blanking plug inserted in the carrier. This
measure applies particularly if the towball
could hinder visibility of the number plate or
lighting.
Transport solutions
Page 169 of 308

167
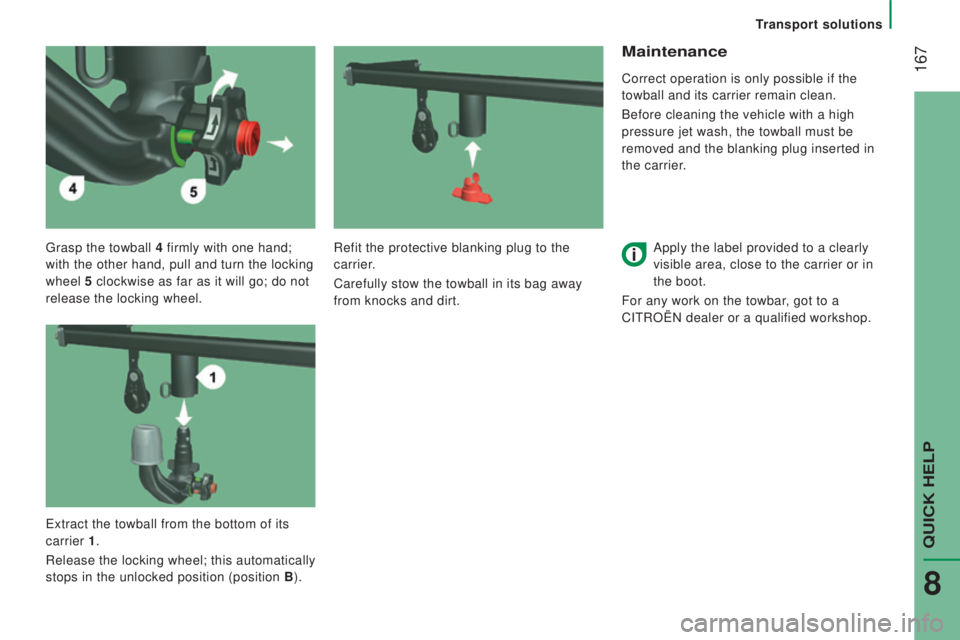
Grasp the towball 4 firmly with one hand;
with the other hand, pull and turn the locking
wheel 5 clockwise as far as it will go; do not
release the locking wheel.
Maintenance
Correct operation is only possible if the
towball and its carrier remain clean.
Before cleaning the vehicle with a high
pressure jet wash, the towball must be
removed and the blanking plug inserted in
the carrier.
Apply the label provided to a clearly
visible area, close to the carrier or in
the boot.
For any work on the towbar, got to a
CITROËN dealer or a qualified workshop.
Refit the protective blanking plug to the
carrier.
Carefully stow the towball in its bag away
from knocks and dirt.
Extract the towball from the bottom of its
carrier 1.
Release the locking wheel; this automatically
stops in the unlocked position (position B ).
Transport solutions
QUICK HELP
8