set clock CITROEN RELAY 2017 Handbook (in English)
[x] Cancel search | Manufacturer: CITROEN, Model Year: 2017, Model line: RELAY, Model: CITROEN RELAY 2017Pages: 292, PDF Size: 9.04 MB
Page 19 of 292

17MAIn FunctIOnS OF tHE KEY
type of keyunlocking the cabin Locking the doorsu nlocking the rear doors
Mechanical key Turn anti-clockwise
(driver's side). Turn clockwise
(driver's side). -
Remote control -
Signalling
Direction indicators 2 flashes.1 flash.2 flashes.
Indicator lamp in the central
locking control button on the dashboard Off.
On for about 3 seconds,
then flashing. Flashing.
Using the mechanical key in the drivers' door lock barrel does not activate (set) or deactivate the alarm.
2
Access
rEAdY tO GO
Page 74 of 292
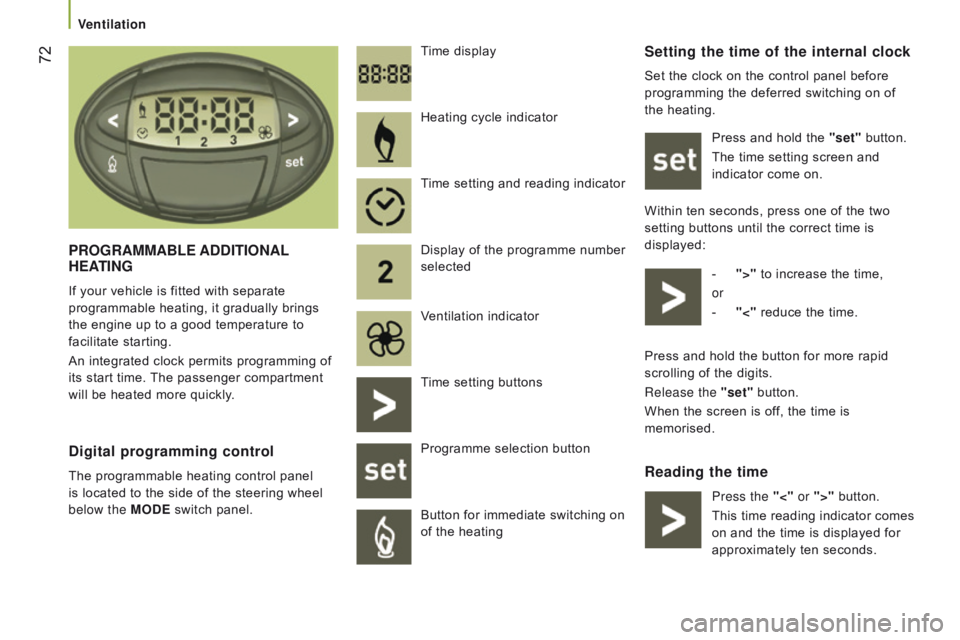
72Setting the time of the internal clock
Set the clock on the control panel before
programming the deferred switching on of
the heating.Press and hold the "set" button.
The time setting screen and
indicator come on.
Within ten seconds, press one of the two
setting buttons until the correct time is
displayed: -
">"
to increase the time,
or
-
"<"
reduce the time.
reading the time
Pr
OG
r
AMMABLE
A
dd
I
t
IO
n
AL
HEAt
I
n
G
If your vehicle is fitted with separate
programmable heating, it gradually brings
the engine up to a good temperature to
facilitate starting.
An integrated clock permits programming of
its start time. The passenger compartment
will be heated more quickly. Time display
digital programming control
The programmable heating control panel
is located to the side of the steering wheel
below the MO
d E switch panel. Heating cycle indicator
Time setting and reading indicator
Display of the programme number
selected
Ventilation indicator
Time setting buttons
Programme selection button
Button for immediate switching on
of the heating
Press and hold the button for more rapid
scrolling of the digits.
Release the "set" button.
When the screen is off, the time is
memorised.
Press the "<" or ">" button.
This time reading indicator comes
on and the time is displayed for
approximately ten seconds.
Ventilation
Page 95 of 292
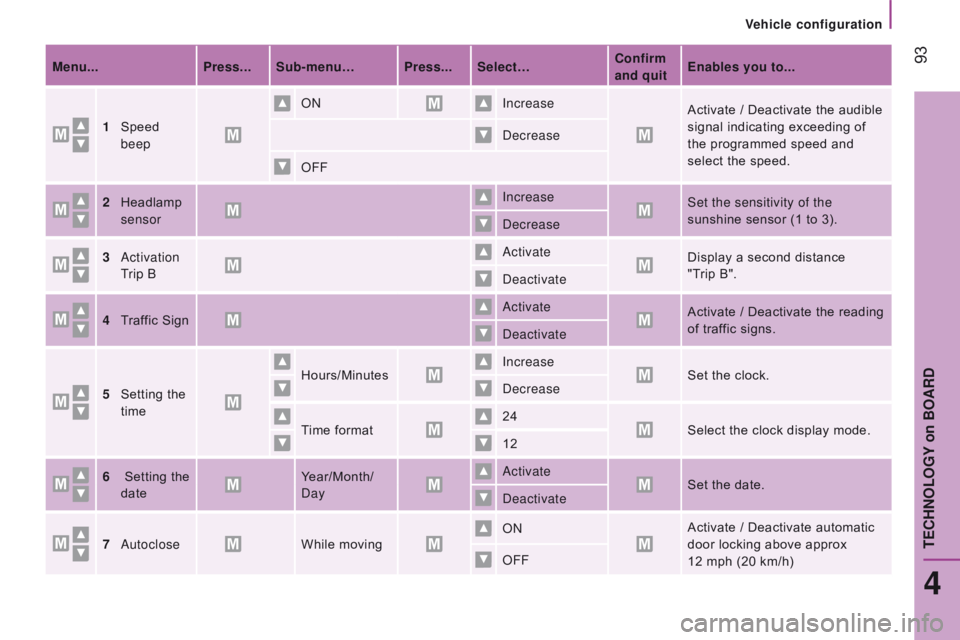
93Menu...Press... Sub-menu… Press... Select…c onfirm
and quit Enables you to...
1
Speed
beep ON
Increase
Activate / Deactivate the audible
signal indicating exceeding of
the programmed speed and
select the speed.
Decrease
OFF
2
Headlamp
sensor Increase
Set the sensitivity of the
sunshine sensor (1 to 3).
Decrease
3
Activation
Trip B Activate
Display a second distance
"Trip B".
Deactivate
4
T
raffic Sign Activate
Activate / Deactivate the reading
of traffic signs.
Deactivate
5
Setting the
time Hours/Minutes
Increase
Set the clock.
Decrease
Time format 24
Select the clock display mode.
12
6
Setting the
date Year/Month/
Day Activate
Set the date.
Deactivate
7
Autoclose While moving ON
Activate / Deactivate automatic
door locking above approx
12
mph (20 km/h)
OFF
4
tEcHnOLOGY on BOArd
Vehicle configuration
Page 178 of 292

176
- If a pressure of at least 3 bar is not
reached within 5 minutes, disconnect
the compressor from the valve and the
power socket, then move the vehicle
forward by approximately 10 metres
to
distribute the sealant fluid inside
the
tyre.
-
Then repeat the inflation operation:
●
if a pressure of at least
3 bar is not
reached within 10 minutes, switch off
your vehicle: the tyre has suffered
too much damage and repair has not
been possible. Contact a CITROËN
dealer or a qualified workshop.
●
if the tyre has been inflated to a
pressure of 5 bar, set off again
immediately.
After driving for approximately 10 minutes,
stop and check the pressure of the tyre
again.
Adjust the pressure to the value given on the
label on the driver's door pillar, and contact
a CITROËN dealer or a qualified workshop
as soon as possible.
checking and adjusting the
pressure
The compressor can only be used to check
and adjust the pressure.
-
Disconnect the hose
I and connect it to
the tyre valve directly; the cartridge will
then be connected to the compressor
and the filling fluid will not be injected.
If it is necessary to deflate the tyre, connect
the hose I to the tyre valve and press the
yellow button, placed in the centre of the
switch on the compressor.
replacing the cartridge
To replace the sealant cartridge, carry out
the following operations:
-
disconnect the hose
I,
-
turn the cartridge to be replaced
anticlockwise and lift it,
-
insert the new cartridge and turn it
clockwise,
-
reconnect the hose
I and connect the
hose B in its location.
The cartridge contains ethylene-glycol,
a product which is harmful if swallowed
and which causes irritation to the eyes.
Keep out of reach of children.
After use, do not discard the cartridge in the
environment, take it to a CITROËN
dealer or
an appropriate waste disposal organisation.
This puncture repair kit and
replacement cartridges are available
from CITROËN dealers.
Puncture
Page 225 of 292
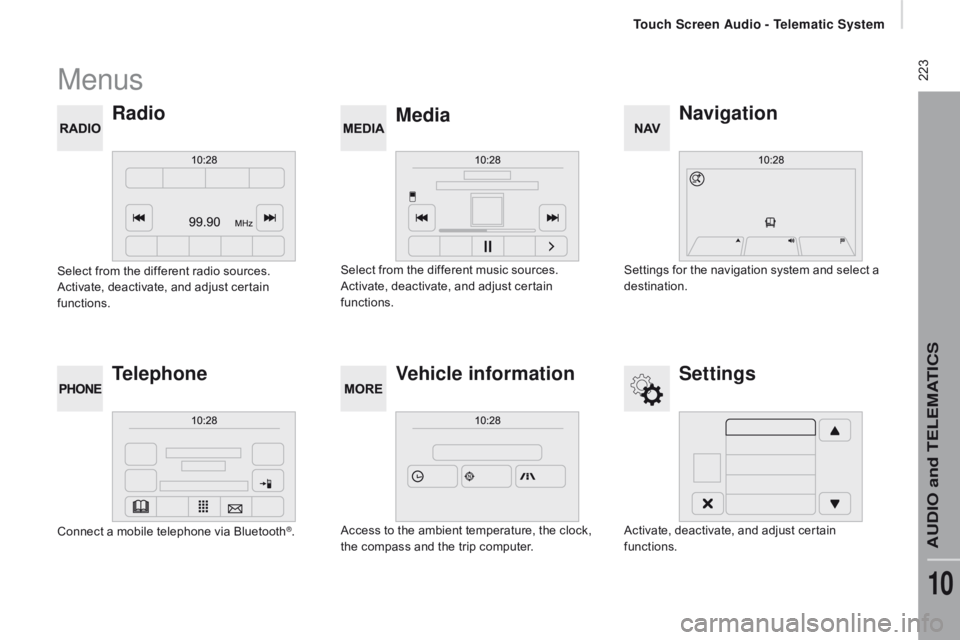
223Menus
navigation
Mediarad
io
Settings
tel
ephone Vehicle information
Settings for the navigation system and select a
destination.
Select from the different music sources.
Activate, deactivate, and adjust certain
functions.
Select from the different radio sources.
Activate, deactivate, and adjust certain
functions.
Activate, deactivate, and adjust certain
functions.
Connect a mobile telephone via Bluetooth
®.
Access to the ambient temperature, the clock,
the compass and the trip computer.
Touch Screen Audio - Telematic System
AUDIO and TELEMATICS
10
Page 249 of 292
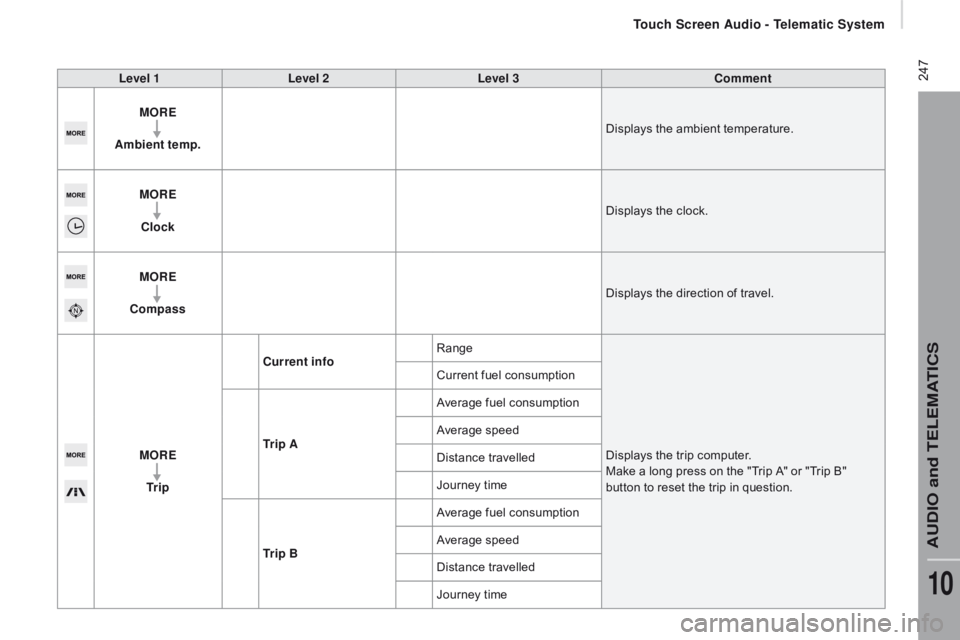
247Level 1Level 2 Level 3co mment
MO r
E
A
mbient temp. Displays the ambient temperature.
MO
r
E
c
lock Displays the clock.
MO
r
E
co
mpass Displays the direction of travel.
MO
r
E
tr
i p
cur
rent infoRange
Displays the trip computer.
Make a long press on the "Trip A" or "Trip B"
button to reset the trip in question.
Current fuel consumption
tr
i p A Average fuel consumption
Average speed
Distance travelled
Journey time
tr
i p B Average fuel consumption
Average speed
Distance travelled
Journey time
touch Screen Audio - telematic System
AudIO and tELEMAtIcS
10
Page 253 of 292
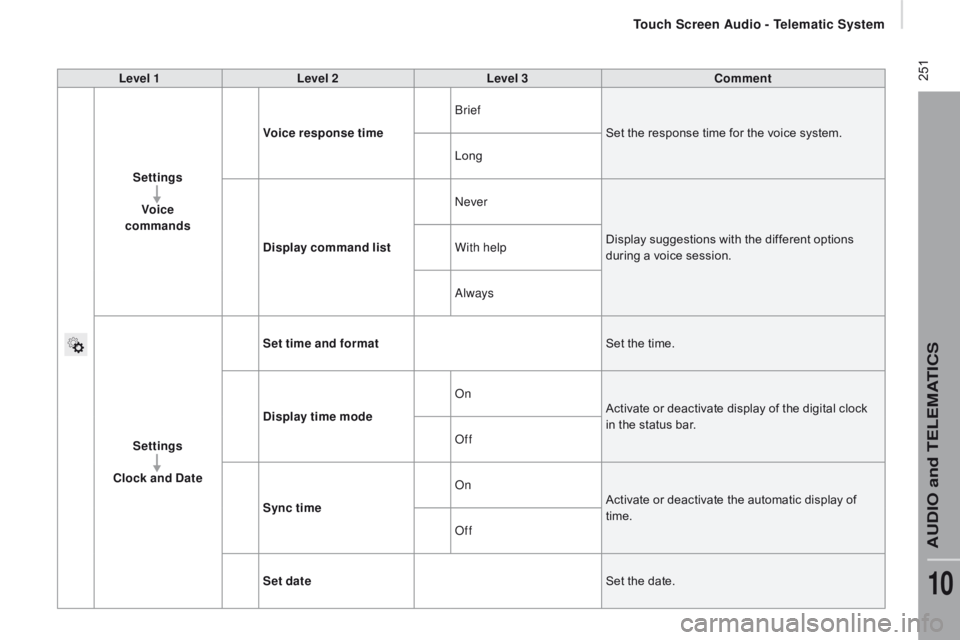
251Level 1Level 2 Level 3co mment
Settings Voice
commands Voice response time
Brief
Set the response time for the voice system.
Long
d
isplay command list Never
Display suggestions with the different options
during a voice session.
With help
Always
Settings
clo
ck and d
at
eSet time and format
Set the time.
d
isplay time mode On
Activate or deactivate display of the digital clock
in the status bar.
Off
Sync time On
Activate or deactivate the automatic display of
time.
Off
Set date Set the date.
touch Screen Audio - telematic System
AudIO and tELEMAtIcS
10
Page 259 of 292
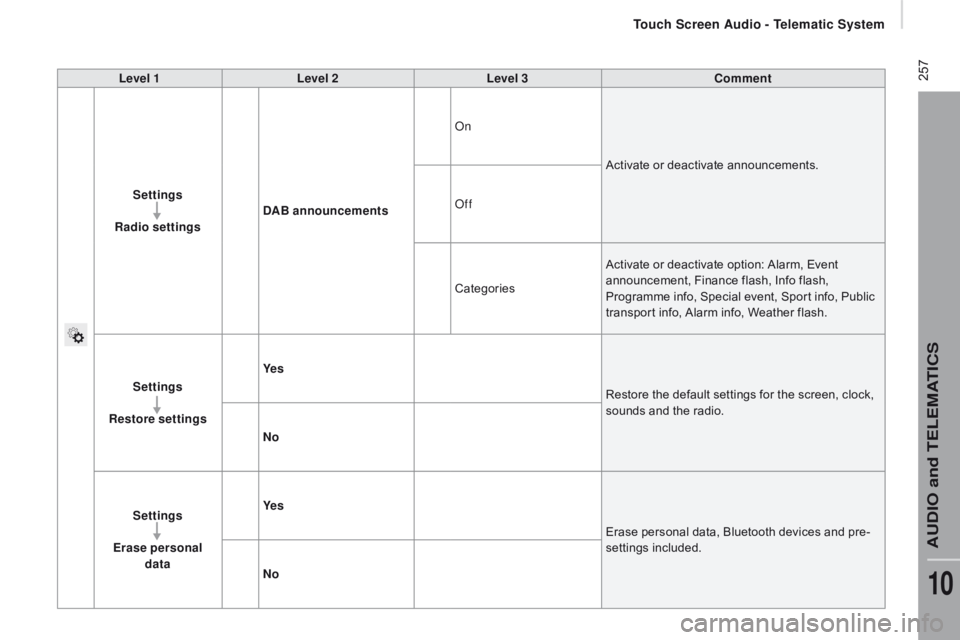
257Level 1Level 2 Level 3co mment
Settings
r
adio settings
dA
B announcements On
Activate or deactivate announcements.
Off
Categories Activate or deactivate option: Alarm, Event
announcement, Finance flash, Info flash,
Programme info, Special event, Sport info, Public
transport info, Alarm info, Weather flash.
Settings
re
store settings Ye s
Restore the default settings for the screen, clock,
sounds and the radio.
n
o
Settings
Erase personal data Ye s
Erase personal data, Bluetooth devices and pre-
settings included.
n
o
touch Screen Audio - telematic System
AudIO and tELEMAtIcS
10