tow CITROEN RELAY 2019 Handbook (in English)
[x] Cancel search | Manufacturer: CITROEN, Model Year: 2019, Model line: RELAY, Model: CITROEN RELAY 2019Pages: 232, PDF Size: 8.21 MB
Page 44 of 232

42
Mirrors
Door mirrors
These are divided into two zones:
A -Upper mirror
B - Lower mirror
Electric adjustments
The key must be in the MAR position.
Left-hand mirror:
A1 - Upper mirror
B1 - Lower mirror
Right-hand mirror:
A2 - Upper mirror
B2 - Lower mirror
F
T
hen move the control in the direction of the
adjustment required.
The rear view mirror glass is spherical in
order to widen the lateral field of view. The
objects obser ved are, in reality, closer than
they appear. Therefore, this must be taken
into account in order to assess the distance
c o r r e c t l y.
The shell incorporates the direction indicator
side repeater and aerials, depending on the
equipment available on board (GPS, GSM,
Radio, etc.). F
T
urn the control to select the mirror zone.
Electric folding
F Press this control.
Defrosting the mirrors
F Press the heated rear window button.
Rear view mirror
The lever located on the lower edge moves the
mirror into two positions.
For the day position, the lever is pushed.
For the night position to prevent dazzle, pull the
lever towards you.
Ease of use and comfort
Page 45 of 232

43
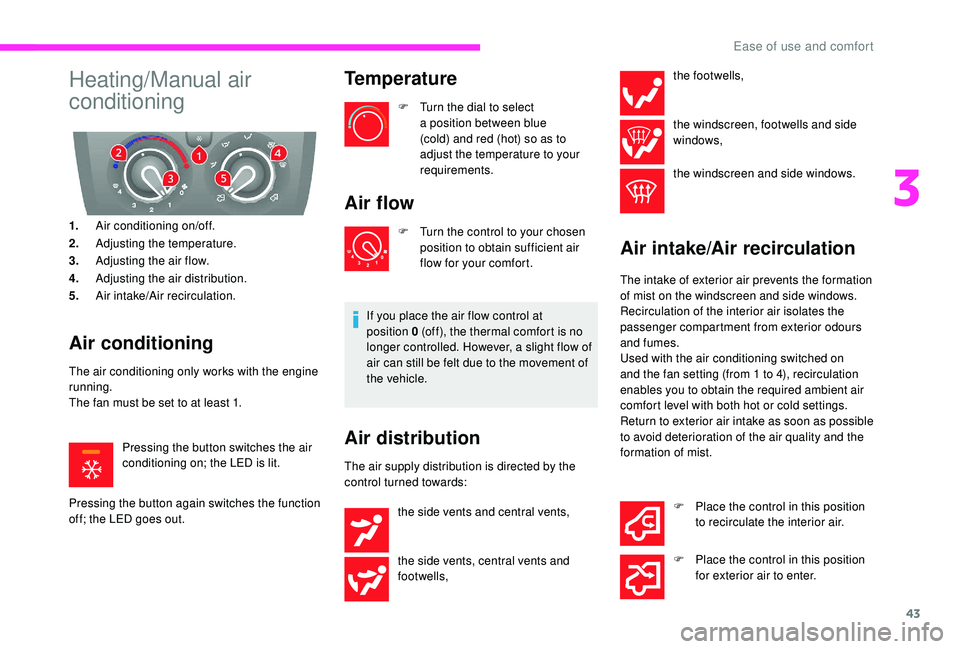
Heating/Manual air
conditioning
1.Air conditioning on/off.
2. Adjusting the temperature.
3. Adjusting the air flow.
4. Adjusting the air distribution.
5. Air intake/Air recirculation.
Air conditioning
The air conditioning only works with the engine
running.
The fan must be set to at least 1.
Pressing the button switches the air
conditioning on; the LED is lit.
Pressing the button again switches the function
off; the LED goes out.
Temperature
F Turn the dial to select a position between blue
(cold) and red (hot) so as to
adjust the temperature to your
requirements.
Air flow
F Turn the control to your chosen position to obtain sufficient air
flow for your comfort.
If you place the air flow control at
position 0 (off), the thermal comfort is no
longer controlled. However, a slight flow of
air can still be felt due to the movement of
the vehicle.
Air distribution
The air supply distribution is directed by the
control turned towards: the footwells,
the windscreen, footwells and side
windows,
the windscreen and side windows.
Air intake/Air recirculation
The intake of exterior air prevents the formation
of mist on the windscreen and side windows.
Recirculation of the interior air isolates the
passenger compartment from exterior odours
and fumes.
Used with the air conditioning switched on
and the fan setting (from 1
to 4), recirculation
enables you to obtain the required ambient air
comfort level with both hot or cold settings.
Return to exterior air intake as soon as possible
to avoid deterioration of the air quality and the
formation of mist.
the side vents and central vents,
the side vents, central vents and
footwells, F
P
lace the control in this position
to recirculate the interior air.
F
P
lace the control in this position
for exterior air to enter.
3
Ease of use and comfort
Page 46 of 232

44
Automatic single zone air
conditioning
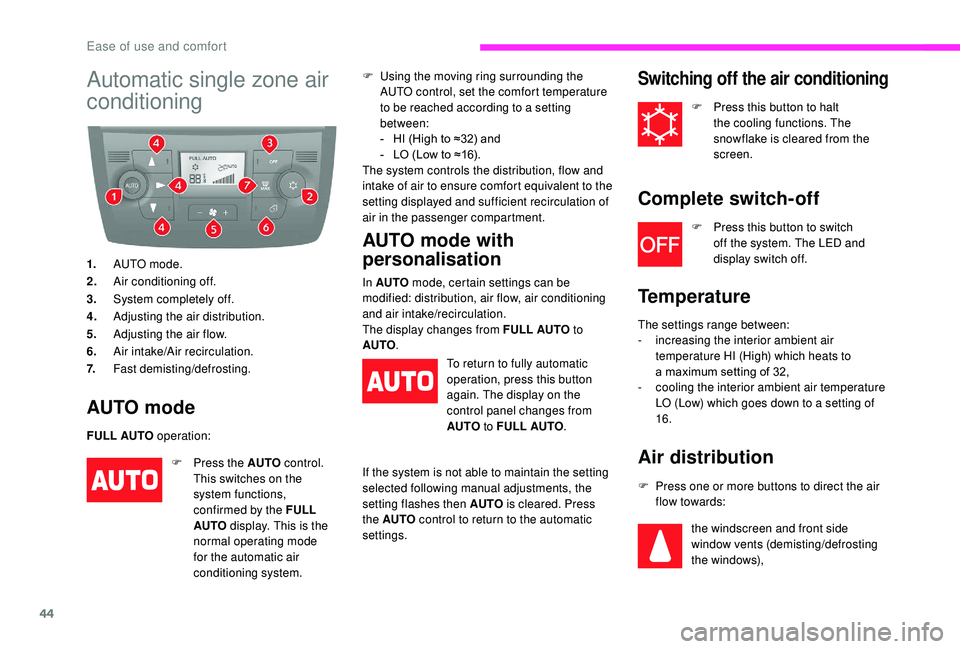
1.AUTO mode.
2. Air conditioning off.
3. System completely off.
4. Adjusting the air distribution.
5. Adjusting the air flow.
6. Air intake/Air recirculation.
7. Fast demisting/defrosting.
AUTO mode
FULL AUTO operation: F
U
sing the moving ring surrounding the
AUTO control, set the comfort temperature
to be reached according to a setting
between:
-
H
I (High to ≈32) and
-
L
O (Low to ≈16).
The system controls the distribution, flow and
intake of air to ensure comfort equivalent to the
setting displayed and sufficient recirculation of
air in the passenger compartment.
F
P
ress the AUTO control.
This switches on the
system functions,
confirmed by the FULL
AUTO display. This is the
normal operating mode
for the automatic air
conditioning system.
AUTO mode with
personalisation
In AUTO mode, certain settings can be
modified: distribution, air flow, air conditioning
and air intake/recirculation.
The display changes from FULL AUTO to
AUTO .
To return to fully automatic
operation, press this button
again. The display on the
control panel changes from
AUTO to FULL AUTO .
If the system is not able to maintain the setting
selected following manual adjustments, the
setting flashes then AUTO is cleared. Press
the AUTO control to return to the automatic
settings.
Switching off the air conditioning
F Press this button to halt the cooling functions. The
snowflake is cleared from the
screen.
Complete switch-off
F Press this button to switch off the system. The LED and
display switch off.
Temperature
The settings range between:
- i ncreasing the interior ambient air
temperature HI (High) which heats to
a
maximum setting of 32,
-
c
ooling the interior ambient air temperature
LO (Low) which goes down to a
setting of
16.
Air distribution
F Press one or more buttons to direct the air flow towards:
the windscreen and front side
window vents (demisting/defrosting
the windows),
Ease of use and comfort
Page 52 of 232

50
To avoid the risks of poisoning or
asphyxia, the additional heating must
not be used, even for short periods, in
a closed environment such as a garage or
workshop which are not equipped with an
exhaust gas extraction system.
The additional heating switches off when
the battery voltage is low, so as to allow
engine starting.
The additional heating is fed by the
vehicle's fuel tank. Ensure that the low fuel
warning lamp is not on.
Always switch off the additional heating
when refuelling to avoid any risk of fire or
explosion!
The temperature near the heating
system must not exceed 120°C. A higher
temperature (e.g. when baking the
paint) could damage the components of
electronic circuits.
The additional heating is fitted with
a
temperature limiter which cuts off
the combustion in the event of engine
overheating due to a
lack of coolant.
Check the level and top up if necessary.
For more information on Checking levels ,
refer to the corresponding section.
Then press the programme selection
button before switching the heating on
again.Recommendations for ventilation and air conditioning
In order for these systems to be fully effective,
follow the operation and maintenance
guidelines below:
F
T
o ensure that the air is distributed evenly,
keep the external air intake grilles at the
base of the windscreen, the nozzles, the
vents, the air outlets and the air extractor
in the boot free from obstructions.
F
D
o not cover the sunshine sensor,
located on the dashboard; this is used for
regulation of the automatic air conditioning
system.
F
O
perate the air conditioning system for
at least 5
to 10 minutes once or twice
a
month to keep it in per fect working order.
F
E
nsure that the passenger compartment
filter is in good condition and replace
the filter elements periodically. We
recommend the use of a
combined
passenger compartment filter. Thanks to
its special active additive, it helps both to
purify the air breathed by the occupants
and to keep the passenger compartment
clean (reduction of allergic symptoms, bad
odours and greasy deposits). F
T o ensure correct operation of the
air conditioning system, you are also
advised to have it checked regularly as
recommended in the Maintenance and
Warranty Guide.
F
I
f the system does not produce cold air,
switch it off and contact a
CITROËN
dealer or a
qualified workshop.
When towing the maximum load on a
steep
gradient in high temperatures, switching off
the air conditioning increases the available
engine power and so improves the towing
ability.
To avoid the windows misting up and
deterioration in the quality of the air:
-
d
o not drive for too long with the
ventilation switched off.
-
d
o not keep air recirculation set for an
extended period.
Ease of use and comfort
Page 54 of 232

52
With Stop & Start, when the rear screen
demisting is switched on, STOP mode is
not available.
Cab layout
Sun visor
F To avoid glare from ahead, fold the sun visor down.
Pockets are arranged in the sun visors for
storing toll cards, tickets, etc.
Central storage Front seat storage
If your vehicle is fitted with a seat with
v ariable damping, it does not have any
storage compartments.
The space under the passenger's seat is
used to store the tool box containing the tools
required to change a
wheel or bulb or to tow the
vehicle.
An open storage space is provided, located
under the centre console panel.
It gives access to the auxiliary Jack socket and
the USB port intended for the transfer of data to
the audio system.
Depending on equipment, it is also fitted with a
double cup holder and/or a
smartphone holder. There is a
fixed storage tray under the driver's
seat.
Ease of use and comfort
Page 59 of 232

57
Rear fittings
Stowing rings
As a safety precaution in case of sharp
b raking, you are advised to place heavy
objects as far for wards towards the cab as
possible.
Support for stowing rail
Supports for securing a stowing rail are
a vailable above the trims, on each side of the
vehicle.
Maximum load: 200
kg.
Side trim
The lower parts of the sides are fitted with load
protection trims.
Stowing rings are provided on the floor to
secure and make safe your loads: 8
for L1
and
L2
length vehicles, 10
for L3
and L4
length
vehicles.
Two additional rings are located on the partition
behind the cab.
Maximum load: 500
kg.
12 Volt socket
The connection of an electrical device
not approved by CITROËN, such as
a
USB charger, may adversely affect the
operation of vehicle electrical systems,
causing faults such as poor radio
reception or inter ference with displays in
the screens.
Maximum power: 180
W.
3
Ease of use and comfort
Page 62 of 232

60
Exterior fittings
Protective grille
Depending on the country of sale, a
protective grille fitted to the inside of the front
bumper provides protection for underbonnet
components against flying stones, etc.
Protectors for very cold
conditions
Depending on the country of sale, protective foam
pads are present to avoid the ingress of cold or
snow to the upper part of the underbonnet.
Folding foot board
Located at the edge of each headlamp unit,
they are fitted to the front panel above the
r a d i a t o r.
Slide them towards the outside of the vehicle to
remove them.To facilitate the entry and exit of rear
passengers, your vehicle may be fitted with
a
foot board, which is deployed on opening the
sliding side door.
Ease of use and comfort
Page 63 of 232

61
Lighting controls
Selection and control of the various front and
rear lamps providing the vehicle's lighting.In some weather conditions (e.g. low
temperature or humidity), the presence
of misting on the internal sur face of the
glass of the headlamps and rear lamps is
normal; it disappears after the lamps have
been on for a
few minutes.
Travelling abroad
If using your vehicle in a
country that
drives on the other side of the road, the
headlamps must be adjusted to avoid
dazzling oncoming drivers.
Contact a
CITROËN dealer or a qualified
workshop.
Selection of main lighting
mode
Lighting off (ignition off)/
Daytime running lamps (engine
running).
Dipped beam headlamps/Main
beam headlamps.
Automatic illumination of the dipped
beam/main beam headlamps.
Switching the headlamps
(dipped beam/main beam)
F Pull the lighting control stalk towards you to switch between dipped and main beam
headlamps.
To flash the headlamps, pull the lighting control
stalk towards you, regardless of the position of
the ring.
Direction indicators
F Turn the ring to align the white mark with the symbol required. F
L
eft: lower the lighting control stalk passing
the point of resistance.
F
R
ight: raise the lighting control stalk passing
the point of resistance.
" Motorway " function
F Press briefly upwards or downwards,
without going beyond the point of
resistance; the direction indicators will flash
five times.
Foglamps
If your vehicle is equipped with foglamps,
they operate with the dipped or main beam
headlamps.
4
Lighting and visibility
Page 64 of 232

62
Front foglamps
Rear foglamps
F
P
ress one of these controls to switch on the
lamps.
The foglamps may only be used in fog or
when snow is falling.
In clear weather or in rain, both day and
night, rear foglamps dazzle and their use
is prohibited.
Do not forget to switch them off when they
are no longer necessary.
LED daytime running
lamps
On starting the vehicle, in daylight the LED
daytime running lamps come on automatically.
If the sidelamps, dipped or main beam
headlamps are switched on manually or
automatically, the daytime running lamps
"go out.
Programming
For countries where exterior lighting by day is
not a legal requirement, you can activate or
deactivate the function via the configuration
menu.
Automatic illumination of
headlamps
If your vehicle is fitted with this function, the
dipped beam headlamps are switched on
automatically if the light is poor.
In fog or snow, the sunshine sensor may
detect sufficient light. In this case, the
lighting will not come on automatically. If
necessary, you must switch on the dipped
beam headlamps manually.
They are switched off when the light
returns to a
sufficient level.
Do not cover the sunshine sensor at the
top centre of the windscreen.
Activation
F Turn the ring to this position.
The lamps are switched off automatically when
the ignition is switched off.
Guide-me-home lighting
If your vehicle is fitted with this function: when
you leave your vehicle, the dipped beam
headlamps remain on for the selected duration
(when leaving a car park for example).
Ignition off or key in the
STOP position
F Within 2 minutes after switching off the
engine, position the ignition key in the STOP
position or remove it.
F
P
ull the lighting control stalk towards the
steering wheel.
This indicator lamp lights up in
the instrument panel.
Every time the lighting control stalk is pulled
towards the steering wheel, the guide-me-
home lighting is extended by 30
seconds
You can adjust the sensitivity of the
sunshine sensor.
For more information on
Vehicle
configuration , refer to the corresponding
section.
Lighting and visibility
Page 65 of 232

63
up to approximately 3 minutes. When this
t ime has elapsed, the lamps are switched off
automatically.
Deactivate this control by keeping the stalk
pulled towards the steering wheel for more than
2
seconds.
Automatic headlamps
System which automatically changes to main
beam according to the ambient light level and
the driving conditions, using a camera located
at the top of the windscreen.
This system is a
driving aid.
The driver remains responsible for the
vehicle's lighting, its correct use for the
prevailing conditions of light, visibility
and traffic, and obser vation of driving
regulations.
Activation
F Turn the lighting control stalk ring to this position.
F
A
ctivate the function with the MODE button;
in the "Automatic headlamp dipping" menu,
select "ON". For more information on Vehicle
configuration
, refer to the corresponding
section.
F
F
lash the headlamps (going beyond the
point of resistance) to activate the function.
Operation
Once activated, the system operates as
follows:
If the ambient light level is sufficient and/or if
the traffic conditions do not allow illumination of
the main beam headlamps:
-
D
ipped beam is maintained; this
indicator lamp lights up in the
instrument panel.
4
Lighting and visibility