dashboard CITROEN RELAY 2020 Handbook (in English)
[x] Cancel search | Manufacturer: CITROEN, Model Year: 2020, Model line: RELAY, Model: CITROEN RELAY 2020Pages: 196, PDF Size: 34.07 MB
Page 60 of 196

58
Safety
Installing a booster seat
The chest part of the seat belt must be
positioned on the child's shoulder without
touching the neck.
Ensure that the lap part of the seat belt
passes correctly over the child's thighs.
Use a booster seat with backrest, equipped
with a belt guide at shoulder level.
Additional protections
To prevent accidental opening of the
doors and rear windows, use the "Child lock".
Take care not to open the rear windows by
more than one third.
To protect young children from the rays of the
sun, fit side blinds on the rear windows.
As a safety precaution, do not leave:
– a child alone and unattended in a vehicle,
– a child or an animal in a vehicle which is
exposed to the sun, with the windows closed,
– the keys within reach of children inside the
vehicle.
Child seat at the rear
time discharging the hot gas via openings
provided for this purpose.
Front airbags
Do not drive holding the steering wheel
by its spokes or resting your hands on the
centre part of the wheel.
Passengers must not place their feet on the
dashboard.
Do not smoke as deployment of the airbags
can cause burns or the risk of injury from a
cigarette or pipe.
Never remove or pierce the steering wheel or
hit it violently.
Do not fix or attach anything to the steering
wheel or dashboard, as this could cause
injuries when the airbags are deployed.
Lateral airbags
Use only approved covers on the seats,
compatible with the deployment of the lateral
airbags. For information on the range of seat
covers suitable for your vehicle, contact a
CITROËN dealer.
Do not fix or attach anything to the seat
backrests (clothes, etc.), as this could cause
injuries to the thorax or arm when the lateral
airbag is deployed.
Do not sit with the upper part of the body any
nearer to the door than necessary.
Curtain airbags
Do not fix or attach anything to the roof,
as this could cause head injuries when the
curtain airbag is deployed.
Do not remove the grab handles installed on
the roof, as they play a part in securing the
curtain airbags.
Child seats
The regulations on carrying children are specific to each country. Refer to the
legislation in force in your country.
For maximum safety, please observe the
following recommendations:
– In accordance with European regulations, all
children under the age of 12 or less than 4
ft 11” (150 cm) tall must travel in approved
child seats suited to their weight , on seats
fitted with a seat belt or ISOFIX mountings.
– Statistically, the safest seats in your
vehicle for carrying children are the rear
seats.
– Children weighing less than 9 kg must
travel in the "rear facing" position, whether in
the front or rear of the vehicle.
It is recommended that children travel
on the rear seats of the vehicle:
– ‘rear facing’ up to the age of 3,
– ‘forward facing’ over the age of 3.
Make sure that the seat belt is correctly
positioned and tightened.
For child seats with a support leg, ensure that
the support leg is in firm and steady contact
with the floor.
Advice
An incorrectly installed child seat compromises the child's safety in the
event of an accident.
Ensure that there is no seat belt or seat belt
buckle under the child seat, as this could
destabilise it.
Remember to fasten the seat belts or the
harness of child seats, keeping the slack
relative to the child's body to a minimum,
even for short journeys.
When installing a child seat using the seat
belt, ensure that the seat belt is tightened
correctly on the child seat and that it secures
the child seat firmly on the seat of the vehicle.
If the passenger seat is adjustable, move it
forwards if necessary.
Remove the head restraint before
installing a child seat with a backrest on a
passenger seat.
Ensure that the head restraint is stored or
attached securely to prevent it from being
thrown around the vehicle in the event of
sharp braking. Refit the head restraint once
the child seat has been removed.
Page 96 of 196

94
Practical information
► Pull the control located on the side of the
dashboard towards you.
On the outside
► Open the lock using the key.
► Hold towball 4 firmly in one hand; using
the other hand, pull and turn wheel 5 fully in a
clockwise direction; do not release the wheel.
► Extract the towball from the bottom of its
carrier 1.
► Release the wheel; this automatically stops in
the unlocked position (position B).
► Refit the protective plug to the carrier .
► Carefully stow the towball in its bag away
from knocks and dirt.
Maintenance
Correct operation is only possible if the towball
and its carrier are kept clean.
Before cleaning the vehicle with a high-pressure
jet wash, the towball must be removed and the
protective plug fitted to the carrier.
Apply the label provided to a clearly visible area, close to the carrier or in the
boot.
Go to a CITROËN dealer or a qualified
workshop for any work on the towbar system.
Roof-mounted carrying
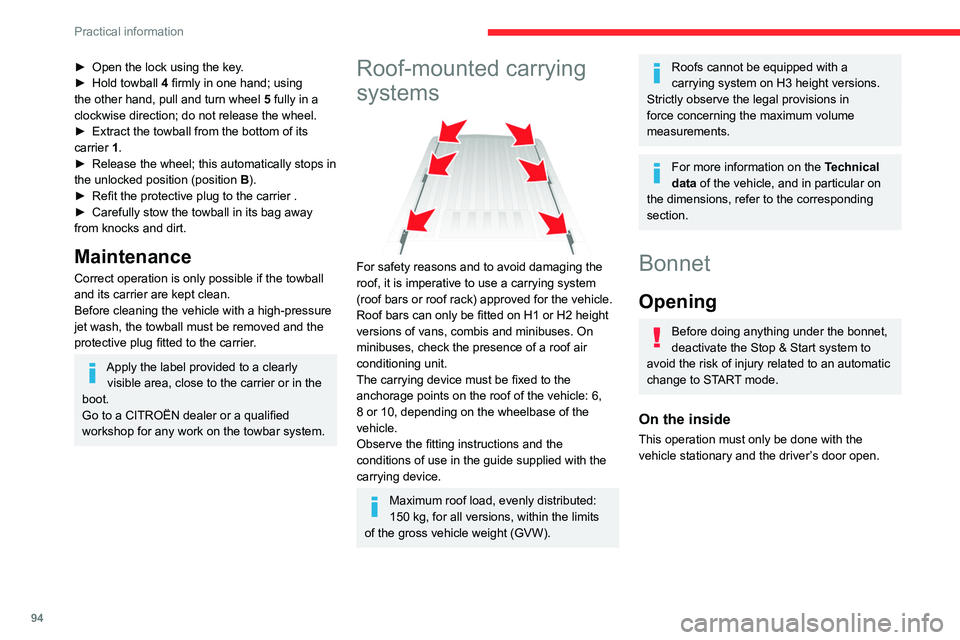
systems
For safety reasons and to avoid damaging the
roof, it is imperative to use a carrying system
(roof bars or roof rack) approved for the vehicle.
Roof bars can only be fitted on H1 or H2 height
versions of vans, combis and minibuses. On
minibuses, check the presence of a roof air
conditioning unit.
The carrying device must be fixed to the
anchorage points on the roof of the vehicle: 6,
8 or 10, depending on the wheelbase of the
vehicle.
Observe the fitting instructions and the
conditions of use in the guide supplied with the
carrying device.
Maximum roof load, evenly distributed:
150 kg, for all versions, within the limits
of the gross vehicle weight (GVW).
Roofs cannot be equipped with a
carrying system on H3 height versions.
Strictly observe the legal provisions in
force concerning the maximum volume
measurements.
For more information on the Technical
data of the vehicle, and in particular on
the dimensions, refer to the corresponding
section.
Bonnet
Opening
Before doing anything under the bonnet,
deactivate the Stop & Start system to
avoid the risk of injury related to an automatic
change to START mode.
On the inside
This operation must only be done with the
vehicle stationary and the driver’s door open.
Page 97 of 196

95
Practical information
7
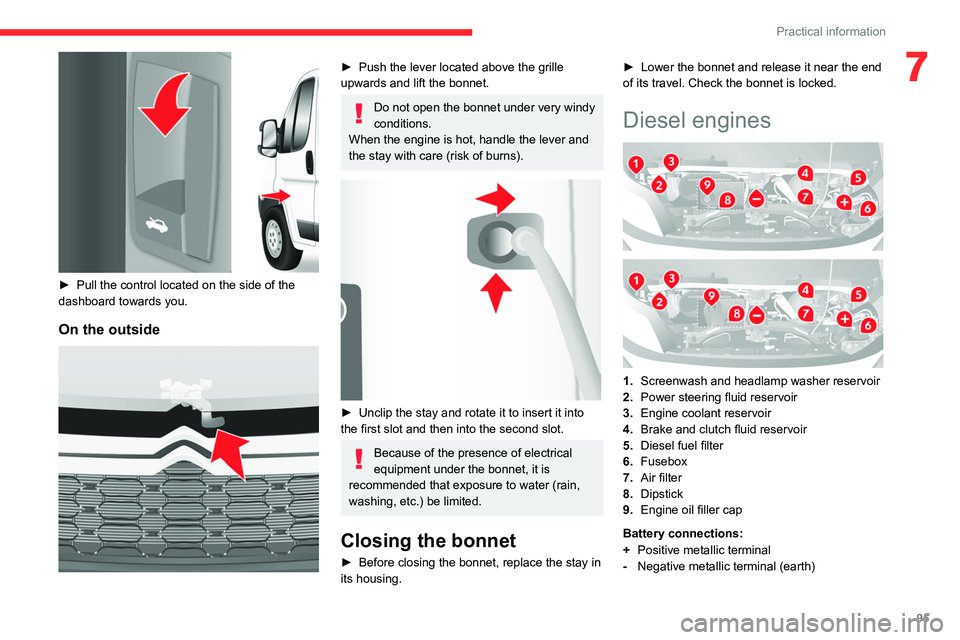
► Pull the control located on the side of the
dashboard towards you.
On the outside
► Push the lever located above the grille
upwards and lift the bonnet.
Do not open the bonnet under very windy
conditions.
When the engine is hot, handle the lever and
the stay with care (risk of burns).
► Unclip the stay and rotate it to insert it into
the first slot and then into the second slot.
Because of the presence of electrical
equipment under the bonnet, it is
recommended that exposure to water (rain,
washing, etc.) be limited.
Closing the bonnet
► Before closing the bonnet, replace the stay in
its housing. ►
Lower the bonnet and release it near the end
of its travel. Check the bonnet is locked.
Diesel engines
1. Screenwash and headlamp washer reservoir
2. Power steering fluid reservoir
3. Engine coolant reservoir
4. Brake and clutch fluid reservoir
5. Diesel fuel filter
6. Fusebox
7. Air filter
8. Dipstick
9. Engine oil filler cap
Battery connections:
+ Positive metallic terminal
- Negative metallic terminal (earth)
Page 106 of 196

104
In the event of a breakdown
Temporary puncture repair kit
This temporary puncture repair kit is stored in a
bag, placed in one of the front doors.
It includes:
– a cartridge A, containing the sealant, equipped
with: • a filling pipe B,
• a sticker C indicating "50 mph (80 km/h)
max.", which the driver must apply within
their field of vision (on the dashboard) after
having repaired the tyre,
– a quick user guide for the repair kit,
– a compressor D equipped with a pressure
gauge and connections,
– adapters, for the inflation of various
components.
Repairing a tyre
► Apply the parking brake.
► Unscrew the cap of the tyre valve, remove
filling hose B and screw ring E onto the valve.
► Make sure compressor switch F is in
position 0 (off).
► Start the engine.
► Insert plug G into the nearest socket on the
vehicle.
► Operate the compressor by setting switch F
to position I (on).
► Inflate the tyre to a pressure of 5 bar.
To obtain a more accurate reading, it is
recommended to check the pressure value on
pressure gauge H, with the compressor off.
► If a pressure of at least 3 bar is not reached
within 5 minutes, disconnect the compressor
from the valve and the power socket, then move
the vehicle forwards by approximately 10 metres,
to disperse the sealant inside the tyre.
► Then repeat the inflation procedure:
• if a pressure of at least 3 bar is not reached
within 10 minutes, stop your vehicle: the tyre
is too damaged and could not be repaired.
Contact a CITROËN dealer or a qualified
workshop.
• if the tyre pressure has reached 5 bar,
restart immediately.
► After driving for approximately 10 minutes,
stop and check the tyre pressure again.
► Restore the correct pressure in accordance
with the label on the driver's side pillar and
contact a CITROËN dealer or a qualified
workshop as soon as possible.
This puncture repair kit and the replacement cartridges are available
from a CITROËN dealer.
Checking and restoring
pressure
The compressor can only be used to check and
restore pressure.
► Disconnect hose I and directly connect it
to the tyre valve; the cartridge will thereby be
connected to the compressor and the sealant will
not be injected.
If the tyre needs to be deflated, connect hose
I to the tyre valve and press the yellow button
located in the centre of the compressor switch.
Replacing the cartridge
To replace the sealant cartridge, proceed as
follows:
► Disconnect the hose I.
► Turn the cartridge to be replaced anti-
clockwise and lift it.
► Insert the new cartridge and turn it clockwise,
► Reconnect the hose I and connect pipe B to
its location.
The cartridge contains ethylene glycol, which is harmful if swallowed and irritates
the eyes.
It must be kept out of the reach of children.
Page 118 of 196

11 6
In the event of a breakdown
Changing a fuse
The three fuseboxes are located on the
dashboard on the left-hand side, in the pillar
on the right-hand side and in the engine
compartment.
The designations provided are only for the fuses
that can be replaced by the user. For any other
work, visit a CITROËN dealer or a qualified
workshop.
Professional repairers: for full information
on the fuses and relays, consult the
wiring information and diagrams available
from a CITROËN dealer.
Removing and fitting a fuse
Good
Failed
Before changing a fuse, the cause of the fault
must be found and rectified. The numbers of the
fuses are indicated on the fuse box.
Always replace a faulty fuse with a fuse of
the same rating.
CITROËN accepts no responsibility for
the cost incurred in repairing your vehicle
or for rectifying malfunctions resulting from
the installation of accessories not supplied or
not recommended by CITROËN and not
installed in accordance with its
recommendations, in particular when the
combined power consumption of all of the
additional equipment connected exceeds 10
milliamperes.
Left-hand side dashboard
fuses
► Remove the screws and tilt the casing to
access the fuses.
Fuses A (amperes)Allocation
12 7.5Right-hand dipped beam headlamp
13 7.5Left-hand dipped beam headlamp
Page 178 of 196

176
Alphabetical index
A
ABS 52
Accessories 51
Active Safety Brake 84, 86
AdBlue® 101
AdBlue® tank 102
Adjusting the date 18
Adjusting the seat angle 27
Adjusting the seat belt height 55
Adjusting the time 18
Advice on driving 5, 64–65
Airbags 57–59
Airbags, curtain 58
Airbags, front 57–58
Airbags, lateral 58
Air conditioning 31, 35–36
Air conditioning, additional 35–36
Air conditioning, automatic 33
Air conditioning, manual 32–33
Air vents 31
Alarm 24–25
Anti-lock braking system (ABS) 52
Armrest, front 28
ASR 52
Assistance, emergency braking 52, 86
Audible warning 51
Audio streaming (Bluetooth) 162–163
Audio system 151
B
Battery 67, 120
Battery, 12 V 98, 120
Blind spot sensors 83
BlueHDi 12, 98
Bluetooth (hands-free) 154, 166–167
Bluetooth (telephone) 154, 166–167
Bonnet 94
Brake discs 99–100
Brakes 99–100
Braking, automatic emergency 84, 86
Brightness 6
Bulbs (changing) 111
Bulbs (changing, type) 111
C
Cable, audio 153, 162
Cable, Jack 153, 162
Capacity, fuel tank 90
CD 162
CD, MP3 162
Centre console 4
Changing a bulb 111
Checking the levels 96–98
Checks 98–100
Checks, routine 98–100
Children 56
Child seats 56, 58–59
Cigar lighter 43
Collision Risk Alert 84–85
Configuration, vehicle 13, 18
Container, AdBlue® 101–102
Control, heated seats 28
Control stalk, lighting 46
Control stalk, wipers 49
Courtesy lamp, front 38–40, 42
Courtesy lamp, rear 43
Courtesy lamps 43
Cruise control 78–80
D
DAB (Digital Audio Broadcasting) -
Digital radio 161
Dashboard 4
Daytime running lamps 46
Daytime running lamps, LED 46
Deactivating the passenger airbag 57, 59
Dimensions 129
Dipstick 96
Direction indicators 46
Display screen, instrument panel 6, 69
Driving 64–65
Driving abroad 46
Driving aids camera (warnings) 74
Driving aids (recommendations) 73
Driving economically 5
DSC 52
Dynamic stability control (DSC) 52–53