light CITROEN RELAY 2020 Handbook (in English)
[x] Cancel search | Manufacturer: CITROEN, Model Year: 2020, Model line: RELAY, Model: CITROEN RELAY 2020Pages: 196, PDF Size: 34.07 MB
Page 39 of 196

37
Ease of use and comfort
3Delayed starting of the
heating system
The start time can be programmed between 1
minute and 24 hours in advance.
You can memorise up to three different start
times, but only programme a single delayed
start.
To perform a daily start at a fixed time, reprogramme the memorised time each
day.
► Press button 3; the screen comes on.
The - -:- - symbol or the previous memorised
time and the corresponding preset number (1, 2
or 3) are displayed for 10 seconds.
To recall the other preset times, press button 3 several times before the end of
the 10 seconds.
Within 10 seconds, press one of the buttons 1 to
select the desired start time.
The memorisation is confirmed by the
disappearance of the start time, the display of
the preset number (1, 2 or 3) and the lighting of
the screen.
By default, preset times are already
memorised in the system (1 = 06:00, 2 =
16:00, 3 = 22:00). Any change cancels and
replaces the previous preset time.
If the battery is disconnected, the default
preset times will be restored.
Cancelling the programming
► To delete the programmed start time, briefly
press button 3.
The lighting of the screen and the preset number
(1, 2 or 3) go off.
Recalling one of the preset
start times
► Press button 3 as many times as necessary
until the number corresponding to the desired
preset start time (1, 2 or 3) appears.
After ten seconds, the time disappears but
remains memorised while the corresponding
number (1, 2 or 3) and the screen remain on.
Setting the operating
duration
The operating duration can be set between 10
and 60 minutes.
► Press and hold button 3.
► Press simultaneously one of the buttons 1.
The time and the time setting indicator lamp light
up.
► Press and hold button 3 again.
► Press simultaneously one of the buttons 1
again.
The programmed operating duration is displayed
and the heating or ventilation cycle indicator
lamp flashes.
► Set the duration by pressing one of the
buttons 1.
The memorisation is confirmed by the
disappearance of the duration on the screen or
by pressing button 3 again.
Switching the heating off
In the event of a delayed start, the heating
switches off automatically at the end of the
programmed duration.
► In the event of an immediate start, press
button 2 again to switch it off manually.
The heating cycle indicator lamp and the screen
switch off.
Have the additional heating checked at
least once a year at the beginning of
winter. Maintenance and repairs should only
be carried out by a CITROËN dealer or a
qualified workshop.
Use only genuine replacement parts.
To avoid the risks of poisoning or asphyxia, the additional heating must not
be used, even for short periods, in a closed
environment such as a garage or workshop
which are not equipped with an exhaust gas
extraction system.
The additional heating switches off when the
battery voltage is low, so as to allow engine
starting.
The additional heating is fed by the vehicle's
fuel tank. Ensure that the low fuel warning
lamp is not on.
Page 41 of 196
39
Ease of use and comfort
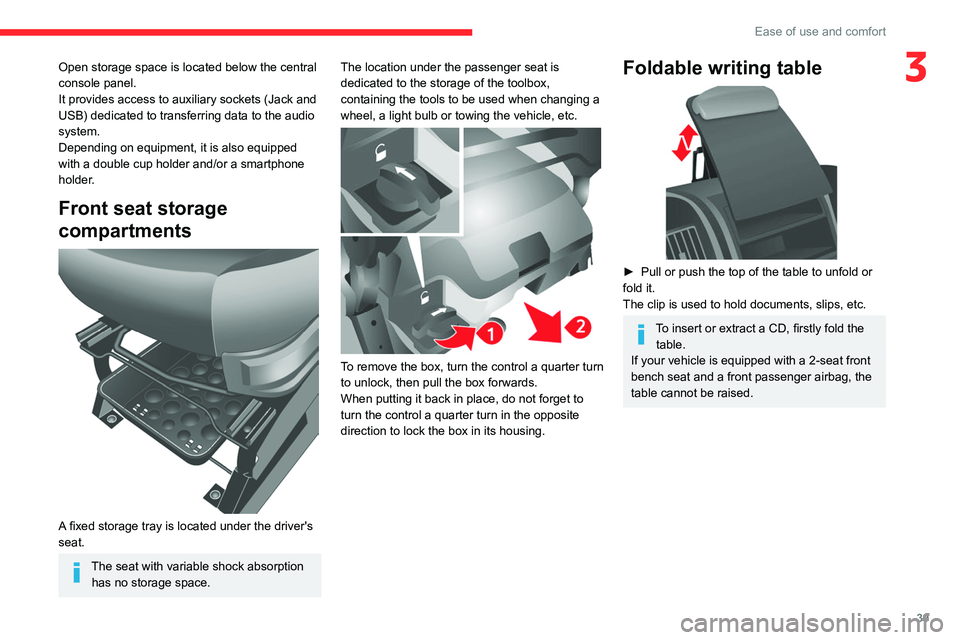
3Open storage space is located below the central
console panel.
It provides access to auxiliary sockets (Jack and
USB) dedicated to transferring data to the audio
system.
Depending on equipment, it is also equipped
with a double cup holder and/or a smartphone
holder.
Front seat storage
compartments
A fixed storage tray is located under the driver's
seat.
The seat with variable shock absorption has no storage space. The location under the passenger seat is
dedicated to the storage of the toolbox,
containing the tools to be used when changing a
wheel, a light bulb or towing the vehicle, etc.
To remove the box, turn the control a quarter turn
to unlock, then pull the box forwards.
When putting it back in place, do not forget to
turn the control a quarter turn in the opposite
direction to lock the box in its housing.
Foldable writing table
► Pull or push the top of the table to unfold or
fold it.
The clip is used to hold documents, slips, etc.
To insert or extract a CD, firstly fold the table.
If your vehicle is equipped with a 2-seat front
bench seat and a front passenger airbag, the
table cannot be raised.
Page 43 of 196
41
Ease of use and comfort
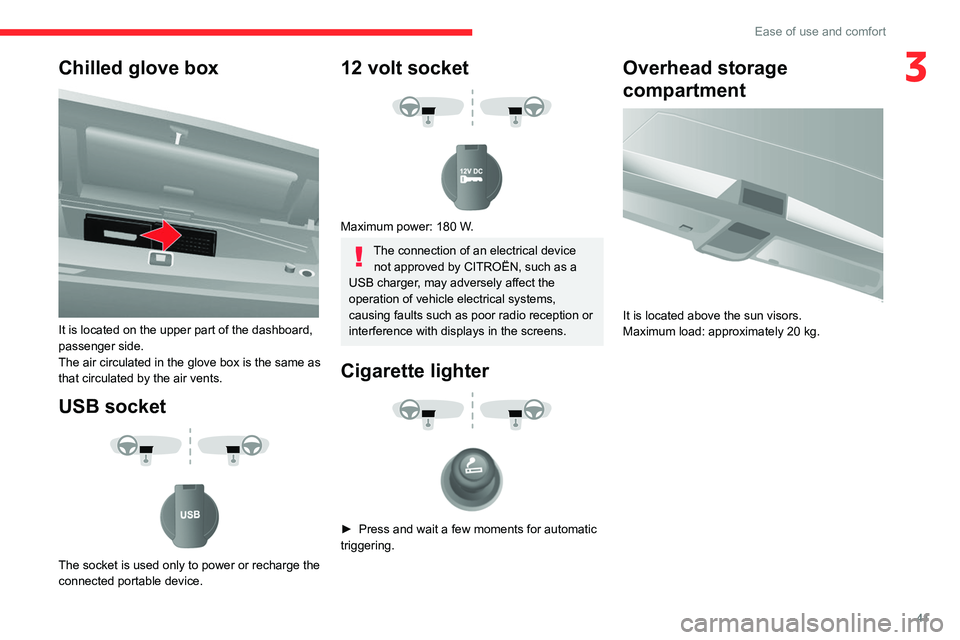
3Chilled glove box
It is located on the upper part of the dashboard,
passenger side.
The air circulated in the glove box is the same as
that circulated by the air vents.
USB socket
The socket is used only to power or recharge the
connected portable device.
12 volt socket
Maximum power: 180 W.
The connection of an electrical device not approved by CITROËN, such as a
USB charger, may adversely affect the
operation of vehicle electrical systems,
causing faults such as poor radio reception or
interference with displays in the screens.
Cigarette lighter
► Press and wait a few moments for automatic
triggering.
Overhead storage
compartment
It is located above the sun visors.
Maximum load: approximately 20 kg.
Page 45 of 196
43
Ease of use and comfort
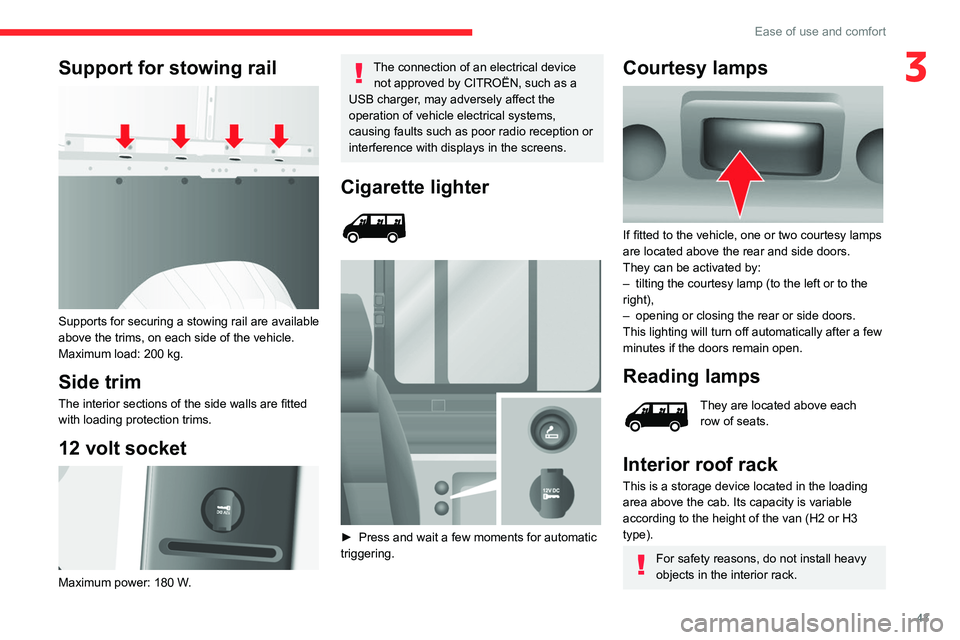
3Support for stowing rail
Supports for securing a stowing rail are available
above the trims, on each side of the vehicle.
Maximum load: 200 kg.
Side trim
The interior sections of the side walls are fitted
with loading protection trims.
12 volt socket
Maximum power: 180 W.
The connection of an electrical device not approved by CITROËN, such as a
USB charger, may adversely affect the
operation of vehicle electrical systems,
causing faults such as poor radio reception or
interference with displays in the screens.
Cigarette lighter
► Press and wait a few moments for automatic
triggering.
Courtesy lamps
If fitted to the vehicle, one or two courtesy lamps
are located above the rear and side doors.
They can be activated by:
– tilting the courtesy lamp (to the left or to the
right),
– opening or closing the rear or side doors.
This lighting will turn off automatically after a few
minutes if the doors remain open.
Reading lamps
They are located above each
row of seats.
Interior roof rack
This is a storage device located in the loading
area above the cab. Its capacity is variable
according to the height of the van (H2 or H3
type).
For safety reasons, do not install heavy
objects in the interior rack.
Page 46 of 196
44
Ease of use and comfort
Exterior fittings
Protective grille
Depending on the country of sale, a protective
grille, fixed inside the front bumper, protects the
engine parts against loose chippings, etc.
Very cold climate protectors
Depending on the country of sale, protective
foam is present to prevent the penetration of
cold or snow in the upper part of the engine
compartment.
Load stop
On the floor, behind the front seats, a horizontal
partition protects the driver and front passengers
against the risk of load movement.
Ladder-type vertical
partition
Depending on the country of sale, behind the
driver’s seat, a ladder-type vertical partition
protects the driver against the risk of load
movement.
Glass partition
Depending on the country of sale, a glass
partition isolates the cab from the loading area.
You can nevertheless use the control to open/
close its sliding glass.
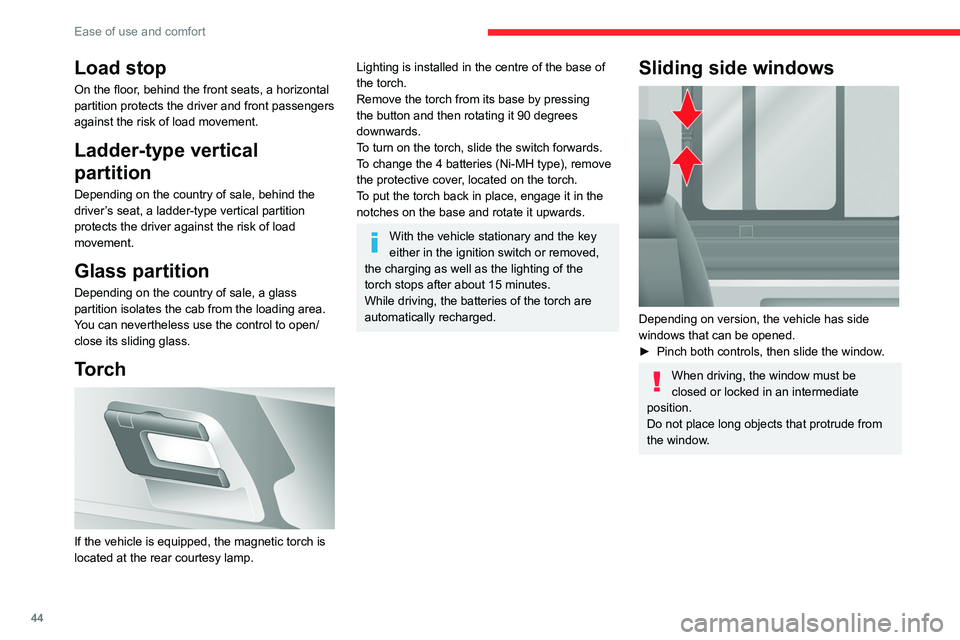
Torch
If the vehicle is equipped, the magnetic torch is
located at the rear courtesy lamp.
Lighting is installed in the centre of the base of
the torch.
Remove the torch from its base by pressing
the button and then rotating it 90 degrees
downwards.
To turn on the torch, slide the switch forwards.
To change the 4 batteries (Ni-MH type), remove
the protective cover, located on the torch.
To put the torch back in place, engage it in the
notches on the base and rotate it upwards.
With the vehicle stationary and the key
either in the ignition switch or removed,
the charging as well as the lighting of the
torch stops after about 15 minutes.
While driving, the batteries of the torch are
automatically recharged.
Sliding side windows
Depending on version, the vehicle has side
windows that can be opened.
► Pinch both controls, then slide the window.
When driving, the window must be
closed or locked in an intermediate
position.
Do not place long objects that protrude from
the window.
Page 48 of 196
46
Lighting and visibility
Lighting control stalk
In some weather conditions (e.g. low
temperature or humidity), the presence
of misting on the internal surface of the glass
of the headlamps and rear lamps is normal; it
disappears after the lamps have been on for a
few minutes.
Travelling abroad
If using your vehicle in a country that
drives on the other side of the road, the
headlamps must be adjusted to avoid
dazzling on-coming drivers.
Contact a CITROËN dealer or a qualified
workshop.
Selection of main lighting
mode
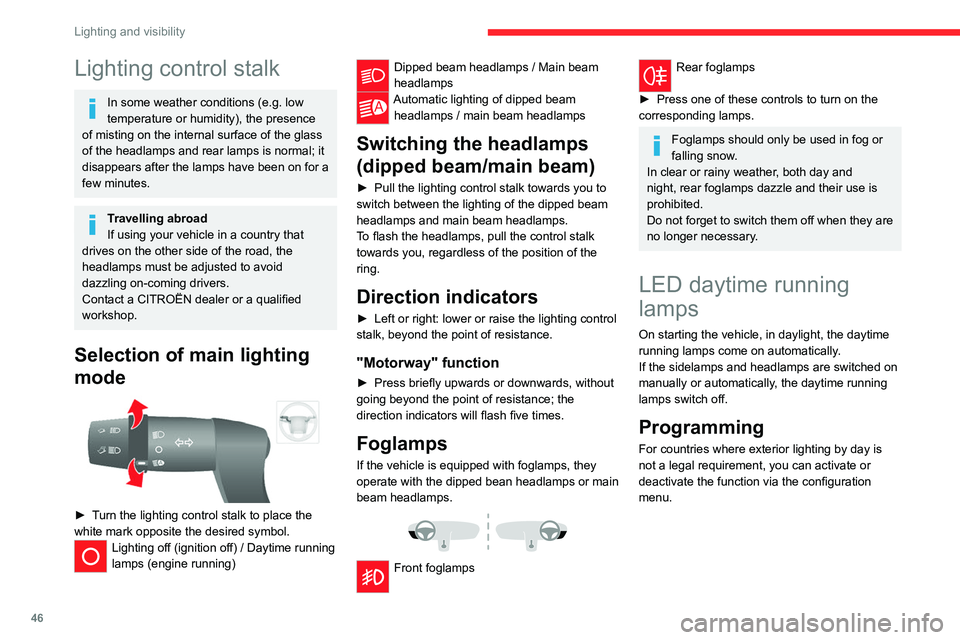
► Turn the lighting control stalk to place the
white mark opposite the desired symbol.
Lighting off (ignition off) / Daytime running
lamps (engine running)
Dipped beam headlamps / Main beam
headlamps
Automatic lighting of dipped beam headlamps / main beam headlamps
Switching the headlamps
(dipped beam/main beam)
► Pull the lighting control stalk towards you to
switch between the lighting of the dipped beam
headlamps and main beam headlamps.
To flash the headlamps, pull the control stalk
towards you, regardless of the position of the
ring.
Direction indicators
► Left or right: lower or raise the lighting control
stalk, beyond the point of resistance.
"Motorway" function
► Press briefly upwards or downwards, without
going beyond the point of resistance; the
direction indicators will flash five times.
Foglamps
If the vehicle is equipped with foglamps, they
operate with the dipped bean headlamps or main
beam headlamps.
Front foglamps
Rear foglamps
► Press one of these controls to turn on the
corresponding lamps.
Foglamps should only be used in fog or
falling snow.
In clear or rainy weather, both day and
night, rear foglamps dazzle and their use is
prohibited.
Do not forget to switch them off when they are
no longer necessary.
LED daytime running
lamps
On starting the vehicle, in daylight, the daytime
running lamps come on automatically.
If the sidelamps and headlamps are switched on
manually or automatically, the daytime running
lamps switch off.
Programming
For countries where exterior lighting by day is
not a legal requirement, you can activate or
deactivate the function via the configuration
menu.
Automatic illumination of headlamps
If your vehicle is fitted with this function, the
dipped beam headlamps are switched on
automatically if the light is poor.
In fog or snow, the sunshine sensor may
detect sufficient light. In this case, the
lighting will not come on automatically. If
necessary, you must switch on the dipped
beam headlamps manually.
They are switched off when the light returns
to a sufficient level.
Do not cover the sunshine sensor at the top
centre of the windscreen.
You can adjust the sensitivity of the sunshine sensor.
For more information on Vehicle
configuration , refer to the corresponding
section.
Activation
► Turn the ring to this position.
The lamps go out automatically when the ignition
is switched off.
Page 49 of 196

47
Lighting and visibility
4Automatic illumination of headlamps
If your vehicle is fitted with this function, the
dipped beam headlamps are switched on
automatically if the light is poor.
In fog or snow, the sunshine sensor may
detect sufficient light. In this case, the
lighting will not come on automatically. If
necessary, you must switch on the dipped
beam headlamps manually.
They are switched off when the light returns
to a sufficient level.
Do not cover the sunshine sensor at the top
centre of the windscreen.
You can adjust the sensitivity of the sunshine sensor.
For more information on Vehicle
configuration , refer to the corresponding
section.
Activation
► Turn the ring to this position.
The lamps go out automatically when the ignition
is switched off.
Guide-me-home lighting
If your vehicle is equipped: when you leave your
vehicle, the dipped beam headlamps remain on
for the selected period of time (e.g. leaving a car
park).
With the ignition off or the
key in the STOP position
► Within 2 minutes of switching off the engine,
turn the ignition key to the STOP position or
remove the key.
► Pull the lighting control stalk towards the
steering wheel.
This indicator lamp lights up on the
dashboard.
Each action on the lighting control stalk, pulled
towards the steering wheel, extends the
guide-me-home lighting by 30 seconds up to
approximately 3 minutes. Once this time has
elapsed, the lamps go out automatically.
Deactivate this control by holding the control
stalk pulled towards the steering wheel for more
than 2 seconds.
Automatic headlamps
System which automatically changes to main
beam according to the ambient light level and
the driving conditions, using a camera located at
the top of the windscreen.
This system is a driving aid. The driver remains responsible for
the vehicle's lighting, its correct use for the
prevailing conditions of light, visibility and
traffic, and observation of driving regulations.
Activation
► Turn the lighting control stalk ring to
this position.
► Set the function by pressing the
MODE button: select "ON" in the
"Automatic main beam" menu.
For more information on Vehicle
configuration , refer to the corresponding
section.
► Flash the headlamps (going beyond the point
of resistance) to activate the function.
Operation
Page 50 of 196
48
Lighting and visibility
Once the function is activated, the system
operates as follows:
If the brightness is sufficient and/or if the traffic
conditions do not allow illumination of the main
beam headlamps:
– The dipped beam headlamps will
remain on: this indicator lamp lights up on
the instrument panel.
If the brightness is very low and the traffic
conditions allow:
– The main beam headlamps
come on automatically: these
indicator lamps light up on the instrument panel.
If the situation requires a change of headlamp
beam, the driver can take over at any time.
Flashing the headlamps again pauses the
function and the lighting system changes to
"automatic illumination of headlamps" mode.
At a speed lower than approximately 9 mph (15
km/h), the function deactivates automatically.
If the main beam headlamps are still needed,
flash the headlamps again; the main beam
headlamps then remain on fixed until the vehicle
reaches a speed of approximately 25 mph (40
km/h).
Above 25 mph (40 km/h), the function is
reactivated automatically (provided that you have
not flashed the headlamps again to turn off the
main beam headlamps during this interval).
Deactivation
► Turn the lighting control stalk ring to
the "Dipped beam" position.
The system may suffer interference or not work correctly:
– under conditions of poor visibility (falling
snow, heavy rain or thick fog, etc.),
– if the windscreen in front of the camera is
dirty, misted or obscured (by a sticker, etc.),
– if the vehicle is facing highly reflective
signs.
The system is not able to detect: – road users that do not have their own
lighting, such as pedestrians,
– vehicles whose lighting is obscured, such
as when running behind a safety barrier on a
motorway, for example,
– vehicles at the top or bottom of a steep
slope, on twisty roads, on crossroads.
Parking lamps
This system allows you to leave the lamps on
when parked; with the ignition off, and the key in
the STOP position or removed.
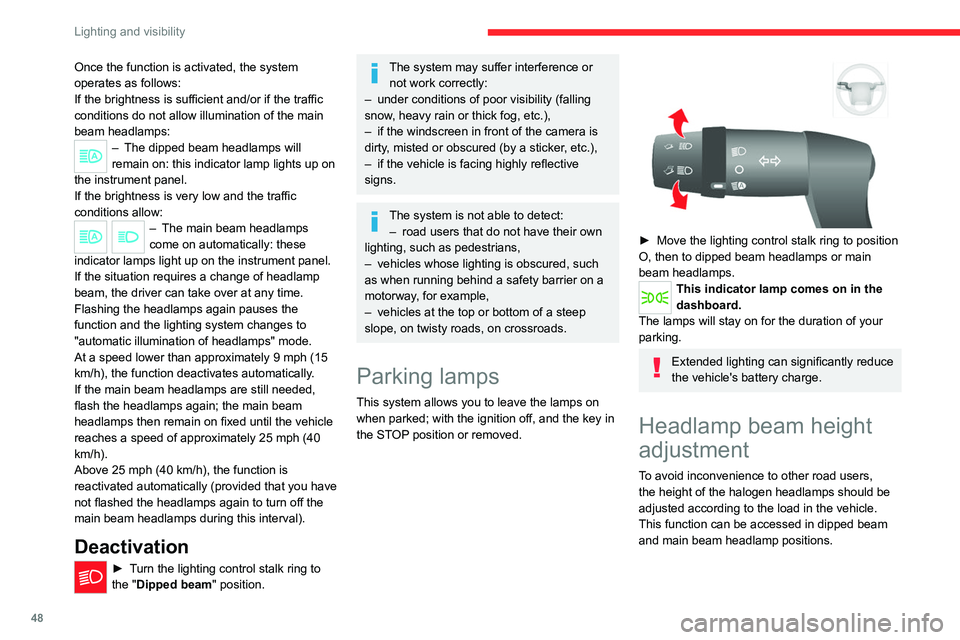
► Move the lighting control stalk ring to position
O, then to dipped beam headlamps or main
beam headlamps.
This indicator lamp comes on in the
dashboard.
The lamps will stay on for the duration of your
parking.
Extended lighting can significantly reduce
the vehicle's battery charge.
Headlamp beam height
adjustment
To avoid inconvenience to other road users,
the height of the halogen headlamps should be
adjusted according to the load in the vehicle.
This function can be accessed in dipped beam
and main beam headlamp positions.
Successive presses on these
controls adjust the headlamps.
An indicator lamp on the display indicates the
selected setting position (0, 1, 2, 3).
Wiper control stalk
Windscreen wipers
The wiping is active only when the ignition key is
in the ON position.
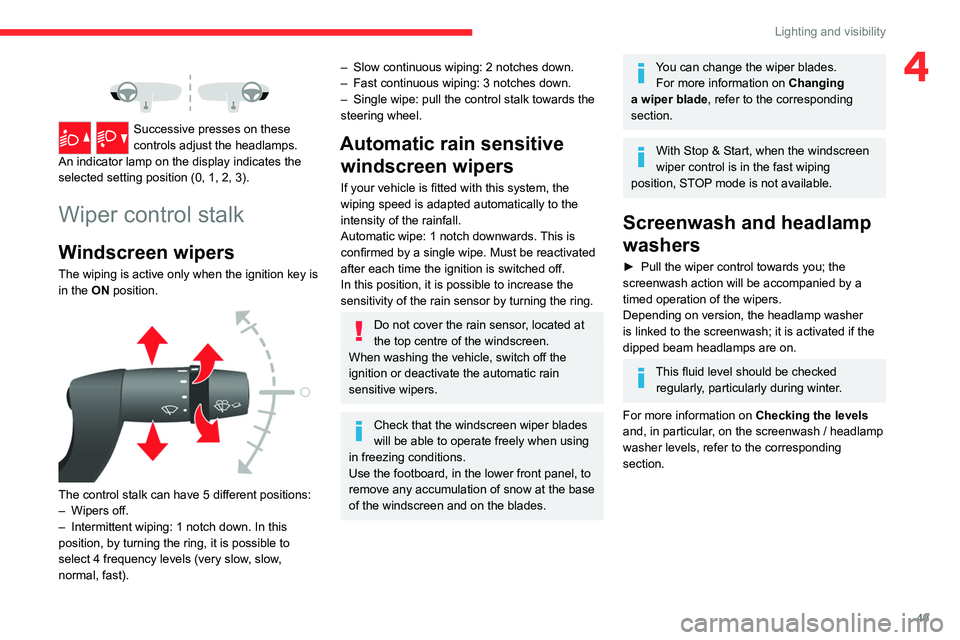
The control stalk can have 5 different positions:
– Wipers off.
– Intermittent wiping: 1 notch down. In this
position, by turning the ring, it is possible to
select 4 frequency levels (very slow, slow,
normal, fast).
Page 51 of 196
49
Lighting and visibility
4
Successive presses on these
controls adjust the headlamps.
An indicator lamp on the display indicates the
selected setting position (0, 1, 2, 3).
Wiper control stalk
Windscreen wipers
The wiping is active only when the ignition key is
in the ON position.
The control stalk can have 5 different positions:
– Wipers off.
– Intermittent wiping: 1 notch down. In this
position, by turning the ring, it is possible to
select 4 frequency levels (very slow, slow,
normal, fast).
– Slow continuous wiping: 2 notches down.
– Fast continuous wiping: 3 notches down.
– Single wipe: pull the control stalk towards the
steering wheel.
Automatic rain sensitive windscreen wipers
If your vehicle is fitted with this system, the
wiping speed is adapted automatically to the
intensity of the rainfall.
Automatic wipe: 1 notch downwards. This is
confirmed by a single wipe. Must be reactivated
after each time the ignition is switched off.
In this position, it is possible to increase the
sensitivity of the rain sensor by turning the ring.
Do not cover the rain sensor, located at
the top centre of the windscreen.
When washing the vehicle, switch off the
ignition or deactivate the automatic rain
sensitive wipers.
Check that the windscreen wiper blades
will be able to operate freely when using
in freezing conditions.
Use the footboard, in the lower front panel, to
remove any accumulation of snow at the base
of the windscreen and on the blades.
You can change the wiper blades. For more information on Changing
a wiper blade , refer to the corresponding
section.
With Stop & Start, when the windscreen
wiper control is in the fast wiping
position, STOP mode is not available.
Screenwash and headlamp
washers
► Pull the wiper control towards you; the
screenwash action will be accompanied by a
timed operation of the wipers.
Depending on version, the headlamp washer
is linked to the screenwash; it is activated if the
dipped beam headlamps are on.
This fluid level should be checked regularly, particularly during winter.
For more information on Checking the levels
and, in particular, on the screenwash / headlamp
washer levels, refer to the corresponding
section.
Page 52 of 196

50
Lighting and visibility
Changing a wiper blade
The footboards, located in the lower front panel,
allow you to access the wiper blades and
screenwash jets.
Check that the screenwash or headlamp
washer jets are not clogged.
Changing a windscreen
wiper blade
► Lift the arm. ►
Unclip the wiper blade by pressing the button
and remove it by pulling it outwards.
► Fit the new wiper blade and make sure it is
secure.
► Lower the arm in place.