CIGARETTE CITROEN RELAY 2020 Handbook (in English)
[x] Cancel search | Manufacturer: CITROEN, Model Year: 2020, Model line: RELAY, Model: CITROEN RELAY 2020Pages: 196, PDF Size: 34.07 MB
Page 6 of 196

4
Overview
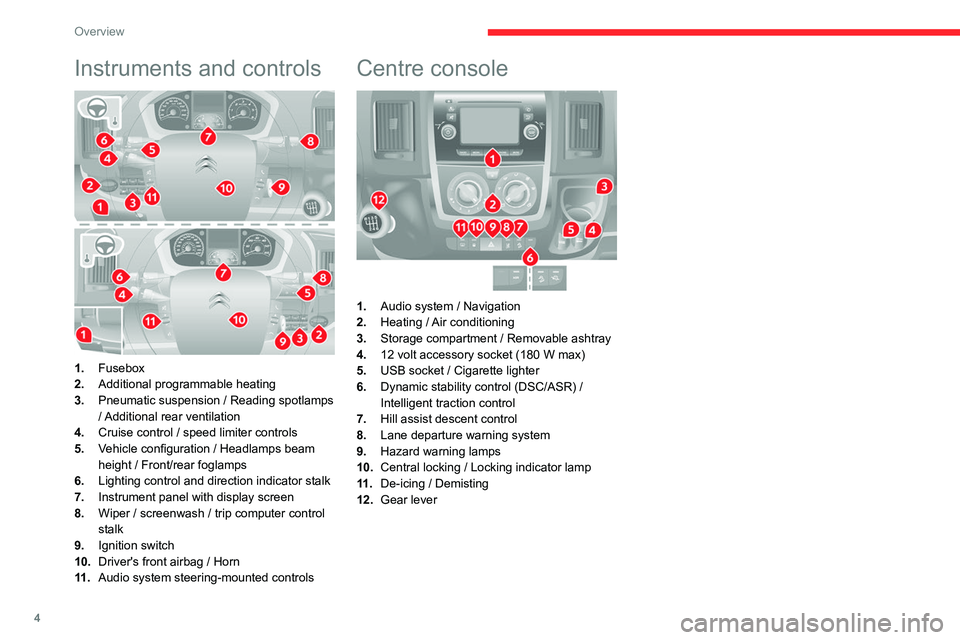
Instruments and controls
1.Fusebox
2. Additional programmable heating
3. Pneumatic suspension / Reading spotlamps
/ Additional rear ventilation
4. Cruise control / speed limiter controls
5. Vehicle configuration / Headlamps beam
height / Front/rear foglamps
6. Lighting control and direction indicator stalk
7. Instrument panel with display screen
8. Wiper / screenwash / trip computer control
stalk
9. Ignition switch
10. Driver's front airbag / Horn
11 . Audio system steering-mounted controls
Centre console
1.Audio system / Navigation
2. Heating / Air conditioning
3. Storage compartment / Removable ashtray
4. 12 volt accessory socket (180 W max)
5. USB socket / Cigarette lighter
6. Dynamic stability control (DSC/ASR) /
Intelligent traction control
7. Hill assist descent control
8. Lane departure warning system
9. Hazard warning lamps
10. Central locking / Locking indicator lamp
11 . De-icing / Demisting
12. Gear lever
Page 43 of 196

41
Ease of use and comfort
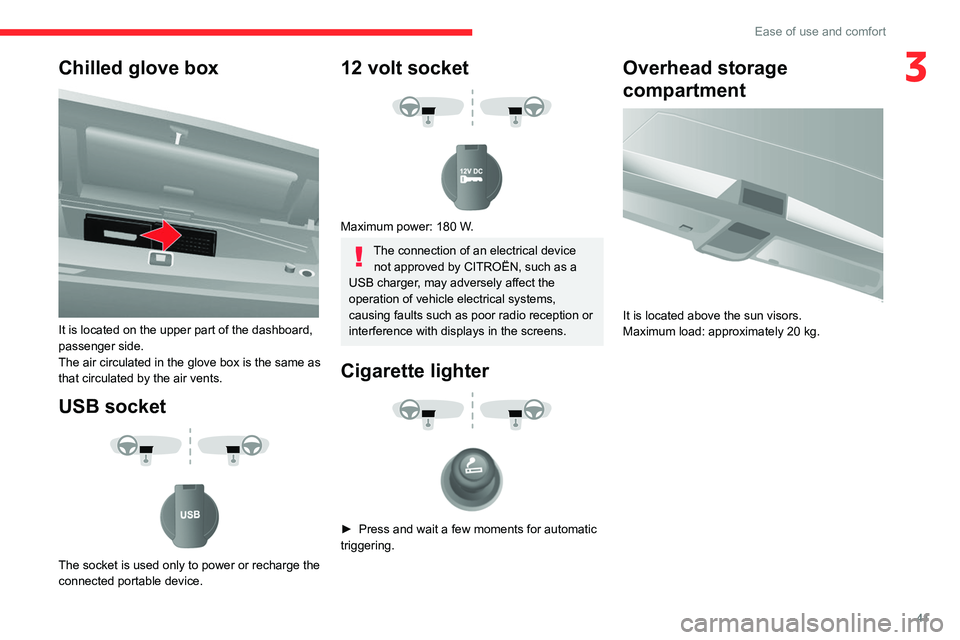
3Chilled glove box
It is located on the upper part of the dashboard,
passenger side.
The air circulated in the glove box is the same as
that circulated by the air vents.
USB socket
The socket is used only to power or recharge the
connected portable device.
12 volt socket
Maximum power: 180 W.
The connection of an electrical device not approved by CITROËN, such as a
USB charger, may adversely affect the
operation of vehicle electrical systems,
causing faults such as poor radio reception or
interference with displays in the screens.
Cigarette lighter
► Press and wait a few moments for automatic
triggering.
Overhead storage
compartment
It is located above the sun visors.
Maximum load: approximately 20 kg.
Page 45 of 196

43
Ease of use and comfort
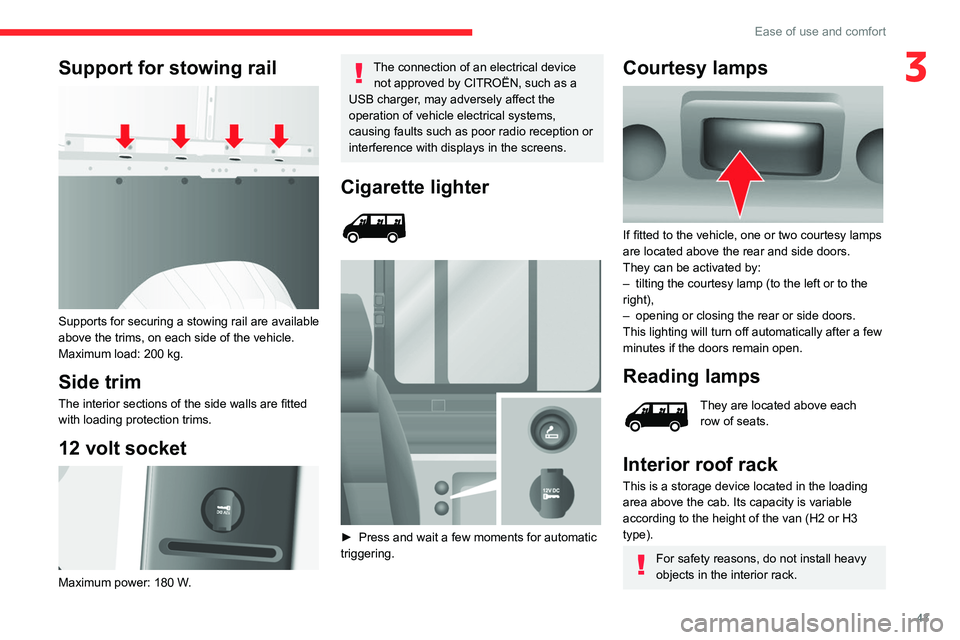
3Support for stowing rail
Supports for securing a stowing rail are available
above the trims, on each side of the vehicle.
Maximum load: 200 kg.
Side trim
The interior sections of the side walls are fitted
with loading protection trims.
12 volt socket
Maximum power: 180 W.
The connection of an electrical device not approved by CITROËN, such as a
USB charger, may adversely affect the
operation of vehicle electrical systems,
causing faults such as poor radio reception or
interference with displays in the screens.
Cigarette lighter
► Press and wait a few moments for automatic
triggering.
Courtesy lamps
If fitted to the vehicle, one or two courtesy lamps
are located above the rear and side doors.
They can be activated by:
– tilting the courtesy lamp (to the left or to the
right),
– opening or closing the rear or side doors.
This lighting will turn off automatically after a few
minutes if the doors remain open.
Reading lamps
They are located above each
row of seats.
Interior roof rack
This is a storage device located in the loading
area above the cab. Its capacity is variable
according to the height of the van (H2 or H3
type).
For safety reasons, do not install heavy
objects in the interior rack.
Page 60 of 196

58
Safety
Installing a booster seat
The chest part of the seat belt must be
positioned on the child's shoulder without
touching the neck.
Ensure that the lap part of the seat belt
passes correctly over the child's thighs.
Use a booster seat with backrest, equipped
with a belt guide at shoulder level.
Additional protections
To prevent accidental opening of the
doors and rear windows, use the "Child lock".
Take care not to open the rear windows by
more than one third.
To protect young children from the rays of the
sun, fit side blinds on the rear windows.
As a safety precaution, do not leave:
– a child alone and unattended in a vehicle,
– a child or an animal in a vehicle which is
exposed to the sun, with the windows closed,
– the keys within reach of children inside the
vehicle.
Child seat at the rear
time discharging the hot gas via openings
provided for this purpose.
Front airbags
Do not drive holding the steering wheel
by its spokes or resting your hands on the
centre part of the wheel.
Passengers must not place their feet on the
dashboard.
Do not smoke as deployment of the airbags
can cause burns or the risk of injury from a
cigarette or pipe.
Never remove or pierce the steering wheel or
hit it violently.
Do not fix or attach anything to the steering
wheel or dashboard, as this could cause
injuries when the airbags are deployed.
Lateral airbags
Use only approved covers on the seats,
compatible with the deployment of the lateral
airbags. For information on the range of seat
covers suitable for your vehicle, contact a
CITROËN dealer.
Do not fix or attach anything to the seat
backrests (clothes, etc.), as this could cause
injuries to the thorax or arm when the lateral
airbag is deployed.
Do not sit with the upper part of the body any
nearer to the door than necessary.
Curtain airbags
Do not fix or attach anything to the roof,
as this could cause head injuries when the
curtain airbag is deployed.
Do not remove the grab handles installed on
the roof, as they play a part in securing the
curtain airbags.
Child seats
The regulations on carrying children are specific to each country. Refer to the
legislation in force in your country.
For maximum safety, please observe the
following recommendations:
– In accordance with European regulations, all
children under the age of 12 or less than 4
ft 11” (150 cm) tall must travel in approved
child seats suited to their weight , on seats
fitted with a seat belt or ISOFIX mountings.
– Statistically, the safest seats in your
vehicle for carrying children are the rear
seats.
– Children weighing less than 9 kg must
travel in the "rear facing" position, whether in
the front or rear of the vehicle.
It is recommended that children travel
on the rear seats of the vehicle:
– ‘rear facing’ up to the age of 3,
– ‘forward facing’ over the age of 3.
Make sure that the seat belt is correctly
positioned and tightened.
For child seats with a support leg, ensure that
the support leg is in firm and steady contact
with the floor.
Advice
An incorrectly installed child seat compromises the child's safety in the
event of an accident.
Ensure that there is no seat belt or seat belt
buckle under the child seat, as this could
destabilise it.
Remember to fasten the seat belts or the
harness of child seats, keeping the slack
relative to the child's body to a minimum,
even for short journeys.
When installing a child seat using the seat
belt, ensure that the seat belt is tightened
correctly on the child seat and that it secures
the child seat firmly on the seat of the vehicle.
If the passenger seat is adjustable, move it
forwards if necessary.
Remove the head restraint before
installing a child seat with a backrest on a
passenger seat.
Ensure that the head restraint is stored or
attached securely to prevent it from being
thrown around the vehicle in the event of
sharp braking. Refit the head restraint once
the child seat has been removed.
Page 122 of 196

120
In the event of a breakdown
FusesA (amperes)Allocation
14 15Front 12 V socket (+ battery)
15 15Cigarette lighter (+ battery)
19 7.5Air conditioning compressor
20 30Screenwash/headlamp wash pump
21 15Fuel pump supply
23 30ABS solenoid valves
24 7.5Auxiliary control panel - Door mirror control and folding (+ key)
30 15Door mirror defrosting
12 V battery
Procedure for starting the engine using another
battery or charging a discharged battery.
Lead-acid starter batteries
Batteries contain harmful substances
such as sulphuric acid and lead.
They must be disposed of in accordance
with regulations and must not, in any
circumstances, be discarded with household
waste.
Take used remote control batteries and
vehicle batteries to a special collection point.
Protect your eyes and face before
handling the battery.
All operations on the battery must be carried
out in a well ventilated area and away from
naked flames and sources of sparks, so as to
avoid the risk of explosion or fire.
Wash your hands afterwards.
Accessing the battery
The battery is located under the left-hand front
floor.
► Unscrew the 6 access flap retaining screws.
► Lift or completely remove the access flap.