Screenwash CITROEN RELAY 2020 Handbook (in English)
[x] Cancel search | Manufacturer: CITROEN, Model Year: 2020, Model line: RELAY, Model: CITROEN RELAY 2020Pages: 196, PDF Size: 34.07 MB
Page 6 of 196
4
Overview
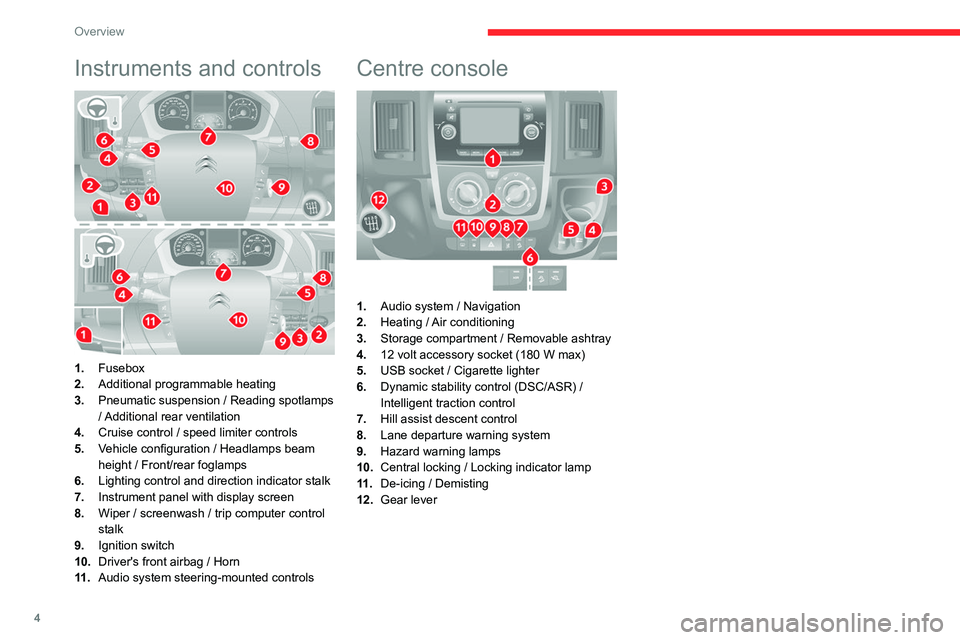
Instruments and controls
1.Fusebox
2. Additional programmable heating
3. Pneumatic suspension / Reading spotlamps
/ Additional rear ventilation
4. Cruise control / speed limiter controls
5. Vehicle configuration / Headlamps beam
height / Front/rear foglamps
6. Lighting control and direction indicator stalk
7. Instrument panel with display screen
8. Wiper / screenwash / trip computer control
stalk
9. Ignition switch
10. Driver's front airbag / Horn
11 . Audio system steering-mounted controls
Centre console
1.Audio system / Navigation
2. Heating / Air conditioning
3. Storage compartment / Removable ashtray
4. 12 volt accessory socket (180 W max)
5. USB socket / Cigarette lighter
6. Dynamic stability control (DSC/ASR) /
Intelligent traction control
7. Hill assist descent control
8. Lane departure warning system
9. Hazard warning lamps
10. Central locking / Locking indicator lamp
11 . De-icing / Demisting
12. Gear lever
Page 51 of 196
49
Lighting and visibility
4
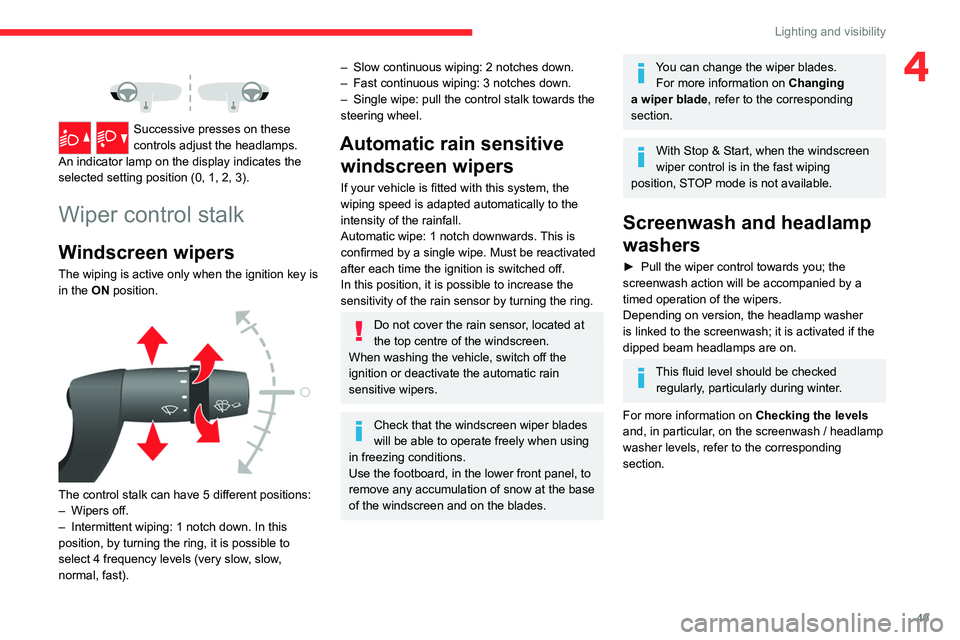
Successive presses on these
controls adjust the headlamps.
An indicator lamp on the display indicates the
selected setting position (0, 1, 2, 3).
Wiper control stalk
Windscreen wipers
The wiping is active only when the ignition key is
in the ON position.
The control stalk can have 5 different positions:
– Wipers off.
– Intermittent wiping: 1 notch down. In this
position, by turning the ring, it is possible to
select 4 frequency levels (very slow, slow,
normal, fast).
– Slow continuous wiping: 2 notches down.
– Fast continuous wiping: 3 notches down.
– Single wipe: pull the control stalk towards the
steering wheel.
Automatic rain sensitive windscreen wipers
If your vehicle is fitted with this system, the
wiping speed is adapted automatically to the
intensity of the rainfall.
Automatic wipe: 1 notch downwards. This is
confirmed by a single wipe. Must be reactivated
after each time the ignition is switched off.
In this position, it is possible to increase the
sensitivity of the rain sensor by turning the ring.
Do not cover the rain sensor, located at
the top centre of the windscreen.
When washing the vehicle, switch off the
ignition or deactivate the automatic rain
sensitive wipers.
Check that the windscreen wiper blades
will be able to operate freely when using
in freezing conditions.
Use the footboard, in the lower front panel, to
remove any accumulation of snow at the base
of the windscreen and on the blades.
You can change the wiper blades. For more information on Changing
a wiper blade , refer to the corresponding
section.
With Stop & Start, when the windscreen
wiper control is in the fast wiping
position, STOP mode is not available.
Screenwash and headlamp
washers
► Pull the wiper control towards you; the
screenwash action will be accompanied by a
timed operation of the wipers.
Depending on version, the headlamp washer
is linked to the screenwash; it is activated if the
dipped beam headlamps are on.
This fluid level should be checked regularly, particularly during winter.
For more information on Checking the levels
and, in particular, on the screenwash / headlamp
washer levels, refer to the corresponding
section.
Page 52 of 196

50
Lighting and visibility
Changing a wiper blade
The footboards, located in the lower front panel,
allow you to access the wiper blades and
screenwash jets.
Check that the screenwash or headlamp
washer jets are not clogged.
Changing a windscreen
wiper blade
► Lift the arm. ►
Unclip the wiper blade by pressing the button
and remove it by pulling it outwards.
► Fit the new wiper blade and make sure it is
secure.
► Lower the arm in place.
Page 97 of 196
95
Practical information
7
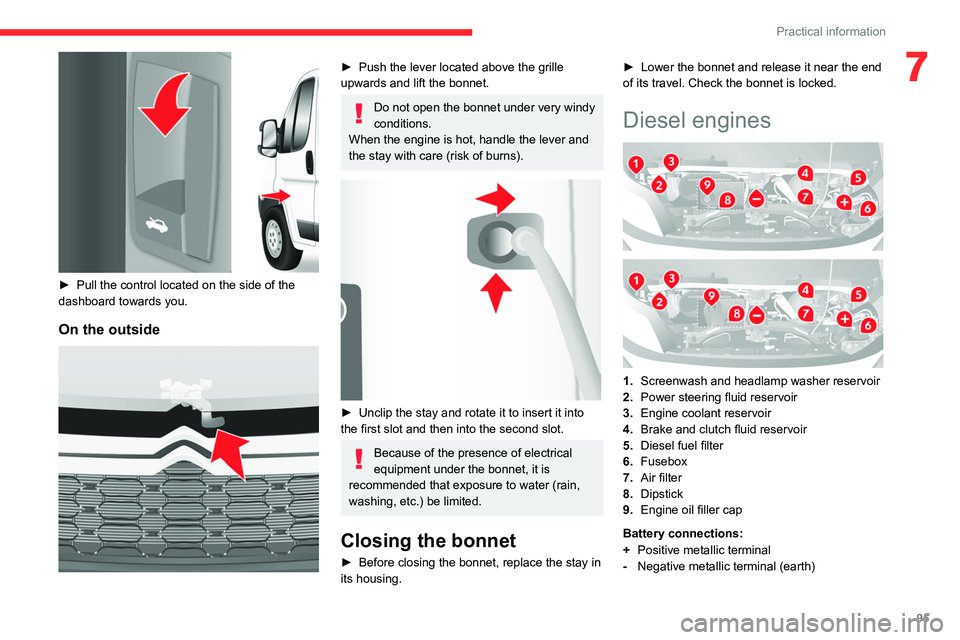
► Pull the control located on the side of the
dashboard towards you.
On the outside
► Push the lever located above the grille
upwards and lift the bonnet.
Do not open the bonnet under very windy
conditions.
When the engine is hot, handle the lever and
the stay with care (risk of burns).
► Unclip the stay and rotate it to insert it into
the first slot and then into the second slot.
Because of the presence of electrical
equipment under the bonnet, it is
recommended that exposure to water (rain,
washing, etc.) be limited.
Closing the bonnet
► Before closing the bonnet, replace the stay in
its housing. ►
Lower the bonnet and release it near the end
of its travel. Check the bonnet is locked.
Diesel engines
1. Screenwash and headlamp washer reservoir
2. Power steering fluid reservoir
3. Engine coolant reservoir
4. Brake and clutch fluid reservoir
5. Diesel fuel filter
6. Fusebox
7. Air filter
8. Dipstick
9. Engine oil filler cap
Battery connections:
+ Positive metallic terminal
- Negative metallic terminal (earth)
Page 100 of 196

98
Practical information
A clogged passenger compartment filter can adversely affect air conditioning
system performance and generate
undesirable odours.
Oil filter
Change the oil filter each time the engine
oil is changed.
Particle filter (Diesel)
In addition to the catalytic converter, this filter
actively contributes to the preservation of
air quality by trapping the unburnt pollutant
particles. Black exhaust fumes are therefore not
emitted.
Operation
This filter, inserted into the exhaust system,
accumulates the carbonaceous particles. The
engine management computer automatically
and periodically manages the removal of
carbonaceous particles (regeneration).
The regeneration procedure is triggered
according to the amount of accumulated
particles and the conditions of use of the vehicle.
During this phase, you may notice certain
phenomena - accelerated idling, triggering of
the cooling fan, increased smoke and increased
temperature at the exhaust - which have no
impact on the operation of the vehicle and the
environment.
Screenwash and headlamp
washer fluid
To check the level or top up this fluid on
vehicles fitted with headlamp washers,
immobilise the vehicle and switch off the engine.
Reservoir capacity: approximately 5.5 litres.
To access the filler cap, pull the telescopic filler
neck and unclip the cap.
Fluid specification
The fluid must be topped up with a ready-to-use
mixture.
In winter (temperatures below zero), a liquid
containing an agent to prevent freezing must
be used which is appropriate for the prevailing
conditions, in order to protect the elements of the
system (pump, tank, ducts, jets, etc.).
Filling with pure water is prohibited under
all circumstances (risk of freezing,
limestone deposits, etc.).
AdBlue (BlueHDi)
An alert is triggered when the reserve level is
reached.
For more information on Indicators and in
particular the AdBlue range indicators, refer to
the corresponding section.
To avoid the vehicle being immobilised in
accordance with regulations, you must top up the
AdBlue tank.
For more information on AdBlue
® (BlueHDi),
and in particular on the supply of AdBlue, refer to
the corresponding section.
Checks
Unless otherwise indicated, check these
components in accordance with the
manufacturer's service schedule and according
to your engine.
Otherwise, have them checked by a CITROËN
dealer or a qualified workshop.
Only use products recommended by
CITROËN or products of equivalent
quality and specification.
In order to optimise the operation of
components as important as those in the
braking system, CITROËN selects and offers
very specific products.
12 V battery
The battery does not require any maintenance.
However, check regularly that the terminals
are correctly tightened (versions without quick
release terminals) and that the connections are
clean.
For more information on the precautions
to take before any work on the 12 V
battery, refer to the corresponding section.
Versions equipped with Stop & Start are
fitted with a 12 V lead-acid battery of
specific technology and specification.
Its replacement should be carried out only by
a CITROËN dealer or a qualified workshop.
Air filter
Depending on the environment and the
use of the vehicle (e.g. dusty atmosphere,
city driving), change it twice as often, if
necessary .
Passenger compartment
filter
Depending on the environment and the
use of the vehicle (e.g. dusty atmosphere,
city driving), change it twice as often, if
necessary .
Page 122 of 196

120
In the event of a breakdown
FusesA (amperes)Allocation
14 15Front 12 V socket (+ battery)
15 15Cigarette lighter (+ battery)
19 7.5Air conditioning compressor
20 30Screenwash/headlamp wash pump
21 15Fuel pump supply
23 30ABS solenoid valves
24 7.5Auxiliary control panel - Door mirror control and folding (+ key)
30 15Door mirror defrosting
12 V battery
Procedure for starting the engine using another
battery or charging a discharged battery.
Lead-acid starter batteries
Batteries contain harmful substances
such as sulphuric acid and lead.
They must be disposed of in accordance
with regulations and must not, in any
circumstances, be discarded with household
waste.
Take used remote control batteries and
vehicle batteries to a special collection point.
Protect your eyes and face before
handling the battery.
All operations on the battery must be carried
out in a well ventilated area and away from
naked flames and sources of sparks, so as to
avoid the risk of explosion or fire.
Wash your hands afterwards.
Accessing the battery
The battery is located under the left-hand front
floor.
► Unscrew the 6 access flap retaining screws.
► Lift or completely remove the access flap.
Page 136 of 196
134
Technical data
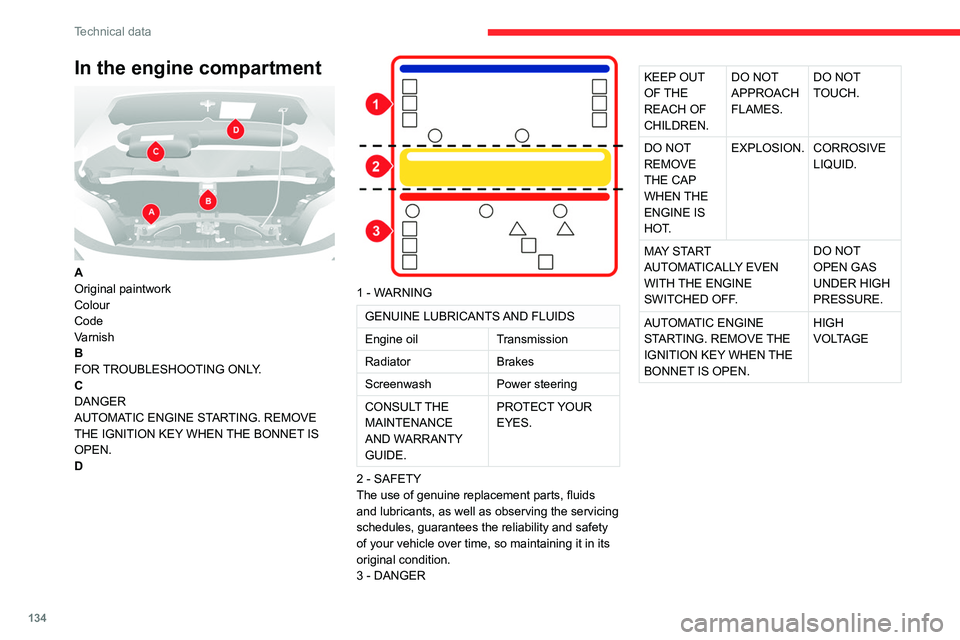
In the engine compartment
A
Original paintwork
Colour
Code
Varnish
B
FOR TROUBLESHOOTING ONLY.
C
DANGER
AUTOMATIC ENGINE STARTING. REMOVE
THE IGNITION KEY WHEN THE BONNET IS
OPEN.
D
1 - WARNING
GENUINE LUBRICANTS AND FLUIDS
Engine oil Transmission
Radiator Brakes
Screenwash Power steering
CONSULT THE
MAINTENANCE
AND WARRANTY
GUIDE. PROTECT YOUR
EYES.
2 - SAFETY
The use of genuine replacement parts, fluids
and lubricants, as well as observing the servicing
schedules, guarantees the reliability and safety
of your vehicle over time, so maintaining it in its
original condition.
3 - DANGER
KEEP OUT
OF THE
REACH OF
CHILDREN. DO NOT
APPROACH
FLAMES. DO NOT
TOUCH.
DO NOT
REMOVE
THE CAP
WHEN THE
ENGINE IS
HOT. EXPLOSION.
CORROSIVE
LIQUID.
MAY START
AUTOMATICALLY EVEN
WITH THE ENGINE
SWITCHED OFF. DO NOT
OPEN GAS
UNDER HIGH
PRESSURE.
AUTOMATIC ENGINE
STARTING. REMOVE THE
IGNITION KEY WHEN THE
BONNET IS OPEN. HIGH
VOLTAGEIn the fuel filler flap
DANGER REMOVE SLOWLY.
FUEL VAPOURS MAY CAUSE INJURY.
Page 180 of 196
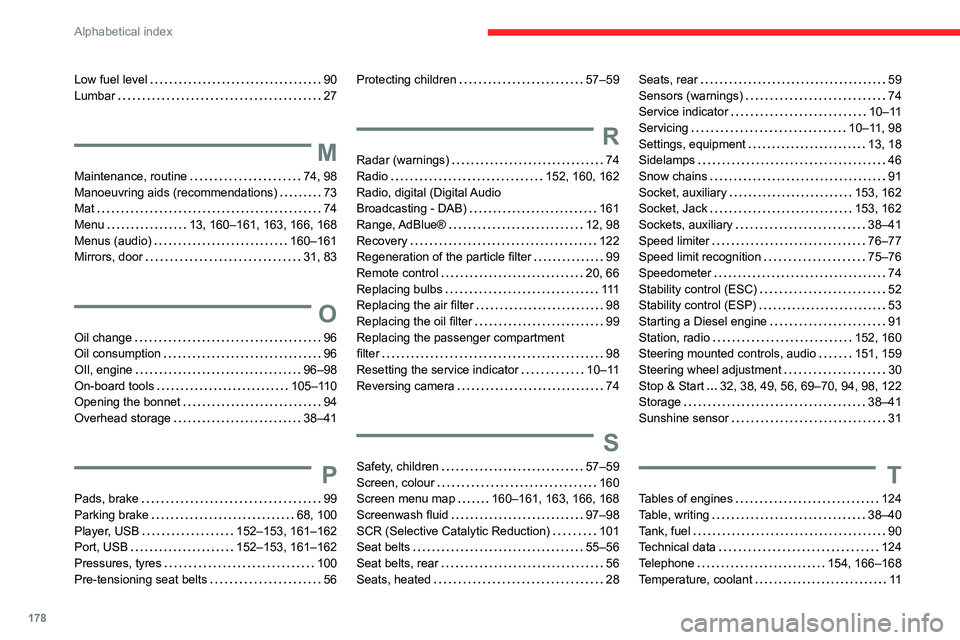
178
Alphabetical index
Low fuel level 90
Lumbar 27
M
Maintenance, routine 74, 98
Manoeuvring aids (recommendations) 73
Mat 74
Menu 13, 160–161, 163, 166, 168
Menus (audio) 160–161
Mirrors, door 31, 83
O
Oil change 96
Oil consumption 96
OIl, engine 96–98
On-board tools 105–110
Opening the bonnet 94
Overhead storage 38–41
P
Pads, brake 99
Parking brake 68, 100
Player, USB 152–153, 161–162
Port, USB 152–153, 161–162
Pressures, tyres 100
Pre-tensioning seat belts 56
Protecting children 57–59
R
Radar (warnings) 74
Radio 152, 160, 162
Radio, digital (Digital Audio
Broadcasting - DAB) 161
Range, AdBlue® 12, 98
Recovery 122
Regeneration of the particle filter 99
Remote control 20, 66
Replacing bulbs 111
Replacing the air filter 98
Replacing the oil filter 99
Replacing the passenger compartment
filter 98
Resetting the service indicator 10–11
Reversing camera 74
S
Safety, children 57–59
Screen, colour 160
Screen menu map 160–161, 163, 166, 168
Screenwash fluid 97–98
SCR (Selective Catalytic Reduction) 101
Seat belts 55–56
Seat belts, rear 56
Seats, heated 28
Seats, rear 59
Sensors (warnings) 74
Service indicator 10–11
Servicing 10–11, 98
Settings, equipment 13, 18
Sidelamps 46
Snow chains 91
Socket, auxiliary 153, 162
Socket, Jack 153, 162
Sockets, auxiliary 38–41
Speed limiter 76–77
Speed limit recognition 75–76
Speedometer 74
Stability control (ESC) 52
Stability control (ESP) 53
Starting a Diesel engine 91
Station, radio 152, 160
Steering mounted controls, audio 151, 159
Steering wheel adjustment 30
Stop & Start 32, 38, 49, 56, 69–70, 94, 98, 122
Storage 38–41
Sunshine sensor 31
T
Tables of engines 124
Table, writing 38–40
Tank, fuel 90
Technical data 124
Telephone 154, 166–168
Temperature, coolant 11