clock reset CITROEN RELAY 2020 Handbook (in English)
[x] Cancel search | Manufacturer: CITROEN, Model Year: 2020, Model line: RELAY, Model: CITROEN RELAY 2020Pages: 196, PDF Size: 34.07 MB
Page 21 of 196

19
Instruments
1► Select the "Time setting" menu to set the time
and the clock format (24h or 12h) or select the
"Date setting" menu to set the day, month and
year.
For more information on Vehicle configuration
(MODE), refer to the corresponding section.
Using the touch screen audio and
telematics system
From the "Clock and Date" sub-menu:
► Select "Time setting and format" to set the
hour, minutes and seconds and choose the
format (24h, 12h with am or pm).
► Select "Date setting" to set the day, month
and year.
To set the time manually, "Time Synchro" must be deactivated (Off).
Trip computer
Information displayed about the current journey
(range, current fuel consumption, average fuel
consumption, etc.).
► To access trip computer information, press
the TRIP button, located at the end of the wiper
control stalk.
Range
This indicates the distance which can still be
travelled with the fuel remaining in the tank,
depending on the average fuel consumption over
the last few miles (kilometres) travelled.
Distance A
This indicates the distance travelled since the
last trip computer zero reset.
Average consumption A
This is the average fuel consumption since the
last trip computer zero reset.
Current consumption A
This is the average fuel consumption over the
last few seconds.
Average speed A
This is the average speed calculated since the
last trip computer zero reset (with the ignition
on).
Trip A duration
This indicates the cumulative time since the last
trip computer zero reset.
If TRIP B is activated in the MODE menu:
– Distance B
– Average consumption B
– Average speed B
– Trip B duration Tachograph
If your vehicle is equipped with it, this stores in
the device and on an inserted card all the data
relating to the vehicle.
Example: at the beginning of each trip or shift
change.
When the card is inserted, all the data can be:
– displayed on the tachograph screen,
– printed,
– transferred to external storage media via an
interface.
For more information, refer to the documents
provided by the tachograph manufacturer.
If your vehicle is equipped with a
tachograph, it is recommended that the
(-) terminal of the battery (located under the
floor on the left-hand side, in the cab) be
disconnected during a prolonged stop of the
vehicle of more than 5 days.
Page 38 of 196

36
Ease of use and comfort
Delayed starting of the
heating system
The start time can be programmed between 1
minute and 24 hours in advance.
You can memorise up to three different start
times, but only programme a single delayed
start.
To perform a daily start at a fixed time, reprogramme the memorised time each
day.
► Press button 3; the screen comes on.
The - -:- - symbol or the previous memorised
time and the corresponding preset number (1, 2
or 3) are displayed for 10 seconds.
To recall the other preset times, press button 3 several times before the end of
the 10 seconds.
Within 10 seconds, press one of the buttons 1 to
select the desired start time.
The memorisation is confirmed by the
disappearance of the start time, the display of
the preset number (1, 2 or 3) and the lighting of
the screen.
By default, preset times are already
memorised in the system (1 = 06:00, 2 =
16:00, 3 = 22:00). Any change cancels and
replaces the previous preset time.
If the battery is disconnected, the default
preset times will be restored.
Setting the comfort
temperature
► Turn control 1 to select a position between
blue (cold) and red (hot) so as to adjust the
temperature to your requirements.
The OFF control on the "Mono-zone" central control panel switches the
function off.
However, a back-up system will automatically
ventilate the rear circuit, even if the control is
in position 0, to avoid the formation of mist.
Air flow
► Set control 2 to the desired position to
increase or decrease the air flow.
Additional programmable heating
The additional programmable heating gradually
brings the engine to a good temperature to
facilitate its starting.
An built-in clock allows the time of its triggering
to be programmed. The passenger compartment
will warm up faster.
The warming-up of the passenger compartment, de-icing and demisting are
facilitated. The control panel for the programmable
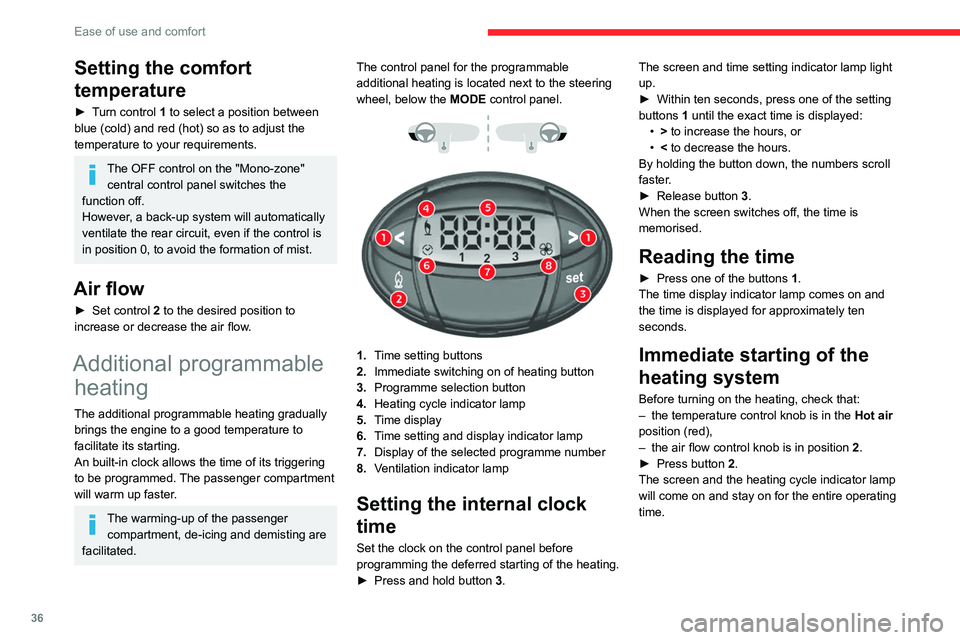
additional heating is located next to the steering
wheel, below the MODE control panel.
1. Time setting buttons
2. Immediate switching on of heating button
3. Programme selection button
4. Heating cycle indicator lamp
5. Time display
6. Time setting and display indicator lamp
7. Display of the selected programme number
8. Ventilation indicator lamp
Setting the internal clock
time
Set the clock on the control panel before
programming the deferred starting of the heating.
► Press and hold button 3. The screen and time setting indicator lamp light
up.
► Within ten seconds, press one of the setting
buttons 1 until the exact time is displayed: • > to increase the hours, or
• < to decrease the hours.
By holding the button down, the numbers scroll
faster.
► Release button 3.
When the screen switches off, the time is
memorised.
Reading the time
► Press one of the buttons 1.
The time display indicator lamp comes on and
the time is displayed for approximately ten
seconds.
Immediate starting of the
heating system
Before turning on the heating, check that:
– the temperature control knob is in the Hot air
position (red),
– the air flow control knob is in position 2.
► Press button 2.
The screen and the heating cycle indicator lamp
will come on and stay on for the entire operating
time.
Page 170 of 196

168
Touch screen audio and telematics system
Enter the telephone number using the keypad,
then press the “Call” button to make the call.
Calling a contact
Press "PHONE".
Press the "Contacts" button or the
"Recent calls" button.
Select the desired contact from the list offered to
start the call.
Vehicle information
Press "MORE" to display the vehicle
information menus:
Exterior temp.
Display the exterior temperature.
Clock
Display the clock.
Compass
Display the direction that you are travelling in.
Trip
– Current info., Trip A, Trip B.
Display the trip computer.
Press and hold the "Trip A" or "Trip B" button to
reset the trip concerned.
Settings
Press this button to display the settings
menus:
Display
– Brightness. –
Set the brightness of the screen.
– Display mode.
– Set the display mode.
– Language.
– Choose the desired language.
– Unit of measurement.
– Set the display units for consumption, distance
and temperature.
– Touch screen beep.
– Activate or deactivate the audible signal when
touching a button on the screen.
– Display Trip B.
– Display Trip B on the driver's screen.
Voice commands
– Voice response time.
– Set the length of the voice system response.
– Display list of commands.
– Display suggestions with the different options
during a voice session.
Clock and Date
– Time setting and format.
– Setting the time.
– Display time mode.
– Activate or deactivate the display of the digital
clock on the status bar.
– Synchro time.
– Activate or deactivate the automatic time
display.
– Date setting.
– Set the date.
Safety/Assistance
– Reversing camera .
– Display the reversing camera in reverse. –
Camera delay .
– Maintain the on-screen display of the
reversing camera for a maximum of 10 seconds
or up to 11 mph (18 km/h).
Lighting
– Daytime running lamps.
– Activate or deactivate the automatic
illumination of the headlamps when starting.
Doors & locking
– Autoclose.
– Activate or deactivate the automatic locking of
the doors when the vehicle is moving.
Audio
– Equalizer.
– Adjust the bass, medium and treble.
– Balance/Fade.
– Adjust the balance of the front and rear
speakers, left and right.
– Press the button in the centre of the arrows to
balance the settings.
– Volume/Speed.
– Select the desired parameter; the option is
highlighted.
– Loudness.
– Optimise the quality of low volume audio.
– Automatic radio.
– Set the radio when starting up or recover the
active state when the ignition key was last turned
to STOP.
– Radio switch-off delay .
– Set the parameter.
– AUX vol. setting .
– Set the parameters.
Page 171 of 196

169
Touch screen audio and telematics system
12Telephone/Bluetooth®
– Connected tels.
– Start the Bluetooth® connection of the selected
mobile device.
– Delete the selected mobile device.
– Memorise the selected mobile device in the
favourites.
– Set the parameters.
– Add device.
– Add a new mobile device.
– Connected audio.
– Connect the mobile device only for audio.
Radio setting
– DAB announcements.
– Activate or deactivate the announcements.
– Activate or deactivate the options: Alarm,
Event announc., Stock market newsflash,
Newsflash, Programme info, Special event, Sport
info, Public transp. info. Alarm announcement,
Weather newsflash.
Restore settings
Restore the default settings of the screen, clock,
sound and radio.
Delete personal data
Delete personal data, Bluetooth
® devices and
built-in presets.
Voice commands
Information - Using the
system
Instead of touching the screen, you can
use your voice to control the system.
To ensure that voice commands are always recognised by the system, please
observe the following recommendations:
– speak in a normal tone of voice,
– before speaking, always wait for the "beep"
(acoustic signal),
– the system is able to recognise the voice
commands provided, regardless of gender,
tone and inflection of the voice of the speaker,
– if possible, minimise the noise inside the
passenger compartment,
– before issuing a voice command, ask any
other passengers to refrain from speaking.
Since the system recognises commands
regardless of who is speaking, when several
people are speaking simultaneously, it
is possible for the system to recognise
commands that are different or additional to
what has been requested,
– for optimal operation, you are advised to
close the windows and any sunroof present
(on versions/markets where fitted) to avoid
any external source of disturbance.
Steering-mounted controls
This button is used to activate the “Telephone” voice recognition mode that
allows you to make calls, view recent/received/
outgoing calls, display the directory, etc.
This button is used to activate the "Radio/ Media" voice recognition mode that allows
you to tune to a specific radio station or a
specific AM/FM radio frequency, play a track or
an album contained on a USB stick/iPod/MP3/
CD.
Quick voice interaction can be used if
these buttons are depressed during a
voice message from the system; it allows you
to directly say a voice command.
For example, if the system is in the middle
of saying a voice help message and if we
know the command to give the system, by
pressing these buttons, the voice message
is interrupted and it is possible to directly
say the desired voice command (so avoiding
having to listen to the complete voice help
message).
When the system is waiting for a voice
command from the user, pressing these
buttons closes the voice session.
Each time a button is pressed, a "beep"
(acoustic signal) is emitted and the
screen displays a screen page of suggestions
asking the user to say a command.