sensor CITROEN RELAY 2020 Handbook (in English)
[x] Cancel search | Manufacturer: CITROEN, Model Year: 2020, Model line: RELAY, Model: CITROEN RELAY 2020Pages: 196, PDF Size: 34.07 MB
Page 4 of 196
2
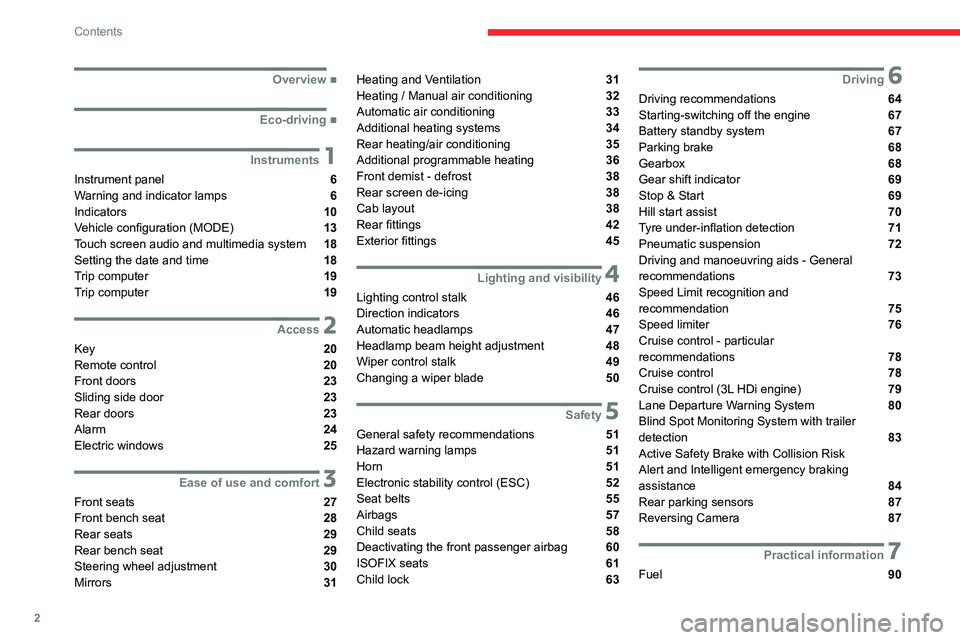
Contents
■
Overview
■
Eco-driving
1Instruments
Instrument panel 6
Warning and indicator lamps 6
Indicators 10
Vehicle configuration (MODE)
13
Touch screen audio and multimedia system 18
Setting the date and time 18
Trip computer 19
Trip computer 19
2Access
Key 20
Remote control 20
Front doors 23
Sliding side door 23
Rear doors 23
Alarm 24
Electric windows 25
3Ease of use and comfort
Front seats 27
Front bench seat 28
Rear seats 29
Rear bench seat 29
Steering wheel adjustment 30
Mirrors 31
Heating and Ventilation 31
Heating / Manual air conditioning 32
Automatic air conditioning 33
Additional heating systems 34
Rear heating/air conditioning 35
Additional programmable heating 36
Front demist - defrost 38
Rear screen de-icing 38
Cab layout 38
Rear fittings
42
Exterior fittings 45
4Lighting and visibility
Lighting control stalk 46
Direction indicators 46
Automatic headlamps 47
Headlamp beam height adjustment 48
Wiper control stalk 49
Changing a wiper blade 50
5Safety
General safety recommendations 51
Hazard warning lamps 51
Horn 51
Electronic stability control (ESC) 52
Seat belts 55
Airbags 57
Child seats 58
Deactivating the front passenger airbag 60
ISOFIX seats 61
Child lock 63
6Driving
Driving recommendations 64
Starting-switching off the engine 67
Battery standby system 67
Parking brake 68
Gearbox 68
Gear shift indicator 69
Stop & Start 69
Hill start assist 70
Tyre under-inflation detection
71
Pneumatic suspension 72
Driving and manoeuvring aids - General
recommendations
73
Speed Limit recognition and
recommendation
75
Speed limiter 76
Cruise control - particular
recommendations
78
Cruise control 78
Cruise control (3L HDi engine) 79
Lane Departure Warning System 80
Blind Spot Monitoring System with trailer
detection
83
Active Safety Brake with Collision Risk
Alert and Intelligent emergency braking
assistance
84
Rear parking sensors 87
Reversing Camera 87
7Practical information
Fuel 90
Page 10 of 196
8
Instruments
Release the parking brake to switch off the
warning lamp, keeping your foot on the brake
pedal.
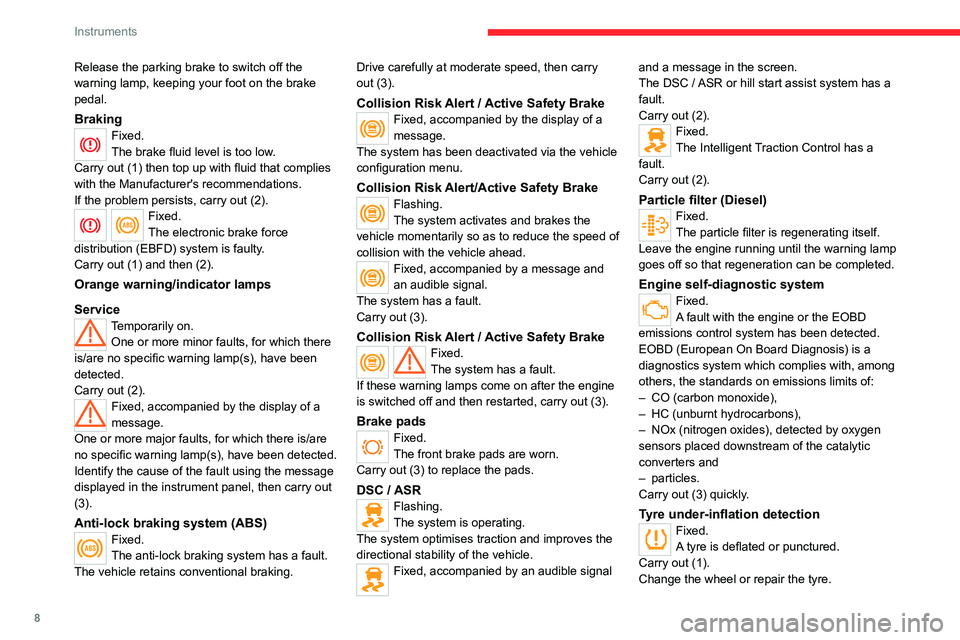
BrakingFixed.
The brake fluid level is too low.
Carry out (1) then top up with fluid that complies
with the Manufacturer's recommendations.
If the problem persists, carry out (2).
Fixed.
The electronic brake force
distribution (EBFD) system is faulty.
Carry out (1) and then (2).
Orange warning/indicator lamps
Service
Temporarily on. One or more minor faults, for which there
is/are no specific warning lamp(s), have been
detected.
Carry out (2).
Fixed, accompanied by the display of a
message.
One or more major faults, for which there is/are
no specific warning lamp(s), have been detected.
Identify the cause of the fault using the message
displayed in the instrument panel, then carry out
(3).
Anti-lock braking system (ABS)Fixed.
The anti-lock braking system has a fault.
The vehicle retains conventional braking. Drive carefully at moderate speed, then carry
out (3).
Collision Risk Alert / Active Safety BrakeFixed, accompanied by the display of a
message.
The system has been deactivated via the vehicle
configuration menu.
Collision Risk Alert/Active Safety BrakeFlashing.
The system activates and brakes the
vehicle momentarily so as to reduce the speed of
collision with the vehicle ahead.
Fixed, accompanied by a message and
an audible signal.
The system has a fault.
Carry out (3).
Collision Risk Alert / Active Safety BrakeFixed.
The system has a fault.
If these warning lamps come on after the engine
is switched off and then restarted, carry out (3).
Brake pads
Fixed.
The front brake pads are worn.
Carry out (3) to replace the pads.
DSC / ASRFlashing.
The system is operating.
The system optimises traction and improves the
directional stability of the vehicle.
Fixed, accompanied by an audible signal and a message in the screen.
The DSC / ASR or hill start assist system has a
fault.
Carry out (2).
Fixed.
The Intelligent Traction Control has a
fault.
Carry out (2).
Particle filter (Diesel)Fixed.
The particle filter is regenerating itself.
Leave the engine running until the warning lamp
goes off so that regeneration can be completed.
Engine self-diagnostic systemFixed.
A fault with the engine or the EOBD
emissions control system has been detected.
EOBD (European On Board Diagnosis) is a
diagnostics system which complies with, among
others, the standards on emissions limits of:
– CO (carbon monoxide),
– HC (unburnt hydrocarbons),
– NOx (nitrogen oxides), detected by oxygen
sensors placed downstream of the catalytic
converters and
– particles.
Carry out (3) quickly.
Tyre under-inflation detectionFixed.
A tyre is deflated or punctured.
Carry out (1).
Change the wheel or repair the tyre.
Page 11 of 196

9
Instruments
1Fixed.
A sensor is faulty.
Carry out (3).
Lane departure warning systemFlashing, accompanied by an
audible signal.
The involuntary crossing of a line on the left or
right has been detected.
Turn the steering wheel in the opposite direction
to return to the correct trajectory.
Fixed, accompanied by an audible signal.
The lane departure warning system is
faulty.
Clean the windscreen.
If the problem persists, carry out (3).
Electronic immobiliserFixed.
The ignition key inserted is not
recognised.
The engine cannot start.
Change key and carry out (3) to have the faulty
key checked.
On for about 10 seconds when the
ignition is switched on.
The alarm has been triggered.
Carry out (3) to have the locks checked.
Water in Diesel fuel filter(Diesel)Fixed.
The Diesel filter contains water.
Carry out (2) without delay - risk of damage to
the injection system!
AdBlueFixed, then flashing accompanied by a
message in the display.
The driving range is decreasing.
You must quickly top up the AdBlue.
Low fuel levelFixed, with the needle in zone E.
The fuel reserve is being used.
Refuel without delay.
Flashing.
The system has a fault.
Carry out (2).
Diesel pre-heaterFixed.
The climatic conditions mean that pre-
heating is necessary.
Wait until the indicator lamp goes off before
starting the engine.
Rear foglampsFixed.
The button on the MODE control panel is
switched on.
The lamps only operate when the dipped beam
headlamps are on.
Under normal visibility conditions, switch them
off.
Green warning/indicator lamps
Direction indicators
Direction indicators with audible signal.
The direction indicators are on.
Front foglampsFixed.
The button on the MODE control panel is
switched on.
The lamps only operate when the dipped beam
headlamps are on.
Dipped beam headlampsFixed.
The lamps are on.
Cruise controlFixed.
Cruise control is selected.
Manual selection.
Blue warning/indicator lamps
Main beam headlamps
Fixed.
The lamps are on.
Automatic headlampsFixed.
The function has been activated via the
“MODE” menu.
Turning the main beam headlamps on and off is
automatically controlled according to traffic and
driving conditions.
Black/white warning lamps
Temperature / Black ice
Fixed, accompanied by a message
in the display.
Climatic conditions can lead to black ice on the
road.
Page 16 of 196
14
Instruments
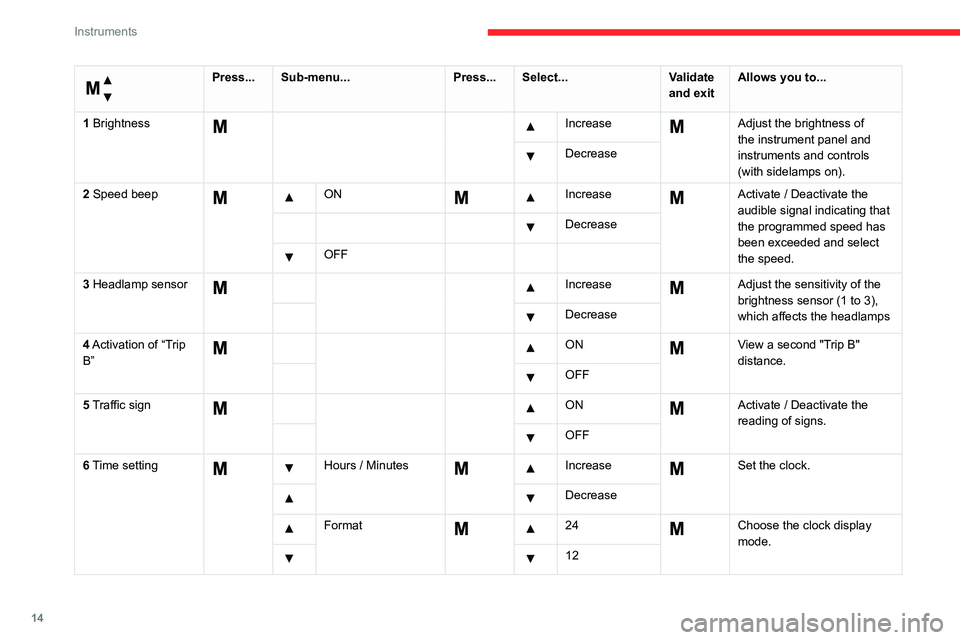
Menu...
Press...Sub-menu... Press...Select... Validate
and exit Allows you to...
1 Brightness
IncreaseAdjust the brightness of
the instrument panel and
instruments and controls
(with sidelamps on).
Decrease
2 Speed beep
ON Increase Activate / Deactivate the
audible signal indicating that
the programmed speed has
been exceeded and select
the speed.
Decrease
OFF
3 Headlamp sensor
Increase Adjust the sensitivity of the
brightness sensor (1 to 3),
which affects the headlamps
Decrease
4 Activation of “Trip
B”
ON View a second "Trip B"
distance.
OFF
5 Traffic sign
ON Activate / Deactivate the
reading of signs.
OFF
6 Time setting
Hours / Minutes Increase Set the clock.
Decrease
Format 24Choose the clock display
mode.
12
Page 20 of 196
18
Instruments
Touch screen audio and telematics system
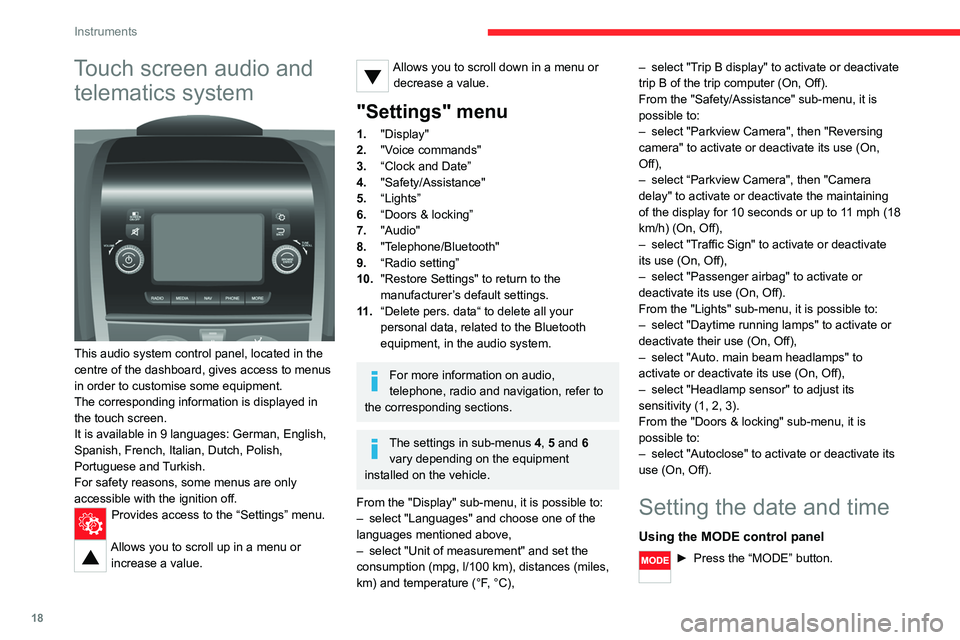
This audio system control panel, located in the
centre of the dashboard, gives access to menus
in order to customise some equipment.
The corresponding information is displayed in
the touch screen.
It is available in 9 languages: German, English,
Spanish, French, Italian, Dutch, Polish,
Portuguese and Turkish.
For safety reasons, some menus are only
accessible with the ignition off.
Provides access to the “Settings” menu.
Allows you to scroll up in a menu or
increase a value.
Allows you to scroll down in a menu or decrease a value.
"Settings" menu
1. "Display"
2. "Voice commands"
3. “Clock and Date”
4. "Safety/Assistance"
5. “Lights”
6. “Doors & locking”
7. "Audio"
8. "Telephone/Bluetooth"
9. “Radio setting”
10. "Restore Settings" to return to the
manufacturer’s default settings.
11 . “Delete pers. data“ to delete all your
personal data, related to the Bluetooth
equipment, in the audio system.
For more information on audio,
telephone, radio and navigation, refer to
the corresponding sections.
The settings in sub-menus 4, 5 and 6
vary depending on the equipment
installed on the vehicle.
From the "Display" sub-menu, it is possible to:
– select "Languages" and choose one of the
languages mentioned above,
– select "Unit of measurement" and set the
consumption (mpg, l/100 km), distances (miles,
km) and temperature (°F, °C), –
select "Trip B display" to activate or deactivate
trip B of the trip computer (On, Off).
From the "Safety/Assistance" sub-menu, it is
possible to:
– select "Parkview Camera", then "Reversing
camera" to activate or deactivate its use (On,
Off),
– select “Parkview Camera", then "Camera
delay" to activate or deactivate the maintaining
of the display for 10 seconds or up to 11 mph (18
km/h) (On, Off),
– select "Traffic Sign" to activate or deactivate
its use (On, Off),
– select "Passenger airbag" to activate or
deactivate its use (On, Off).
From the "Lights" sub-menu, it is possible to:
– select "Daytime running lamps" to activate or
deactivate their use (On, Off),
– select "Auto. main beam headlamps" to
activate or deactivate its use (On, Off),
– select "Headlamp sensor" to adjust its
sensitivity (1, 2, 3).
From the "Doors & locking" sub-menu, it is
possible to:
– select "Autoclose" to activate or deactivate its
use (On, Off).
Setting the date and time
Using the MODE control panel
► Press the “MODE” button.
Page 33 of 196

31
Ease of use and comfort
3As a safety precaution, these operations should only be carried out while the
vehicle is stationary.
Mirrors
Door mirrors
They are divided into two zones:
A - Upper mirror
B - Lower mirror
The mirrors are spherical in shape to widen the
lateral field of vision. The objects that you see in
the mirrors are in fact closer than they appear.
This must be taken into account to correctly
assess the distance.
The shell integrates the direction indicator
side repeater and the aerials, according to the
equipment available on board (GPS, GSM,
Radio, etc.).
Electric adjustments
The ignition key must be in MAR position.
► Turn the control to select the mirror zone.
Left-hand door mirror:
A1 - Upper mirror
B1 - Lower mirror
Right-hand door mirror:
A2 - Upper mirror
B2 - Lower mirror
► Then move the control in the direction of the
desired adjustment.
Electric folding
► Press this control.
De-icing the mirrors
► Press the heated rear screen button.
Interior rear view mirror
The lever on the lower edge allows the mirror to
be placed in two positions.
Day position, the lever is pushed.
Night position for anti-glare, pull the lever
towards you.
Heating and Ventilation
Advice
Using the ventilation and air
conditioning system
► To ensure that air is distributed evenly,
keep the external air intake grilles at the base
of the windscreen, the nozzles, the vents, the
air outlets and the air extractor in the boot
free from obstructions.
► Do not cover the sunshine sensor located
on the dashboard; this sensor is used to
regulate the automatic air conditioning
system.
Page 48 of 196
46
Lighting and visibility
Lighting control stalk
In some weather conditions (e.g. low
temperature or humidity), the presence
of misting on the internal surface of the glass
of the headlamps and rear lamps is normal; it
disappears after the lamps have been on for a
few minutes.
Travelling abroad
If using your vehicle in a country that
drives on the other side of the road, the
headlamps must be adjusted to avoid
dazzling on-coming drivers.
Contact a CITROËN dealer or a qualified
workshop.
Selection of main lighting
mode
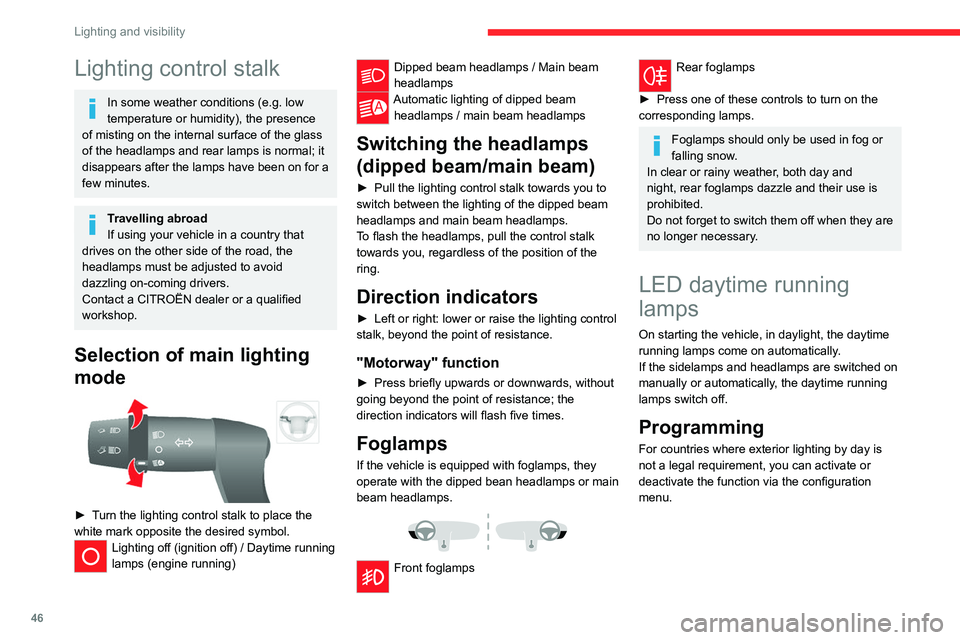
► Turn the lighting control stalk to place the
white mark opposite the desired symbol.
Lighting off (ignition off) / Daytime running
lamps (engine running)
Dipped beam headlamps / Main beam
headlamps
Automatic lighting of dipped beam headlamps / main beam headlamps
Switching the headlamps
(dipped beam/main beam)
► Pull the lighting control stalk towards you to
switch between the lighting of the dipped beam
headlamps and main beam headlamps.
To flash the headlamps, pull the control stalk
towards you, regardless of the position of the
ring.
Direction indicators
► Left or right: lower or raise the lighting control
stalk, beyond the point of resistance.
"Motorway" function
► Press briefly upwards or downwards, without
going beyond the point of resistance; the
direction indicators will flash five times.
Foglamps
If the vehicle is equipped with foglamps, they
operate with the dipped bean headlamps or main
beam headlamps.
Front foglamps
Rear foglamps
► Press one of these controls to turn on the
corresponding lamps.
Foglamps should only be used in fog or
falling snow.
In clear or rainy weather, both day and
night, rear foglamps dazzle and their use is
prohibited.
Do not forget to switch them off when they are
no longer necessary.
LED daytime running
lamps
On starting the vehicle, in daylight, the daytime
running lamps come on automatically.
If the sidelamps and headlamps are switched on
manually or automatically, the daytime running
lamps switch off.
Programming
For countries where exterior lighting by day is
not a legal requirement, you can activate or
deactivate the function via the configuration
menu.
Automatic illumination of headlamps
If your vehicle is fitted with this function, the
dipped beam headlamps are switched on
automatically if the light is poor.
In fog or snow, the sunshine sensor may
detect sufficient light. In this case, the
lighting will not come on automatically. If
necessary, you must switch on the dipped
beam headlamps manually.
They are switched off when the light returns
to a sufficient level.
Do not cover the sunshine sensor at the top
centre of the windscreen.
You can adjust the sensitivity of the sunshine sensor.
For more information on Vehicle
configuration , refer to the corresponding
section.
Activation
► Turn the ring to this position.
The lamps go out automatically when the ignition
is switched off.
Page 49 of 196

47
Lighting and visibility
4Automatic illumination of headlamps
If your vehicle is fitted with this function, the
dipped beam headlamps are switched on
automatically if the light is poor.
In fog or snow, the sunshine sensor may
detect sufficient light. In this case, the
lighting will not come on automatically. If
necessary, you must switch on the dipped
beam headlamps manually.
They are switched off when the light returns
to a sufficient level.
Do not cover the sunshine sensor at the top
centre of the windscreen.
You can adjust the sensitivity of the sunshine sensor.
For more information on Vehicle
configuration , refer to the corresponding
section.
Activation
► Turn the ring to this position.
The lamps go out automatically when the ignition
is switched off.
Guide-me-home lighting
If your vehicle is equipped: when you leave your
vehicle, the dipped beam headlamps remain on
for the selected period of time (e.g. leaving a car
park).
With the ignition off or the
key in the STOP position
► Within 2 minutes of switching off the engine,
turn the ignition key to the STOP position or
remove the key.
► Pull the lighting control stalk towards the
steering wheel.
This indicator lamp lights up on the
dashboard.
Each action on the lighting control stalk, pulled
towards the steering wheel, extends the
guide-me-home lighting by 30 seconds up to
approximately 3 minutes. Once this time has
elapsed, the lamps go out automatically.
Deactivate this control by holding the control
stalk pulled towards the steering wheel for more
than 2 seconds.
Automatic headlamps
System which automatically changes to main
beam according to the ambient light level and
the driving conditions, using a camera located at
the top of the windscreen.
This system is a driving aid. The driver remains responsible for
the vehicle's lighting, its correct use for the
prevailing conditions of light, visibility and
traffic, and observation of driving regulations.
Activation
► Turn the lighting control stalk ring to
this position.
► Set the function by pressing the
MODE button: select "ON" in the
"Automatic main beam" menu.
For more information on Vehicle
configuration , refer to the corresponding
section.
► Flash the headlamps (going beyond the point
of resistance) to activate the function.
Operation
Page 51 of 196
49
Lighting and visibility
4
Successive presses on these
controls adjust the headlamps.
An indicator lamp on the display indicates the
selected setting position (0, 1, 2, 3).
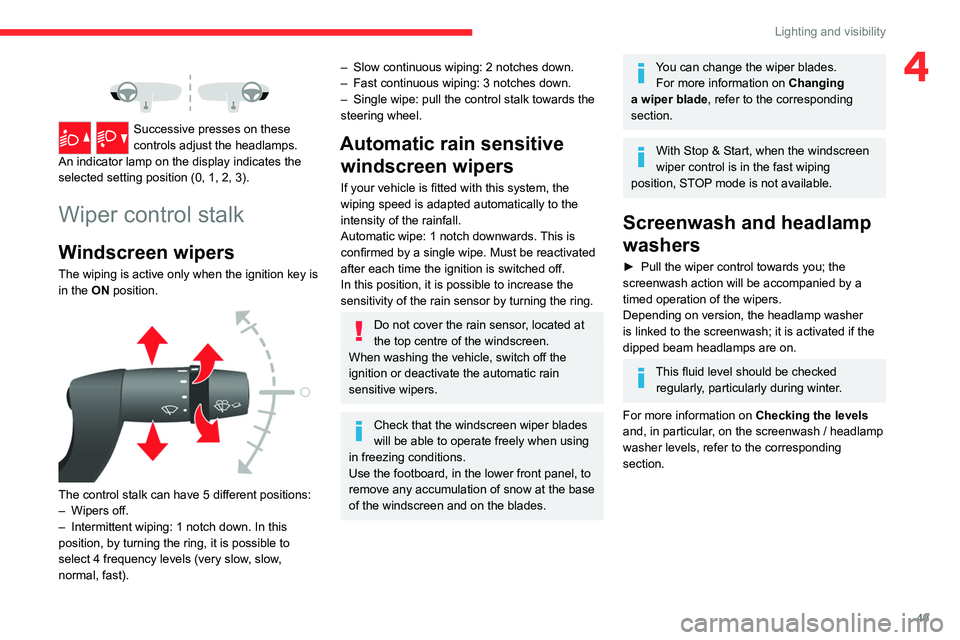
Wiper control stalk
Windscreen wipers
The wiping is active only when the ignition key is
in the ON position.
The control stalk can have 5 different positions:
– Wipers off.
– Intermittent wiping: 1 notch down. In this
position, by turning the ring, it is possible to
select 4 frequency levels (very slow, slow,
normal, fast).
– Slow continuous wiping: 2 notches down.
– Fast continuous wiping: 3 notches down.
– Single wipe: pull the control stalk towards the
steering wheel.
Automatic rain sensitive windscreen wipers
If your vehicle is fitted with this system, the
wiping speed is adapted automatically to the
intensity of the rainfall.
Automatic wipe: 1 notch downwards. This is
confirmed by a single wipe. Must be reactivated
after each time the ignition is switched off.
In this position, it is possible to increase the
sensitivity of the rain sensor by turning the ring.
Do not cover the rain sensor, located at
the top centre of the windscreen.
When washing the vehicle, switch off the
ignition or deactivate the automatic rain
sensitive wipers.
Check that the windscreen wiper blades
will be able to operate freely when using
in freezing conditions.
Use the footboard, in the lower front panel, to
remove any accumulation of snow at the base
of the windscreen and on the blades.
You can change the wiper blades. For more information on Changing
a wiper blade , refer to the corresponding
section.
With Stop & Start, when the windscreen
wiper control is in the fast wiping
position, STOP mode is not available.
Screenwash and headlamp
washers
► Pull the wiper control towards you; the
screenwash action will be accompanied by a
timed operation of the wipers.
Depending on version, the headlamp washer
is linked to the screenwash; it is activated if the
dipped beam headlamps are on.
This fluid level should be checked regularly, particularly during winter.
For more information on Checking the levels
and, in particular, on the screenwash / headlamp
washer levels, refer to the corresponding
section.
Page 67 of 196

65
Driving
6Effective eco-driving saves fuel; accelerate
progressively, anticipate the need to slow down
and adapt your speed to suit the situation.
Indicate changes of direction well in advance so
that you are seen by other road users.
Take care
The tyres must be inflated to at least the
pressures indicated on the label, even over-
inflated by 0.2 to 0.3 bar for long journeys.
On flooded roads
We strongly advise against driving on flooded
roads, as this could cause serious damage to
the engine or gearbox, as well as to the electrical
systems of your vehicle.
If you are obliged to drive on a flooded road:
► check that the depth of water does not
exceed 15 cm, taking account of waves that
might be generated by other users,
► deactivate the Stop & Start function,
► drive as slowly as possible without stalling. In
all cases, do not exceed 6 mph (10 km/h),
► do not stop and do not switch off the engine.
On leaving the flooded road, as soon as safety
conditions allow, make several light brake
applications to dry the brake discs and pads.
If in doubt about the state of your vehicle,
contact a CITROËN dealer or a qualified
workshop.
In case of towing
Driving with a trailer places greater
demands on the towing vehicle and
requires extra care from the driver.
Respect the maximum towable weights.
At altitude: reduce the maximum load by
10% per 1,000 metres of altitude; the density
of the air decreases with altitude and the
performance of the engine reduces.
New vehicle: do not pull a trailer before
having driven at least 620 miles (1,000
kilometres).
If the outside temperature is high, let the
engine idle for 1 to 2 minutes after the
vehicle comes to a stop, to help it to cool.
Before setting off
Nose weight
► Distribute the load in the trailer so that the
heaviest items are as close as possible to the
axle and the nose weight (at the point where it
joins your vehicle) approaches the maximum
permitted without exceeding it.
Tyres
► Check the tyre pressures of the towing
vehicle and of the trailer, observing the
recommended pressures.
Lighting
► Check the electrical signalling on the trailer
and the headlamp beam height of your vehicle.
If a genuine CITROËN towing device is
used, the rear parking sensors will be
deactivated automatically to avoid the audible
signal.
When driving
Cooling
Towing a trailer uphill increases the temperature
of the coolant. The maximum towable load
depends on the gradient and the exterior
temperature. The cooling capacity of the fan
does not increase with engine speed.
► Reduce speed and lower the engine speed,
so as to limit the heating-up.
In all cases, pay attention to the coolant
temperature.
If this warning lamp and the STOP
warning lamp come on, stop the vehicle
and switch off the engine as soon as possible.