sensor Citroen XSARA PICASSO 2005 1.G User Guide
[x] Cancel search | Manufacturer: CITROEN, Model Year: 2005, Model line: XSARA PICASSO, Model: Citroen XSARA PICASSO 2005 1.GPages: 462, PDF Size: 10.48 MB
Page 86 of 462
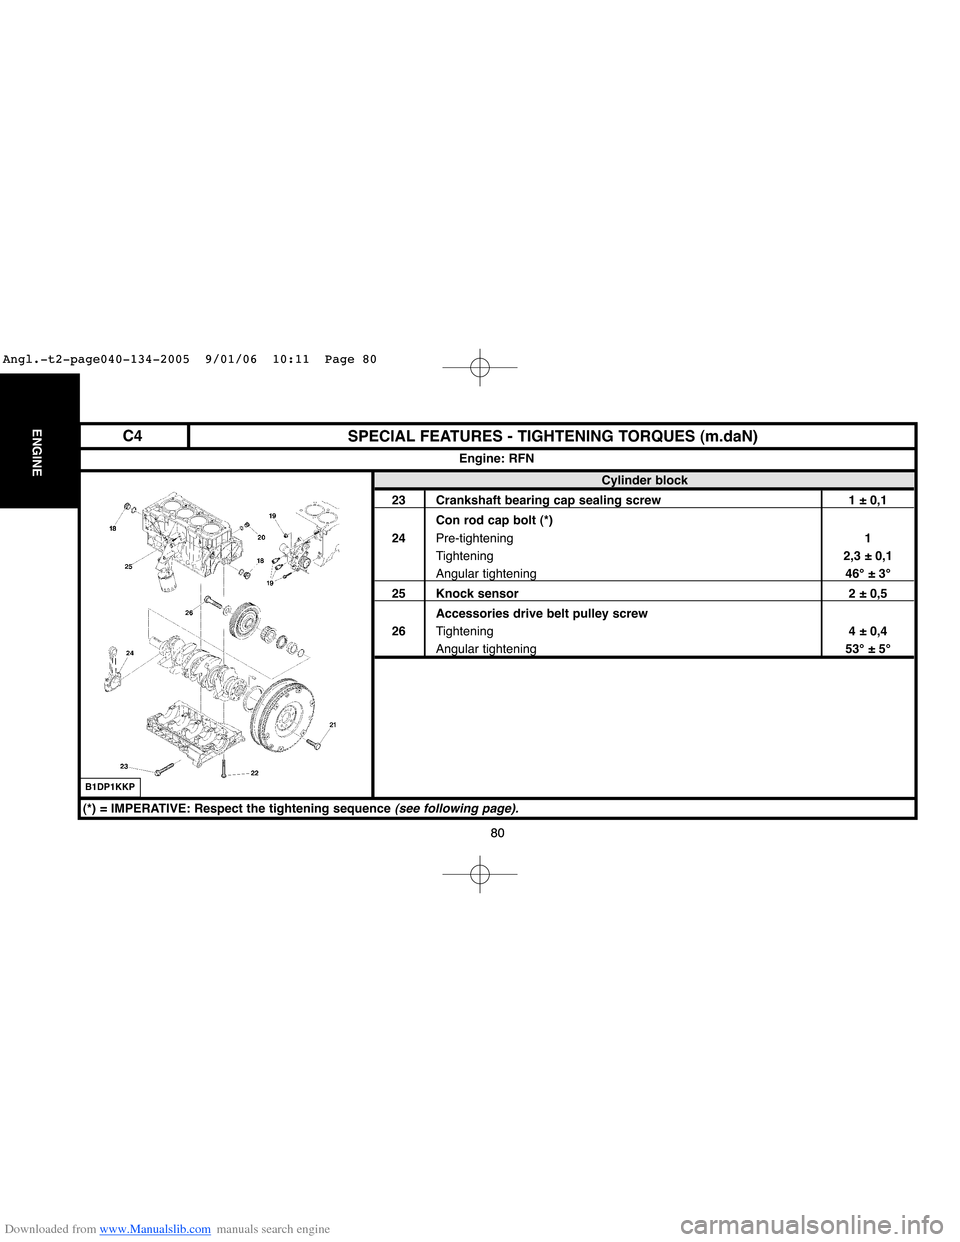
Downloaded from www.Manualslib.com manuals search engine 80
ENGINE
80
SPECIAL FEATURES - TIGHTENING TORQUES (m.daN)
Cylinder block
23 Crankshaft bearing cap sealing screw 1 ± 0,1
Con rod cap bolt (*)
24Pre-tightening1
Tightening2,3 ± 0,1
Angular tightening46°±3°
25 Knock sensor 2 ± 0,5
Accessories drive belt pulley screw
26Tightening4 ± 0,4
Angular tightening53°±5°
Engine: RFN
B1DP1KKP
(*) = IMPERATIVE: Respect the tightening sequence (see following page).
C4
Angl.-t2-page040-134-2005 9/01/06 10:11 Page 80
Page 88 of 462
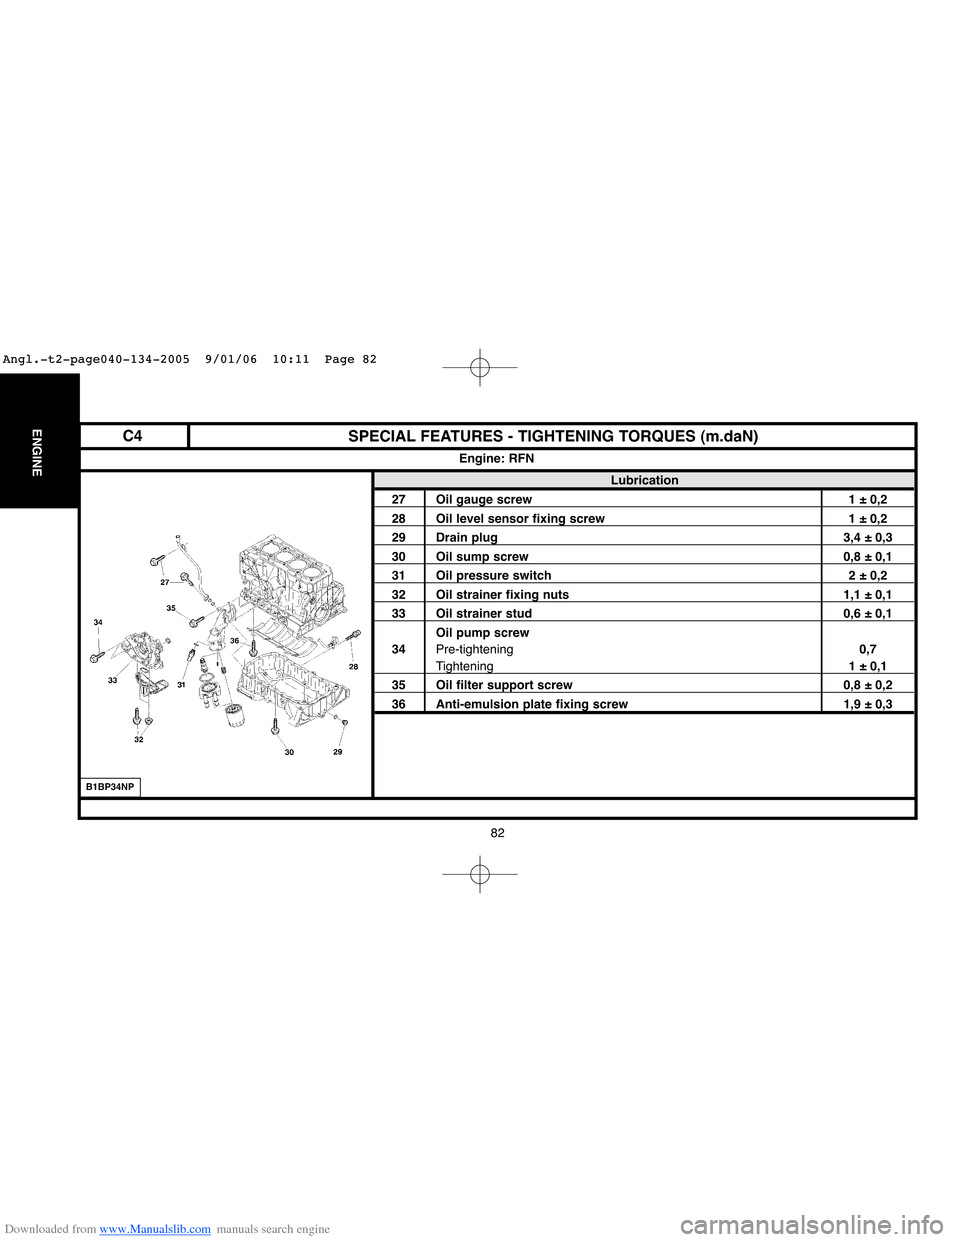
Downloaded from www.Manualslib.com manuals search engine 82
ENGINESPECIAL FEATURES - TIGHTENING TORQUES (m.daN)
Lubrication
27 Oil gauge screw 1 ± 0,2
28 Oil level sensor fixing screw 1 ± 0,2
29 Drain plug 3,4 ± 0,3
30 Oil sump screw 0,8 ± 0,1
31 Oil pressure switch 2 ± 0,2
32 Oil strainer fixing nuts 1,1 ± 0,1
33 Oil strainer stud 0,6 ± 0,1
Oil pump screw
34Pre-tightening0,7
Tightening1 ± 0,1
35 Oil filter support screw 0,8 ± 0,2
36 Anti-emulsion plate fixing screw 1,9 ± 0,3
Engine: RFN
B1BP34NP
C4
Angl.-t2-page040-134-2005 9/01/06 10:11 Page 82
Page 92 of 462
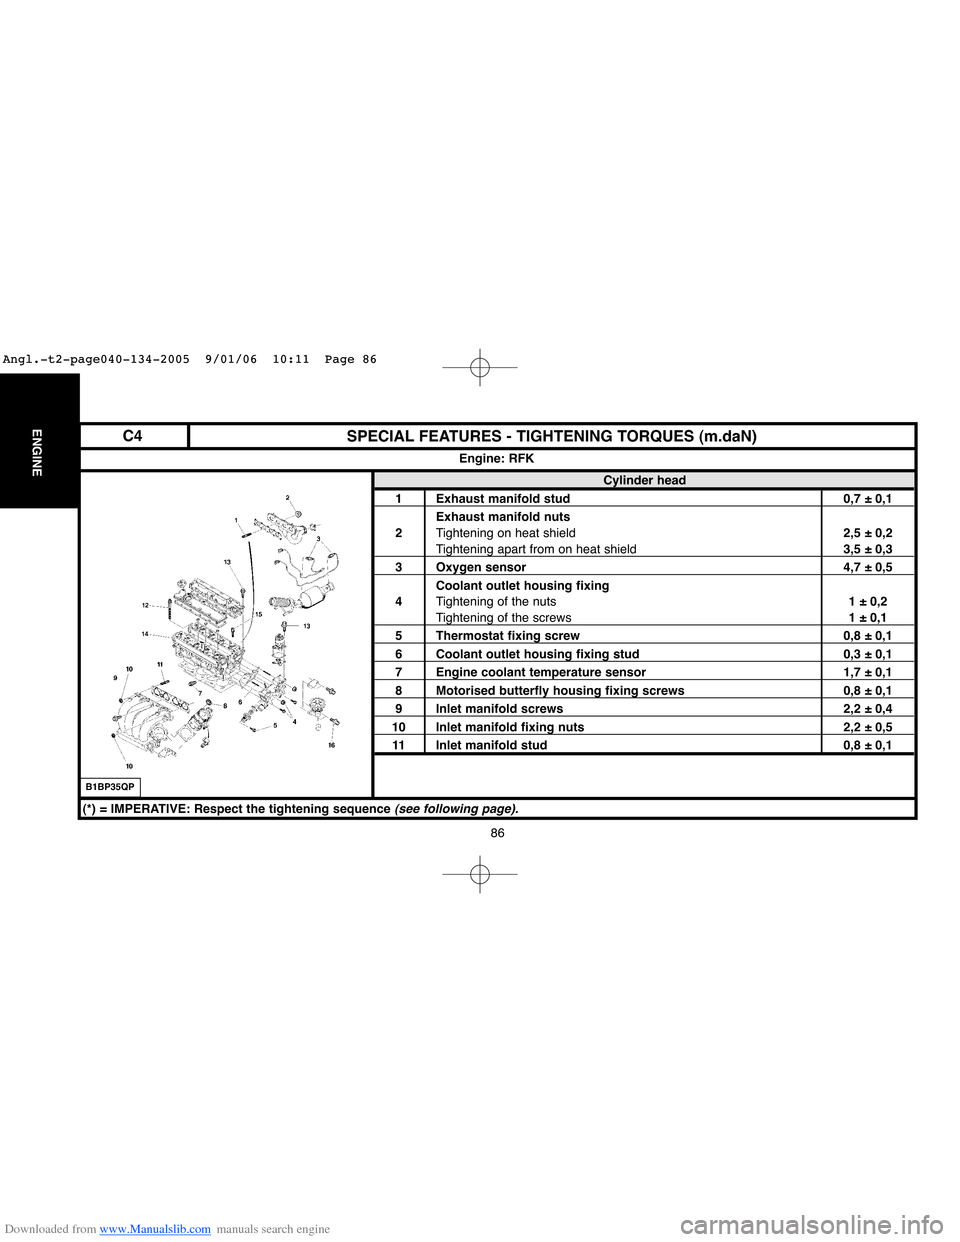
Downloaded from www.Manualslib.com manuals search engine 86
ENGINESPECIAL FEATURES - TIGHTENING TORQUES (m.daN)
Cylinder head
1 Exhaust manifold stud 0,7 ± 0,1
Exhaust manifold nuts
2Tightening on heat shield2,5 ± 0,2
Tightening apart from on heat shield3,5 ± 0,3
3 Oxygen sensor 4,7 ± 0,5
Coolant outlet housing fixing
4Tightening of the nuts1 ± 0,2
Tightening of the screws1 ± 0,1
5 Thermostat fixing screw 0,8 ± 0,1
6 Coolant outlet housing fixing stud 0,3 ± 0,1
7 Engine coolant temperature sensor 1,7 ± 0,1
8 Motorised butterfly housing fixing screws 0,8 ± 0,1
9 Inlet manifold screws 2,2 ± 0,4
10 Inlet manifold fixing nuts 2,2 ± 0,5
11 Inlet manifold stud 0,8 ± 0,1
Engine: RFK
B1BP35QP
(*) = IMPERATIVE: Respect the tightening sequence(see following page).
C4
Angl.-t2-page040-134-2005 9/01/06 10:11 Page 86
Page 96 of 462
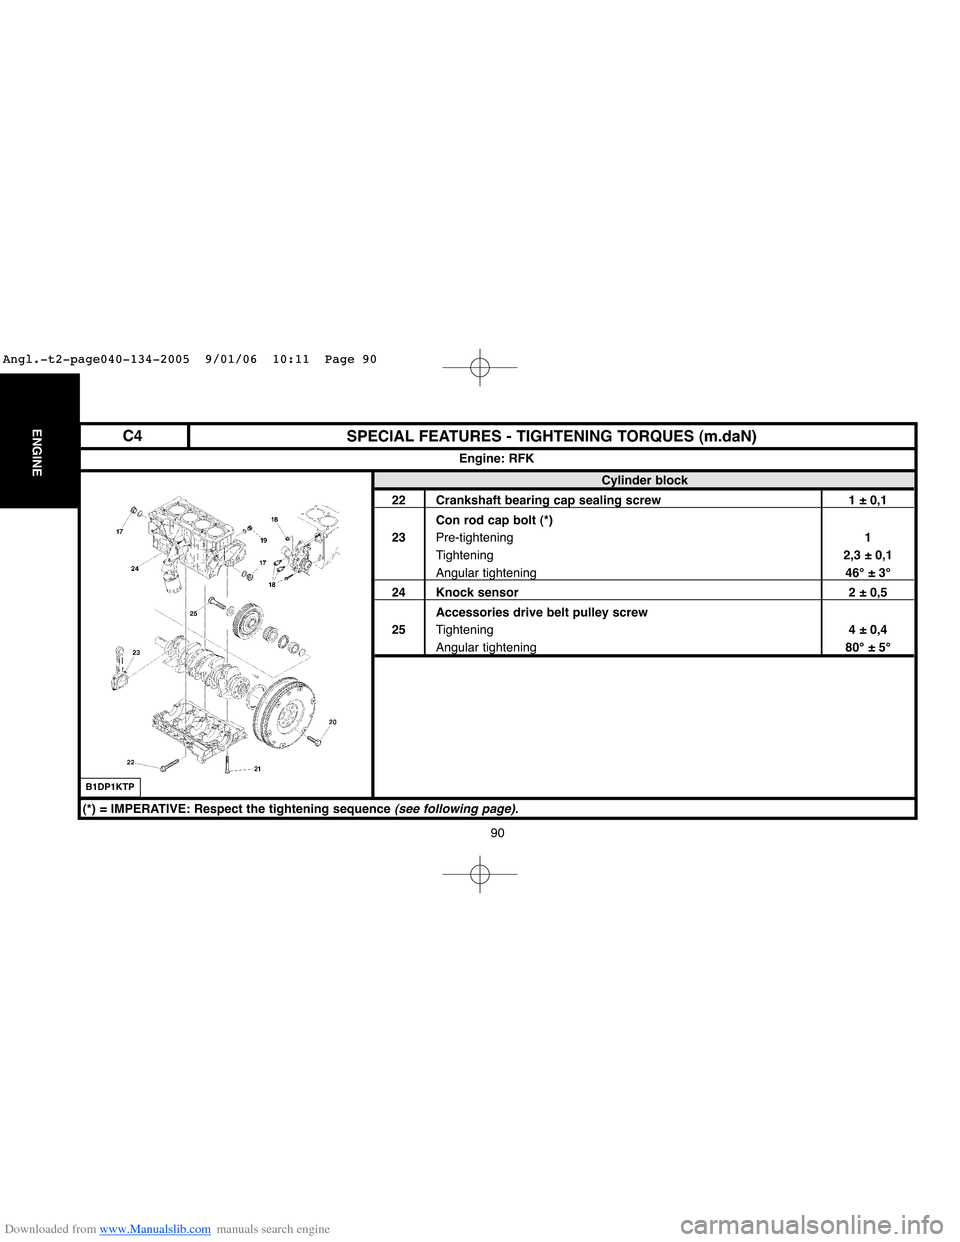
Downloaded from www.Manualslib.com manuals search engine 90
ENGINESPECIAL FEATURES - TIGHTENING TORQUES (m.daN)
Cylinder block
22 Crankshaft bearing cap sealing screw 1 ± 0,1
Con rod cap bolt (*)
23Pre-tightening1
Tightening2,3 ± 0,1
Angular tightening46°±3°
24 Knock sensor 2 ± 0,5
Accessories drive belt pulley screw
25Tightening4 ± 0,4
Angular tightening80°±5°
Engine: RFK
B1DP1KTP
(*) = IMPERATIVE: Respect the tightening sequence (see following page).
C4
Angl.-t2-page040-134-2005 9/01/06 10:11 Page 90
Page 98 of 462
Downloaded from www.Manualslib.com manuals search engine 92
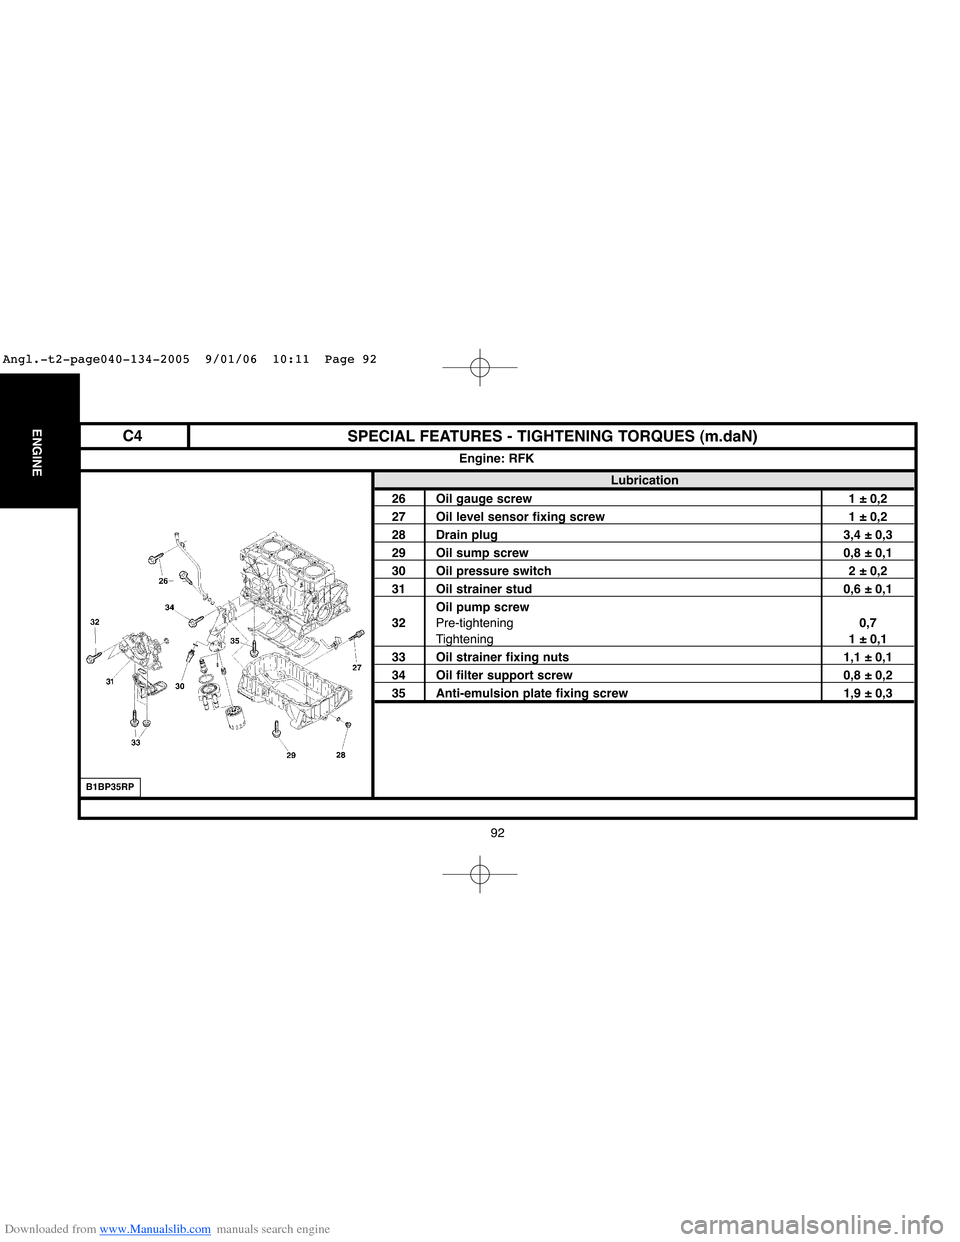
ENGINESPECIAL FEATURES - TIGHTENING TORQUES (m.daN)
Lubrication
26 Oil gauge screw 1 ± 0,2
27 Oil level sensor fixing screw 1 ± 0,2
28 Drain plug 3,4 ± 0,3
29 Oil sump screw 0,8 ± 0,1
30 Oil pressure switch 2 ± 0,2
31 Oil strainer stud 0,6 ± 0,1
Oil pump screw
32Pre-tightening0,7
Tightening1 ± 0,1
33 Oil strainer fixing nuts 1,1 ± 0,1
34 Oil filter support screw 0,8 ± 0,2
35 Anti-emulsion plate fixing screw 1,9 ± 0,3
Engine: RFK
B1BP35RP
C4
Angl.-t2-page040-134-2005 9/01/06 10:11 Page 92
Page 124 of 462
Downloaded from www.Manualslib.com manuals search engine 118
ENGINE
118
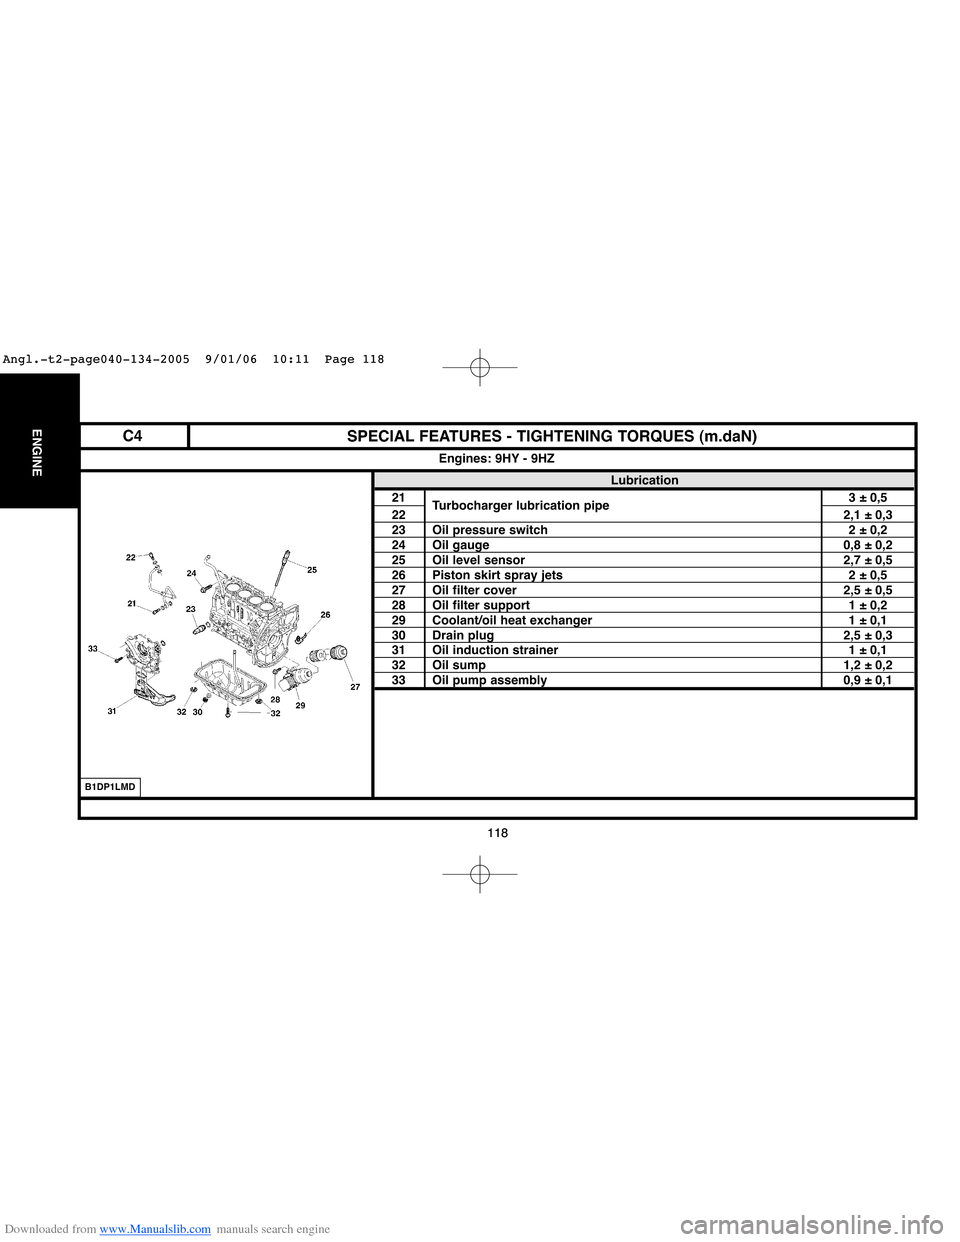
SPECIAL FEATURES - TIGHTENING TORQUES (m.daN)
Lubrication
21
Turbocharger lubrication pipe3 ± 0,5
222,1 ± 0,323 Oil pressure switch 2 ± 0,224 Oil gauge 0,8 ± 0,225 Oil level sensor 2,7 ± 0,526 Piston skirt spray jets 2 ± 0,527 Oil filter cover 2,5 ± 0,528 Oil filter support 1 ± 0,229 Coolant/oil heat exchanger 1 ± 0,130 Drain plug 2,5 ± 0,331 Oil induction strainer 1 ± 0,132 Oil sump 1,2 ± 0,233 Oil pump assembly 0,9 ± 0,1
Engines: 9HY - 9HZ
B1DP1LMD
C4
Angl.-t2-page040-134-2005 9/01/06 10:11 Page 118
Page 240 of 462
Downloaded from www.Manualslib.com manuals search engine 234
ENGINECHECKING AND SETTING THE VALVE TIMING
Engines: 8HX - 8HZ
B1EP18GC
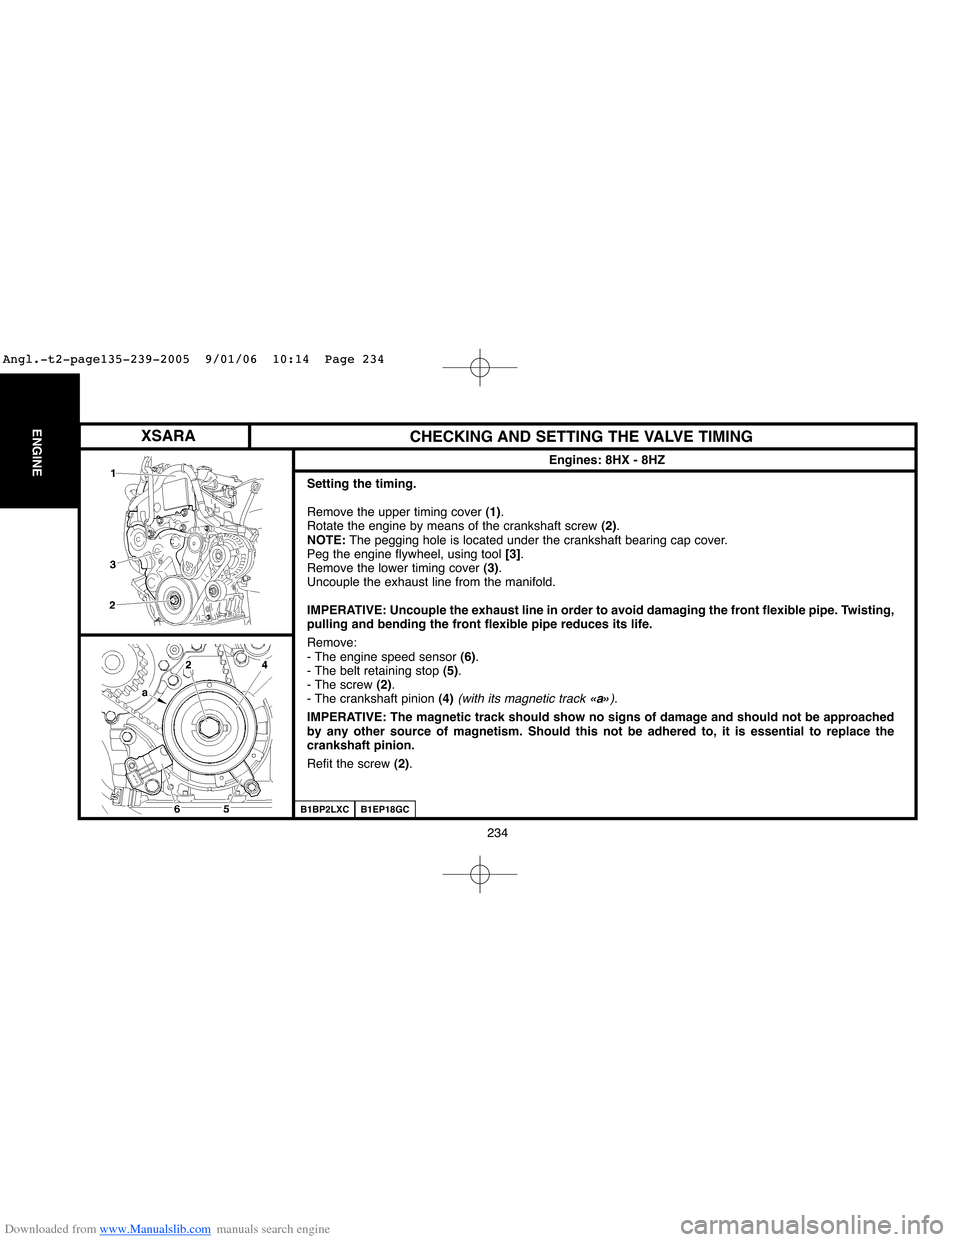
Setting the timing.
Remove the upper timing cover (1).
Rotate the engine by means of the crankshaft screw (2).
NOTE:The pegging hole is located under the crankshaft bearing cap cover.
Peg the engine flywheel, using tool [3].
Remove the lower timing cover (3).
Uncouple the exhaust line from the manifold.
IMPERATIVE: Uncouple the exhaust line in order to avoid damaging the front flexible pipe. Twisting,
pulling and bending the front flexible pipe reduces its life.
Remove:
- The engine speed sensor (6).
- The belt retaining stop (5).
- The screw (2).
- The crankshaft pinion (4)
(with its magnetic track «a»).
IMPERATIVE: The magnetic track should show no signs of damage and should not be approached
by any other source of magnetism. Should this not be adhered to, it is essential to replace the
crankshaft pinion.
Refit the screw (2).
B1BP2LXC
XSARA
Angl.-t2-page135-239-2005 9/01/06 10:14 Page 234
Page 244 of 462
Downloaded from www.Manualslib.com manuals search engine 238
ENGINECHECKING AND SETTING THE VALVE TIMING
Engines: 8HX - 8HZ
B1EP18KC
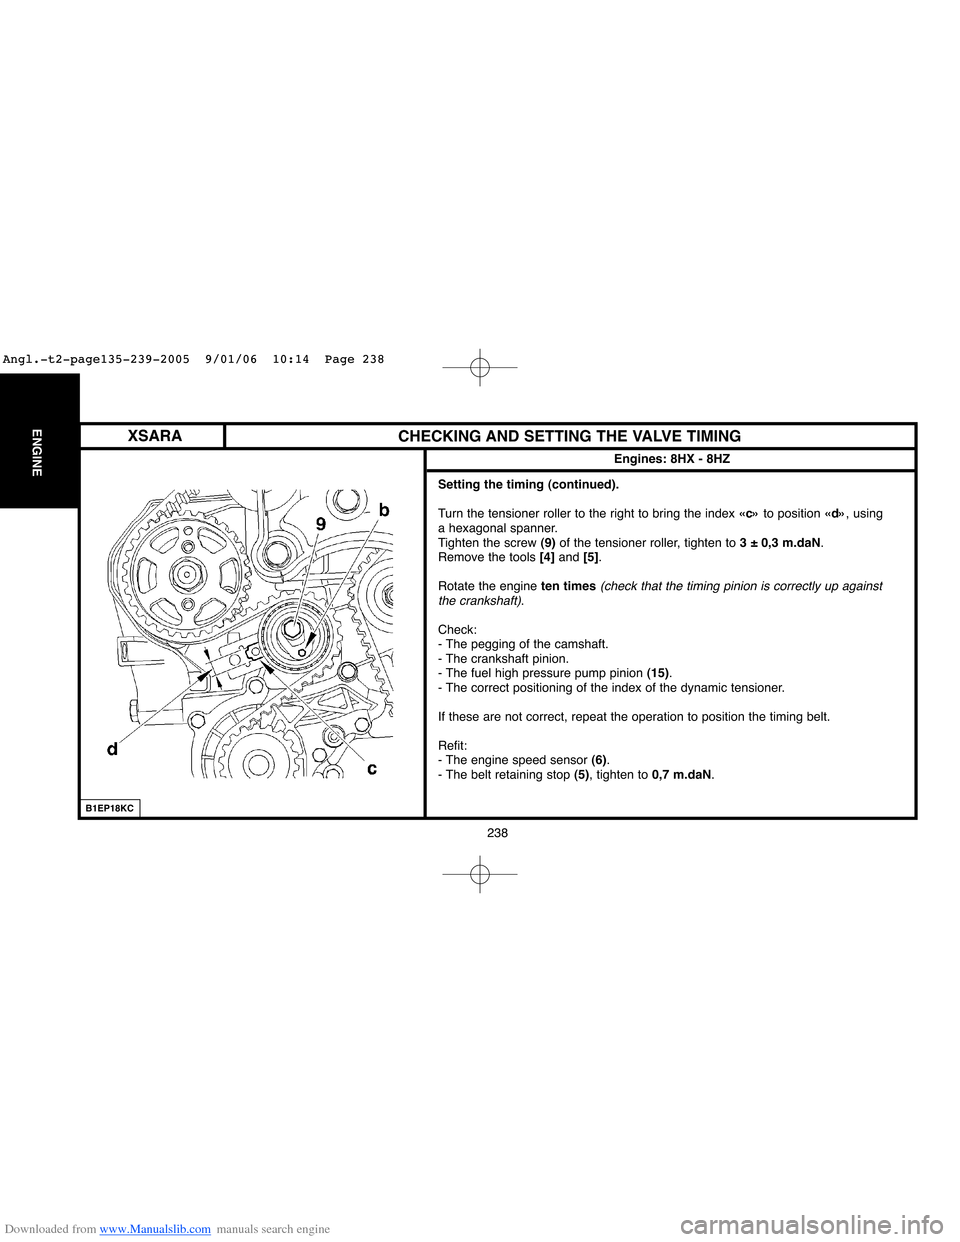
Setting the timing (continued).
Turn the tensioner roller to the right to bring the index «c»to position «d», using
a hexagonal spanner.
Tighten the screw (9)of the tensioner roller, tighten to 3 ± 0,3 m.daN.
Remove the tools [4]and [5].
Rotate the engine ten times
(check that the timing pinion is correctly up against
the crankshaft).
Check:
- The pegging of the camshaft.
- The crankshaft pinion.
- The fuel high pressure pump pinion (15).
- The correct positioning of the index of the dynamic tensioner.
If these are not correct, repeat the operation to position the timing belt.
Refit:
- The engine speed sensor (6).
- The belt retaining stop (5), tighten to 0,7 m.daN.
XSARA
Angl.-t2-page135-239-2005 9/01/06 10:14 Page 238
Page 250 of 462
Downloaded from www.Manualslib.com manuals search engine 244
ENGINECHECKING AND SETTING THE VALVE TIMING
Engines: 9HX - 9HY - 9HZ
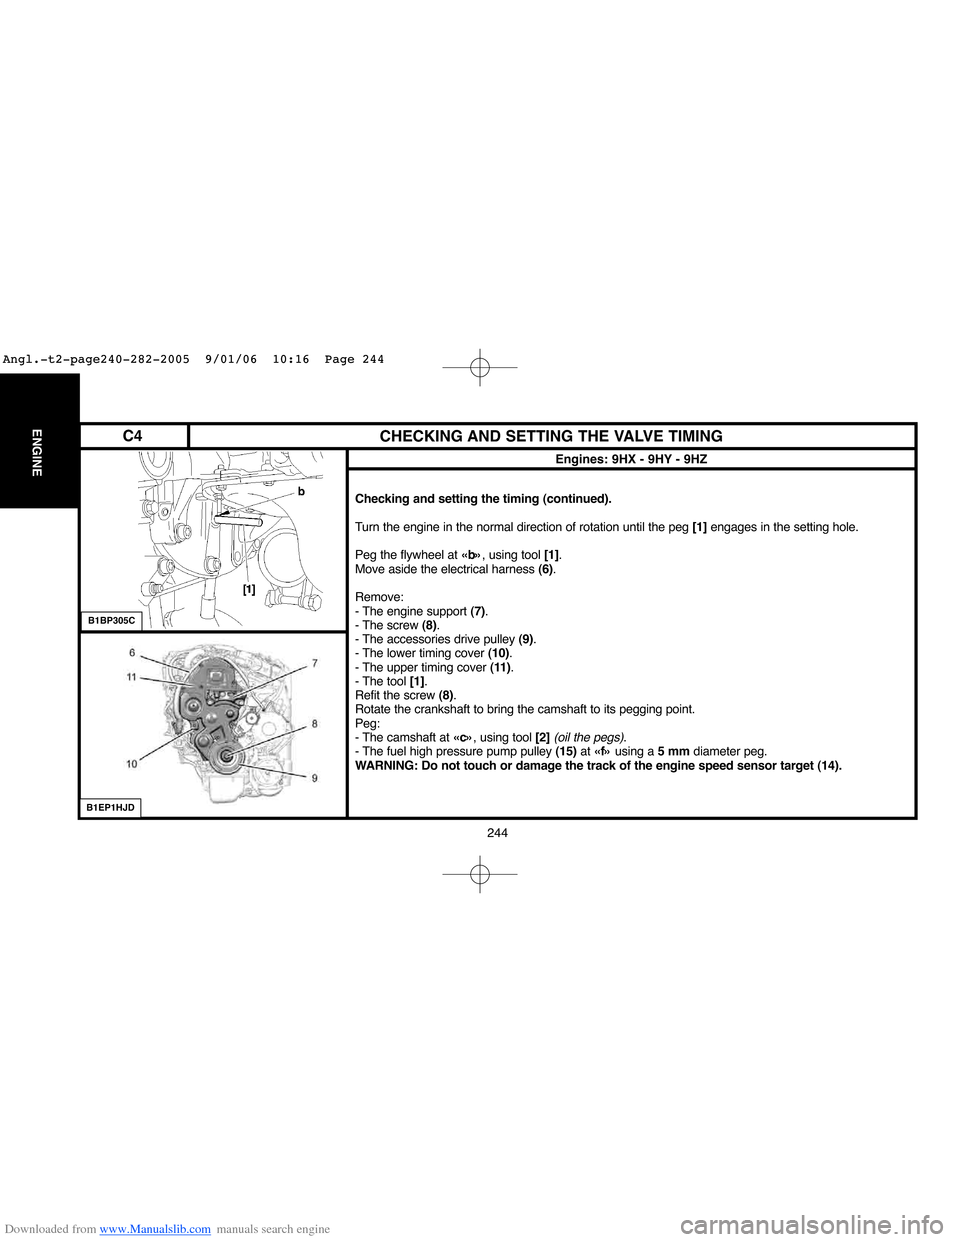
Checking and setting the timing (continued).
Turn the engine in the normal direction of rotation until the peg [1]engages in the setting hole.
Peg the flywheel at «b», using tool [1].
Move aside the electrical harness (6).
Remove:
- The engine support (7).
- The screw (8).
- The accessories drive pulley (9).
- The lower timing cover (10).
- The upper timing cover (11).
- The tool [1].
Refit the screw (8).
Rotate the crankshaft to bring the camshaft to its pegging point.
Peg:
- The camshaft at «c», using tool [2]
(oil the pegs).
- The fuel high pressure pump pulley (15)at «f»using a 5 mmdiameter peg.
WARNING: Do not touch or damage the track of the engine speed sensor target (14).
B1BP305C
B1EP1HJD
C4
Angl.-t2-page240-282-2005 9/01/06 10:16 Page 244
Page 251 of 462
Downloaded from www.Manualslib.com manuals search engine 245
ENGINE
CHECKING AND SETTING THE VALVE TIMING
Engines: 9HX - 9HY - 9HZ
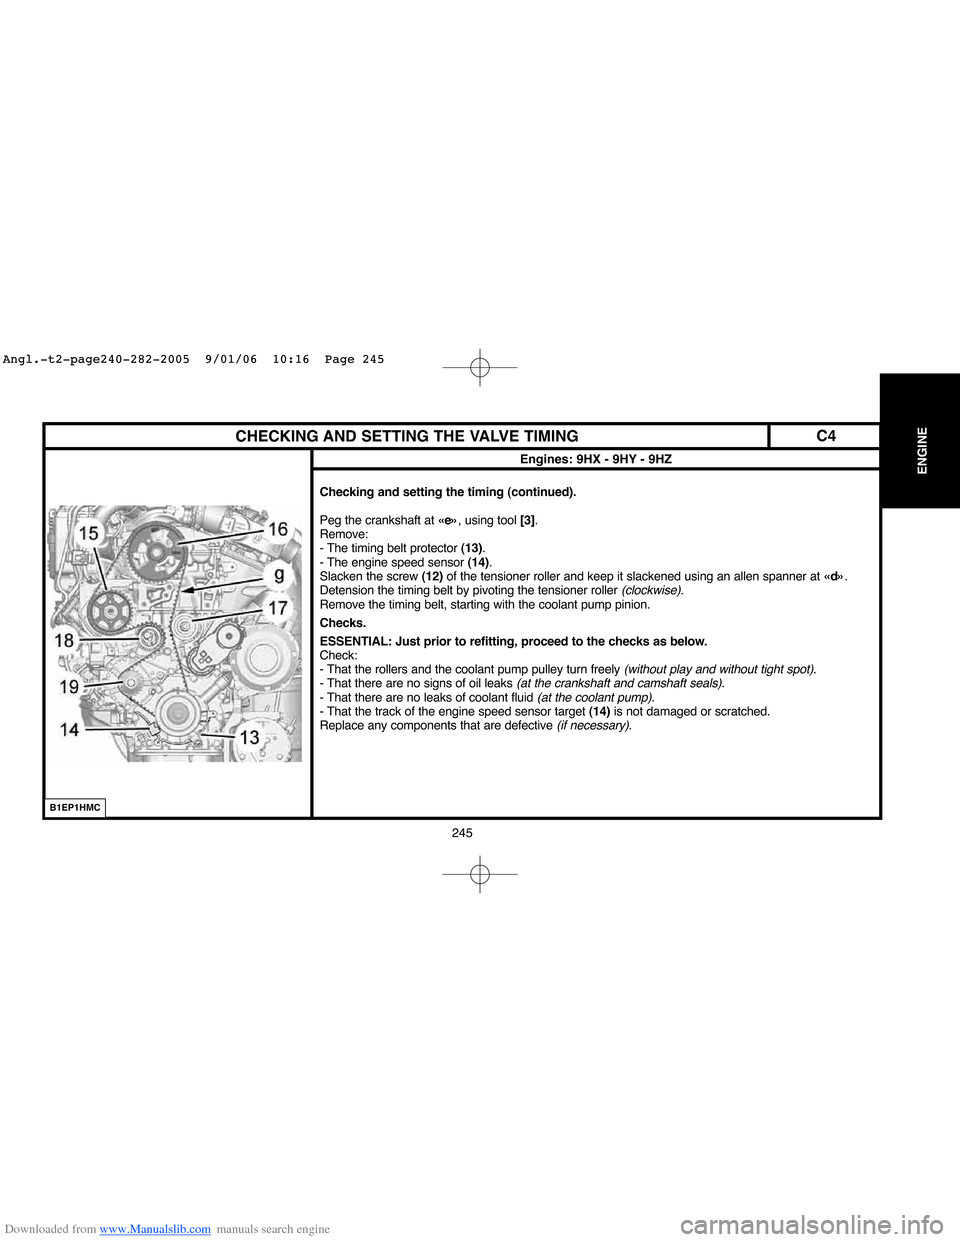
Checking and setting the timing (continued).
Peg the crankshaft at «e», using tool [3].
Remove:
- The timing belt protector (13).
- The engine speed sensor (14).
Slacken the screw (12)of the tensioner roller and keep it slackened using an allen spanner at «d».
Detension the timing belt by pivoting the tensioner roller
(clockwise).
Remove the timing belt, starting with the coolant pump pinion.
Checks.
ESSENTIAL: Just prior to refitting, proceed to the checks as below.
Check:
- That the rollers and the coolant pump pulley turn freely
(without play and without tight spot).
- That there are no signs of oil leaks (at the crankshaft and camshaft seals).
- That there are no leaks of coolant fluid (at the coolant pump).
- That the track of the engine speed sensor target (14)is not damaged or scratched.
Replace any components that are defective
(if necessary).
B1EP1HMC
C4
Angl.-t2-page240-282-2005 9/01/06 10:16 Page 245