tow DACIA DUSTER 2012 1.G User Guide
[x] Cancel search | Manufacturer: DACIA, Model Year: 2012, Model line: DUSTER, Model: DACIA DUSTER 2012 1.GPages: 200, PDF Size: 2.4 MB
Page 94 of 200
air conditioning ..................................... (up to the end of the DU)
heating and air conditioning system ..... (up to the end of the DU)
heating system ..................................... (up to the end of the DU)
air conditioning ..................................... (up to the end of the DU)
rear screen de-icing/demisting ............. (up to the end of the DU)
ventilation heating and air conditioning system (up to the end of the DU)
3.4
ENG_UD25124_1
Chauffage - Ventilation - Air conditionné (H79 - Dacia)
ENG_NU_898-5_H79_Dacia_3
Jaune NoirNoir texte
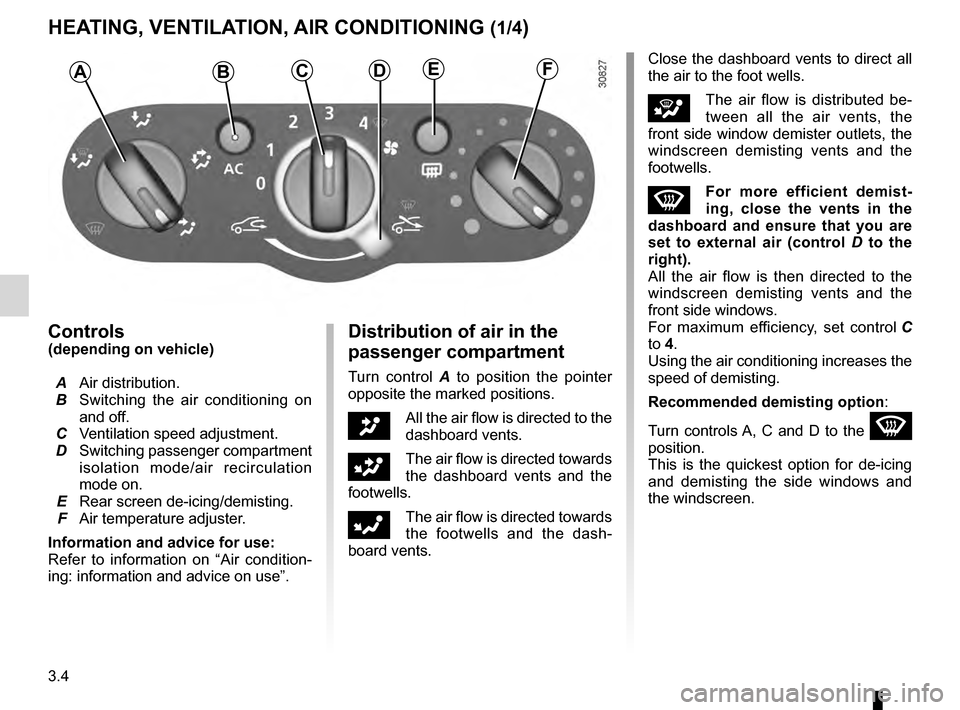
Controls(depending on vehicle)
A
Air distributi
on.
B
S
witching the air conditioning on
and off.
C
V
entilation speed adjustment.
D
Switching
passenger compartment
isolation mode/air recirculation
mode on.
E
Rear screen
de-icing/demisting.
F
Air temperature adjuster
.
Information and advice for use:
Refer to information on “Air condition-
ing: information and advice on use”.Distribution of air in the
passenger compartment
Turn control A to position the pointer
opposite the marked positions.
JAll the air flow is directed to the
dashboard vents.
GThe air flow is directed towards
the dashboard vents and the
footwells.
FThe air flow is directed towards
the footwells and the dash-
board vents. Close the dashboard vents to direct all
the air to the foot wells.
iThe air flow is distributed be-
tween all the air vents, the
front side window demister outlets, the
windscreen demisting vents and the
footwells.
WFor more efficient demist-
ing, close the vents in the
dashboard and ensure that you are
set to external air (control D to the
right).
All the air flow is then directed to the
windscreen demisting vents and the
front side windows.
For maximum efficiency, set control
C
to 4.
Using the air conditioning increases the
speed of demisting.
Recommended demisting option :
Turn controls A, C and D to the
W
position.
This is the quickest option for de-icing
and demisting the side windows and
the windscreen.
HEATING, VENTILATION, AIR CONDITIONING (1/4)
ABCDEF
Page 98 of 200
air conditioning ..................................... (up to the end of the DU)
heating system ..................................... (up to the end of the DU)
heating and air conditioning system ..... (up to the end of the DU)
ventilation heating and air conditioning system (up to the end of the DU)
air conditioning ...................................................... (current page)
3.8
ENG_UD18246_14
Air conditionné : informations et conseils utilisation (B90 - U90 - \
L90 Ph2 - F90 Ph2 - R90 Ph2 - H79 - Dacia)
ENG_NU_898-5_H79_Dacia_3
Air conditioning: information and advice on use
AIR CONDITIONING: information and advice on use
Fuel consumption
You will normally notice an increase
in fuel consumption (especially
when driving in town) when the air
conditioning is operating.
For vehicles fitted with air condition-
ing with no automatic mode, switch
off the system when it is not re-
quired.
Advice for reducing consumption
and helping to preserve the envi-
ronment
Drive with the air vents open and
the windows closed.
If the vehicle has been parked in
the sun, open the doors for a few
moments to let the hot air escape
before starting the engine. Operating faults
As a general rule, contact your ap-
proved dealer in the event of an op-
erating fault.
–
R
eduction in de-icing, demist-
ing or air conditioning per-
formance.
This may be caused by the pas-
senger compartment filter car-
tridge becoming clogged.
–
No cold air is being produced .
C
heck that the controls are set
correctly and that the fuses are
sound. Otherwise, switch off the
system.
Do not open the refriger-
ant fluid circuit. The fluid
may damage eyes or skin.Presence of water under the ve-
hicle. After prolonged use of the air
conditioning system, it is normal for
water to be present under the vehi-
cle. This is caused by condensation.Maintenance
Refer to the Maintenance Service
Booklet for your vehicle for the in-
spection frequency.
Page 111 of 200
transporting objectsin the luggage compartment ........... (up to the end of the DU)
towing rings .......................................... (up to the end of the DU)
towing towing equipment ............................ (up to the end of the DU)
towing equipment fitting ............................................... (up to the end of the DU)
towing a caravan .................................. (up to the end of the DU)
3.21
ENG_UD24628_3
Transport d’objets dans le coffre (H79 - Dacia)
ENG_NU_898-5_H79_Dacia_3
Transporting objects in the boot
TRANSPORTING OBjECTS IN THE LuGGAGE COMPARTMENT
Always position the heavi-
est items directly on the
floor. Use the lashing points
on the luggage compart-
ment floor, if these are fitted to the
vehicle. The luggage should be
loaded in such a way that no items
will be thrown forward and strike the
occupants if the driver has to brake
suddenly.
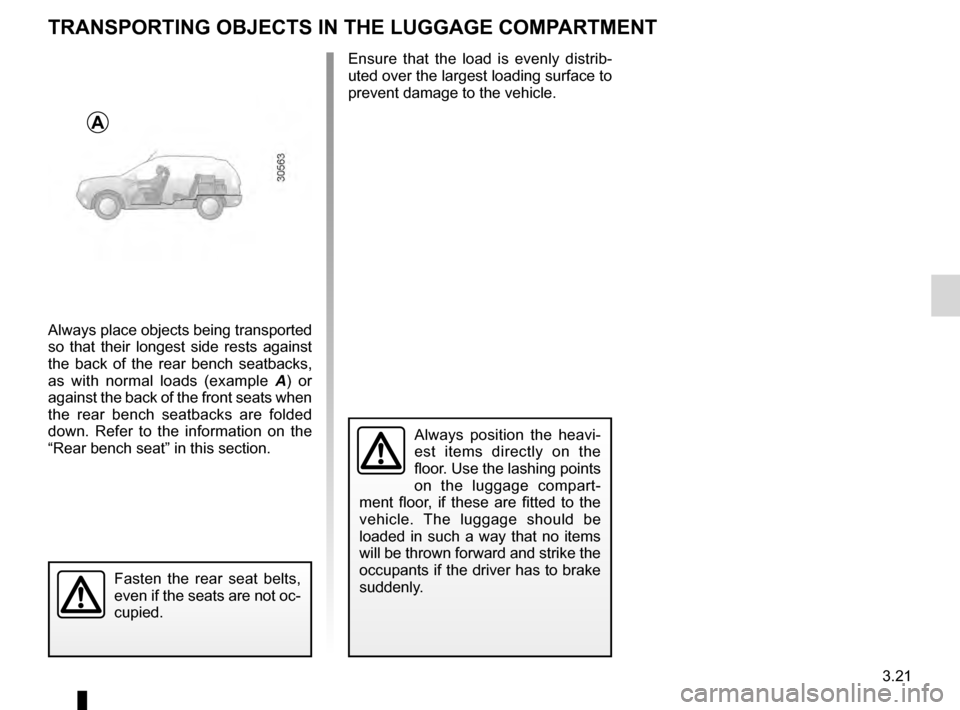
Always place objects being transported
so that their longest side rests against
the back of the rear bench seatbacks,
as with normal loads (example
A )
or
against the back of the front seats when
the rear bench seatbacks are folded
down. Refer to the information on the
“Rear bench seat” in this section.
A
Fasten the rear seat belts,
even if the seats are not oc-
cupied.
Ensure that the load is evenly distrib-
uted over the largest loading surface to
prevent damage to the vehicle.
Page 112 of 200
luggage compartment cover ................. (up to the end of the DU)
3.22
ENG_UD20577_3
Cache-bagages (H79 - Dacia)
ENG_NU_898-5_H79_Dacia_3
Jaune NoirNoir texte
Luggage cover
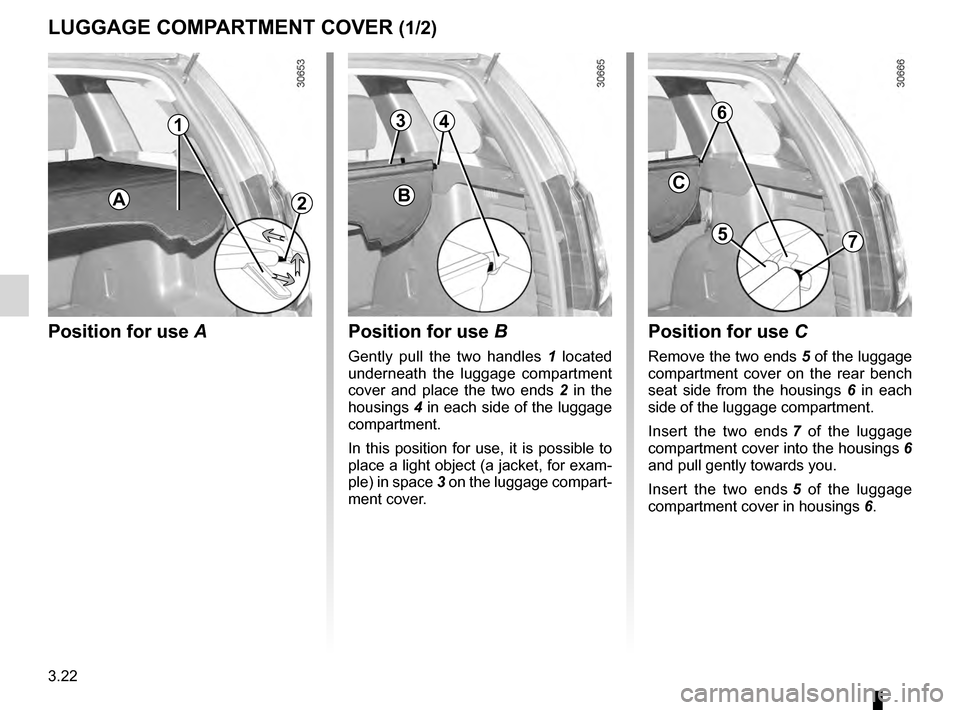
Position for use A Position for use B
Gently pull the two handles 1 located
underneath the luggage compartment
cover and place the two ends
2
in the
housings
4 in
each side of the luggage
compartment.
In this position for use, it is possible to
place a light object (a jacket, for exam-
ple) in space
3
on the luggage compart-
ment cover.
Position for use C
Remove the two ends 5 of the luggage
compartment cover on the rear bench
seat side from the housings
6
in each
side of the luggage compartment.
Insert the two ends
7
of the luggage
compartment cover into the housings
6
and pull gently towards you.
Insert the two ends
5
of the luggage
compartment cover in housings
6
.
LuGGAGE COMPARTMENT COVER (1/2)
A2B
143
C
6
57
Page 125 of 200
tyre pressures ....................................... (up to the end of the DU)
tyres ...................................................... (up to the end of the DU)
tyre pressure......................................... (up to the end of the DU)
4.11
ENG_UD14128_1
Pressions de gonflage des pneumatiques à froid (H79 - Dacia)
ENG_NU_898-5_H79_Dacia_4
Tyre pressures
TyRE PRESSURE
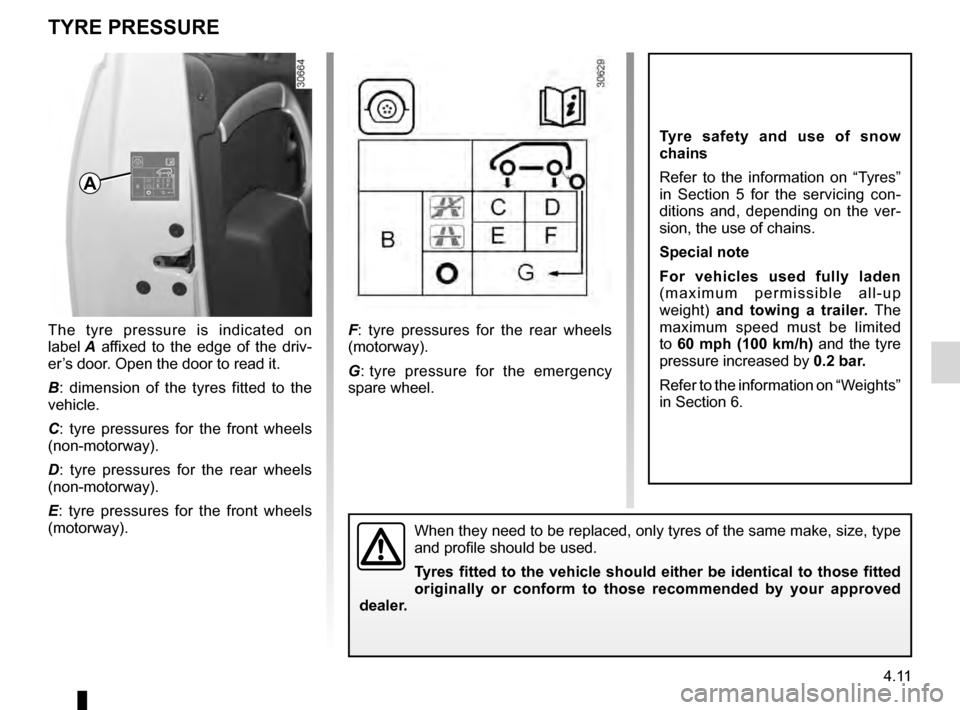
The tyre pressure is indicated on
label A
affixed to the edge of the driv-
er’s door. Open the door to read it.
B : dimension of the tyres fitted to the
vehicle.
C : tyre pressures for the front wheels
(non-motorway).
D : tyre pressures for the rear wheels
(non-motorway).
E : tyre pressures for the front wheels
(motorway). F
: tyre pressures for the rear wheels
(motorway).
G :
t
yre pressure for the emergency
spare wheel.
Tyre safety and use of snow
chains
Refer to the information on “Tyres”
in Section 5 for the servicing con-
ditions and, depending on the ver-
sion, the use of chains.
Special note
For vehicles used fully laden
( m a x i m u m p e r m i s s i b l e a l l - u p
weight) and towing a trailer. The
maximum speed must be limited
to 60 mph (100 km/h) and the tyre
pressure increased by 0.2 bar.
Refer to the information on “Weights”
in Section 6.
When they need to be replaced, only tyres of the same make, size, type
and profile should be used.
Tyres fitted to the vehicle should either be identical to those fitted
originally or conform to those recommended by your approved
dealer.
A
Page 133 of 200
5.1
ENG_UD25064_7
Sommaire 5 (H79 - Dacia)
ENG_NU_898-5_H79_Dacia_5
Section 5: Practical advice
Tools .. . . . . . . . . . . . . . . . . . . . . . . . . . . . . . . . . . . . . . . . . . . . . . . . . . . . . . . . . . . . . . . . . . . . . . . . 5.2
Puncture
.
. . . . . . . . . . . . . . . . . . . . . . . . . . . . . . . . . . . . . . . . . . . . . . . . . . . . . . . . . . . . . . . . . . . . .
5.3
T
yre inflation kit
.
. . . . . . . . . . . . . . . . . . . . . . . . . . . . . . . . . . . . . . . . . . . . . . . . . . . . . . . . . . . . . . . .
5.5
Wheel trims and wheels
.
. . . . . . . . . . . . . . . . . . . . . . . . . . . . . . . . . . . . . . . . . . . . . . . . . . . . . . . . .
5.8
Changing a wheel
.
. . . . . . . . . . . . . . . . . . . . . . . . . . . . . . . . . . . . . . . . . . . . . . . . . . . . . . . . . . . . . .
5.9
T
yres . . . . . . . . . . . . . . . . . . . . . . . . . . . . . . . . . . . . . . . . . . . . . . . . . . . . . . . . . . . . . . . . . . . . . . . . .
5.1
1
Changing bulbs
.
. . . . . . . . . . . . . . . . . . . . . . . . . . . . . . . . . . . . . . . . . . . . . . . . . . . . . . . . . . . . . . . .
5.14
Front lights
. . . . . . . . . . . . . . . . . . . . . . . . . . . . . . . . . . . . . . . . . . . . . . . . . . . . . . . . . . . . . . .
5.14
Fog lights
.
. . . . . . . . . . . . . . . . . . . . . . . . . . . . . . . . . . . . . . . . . . . . . . . . . . . . . . . . . . . . . . .
5.17
Rear lights
.
. . . . . . . . . . . . . . . . . . . . . . . . . . . . . . . . . . . . . . . . . . . . . . . . . . . . . . . . . . . . . .
5.18
Side indicator lights
.
. . . . . . . . . . . . . . . . . . . . . . . . . . . . . . . . . . . . . . . . . . . . . . . . . . . . . . .
5.21
Interior lights
. . . . . . . . . . . . . . . . . . . . . . . . . . . . . . . . . . . . . . . . . . . . . . . . . . . . . . . . . . . . . .
5.22
Fuses
. . . . . . . . . . . . . . . . . . . . . . . . . . . . . . . . . . . . . . . . . . . . . . . . . . . . . . . . . . . . . . . . . . . . . . . . .
5.25
Battery: troubleshooting. . . . . . . . . . . . . . . . . . . . . . . . . . . . . . . . . . . . \
. . . . . . . . . . . . . . . . . . . . . . .
5.28
Radio frequency remote control unit: battery. . . . . . . . . . . . . . . . . . . . . . . . . . . . . . . . . . . . \
. . . . . . .
5.30
Wiper blades
.
. . . . . . . . . . . . . . . . . . . . . . . . . . . . . . . . . . . . . . . . . . . . . . . . . . . . . . . . . . . . . . . . . .
5.31
T
owing: breakdown
.
. . . . . . . . . . . . . . . . . . . . . . . . . . . . . . . . . . . . . . . . . . . . . . . . . . . . . . . . . . . . .
5.32
T
owing: towbar. . . . . . . . . . . . . . . . . . . . . . . . . . . . . . . . . . . . \
. . . . . . . . . . . . . . . . . . . . . . . . . . . . . .
5.35
Fitted audio equipment
.
. . . . . . . . . . . . . . . . . . . . . . . . . . . . . . . . . . . . . . . . . . . . . . . . . . . . . . . . . .
5.36
Accessories
. . . . . . . . . . . . . . . . . . . . . . . . . . . . . . . . . . . . . . . . . . . . . . . . . . . . . . . . . . . . . . . . . . . .
5.38
Operating faults
. . . . . . . . . . . . . . . . . . . . . . . . . . . . . . . . . . . . . . . . . . . . . . . . . . . . . . . . . . . . . . . . .
5.39
Page 153 of 200
bulbschanging ......................................... (up to the end of the DU)
changing a bulb .................................... (up to the end of the DU)
practical advice ..................................... (up to the end of the DU)
lighting: exterior ............................................ (up to the end of the DU)
bulbs changing ......................................... (up to the end of the DU)
indicator lights....................................... (up to the end of the DU)
5.21
ENG_UD20584_2
Répétiteurs latéraux : remplacement des lampes (H79 - Dacia)
ENG_NU_898-5_H79_Dacia_5
Side indicator lights
INDICATOR LIGHTS: changing bulbs
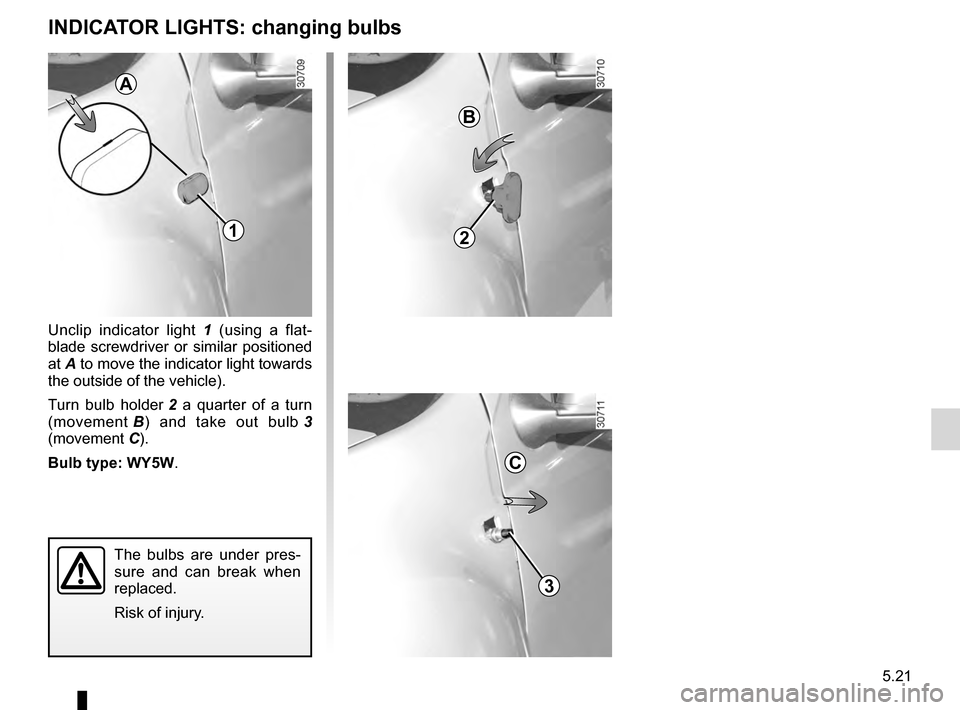
Unclip indicator light 1 (using a flat-
blade screwdriver or similar positioned
at
A
to move the indicator light towards
the outside of the vehicle).
Turn bulb holder
2
a quarter of a turn
(movement
B )
and take out bulb
3
(movement
C).
Bulb type: WY5W.
The bulbs are under pres-
sure and can break when
replaced.
Risk of injury.
A
1
B
2
3
C
Page 155 of 200
JauneNoirNoir texte
5.23
ENG_UD20702_2
Eclaireurs intérieurs : remplacement des lampes (H79 - Dacia)
ENG_NU_898-5_H79_Dacia_5
INTERIOR LIGHTS: changing bulbs (2/3)
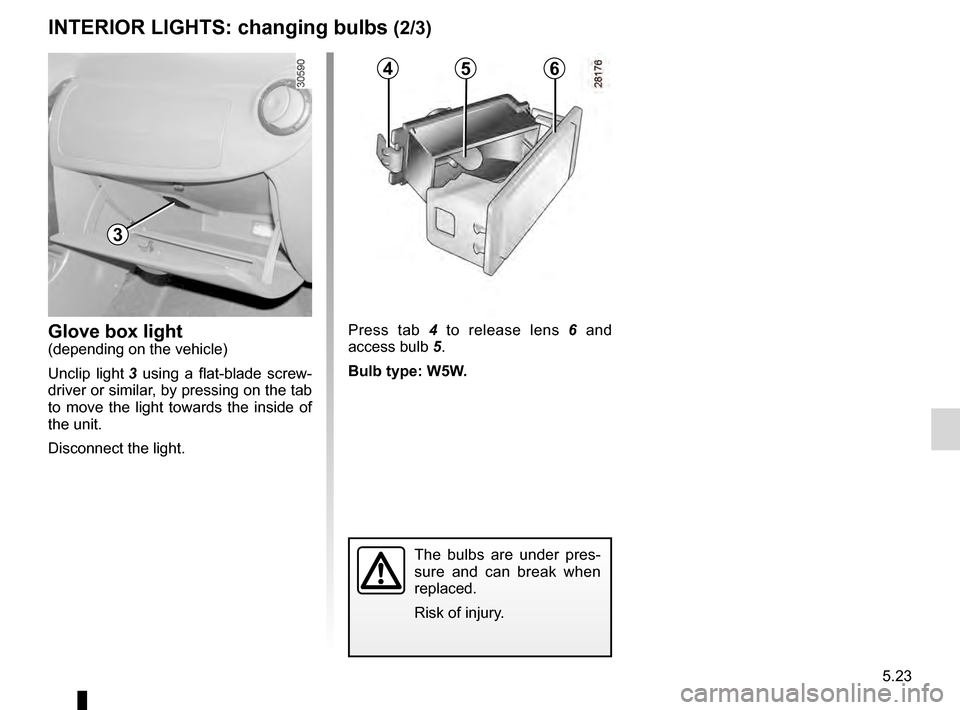
Press tab 4 to release lens 6 and
access bulb 5 .
Bulb type: W5W.Glove box light(depending on the vehicle)
Unclip light 3 using a flat-blade screw-
driver or similar, by pressing on the tab
to move the light towards the inside of
the unit.
Disconnect the light.
456
The bulbs are under pres-
sure and can break when
replaced.
Risk of injury.
3
Page 156 of 200
5.24
ENG_UD20702_2
Eclaireurs intérieurs : remplacement des lampes (H79 - Dacia)
ENG_NU_898-5_H79_Dacia_5
INTERIOR LIGHTS: changing bulbs (3/3)
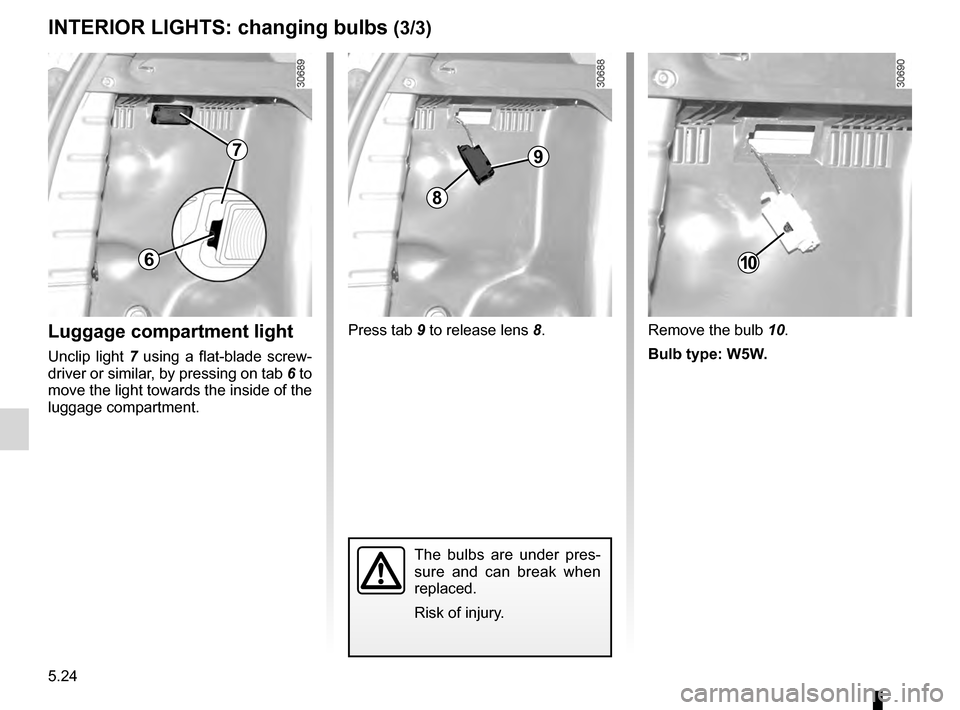
Luggage compartment light
Unclip light 7 using a flat-blade screw-
driver or similar, by pressing on tab 6 to
move the light towards the inside of the
luggage compartment.
The bulbs are under pres-
sure and can break when
replaced.
Risk of injury.
Remove the bulb 10 .
Bulb type: W5W.
Press tab
9 to release lens
8
.
6
7
8
9
10
Page 164 of 200
towing hitch........................................... (up to the end of the DU)
practical advice ..................................... (up to the end of the DU)
towing breakdown ...................................... (up to the end of the DU)
5.32
ENG_UD22437_4
Remorquage : dépannage (H79 - Dacia)
ENG_NU_898-5_H79_Dacia_5
Jaune NoirNoir texte
Towing: troubleshooting
TOWING: breakdown (1/3)
Towing procedure
The steering wheel must be un-
locked and the ignition key must be
in position M (ignition on) to pro-
vide stop lights and hazard warning
lights on the towed vehicle. At night
the vehicle must have its lights on.
Unhitch the trailer, etc., if one is being
towed.
You must observe the towing regu-
lations which apply in the country in
which you are driving: do not exceed
the towing weight for your vehicle.
Contact an approved Dealer.
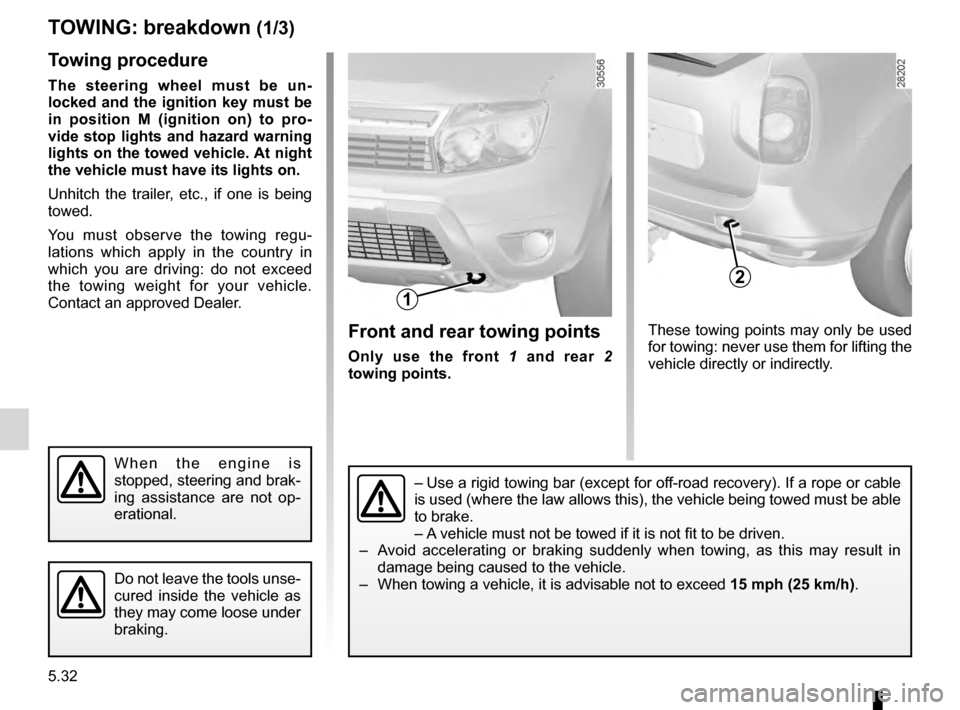
Front and rear towing points
Only use the front 1 and rear 2
towing points.
W h e n t h e e n g i n e i s
stopped, steering and brak-
ing assistance are not op-
erational.
Do not leave the tools unse-
cured inside the vehicle as
they may come loose under
braking.
– Use a rigid towing bar (except for off-road recovery). If a rope or cable
is used (where the law allows this), the vehicle being towed must be able
to brake.
–
A
vehicle must not be towed if it is not fit to be driven.
–
A
void accelerating or braking suddenly when towing, as this may result in
damage being caused to the vehicle.
–
When towing a vehicle, it is advisable not to exceed 15 mph (25
km/h).
These towing points may only be used
for towing: never use them for lifting the
vehicle directly or indirectly.
1
2