set tp DACIA DUSTER 2015 Owner's Manual
[x] Cancel search | Manufacturer: DACIA, Model Year: 2015, Model line: DUSTER, Model: DACIA DUSTER 2015Pages: 244, PDF Size: 3.57 MB
Page 119 of 244
Downloaded from www.Manualslib.com manuals search engine JauneNoir Noir texte
2.37
ENG_UD33904_1
Boîte de vitesses automatique (H79 Ph2 - Dacia)
ENG_NU_1079-3_H79Ph2_Dacia_2
AUTOMATIC TRANSMISSION (3/3)
– If the road contour and bends in
the road do not allow you to stay in
automatic mode (e.g.: in mountain-
ous areas), it is recommended that
you switch to manual mode.
This will prevent the automatic gear-
box from changing gears repeatedly
when climbing, and permit engine
braking on long descents.
– In cold weather, start the engine
and wait a few seconds before
moving the selector lever from posi-
tion P or N and engaging it in D or R
to prevent the engine stalling.
– Vehicles not fitted with traction
control: on a slippery surface or
surface with a low level of adhesion,
change to manual mode and select
second gear (or even third) before
starting the engine to avoid wheel-
spin when accelerating.Parking the vehicleWhen the vehicle is stopped, move the
lever to position P while keeping your
foot on the brake pedal: the gearbox is
in neutral and the drive wheels are me-
chanically locked by the driveshaft.
Apply the handbrake.
Operating faults
If a vehicle with an automatic gear-
box breaks down, please refer to the
information on “Towing” in Section 5.
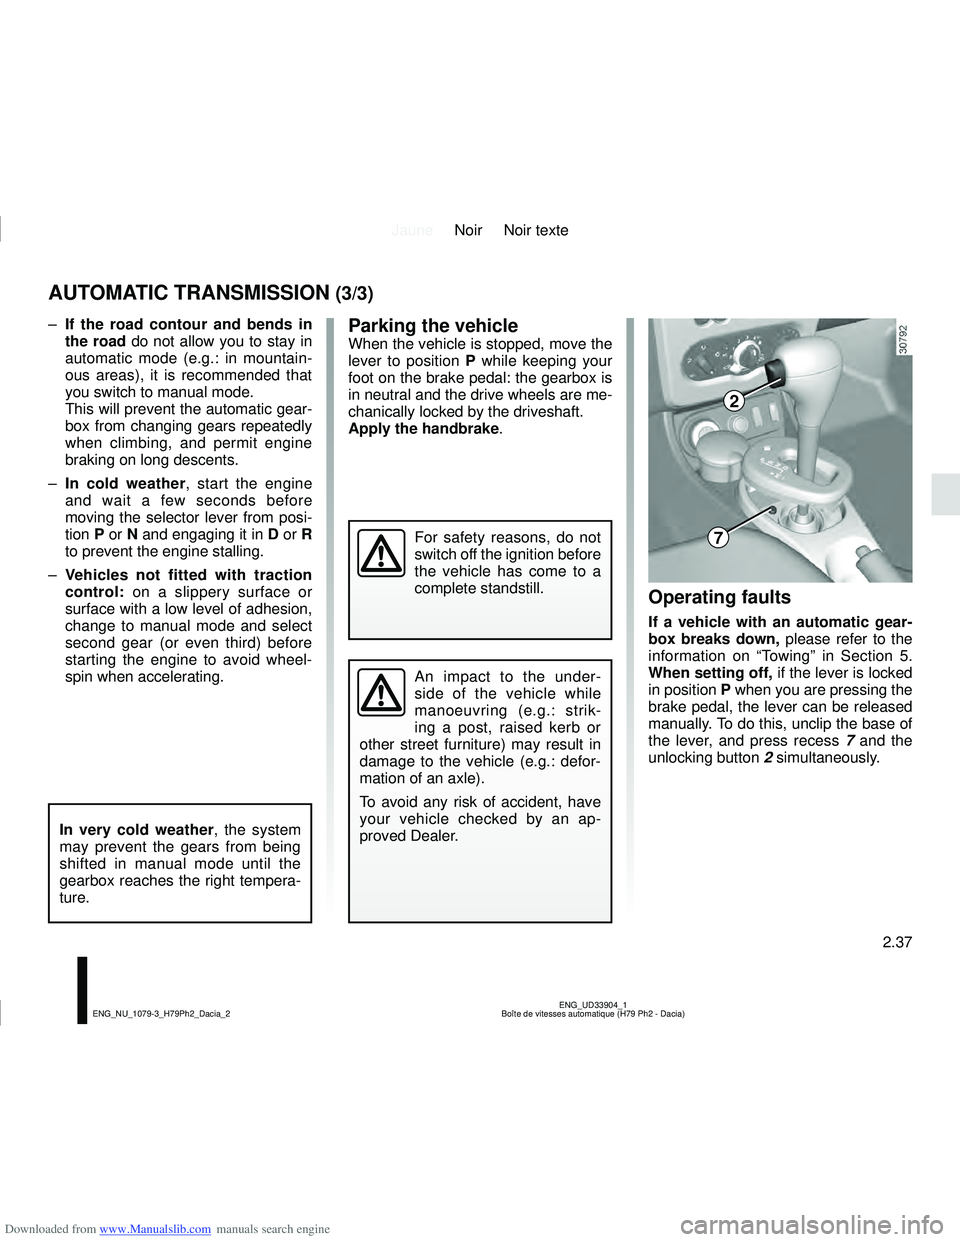
When setting off, if the lever is locked
in position P when you are pressing the
brake pedal, the lever can be released
manually. To do this, unclip the base of
the lever, and press recess 7 and the
unlocking button 2 simultaneously.
In very cold weather, the system
may prevent the gears from being
shifted in manual mode until the
gearbox reaches the right tempera-
ture.
An impact to the under-
side of the vehicle while
manoeuvring (e.g.: strik-
ing a post, raised kerb or
other street furniture) may result in
damage to the vehicle (e.g.: defor-
mation of an axle).
To avoid any risk of accident, have
your vehicle checked by an ap-
proved Dealer.
For safety reasons, do not
switch off the ignition before
the vehicle has come to a
complete standstill.
2
7
Page 126 of 244
Downloaded from www.Manualslib.com manuals search engine JauneNoir Noir texte
3.4
ENG_UD32151_1
Chauffage - Ventilation - Air conditionné (H79 - Dacia)
ENG_NU_1079-3_H79Ph2_Dacia_3
HEATING, VENTILATION, AIR CONDITIONING (1/3)
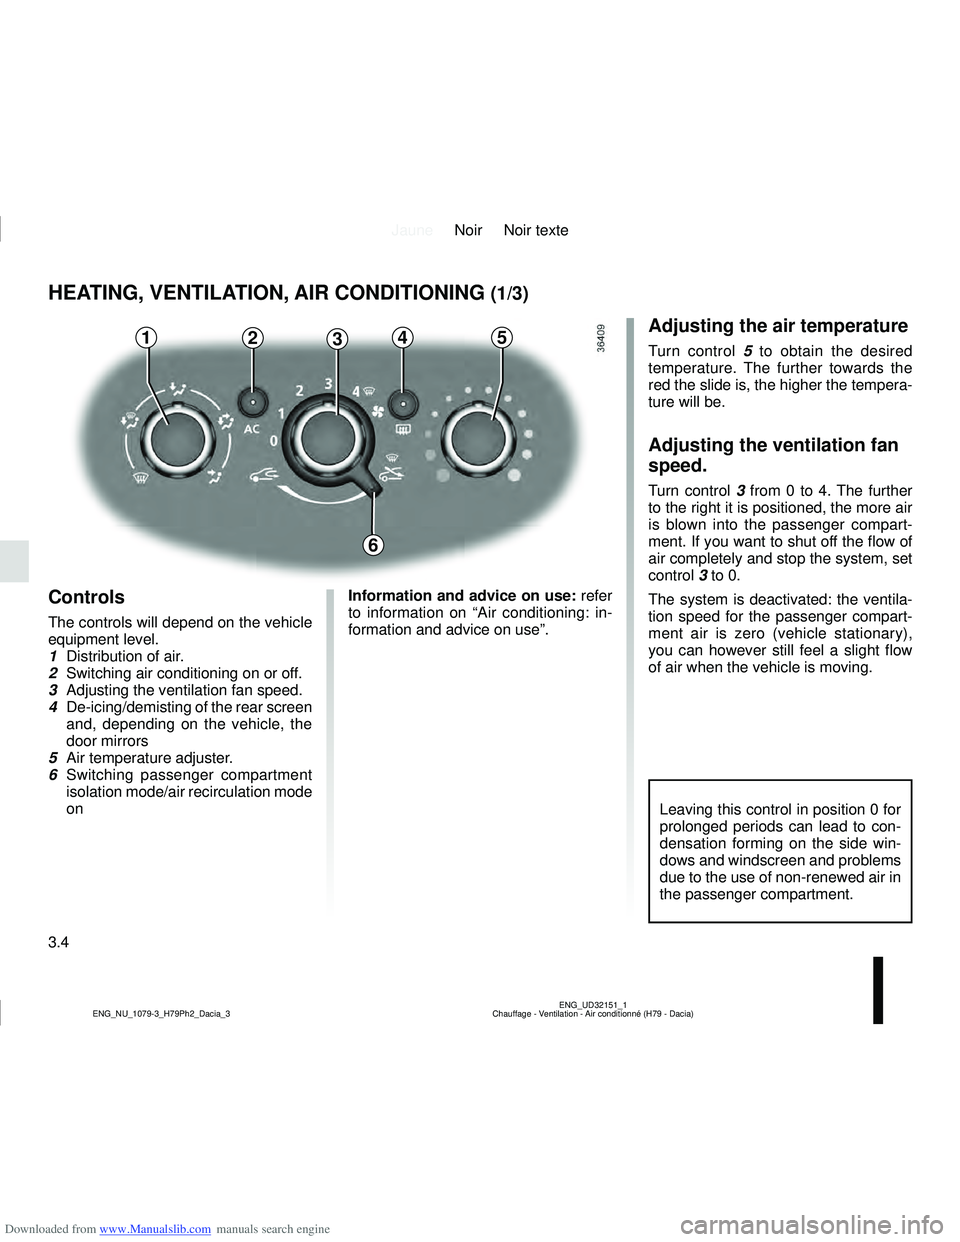
23415
Controls
The controls will depend on the vehicle
equipment level.
1 Distribution of air.
2 Switching air conditioning on or off.
3 Adjusting the ventilation fan speed.
4 De-icing/demisting of the rear screen
and, depending on the vehicle, the
door mirrors
5 Air temperature adjuster.
6 Switching passenger compartment isolation mode/air recirculation mode
on Information and advice on use:
refer
to information on “Air conditioning: in-
formation and advice on use”.
Adjusting the air temperature
Turn control 5 to obtain the desired
temperature. The further towards the
red the slide is, the higher the tempera-
ture will be.
Adjusting the ventilation fan
speed.
Turn control 3 from 0 to 4. The further
to the right it is positioned, the more air
is blown into the passenger compart-
ment. If you want to shut off the flow of
air completely and stop the system, set
control 3 to 0.
The system is deactivated: the ventila-
tion speed for the passenger compart-
ment air is zero (vehicle stationary),
you can however still feel a slight flow
of air when the vehicle is moving.
Leaving this control in position 0 for
prolonged periods can lead to con-
densation forming on the side win-
dows and windscreen and problems
due to the use of non-renewed air in
the passenger compartment.
6
Page 128 of 244
Downloaded from www.Manualslib.com manuals search engine JauneNoir Noir texte
3.6
ENG_UD32151_1
Chauffage - Ventilation - Air conditionné (H79 - Dacia)
ENG_NU_1079-3_H79Ph2_Dacia_3
HEATING, VENTILATION, AIR CONDITIONING (3/3)
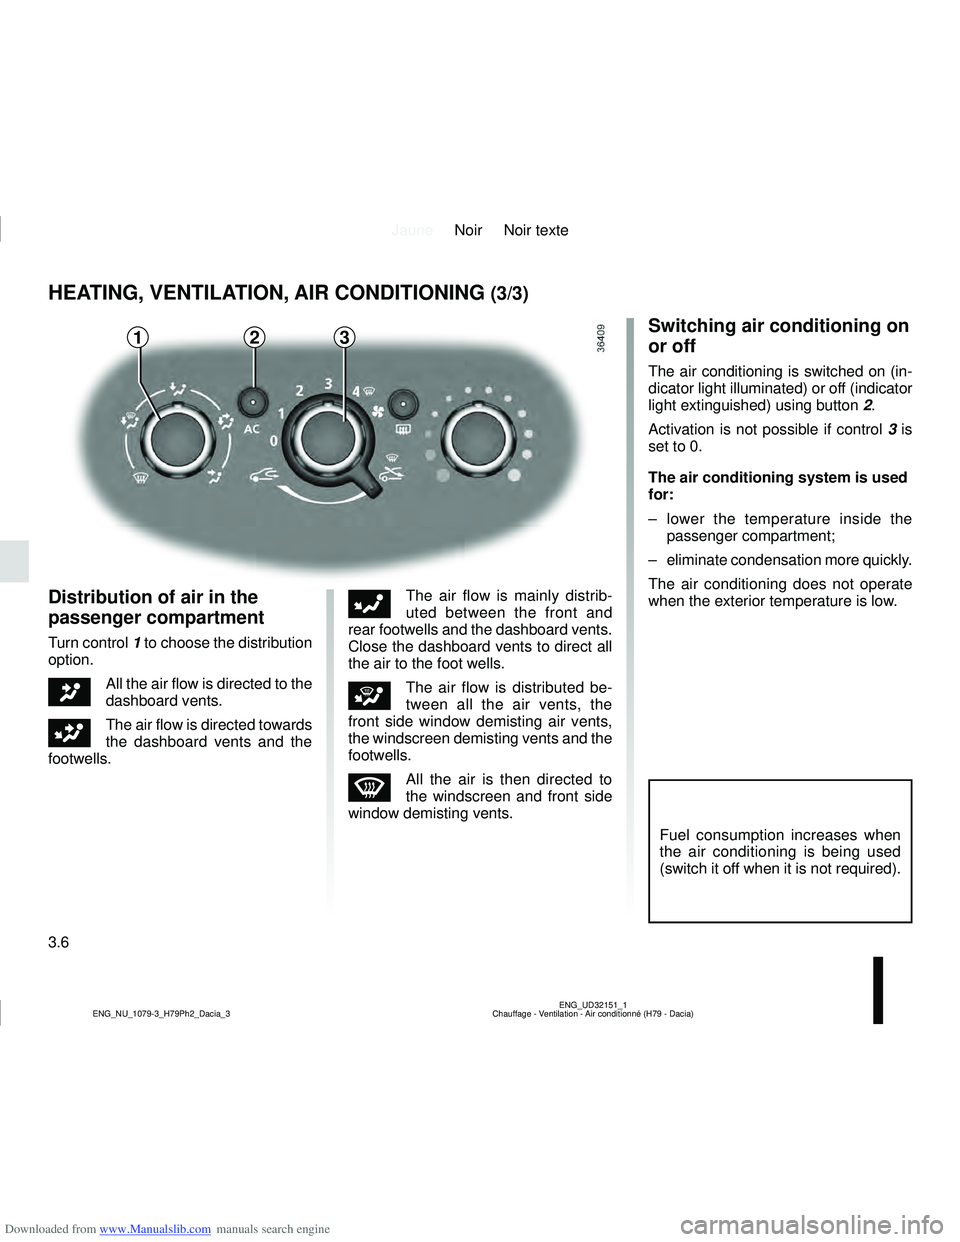
2
Distribution of air in the
passenger compartment
Turn control 1 to choose the distribution
option.
JAll the air flow is directed to the
dashboard vents.
GThe air flow is directed towards
the dashboard vents and the
footwells.
FThe air flow is mainly distrib-
uted between the front and
rear footwells and the dashboard vents.
Close the dashboard vents to direct all
the air to the foot wells.
iThe air flow is distributed be-
tween all the air vents, the
front side window demisting air vents,
the windscreen demisting vents and the
footwells.
WAll the air is then directed to
the windscreen and front side
window demisting vents.
Switching air conditioning on
or off
The air conditioning is switched on (in-
dicator light illuminated) or off (indicator
light extinguished) using button 2.
Activation is not possible if control 3 is
set to 0.
The air conditioning system is used
for:
– lower the temperature inside the passenger compartment;
– eliminate condensation more quickly.
The air conditioning does not operate
when the exterior temperature is low.
Fuel consumption increases when
the air conditioning is being used
(switch it off when it is not required).
13
Page 129 of 244
Downloaded from www.Manualslib.com manuals search engine JauneNoir Noir texte
3.7
ENG_UD18246_14
Air conditionné : informations et conseils utilisation (B90 - U90 - \
L90 Ph2 - F90 Ph2 - R90 Ph2 - H79 - Dacia)
ENG_NU_1079-3_H79Ph2_Dacia_3
AIR CONDITIONING: information and advice on use
Fuel consumption
You will normally notice an increase
in fuel consumption (especially
when driving in town) when the air
conditioning is operating.
For vehicles fitted with air condition-
ing with no automatic mode, switch
off the system when it is not re-
quired.
Advice for reducing consumption
and helping to preserve the envi-
ronment
Drive with the air vents open and
the windows closed.
If the vehicle has been parked in
the sun, open the doors for a few
moments to let the hot air escape
before starting the engine. Operating faults
As a general rule, contact your ap-
proved dealer in the event of an op-
erating fault.
– Reduction in de-icing, demist-
ing or air conditioning per-
formance.
This may be caused by the pas-
senger compartment filter car-
tridge becoming clogged.
– No cold air is being produced .
Check that the controls are set
correctly and that the fuses are
sound. Otherwise, switch off the
system.
Do not open the refriger-
ant fluid circuit. The fluid
may damage eyes or skin.Presence of water under the ve-
hicle. After prolonged use of the air
conditioning system, it is normal for
water to be present under the vehi-
cle. This is caused by condensation.Maintenance
Refer to the Maintenance Document
for your vehicle for the inspection
frequency.
Page 138 of 244
Downloaded from www.Manualslib.com manuals search engine JauneNoir Noir texte
3.16
ENG_UD32112_1
Appuis-tête arrière (H79 - Dacia)
ENG_NU_1079-3_H79Ph2_Dacia_3
REAR HEADRESTS
The headrest is a safety
component. Ensure that it is
fitted and in the correct po-
sition: the top of your head
should be in line with the top of the
headrest.
C
1
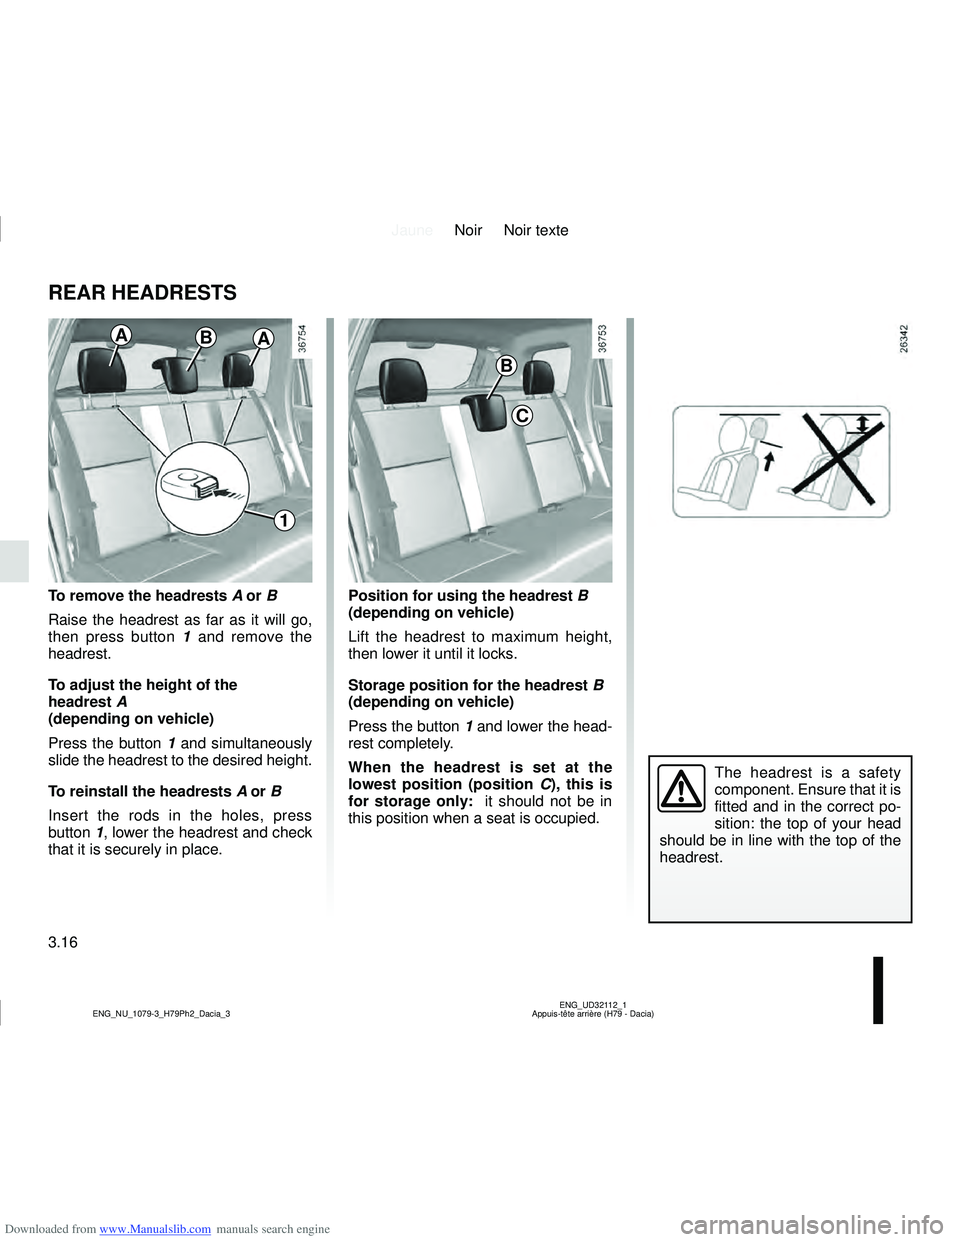
To remove the headrests A or B
Raise the headrest as far as it will go,
then press button 1 and remove the
headrest.
To adjust the height of the
headrest A
(depending on vehicle)
Press the button 1 and simultaneously
slide the headrest to the desired height.
To reinstall the headrests A or B
Insert the rods in the holes, press
button 1, lower the headrest and check
that it is securely in place. Position for using the headrest
B
(depending on vehicle)
Lift the headrest to maximum height,
then lower it until it locks.
Storage position for the headrest B
(depending on vehicle)
Press the button 1 and lower the head-
rest completely.
When the headrest is set at the
lowest position (position C ), this is
for storage only: it should not be in
this position when a seat is occupied.
BAA
B
Page 158 of 244
Downloaded from www.Manualslib.com manuals search engine JauneNoir Noir texte
4.6
ENG_UD34980_2
Niveau huile moteur : appoint / remplissage (H79 Ph2 - Dacia)
ENG_NU_1079-3_H79Ph2_Dacia_4
ENGINE OIL LEVEL: topping up, filling (3/3)
Never run the engine in an
enclosed space as exhaust
gases are poisonous.
Resetting the alert after an oil
change
(depending on the vehicle)
If you change the oil yourself, you will
need to reset the oil change warning.
To do this, after switching on the igni-
tion, for ten seconds you must:
– Depress the accelerator pedal fully,
– with your foot on the accelerator,
depress the brake pedal three times
in succession.
Reinitialisation is complete when the
# indicator light goes out. If this is
not the case, repeat the operation.
Special case: if you change the oil
before the oil change interval excee-
ded warning is displayed, it will also be
necessary to reset the display. In this
case, the
# warning light comes on
for approximately 5 seconds to confirm
the reset.
The engine may be hot
during operations in close
proximity. In addition, the
engine cooling fan may
come on at any moment.
Risk of injury.
Exceeding the maximum
engine oil level
Under no circumstances
must the maximum fill level
be exceeded: risk of damage to the
engine and catalytic converter.
If the oil level exceeds the maximum
level, do not start your vehicle .
Contact an authorised dealer.
Page 162 of 244
Downloaded from www.Manualslib.com manuals search engine JauneNoir Noir texte
4.10
ENG_UD20151_3
Filtres (B90 - U90 - L90 Ph2 - F90 Ph2 - R90 Ph2 - H79 - Dacia)
ENG_NU_1079-3_H79Ph2_Dacia_4
FILTERS
The replacement of filter elements (air
filter, passenger compartment filter,
diesel filter, etc.) is scheduled in the
maintenance operations for your vehi-
cle.
Replacement intervals for filter el-
ements: refer to the Maintenance
Document for your vehicle.
Passenger compartment filter
If your vehicle is not originally fitted with
a passenger compartment filter, it is
possible to have one retrofitted.
Contact an approved dealer.
The engine may be hot
when carrying out opera-
tions in close proximity. In
addition, the engine cooling
fan can come on at any moment.
Risk of injury.
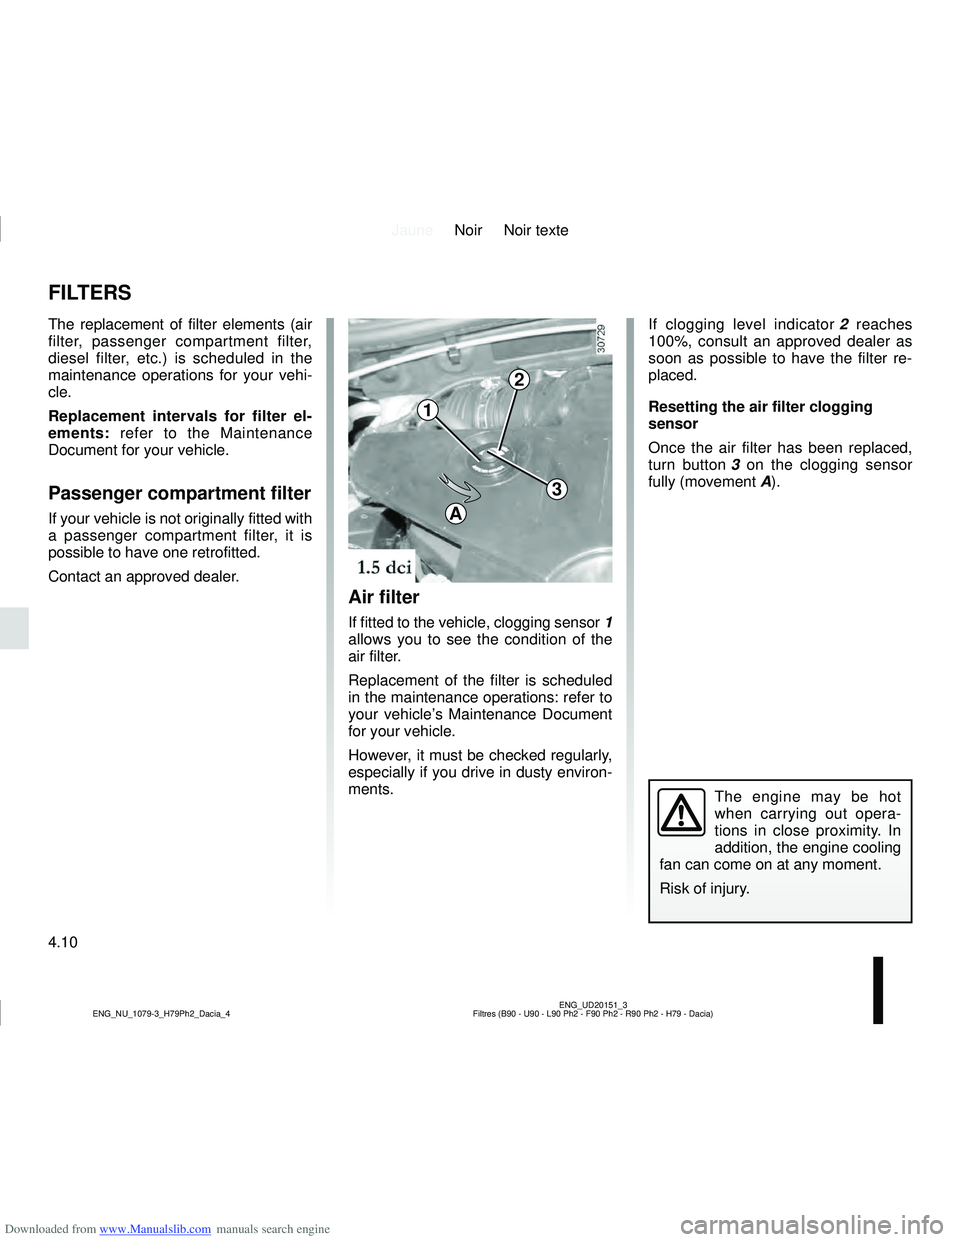
Air filter
If fitted to the vehicle, clogging sensor 1
allows you to see the condition of the
air filter.
Replacement of the filter is scheduled
in the maintenance operations: refer to
your vehicle’s Maintenance Document
for your vehicle.
However, it must be checked regularly,
especially if you drive in dusty environ-
ments.
If clogging level indicator 2 reaches
100%, consult an approved dealer as
soon as possible to have the filter re-
placed.
Resetting the air filter clogging
sensor
Once the air filter has been replaced,
turn button 3 on the clogging sensor
fully (movement A).
1
2
3
A
Page 184 of 244
Downloaded from www.Manualslib.com manuals search engine JauneNoir Noir texte
5.16
ENG_UD35430_2
Feux avant : remplacement des lampes (H79 Ph2 - Dacia)
ENG_NU_1079-3_H79Ph2_Dacia_5
FRONT LIGHTS: changing bulbs (2/4)
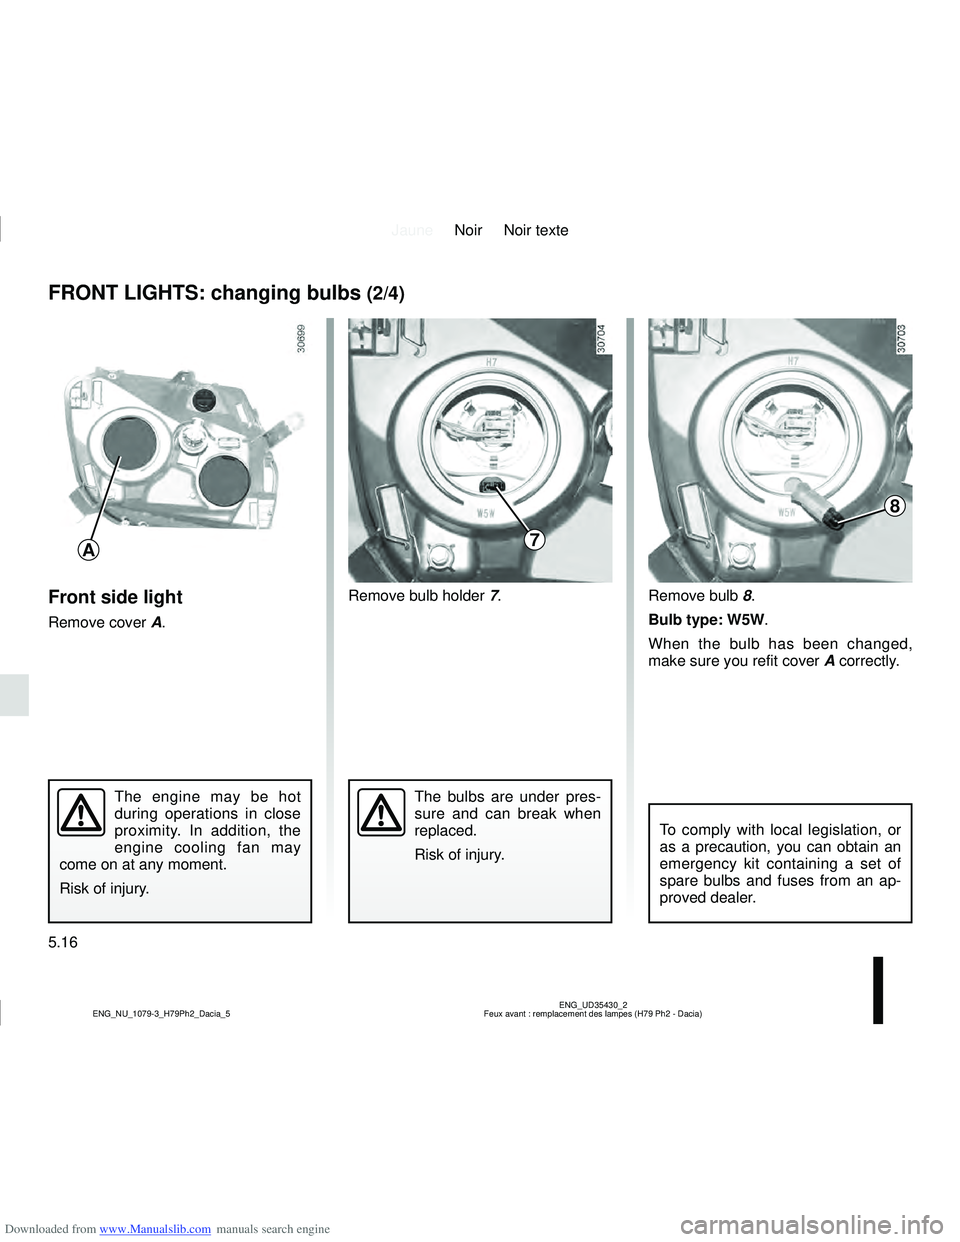
Front side light
Remove cover A.
To comply with local legislation, or
as a precaution, you can obtain an
emergency kit containing a set of
spare bulbs and fuses from an ap-
proved dealer.
The bulbs are under pres-
sure and can break when
replaced.
Risk of injury.
Remove bulb holder 7. Remove bulb 8.
Bulb type: W5W.
When the bulb has been changed,
make sure you refit cover A correctly.
The engine may be hot
during operations in close
proximity. In addition, the
engine cooling fan may
come on at any moment.
Risk of injury.
A7
8
Page 186 of 244
Downloaded from www.Manualslib.com manuals search engine JauneNoir Noir texte
5.18
ENG_UD35430_2
Feux avant : remplacement des lampes (H79 Ph2 - Dacia)
ENG_NU_1079-3_H79Ph2_Dacia_5
FRONT LIGHTS: changing bulbs (4/4)
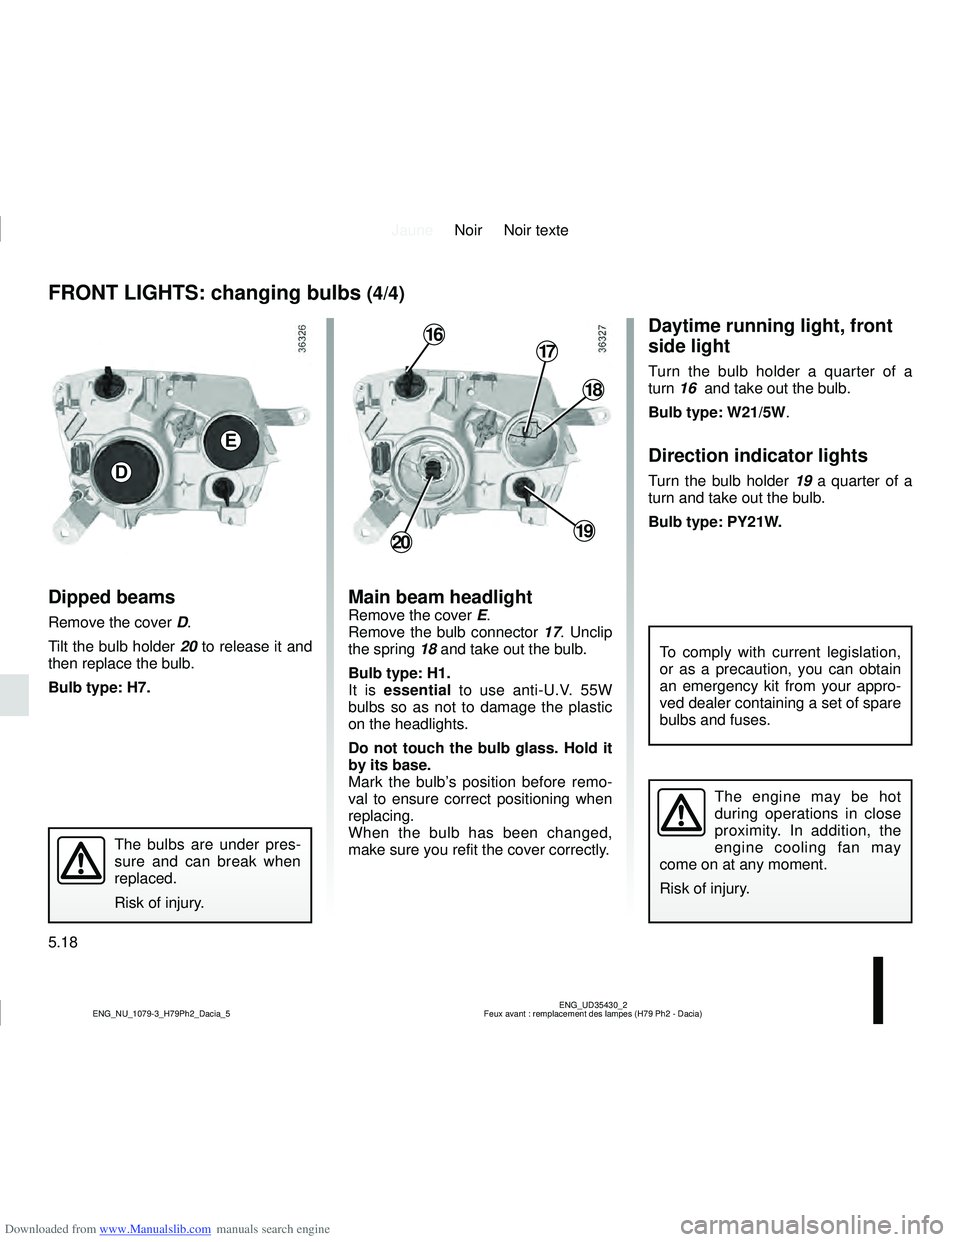
Dipped beams
Remove the cover D.
Tilt the bulb holder 20 to release it and
then replace the bulb.
Bulb type: H7.
Main beam headlightRemove the cover E.
Remove the bulb connector 17. Unclip
the spring 18 and take out the bulb.
Bulb type: H1.
It is essential to use anti-U.V. 55W
bulbs so as not to damage the plastic
on the headlights.
Do not touch the bulb glass. Hold it
by its base.
Mark the bulb’s position before remo-
val to ensure correct positioning when
replacing.
When the bulb has been changed,
make sure you refit the cover correctly.
Daytime running light, front
side light
Turn the bulb holder a quarter of a
turn 16 and take out the bulb.
Bulb type: W21/5W.
Direction indicator lights
Turn the bulb holder 19 a quarter of a
turn and take out the bulb.
Bulb type: PY21W.D
E
20
16
18
17
19
The engine may be hot
during operations in close
proximity. In addition, the
engine cooling fan may
come on at any moment.
Risk of injury.
To comply with current legislation,
or as a precaution, you can obtain
an emergency kit from your appro-
ved dealer containing a set of spare
bulbs and fuses.
The bulbs are under pres-
sure and can break when
replaced.
Risk of injury.
Page 187 of 244
Downloaded from www.Manualslib.com manuals search engine JauneNoir Noir texte
5.19
ENG_UD32185_1
Projecteurs antibrouillard : remplacement des lampes (H79 Ph2 - Dacia)\
ENG_NU_1079-3_H79Ph2_Dacia_5
Additional lights
If you wish to fit fog lights to your ve-
hicle, please see an authorised dealer.
FOG LIGHTS: changing bulbs
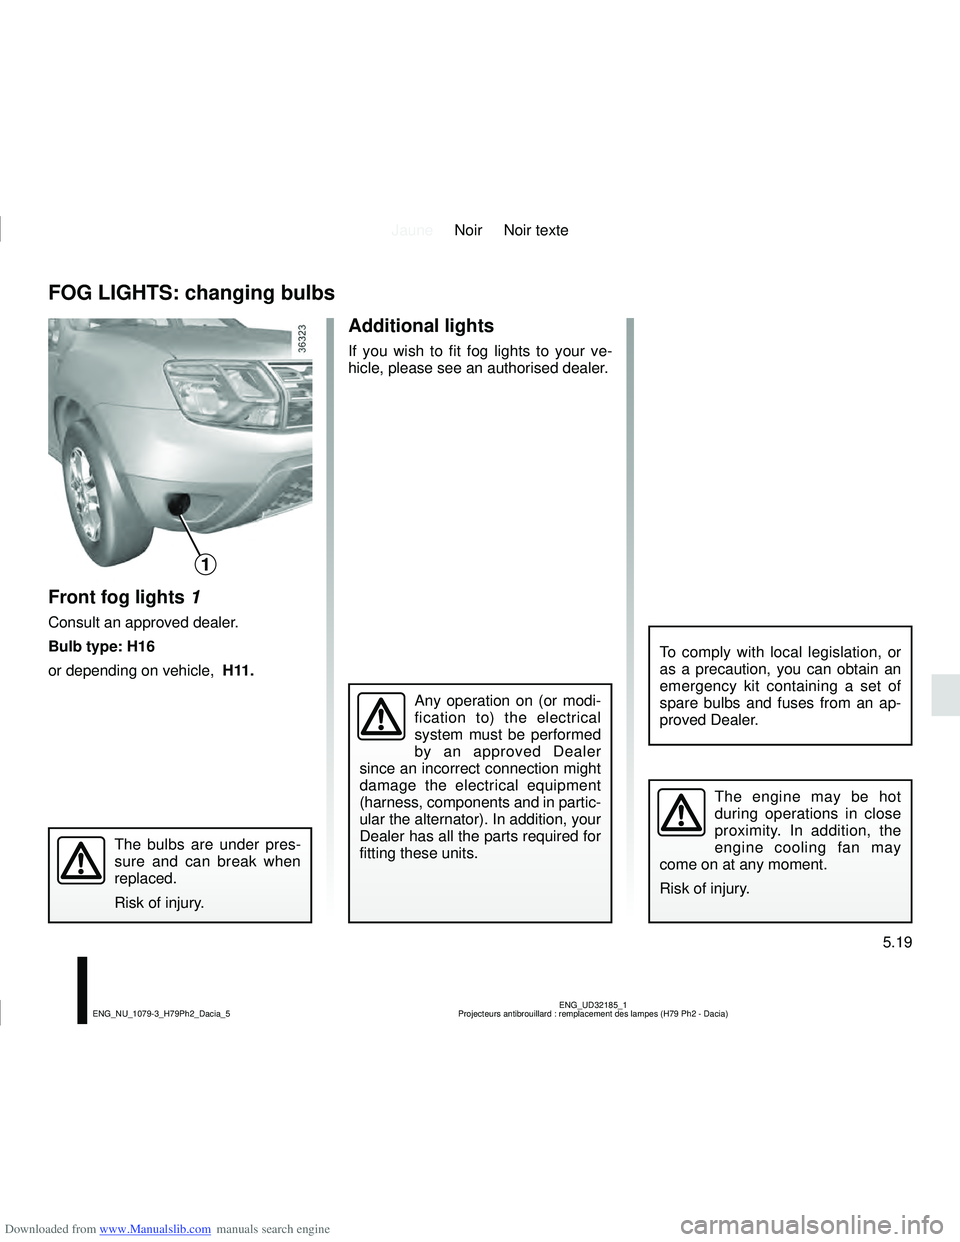
Front fog lights 1
Consult an approved dealer.
Bulb type: H16
or depending on vehicle, H11.
Any operation on (or modi-
fication to) the electrical
system must be performed
by an approved Dealer
since an incorrect connection might
damage the electrical equipment
(harness, components and in partic-
ular the alternator). In addition, your
Dealer has all the parts required for
fitting these units.
The engine may be hot
during operations in close
proximity. In addition, the
engine cooling fan may
come on at any moment.
Risk of injury.
The bulbs are under pres-
sure and can break when
replaced.
Risk of injury.
1
To comply with local legislation, or
as a precaution, you can obtain an
emergency kit containing a set of
spare bulbs and fuses from an ap-
proved Dealer.