engine DACIA DUSTER 2016 1.G Repair Manual
[x] Cancel search | Manufacturer: DACIA, Model Year: 2016, Model line: DUSTER, Model: DACIA DUSTER 2016 1.GPages: 254, PDF Size: 18.85 MB
Page 167 of 254
JauneNoir Noir texte
4.9
ENG_UD37390_3
Niveaux (H79 - H79 Ph2 - Dacia) ENG_NU_1079-6_H79Ph2_Dacia_4
LEVELS (2/3)
Coolant level checking frequency
Check the coolant level regularly
(very severe damage is likely to be
caused to the engine if it runs out of
coolant).
If the level needs to be topped up, only
use products approved by our Technical
Department which ensure:
– protection against freezing;
– anticorrosion protection of the cool-
ing system.
Replacement intervals
Refer to the Maintenance Document for
your vehicle.
No operations should be
carried out on the cooling
circuit when the engine is
hot.
Risk of burns.
Consult your approved dealer at
once if you notice an abnormal or
repeated drop in any of the fluid
levels.
The engine may be hot
when carrying out opera-
tions in close proximity. In
addition, the engine cooling
fan can come on at any moment.
Risk of injury.
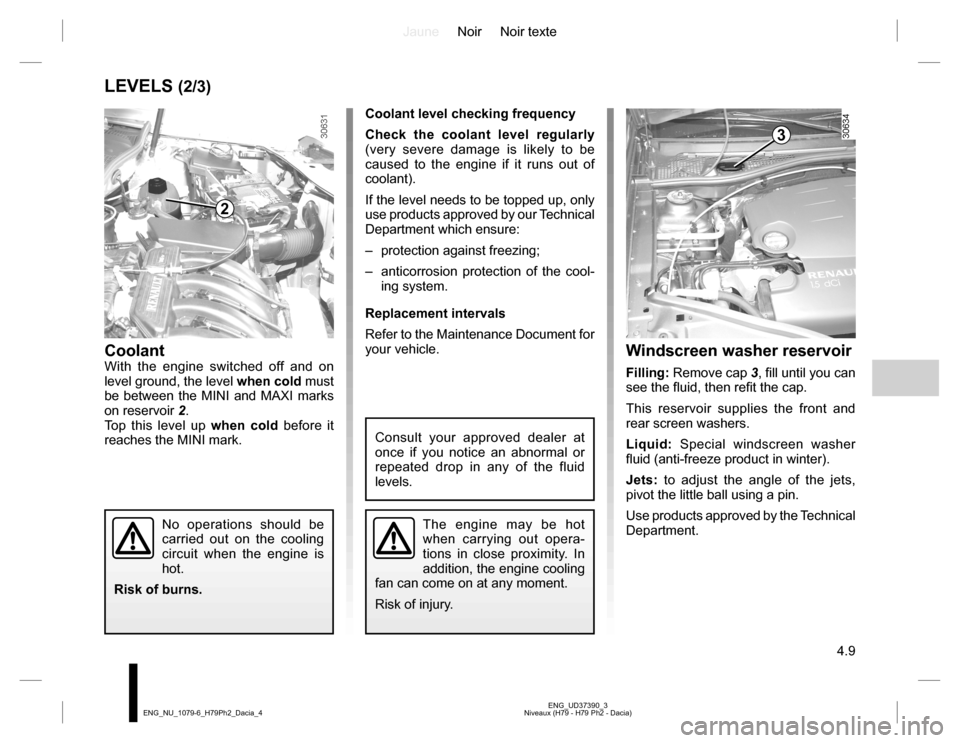
Windscreen washer reservoir
Filling: Remove cap 3, fill until you can
see the fluid, then refit the cap.
This reservoir supplies the front and
rear screen washers.
Liquid: Special windscreen washer
fluid (anti-freeze product in winter).
Jets: to adjust the angle of the jets,
pivot the little ball using a pin.
Use products approved by the Technical
Department.
CoolantWith the engine switched off and on
level ground, the level when cold must
be between the MINI and MAXI marks
on reservoir 2.
Top this level up when cold before it
reaches the MINI mark.
2
3
Page 168 of 254
JauneNoir Noir texte
4.10
ENG_UD37390_3
Niveaux (H79 - H79 Ph2 - Dacia) ENG_NU_1079-6_H79Ph2_Dacia_4
LEVELS (3/3)
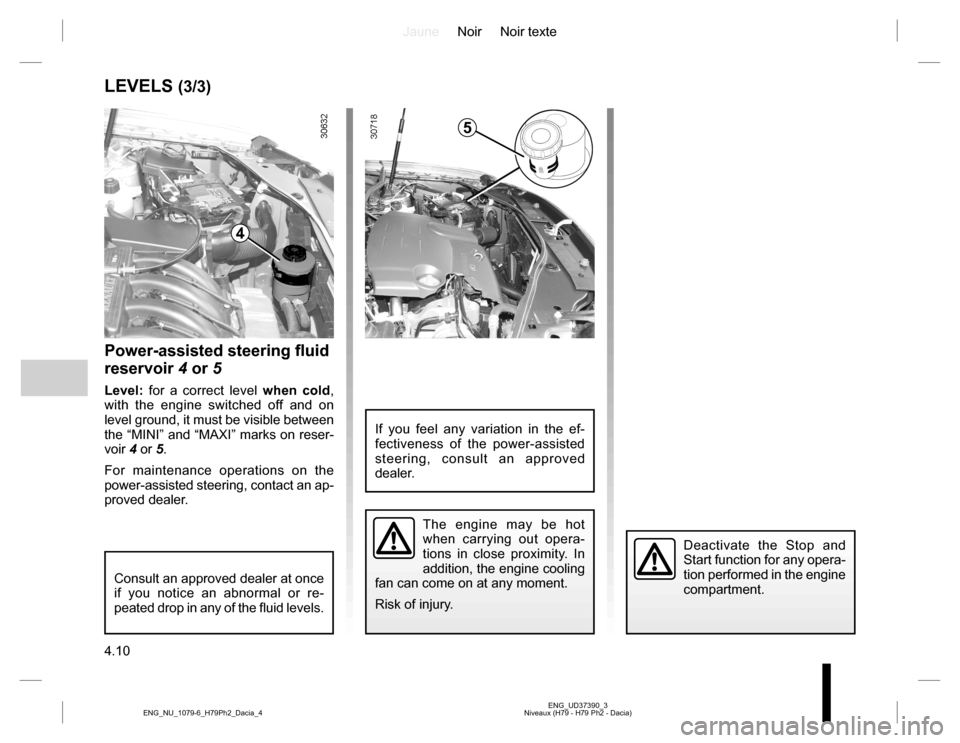
Power-assisted steering fluid
reservoir 4 or 5
Level: for a correct level when cold,
with the engine switched off and on
level ground, it must be visible between
the “MINI” and “MAXI” marks on reser-
voir 4 or 5.
For maintenance operations on the
power-assisted steering, contact an ap-
proved dealer.
The engine may be hot
when carrying out opera-
tions in close proximity. In
addition, the engine cooling
fan can come on at any moment.
Risk of injury.
Consult an approved dealer at once
if you notice an abnormal or re-
peated drop in any of the fluid levels.
If you feel any variation in the ef-
fectiveness of the power-assisted
steering, consult an approved
dealer.
5
4
Deactivate the Stop and
Start function for any opera-
tion performed in the engine
compartment.
Page 169 of 254
JauneNoir Noir texte
4.11
ENG_UD37393_1
Filtres (H79 Ph2 - Dacia) ENG_NU_1079-6_H79Ph2_Dacia_4
FILTERS
The replacement of filter elements (air
filter, passenger compartment filter,
diesel filter, etc.) is scheduled in the
maintenance operations for your vehi-
cle.
Replacement intervals for filter el-
ements: refer to the Maintenance
Document for your vehicle.
Passenger compartment filter
If your vehicle is not originally fitted with
a passenger compartment filter, it is
possible to have one retrofitted.
Contact an approved dealer.
The engine may be hot
when carrying out opera-
tions in close proximity. In
addition, the engine cooling
fan can come on at any moment.
Risk of injury.
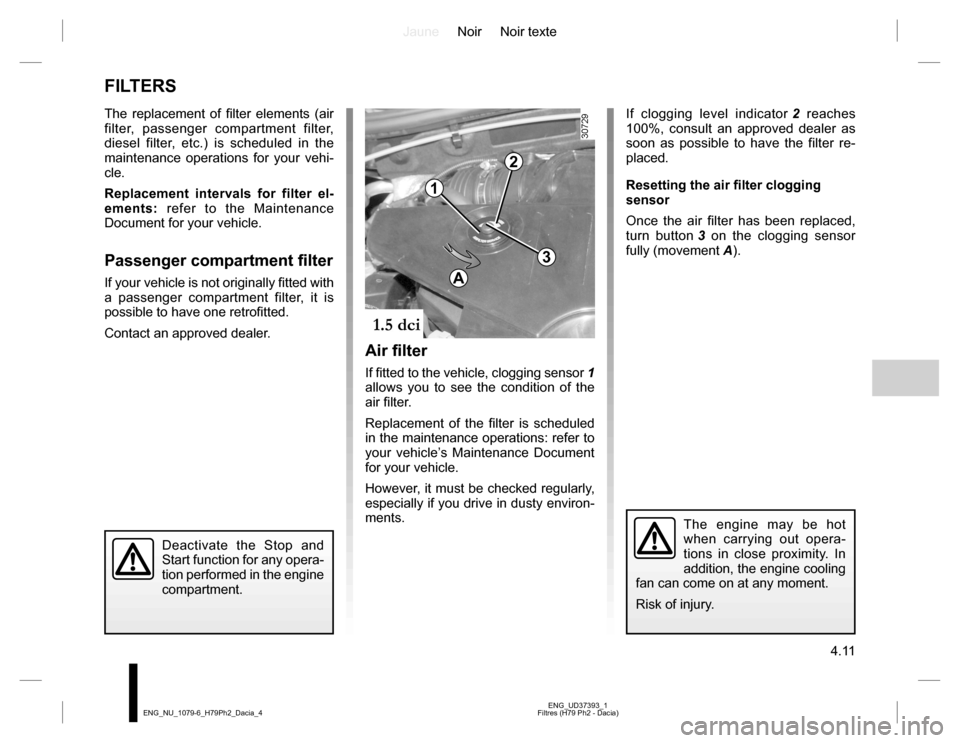
Air filter
If fitted to the vehicle, clogging sensor 1
allows you to see the condition of the
air filter.
Replacement of the filter is scheduled
in the maintenance operations: refer to
your vehicle’s Maintenance Document
for your vehicle.
However, it must be checked regularly,
especially if you drive in dusty environ-
ments.
If clogging level indicator 2 reaches
100%, consult an approved dealer as
soon as possible to have the filter re-
placed.
Resetting the air filter clogging
sensor
Once the air filter has been replaced,
turn button 3 on the clogging sensor
fully (movement A).
1
2
3
A
Deactivate the Stop and
Start function for any opera-
tion performed in the engine
compartment.
Page 172 of 254
JauneNoir Noir texte
4.14
ENG_UD37394_2
Batterie (H79 Ph2 - Dacia) ENG_NU_1079-6_H79Ph2_Dacia_4
BATTERY (1/2)
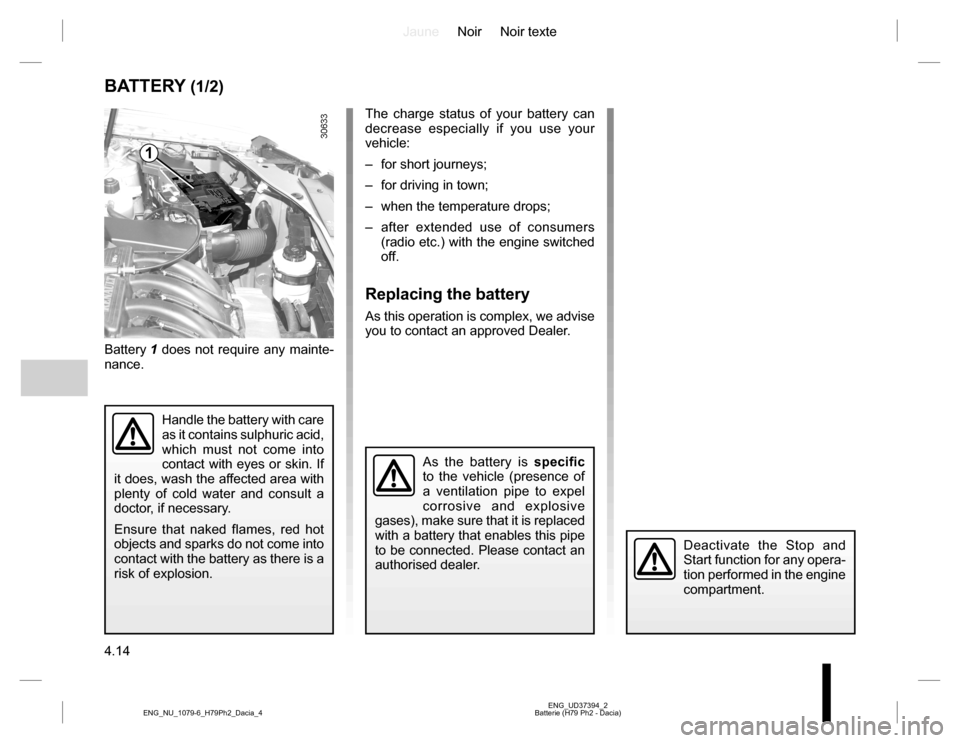
Battery 1 does not require any mainte-
nance.
Handle the battery with care
as it contains sulphuric acid,
which must not come into
contact with eyes or skin. If
it does, wash the affected area with
plenty of cold water and consult a
doctor, if necessary.
Ensure that naked flames, red hot
objects and sparks do not come into
contact with the battery as there is a
risk of explosion.
1
The charge status of your battery can
decrease especially if you use your
vehicle:
– for short journeys;
– for driving in town;
– when the temperature drops;
– after extended use of consumers
(radio etc.) with the engine switched
off.
Replacing the battery
As this operation is complex, we advise
you to contact an approved Dealer.
As the battery is specific
to the vehicle (presence of
a ventilation pipe to expel
corrosive and explosive
gases), make sure that it is replaced
with a battery that enables this pipe
to be connected. Please contact an
authorised dealer.
Deactivate the Stop and
Start function for any opera-
tion performed in the engine
compartment.
Page 173 of 254
JauneNoir Noir texte
4.15
ENG_UD37394_2
Batterie (H79 Ph2 - Dacia) ENG_NU_1079-6_H79Ph2_Dacia_4
BATTERY (2/2)
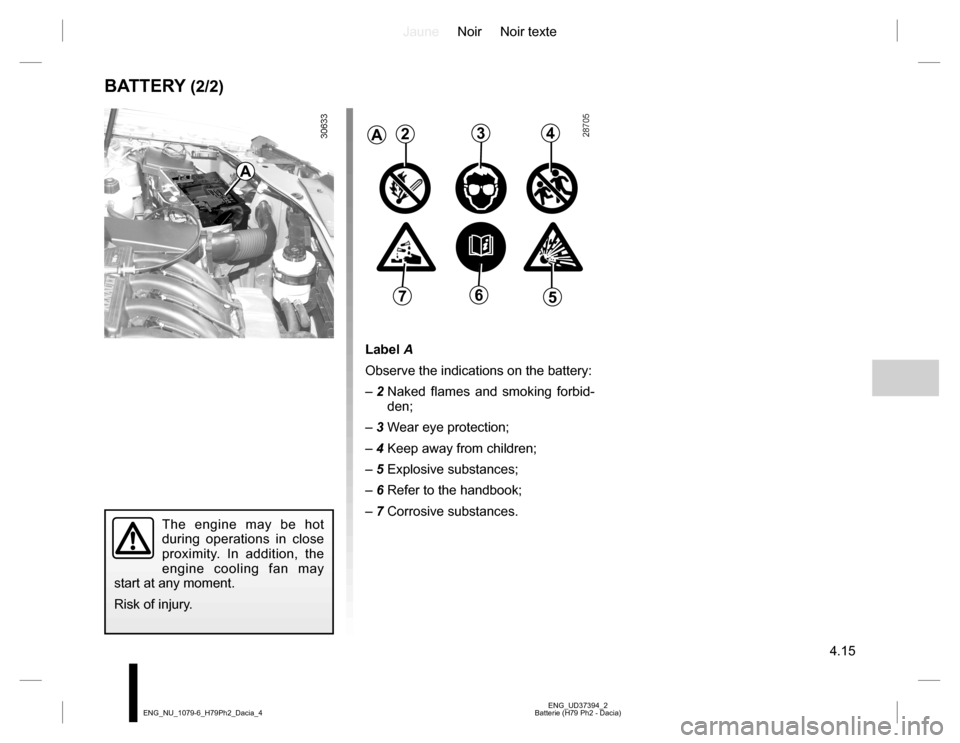
Label A
Observe the indications on the battery:
– 2 Naked flames and smoking forbid-
den;
– 3 Wear eye protection;
– 4 Keep away from children;
– 5 Explosive substances;
– 6 Refer to the handbook;
– 7 Corrosive substances.
The engine may be hot
during operations in close
proximity. In addition, the
engine cooling fan may
start at any moment.
Risk of injury.
A234
567
A
Page 174 of 254
JauneNoir Noir texte
4.16
ENG_UD26811_2
Entretien de la carrosserie (peinture mate) (X44 - X77 - J77 - X85 - B90 - X61 - TEST - X77 ph2 - X95 - B95 - D95 - K95 - J95 - R95 - L90 Ph2 - F90 Ph2 - R90 Ph2 - X62 ENG_NU_1079-6_H79Ph2_Dacia_4
BODYWORK MAINTENANCE (1/2)
You should
Wash your car frequently, with the
engine off, with cleaning products rec-
ommended by the manufacturer (never
use abrasive products). Rinse thor-
oughly beforehand with a jet:
– spots of tree resin and industrial
grime;
– mud in the wheel arches and under-
neath the body which forms damp
patches;
– bird droppings, which cause a
chemical reaction with the paint that
rapidly discolours paintwork and
may even cause the paint to peel
off;
wash the vehicle immediately to
remove these marks since it is im-
possible to remove them by polish-
ing;
– salt, particularly in the wheel arches
and underneath the body after driv-
ing in areas where the roads have
been gritted.
Remove any plant matter (resin, leaves,
etc.) from the vehicle regularly.
What you should not doDo not degrease or clean mechani-
cal components (e.g. the engine com-
partment), underneath the body, parts
with hinges (e.g. inside the doors) and
painted plastic external fittings (e.g.
bumpers) using high-pressure clean-
ing equipment or by spraying on prod-
ucts not approved by our Technical
Department. Doing this could give rise
to corrosion or operational faults.
Wash the vehicle in bright sunlight or
freezing temperatures.
Do not scrape off mud or dirt without
pre-wetting.
Allow dirt to accumulate on the exterior.
Allow rust to form following minor im-
pacts.
Do not use solvents not approved by
our Technical Department to remove
stains as this could damage the paint-
work.
Do not drive in snow or muddy condi-
tions without washing the vehicle, par-
ticularly under the wheel arches and
body. A well-maintained vehicle will last
longer. It is therefore recommended to
maintain the exterior of the vehicle reg-
ularly.
Your vehicle has been treated with very
effective anti-corrosion products. It is
nevertheless subject to various outside
influences.
Corrosive agents in the atmosphere
– atmospheric pollution (built-up and
industrial areas),
– saline atmospheres (near the sea,
particularly in hot weather),
– seasonal and damp weather condi-
tions (e.g. road salt in winter, water
from road cleaners, etc.).
Minor impacts
Abrasive action
Dust and sand in the air, mud, road grit
thrown up by other vehicles, etc.
You should take a number of minor pre-
cautions in order to safeguard your ve-
hicle against such risks.
Page 185 of 254
JauneNoir Noir texte
5.7
ENG_UD38373_2
Kit de gonflage des pneumatiques (H79 Ph2 - Dacia) ENG_NU_1079-6_H79Ph2_Dacia_5
For all vehicles, with the engine run-
ning and the handbrake applied,
– unroll the hose from the container;
– connect the compressor hose 3 to
the container’s inlet 8;
– depending on the vehicle, connect
the container 8 to the compressor
from the container recess 7;
– unscrew the valve cap on the rel-
evant wheel and screw on the con-
tainer’s inflation adapter 1;
– adapter 2 must be connected to the
vehicle accessories socket;
– press switch 4 to inflate the tyre to
the recommended pressure (please
refer to the information in the section
on “Tyre pressure”);
– after a maximum of 15 minutes, stop
inflating and read the pressure (on
pressure gauge 5).Note: while the container is empty-
ing (approximately 30 seconds), the
pressure gauge 5 will briefly indicate
a pressure of up to 6 bar. The pres-
sure will then drop.
– adjust the pressure: to increase
it, continue inflation with the kit; to
reduce it, press button 6.
If a minimum pressure of 1.8 bar is
not reached after 15 minutes, repair
is not possible; do not drive the ve-
hicle but contact an approved dealer.Nothing should be placed
around the driver’s feet
as such objects may slide
under the pedals during
sudden braking manoeuvres and
obstruct their use.
Please be aware that a
poorly tightened or missing
valve cap can make the
tyres less airtight and lead
to pressure loss. Always use valve
caps identical to the original ones
and ensure they are tightly screwed
on.
TYRE INFLATION KIT (3/4)
Page 194 of 254
JauneNoir Noir texte
5.16
ENG_UD39295_3
Feux avant : remplacement des lampes (H79 Ph2 - Dacia) ENG_NU_1079-6_H79Ph2_Dacia_5
FRONT LIGHTS: changing bulbs
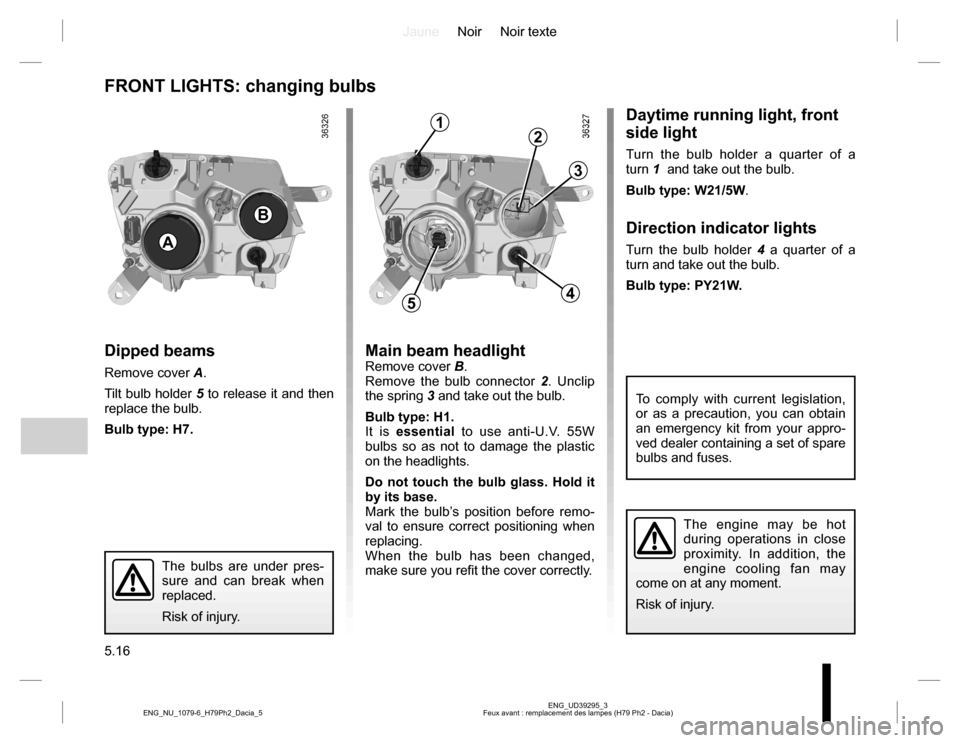
Dipped beams
Remove cover A.
Tilt bulb holder 5 to release it and then
replace the bulb.
Bulb type: H7.
Main beam headlightRemove cover B.
Remove the bulb connector 2. Unclip
the spring 3 and take out the bulb.
Bulb type: H1.
It is essential to use anti-U.V. 55W
bulbs so as not to damage the plastic
on the headlights.
Do not touch the bulb glass. Hold it
by its base.
Mark the bulb’s position before remo-
val to ensure correct positioning when
replacing.
When the bulb has been changed,
make sure you refit the cover correctly.
Daytime running light, front
side light
Turn the bulb holder a quarter of a
turn 1 and take out the bulb.
Bulb type: W21/5W.
Direction indicator lights
Turn the bulb holder 4 a quarter of a
turn and take out the bulb.
Bulb type: PY21W.A
B
5
1
3
2
4
The engine may be hot
during operations in close
proximity. In addition, the
engine cooling fan may
come on at any moment.
Risk of injury.
To comply with current legislation,
or as a precaution, you can obtain
an emergency kit from your appro-
ved dealer containing a set of spare
bulbs and fuses.
The bulbs are under pres-
sure and can break when
replaced.
Risk of injury.
Page 195 of 254
JauneNoir Noir texte
5.17
ENG_UD38548_2
Projecteurs antibrouillard : remplacement des lampes (H79 Ph2 - Dacia) ENG_NU_1079-6_H79Ph2_Dacia_5
Additional lights
If you wish to fit fog lights to your ve-
hicle, please see an authorised dealer.
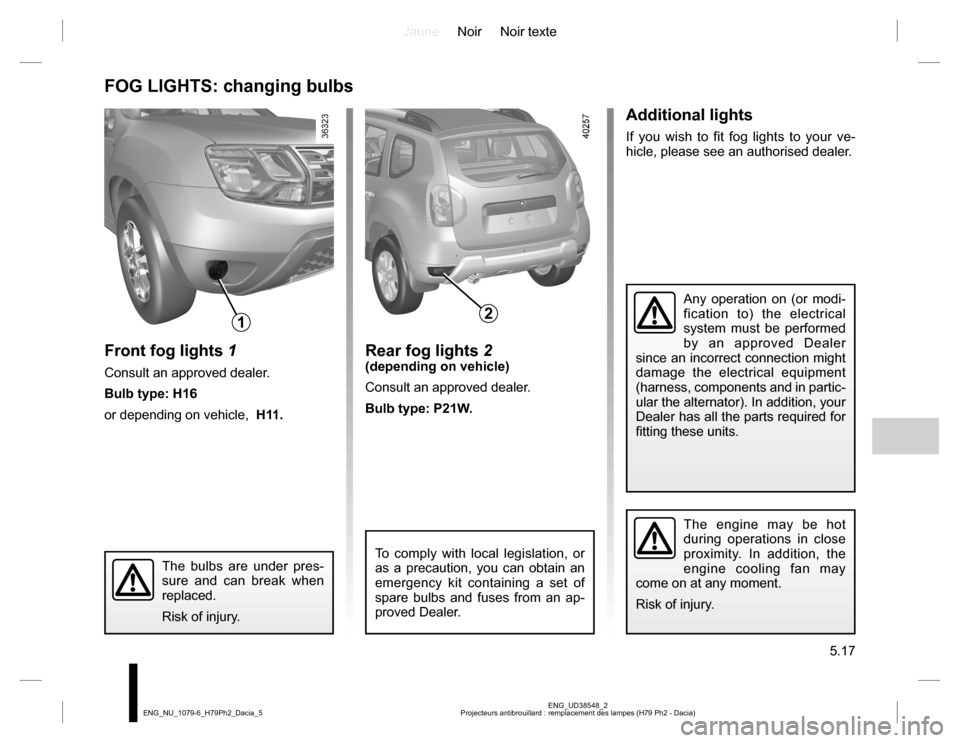
FOG LIGHTS: changing bulbs
Front fog lights 1
Consult an approved dealer.
Bulb type: H16
or depending on vehicle, H11.
Any operation on (or modi-
fication to) the electrical
system must be performed
by an approved Dealer
since an incorrect connection might
damage the electrical equipment
(harness, components and in partic-
ular the alternator). In addition, your
Dealer has all the parts required for
fitting these units.
The engine may be hot
during operations in close
proximity. In addition, the
engine cooling fan may
come on at any moment.
Risk of injury.
The bulbs are under pres-
sure and can break when
replaced.
Risk of injury.
1
To comply with local legislation, or
as a precaution, you can obtain an
emergency kit containing a set of
spare bulbs and fuses from an ap-
proved Dealer.
Rear fog lights 2(depending on vehicle)
Consult an approved dealer.
Bulb type: P21W.
2
Page 207 of 254
JauneNoir Noir texte
5.29
ENG_UD39267_6
Fusibles (H79 - H79 Ph2 - Dacia) ENG_NU_1079-6_H79Ph2_Dacia_5
FUSES (2/8)
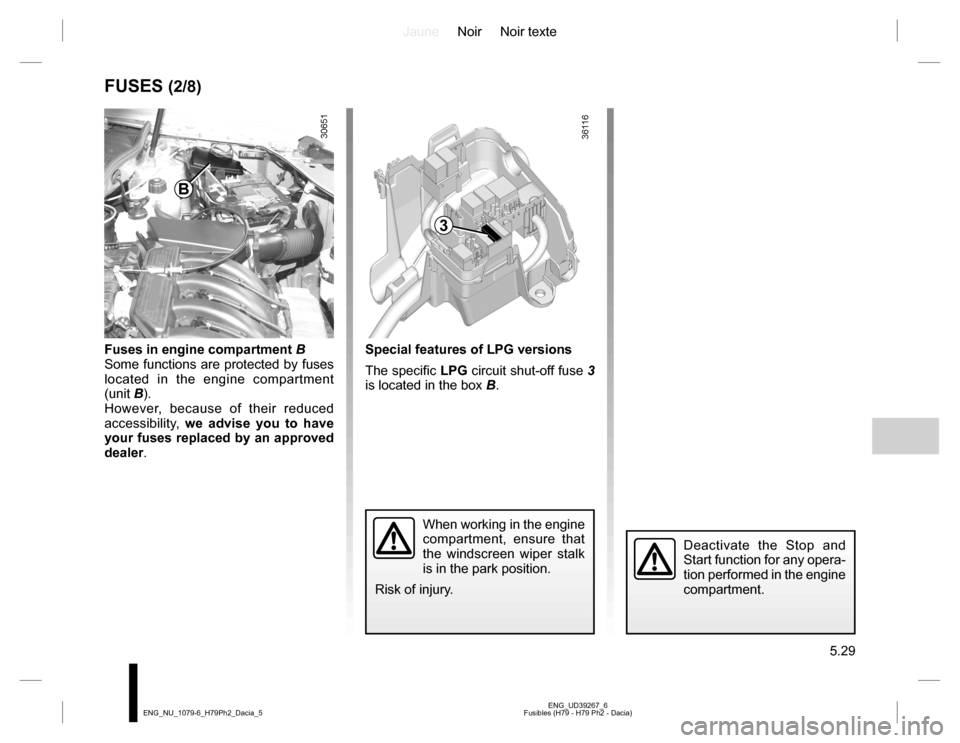
Fuses in engine compartment B
Some functions are protected by fuses
located in the engine compartment
(unit B).
However, because of their reduced
accessibility, we advise you to have
your fuses replaced by an approved
dealer.
B
Special features of LPG versions
The specific LPG circuit shut-off fuse 3
is located in the box B.
3
When working in the engine
compartment, ensure that
the windscreen wiper stalk
is in the park position.
Risk of injury.
Deactivate the Stop and
Start function for any opera-
tion performed in the engine
compartment.