key DACIA DUSTER 2021 Owners Manual
[x] Cancel search | Manufacturer: DACIA, Model Year: 2021, Model line: DUSTER, Model: DACIA DUSTER 2021Pages: 244, PDF Size: 3.57 MB
Page 7 of 244
Downloaded from www.Manualslib.com manuals search engine JauneNoir Noir texte
1.1
ENG_UD35424_5
Sommaire 1 (H79 - Dacia)
ENG_NU_1079-3_H79Ph2_Dacia_1
Section 1: Getting to know your vehicle
Keys, radio frequency remote control: general information . . . . . . . . . . . . . . . . . . . . . . . . . . . . . . . . 1.2
Locking and unlocking the doors . . . . . . . . . . . . . . . . . . . . . . . . . . . . . . . . . . . . \
. . . . . . . . . . . . . . . . 1.5
Automatic locking when driving . . . . . . . . . . . . . . . . . . . . . . . . . . . . . . . . . . . . \
. . . . . . . . . . . . . . . . . 1.8
Opening and closing the doors . . . . . . . . . . . . . . . . . . . . . . . . . . . . . . . . . . . .\
. . . . . . . . . . . . . . . . . 1.9
Engine immobiliser system . . . . . . . . . . . . . . . . . . . . . . . . . . . . . . . . . . . .\
. . . . . . . . . . . . . . . . . . . . 1.11
Front headrests . . . . . . . . . . . . . . . . . . . . . . . . . . . . . . . . . . . . \
. . . . . . . . . . . . . . . . . . . . . . . . . . . . . 1.12
Front seats. . . . . . . . . . . . . . . . . . . . . . . . . . . . . . .\
. . . . . . . . . . . . . . . . . . . . . . . . . . . . . . . . . . . . . . 1.13
Seat belts. . . . . . . . . . . . . . . . . . . . . . . . . . . . . . . \
. . . . . . . . . . . . . . . . . . . . . . . . . . . . . . . . . . . . . . . 1.15
Methods of restraint in addition to the front seat belts . . . . . . . . . . . . . . . . . . . . . . . . . . . . . . . . . . . . 1.20
Side protection devices . . . . . . . . . . . . . . . . . . . . . . . . . . . . . . . . . . . . \
. . . . . . . . . . . . . . . . . . . . . . . 1.23
Additional methods of restraint . . . . . . . . . . . . . . . . . . . . . . . . . . . . . . . . . . . .\
. . . . . . . . . . . . . . . . . 1.24
Child safety: general information . . . . . . . . . . . . . . . . . . . . . . . . . . . . . . . . . . . . \
. . . . . . . . . . . . . . . . 1.25 mounting a child seat . . . . . . . . . . . . . . . . . . . . . . . . . . . . . . . . . . . . \
. . . . . . . . . . . . . . . . . . . 1.28
fitting a child seat . . . . . . . . . . . . . . . . . . . . . . . . . . . . . . . . . . . . \
. . . . . . . . . . . . . . . . . . . . . . 1.30
deactivating/activating the front passenger airbag . . . . . . . . . . . . . . . . . . . . . . . . . . . . . . . . . 1.36
Rear view mirrors . . . . . . . . . . . . . . . . . . . . . . . . . . . . . . . . . . . .\
. . . . . . . . . . . . . . . . . . . . . . . . . . . 1.39
Driving position . . . . . . . . . . . . . . . . . . . . . . . . . . . . . . . . . . . .\
. . . . . . . . . . . . . . . . . . . . . . . . . . . . . 1.40
Instrument panel: warning lights . . . . . . . . . . . . . . . . . . . . . . . . . . . . . . . . . . . .\
. . . . . . . . . . . . . . . . 1.44
Display and indicators . . . . . . . . . . . . . . . . . . . . . . . . . . . . . . . . . . . . \
. . . . . . . . . . . . . . . . . . . . . . . . 1.51
On-board computer . . . . . . . . . . . . . . . . . . . . . . . . . . . . . . . . . . . . \
. . . . . . . . . . . . . . . . . . . . . . . . . . 1.54
Steering wheel, Power-assisted steering . . . . . . . . . . . . . . . . . . . . . . . . . . . . . . . . . . . .\
. . . . . . . . . 1.60
Time . . . . . . . . . . . . . . . . . . . . . . . . . . . . . . . . . . . . \
. . . . . . . . . . . . . . . . . . . . . . . . . . . . . . . . . . . . . . 1.61
Audible and visual signals . . . . . . . . . . . . . . . . . . . . . . . . . . . . . . . . . . . . \
. . . . . . . . . . . . . . . . . . . . . 1.62
Exterior lighting and signals. . . . . . . . . . . . . . . . . . . . . .\
. . . . . . . . . . . . . . . . . . . . . . . . . . . . . . . . . . 1.64
Adjusting the headlight beam height . . . . . . . . . . . . . . . . . . . . . . . . . . . . . . . . . . . . \
. . . . . . . . . . . . . 1.66
Screen washer, wiper . . . . . . . . . . . . . . . . . . . . . . . . . . . . . . . . . . . .\
. . . . . . . . . . . . . . . . . . . . . . . . 1.68
Fuel tank (filling with fuel) . . . . . . . . . . . . . . . . . . . . . . . . . . . . . . . . . . . .\
. . . . . . . . . . . . . . . . . . . . . 1.70
Page 8 of 244
Downloaded from www.Manualslib.com manuals search engine JauneNoir Noir texte
1.2
ENG_UD29226_2
Clés / télécommande à radiofréquence: généralité\
s (X67 - X92 - X52 - Renault)
ENG_NU_1079-3_H79Ph2_Dacia_1
KEYS, RADIO FREQUENCY REMOTE CONTROL: general information (1/2)
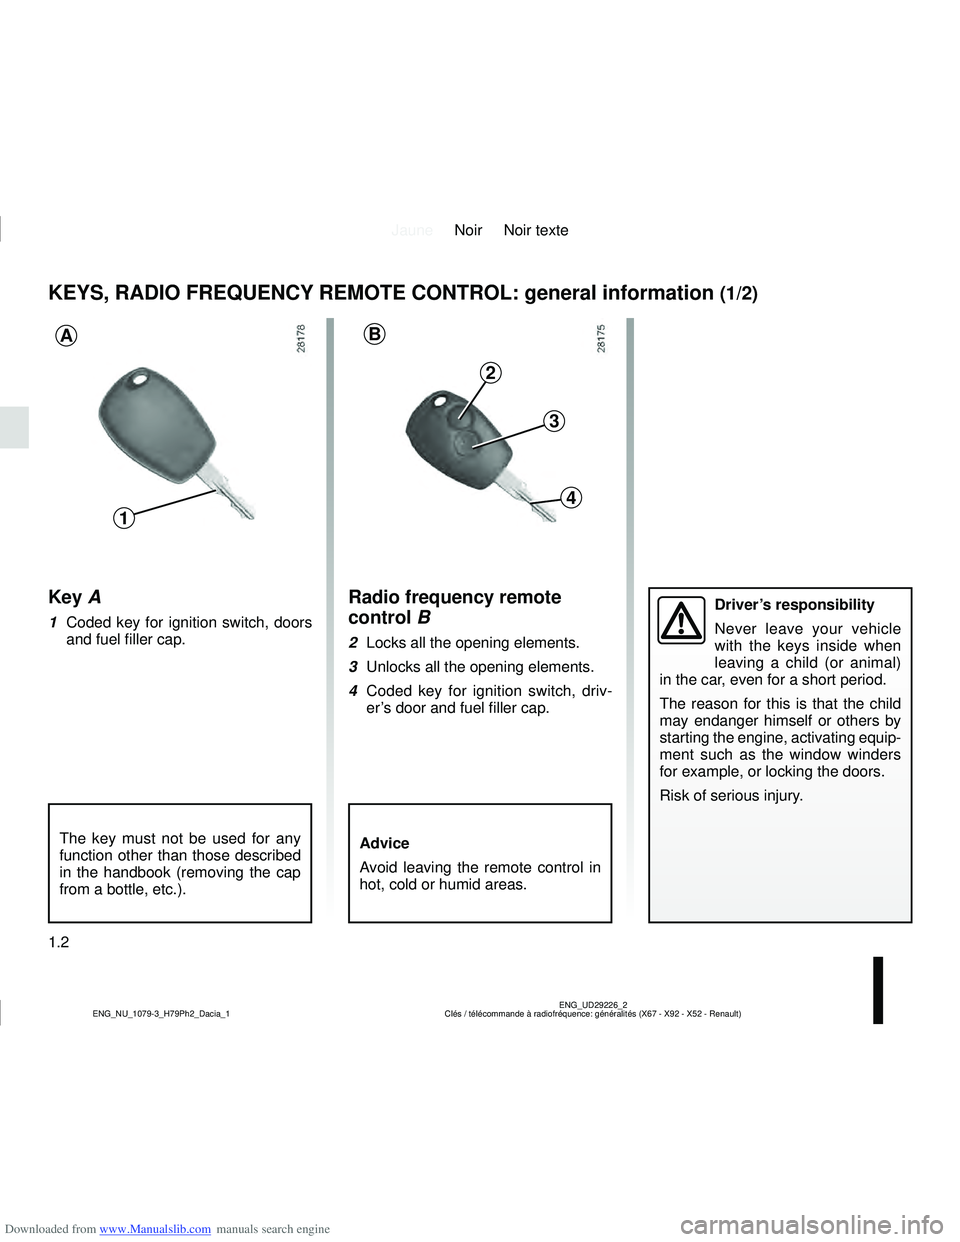
Radio frequency remote
control B
2 Locks all the opening elements.
3 Unlocks all the opening elements.
4 Coded key for ignition switch, driv- er’s door and fuel filler cap.
Driver’s responsibility
Never leave your vehicle
with the keys inside when
leaving a child (or animal)
in the car, even for a short period.
The reason for this is that the child
may endanger himself or others by
starting the engine, activating equip-
ment such as the window winders
for example, or locking the doors.
Risk of serious injury.Key A
1 Coded key for ignition switch, doors and fuel filler cap.
Advice
Avoid leaving the remote control in
hot, cold or humid areas.
BA
3
2
4
1
The key must not be used for any
function other than those described
in the handbook (removing the cap
from a bottle, etc.).
Page 9 of 244
Downloaded from www.Manualslib.com manuals search engine JauneNoir Noir texte
1.3
ENG_UD29226_2
Clés / télécommande à radiofréquence: généralité\
s (X67 - X92 - X52 - Renault)
ENG_NU_1079-3_H79Ph2_Dacia_1
The remote control unit
operating range
This varies according to the environ-
ment. It is therefore important when
handling the remote control to ensure
that you do not lock or unlock the ve-
hicle by inadvertently pressing the but-
tons.
Interference
The presence of certain objects (metal
objects, mobile telephones, or an area
with strong electromagnetic radiation,
etc.) close to the key may create inter-
ference and affect the operation of the
system.
KEYS, RADIO FREQUENCY REMOTE CONTROL: general information (2/2)
Replacement and additional keys
or remote controls
If you lose your remote control key
or require another, you can obtain
one from an approved dealer.
If a remote control or key is re-
placed, it will be necessary to take
the vehicle and all of its remote
control keys to an authorised
dealer to reset them.
You may use up to four remote con-
trol keys per vehicle.
Remote control key failure
Make sure that the correct battery
type is being used, and that the
battery is in good condition and in-
serted correctly. These batteries
have a service life of approximately
two years.
Refer to the information on “Radio
frequency remote control: Batteries”
in Section 5.
Page 10 of 244
Downloaded from www.Manualslib.com manuals search engine JauneNoir Noir texte
1.4
ENG_UD32107_1
Télécommande à radiofréquence : utilisation (H79 Ph2 - H79 \
Nissan - Dacia)
ENG_NU_1079-3_H79Ph2_Dacia_1
RADIO FREQUENCY REMOTE CONTROL: use
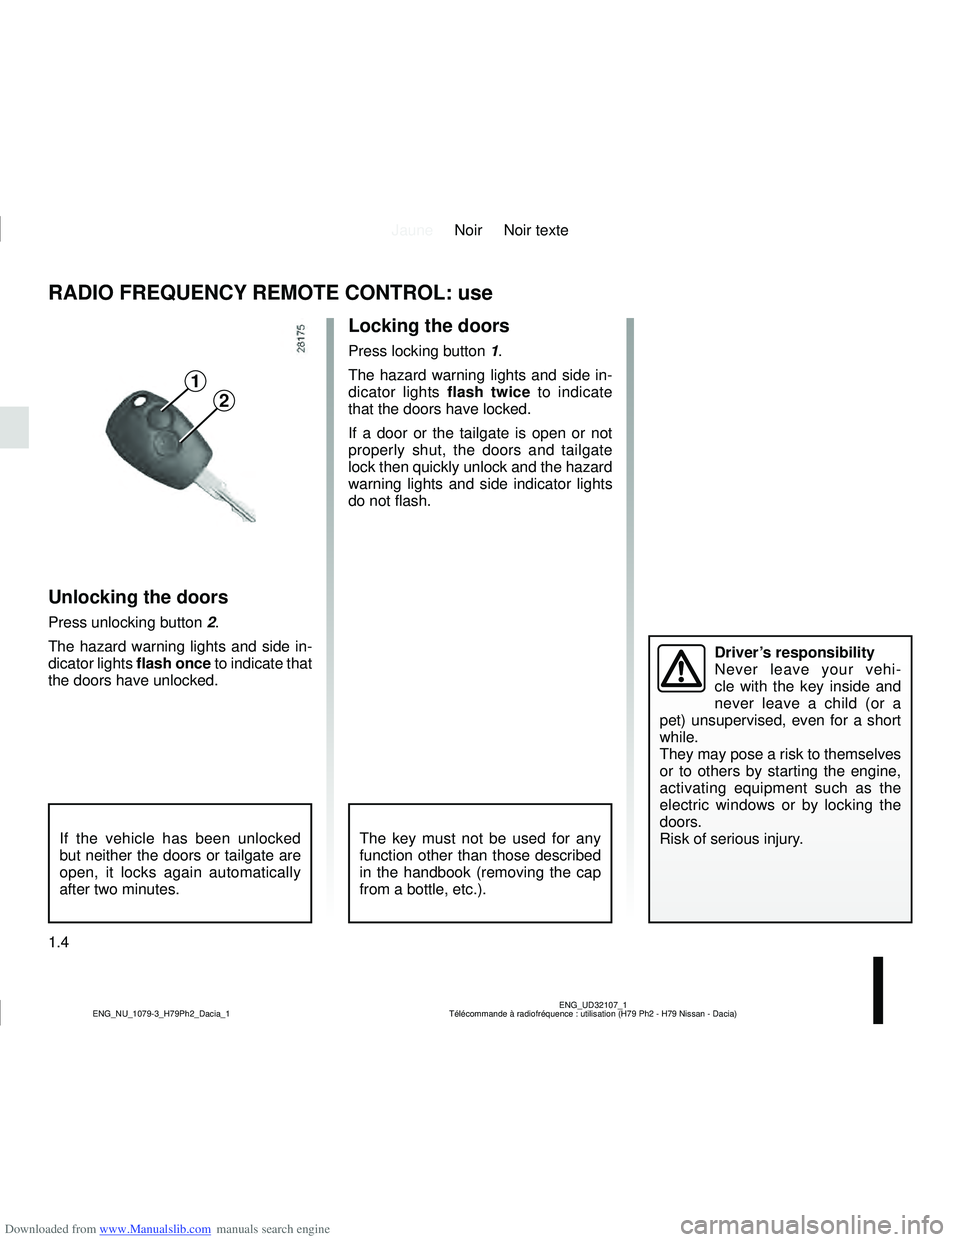
Locking the doors
Press locking button 1.
The hazard warning lights and side in-
dicator lights flash twice to indicate
that the doors have locked.
If a door or the tailgate is open or not
properly shut, the doors and tailgate
lock then quickly unlock and the hazard
warning lights and side indicator lights
do not flash.
Unlocking the doors
Press unlocking button 2.
The hazard warning lights and side in-
dicator lights flash once to indicate that
the doors have unlocked.
1
2
The key must not be used for any
function other than those described
in the handbook (removing the cap
from a bottle, etc.).
Driver’s responsibility
Never leave your vehi-
cle with the key inside and
never leave a child (or a
pet) unsupervised, even for a short
while.
They may pose a risk to themselves
or to others by starting the engine,
activating equipment such as the
electric windows or by locking the
doors.
Risk of serious injury.
If the vehicle has been unlocked
but neither the doors or tailgate are
open, it locks again automatically
after two minutes.
Page 11 of 244
Downloaded from www.Manualslib.com manuals search engine JauneNoir Noir texte
1.5
ENG_UD32108_1
Verrouillage et déverrouillage des portes (H79 - Dacia)
ENG_NU_1079-3_H79Ph2_Dacia_1
LOCKING AND UNLOCKING THE DOORS (1/3)
Manual locking
From the outside
Unlock the doors using the remote con-
trol (refer to information on the “Radio
frequency remote control: use” in
Section 1) or using the key in one of the
door locks.
Depending on the vehicle, the key locks
and unlocks the driver’s door or all four
doors.
From the inside
(depending on vehicle)
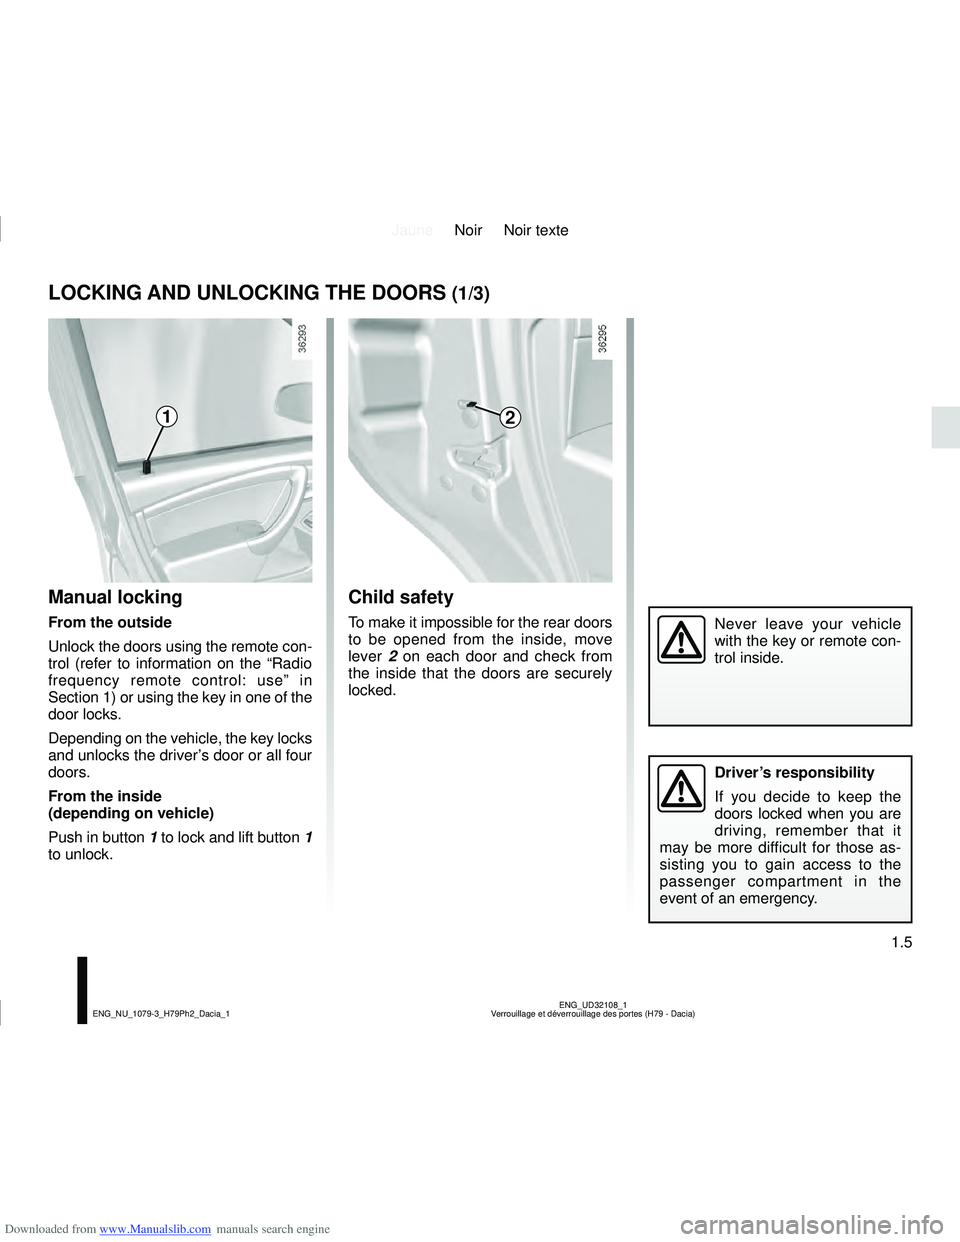
Push in button 1 to lock and lift button 1
to unlock.
Child safety
To make it impossible for the rear doors
to be opened from the inside, move
lever 2 on each door and check from
the inside that the doors are securely
locked.
12
Never leave your vehicle
with the key or remote con-
trol inside.
Driver’s responsibility
If you decide to keep the
doors locked when you are
driving, remember that it
may be more difficult for those as-
sisting you to gain access to the
passenger compartment in the
event of an emergency.
Page 12 of 244
Downloaded from www.Manualslib.com manuals search engine JauneNoir Noir texte
1.6
ENG_UD32108_1
Verrouillage et déverrouillage des portes (H79 - Dacia)
ENG_NU_1079-3_H79Ph2_Dacia_1
LOCKING AND UNLOCKING THE DOORS (2/3)
Electric central locking
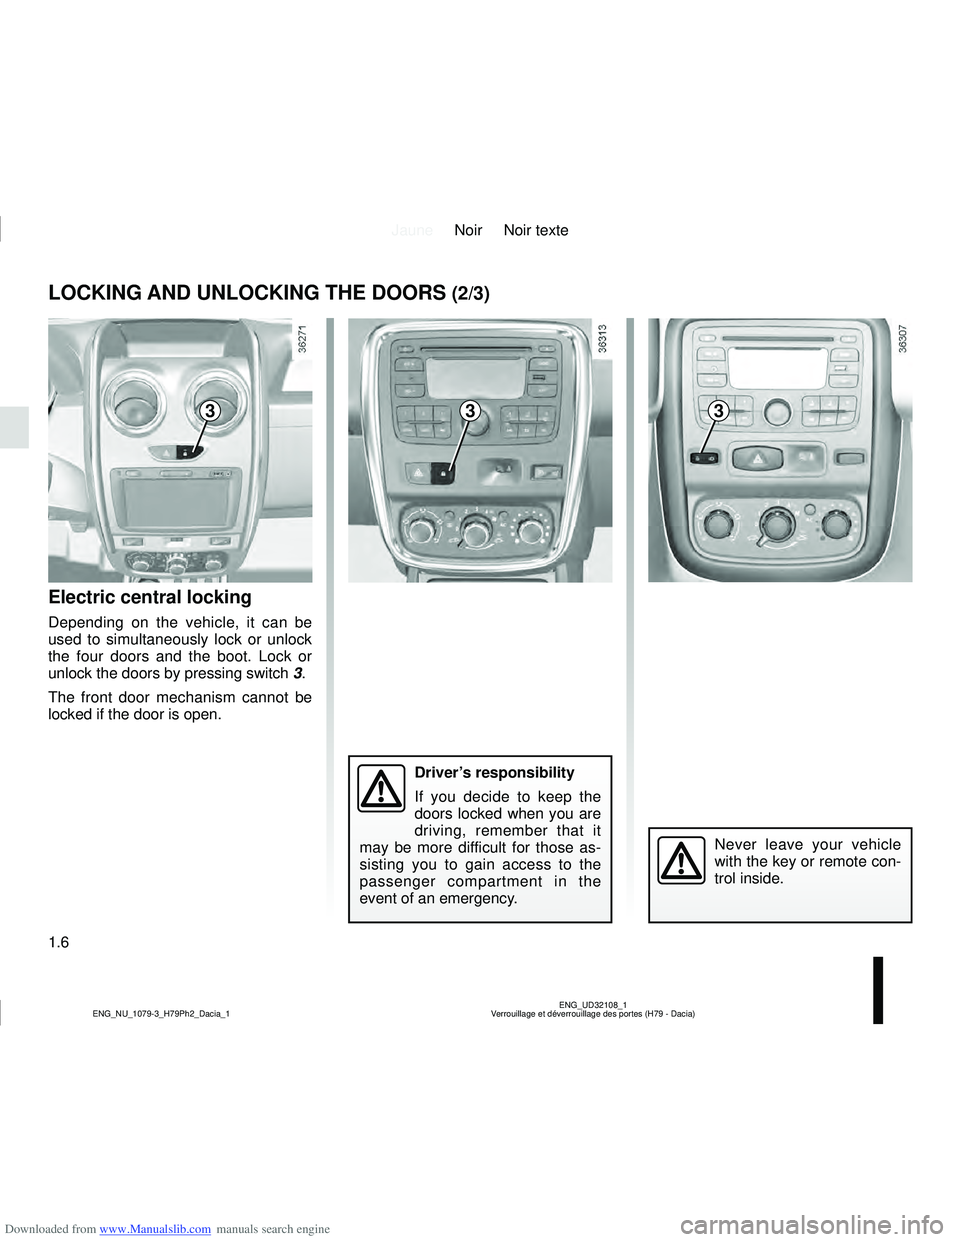
Depending on the vehicle, it can be
used to simultaneously lock or unlock
the four doors and the boot. Lock or
unlock the doors by pressing switch 3.
The front door mechanism cannot be
locked if the door is open.
Driver’s responsibility
If you decide to keep the
doors locked when you are
driving, remember that it
may be more difficult for those as-
sisting you to gain access to the
passenger compartment in the
event of an emergency.
333
Never leave your vehicle
with the key or remote con-
trol inside.
Page 17 of 244
Downloaded from www.Manualslib.com manuals search engine JauneNoir Noir texte
1.11
ENG_UD14192_1
Système antidémarrage (H79 - Dacia)
ENG_NU_1079-3_H79Ph2_Dacia_1
ENGINE IMMOBILISER
This prevents the vehicle being
driven by anyone not in possession
of the vehicle’s coded ignition key.
Operating principle
The vehicle is automatically protected
a few seconds after the ignition is
switched off.
If the vehicle does not recognise the
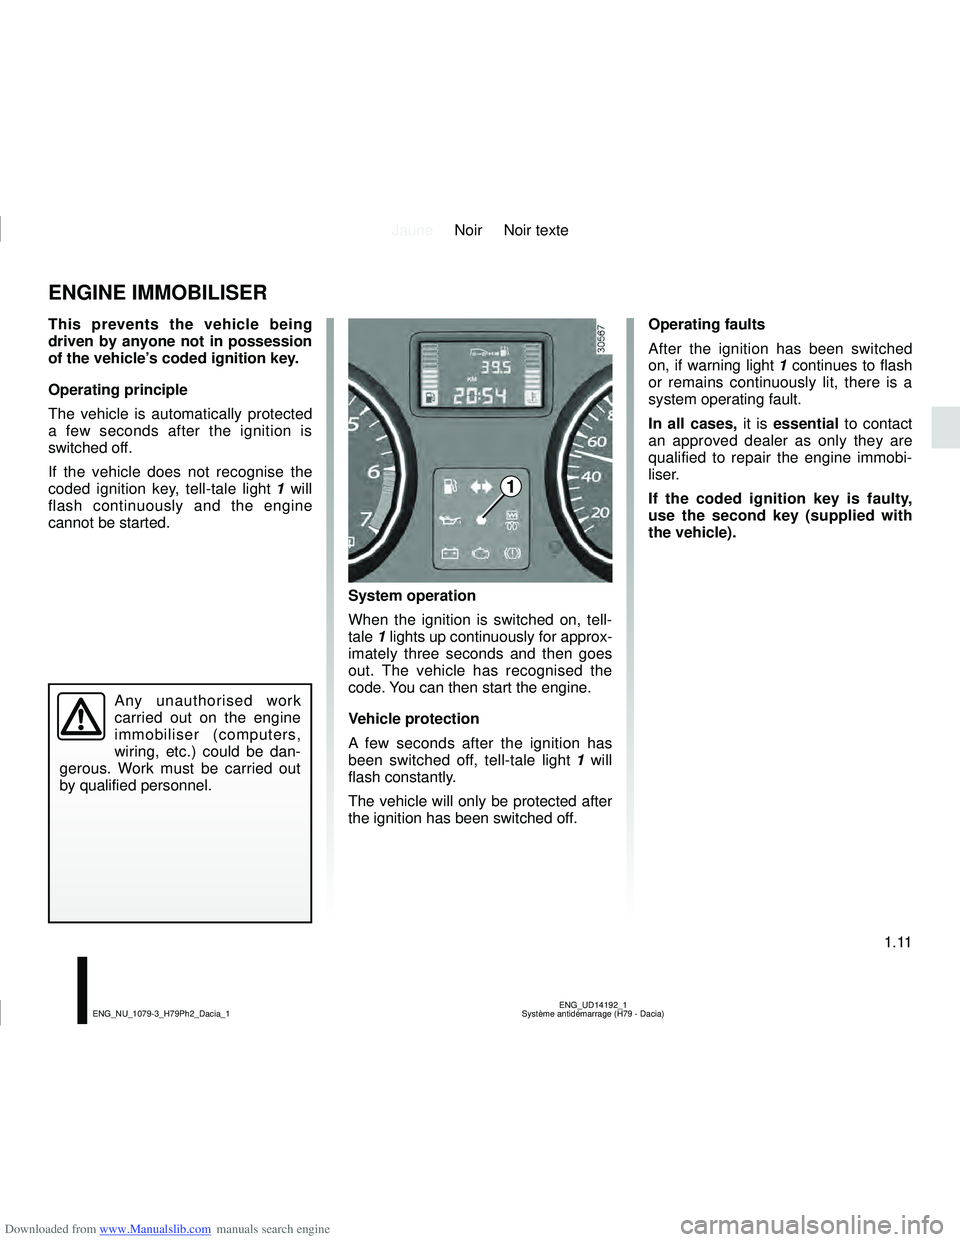
coded ignition key, tell-tale light 1 will
flash continuously and the engine
cannot be started.
Any unauthorised work
carried out on the engine
immobiliser (computers,
wiring, etc.) could be dan-
gerous. Work must be carried out
by qualified personnel.
System operation
When the ignition is switched on, tell-
tale 1 lights up continuously for approx-
imately three seconds and then goes
out. The vehicle has recognised the
code. You can then start the engine.
Vehicle protection
A few seconds after the ignition has
been switched off, tell-tale light 1 will
flash constantly.
The vehicle will only be protected after
the ignition has been switched off. Operating faults
After the ignition has been switched
on, if warning light
1 continues to flash
or remains continuously lit, there is a
system operating fault.
In all cases, it is essential to contact
an approved dealer as only they are
qualified to repair the engine immobi-
liser.
If the coded ignition key is faulty,
use the second key (supplied with
the vehicle).
1
Page 59 of 244
Downloaded from www.Manualslib.com manuals search engine JauneNoir Noir texte
1.53
ENG_UD32126_1
Afficheur et indicateurs (H79 - Dacia)
ENG_NU_1079-3_H79Ph2_Dacia_1
DISPLAY AND INDICATORS (3/3)
Coolant temperature
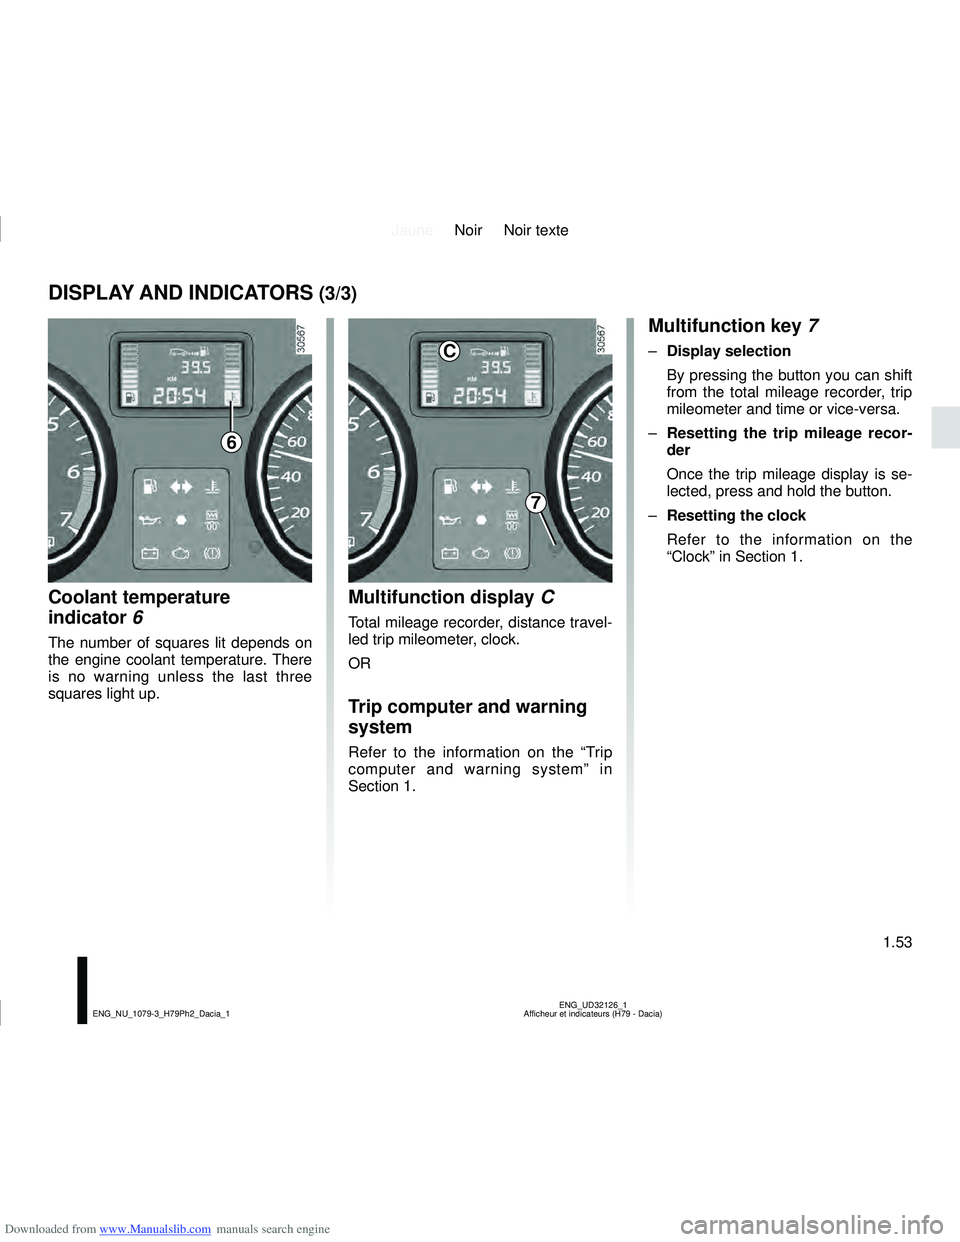
indicator 6
The number of squares lit depends on
the engine coolant temperature. There
is no warning unless the last three
squares light up.
Multifunction display C
Total mileage recorder, distance travel-
led trip mileometer, clock.
OR
Trip computer and warning
system
Refer to the information on the “Trip
computer and warning system” in
Section 1.
Multifunction key 7
– Display selection
By pressing the button you can shift
from the total mileage recorder, trip
mileometer and time or vice-versa.
– Resetting the trip mileage recor-
der
Once the trip mileage display is se-
lected, press and hold the button.
– Resetting the clock
Refer to the information on the
“Clock” in Section 1.
6
7
C
Page 60 of 244
Downloaded from www.Manualslib.com manuals search engine JauneNoir Noir texte
1.54
ENG_UD34963_2
Ordinateur de bord (H79 Ph2 - Dacia)
ENG_NU_1079-3_H79Ph2_Dacia_1
ON-BOARD COMPUTER (1/6)
2
3
4
The display of information shown below DEPENDS ON THE VEHICLE EQUIPMENT \
AND COUNTRY.
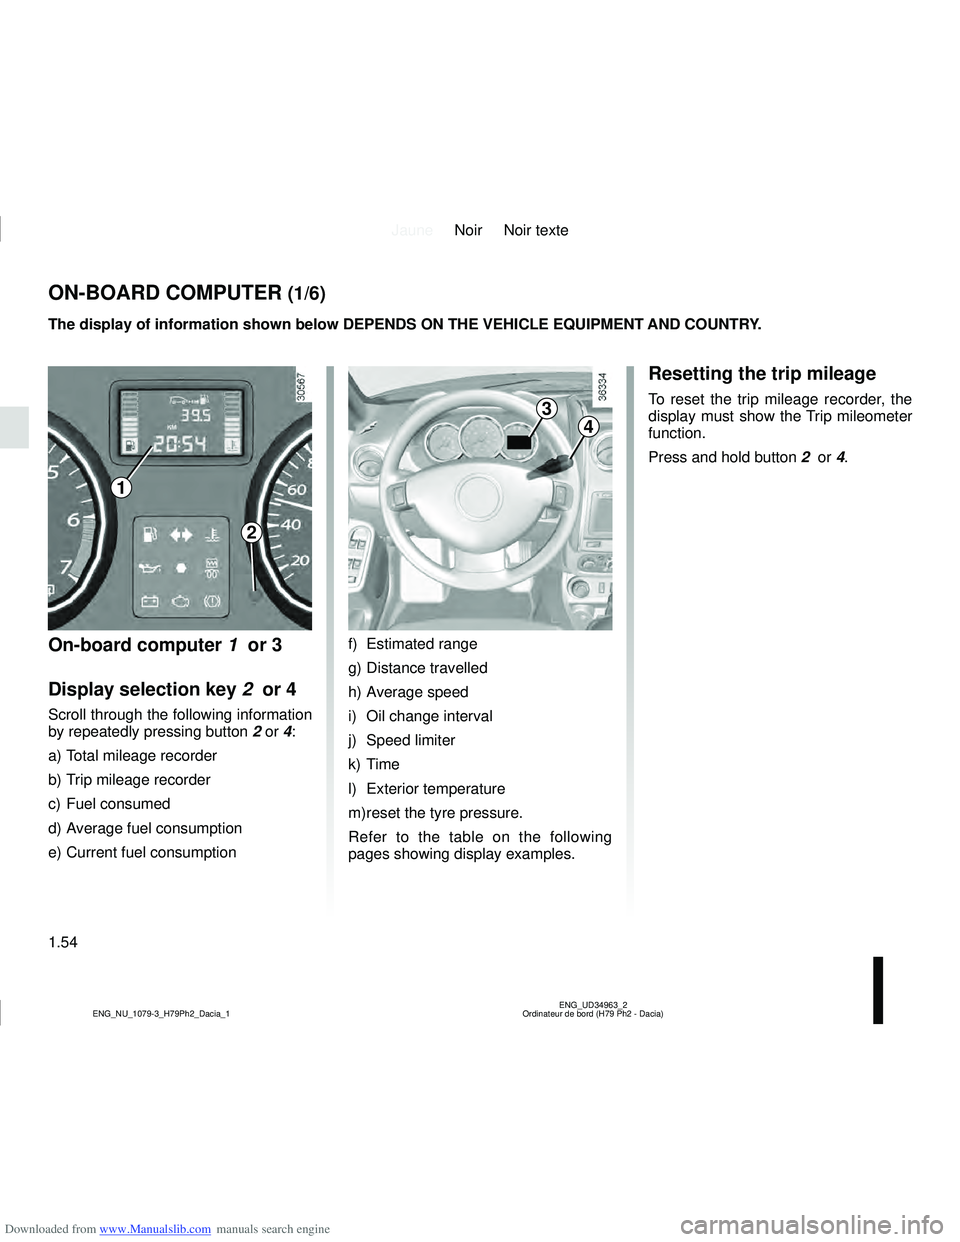
On-board computer 1 or 3
Display selection key 2 or 4
Scroll through the following information
by repeatedly pressing button 2 or 4:
a) Total mileage recorder
b) Trip mileage recorder
c) Fuel consumed
d) Average fuel consumption
e) Current fuel consumption f) Estimated range
g) Distance travelled
h) Average speed
i) Oil change interval
j) Speed limiter
k) Time
l) Exterior temperature
m) reset the tyre pressure.
Refer to the table on the following
pages showing display examples.
Resetting the trip mileage
To reset the trip mileage recorder, the
display must show the Trip mileometer
function.
Press and hold button
2 or 4.
1
Page 61 of 244
Downloaded from www.Manualslib.com manuals search engine JauneNoir Noir texte
1.55
ENG_UD34963_2
Ordinateur de bord (H79 Ph2 - Dacia)
ENG_NU_1079-3_H79Ph2_Dacia_1
Interpreting some of the
values displayed after
resetting
The values showing average fuel
consumption, range and average
speed will become more stable and re-
liable the further you travel after pres-
sing the reset button.
For the first few miles after pressing
the reset key you will notice that the
range increases as you travel. This
range takes into account the average
fuel consumption since the last time the
reset button was pressed. Therefore,
the fuel consumption may decrease
when:
– the vehicle stops accelerating,
– the engine reaches its operating
temperature (engine cold when
reset button pressed),
– when driving from a built-up area
onto the open road.
Therefore, if the average fuel
consumption decreases, the
range will increase. – You may also notice that the ave-
rage fuel consumption increases
when the vehicle is stationary and
the engine idling.
This is normal, since the computer
takes account of fuel used during
idling.
Manually resetting the journey para-
meters: with the display showing one
of the journey parameters, press the
button 2 until the display is reset.
Automatically resetting the journey
parameters: the reset is automatic
when the capacity of one of the memo-
ries is exceeded.
ON-BOARD COMPUTER (2/6)
The display of information shown below DEPENDS ON THE VEHICLE EQUIPMENT \
AND COUNTRY.