check engine DACIA DUSTER 2022 Service Manual
[x] Cancel search | Manufacturer: DACIA, Model Year: 2022, Model line: DUSTER, Model: DACIA DUSTER 2022Pages: 244, PDF Size: 3.57 MB
Page 156 of 244
Downloaded from www.Manualslib.com manuals search engine JauneNoir Noir texte
4.4
ENG_UD34980_2
Niveau huile moteur : appoint / remplissage (H79 Ph2 - Dacia)
ENG_NU_1079-3_H79Ph2_Dacia_4
ENGINE OIL LEVEL: topping up, filling (1/3)
Topping up/filling
The vehicle must be parked on level
ground and the engine should be cold
(for instance, before the engine is star-
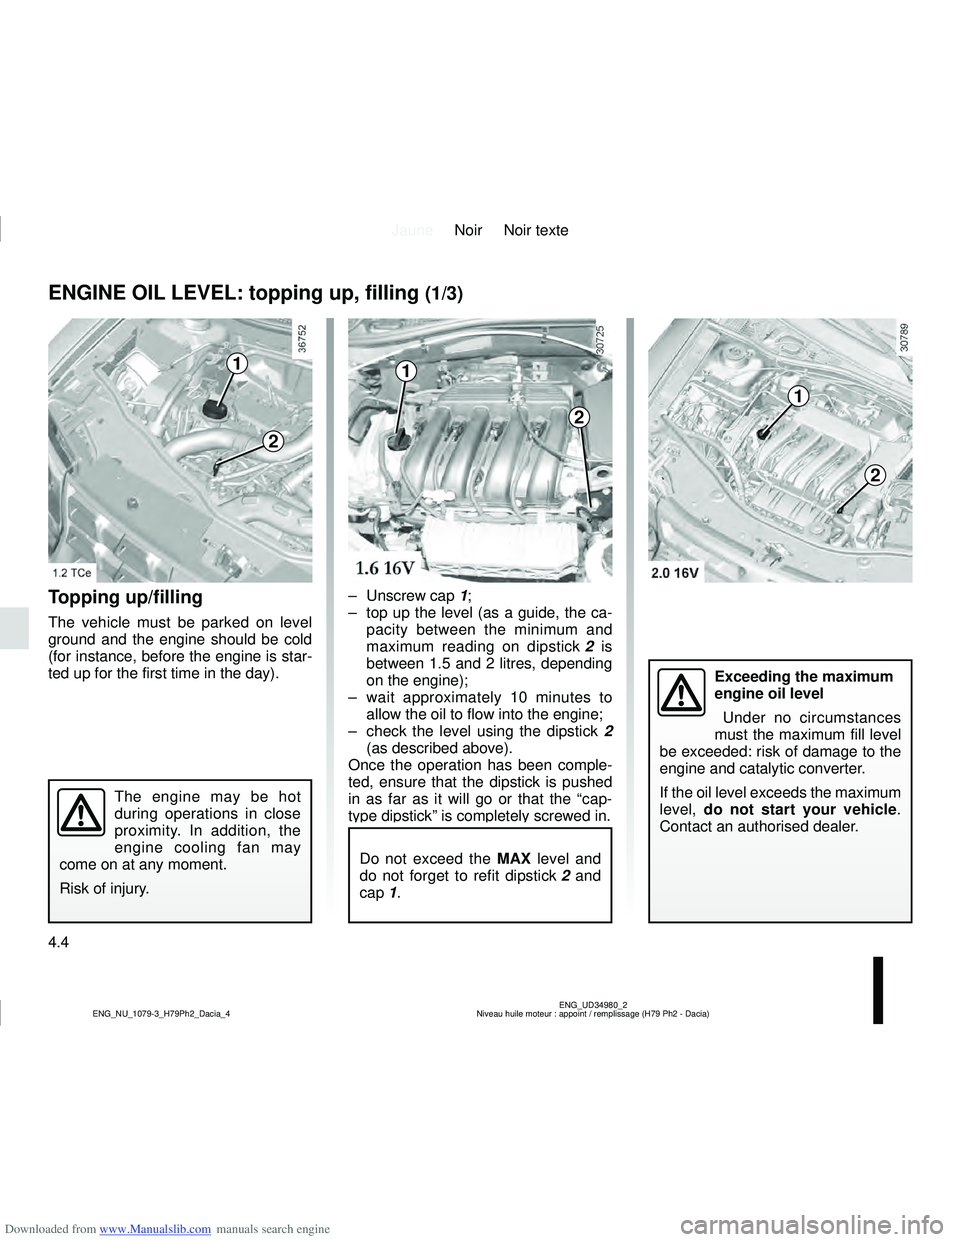
ted up for the first time in the day). – Unscrew cap 1;
– top up the level (as a guide, the ca-
pacity between the minimum and
maximum reading on dipstick 2 is
between 1.5 and 2 litres, depending
on the engine);
– wait approximately 10 minutes to allow the oil to flow into the engine;
– check the level using the dipstick 2
(as described above).
Once the operation has been comple-
ted, ensure that the dipstick is pushed
in as far as it will go or that the “cap-
type dipstick” is completely screwed in.
Do not exceed the MAX level and
do not forget to refit dipstick 2 and
cap 1.
1
2
The engine may be hot
during operations in close
proximity. In addition, the
engine cooling fan may
come on at any moment.
Risk of injury.
1
2
1
2
Exceeding the maximum
engine oil level
Under no circumstances
must the maximum fill level
be exceeded: risk of damage to the
engine and catalytic converter.
If the oil level exceeds the maximum
level, do not start your vehicle .
Contact an authorised dealer.
Page 157 of 244
Downloaded from www.Manualslib.com manuals search engine JauneNoir Noir texte
4.5
ENG_UD34980_2
Niveau huile moteur : appoint / remplissage (H79 Ph2 - Dacia)
ENG_NU_1079-3_H79Ph2_Dacia_4
ENGINE OIL LEVEL: topping up, filling (2/3)
Oil change
Service interval: refer to the
Maintenance Document for your vehi-
cle.
Oil change capacity
Please refer to the maintenance docu-
ment for your vehicle, or contact an au-
thorised dealer.
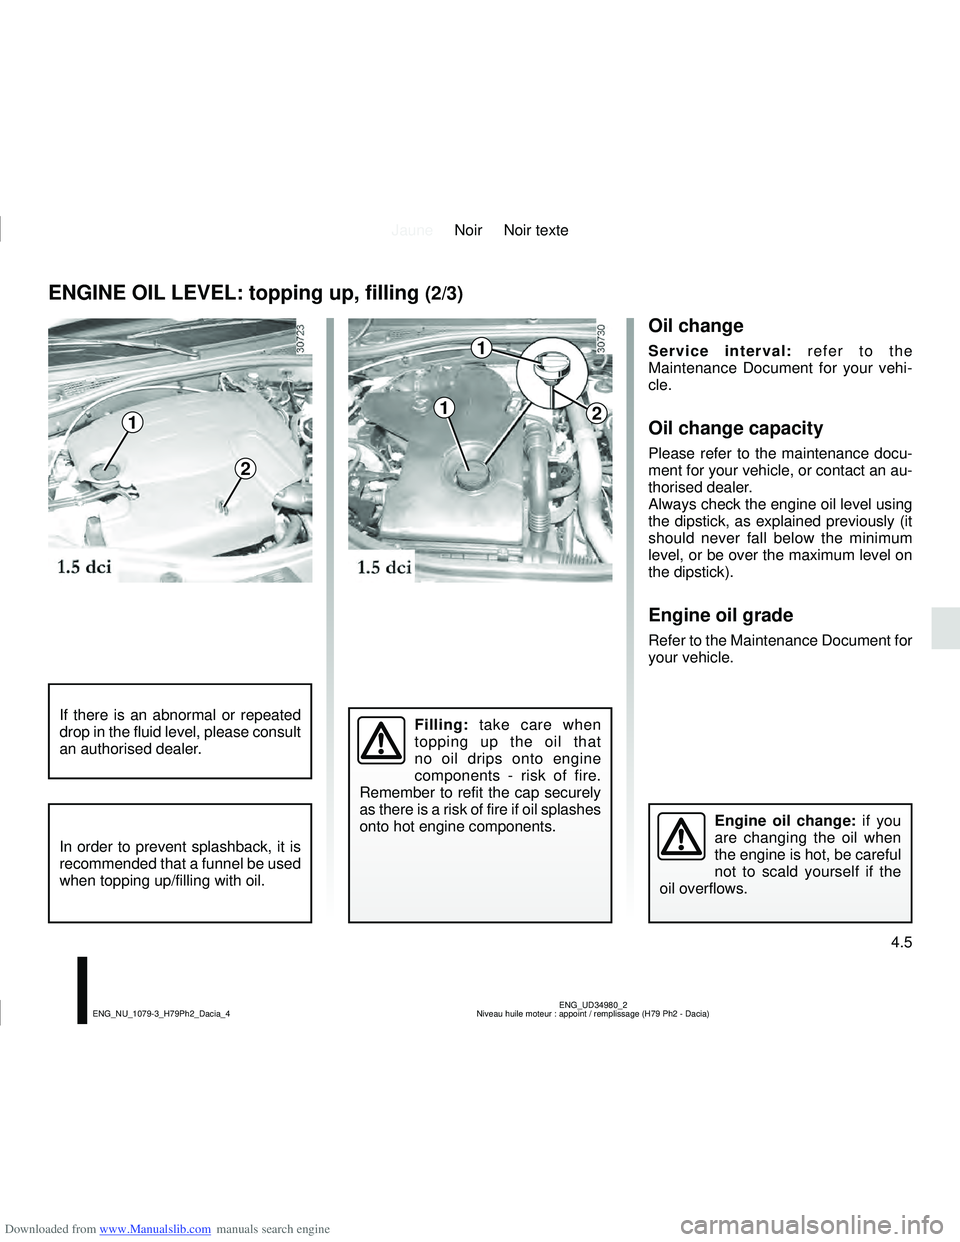
Always check the engine oil level using
the dipstick, as explained previously (it
should never fall below the minimum
level, or be over the maximum level on
the dipstick).
Engine oil grade
Refer to the Maintenance Document for
your vehicle.
Filling: take care when
topping up the oil that
no oil drips onto engine
components - risk of fire.
Remember to refit the cap securely
as there is a risk of fire if oil splashes
onto hot engine components.If there is an abnormal or repeated
drop in the fluid level, please consult
an authorised dealer.
Engine oil change: if you
are changing the oil when
the engine is hot, be careful
not to scald yourself if the
oil overflows.
1
2
1
1
2
In order to prevent splashback, it is
recommended that a funnel be used
when topping up/filling with oil.
Page 159 of 244
Downloaded from www.Manualslib.com manuals search engine JauneNoir Noir texte
4.7
ENG_UD20646_2
Niveaux (H79 - Dacia)
ENG_NU_1079-3_H79Ph2_Dacia_4
LEVELS (1/3)
Brake fluid level
This should be checked frequently,
and immediately if you notice even the
slightest loss in braking efficiency.
The level should be read with the engine
switched off and on level ground. Level
It is normal for the level to drop as the
brake shoes become worn, but it must
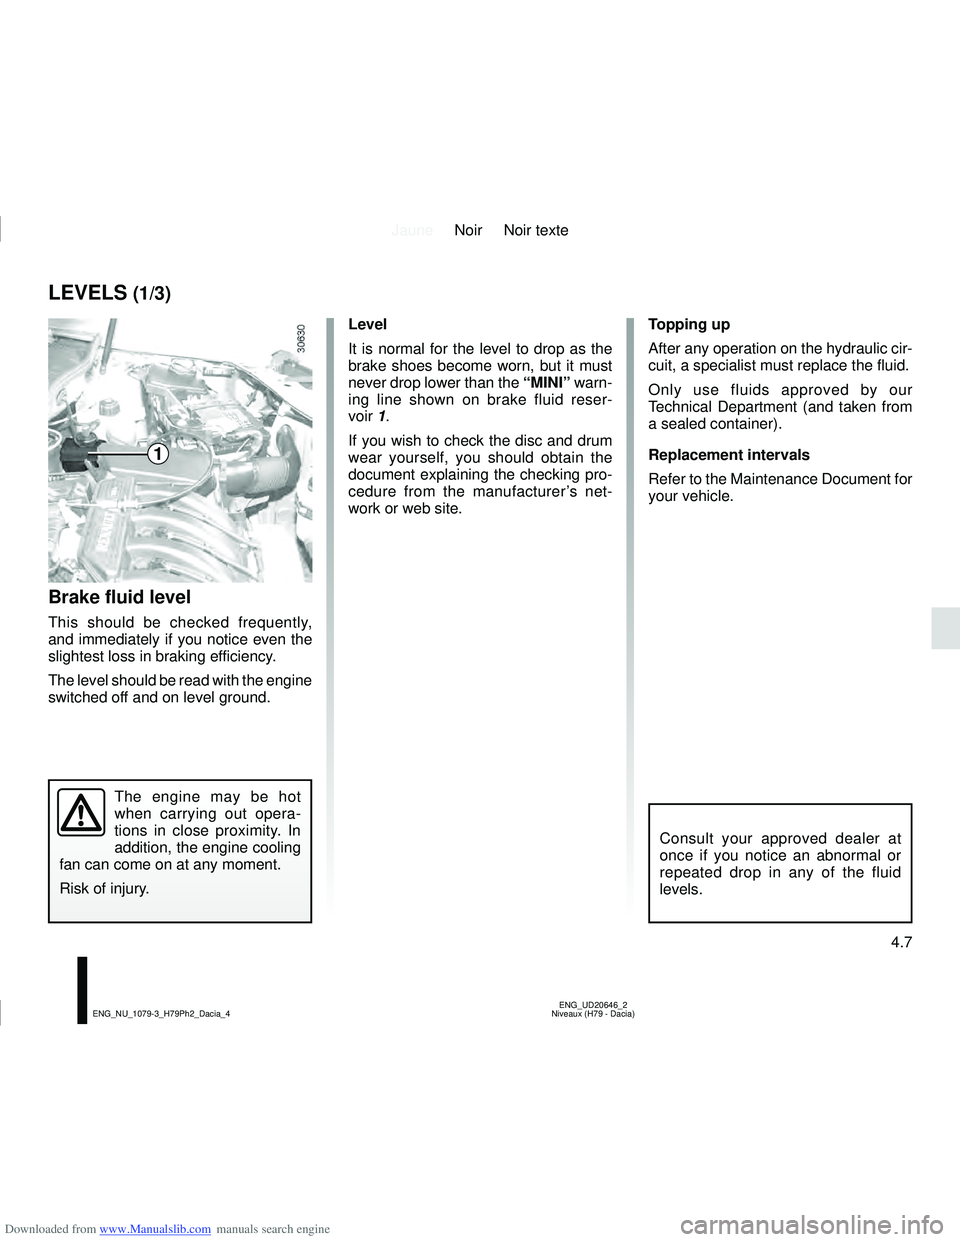
never drop lower than the “MINI” warn-
ing line shown on brake fluid reser-
voir 1.
If you wish to check the disc and drum
wear yourself, you should obtain the
document explaining the checking pro-
cedure from the manufacturer’s net-
work or web site.
Topping up
After any operation on the hydraulic cir-
cuit, a specialist must replace the fluid.
Only use fluids approved by our
Technical Department (and taken from
a sealed container).
Replacement intervals
Refer to the Maintenance Document for
your vehicle.
The engine may be hot
when carrying out opera-
tions in close proximity. In
addition, the engine cooling
fan can come on at any moment.
Risk of injury.
Consult your approved dealer at
once if you notice an abnormal or
repeated drop in any of the fluid
levels.
1
Page 160 of 244
Downloaded from www.Manualslib.com manuals search engine JauneNoir Noir texte
4.8
ENG_UD20646_2
Niveaux (H79 - Dacia)
ENG_NU_1079-3_H79Ph2_Dacia_4
LEVELS (2/3)
Coolant level checking frequency
Check the coolant level regularly
(very severe damage is likely to be
caused to the engine if it runs out of
coolant).
If the level needs to be topped up, only
use products approved by our Technical
Department which ensure:
– protection against freezing;
– anticorrosion protection of the cool- ing system.
Replacement intervals
Refer to the Maintenance Document for
your vehicle.
No operations should be
carried out on the cooling
circuit when the engine is
hot.
Risk of burns.
Consult your approved dealer at
once if you notice an abnormal or
repeated drop in any of the fluid
levels.
The engine may be hot
when carrying out opera-
tions in close proximity. In
addition, the engine cooling
fan can come on at any moment.
Risk of injury.
Windscreen washer reservoir
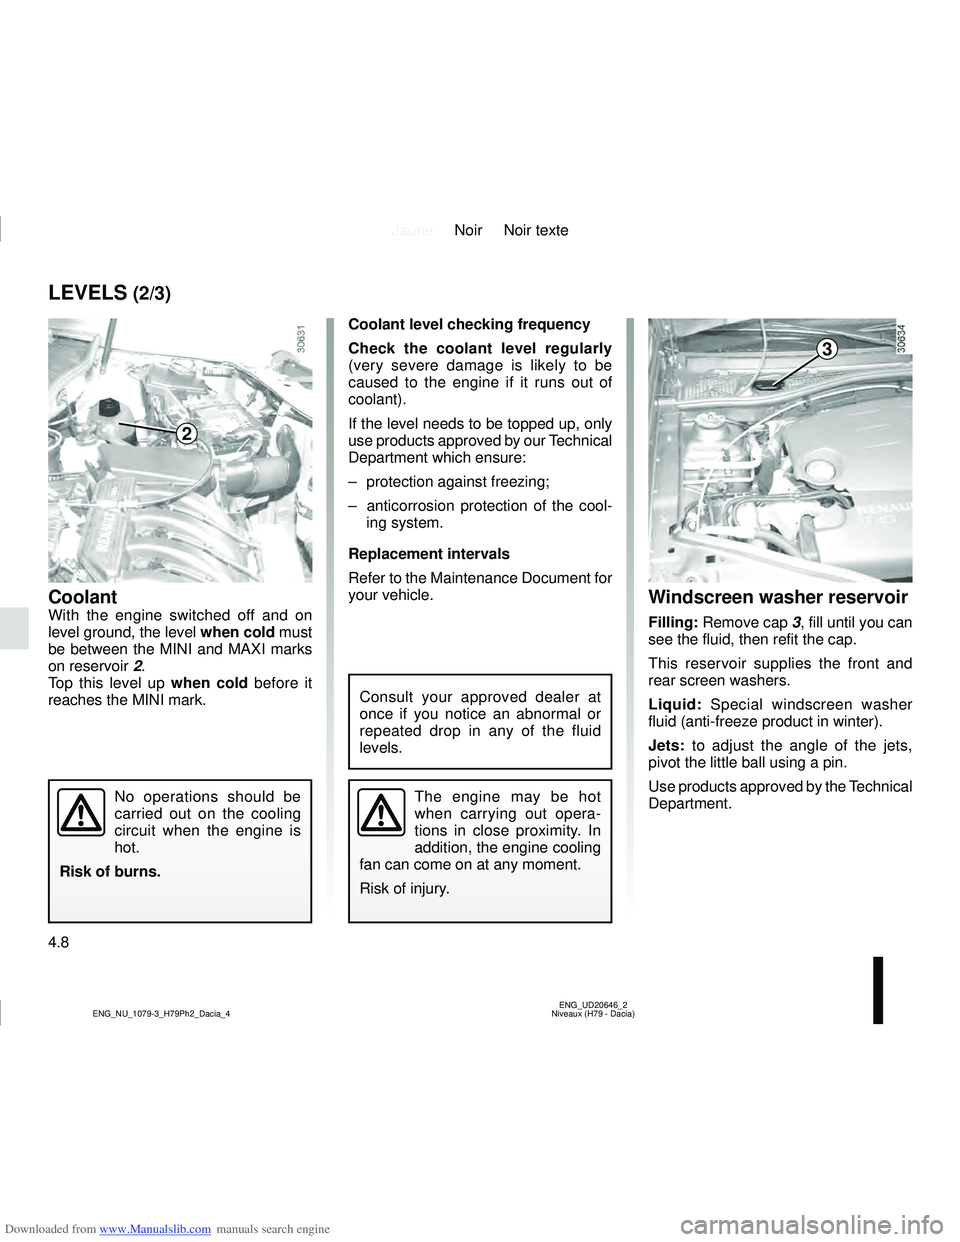
Filling: Remove cap 3, fill until you can
see the fluid, then refit the cap.
This reservoir supplies the front and
rear screen washers.
Liquid: Special windscreen washer
fluid (anti-freeze product in winter).
Jets: to adjust the angle of the jets,
pivot the little ball using a pin.
Use products approved by the Technical
Department.
CoolantWith the engine switched off and on
level ground, the level when cold must
be between the MINI and MAXI marks
on reservoir 2.
Top this level up when cold before it
reaches the MINI mark.
2
3
Page 162 of 244
Downloaded from www.Manualslib.com manuals search engine JauneNoir Noir texte
4.10
ENG_UD20151_3
Filtres (B90 - U90 - L90 Ph2 - F90 Ph2 - R90 Ph2 - H79 - Dacia)
ENG_NU_1079-3_H79Ph2_Dacia_4
FILTERS
The replacement of filter elements (air
filter, passenger compartment filter,
diesel filter, etc.) is scheduled in the
maintenance operations for your vehi-
cle.
Replacement intervals for filter el-
ements: refer to the Maintenance
Document for your vehicle.
Passenger compartment filter
If your vehicle is not originally fitted with
a passenger compartment filter, it is
possible to have one retrofitted.
Contact an approved dealer.
The engine may be hot
when carrying out opera-
tions in close proximity. In
addition, the engine cooling
fan can come on at any moment.
Risk of injury.
Air filter
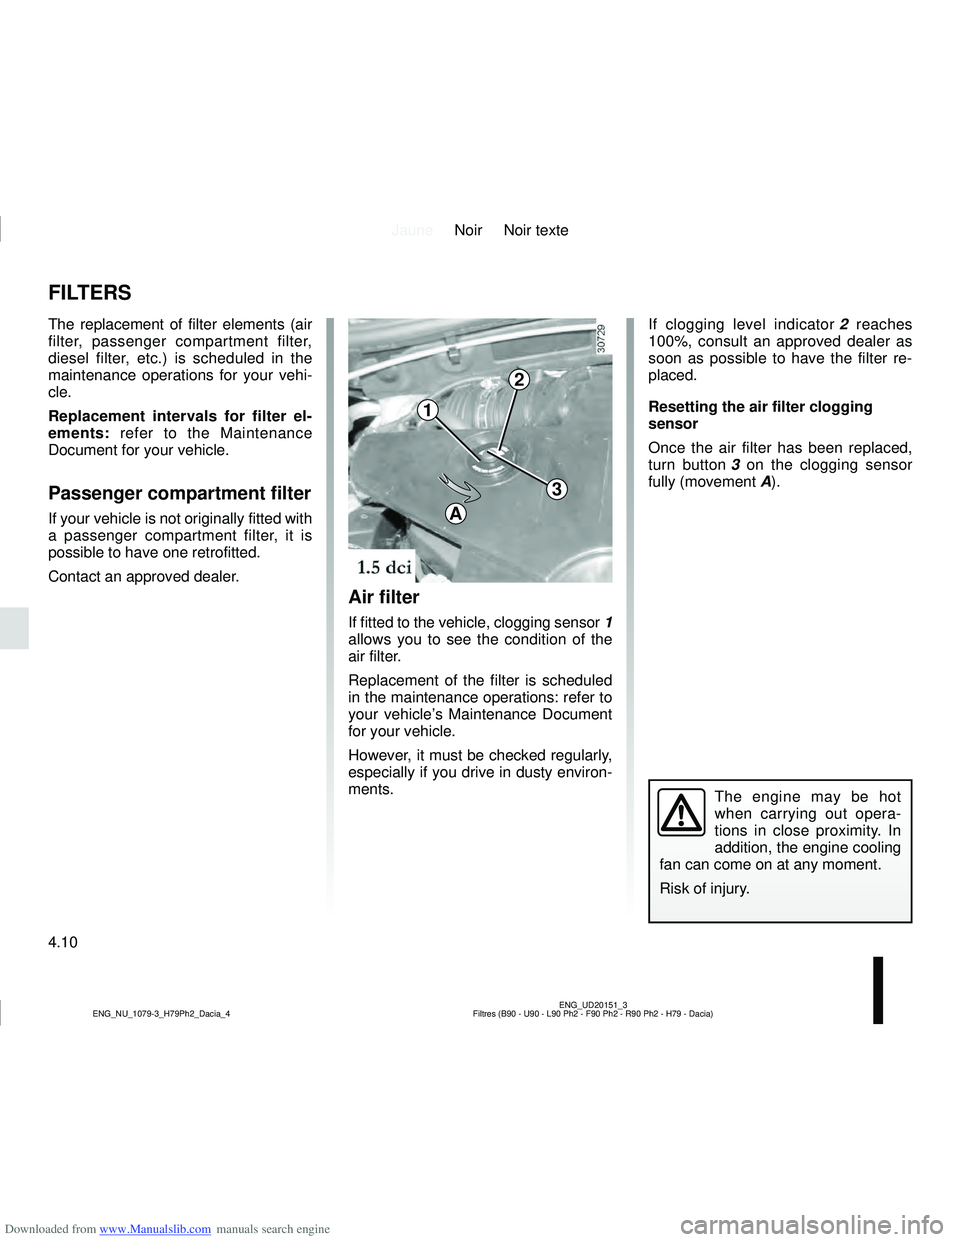
If fitted to the vehicle, clogging sensor 1
allows you to see the condition of the
air filter.
Replacement of the filter is scheduled
in the maintenance operations: refer to
your vehicle’s Maintenance Document
for your vehicle.
However, it must be checked regularly,
especially if you drive in dusty environ-
ments.
If clogging level indicator 2 reaches
100%, consult an approved dealer as
soon as possible to have the filter re-
placed.
Resetting the air filter clogging
sensor
Once the air filter has been replaced,
turn button 3 on the clogging sensor
fully (movement A).
1
2
3
A
Page 163 of 244
Downloaded from www.Manualslib.com manuals search engine JauneNoir Noir texte
4.11
ENG_UD35428_2
Pressions de gonflage des pneumatiques à froid (H79 - Dacia)
ENG_NU_1079-3_H79Ph2_Dacia_4
TYRE PRESSURE
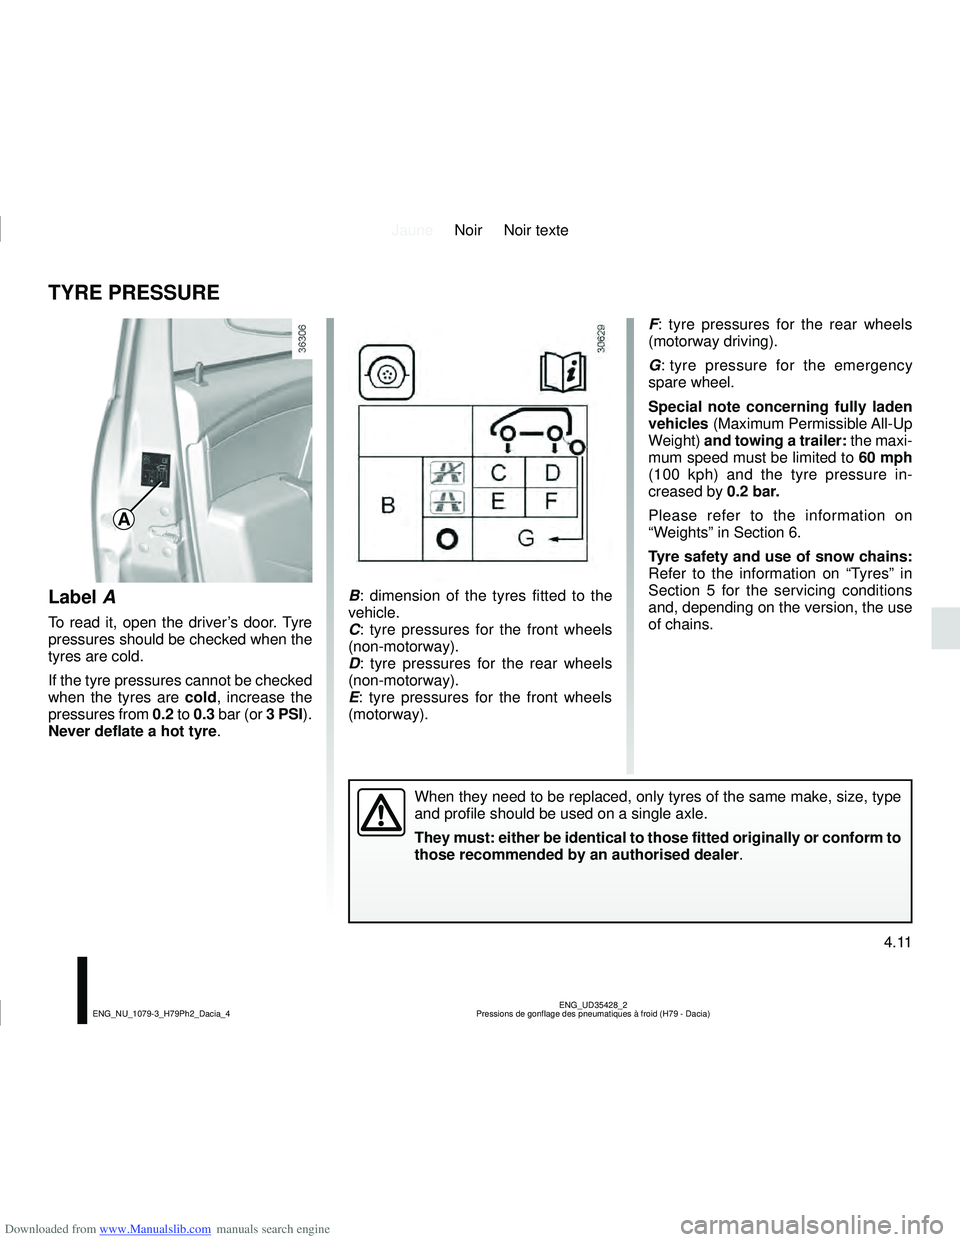
B : dimension of the tyres fitted to the
vehicle.
C : tyre pressures for the front wheels
(non-motorway).
D : tyre pressures for the rear wheels
(non-motorway).
E : tyre pressures for the front wheels
(motorway).
When they need to be replaced, only tyres of the same make, size, type
and profile should be used on a single axle.
They must: either be identical to those fitted originally or conform to \
those recommended by an authorised dealer.
F : tyre pressures for the rear wheels
(motorway driving).
G : tyre pressure for the emergency
spare wheel.
Special note concerning fully laden
vehicles (Maximum Permissible All-Up
Weight) and towing a trailer: the maxi-
mum speed must be limited to 60 mph
(100 kph) and the tyre pressure in-
creased by 0.2 bar.
Please refer to the information on
“Weights” in Section 6.
Tyre safety and use of snow chains:
Refer to the information on “Tyres” in
Section 5 for the servicing conditions
and, depending on the version, the use
of chains.
A
Label A
To read it, open the driver’s door. Tyre
pressures should be checked when the
tyres are cold.
If the tyre pressures cannot be checked
when the tyres are cold , increase the
pressures from 0.2 to 0.3 bar (or 3 PSI).
Never deflate a hot tyre .
Page 166 of 244
Downloaded from www.Manualslib.com manuals search engine JauneNoir Noir texte
4.14
ENG_UD26811_2
Entretien de la carrosserie (peinture mate) (X44 - X77 - J77 - X85 - \
B90 - X61 - TEST - X77 ph2 - X95 - B95 - D95 - K95 - J95 - R95 - L90 Ph2 - F90 Ph2 - R90 Ph2 - X62
ENG_NU_1079-3_H79Ph2_Dacia_4
Respect local regulations about wash-
ing vehicles (e.g. do not wash your ve-
hicle on a public highway).
Observe the vehicle stopping distances
when driving on gravelled surfaces to
prevent paint damage.
Repair, or have repaired quickly, areas
where the paint has been damaged, to
prevent corrosion spreading.
Remember to visit the body shop pe-
riodically in order to maintain your
anti-corrosion warranty. Refer to the
Maintenance Document.
If it is necessary to clean mechani-
cal components, hinges, etc., spray
them with products approved by our
Technical Department to protect them
after they have been cleaned.
BODYWORK MAINTENANCE (2/2)
We have selected special products
to care for your vehicle and you can
obtain these from the manufactur-
er’s accessory outlets.
Using a roller type car wash
Return the windscreen wiper stalk to
the Park position (refer to the informa-
tion on the “Windscreen washer, wiper”
in Section 1). Check the mounting of
external accessories, additional lights
and mirrors, and ensure that the wiper
blades are secured with adhesive tape.
Remove the radio aerial mast if your
vehicle is fitted with this equipment.
Remember to remove the tape and refit
the antenna after washing.
Cleaning the headlights
As the headlights are made of plastic
“glass”, use a soft cloth or cotton wool
to clean them. If this does not clean
them properly, moisten the cloth with
soapy water, then wipe clean with a soft
damp cloth or cotton wool.
Finally, carefully dry off with a soft dry
cloth.
Cleaning products containing alco-
hol must not be used.
Vehicles with a matte paint
finish
This type of paint requires certain pre-
cautions.
Do not do the following
– use wax-based products (polishing);
– rub hard;
– wash the vehicle in a roller-type car
wash;
– wash the vehicle using a high-pres-
sure device;
– attach stickers to the paintwork (risk
of leaving marks).
You should do the following
Wash the vehicle by hand using plenty
of water, using a soft cloth or a gentle
sponge.
Page 171 of 244
Downloaded from www.Manualslib.com manuals search engine JauneNoir Noir texte
5.3
ENG_UD36115_2
Crevaison (H79 Ph2 - Dacia)
ENG_NU_1079-3_H79Ph2_Dacia_5
PUNCTURE (1/2)
Emergency spare wheel 4x2
version (2WD)
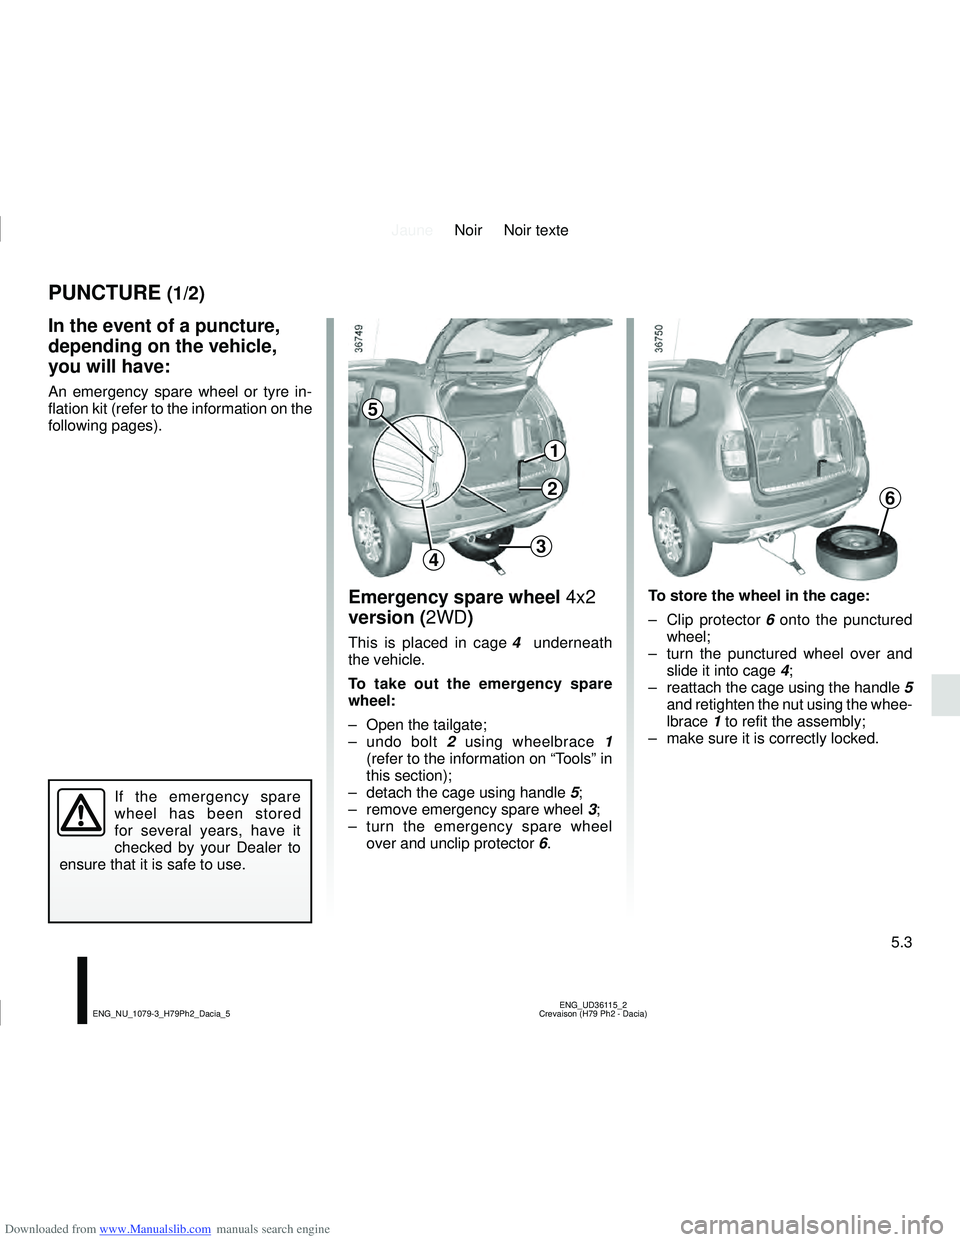
This is placed in cage 4 underneath
the vehicle.
To take out the emergency spare
wheel:
– Open the tailgate;
– undo bolt 2 using wheelbrace 1
(refer to the information on “Tools” in
this section);
– detach the cage using handle 5;
– remove emergency spare wheel 3;
– turn the emergency spare wheel over and unclip protector 6.
In the event of a puncture,
depending on the vehicle,
you will have:
An emergency spare wheel or tyre in-
flation kit (refer to the information on the
following pages).
If the emergency spare
wheel has been stored
for several years, have it
checked by your Dealer to
ensure that it is safe to use.
To store the wheel in the cage:
– Clip protector 6 onto the punctured
wheel;
– turn the punctured wheel over and slide it into cage 4;
– reattach the cage using the handle 5
and retighten the nut using the whee-
lbrace 1 to refit the assembly;
– make sure it is correctly locked.
1
2
34
5
6
Page 172 of 244
Downloaded from www.Manualslib.com manuals search engine JauneNoir Noir texte
5.4
ENG_UD36115_2
Crevaison (H79 Ph2 - Dacia)
ENG_NU_1079-3_H79Ph2_Dacia_5
PUNCTURE (2/2)
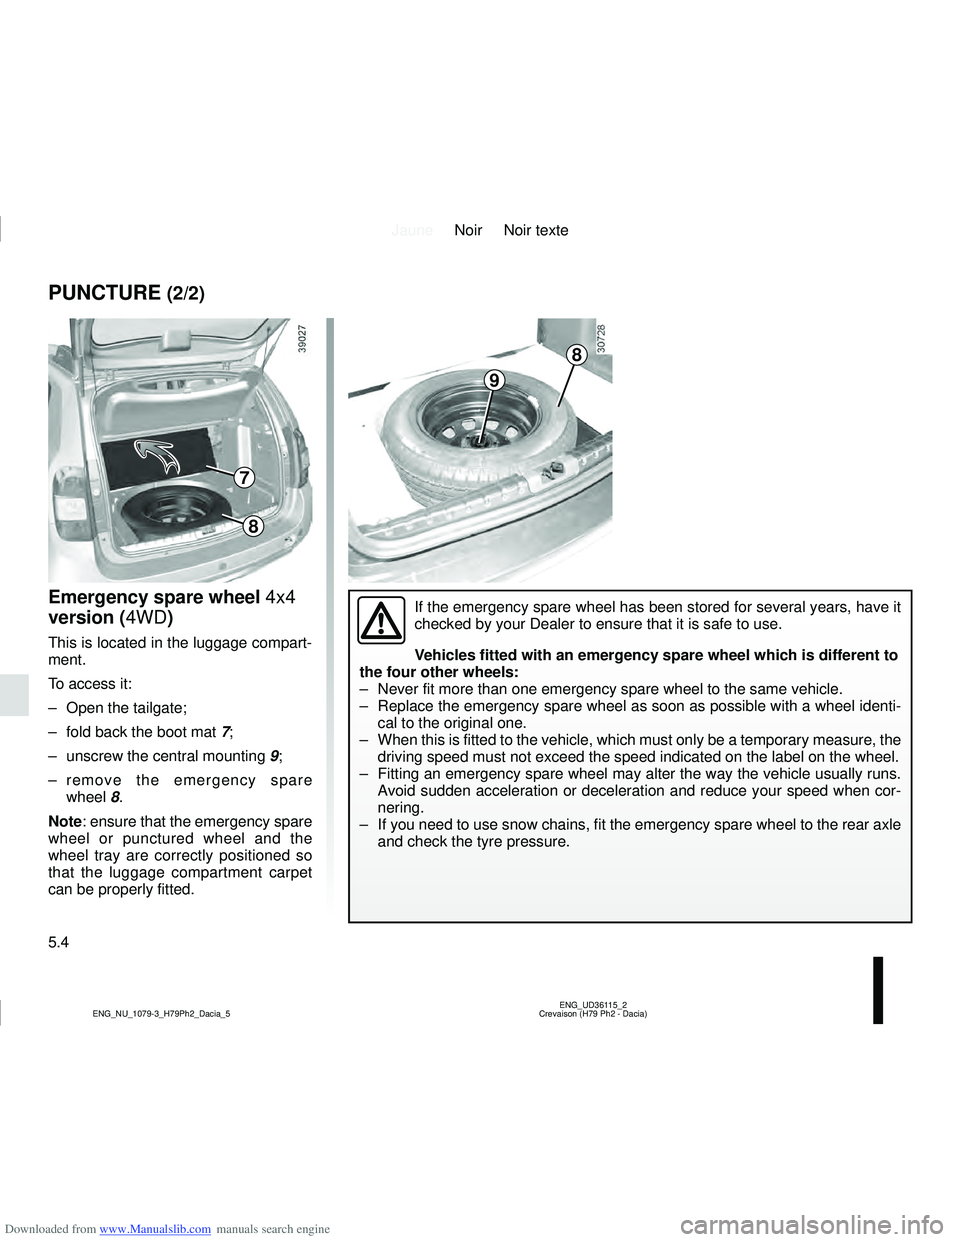
Emergency spare wheel 4x4
version (4WD)
This is located in the luggage compart-
ment.
To access it:
– Open the tailgate;
– fold back the boot mat 7;
– unscrew the central mounting 9;
– remove the emergency spare wheel 8.
Note: ensure that the emergency spare
wheel or punctured wheel and the
wheel tray are correctly positioned so
that the luggage compartment carpet
can be properly fitted.
9
8
If the emergency spare wheel has been stored for several years, have it \
checked by your Dealer to ensure that it is safe to use.
Vehicles fitted with an emergency spare wheel which is different to
the four other wheels:
– Never fit more than one emergency spare wheel to the same vehicle.
– Replace the emergency spare wheel as soon as possible with a wheel ident\
i- cal to the original one.
– When this is fitted to the vehicle, which must only be a temporary measu\
re, the driving speed must not exceed the speed indicated on the label on the wh\
eel.
– Fitting an emergency spare wheel may alter the way the vehicle usually runs. Avoid sudden acceleration or deceleration and reduce your speed when cor-\
nering.
– If you need to use snow chains, fit the emergency spare wheel to the rear axle and check the tyre pressure.
7
8
Page 173 of 244
Downloaded from www.Manualslib.com manuals search engine JauneNoir Noir texte
5.5
ENG_UD32703_1
Kit de gonflage des pneumatiques (H79 Ph2 - Dacia)
ENG_NU_1079-3_H79Ph2_Dacia_5
TYRE INFLATION KIT (1/4)
The kit is only approved
for inflating the tyres of the
vehicle initially fitted with the
kit. It must never be used to
inflate the tyres of another vehicle,
or any other inflatable object (rubber
ring, rubber boat, etc.).
Avoid spillage on skin when han-
dling the repair liquid bottle. If dro-
plets do leak out, rinse them off with
plenty of water.
Keep the repair kit away from chil-
dren.
Do not dispose of the empty bottle
in the countryside. Return it to your
approved dealer or to a recycling or-
ganisation.
The bottle has a limited service
life which is indicated on its label.
Check the expiry date.
Contact an approved dealer to re-
place the inflation tube and repair
product bottle.
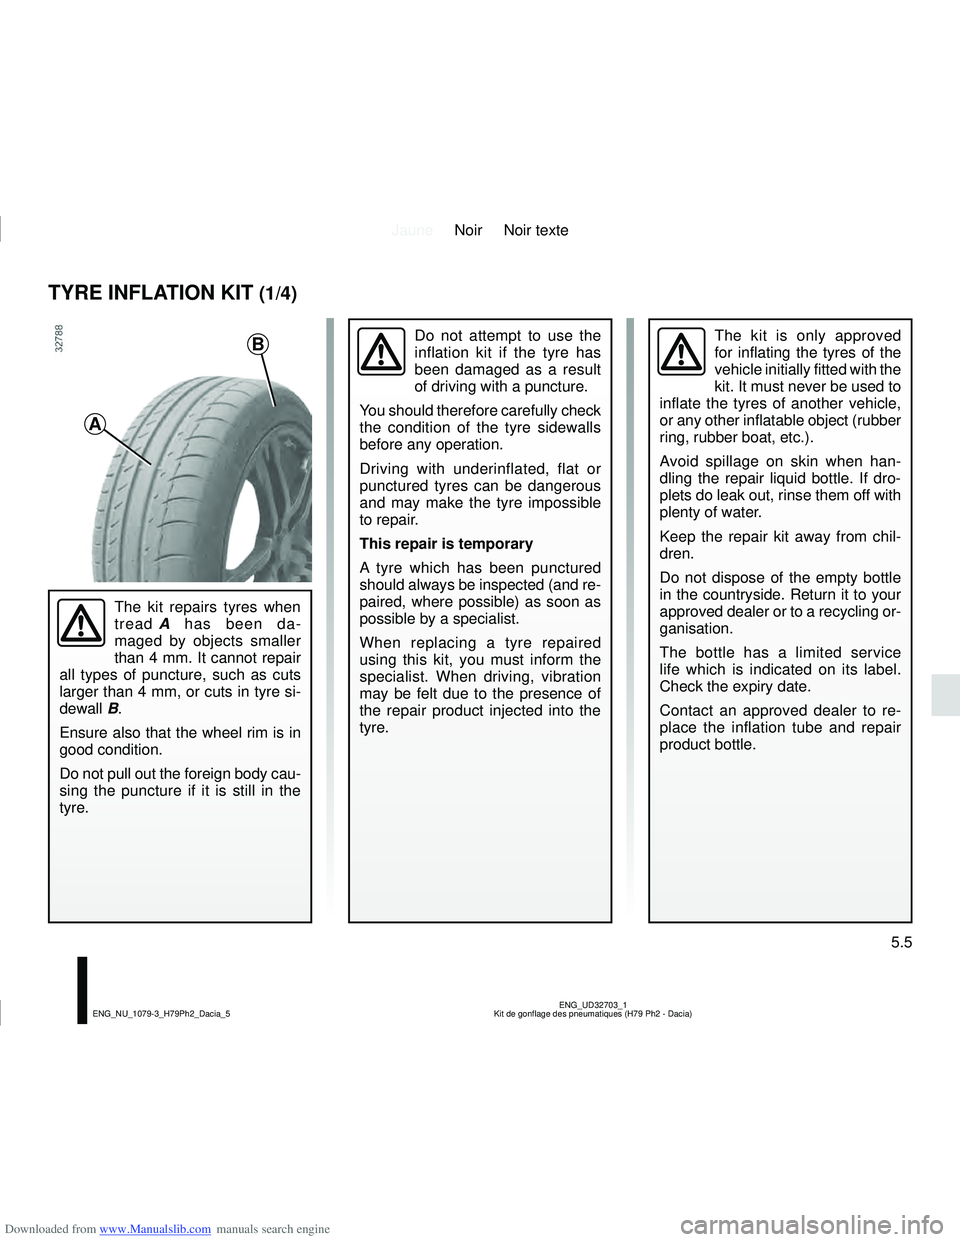
A
B
The kit repairs tyres when
tread A has been da-
maged by objects smaller
than 4 mm. It cannot repair
all types of puncture, such as cuts
larger than 4 mm, or cuts in tyre si-
dewall B.
Ensure also that the wheel rim is in
good condition.
Do not pull out the foreign body cau-
sing the puncture if it is still in the
tyre.
Do not attempt to use the
inflation kit if the tyre has
been damaged as a result
of driving with a puncture.
You should therefore carefully check
the condition of the tyre sidewalls
before any operation.
Driving with underinflated, flat or
punctured tyres can be dangerous
and may make the tyre impossible
to repair.
This repair is temporary
A tyre which has been punctured
should always be inspected (and re-
paired, where possible) as soon as
possible by a specialist.
When replacing a tyre repaired
using this kit, you must inform the
specialist. When driving, vibration
may be felt due to the presence of
the repair product injected into the
tyre.