warning DACIA DUSTER 2022 Workshop Manual
[x] Cancel search | Manufacturer: DACIA, Model Year: 2022, Model line: DUSTER, Model: DACIA DUSTER 2022Pages: 244, PDF Size: 3.57 MB
Page 121 of 244

Downloaded from www.Manualslib.com manuals search engine JauneNoir Noir texte
2.39
ENG_UD32147_1
Aide au parking (H79 - Dacia)
ENG_NU_1079-3_H79Ph2_Dacia_2
PARKING DISTANCE CONTROL (2/2)
Deactivating the system
You can deactivate the system by
pressing switch 1.
The warning light built into the switch
remains lit constantly.
The deactivated system can be reacti-
vated by pressing the switch again.
Operating faults
When the system detects an operat-
ing fault, there will be a three-second
continuous beep as a warning. Please
consult an authorised dealer.
1
Page 127 of 244
Downloaded from www.Manualslib.com manuals search engine JauneNoir Noir texte
3.5
ENG_UD32151_1
Chauffage - Ventilation - Air conditionné (H79 - Dacia)
ENG_NU_1079-3_H79Ph2_Dacia_3
HEATING, VENTILATION, AIR CONDITIONING (2/3)
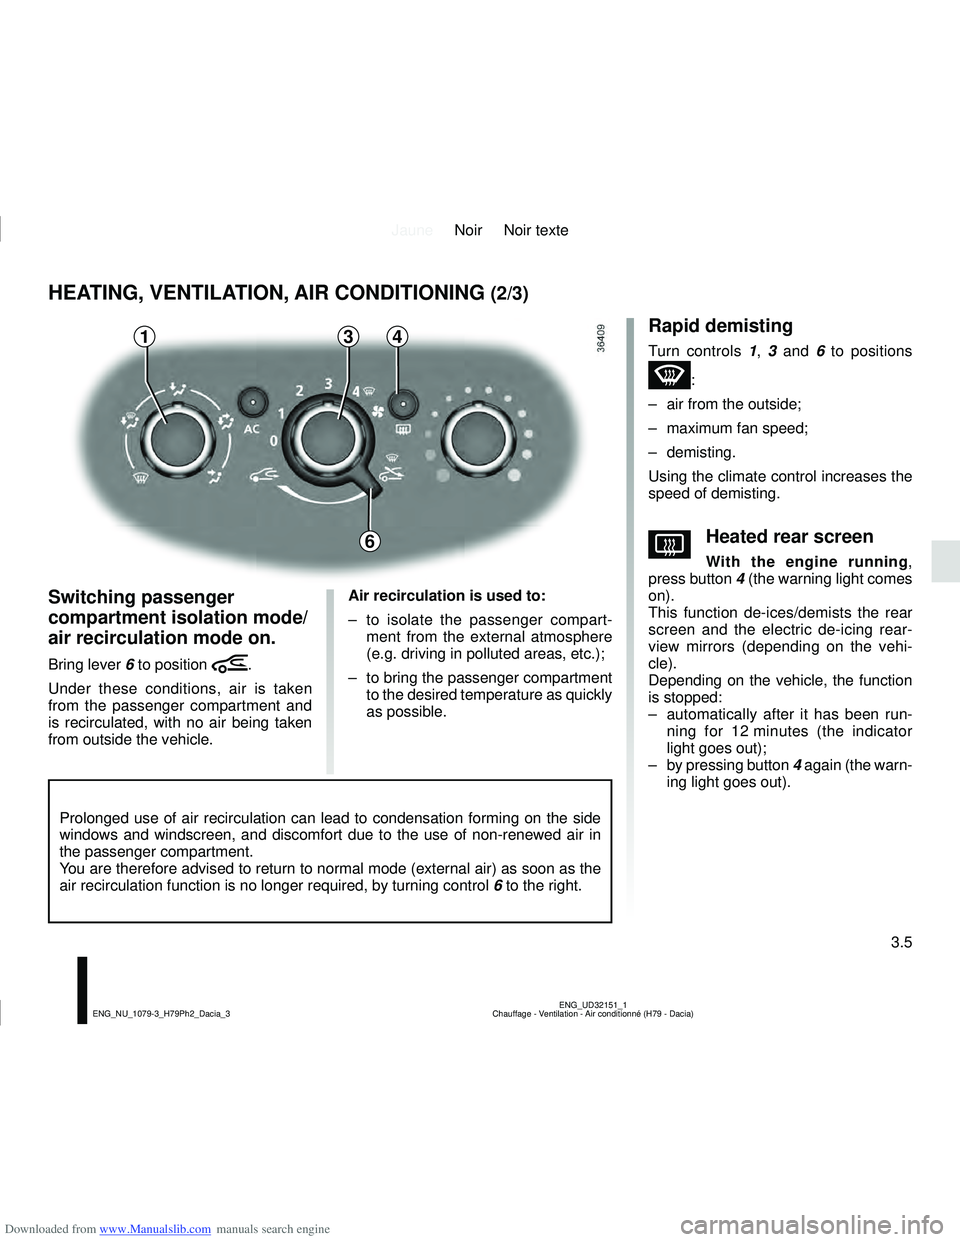
43
Switching passenger
compartment isolation mode/
air recirculation mode on.
Bring lever 6 to position â.
Under these conditions, air is taken
from the passenger compartment and
is recirculated, with no air being taken
from outside the vehicle. Air recirculation is used to:
– to isolate the passenger compart-
ment from the external atmosphere
(e.g. driving in polluted areas, etc.);
– to bring the passenger compartment to the desired temperature as quickly
as possible.
Rapid demisting
Turn controls 1 , 3 and 6 to positions
W:
– air from the outside;
– maximum fan speed;
– demisting.
Using the climate control increases the
speed of demisting.
VHeated rear screen
With the engine running ,
press button 4 (the warning light comes
on).
This function de-ices/demists the rear
screen and the electric de-icing rear-
view mirrors (depending on the vehi-
cle).
Depending on the vehicle, the function
is stopped:
– automatically after it has been run- ning for 12 minutes (the indicator
light goes out);
– by pressing button 4 again (the warn-
ing light goes out).
Prolonged use of air recirculation can lead to condensation forming on the side
windows and windscreen, and discomfort due to the use of non-renewed air\
in
the passenger compartment.
You are therefore advised to return to normal mode (external air) as so\
on as the
air recirculation function is no longer required, by turning control 6 to the right.
1
6
Page 130 of 244
Downloaded from www.Manualslib.com manuals search engine JauneNoir Noir texte
3.8
ENG_UD27152_1
Climatisation additionnelle (H79 - Dacia)
ENG_NU_1079-3_H79Ph2_Dacia_3
ADDITIONAL AIR CONDITIONING
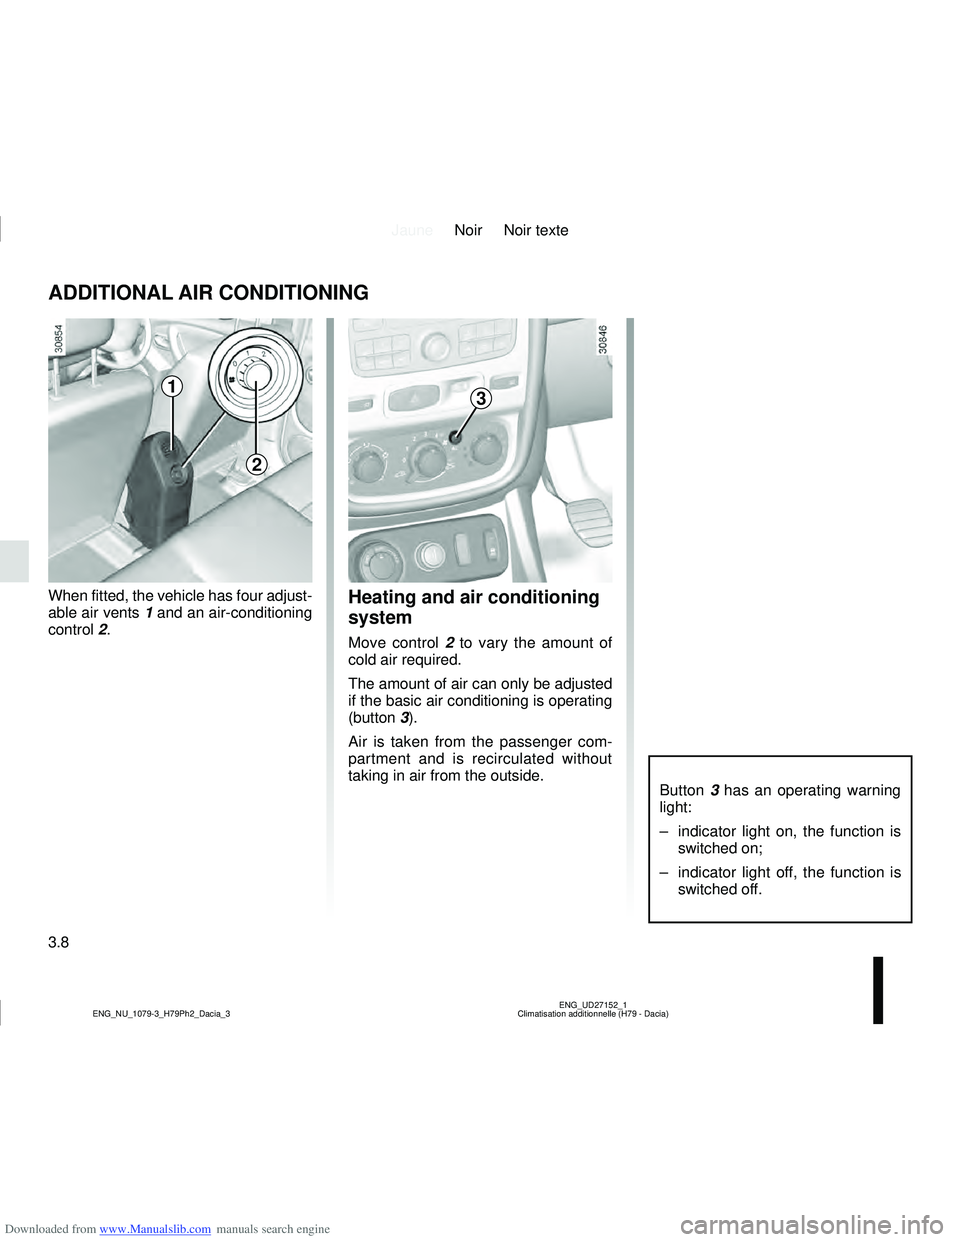
When fitted, the vehicle has four adjust-
able air vents 1 and an air-conditioning
control 2.Heating and air conditioning
system
Move control 2 to vary the amount of
cold air required.
The amount of air can only be adjusted
if the basic air conditioning is operating
(button 3).
Air is taken from the passenger com-
partment and is recirculated without
taking in air from the outside.
Button 3 has an operating warning
light:
– indicator light on, the function is switched on;
– indicator light off, the function is switched off.
3
2
1
Page 158 of 244
Downloaded from www.Manualslib.com manuals search engine JauneNoir Noir texte
4.6
ENG_UD34980_2
Niveau huile moteur : appoint / remplissage (H79 Ph2 - Dacia)
ENG_NU_1079-3_H79Ph2_Dacia_4
ENGINE OIL LEVEL: topping up, filling (3/3)
Never run the engine in an
enclosed space as exhaust
gases are poisonous.
Resetting the alert after an oil
change
(depending on the vehicle)
If you change the oil yourself, you will
need to reset the oil change warning.
To do this, after switching on the igni-
tion, for ten seconds you must:
– Depress the accelerator pedal fully,
– with your foot on the accelerator,
depress the brake pedal three times
in succession.
Reinitialisation is complete when the
# indicator light goes out. If this is
not the case, repeat the operation.
Special case: if you change the oil
before the oil change interval excee-
ded warning is displayed, it will also be
necessary to reset the display. In this
case, the
# warning light comes on
for approximately 5 seconds to confirm
the reset.
The engine may be hot
during operations in close
proximity. In addition, the
engine cooling fan may
come on at any moment.
Risk of injury.
Exceeding the maximum
engine oil level
Under no circumstances
must the maximum fill level
be exceeded: risk of damage to the
engine and catalytic converter.
If the oil level exceeds the maximum
level, do not start your vehicle .
Contact an authorised dealer.
Page 174 of 244
Downloaded from www.Manualslib.com manuals search engine JauneNoir Noir texte
5.6
ENG_UD32703_1
Kit de gonflage des pneumatiques (H79 Ph2 - Dacia)
ENG_NU_1079-3_H79Ph2_Dacia_5
TYRE INFLATION KIT (2/4)
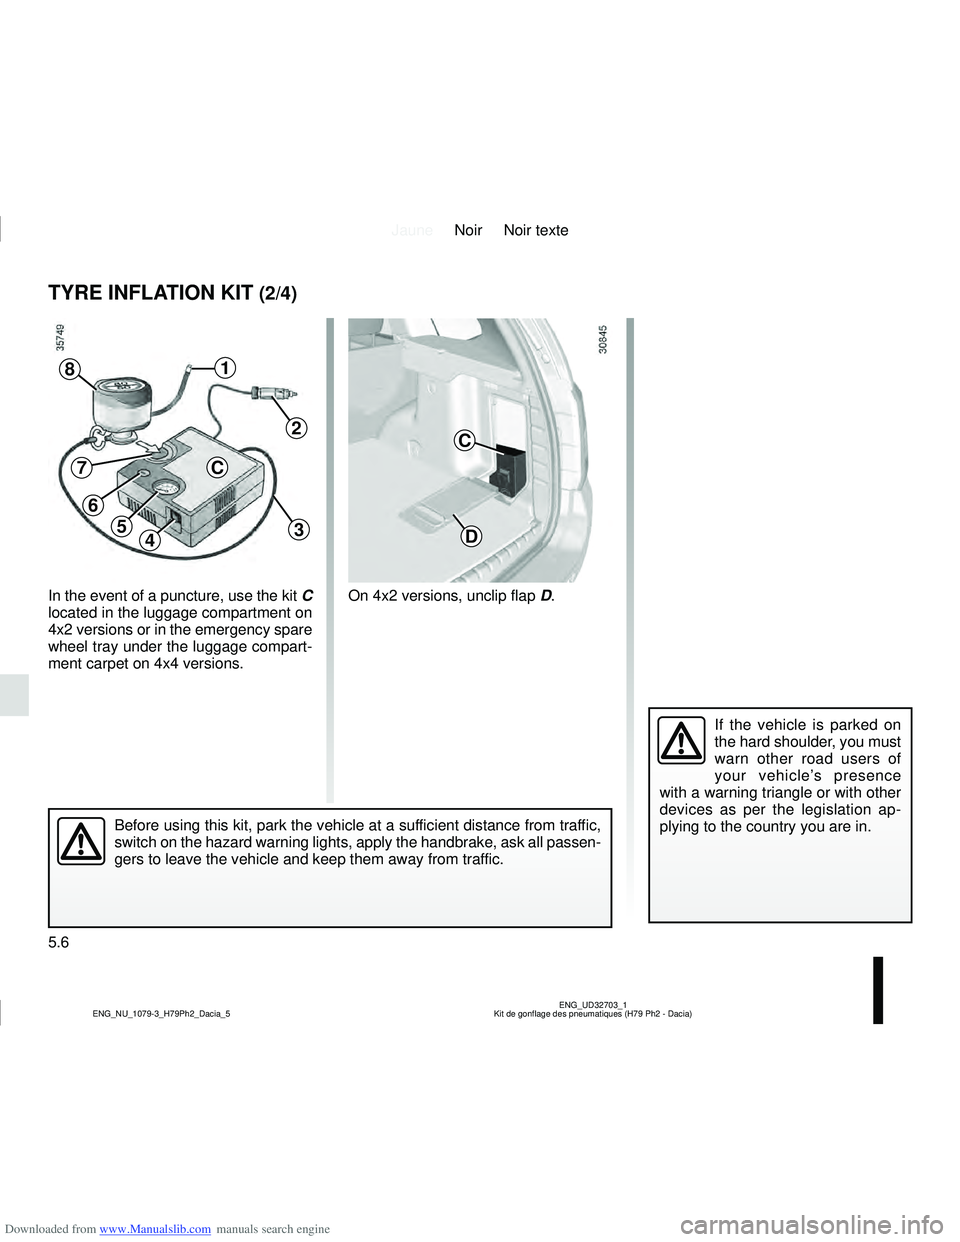
In the event of a puncture, use the kit C
located in the luggage compartment on
4x2 versions or in the emergency spare
wheel tray under the luggage compart-
ment carpet on 4x4 versions.
45
1
Before using this kit, park the vehicle at a sufficient distance from traffic,
switch on the hazard warning lights, apply the handbrake, ask all passen\
-
gers to leave the vehicle and keep them away from traffic.
8
2
3
7
6
On 4x2 versions, unclip flap D.
C
C
D
If the vehicle is parked on
the hard shoulder, you must
warn other road users of
your vehicle’s presence
with a warning triangle or with other
devices as per the legislation ap-
plying to the country you are in.
Page 178 of 244
Downloaded from www.Manualslib.com manuals search engine JauneNoir Noir texte
5.10
ENG_UD34941_5
Changement de roue (H79 - H79 Ph2 - Dacia)
ENG_NU_1079-3_H79Ph2_Dacia_5
CHANGING A WHEEL (1/2)
Switch on the hazard warn-
ing lights.
Park the vehicle away from
traffic on flat ground with a
good level of grip. Engage the hand-
brake and put into gear (first or re-
verse).
Ask the passengers to leave the ve-
hicle and to keep away from traffic.
If you have a puncture, re-
place the wheel as soon as
possible.
A tyre which has been punc-
tured should always be inspected
(and repaired, where possible) by a
specialist.
Vehicles equipped with a jack
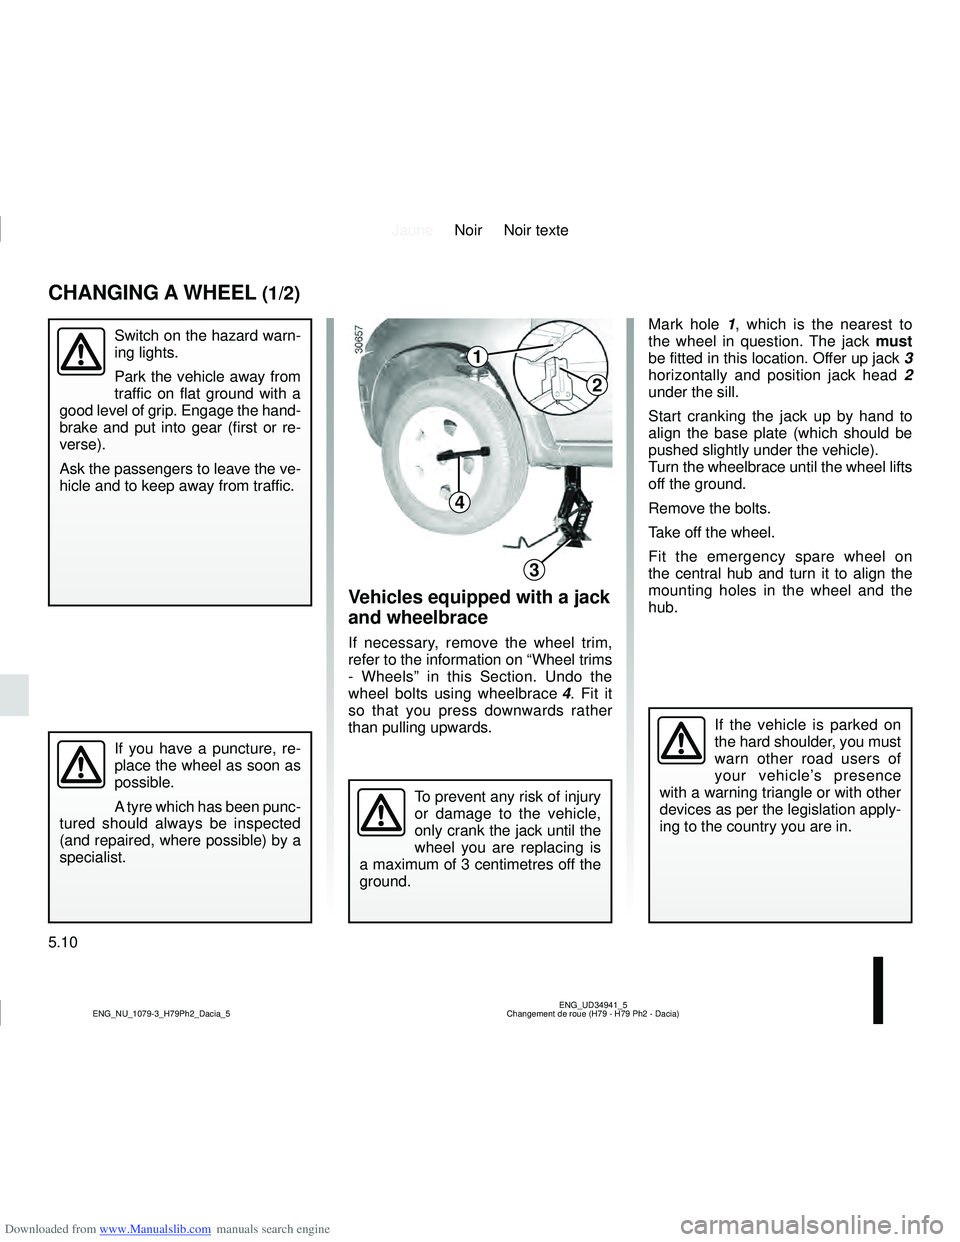
and wheelbrace
If necessary, remove the wheel trim,
refer to the information on “Wheel trims
- Wheels” in this Section. Undo the
wheel bolts using wheelbrace 4. Fit it
so that you press downwards rather
than pulling upwards. Mark hole 1
, which is the nearest to
the wheel in question. The jack must
be fitted in this location. Offer up jack 3
horizontally and position jack head 2
under the sill.
Start cranking the jack up by hand to
align the base plate (which should be
pushed slightly under the vehicle).
Turn the wheelbrace until the wheel lifts
off the ground.
Remove the bolts.
Take off the wheel.
Fit the emergency spare wheel on
the central hub and turn it to align the
mounting holes in the wheel and the
hub.
To prevent any risk of injury
or damage to the vehicle,
only crank the jack until the
wheel you are replacing is
a maximum of 3 centimetres off the
ground.
If the vehicle is parked on
the hard shoulder, you must
warn other road users of
your vehicle’s presence
with a warning triangle or with other
devices as per the legislation apply-
ing to the country you are in.
1
2
3
4
Page 179 of 244
Downloaded from www.Manualslib.com manuals search engine JauneNoir Noir texte
5.11
ENG_UD34941_5
Changement de roue (H79 - H79 Ph2 - Dacia)
ENG_NU_1079-3_H79Ph2_Dacia_5
CHANGING A WHEEL (2/2)
If the vehicle is parked on
the hard shoulder, you must
warn other road users of
your vehicle’s presence
with a warning triangle or with other
devices as per the legislation apply-
ing to the country you are in.
Note: ensure that the emergency
spare wheel or punctured wheel and
the wheel tray are correctly posi-
tioned so that the luggage compart-
ment carpet can be properly fitted.
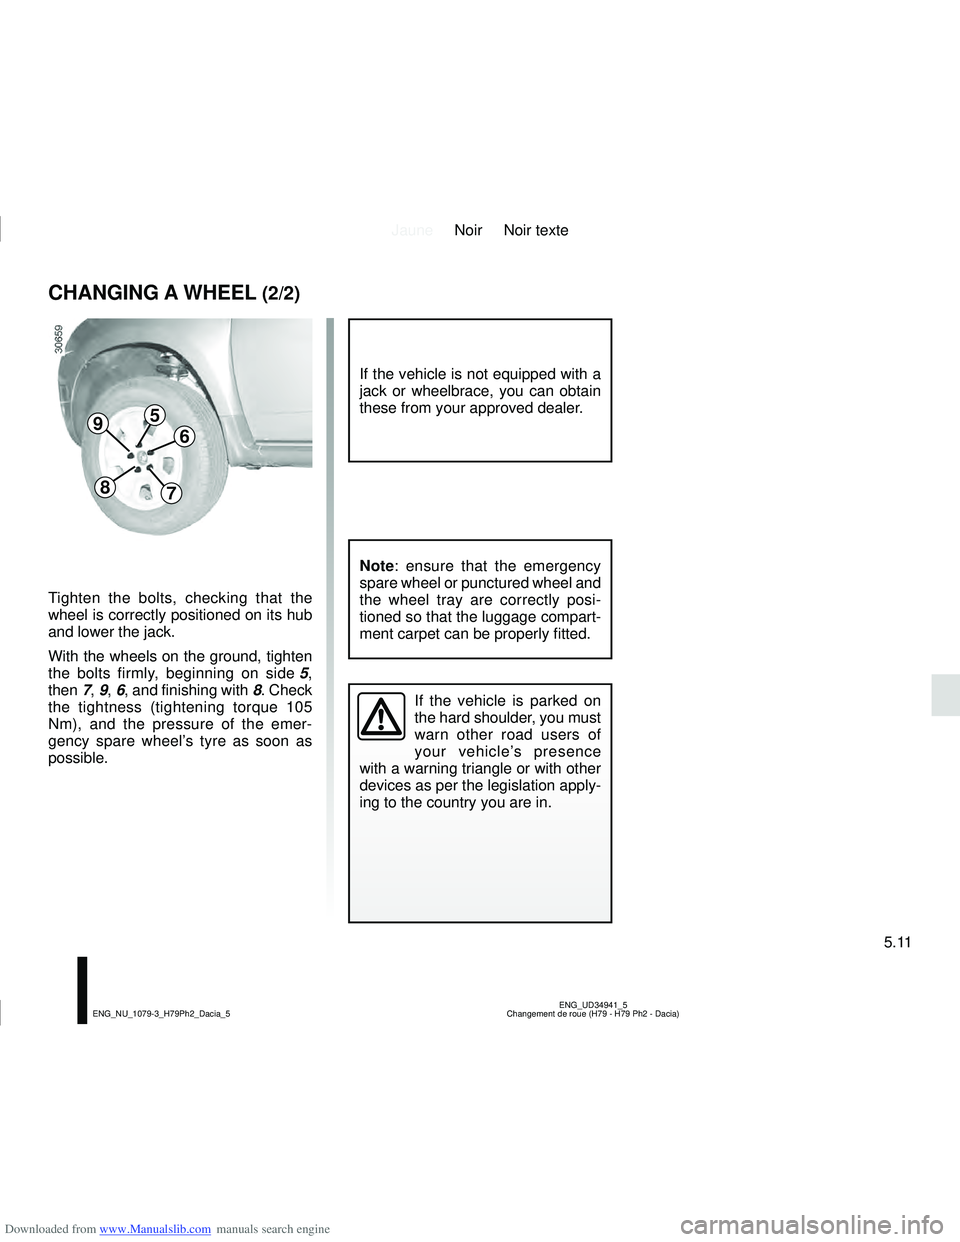
Tighten the bolts, checking that the
wheel is correctly positioned on its hub
and lower the jack.
With the wheels on the ground, tighten
the bolts firmly, beginning on side 5,
then 7, 9, 6, and finishing with 8. Check
the tightness (tightening torque 105
Nm), and the pressure of the emer-
gency spare wheel’s tyre as soon as
possible.
If the vehicle is not equipped with a
jack or wheelbrace, you can obtain
these from your approved dealer.
5
6
78
9
Page 180 of 244
Downloaded from www.Manualslib.com manuals search engine JauneNoir Noir texte
5.12
ENG_UD20582_3
Pneumatiques (H79 - Dacia)ENG_NU_1079-3_H79Ph2_Dacia_5
TYRES (1/3)
Tyre and wheel safety
The tyres are the only contact between
the vehicle and the road, so it is essen-
tial to keep them in good condition.
You must make sure that your tyres
conform to local road traffic regulations.
When they need to be re-
placed, only tyres of the
same make, size, type and
profile should be used.
Tyres fitted to the vehicle should
either be identical to those fitted
originally or conform to those
recommended by your approved
dealer.Maintaining the tyres
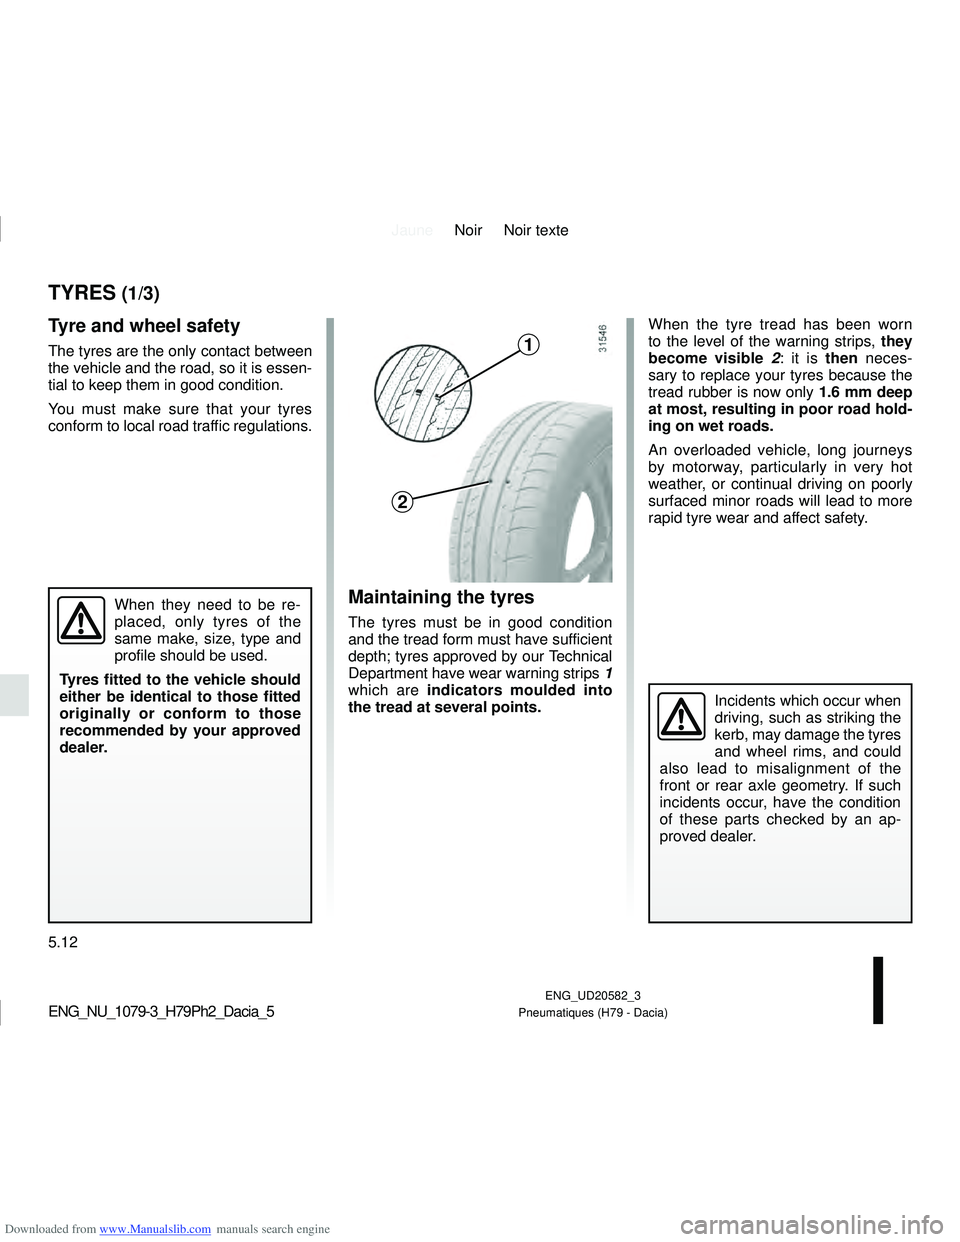
The tyres must be in good condition
and the tread form must have sufficient
depth; tyres approved by our Technical
Department have wear warning strips 1
which are indicators moulded into
the tread at several points. When the tyre tread has been worn
to the level of the warning strips, they
become visible
2: it is then neces-
sary to replace your tyres because the
tread rubber is now only 1.6 mm deep
at most, resulting in poor road hold-
ing on wet roads.
An overloaded vehicle, long journeys
by motorway, particularly in very hot
weather, or continual driving on poorly
surfaced minor roads will lead to more
rapid tyre wear and affect safety.
Incidents which occur when
driving, such as striking the
kerb, may damage the tyres
and wheel rims, and could
also lead to misalignment of the
front or rear axle geometry. If such
incidents occur, have the condition
of these parts checked by an ap-
proved dealer.
1
2
Page 182 of 244
Downloaded from www.Manualslib.com manuals search engine JauneNoir Noir texte
5.14
ENG_UD20582_3
Pneumatiques (H79 - Dacia)ENG_NU_1079-3_H79Ph2_Dacia_5
Use in winter
Chains
2-wheel drive version (2WD)
Snow chains must be fitted to the
front wheels.
4-wheel drive version (4WD)
Snow chains may be fitted to only the
front wheels, or to all four wheels.
TYRES (3/3)
It is forbidden to fit snow
chains to only the rear
wheels.
Snow chains may only be
fitted to tyres of the same size as
those originally fitted to your vehicle.
Only certain chains can be fitted to
tyres.
Consult an approved dealer.
Snow or Winter tyres
We would recommend that these be
fitted to all four wheels to ensure that
your vehicle retains maximum adhe-
sion.
Warning: These tyres sometimes
have a specific direction of rotation
and a maximum speed index which
may be lower than the maximum
speed of your vehicle.
Studded tyres
This type of equipment may only be
used for a limited period and as laid
down by local legislation.
It is necessary to observe the speed
specified by current legislation.
These tyres must, at a minimum, be
fitted to the two front wheels.
In all cases, we would recommend
that you contact your approved
dealer who will be able to advise you
on the choice of equipment which is
most suitable for your vehicle.
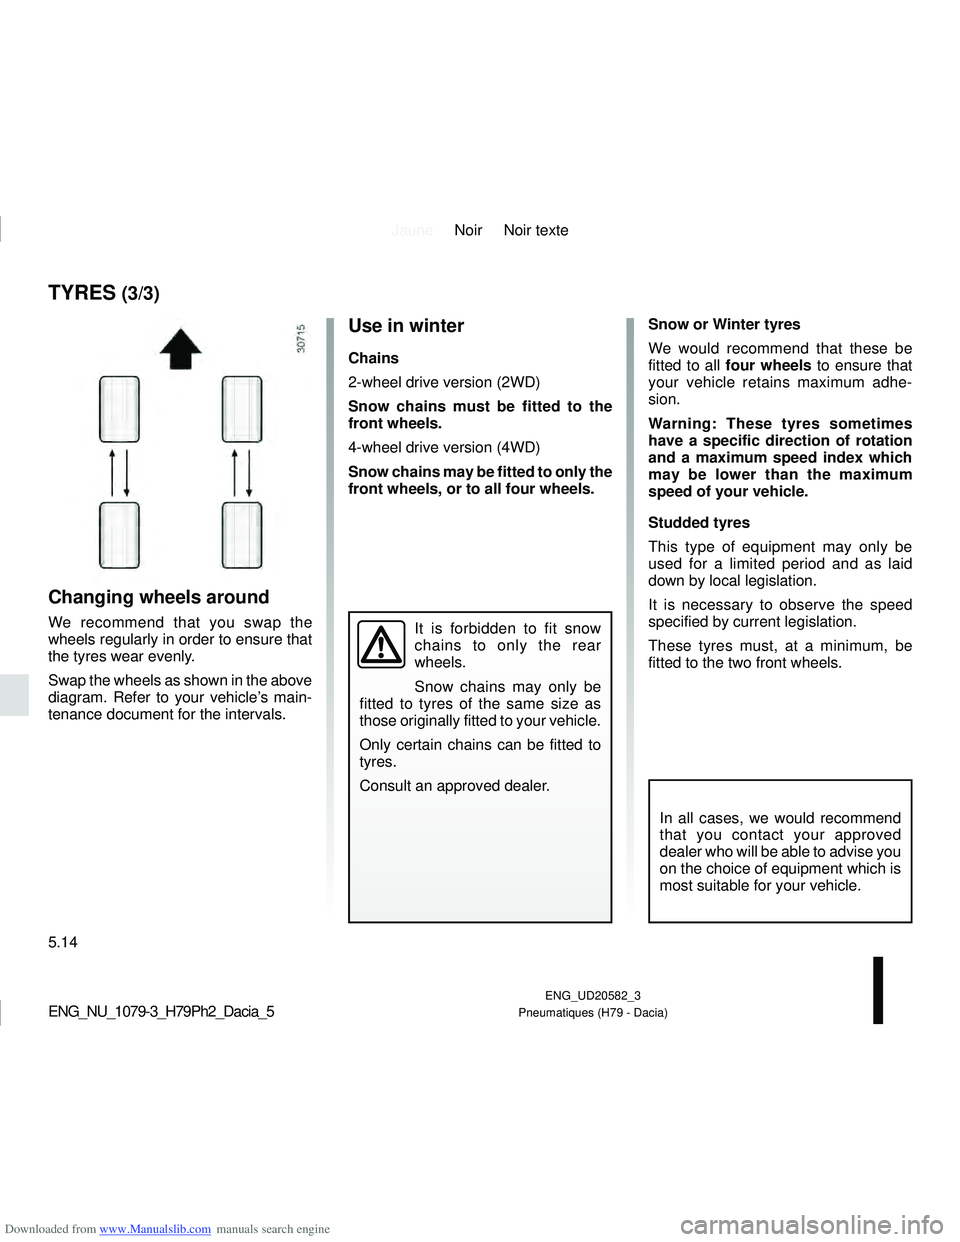
Changing wheels around
We recommend that you swap the
wheels regularly in order to ensure that
the tyres wear evenly.
Swap the wheels as shown in the above
diagram. Refer to your vehicle’s main-
tenance document for the intervals.
Page 200 of 244
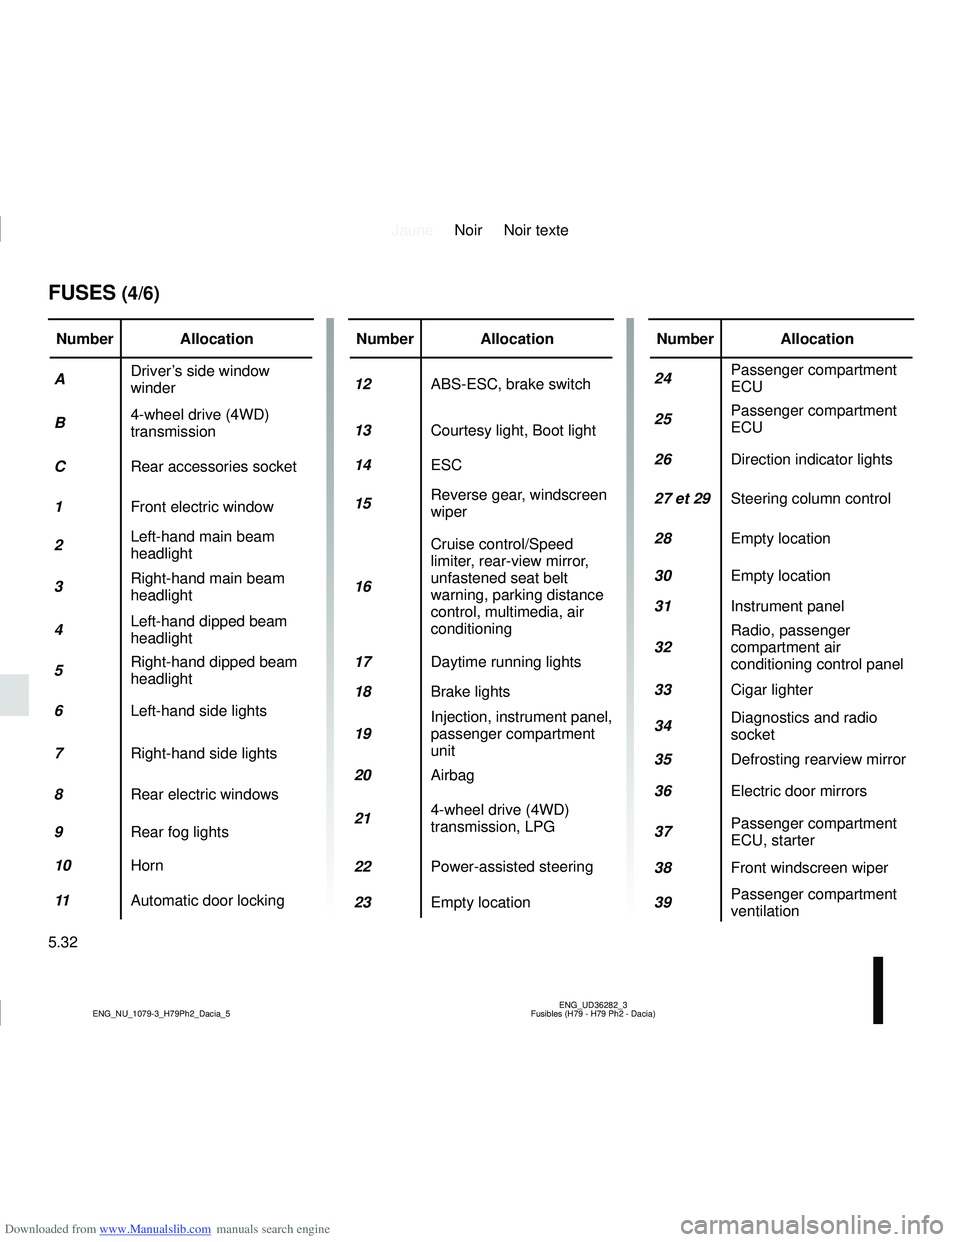
Downloaded from www.Manualslib.com manuals search engine JauneNoir Noir texte
5.32
ENG_UD36282_3
Fusibles (H79 - H79 Ph2 - Dacia)
ENG_NU_1079-3_H79Ph2_Dacia_5
FUSES (4/6)
Number Allocation
A Driver’s side window
winder
B 4-wheel drive (4WD)
transmission
C Rear accessories socket
1 Front electric window
2 Left-hand main beam
headlight
3 Right-hand main beam
headlight
4 Left-hand dipped beam
headlight
5 Right-hand dipped beam
headlight
6 Left-hand side lights
7 Right-hand side lights
8 Rear electric windows
9 Rear fog lights
10 Horn
11 Automatic door lockingNumber Allocation
12 ABS-ESC, brake switch
13 Courtesy light, Boot light
14 ESC
15 Reverse gear, windscreen
wiper
16 Cruise control/Speed
limiter, rear-view mirror,
unfastened seat belt
warning, parking distance
control, multimedia, air
conditioning
17 Daytime running lights
18 Brake lights
19 Injection, instrument panel,
passenger compartment
unit
20 Airbag
21 4-wheel drive (4WD)
transmission, LPG
22 Power-assisted steering
23 Empty locationNumber Allocation
24 Passenger compartment
ECU
25 Passenger compartment
ECU
26 Direction indicator lights
27 et 29 Steering column control
28 Empty location
30 Empty location
31 Instrument panel
32 Radio, passenger
compartment air
conditioning control panel
33 Cigar lighter
34 Diagnostics and radio
socket
35 Defrosting rearview mirror
36 Electric door mirrors
37 Passenger compartment
ECU, starter
38 Front windscreen wiper
39 Passenger compartment
ventilation