light DACIA DUSTER 2022 Repair Manual
[x] Cancel search | Manufacturer: DACIA, Model Year: 2022, Model line: DUSTER, Model: DACIA DUSTER 2022Pages: 244, PDF Size: 3.57 MB
Page 117 of 244
Downloaded from www.Manualslib.com manuals search engine JauneNoir Noir texte
2.35
ENG_UD33904_1
Boîte de vitesses automatique (H79 Ph2 - Dacia)
ENG_NU_1079-3_H79Ph2_Dacia_2
AUTOMATIC TRANSMISSION (1/3)
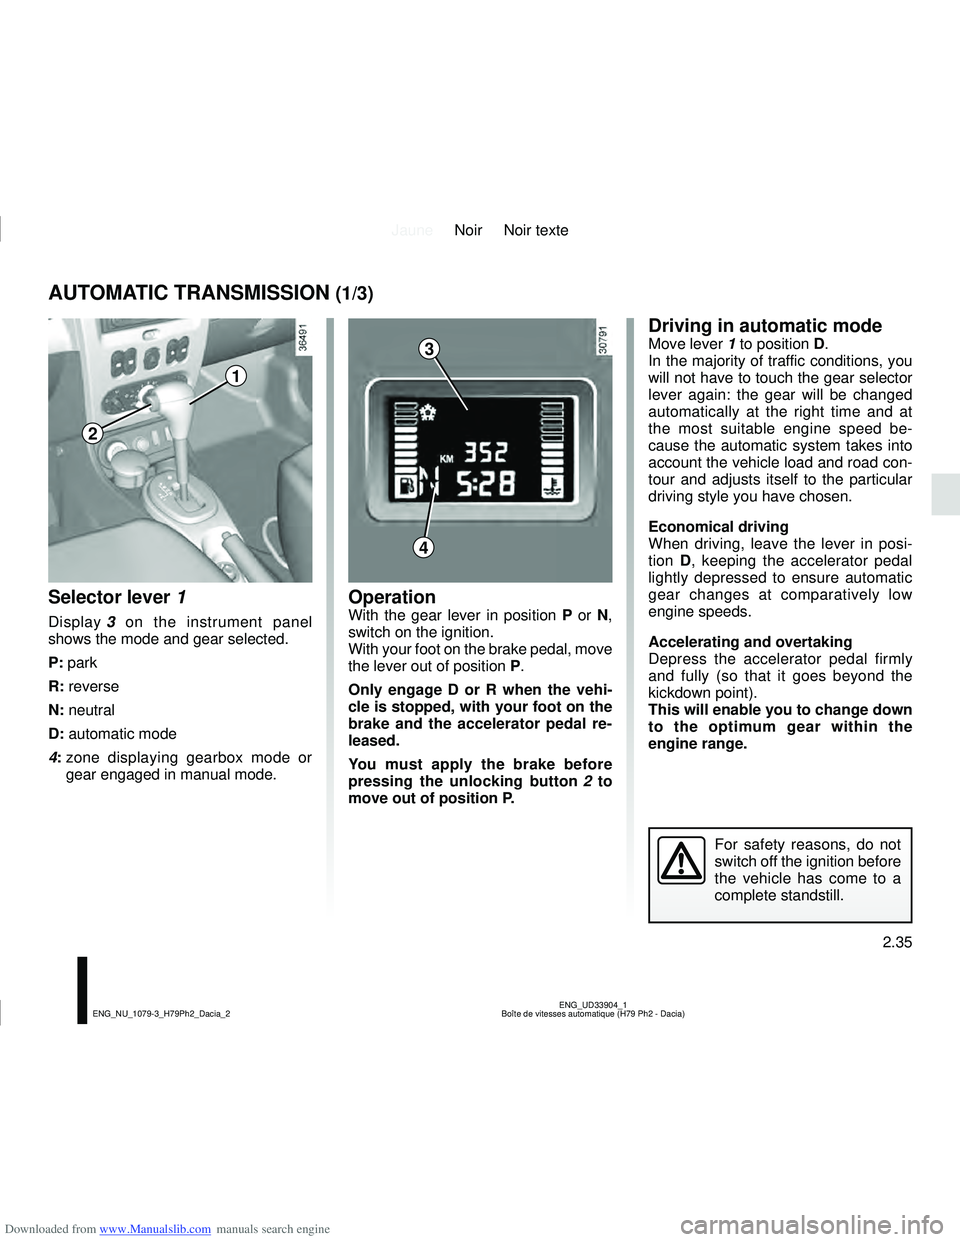
Selector lever 1
Display 3 on the instrument panel
shows the mode and gear selected.
P: park
R: reverse
N: neutral
D: automatic mode
4: zone displaying gearbox mode or
gear engaged in manual mode.
OperationWith the gear lever in position P or N,
switch on the ignition.
With your foot on the brake pedal, move
the lever out of position P.
Only engage D or R when the vehi-
cle is stopped, with your foot on the
brake and the accelerator pedal re-
leased.
You must apply the brake before
pressing the unlocking button 2 to
move out of position P.
Driving in automatic modeMove lever 1 to position D.
In the majority of traffic conditions, you
will not have to touch the gear selector
lever again: the gear will be changed
automatically at the right time and at
the most suitable engine speed be-
cause the automatic system takes into
account the vehicle load and road con-
tour and adjusts itself to the particular
driving style you have chosen.
Economical driving
When driving, leave the lever in posi-
tion D, keeping the accelerator pedal
lightly depressed to ensure automatic
gear changes at comparatively low
engine speeds.
Accelerating and overtaking
Depress the accelerator pedal firmly
and fully (so that it goes beyond the
kickdown point).
This will enable you to change down
to the optimum gear within the
engine range.
For safety reasons, do not
switch off the ignition before
the vehicle has come to a
complete standstill.
3
4
1
2
Page 118 of 244
Downloaded from www.Manualslib.com manuals search engine JauneNoir Noir texte
2.36
ENG_UD33904_1
Boîte de vitesses automatique (H79 Ph2 - Dacia)
ENG_NU_1079-3_H79Ph2_Dacia_2
AUTOMATIC TRANSMISSION (2/3)
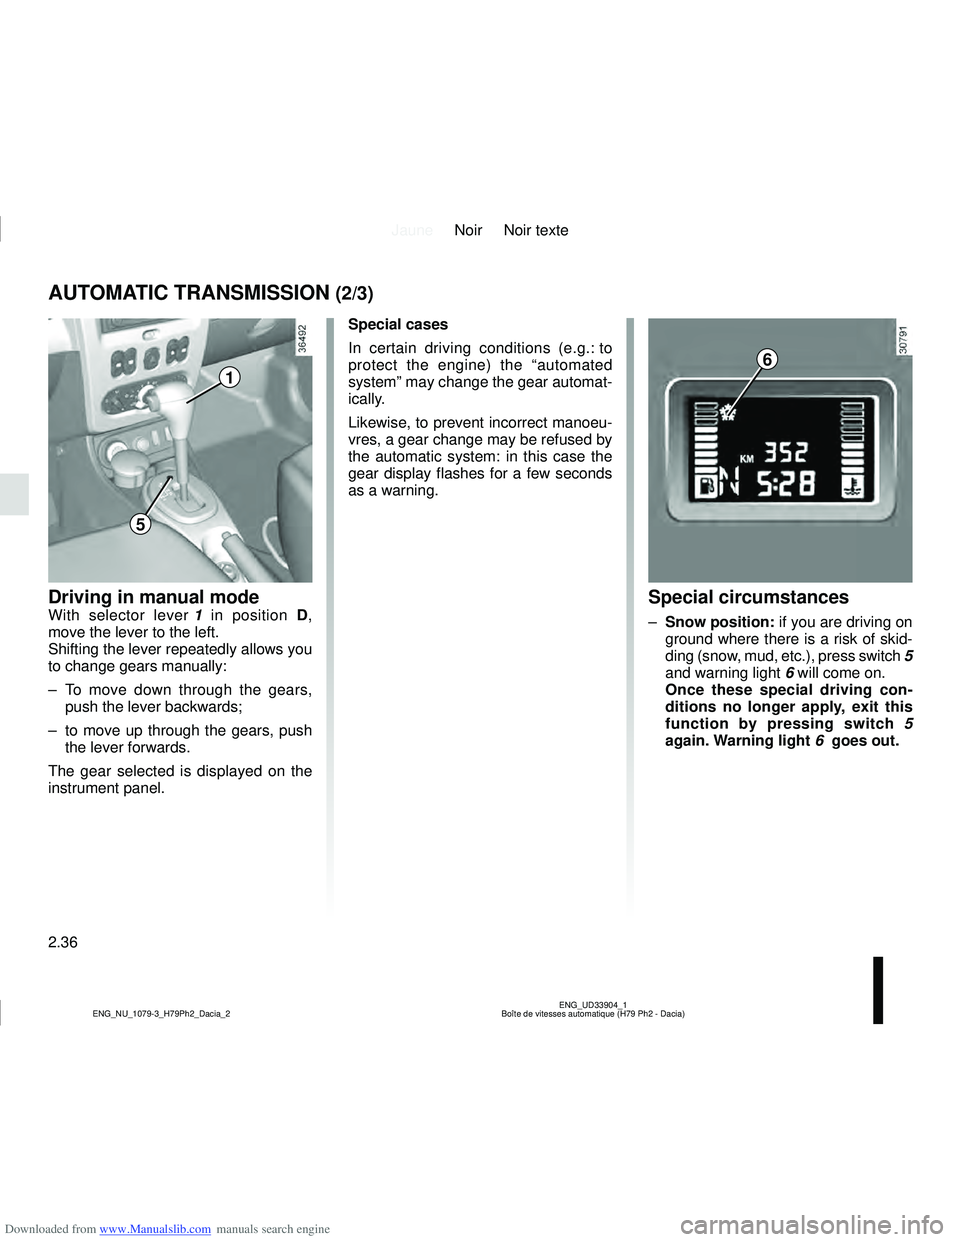
Driving in manual modeWith selector lever 1 in position D,
move the lever to the left.
Shifting the lever repeatedly allows you
to change gears manually:
– To move down through the gears, push the lever backwards;
– to move up through the gears, push the lever forwards.
The gear selected is displayed on the
instrument panel.Special circumstances
– Snow position: if you are driving on
ground where there is a risk of skid-
ding (snow, mud, etc.), press switch 5
and warning light 6 will come on.
Once these special driving con-
ditions no longer apply, exit this
function by pressing switch 5
again. Warning light 6 goes out.
Special cases
In certain driving conditions (e.g.: to
protect the engine) the “automated
system” may change the gear automat-
ically.
Likewise, to prevent incorrect manoeu-
vres, a gear change may be refused by
the automatic system: in this case the
gear display flashes for a few seconds
as a warning.
6
1
5
Page 121 of 244

Downloaded from www.Manualslib.com manuals search engine JauneNoir Noir texte
2.39
ENG_UD32147_1
Aide au parking (H79 - Dacia)
ENG_NU_1079-3_H79Ph2_Dacia_2
PARKING DISTANCE CONTROL (2/2)
Deactivating the system
You can deactivate the system by
pressing switch 1.
The warning light built into the switch
remains lit constantly.
The deactivated system can be reacti-
vated by pressing the switch again.
Operating faults
When the system detects an operat-
ing fault, there will be a three-second
continuous beep as a warning. Please
consult an authorised dealer.
1
Page 123 of 244
Downloaded from www.Manualslib.com manuals search engine JauneNoir Noir texte
3.1
ENG_UD35432_5
Sommaire 3 (H79 - Dacia)
ENG_NU_1079-3_H79Ph2_Dacia_3
Section 3: Your comfort
Air vents, air outlets . . . . . . . . . . . . . . . . . . . . . . . . . . . . . . . . . . . . \
. . . . . . . . . . . . . . . . . . . . . . . . . . 3.2
Air conditioning: information and advice on use . . . . . . . . . . . . . . . . . . . . . . . . . . . . . . . . . . . .\
. . . . 3.7
Additional heating and air conditioning . . . . . . . . . . . . . . . . . . . . . . . . . . . . . . . . . . . .\
. . . . . . . . . . . 3.8
Electric windows . . . . . . . . . . . . . . . . . . . . . . . . . . . . . . . . . . . .\
. . . . . . . . . . . . . . . . . . . . . . . . . . . . 3.9
Interior lighting . . . . . . . . . . . . . . . . . . . . . . . . . . . . . . . . . . . . \
. . . . . . . . . . . . . . . . . . . . . . . . . . . . . . 3.12
Sun visor, Grab handle . . . . . . . . . . . . . . . . . . . . . . . . . . . . . . . . . . . .\
. . . . . . . . . . . . . . . . . . . . . . . 3.14
Ashtrays, Cigarette lighter, Accessories socket . . . . . . . . . . . . . . . . . . . . . . . . . . . . . . . . . . . . \
. . . . . 3.15
Rear headrests . . . . . . . . . . . . . . . . . . . . . . . . . . . . . . . . . . . .\
. . . . . . . . . . . . . . . . . . . . . . . . . . . . . 3.16
Passenger compartment storage space and fittings . . . . . . . . . . . . . . . . . . . . . . . . . . . . . . . . . . . . \
. 3.17
Rear bench seat . . . . . . . . . . . . . . . . . . . . . . . . . . . . . . . . . . . .\
. . . . . . . . . . . . . . . . . . . . . . . . . . . . 3.21
Boot . . . . . . . . . . . . . . . . . . . . . . . . . . . . . . . . . . . . \
. . . . . . . . . . . . . . . . . . . . . . . . . . . . . . . . . . . . . . 3.24
Transporting objects in the boot . . . . . . . . . . . . . . . . . . . . . . . . . . . . . . . . . . . .\
. . . . . . . . . . . . . . . . 3.25
Transporting objects: towing, attachments . . . . . . . . . . . . . . . . . . . . . . . . . . . . . . . . . . . .\
. . . . . . . . 3.27
Rear parcel shelf . . . . . . . . . . . . . . . . . . . . . . . . . . . . . . . . . . . . \
. . . . . . . . . . . . . . . . . . . . . . . . . . . . 3.28
Roof bars . . . . . . . . . . . . . . . . . . . . . . . . . . . . . . . . . . . . \
. . . . . . . . . . . . . . . . . . . . . . . . . . . . . . . . . . 3.29
Multimedia equipment . . . . . . . . . . . . . . . . . . . . . . . . . . . . . . . . . . . . \
. . . . . . . . . . . . . . . . . . . . . . . . 3.30
Page 126 of 244
Downloaded from www.Manualslib.com manuals search engine JauneNoir Noir texte
3.4
ENG_UD32151_1
Chauffage - Ventilation - Air conditionné (H79 - Dacia)
ENG_NU_1079-3_H79Ph2_Dacia_3
HEATING, VENTILATION, AIR CONDITIONING (1/3)
23415
Controls
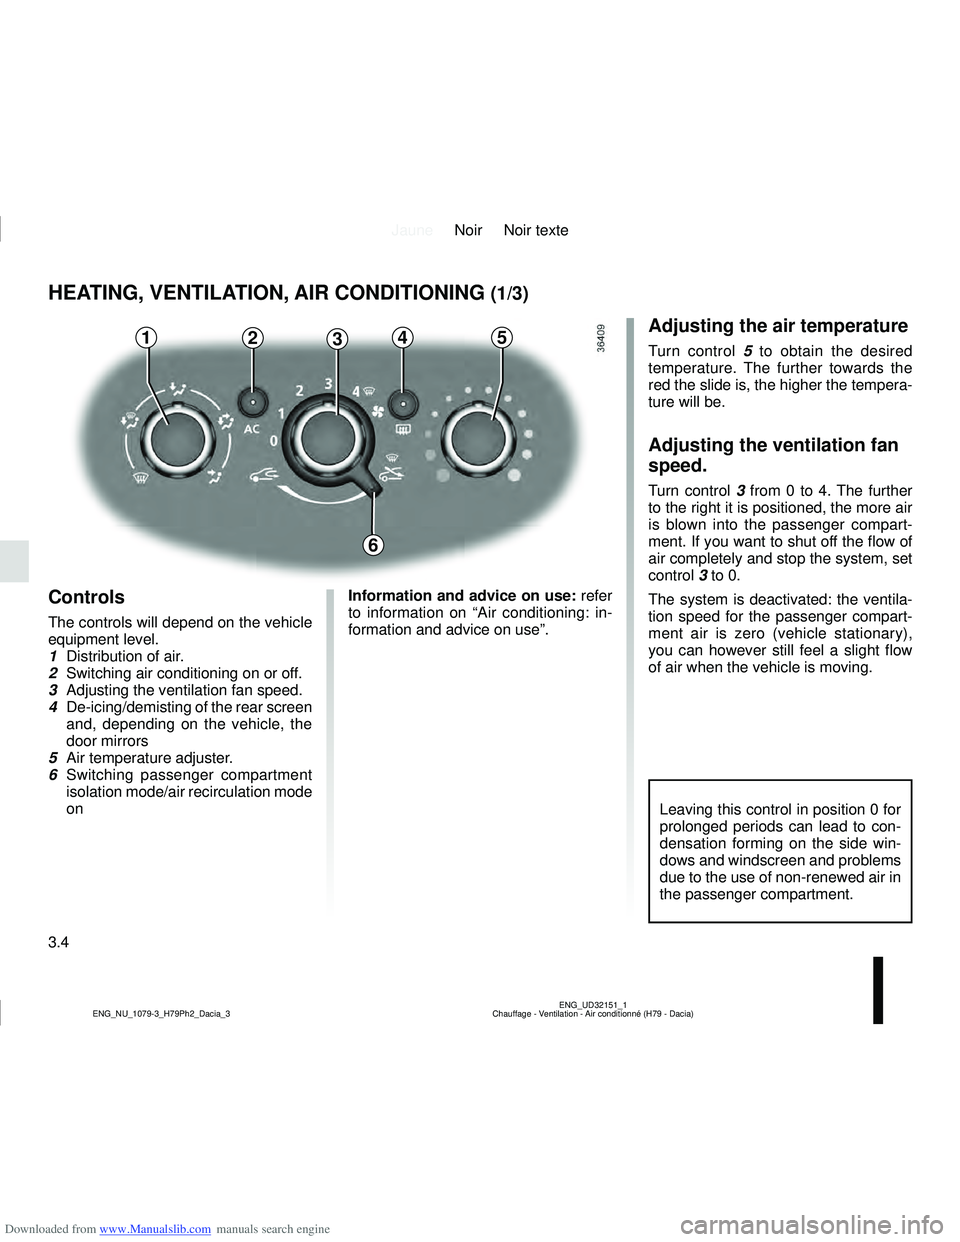
The controls will depend on the vehicle
equipment level.
1 Distribution of air.
2 Switching air conditioning on or off.
3 Adjusting the ventilation fan speed.
4 De-icing/demisting of the rear screen
and, depending on the vehicle, the
door mirrors
5 Air temperature adjuster.
6 Switching passenger compartment isolation mode/air recirculation mode
on Information and advice on use:
refer
to information on “Air conditioning: in-
formation and advice on use”.
Adjusting the air temperature
Turn control 5 to obtain the desired
temperature. The further towards the
red the slide is, the higher the tempera-
ture will be.
Adjusting the ventilation fan
speed.
Turn control 3 from 0 to 4. The further
to the right it is positioned, the more air
is blown into the passenger compart-
ment. If you want to shut off the flow of
air completely and stop the system, set
control 3 to 0.
The system is deactivated: the ventila-
tion speed for the passenger compart-
ment air is zero (vehicle stationary),
you can however still feel a slight flow
of air when the vehicle is moving.
Leaving this control in position 0 for
prolonged periods can lead to con-
densation forming on the side win-
dows and windscreen and problems
due to the use of non-renewed air in
the passenger compartment.
6
Page 127 of 244
Downloaded from www.Manualslib.com manuals search engine JauneNoir Noir texte
3.5
ENG_UD32151_1
Chauffage - Ventilation - Air conditionné (H79 - Dacia)
ENG_NU_1079-3_H79Ph2_Dacia_3
HEATING, VENTILATION, AIR CONDITIONING (2/3)
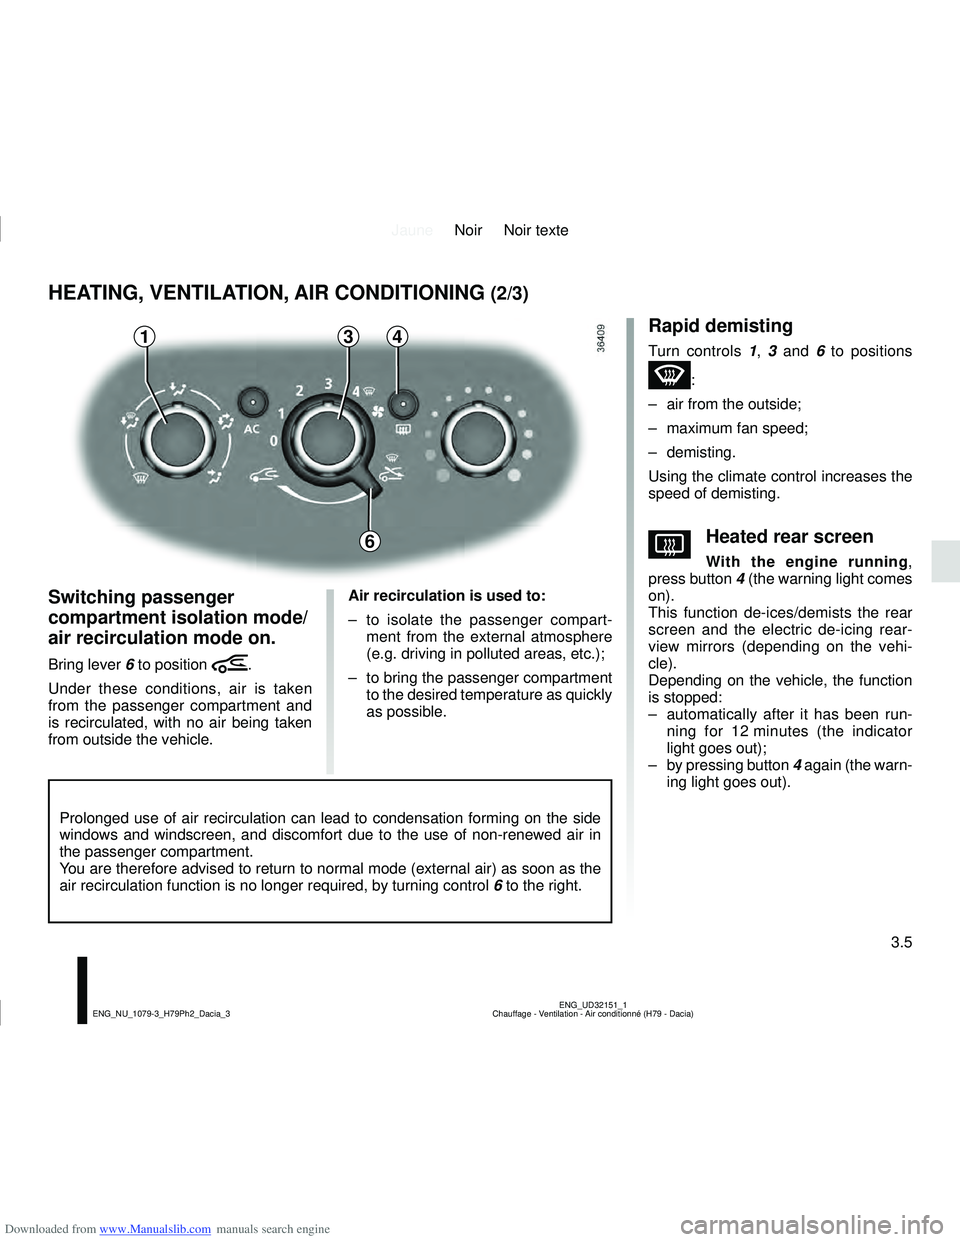
43
Switching passenger
compartment isolation mode/
air recirculation mode on.
Bring lever 6 to position â.
Under these conditions, air is taken
from the passenger compartment and
is recirculated, with no air being taken
from outside the vehicle. Air recirculation is used to:
– to isolate the passenger compart-
ment from the external atmosphere
(e.g. driving in polluted areas, etc.);
– to bring the passenger compartment to the desired temperature as quickly
as possible.
Rapid demisting
Turn controls 1 , 3 and 6 to positions
W:
– air from the outside;
– maximum fan speed;
– demisting.
Using the climate control increases the
speed of demisting.
VHeated rear screen
With the engine running ,
press button 4 (the warning light comes
on).
This function de-ices/demists the rear
screen and the electric de-icing rear-
view mirrors (depending on the vehi-
cle).
Depending on the vehicle, the function
is stopped:
– automatically after it has been run- ning for 12 minutes (the indicator
light goes out);
– by pressing button 4 again (the warn-
ing light goes out).
Prolonged use of air recirculation can lead to condensation forming on the side
windows and windscreen, and discomfort due to the use of non-renewed air\
in
the passenger compartment.
You are therefore advised to return to normal mode (external air) as so\
on as the
air recirculation function is no longer required, by turning control 6 to the right.
1
6
Page 128 of 244
Downloaded from www.Manualslib.com manuals search engine JauneNoir Noir texte
3.6
ENG_UD32151_1
Chauffage - Ventilation - Air conditionné (H79 - Dacia)
ENG_NU_1079-3_H79Ph2_Dacia_3
HEATING, VENTILATION, AIR CONDITIONING (3/3)
2
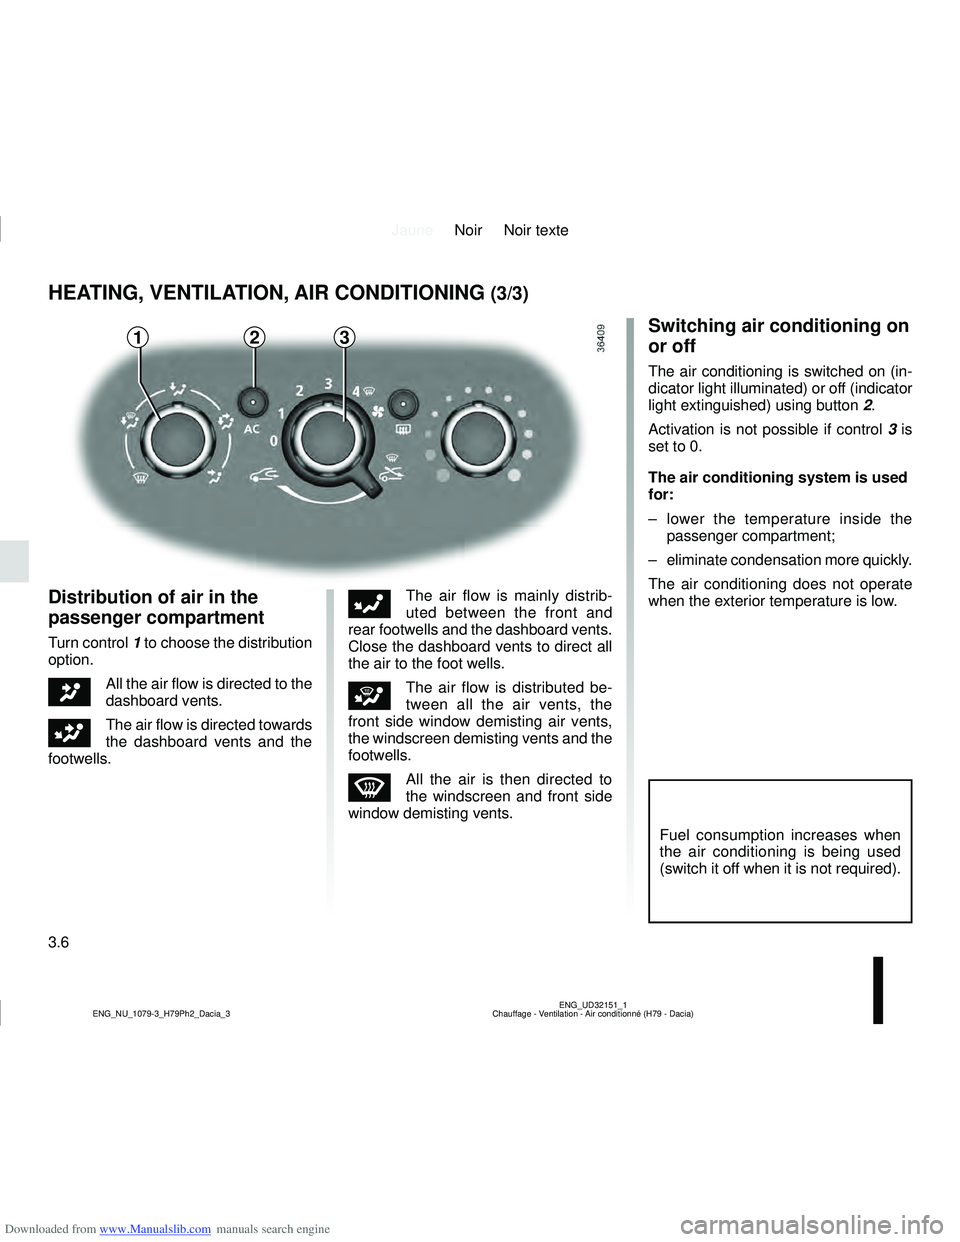
Distribution of air in the
passenger compartment
Turn control 1 to choose the distribution
option.
JAll the air flow is directed to the
dashboard vents.
GThe air flow is directed towards
the dashboard vents and the
footwells.
FThe air flow is mainly distrib-
uted between the front and
rear footwells and the dashboard vents.
Close the dashboard vents to direct all
the air to the foot wells.
iThe air flow is distributed be-
tween all the air vents, the
front side window demisting air vents,
the windscreen demisting vents and the
footwells.
WAll the air is then directed to
the windscreen and front side
window demisting vents.
Switching air conditioning on
or off
The air conditioning is switched on (in-
dicator light illuminated) or off (indicator
light extinguished) using button 2.
Activation is not possible if control 3 is
set to 0.
The air conditioning system is used
for:
– lower the temperature inside the passenger compartment;
– eliminate condensation more quickly.
The air conditioning does not operate
when the exterior temperature is low.
Fuel consumption increases when
the air conditioning is being used
(switch it off when it is not required).
13
Page 130 of 244
Downloaded from www.Manualslib.com manuals search engine JauneNoir Noir texte
3.8
ENG_UD27152_1
Climatisation additionnelle (H79 - Dacia)
ENG_NU_1079-3_H79Ph2_Dacia_3
ADDITIONAL AIR CONDITIONING
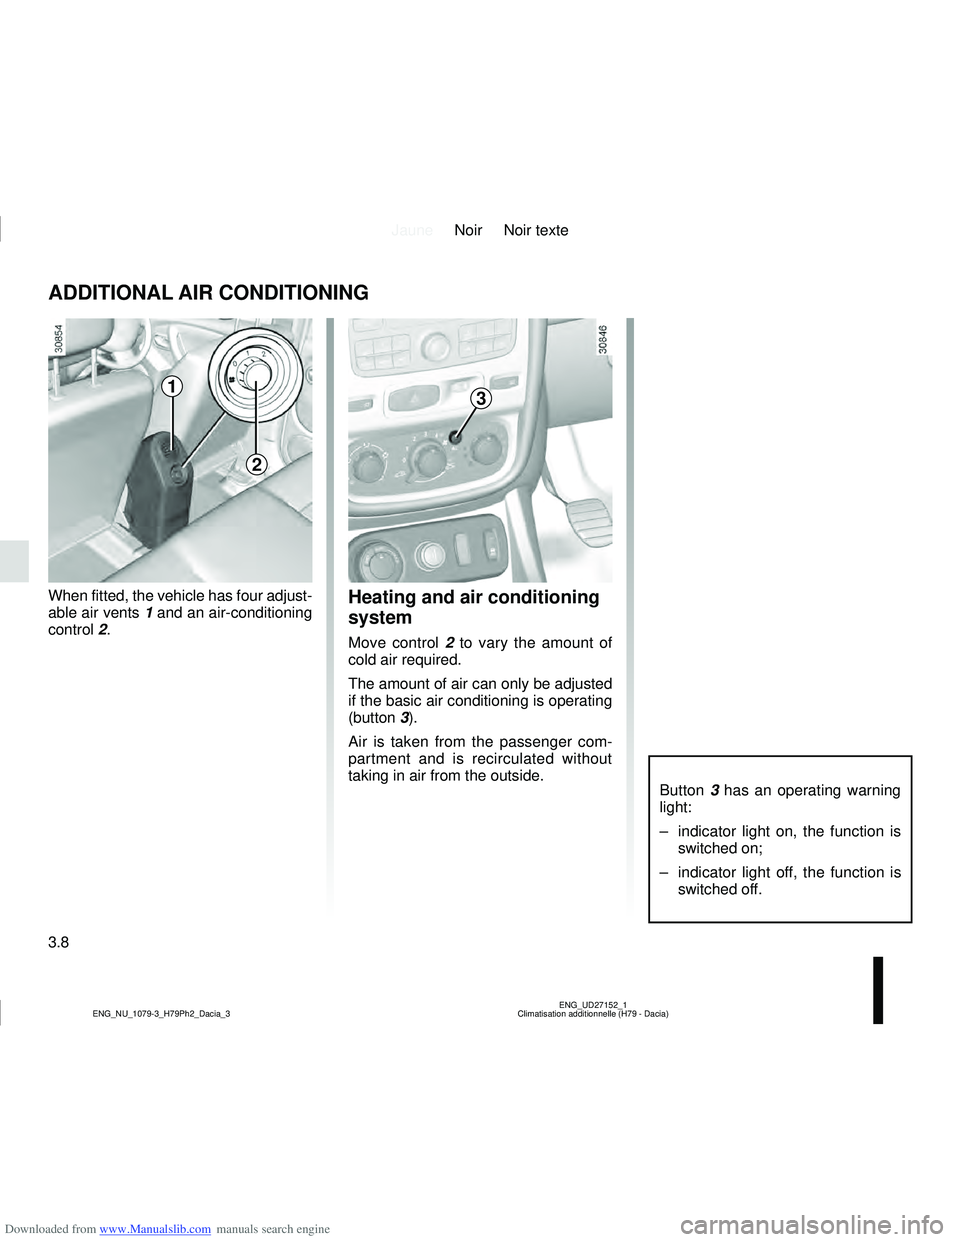
When fitted, the vehicle has four adjust-
able air vents 1 and an air-conditioning
control 2.Heating and air conditioning
system
Move control 2 to vary the amount of
cold air required.
The amount of air can only be adjusted
if the basic air conditioning is operating
(button 3).
Air is taken from the passenger com-
partment and is recirculated without
taking in air from the outside.
Button 3 has an operating warning
light:
– indicator light on, the function is switched on;
– indicator light off, the function is switched off.
3
2
1
Page 134 of 244

Downloaded from www.Manualslib.com manuals search engine JauneNoir Noir texte
3.12
ENG_UD35976_2
Eclairage intérieur (H79 - Dacia)
ENG_NU_1079-3_H79Ph2_Dacia_3
INTERIOR LIGHTING (1/2)
Courtesy light
Pressing switch 1 provides:
– continuous lighting;
– or temporary lighting by opening one of the front doors, or by opening one
of the four doors, depending on the
vehicle. The light only goes out when
the doors are correctly closed;
– no lighting.
1
Map reading lights
Pressing switch 2 provides:
– continuous lighting;
– no lighting.
22
2
2
Page 135 of 244
Downloaded from www.Manualslib.com manuals search engine JauneNoir Noir texte
3.13
ENG_UD35976_2
Eclairage intérieur (H79 - Dacia)
ENG_NU_1079-3_H79Ph2_Dacia_3
INTERIOR LIGHTING (2/2)
Automatic operation of interior li-
ghting
(depending on the vehicle)
– if the doors are unlocked using
the remote control, the lighting
is switched on for approximately
30 seconds.
– If a door is open (or not properly closed), the lighting is switched
on for approximately 3 to 30 mi-
nutes.
– if all the doors are closed, the li- ghting start to dim when the igni-
tion is switched on.
43
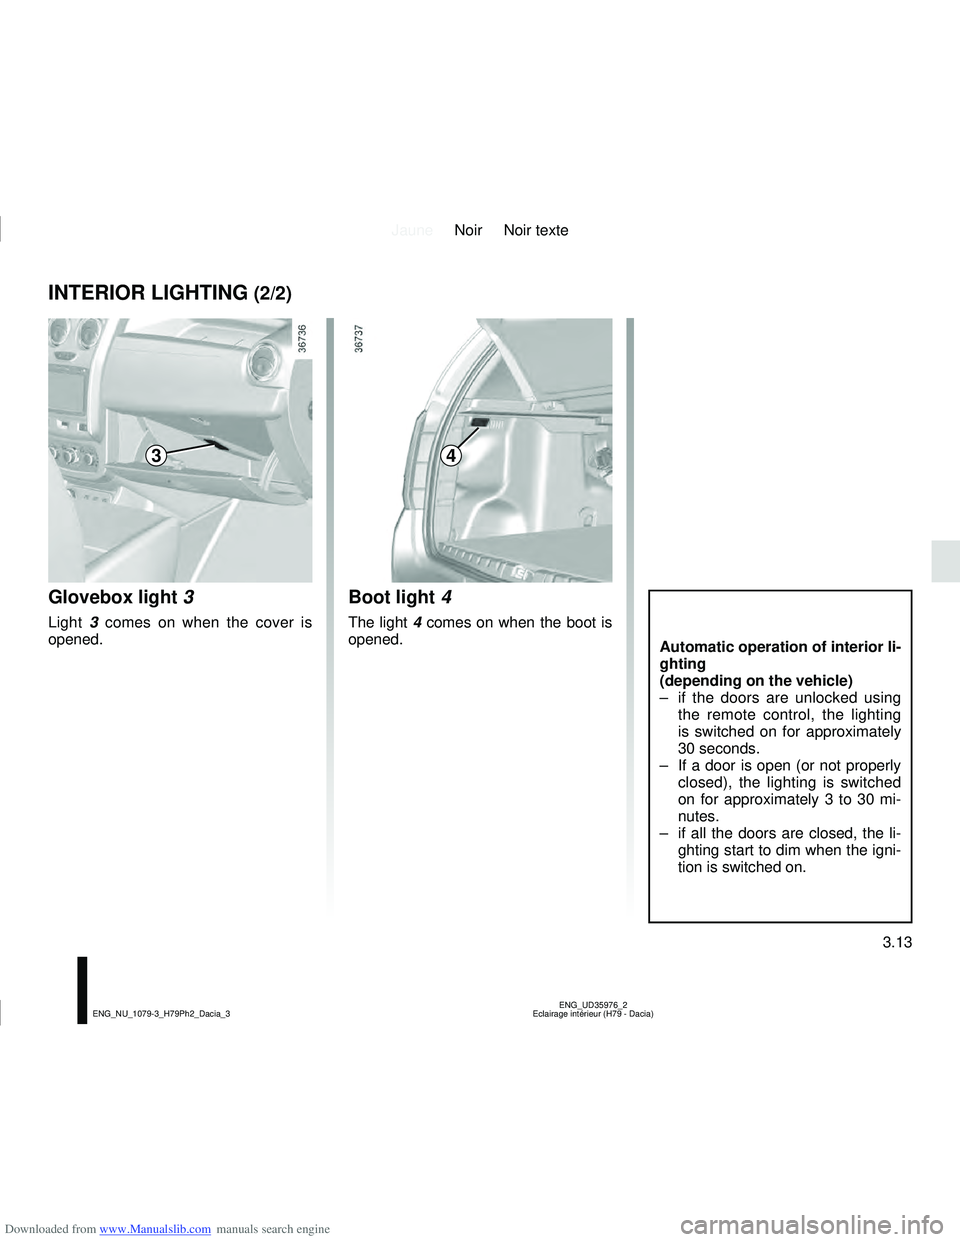
Boot light 4
The light 4 comes on when the boot is
opened.
Glovebox light 3
Light 3 comes on when the cover is
opened.