check engine DACIA LODGY 2012 1.G Workshop Manual
[x] Cancel search | Manufacturer: DACIA, Model Year: 2012, Model line: LODGY, Model: DACIA LODGY 2012 1.GPages: 196, PDF Size: 5.73 MB
Page 152 of 196
Downloaded from www.Manualslib.com manuals search engine lights:brake lights ...................................................... (current page)
JauneNoirNoir texte
5.17
ENG_UD26662_2
Feux arrière: remplacement des lampes (X92 - Renault)
ENG_NU_975-3_X92_Dacia_5
REAR AND sIDE lIGHTs: changing bulbs (2/3)
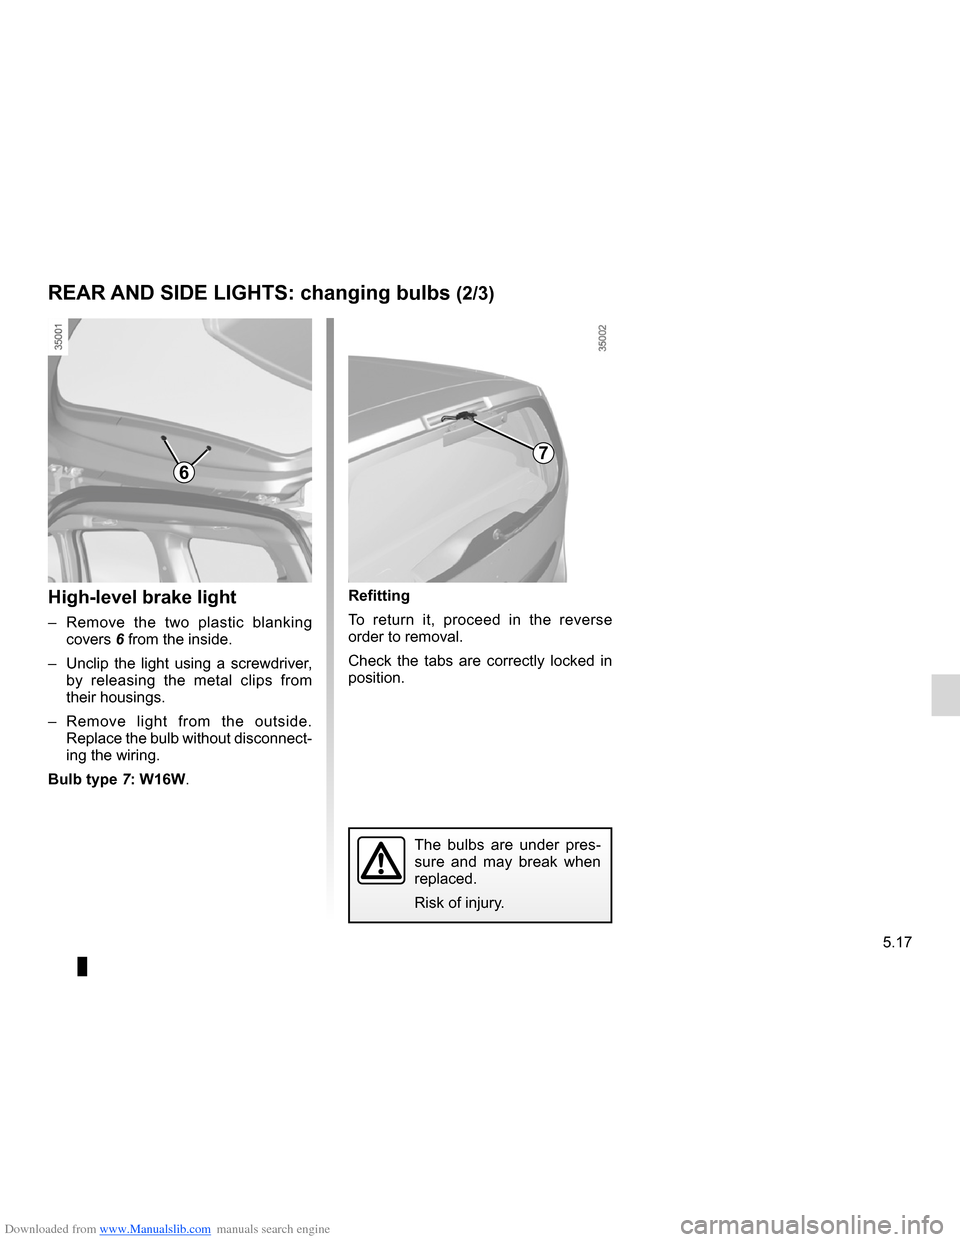
High-level brake light
– Remove the two plastic blanking
covers 6 from the inside.
– Unclip the light using a screwdriver,
by releasing the metal clips from
their housings.
– Remove light from the outside.
Replace the bulb without disconnect-
ing the wiring.
Bulb type 7: W16W.
Refitting
To return it, proceed in the reverse
order to removal.
Check the tabs are correctly locked in
position.
The bulbs are under pres -
sure and may break when
replaced.
Risk of injury.
7
6
Page 156 of 196
Downloaded from www.Manualslib.com manuals search engine fuses ..................................................... (up to the end of the DU)
5.21
ENG_UD28040_2
Fusibles (X92 - Renault)
ENG_NU_975-3_X92_Dacia_5
Fuses
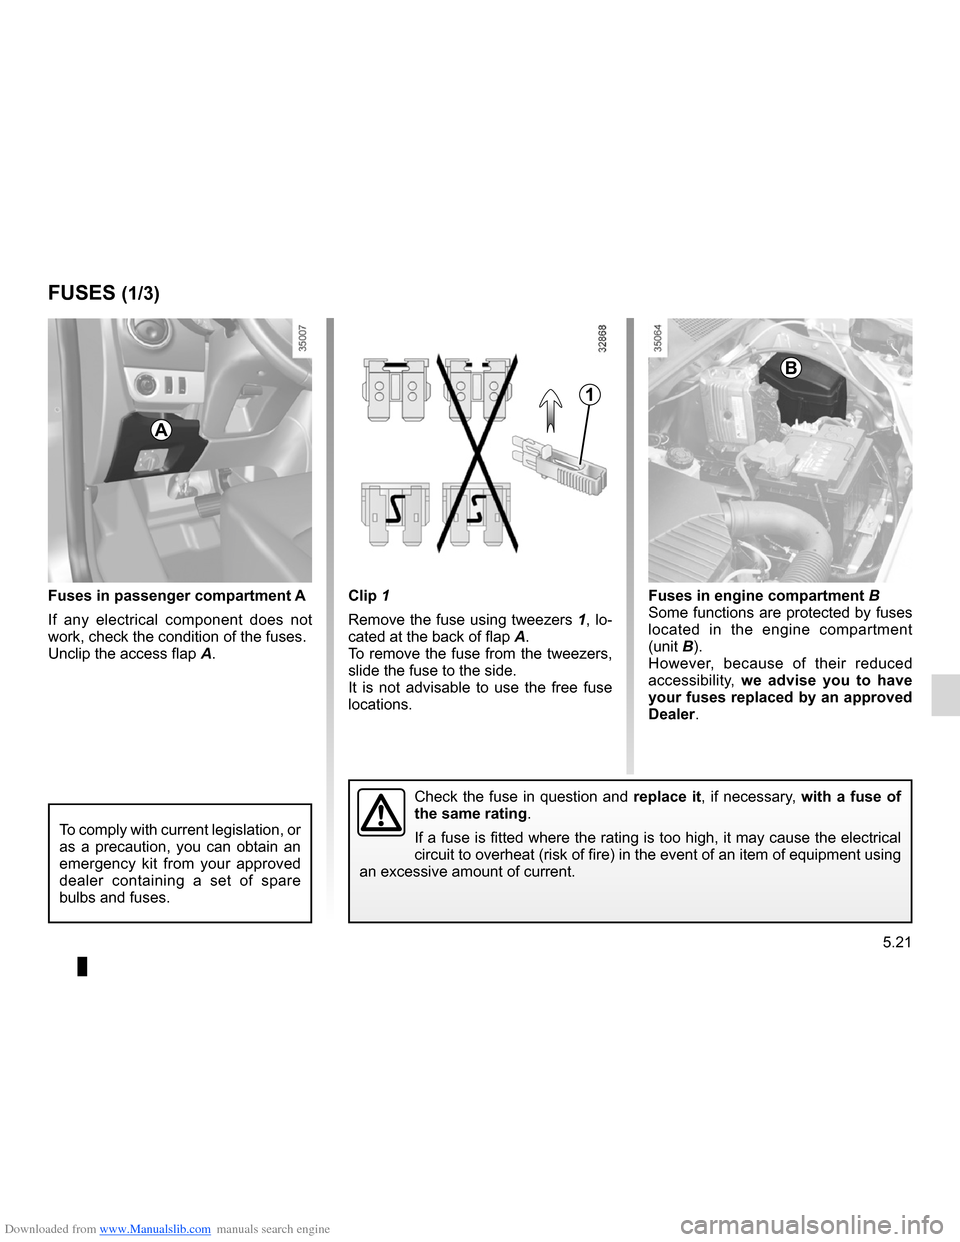
Fuses in passenger compartment A
If any electrical component does not
work, check the condition of the fuses.
Unclip the access flap A.
Check the fuse in question and replace it, if necessary, with a fuse of
the same rating.
If a fuse is fitted where the rating is too high, it may cause the electrical
circuit to overheat (risk of fire) in the event of an item of equipment using
an excessive amount of current.
FUsEs (1/3)
CORRECT INCORRECT
A
To comply with current legislation, or
as a precaution, you can obtain an
emergency kit from your approved
dealer containing a set of spare
bulbs and fuses.
Clip
1
Remove the fuse using tweezers 1, lo-
cated at the back of flap A.
To remove the fuse from the tweezers,
slide the fuse to the side.
It is not advisable to use the free fuse
locations. Fuses in engine compartment
B
Some functions are protected by fuses
located in the engine compartment
(unit B).
However, because of their reduced
accessibility, we advise you to have
your fuses replaced by an approved
Dealer .
1
B
Page 159 of 196
Downloaded from www.Manualslib.com manuals search engine 5.24
ENG_UD13290_3
Télécommande à radiofréquence : piles (X61 - F61 - K61 - Re\
nault)
ENG_NU_975-3_X92_Dacia_5
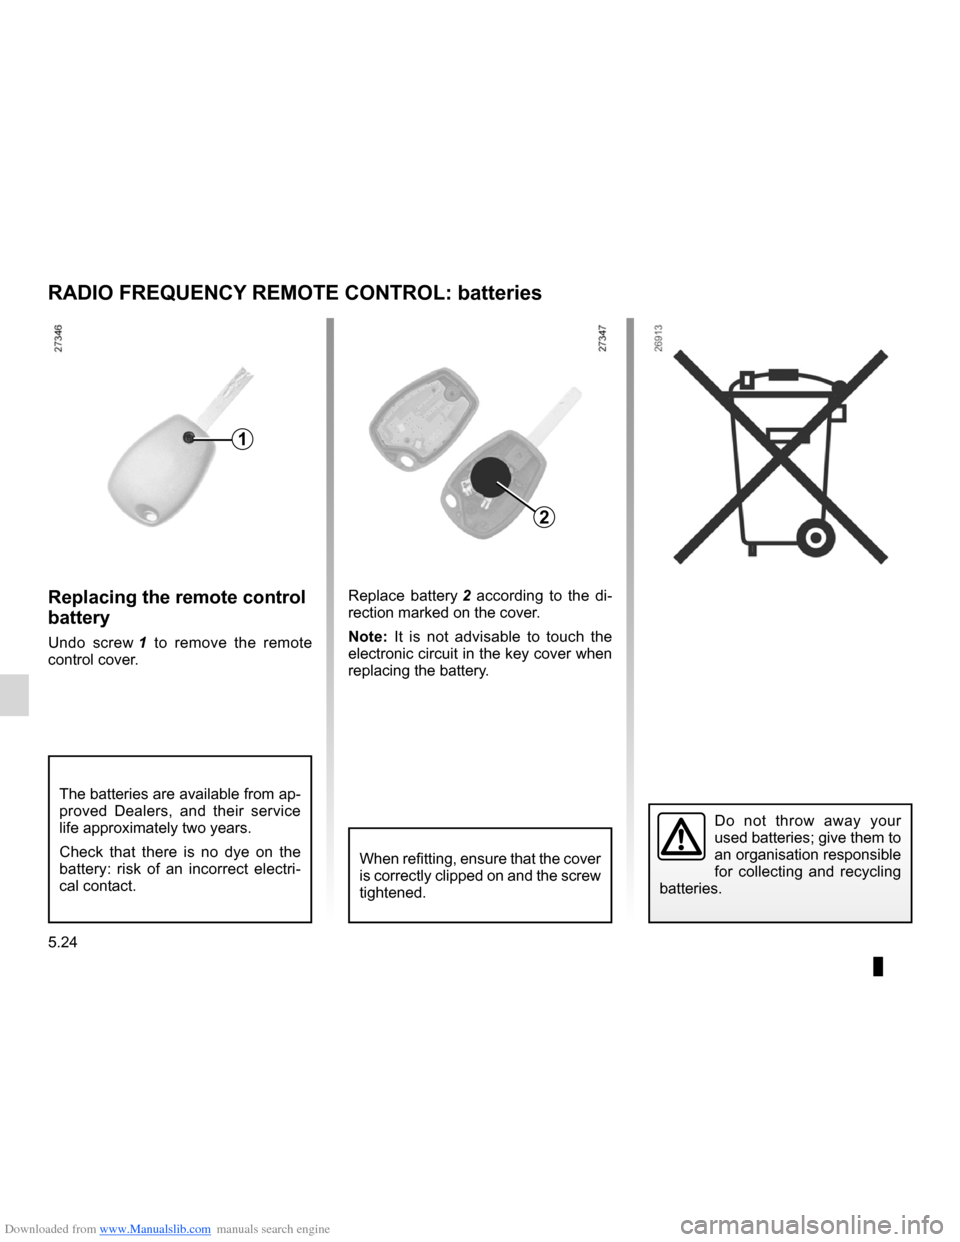
Replacing the remote control
battery
Undo screw 1 to remove the remote
control cover. Replace battery
2 according to the di -
rection marked on the cover.
Note: It is not advisable to touch the
electronic circuit in the key cover when
replacing the battery.
Radio frequency remote control: batteries
Do not throw away your
used batteries; give them to
an organisation responsible
for collecting and recycling
batteries.
RADIo FREQUENCY REMoTE CoNTRol: batteries
1
2
When refitting, ensure that the cover
is correctly clipped on and the screw
tightened.
The batteries are available from ap-
proved Dealers, and their service
life approximately two years.
Check that there is no dye on the
battery: risk of an incorrect electri-
cal contact.
Page 161 of 196
Downloaded from www.Manualslib.com manuals search engine 5.26
ENG_UD24479_1
Batterie : dépannage (X92 - Renault)
ENG_NU_975-3_X92_Dacia_5
BATTERY: troubleshooting (2/2)
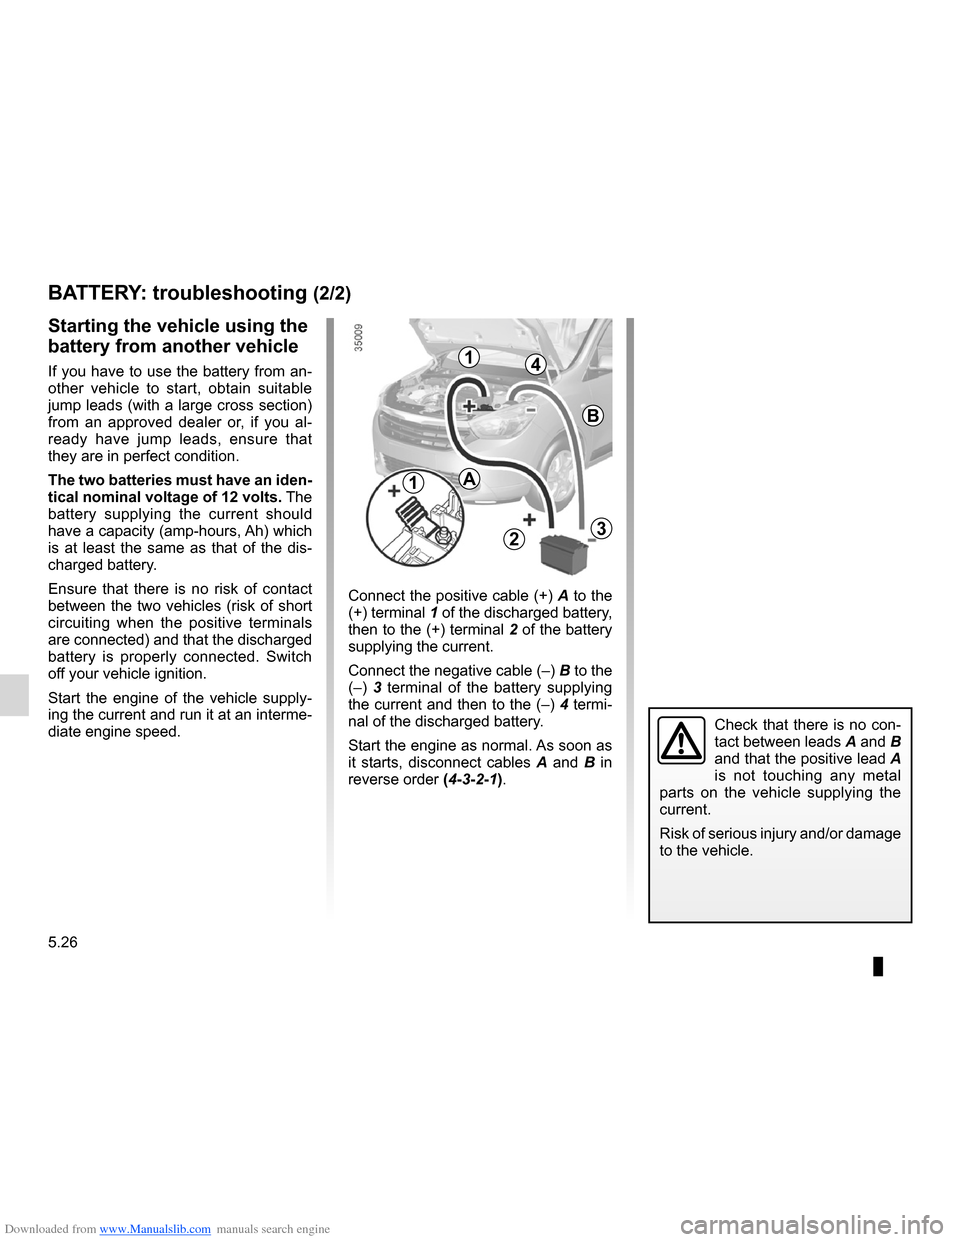
Connect the positive cable (+) A to the
(+) terminal 1 of the discharged battery,
then to the (+) terminal 2 of the battery
supplying the current.
Connect the negative cable (–) B to the
(–) 3 terminal of the battery supplying
the current and then to the (–) 4 termi-
nal of the discharged battery.
Start the engine as normal. As soon as
it starts, disconnect cables A and B in
reverse order (4-3-2-1).
starting the vehicle using the
battery from another vehicle
If you have to use the battery from an-
other vehicle to start, obtain suitable
jump leads (with a large cross section)
from an approved dealer or, if you al -
ready have jump leads, ensure that
they are in perfect condition.
The two batteries must have an iden-
tical nominal voltage of 12 volts. The
battery supplying the current should
have a capacity (amp-hours, Ah) which
is at least the same as that of the dis-
charged battery.
Ensure that there is no risk of contact
between the two vehicles (risk of short
circuiting when the positive terminals
are connected) and that the discharged
battery is properly connected. Switch
off your vehicle ignition.
Start the engine of the vehicle supply -
ing the current and run it at an interme-
diate engine speed.
Check that there is no con-
tact between leads A and B
and that the positive lead A
is not touching any metal
parts on the vehicle supplying the
current.
Risk of serious injury and/or damage
to the vehicle.
14
B
32
A1
Page 162 of 196
Downloaded from www.Manualslib.com manuals search engine wiper blades ......................................... (up to the end of the DU)
wipers ................................................... (up to the end of the DU)
wipers blades ............................................. (up to the end of the DU)
5.27
ENG_UD24481_1
Balais d’essuie-vitres (X92 - Renault)
ENG_NU_975-3_X92_Dacia_5
Wiper blades
WIPER BlADEs
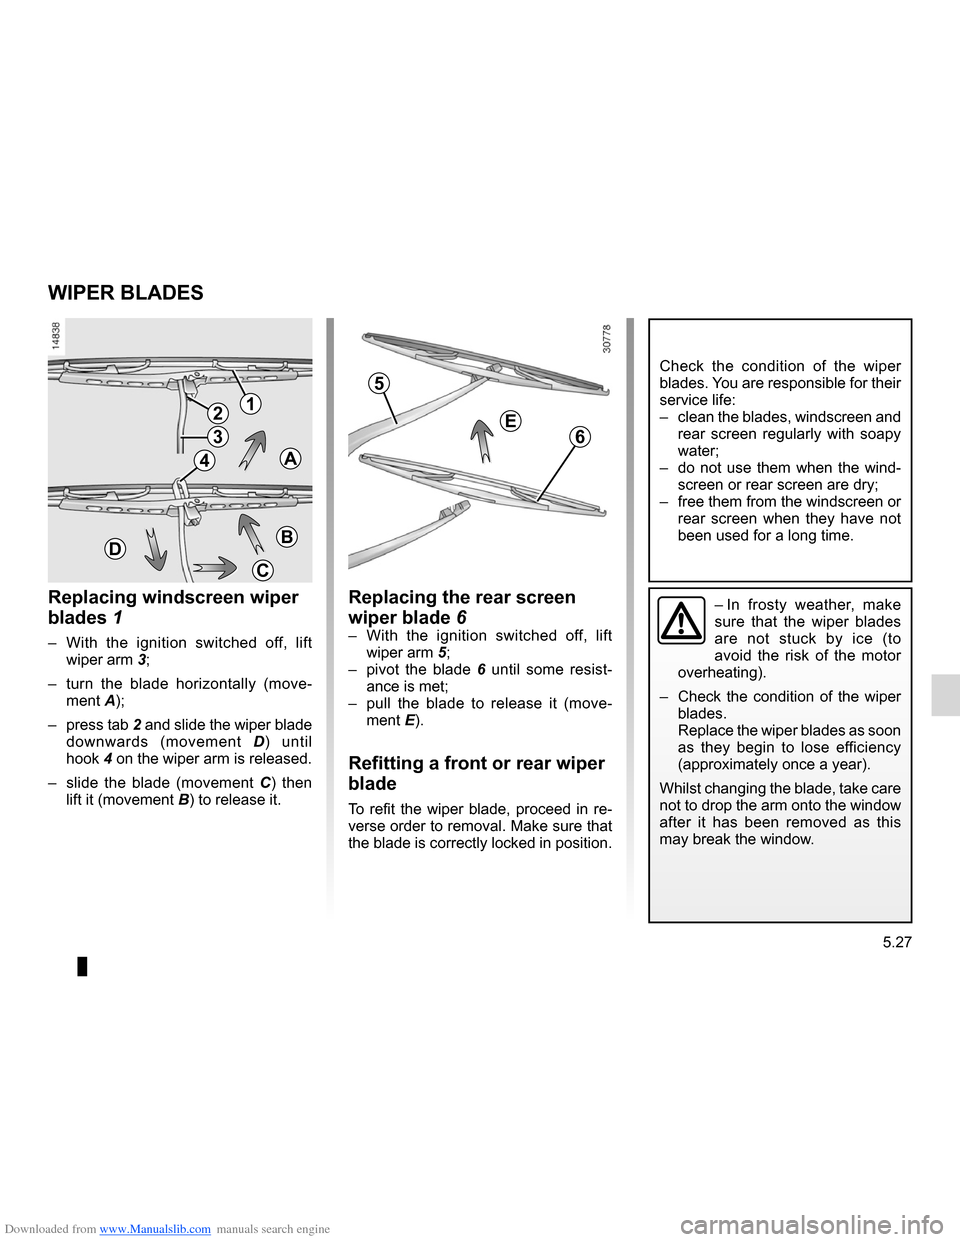
Replacing windscreen wiper
blades 1
– With the ignition switched off, lift
wiper arm 3;
– turn the blade horizontally (move -
ment A);
– press tab 2 and slide the wiper blade
downwards (movement D ) until
hook 4 on the wiper arm is released.
– slide the blade (movement C ) then
lift it (movement B) to release it.
12
3
4
Replacing the rear screen
wiper blade 6
– With the ignition switched off, lift
wiper arm 5;
– pivot the blade 6 until some resist -
ance is met;
– pull the blade to release it (move -
ment E).
Refitting a front or rear wiper
blade
To refit the wiper blade, proceed in re-
verse order to removal. Make sure that
the blade is correctly locked in position.
Check the condition of the wiper
blades. You are responsible for their
service life:
– clean the blades, windscreen and
rear screen regularly with soapy
water;
– do not use them when the wind-
screen or rear screen are dry;
– free them from the windscreen or
rear screen when they have not
been used for a long time.
– In frosty weather, make
sure that the wiper blades
are not stuck by ice (to
avoid the risk of the motor
overheating).
– Check the condition of the wiper
blades.
Replace the wiper blades as soon
as they begin to lose efficiency
(approximately once a year).
Whilst changing the blade, take care
not to drop the arm onto the window
after it has been removed as this
may break the window.
A
D
C
B
5
6E
Page 166 of 196
Downloaded from www.Manualslib.com manuals search engine accessories...........................................(up to the end of the DU)
5.31
ENG_UD27824_1
Accessoires VT (X06 - X35 - X44 - X45 - X77 - X81 - X85 - X90 - X91 - X70 - X76 - X83\
- X61 - TEST - X95 - X33 - X47 - X43 - X38 - H79 - X62 - X32 - X09 - X67 - X92 -
ENG_NU_975-3_X92_Dacia_5
Accessories
ACCEssoRIEs
Electrical and electronic accessoriesBefore installing this type of accessory, make sure it is compatible with your vehicle. You can get advice from an au-
thorised dealer.
Connect accessories with a maximum power of 120 watts only. Fire hazard.
No work may be carried out on the vehicle’s electrical or radio circuits, except by authorised dealers: an incorrectly connected
system may result in damage being caused to the electrical equipment and\
/or the components connected to it.
If the vehicle is fitted with any aftermarket electrical equipment, make sure that the installation is correctly protected by a fuse.
Establish the rating and position of this fuse.
Use of transmission/receiving devices (telephones, CB equipment etc.).\
Telephones and CB equipment with integrated aerials may cause interference to the electronic systems originally fitted to the
vehicle: it is advisable only to use equipment with an external aerial. Furthermore, we remind you of the need to conform
to the legislation in force concerning the use of such equipment.
Fitting after-market accessoriesIf you wish to install accessories on the vehicle: please contact an authorised dealer. Also, to ensure the correct operation of
your vehicle, and to avoid any risk to your safety, we recommend that you use only accessories specifically designed for your
vehicle, which are the only accessories for which the manufacturer will \
provide a warranty.
If you are using an anti-theft device, only attach it to the brake pedal\
.
obstructions to the driver
On the driver’s side, only use mats suitable for the vehicle, attached with the pre-fitted components, and check the fitting regu-
larly. Do not lay one mat on top of another. There is a risk of wedging the pedals
Page 168 of 196
Downloaded from www.Manualslib.com manuals search engine JauneNoirNoir texte
5.33
ENG_UD28684_2
Anomalies de fonctionnement (X92 - Renault)
ENG_NU_975-3_X92_Dacia_5
oPERATING FAUl Ts (2/5)
on the road PossIBlE CAUsEs WHAT To Do
Vibrations. Tyres not inflated to correct pres-
sures, incorrectly balanced or
damaged. Check the tyre pressures; if this is not the cause, have
their condition checked by an approved dealer.
Coolant boiling in the coolant
reservoir. Mechanical fault: cylinder head
gasket damaged, faulty coolant
pump. Stop the engine.
Contact an approved dealer.
Engine cooling fan not working. Contact an approved dealer.
Smoke under the bonnet. Short circuit or cooling system
leak. Stop, switch off the ignition, move away from the vehi-
cle and contact an approved dealer.
The oil pressure warning light
comes on: on a bend or under braking The engine oil level is too low. Top up the engine oil level (refer to the information on
“Engine oil level: topping up/filling” in Section 4).
at idle speed Low oil pressure. Go to your nearest approved dealer.
The oil pressure warning
light takes a long time to
go out or remains lit during
acceleration. Loss of oil pressure.
Stop the vehicle: contact an approved dealer.
Page 170 of 196
Downloaded from www.Manualslib.com manuals search engine JauneNoirNoir texte
5.35
ENG_UD28684_2
Anomalies de fonctionnement (X92 - Renault)
ENG_NU_975-3_X92_Dacia_5
oPERATING FAUl Ts (4/5)
on the road PossIBlE CAUsEs WHAT To Do
Whistling Roof aerial poorly positioned. Position the aerial.
The engine overheats. The coolant
temperature indicator light comes
on. Engine cooling fan not working.
Stop the vehicle, switch off the engine and
contact an approved dealer.
Coolant leaks. Stop the vehicle, switch off the engine and
check the coolant reservoir: it should con -
tain fluid. If there is no coolant, consult an
approved dealer as soon as possible.
The oil change warning light remains
lit after an oil change. Warning not reset after oil change.
Reset the warning after changing the oil;
refer to the information in the paragraph on
the “On-board computer” in Section 1.
Radiator: If there is a significant lack of coolant, remember that it must never be topped up using cold coolant while
the engine is very warm. After any procedure on the vehicle which has involved even partial draining of the cooling
system, it must be refilled with a new mixture prepared in the correct proportions. Reminder: only products approved
by the Technical Department may be used for this purpose.
Page 172 of 196
Downloaded from www.Manualslib.com manuals search engine 6.1
ENG_UD28068_3
Sommaire 6 (X92 - Renault)
ENG_NU_975-3_X92_Dacia_6
Section 6: Technical specifications
Vehicle identification plates . . . . . . . . . . . . . . . . . . . . . . . . . . . . . . . . . . . . . . . . . . . . . . . . . . . . . . . . 6.2
Engine identification plate . . . . . . . . . . . . . . . . . . . . . . . . . . . . . . . . . . . . . . . . . . . . . . . . . . . . . . . . . 6.3
Engine specifications . . . . . . . . . . . . . . . . . . . . . . . . . . . . . . . . . . . . . . . . . . . . . . . . . . . . . . . . . . . . . 6.4
Dimensions . . . . . . . . . . . . . . . . . . . . . . . . . . . . . . . . . . . . . . . . . . . . . . . . . . . . . . . . . . . . . . . . . . . . 6.5
Weights (in kg) . . . . . . . . . . . . . . . . . . . . . . . . . . . . . . . . . . . . . . . . . . . . . . . . . . . . . . . . . . . . . . . . . . 6.6
Replacement parts and repairs . . . . . . . . . . . . . . . . . . . . . . . . . . . . . . . . . . . . . . . . . . . . . . . . . . . . . 6.8
Service sheets . . . . . . . . . . . . . . . . . . . . . . . . . . . . . . . . . . . . . . . . . . . . . . . . . . . . . . . . . . . . . . . . . . 6.9
Anti-corrosion check . . . . . . . . . . . . . . . . . . . . . . . . . . . . . . . . . . . . . . . . . . . . . . . . . . . . . . . . . . . . . 6.15
Page 180 of 196
Downloaded from www.Manualslib.com manuals search engine service sheets....................................... (up to the end of the DU)
maintenance: mechanical ...................................... (up to the end of the DU)
6.9
ENG_UD25385_3
Justificatif d’entretien (X06 - S06 - X35 - X44 - X45 - X65 - X73 - \
X81 - X84 - X85 - X90 - X70 - X76 - X83 - X61 - X24 - X77 ph2 - X95 - L4\
7 - X33 - X47 - X43 - X38 - H79
ENG_NU_975-3_X92_Dacia_6
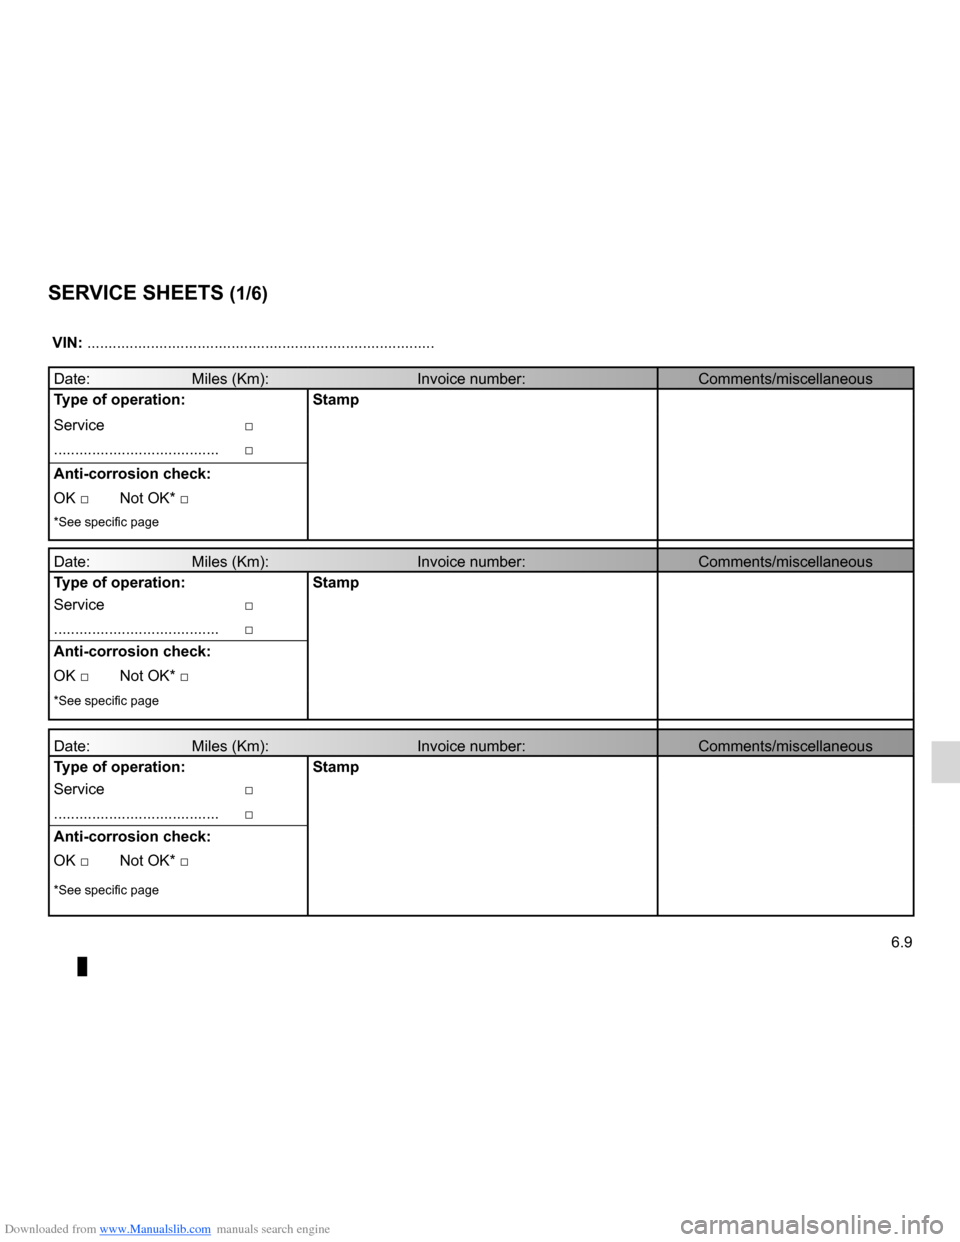
Service sheets
Date: Miles (Km): \
Invoice number: Comments/miscellaneous
Type of operation: Stamp
Service □
....................................... □
Anti-corrosion check:
OK □ Not OK* □
*See specific page
Date: Miles (Km): \
Invoice number: Comments/miscellaneous
Type of operation: Stamp
Service □
....................................... □
Anti-corrosion check:
OK □ Not OK* □
*See specific page
Date: Miles (Km): \
Invoice number: Comments/miscellaneous
Type of operation: Stamp
Service □
....................................... □
Anti-corrosion check:
OK □ Not OK* □
*See specific page
VIN: .......................................................................\
...........
SERVICE SHEETS (1/6)