fuel DACIA LODGY 2012 1.G Owners Manual
[x] Cancel search | Manufacturer: DACIA, Model Year: 2012, Model line: LODGY, Model: DACIA LODGY 2012 1.GPages: 196, PDF Size: 5.73 MB
Page 6 of 196
Downloaded from www.Manualslib.com manuals search engine 1.1
ENG_UD28063_3
Sommaire 1 (X92 - Renault)
ENG_NU_975-3_X92_Dacia_1
Section 1: Getting to know your vehicle
Keys, radio frequency remote control: general information . . . . . . . . . . . . . . . . . . . . . . . . . . . . . . . . 1.2
Locking and unlocking the doors . . . . . . . . . . . . . . . . . . . . . . . . . . . . . . . . . . . . . . . . . . . . . . . . . . . . 1.5
Automatic locking when driving . . . . . . . . . . . . . . . . . . . . . . . . . . . . . . . . . . . . . . . . . . . . . . . . . . . . . 1.7
Opening and closing the doors . . . . . . . . . . . . . . . . . . . . . . . . . . . . . . . . . . . . . . . . . . . . . . . . . . . . . 1.8
Headrests . . . . . . . . . . . . . . . . . . . . . . . . . . . . . . . . . . . . . . . . . . . . . . . . . . . . . . . . . . . . . . . . . . . . . 1.10
Front seats . . . . . . . . . . . . . . . . . . . . . . . . . . . . . . . . . . . . \
. . . . . . . . . . . . . . . . . . . . . . . . . . . . . . . . . 1.11
Seat belts . . . . . . . . . . . . . . . . . . . . . . . . . . . . . . . . . . . . \
. . . . . . . . . . . . . . . . . . . . . . . . . . . . . . . . . . 1.12
Methods of restraint in addition to the front seat belts . . . . . . . . . . . . . . . . . . . . . . . . . . . . . . . . . . . . 1.17
Side protection devices . . . . . . . . . . . . . . . . . . . . . . . . . . . . . . . . . . . . . . . . . . . . . . . . . . . . . . . . . . . 1.21
Additional methods of restraint . . . . . . . . . . . . . . . . . . . . . . . . . . . . . . . . . . . . . . . . . . . . . . . . . . . . . 1.22
Child safety: general information . . . . . . . . . . . . . . . . . . . . . . . . . . . . . . . . . . . . . . . . . . . . . . . . . . . . 1.23
mounting a child seat . . . . . . . . . . . . . . . . . . . . . . . . . . . . . . . . . . . . . . . . . . . . . . . . . . . . . . . 1.26
fitting a child seat . . . . . . . . . . . . . . . . . . . . . . . . . . . . . . . . . . . . . . . . . . . . . . . . . . . . . . . . . . 1.28
deactivating, activating the front passenger airbag . . . . . . . . . . . . . . . . . . . . . . . . . . . . . . . . 1.36
Door mirrors . . . . . . . . . . . . . . . . . . . . . . . . . . . . . . . . . . . . . . . . . . . . . . . . . . . . . . . . . . . . . . . . . . . . 1.39
Driving position . . . . . . . . . . . . . . . . . . . . . . . . . . . . . . . . . . . . . . . . . . . . . . . . . . . . . . . . . . . . . . . . . 1.40
Warning lights . . . . . . . . . . . . . . . . . . . . . . . . . . . . . . . . . . . . . . . . . . . . . . . . . . . . . . . . . . . . . . . . . . 1.42
Displays and indicators . . . . . . . . . . . . . . . . . . . . . . . . . . . . . . . . . . . . . . . . . . . . . . . . . . . . . . . . . . . 1.46
On-board computer . . . . . . . . . . . . . . . . . . . . . . . . . . . . . . . . . . . . . . . . . . . . . . . . . . . . . . . . . . . . . . 1.48
Steering wheel, Clock . . . . . . . . . . . . . . . . . . . . . . . . . . . . . . . . . . . . . . . . . . . . . . . . . . . . . . . . . . . . 1.53
Exterior lighting and signals . . . . . . . . . . . . . . . . . . . . . . . . . . . . . . . . . . . . \
. . . . . . . . . . . . . . . . . . . . 1.54
Adjusting the headlight beam height . . . . . . . . . . . . . . . . . . . . . . . . . . . . . . . . . . . . . . . . . . . . . . . . . 1.56
Audible and visual signals . . . . . . . . . . . . . . . . . . . . . . . . . . . . . . . . . . . . . . . . . . . . . . . . . . . . . . . . . 1.57
Windscreen washer/wiper, De-icing . . . . . . . . . . . . . . . . . . . . . . . . . . . . . . . . . . . . . . . . . . . . . . . . . 1.58
Fuel tank (filling with fuel) . . . . . . . . . . . . . . . . . . . . . . . . . . . . . . . . . . . . . . . . . . . . . . . . . . . . . . . . . 1.60
Page 7 of 196
Downloaded from www.Manualslib.com manuals search engine keys ...................................................... (up to the end of the DU)
remote control door locking unit ........... (up to the end of the DU)
radio frequency remote control/key use ................................................................... (current page)
child safety ............................................................. (current page)
1.2
ENG_UD29226_2
Clés / télécommande à radiofréquence: généralité\
s (X67 - X92 - X52 - Renault)
ENG_NU_975-3_X92_Dacia_1
Jaune NoirNoir texte
Keys, radio frequency remote control: general information
KEYS, RADIO FREQUENCY REMOTE CONTROL: general information (1/2)
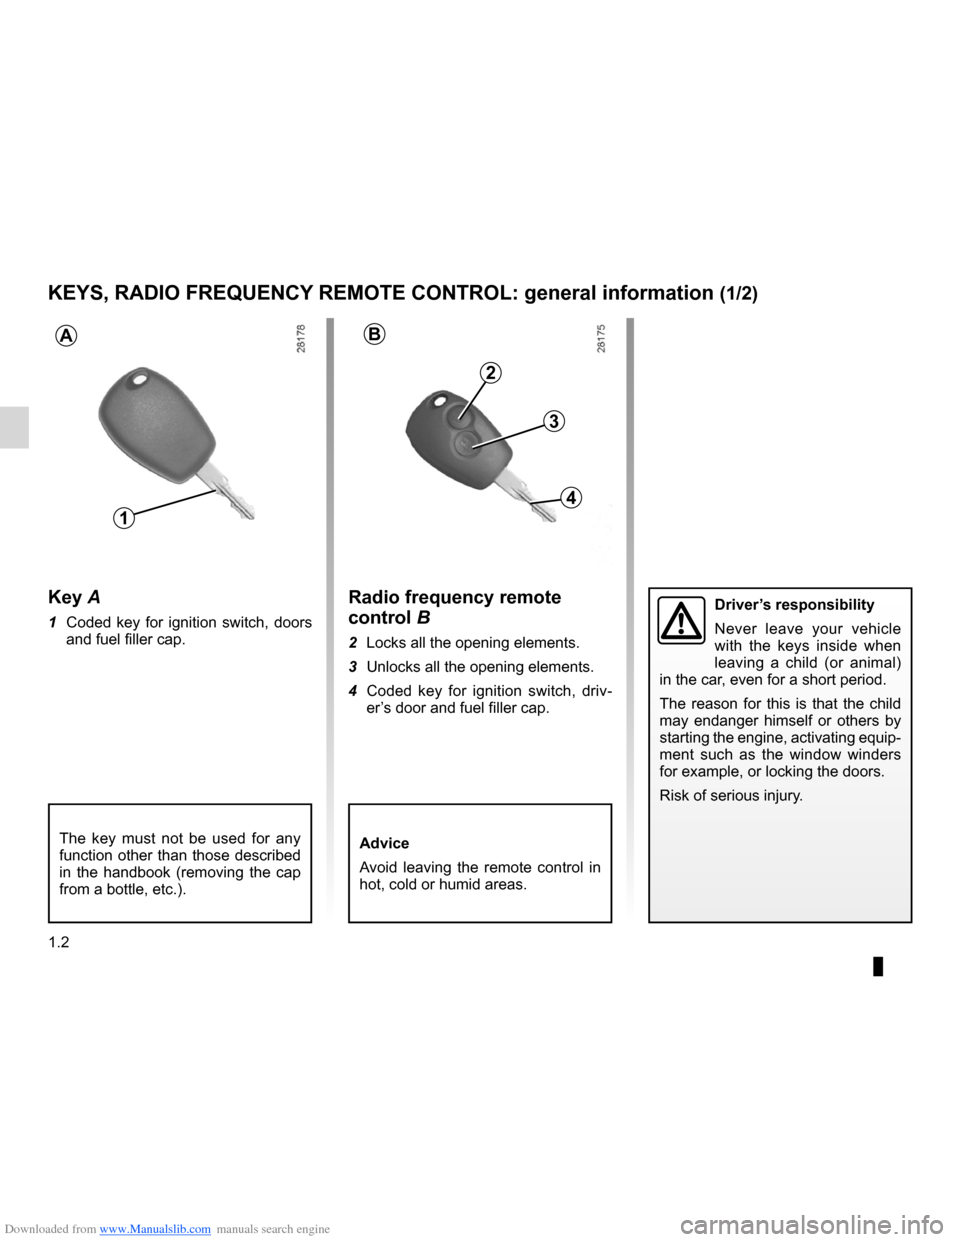
Radio frequency remote
control B
2 Locks all the opening elements.
3 Unlocks all the opening elements.
4 Coded key for ignition switch, driv -
er’s door and fuel filler cap.
Driver’s responsibility
Never leave your vehicle
with the keys inside when
leaving a child (or animal)
in the car, even for a short period.
The reason for this is that the child
may endanger himself or others by
starting the engine, activating equip-
ment such as the window winders
for example, or locking the doors.
Risk of serious injury.Key A
1 Coded key for ignition switch, doors
and fuel filler cap.
Advice
Avoid leaving the remote control in
hot, cold or humid areas.
BA
3
2
4
1
The key must not be used for any
function other than those described
in the handbook (removing the cap
from a bottle, etc.).
Page 48 of 196
Downloaded from www.Manualslib.com manuals search engine JauneNoirNoir texte
1.43
ENG_UD24415_1
Tableau de bord : témoins lumineux (X92 - Renault)
ENG_NU_975-3_X92_Dacia_1
W ARNING LIGHTS (2/4)
The presence and operation of the warning lights DEPEND ON THE EQUIPMENT\
AND COUNTRY.
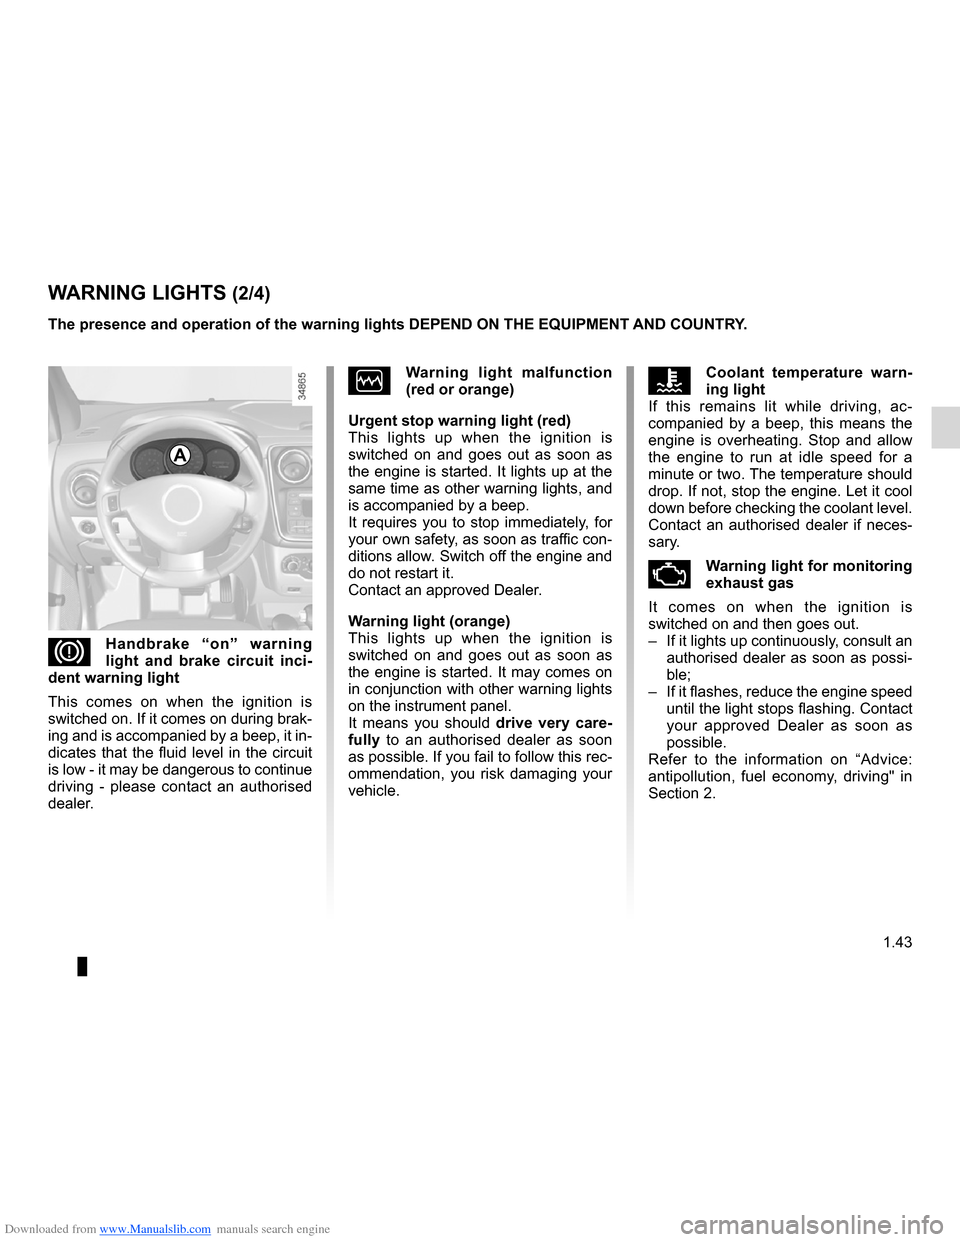
ÔCoolant temperature warn -
ing light
If this remains lit while driving, ac -
companied by a beep, this means the
engine is overheating. Stop and allow
the engine to run at idle speed for a
minute or two. The temperature should
drop. If not, stop the engine. Let it cool
down before checking the coolant level.
Contact an authorised dealer if neces-
sary.
ÄWarning light for monitoring
exhaust gas
It comes on when the ignition is
switched on and then goes out.
– If it lights up continuously, consult an
authorised dealer as soon as possi-
ble;
– If it flashes, reduce the engine speed
until the light stops flashing. Contact
your approved Dealer as soon as
possible.
Refer to the information on “Advice:
antipollution, fuel economy, driving" in
Section 2.
ÒWarning light malfunction
(red or orange)
Urgent stop warning light (red)
This lights up when the ignition is
switched on and goes out as soon as
the engine is started. It lights up at the
same time as other warning lights, and
is accompanied by a beep.
It requires you to stop immediately, for
your own safety, as soon as traffic con-
ditions allow. Switch off the engine and
do not restart it.
Contact an approved Dealer.
Warning light (orange)
This lights up when the ignition is
switched on and goes out as soon as
the engine is started. It may comes on
in conjunction with other warning lights
on the instrument panel.
It means you should drive very care-
fully to an authorised dealer as soon
as possible. If you fail to follow this rec-
ommendation, you risk damaging your
vehicle.
DHandbrake “on” warning
light and brake circuit inci -
dent warning light
This comes on when the ignition is
switched on. If it comes on during brak-
ing and is accompanied by a beep, it in-
dicates that the fluid level in the circuit
is low - it may be dangerous to continue
driving - please contact an authorised
dealer.
A
Page 49 of 196
Downloaded from www.Manualslib.com manuals search engine rear screendemisting ......................................................... (current page)
1.44
ENG_UD24415_1
Tableau de bord : témoins lumineux (X92 - Renault)
ENG_NU_975-3_X92_Dacia_1
Jaune NoirNoir texte
WARNING LIGHTS (3/4)
The presence and operation of the warning lights DEPEND ON THE EQUIPMENT\
AND COUNTRY.
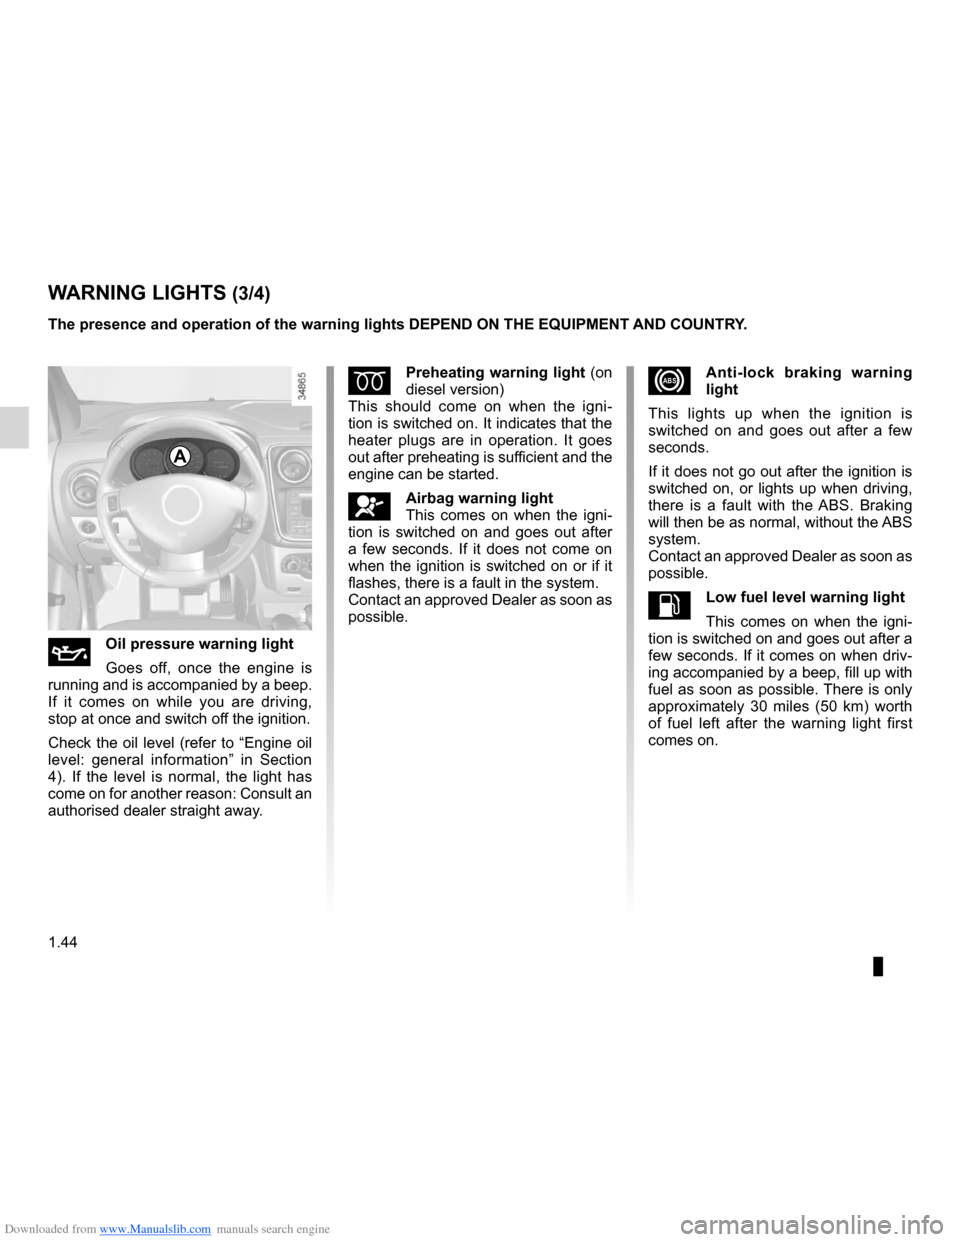
ÉPreheating warning light (on
diesel version)
This should come on when the igni -
tion is switched on. It indicates that the
heater plugs are in operation. It goes
out after preheating is sufficient and the
engine can be started.
åAirbag warning light
This comes on when the igni -
tion is switched on and goes out after
a few seconds. If it does not come on
when the ignition is switched on or if it
flashes, there is a fault in the system.
Contact an approved Dealer as soon as
possible.
xAnti-lock braking warning
light
This lights up when the ignition is
switched on and goes out after a few
seconds.
If it does not go out after the ignition is
switched on, or lights up when driving,
there is a fault with the ABS. Braking
will then be as normal, without the ABS
system.
Contact an approved Dealer as soon as
possible.
LLow fuel level warning light
This comes on when the igni -
tion is switched on and goes out after a
few seconds. If it comes on when driv-
ing accompanied by a beep, fill up with
fuel as soon as possible. There is only
approximately 30 miles (50 km) worth
of fuel left after the warning light first
comes on.
A
ÀOil pressure warning light
Goes off, once the engine is
running and is accompanied by a beep.
If it comes on while you are driving,
stop at once and switch off the ignition.
Check the oil level (refer to “Engine oil
level: general information” in Section
4). If the level is normal, the light has
come on for another reason: Consult an
authorised dealer straight away.
Page 52 of 196
Downloaded from www.Manualslib.com manuals search engine fuel level ................................................................ (current page)
JauneNoirNoir texte
1.47
ENG_UD24416_1
Afficheurs et indicateurs (X92 - Renault)
ENG_NU_975-3_X92_Dacia_1
DISPLAYS AND INDICATORS (2/2)
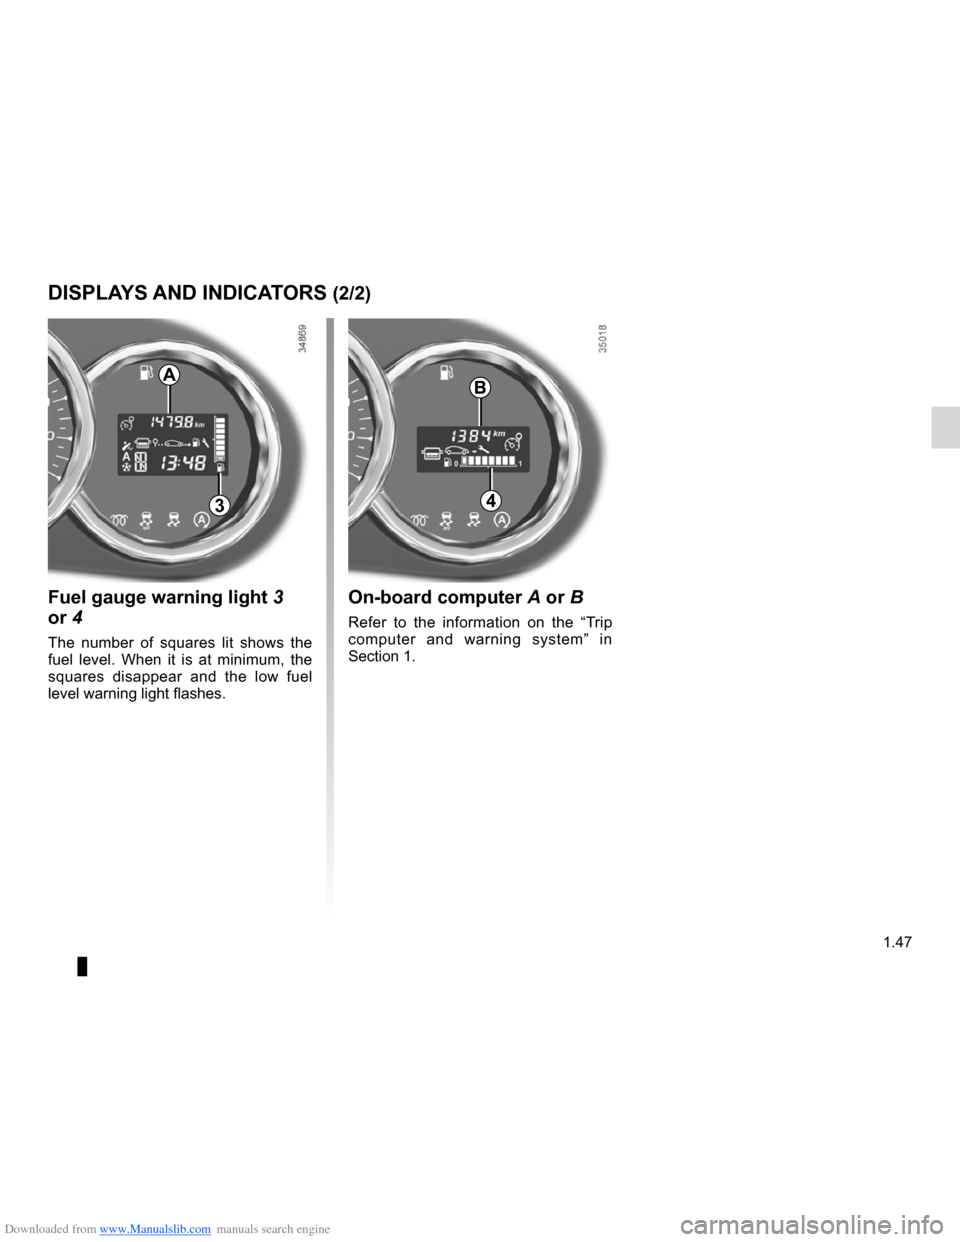
Fuel gauge warning light 3
or 4
The number of squares lit shows the
fuel level. When it is at minimum, the
squares disappear and the low fuel
level warning light flashes.
On-board computer A or B
Refer to the information on the “Trip
computer and warning system” in
Section 1.
3
A
4
B
Page 53 of 196
Downloaded from www.Manualslib.com manuals search engine trip computer and warning system........(up to the end of the DU)
warning lights ........................................ (up to the end of the DU)
instrument panel messages ..................(up to the end of the DU)
instrument panel ................................... (up to the end of the DU)
1.48
ENG_UD28182_2
Ordinateur de bord (X92 - Renault)
ENG_NU_975-3_X92_Dacia_1
Jaune NoirNoir texte
On-board computer
ON-BOARD COMPUTER (1/5)
Interpreting some of the
values displayed after
resetting
The values showing average fuel con-
sumption, range and average speed
will become more stable and reliable
the further you travel after pressing the
reset button.
For the first few miles after pressing the
reset key you will notice that the range
increases as you travel. This range
takes into account the average fuel con-
sumption since the last time the reset
button was pressed. Therefore, the fuel
consumption may decrease when:
– the vehicle stops accelerating;
– the engine reaches its operating
temperature (if the engine was cold
when the reset key was pressed);
– when driving from an urban area
onto the open road.
Resetting is automatic when the maxi-
mum capacity of any of the memories
is exceeded.
1
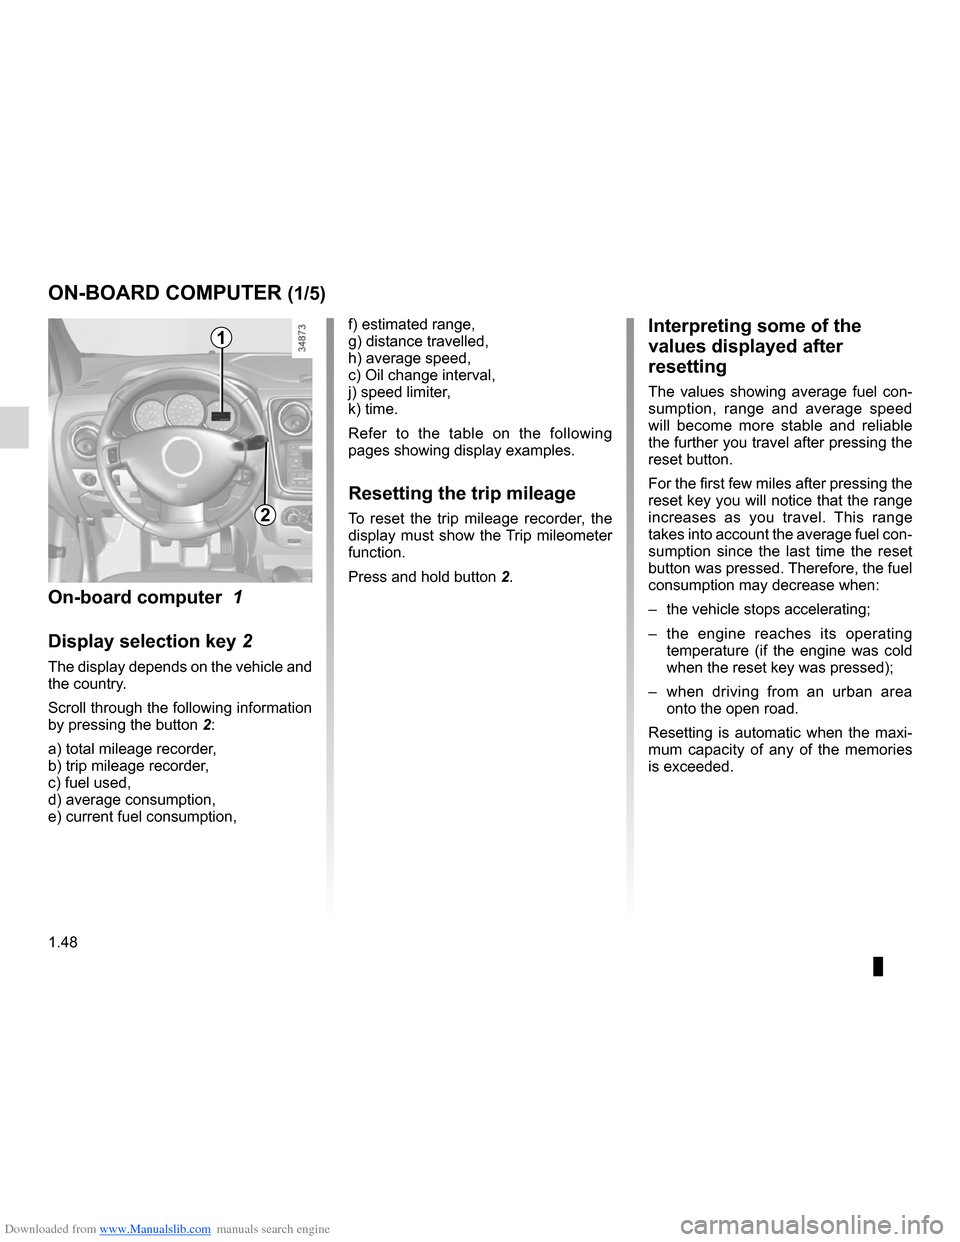
On-board computer 1
Display selection key 2
The display depends on the vehicle and
the country.
Scroll through the following information
by pressing the button 2:
a) total mileage recorder,
b) trip mileage recorder,
c) fuel used,
d) average consumption,
e) current fuel consumption,
2
f) estimated range,
g) distance travelled,
h) average speed,
c) Oil change interval,
j) speed limiter,
k) time.
Refer to the table on the following
pages showing display examples.
Resetting the trip mileage
To reset the trip mileage recorder, the
display must show the Trip mileometer
function.
Press and hold button 2.
Page 54 of 196
Downloaded from www.Manualslib.com manuals search engine JauneNoirNoir texte
1.49
ENG_UD28182_2
Ordinateur de bord (X92 - Renault)
ENG_NU_975-3_X92_Dacia_1
ON-BOARD COMPUTER (2/5)
The display of information shown below DEPENDS ON THE VEHICLE EQUIPMENT \
AND COUNTRY.
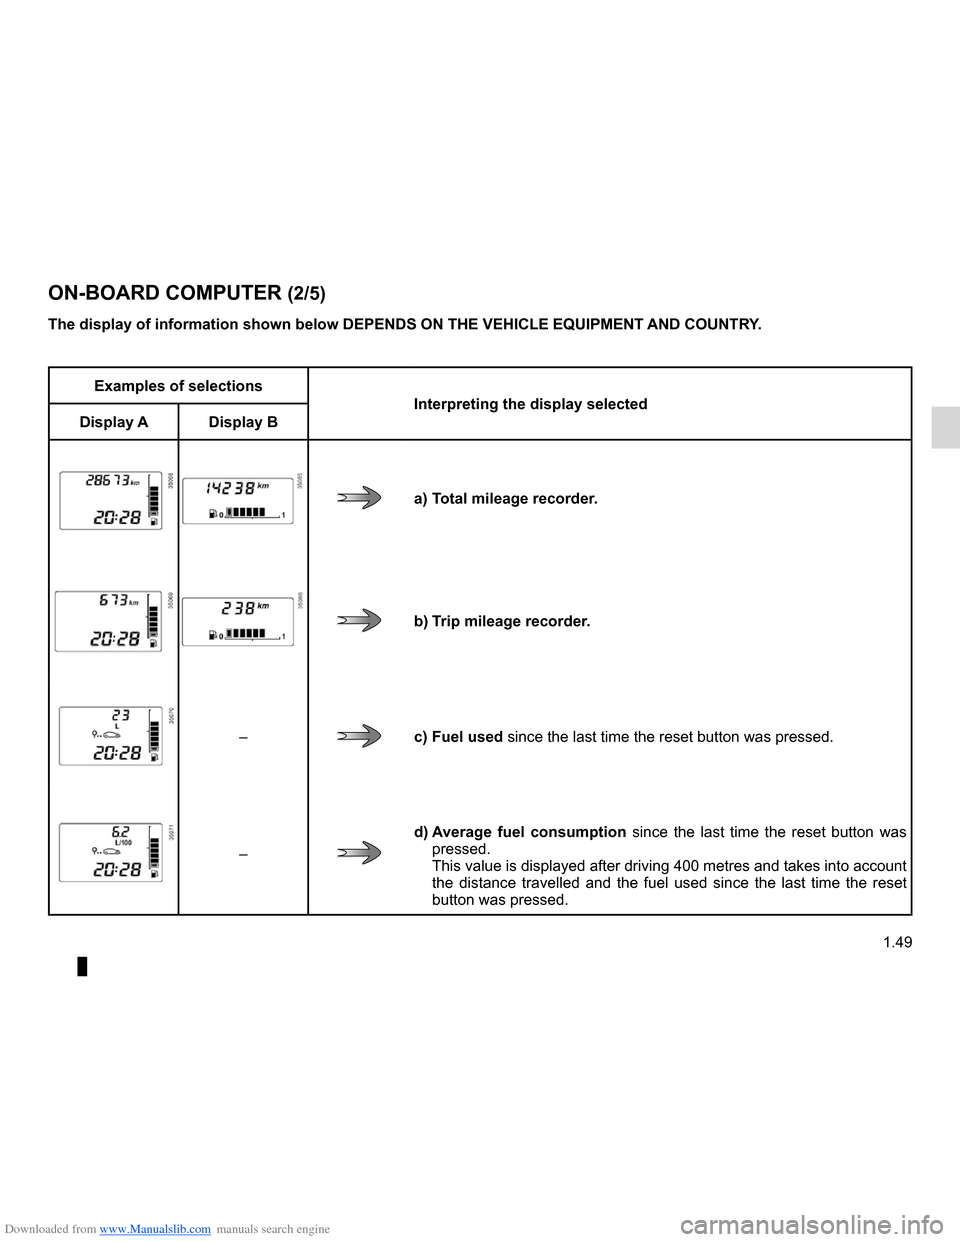
Examples of selections
Interpreting the display selected
Display A Display B
a) Total mileage recorder.
b) Trip mileage recorder.
–c) Fuel used since the last time the reset button was pressed.
–
d) Average fuel consumption since the last time the reset button was
pressed.
This value is displayed after driving 400 metres and takes into account
the distance travelled and the fuel used since the last time the reset
button was pressed.
Page 55 of 196
Downloaded from www.Manualslib.com manuals search engine 1.50
ENG_UD28182_2
Ordinateur de bord (X92 - Renault)
ENG_NU_975-3_X92_Dacia_1
Jaune NoirNoir texte
ON-BOARD COMPUTER (3/5)
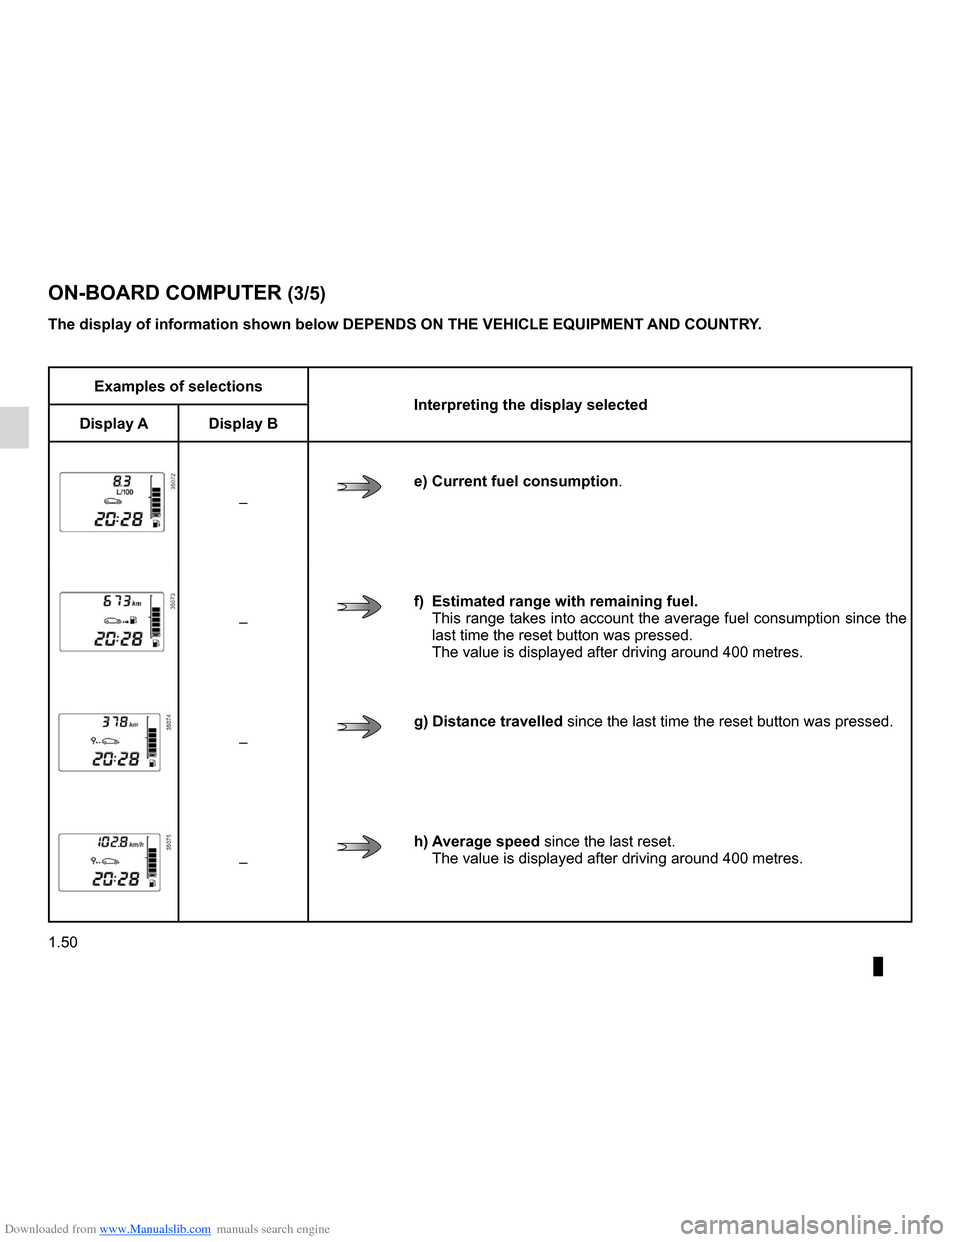
Examples of selections
Interpreting the display selected
Display A Display B
–
e) Current fuel consumption .
–
f) Estimated range with remaining fuel.
This range takes into account the average fuel consumption since the
last time the reset button was pressed.
The value is displayed after driving around 400 metres.
–
g) Distance travelled since the last time the reset button was pressed.
–
h) Average speed since the last reset.
The value is displayed after driving around 400 metres.
The display of information shown below DEPENDS ON THE VEHICLE EQUIPMENT \
AND COUNTRY.
Page 65 of 196
Downloaded from www.Manualslib.com manuals search engine fuel filler cap .......................................................... (current page)
fuel tank capacity ................................................... (current page)
fuel grade ................................................................ (current page)
fuel tank ................................................ (up to the end of the DU)
fuel filler cap .......................................................... (current page)
fuel grade ............................................................... (current page)
1.60
ENG_UD24425_1
Réservoir carburant (X92 - Renault)
ENG_NU_975-3_X92_Dacia_1
Jaune NoirNoir texte
Fuel tank (filling with fuel)
FUEL TANK (1/3)
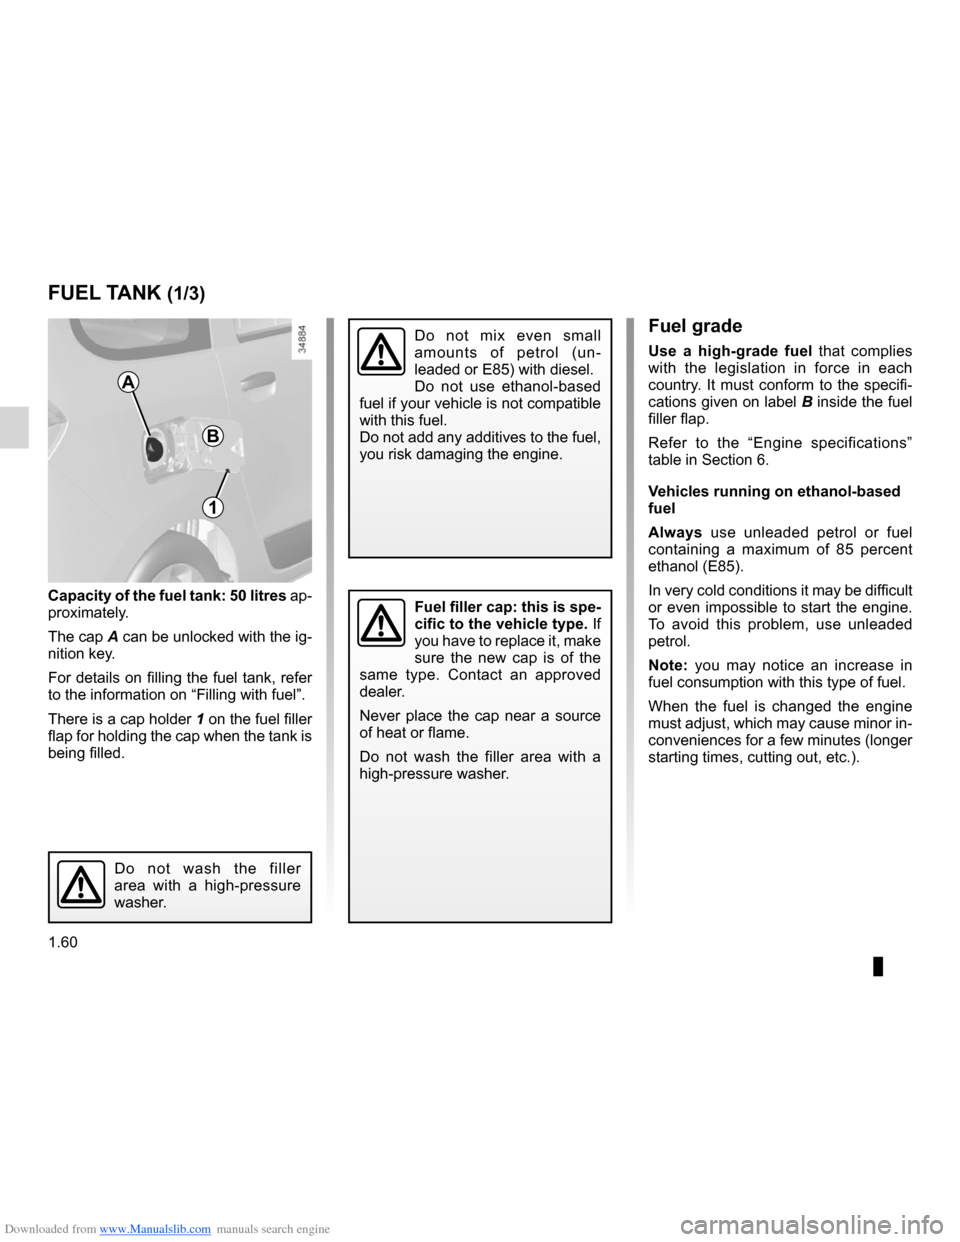
Capacity of the fuel tank: 50 litres ap-
proximately.
The cap A can be unlocked with the ig-
nition key.
For details on filling the fuel tank, refer
to the information on “Filling with fuel”.
There is a cap holder 1 on the fuel filler
flap for holding the cap when the tank is
being filled.Fuel filler cap: this is spe-
cific to the vehicle type. If
you have to replace it, make
sure the new cap is of the
same type. Contact an approved
dealer.
Never place the cap near a source
of heat or flame.
Do not wash the filler area with a
high-pressure washer.
Fuel grade
Use a high-grade fuel that complies
with the legislation in force in each
country. It must conform to the specifi-
cations given on label B inside the fuel
filler flap.
Refer to the “Engine specifications”
table in Section 6.
Vehicles running on ethanol-based
fuel
Always use unleaded petrol or fuel
containing a maximum of 85 percent
ethanol (E85).
In very cold conditions it may be difficult
or even impossible to start the engine.
To avoid this problem, use unleaded
petrol.
Note: you may notice an increase in
fuel consumption with this type of fuel.
When the fuel is changed the engine
must adjust, which may cause minor in-
conveniences for a few minutes (longer
starting times, cutting out, etc.).
1
A
Do not mix even small
amounts of petrol (un -
leaded or E85) with diesel.
Do not use ethanol-based
fuel if your vehicle is not compatible
with this fuel.
Do not add any additives to the fuel,
you risk damaging the engine.
Do not wash the filler
area with a high-pressure
washer.
B
Page 66 of 196
Downloaded from www.Manualslib.com manuals search engine fuelfilling ................................................................. (current page)
JauneNoirNoir texte
1.61
ENG_UD24425_1
Réservoir carburant (X92 - Renault)
ENG_NU_975-3_X92_Dacia_1
FUEL TANK (2/3)
Petrol version
It is essential to use unleaded petrol.
The octane rating (RON) should match
the information given on the label B lo-
cated inside the fuel filler flap.
Diesel versions
It is essential to use diesel fuel that
conforms to the specifications given on
the label inside fuel flap B.Filling with fuel
With the ignition off, insert the nozzle to
open the valve and insert it fully before
turning it on to fill the fuel tank (risk of
splashing).
Keep the nozzle in this position
throughout the entire filling operation.
When the pump cuts out automatically
at the end of the filling procedure, a
maximum of two further filling attempts
may be made, as there must be suffi -
cient space in the fuel tank to allow for
expansion.
Make sure that no water enters the fuel
tank during filling. The valve and its sur-
round must remain clean.
Petrol versions
Using leaded petrol will damage the
antipollution system and may lead to a
loss of warranty.
To ensure that the fuel tank is not filled
with leaded petrol, the fuel tank filler
neck contains a restrictor fitted with a
foolproof system which only allows
the nozzle for unleaded petrol to be
used (at the pump).
Persistent fuel odour
If you notice a persistent
fuel odour you should:
– stop the vehicle as soon as traf-
fic conditions allow and switch off
the ignition;
– switch on the hazard warning
lights and ask your passengers to
leave the vehicle and stay clear
of the traffic;
– contact an approved Dealer.