Connect DACIA LODGY 2015 Owners Manual
[x] Cancel search | Manufacturer: DACIA, Model Year: 2015, Model line: LODGY, Model: DACIA LODGY 2015Pages: 220, PDF Size: 2.62 MB
Page 59 of 220
JauneNoir Noir texte
1.53
ENG_UD24418_1
Volant de direction/Heure (X92 - Renault)
ENG_NU_975-6_X92_Dacia_1
STEERING WHEEL/CLOCK
Adjusting the steering wheel
Depending on the vehicle, the steering
wheel position is adjustable.
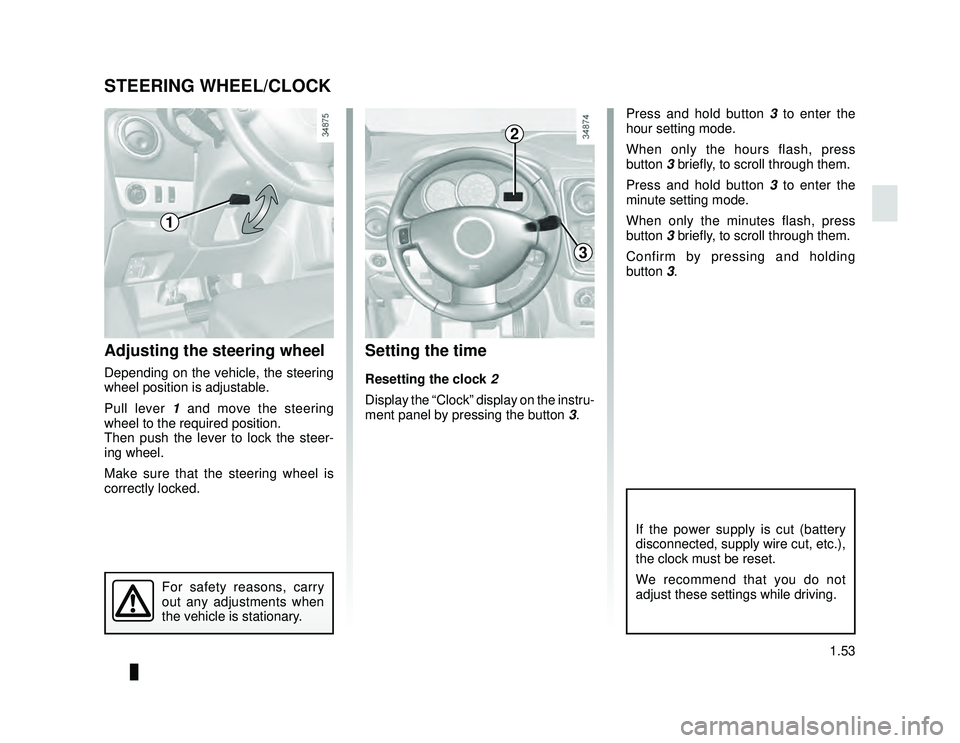
Pull lever 1 and move the steering
wheel to the required position.
Then push the lever to lock the steer-
ing wheel.
Make sure that the steering wheel is
correctly locked.
For safety reasons, carry
out any adjustments when
the vehicle is stationary.
Setting the time
Resetting the clock 2
Display the “Clock” display on the instru-
ment panel by pressing the button 3.
2
1
2
3
If the power supply is cut (battery
disconnected, supply wire cut, etc.),
the clock must be reset.
We recommend that you do not
adjust these settings while driving.
Press and hold button 3 to enter the
hour setting mode.
When only the hours flash, press
button 3 briefly, to scroll through them.
Press and hold button 3 to enter the
minute setting mode.
When only the minutes flash, press
button 3 briefly, to scroll through them.
Confirm by pressing and holding
button 3.
Page 74 of 220
JauneNoir Noir texte
2.4
ENG_UD10826_1
Particularités des versions essence (X95 - J95 - R95 - Renault)
ENG_NU_975-6_X92_Dacia_2
SPECIAL FEATURES OF PETROL VERSIONS
Do not park the vehicle or
run the engine in locations
where combustible sub-
stances or materials such
as grass or leaves can come into
contact with the hot exhaust system.
The following operating conditions
should be avoided:
– driving for long periods when the low fuel level warning light is lit;
– using leaded petrol;
– using fuel or lubrication additives which are not approved.
Or operating faults such as:
– faulty ignition, running out of fuel or disconnected spark plugs resulting
in the engine misfiring or cutting out
when driving;
– loss of power,
may cause the catalytic converter to
overheat, reducing its efficiency which
may irreparably damage it and cause
heat damage to the vehicle. If you notice any of the above operating
faults, have the necessary repairs car-
ried out as soon as possible by an ap-
proved dealer.
These faults may be avoided by regu-
larly taking your vehicle to an approved
Dealer at the intervals specified in the
Maintenance Document.
Starting problems
To avoid damaging the catalytic con-
verter,
do not keep trying to start the
engine (using the start button, or by
pushing or towing the vehicle) without
having identified and corrected the
cause of the fault.
If the fault cannot be identified, do not
continue to try and start the engine, but
contact an approved dealer.
Page 118 of 220

JauneNoir Noir texte
3.16
ENG_UD24445_1
Cendriers, Allume-cigares, Prise d’accessoires (X92 - Renault)
ENG_NU_975-6_X92_Dacia_3
ASHTRAY/CIGARETTE LIGHTER/ACCESSORIES SOCKET
Cigarette lighter or
accessories socket 3
With the ignition on, push in the ciga-
rette lighter 3. It will spring back with a
click when it is ready. Pull it out to use.
After use, replace it without pushing it
all the way in.
1
2
3
6
Ashtray 1
This may be in location 2, 4 or 6.
Lift the cover to open.
To empty, pull the ashtray towards you
and it will be released from its housing.
4
If your vehicle is not fitted with a
cigar lighter and an ashtray, these
can be obtained from an approved
Dealer.
Accessories socket 5
It is provided for connecting acces-
sories approved by our Technical
Department with a maximum power of
120 Watts (12V).
Connect accessories
with a maximum power of
120 Watts only.
Fire hazard.
5
Page 145 of 220

JauneNoir Noir texte
4.9
ENG_UD24461_1
Batterie (X92 - Renault)
ENG_NU_975-6_X92_Dacia_4
BATTERY
The battery 1 does not require any
maintenance.
As the battery is specific
to the vehicle (presence of
a ventilation pipe to expel
corrosive and explosive
gases), make sure that it is replaced
with a battery that enables this pipe
to be connected. Consult an ap-
proved Dealer.
Handle the battery with
care as it contains sulphu-
ric acid, which must not
come into contact with eyes
or skin. If it does, wash the affected
area with plenty of water and see a
doctor if necessary.
Ensure that naked flames, red hot
objects and sparks do not come into
contact with the battery as there is a
risk of explosion.
The charge status of your battery can
decrease especially if you use your ve-
hicle:
– for short journeys;
– for driving in town;
– when the temperature drops;
– after extended use of consumers (radio etc.) with the engine switched
off.
Replacing the battery
As this operation is complex, we advise
you to contact an approved Dealer.
1
Label A
Observe the indications on the battery:
– 2 Naked flames and smoking are for-
bidden;
– 3 Eye protection required;
– 4 Keep away from children;
– 5 Explosive materials;
– 6 Refer to the handbook;
– 7 Corrosive materials.
A234
567
The engine may be hot
during operations in close
proximity. In addition, the
engine cooling fan may
start at any moment.
Risk of injury.
Page 158 of 220
JauneNoir Noir texte
5.6
ENG_UD33465_1
Kit de gonflage des pneumatiques (X67 - X92 - Dacia)
ENG_NU_975-6_X92_Dacia_5
TYRE INFLATION KIT (2/6)
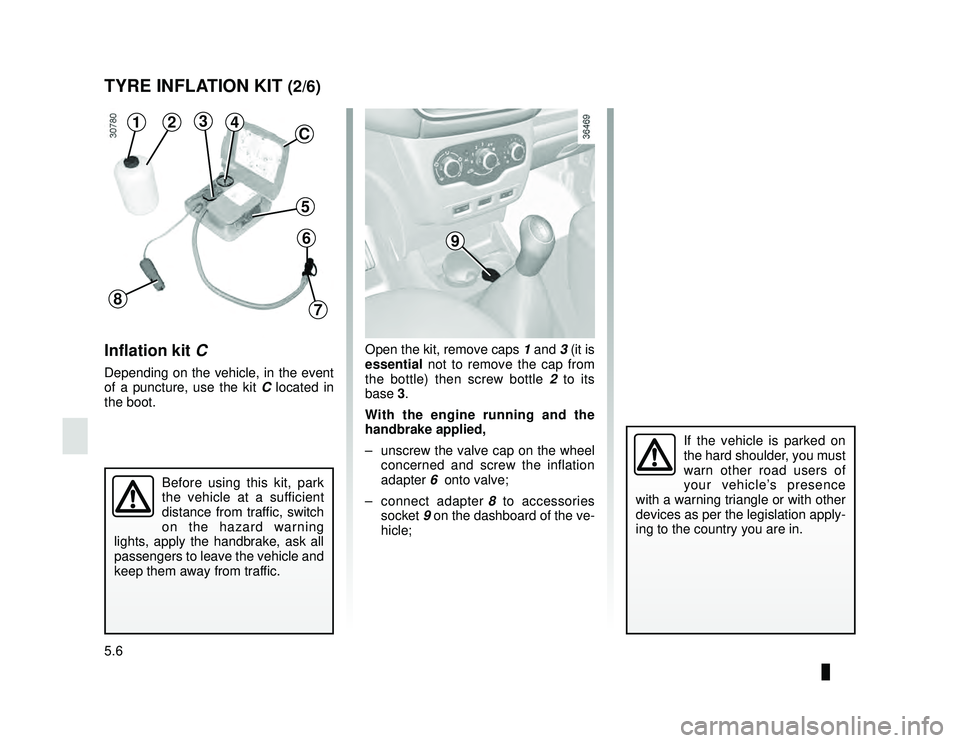
Inflation kit C
Depending on the vehicle, in the event
of a puncture, use the kit C located in
the boot.
Before using this kit, park
the vehicle at a sufficient
distance from traffic, switch
on the hazard warning
lights, apply the handbrake, ask all
passengers to leave the vehicle and
keep them away from traffic.
Open the kit, remove caps 1 and 3 (it is
essential not to remove the cap from
the bottle) then screw bottle 2 to its
base 3.
With the engine running and the
handbrake applied,
– unscrew the valve cap on the wheel concerned and screw the inflation
adapter 6 onto valve;
– connect adapter 8 to accessories
socket 9 on the dashboard of the ve-
hicle;
9
1234
5
6
78
C
If the vehicle is parked on
the hard shoulder, you must
warn other road users of
your vehicle’s presence
with a warning triangle or with other
devices as per the legislation apply-
ing to the country you are in.
Page 159 of 220
JauneNoir Noir texte
5.7
ENG_UD33465_1
Kit de gonflage des pneumatiques (X67 - X92 - Dacia)
ENG_NU_975-6_X92_Dacia_5
TYRE INFLATION KIT (3/6)
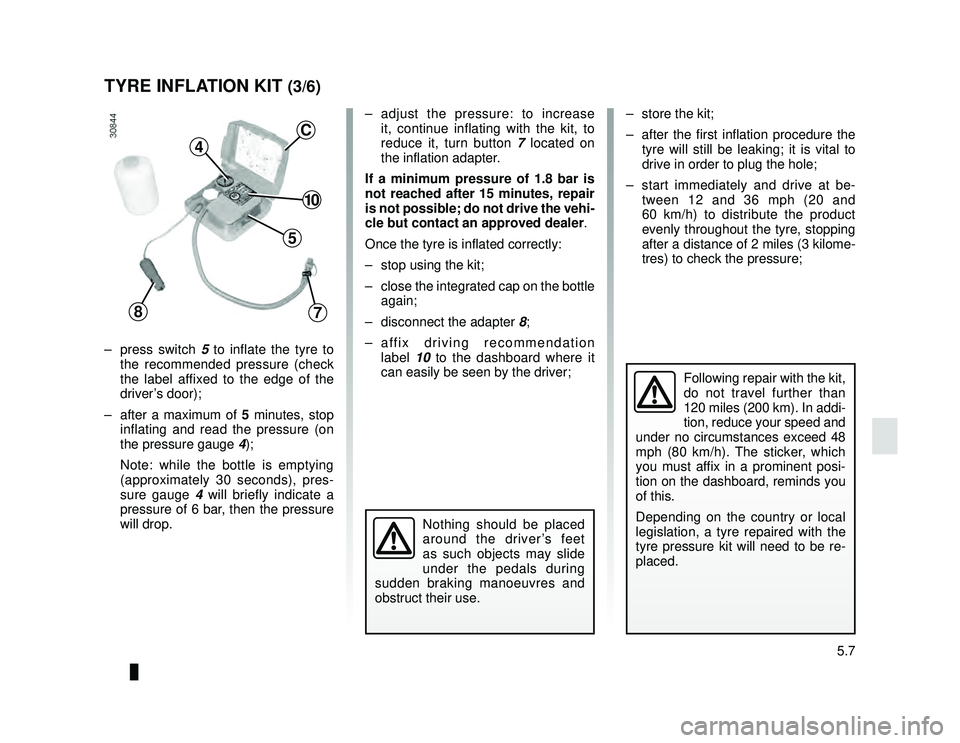
– press switch 5 to inflate the tyre to
the recommended pressure (check
the label affixed to the edge of the
driver’s door);
– after a maximum of 5 minutes, stop inflating and read the pressure (on
the pressure gauge 4);
Note: while the bottle is emptying
(approximately 30 seconds), pres-
sure gauge 4 will briefly indicate a
pressure of 6 bar, then the pressure
will drop. – adjust the pressure: to increase
it, continue inflating with the kit, to
reduce it, turn button 7 located on
the inflation adapter.
If a minimum pressure of 1.8 bar is
not reached after 15 minutes, repair
is not possible; do not drive the vehi-
cle but contact an approved dealer .
Once the tyre is inflated correctly:
– stop using the kit;
– close the integrated cap on the bottle again;
– disconnect the adapter 8;
– affix driving recommendation label 10 to the dashboard where it
can easily be seen by the driver; – store the kit;
– after the first inflation procedure the
tyre will still be leaking; it is vital to
drive in order to plug the hole;
– start immediately and drive at be- tween 12 and 36 mph (20 and
60 km/h) to distribute the product
evenly throughout the tyre, stopping
after a distance of 2 miles (3 kilome-
tres) to check the pressure;
Following repair with the kit,
do not travel further than
120 miles (200 km). In addi-
tion, reduce your speed and
under no circumstances exceed 48
mph (80 km/h). The sticker, which
you must affix in a prominent posi-
tion on the dashboard, reminds you
of this.
Depending on the country or local
legislation, a tyre repaired with the
tyre pressure kit will need to be re-
placed.
Nothing should be placed
around the driver’s feet
as such objects may slide
under the pedals during
sudden braking manoeuvres and
obstruct their use.
4
10
5
78
C
Page 161 of 220
JauneNoir Noir texte
5.9
ENG_UD33465_1
Kit de gonflage des pneumatiques (X67 - X92 - Dacia)
ENG_NU_975-6_X92_Dacia_5
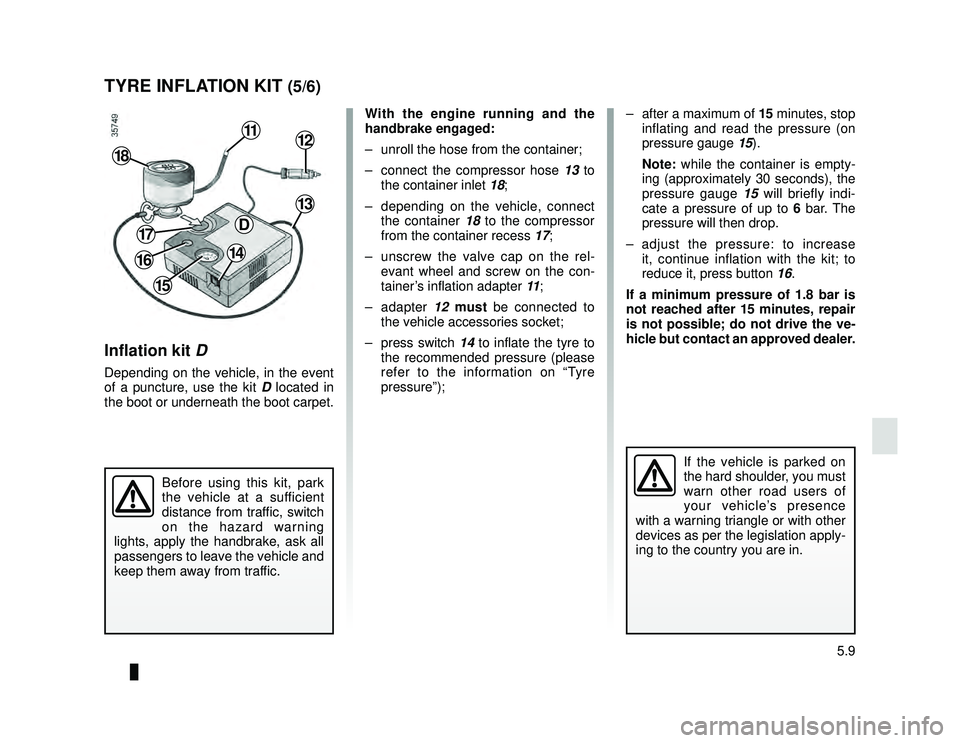
With the engine running and the
handbrake engaged:
– unroll the hose from the container;
– connect the compressor hose 13 to
the container inlet 18;
– depending on the vehicle, connect the container 18 to the compressor
from the container recess 17;
– unscrew the valve cap on the rel- evant wheel and screw on the con-
tainer’s inflation adapter 11;
– adapter 12 must be connected to
the vehicle accessories socket;
– press switch 14 to inflate the tyre to the recommended pressure (please
refer to the information on “Tyre
pressure”); – after a maximum of 15 minutes, stop
inflating and read the pressure (on
pressure gauge 15).
Note: while the container is empty-
ing (approximately 30 seconds), the
pressure gauge 15 will briefly indi-
cate a pressure of up to 6 bar. The
pressure will then drop.
– adjust the pressure: to increase it, continue inflation with the kit; to
reduce it, press button 16.
If a minimum pressure of 1.8 bar is
not reached after 15 minutes, repair
is not possible; do not drive the ve-
hicle but contact an approved dealer.
TYRE INFLATION KIT (5/6)
If the vehicle is parked on
the hard shoulder, you must
warn other road users of
your vehicle’s presence
with a warning triangle or with other
devices as per the legislation apply-
ing to the country you are in.
Before using this kit, park
the vehicle at a sufficient
distance from traffic, switch
on the hazard warning
lights, apply the handbrake, ask all
passengers to leave the vehicle and
keep them away from traffic.
Inflation kit D
Depending on the vehicle, in the event
of a puncture, use the kit D located in
the boot or underneath the boot carpet.
1112
13
14
15
17
18
D
16
Page 169 of 220
JauneNoir Noir texte
5.17
ENG_UD26649_2
Feux avant : remplacement des lampes (X92 - Renault)
ENG_NU_975-6_X92_Dacia_5
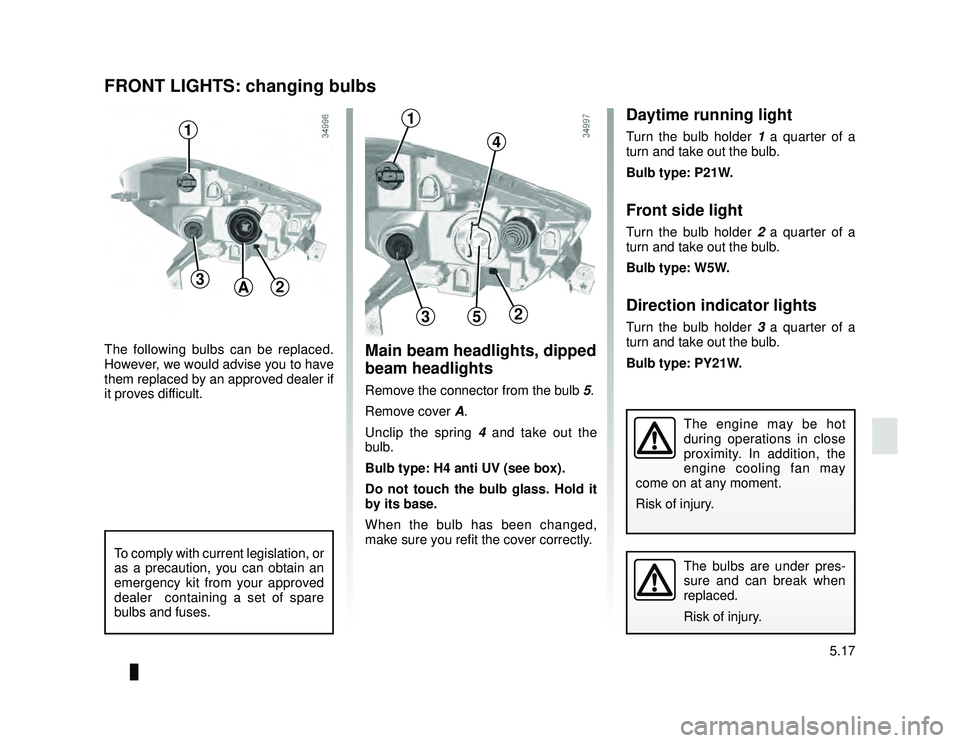
The following bulbs can be replaced.
However, we would advise you to have
them replaced by an approved dealer if
it proves difficult.
The engine may be hot
during operations in close
proximity. In addition, the
engine cooling fan may
come on at any moment.
Risk of injury.
The bulbs are under pres-
sure and can break when
replaced.
Risk of injury.
Main beam headlights, dipped
beam headlights
Remove the connector from the bulb 5.
Remove cover A.
Unclip the spring 4 and take out the
bulb.
Bulb type: H4 anti UV (see box).
Do not touch the bulb glass. Hold it
by its base.
When the bulb has been changed,
make sure you refit the cover correctly.
FRONT LIGHTS: changing bulbs
5
4
23
A
To comply with current legislation, or
as a precaution, you can obtain an
emergency kit from your approved
dealer containing a set of spare
bulbs and fuses.
1Daytime running light
Turn the bulb holder 1 a quarter of a
turn and take out the bulb.
Bulb type: P21W.
Front side light
Turn the bulb holder 2 a quarter of a
turn and take out the bulb.
Bulb type: W5W.
Direction indicator lights
Turn the bulb holder 3 a quarter of a
turn and take out the bulb.
Bulb type: PY21W.
1
32
Page 170 of 220
JauneNoir Noir texte
5.18
ENG_UD29945_2
Feux de brouillard : remplacement des lampes (X92 - Renault)
ENG_NU_975-6_X92_Dacia_5
Additional lights
If you wish to fit fog lights to your ve-
hicle, please see an authorised dealer.
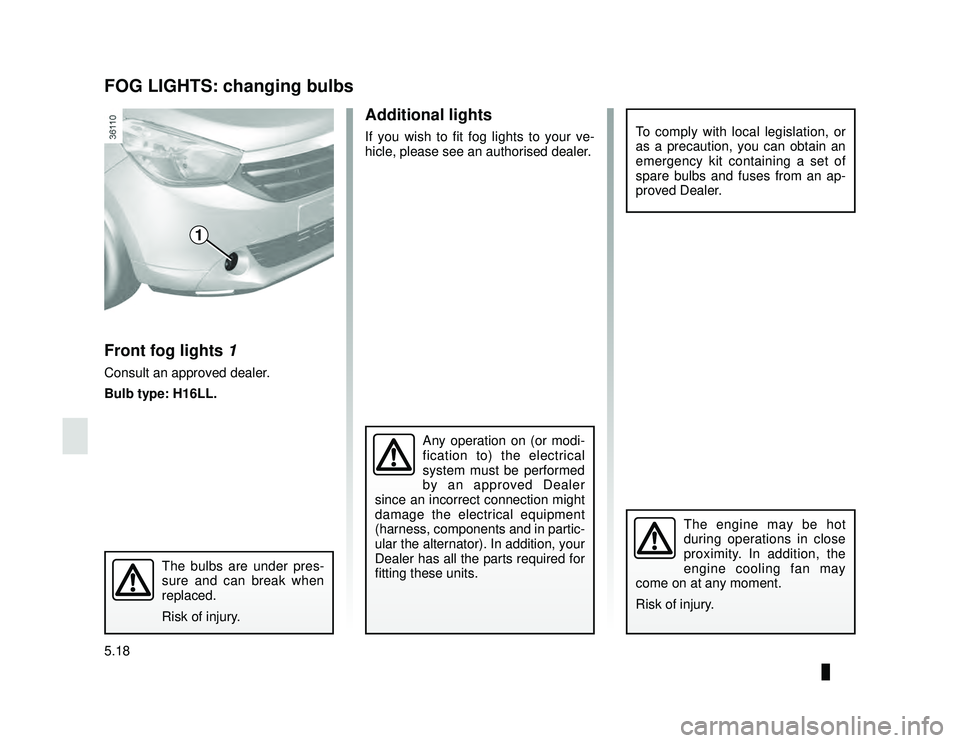
FOG LIGHTS: changing bulbs
Front fog lights 1
Consult an approved dealer.
Bulb type: H16LL.
Any operation on (or modi-
fication to) the electrical
system must be performed
by an approved Dealer
since an incorrect connection might
damage the electrical equipment
(harness, components and in partic-
ular the alternator). In addition, your
Dealer has all the parts required for
fitting these units.
The bulbs are under pres-
sure and can break when
replaced.
Risk of injury.
The engine may be hot
during operations in close
proximity. In addition, the
engine cooling fan may
come on at any moment.
Risk of injury.
To comply with local legislation, or
as a precaution, you can obtain an
emergency kit containing a set of
spare bulbs and fuses from an ap-
proved Dealer.
1
Page 172 of 220
JauneNoir Noir texte
5.20
ENG_UD26662_2
Feux arrière: remplacement des lampes (X92 - Renault)
ENG_NU_975-6_X92_Dacia_5
REAR AND SIDE LIGHTS: changing bulbs (2/3)
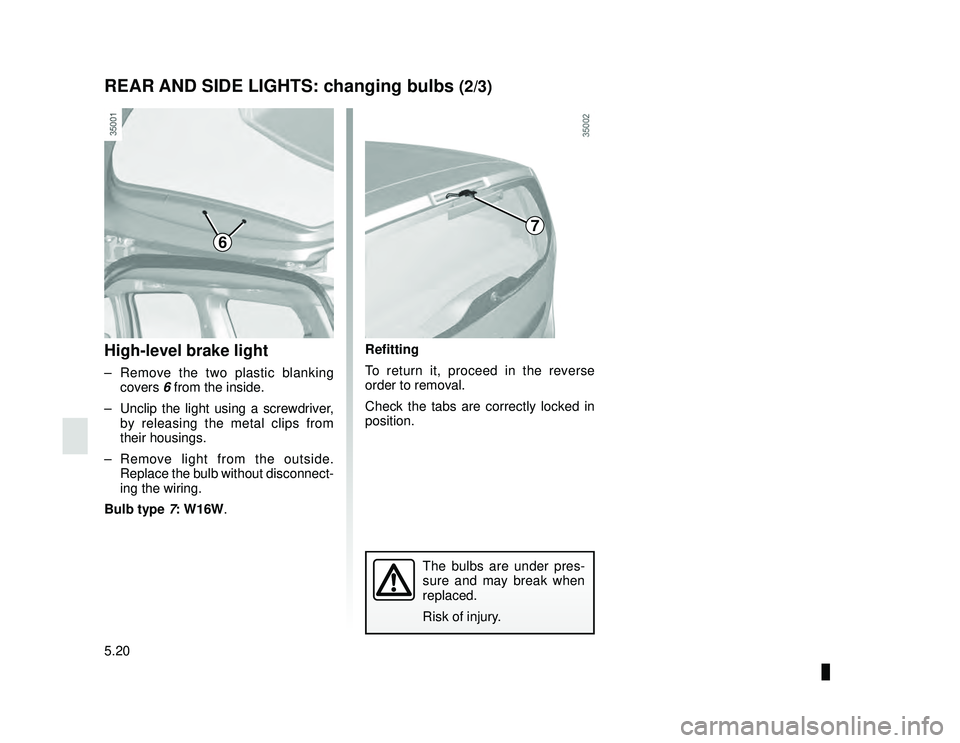
High-level brake light
– Remove the two plastic blanking
covers 6 from the inside.
– Unclip the light using a screwdriver, by releasing the metal clips from
their housings.
– Remove light from the outside. Replace the bulb without disconnect-
ing the wiring.
Bulb type 7: W16W.
Refitting
To return it, proceed in the reverse
order to removal.
Check the tabs are correctly locked in
position.
The bulbs are under pres-
sure and may break when
replaced.
Risk of injury.
7
6