light DACIA LOGAN 2010 Manual Online
[x] Cancel search | Manufacturer: DACIA, Model Year: 2010, Model line: LOGAN, Model: DACIA LOGAN 2010Pages: 238, PDF Size: 3.19 MB
Page 182 of 238
Downloaded from www.Manualslib.com manuals search engine JauneNoir Noir texte
5.18
ENG_UD30828_2
Feux arrière: remplacement des lampes (X52 - Dacia)
ENG_NU_993-5_X52_Dacia_5
REAR AND SIDE LIGHTS: changing bulbs (2/7)
Four-door version (cntd.)
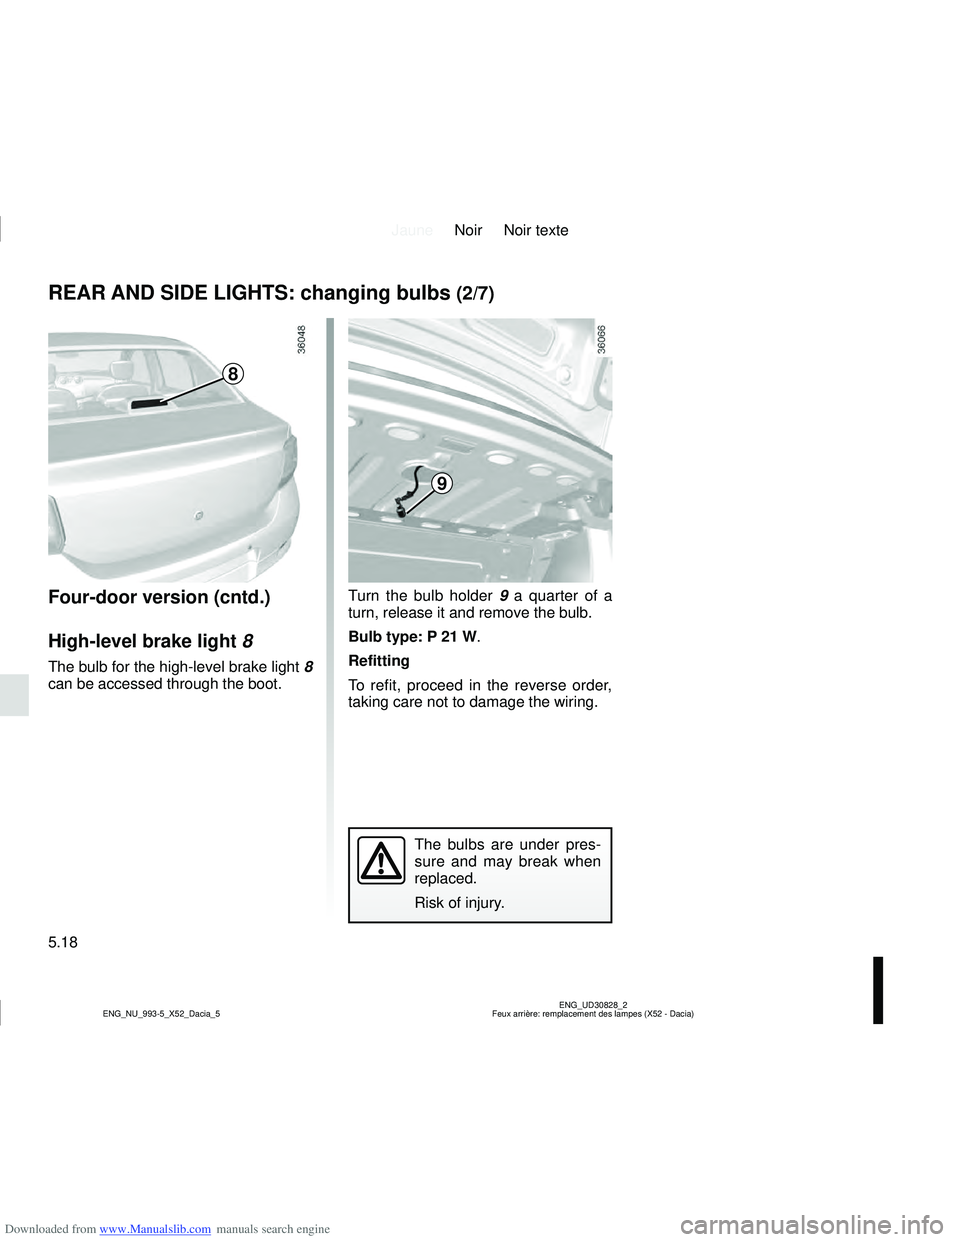
High-level brake light 8
The bulb for the high-level brake light 8
can be accessed through the boot.
8
Turn the bulb holder 9 a quarter of a
turn, release it and remove the bulb.
Bulb type: P 21 W.
Refitting
To refit, proceed in the reverse order,
taking care not to damage the wiring.
9
The bulbs are under pres-
sure and may break when
replaced.
Risk of injury.
Page 183 of 238
Downloaded from www.Manualslib.com manuals search engine JauneNoir Noir texte
5.19
ENG_UD30828_2
Feux arrière: remplacement des lampes (X52 - Dacia)
ENG_NU_993-5_X52_Dacia_5
REAR AND SIDE LIGHTS: changing bulbs (3/7)
Five-door version
Rear side lights and stop light,
indicator lights and fog lights
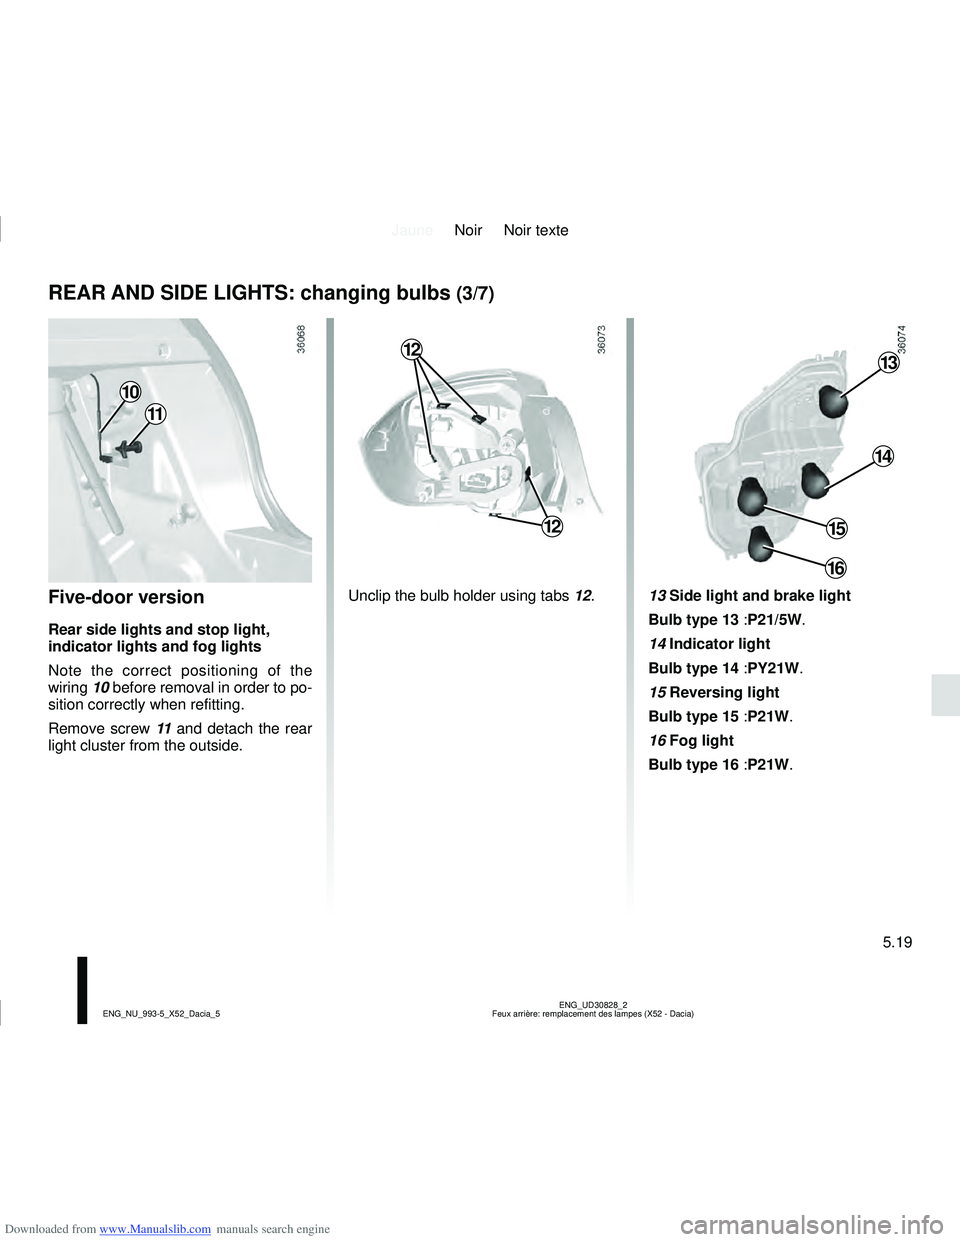
Note the correct positioning of the
wiring 10 before removal in order to po-
sition correctly when refitting.
Remove screw 11 and detach the rear
light cluster from the outside.
Unclip the bulb holder using tabs 12.13 Side light and brake light
Bulb type 13 :P21/5W.
14 Indicator light
Bulb type 14 :PY21W.
15 Reversing light
Bulb type 15 :P21W.
16 Fog light
Bulb type 16 :P21W.
10
11
12
12
13
14
15
16
Page 184 of 238
Downloaded from www.Manualslib.com manuals search engine JauneNoir Noir texte
5.20
ENG_UD30828_2
Feux arrière: remplacement des lampes (X52 - Dacia)
ENG_NU_993-5_X52_Dacia_5
Estate version
Rear side lights and stop light,
indicator lights and fog lights
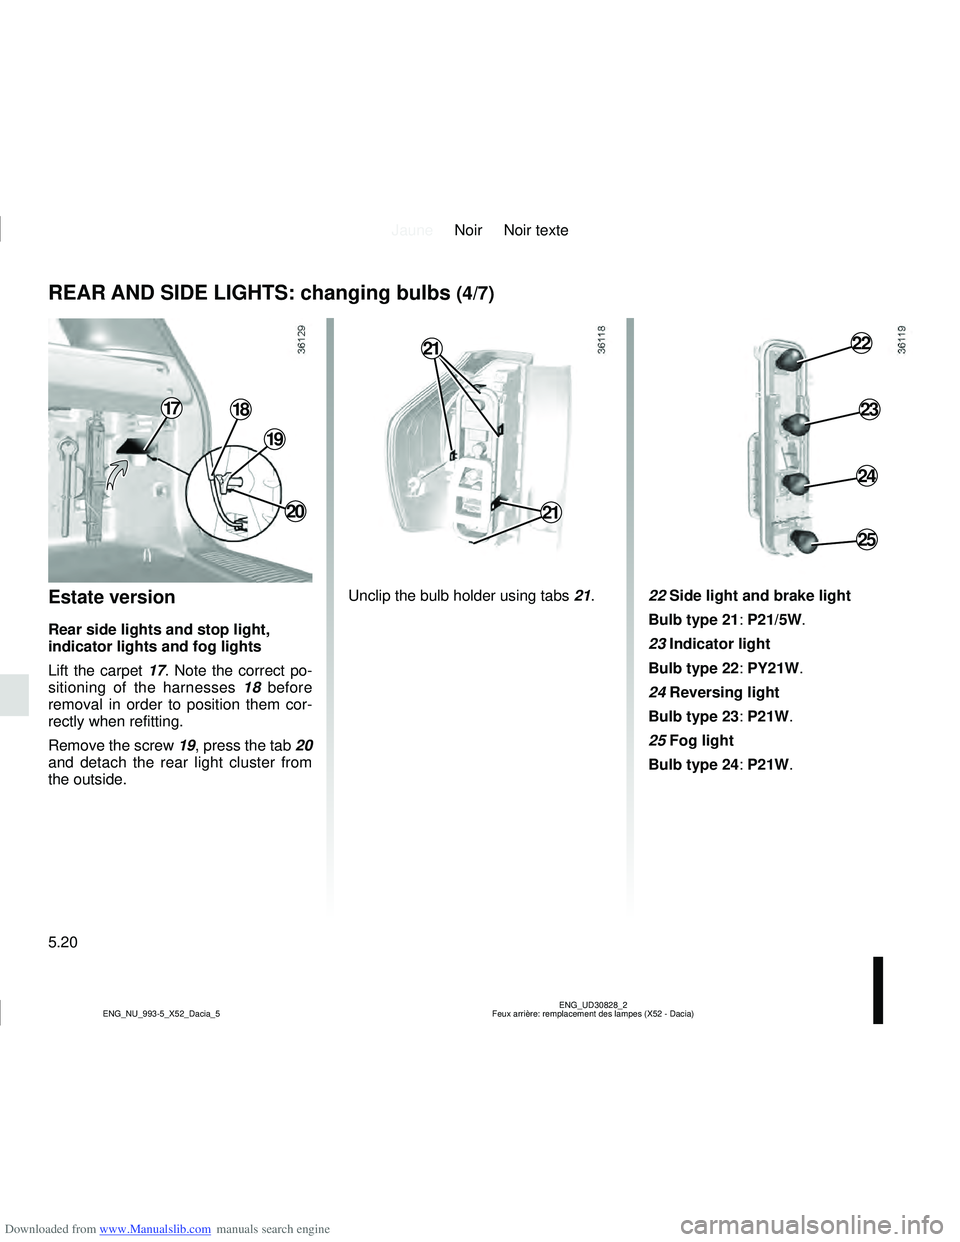
Lift the carpet 17. Note the correct po-
sitioning of the harnesses 18 before
removal in order to position them cor-
rectly when refitting.
Remove the screw 19, press the tab 20
and detach the rear light cluster from
the outside. Unclip the bulb holder using tabs
21.
22 Side light and brake light
Bulb type 21: P21/5W.
23 Indicator light
Bulb type 22: PY21W.
24 Reversing light
Bulb type 23: P21W.
25 Fog light
Bulb type 24: P21W.
REAR AND SIDE LIGHTS: changing bulbs (4/7)
1718
19
21
21
22
23
24
25
20
Page 185 of 238
Downloaded from www.Manualslib.com manuals search engine JauneNoir Noir texte
5.21
ENG_UD30828_2
Feux arrière: remplacement des lampes (X52 - Dacia)
ENG_NU_993-5_X52_Dacia_5
Five door and estate versions
(ctd.)
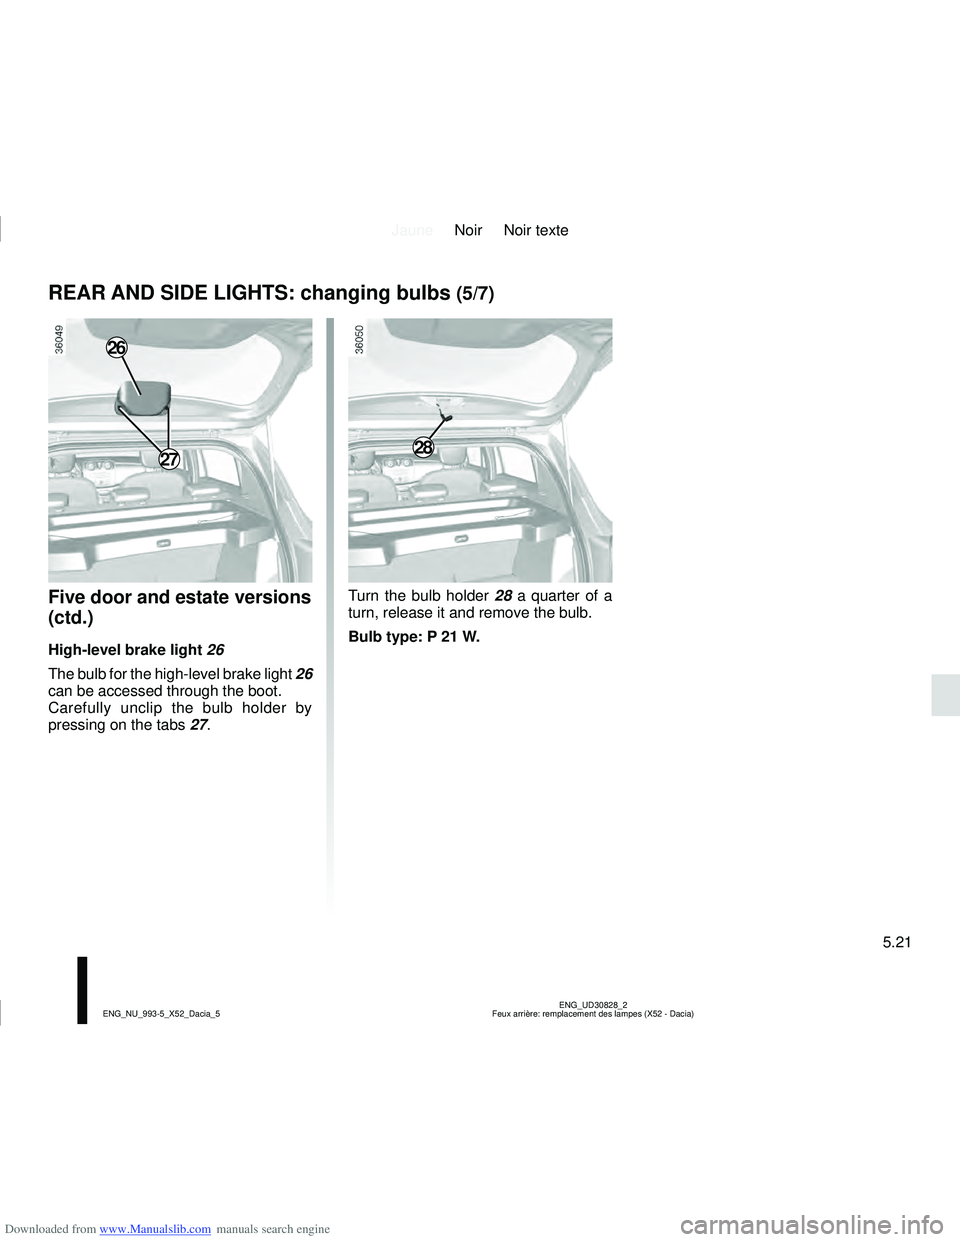
High-level brake light 26
The bulb for the high-level brake light 26
can be accessed through the boot.
Carefully unclip the bulb holder by
pressing on the tabs 27. Turn the bulb holder
28 a quarter of a
turn, release it and remove the bulb.
Bulb type: P 21 W.
REAR AND SIDE LIGHTS: changing bulbs (5/7)
26
2728
Page 186 of 238
Downloaded from www.Manualslib.com manuals search engine JauneNoir Noir texte
5.22
ENG_UD30828_2
Feux arrière: remplacement des lampes (X52 - Dacia)
ENG_NU_993-5_X52_Dacia_5
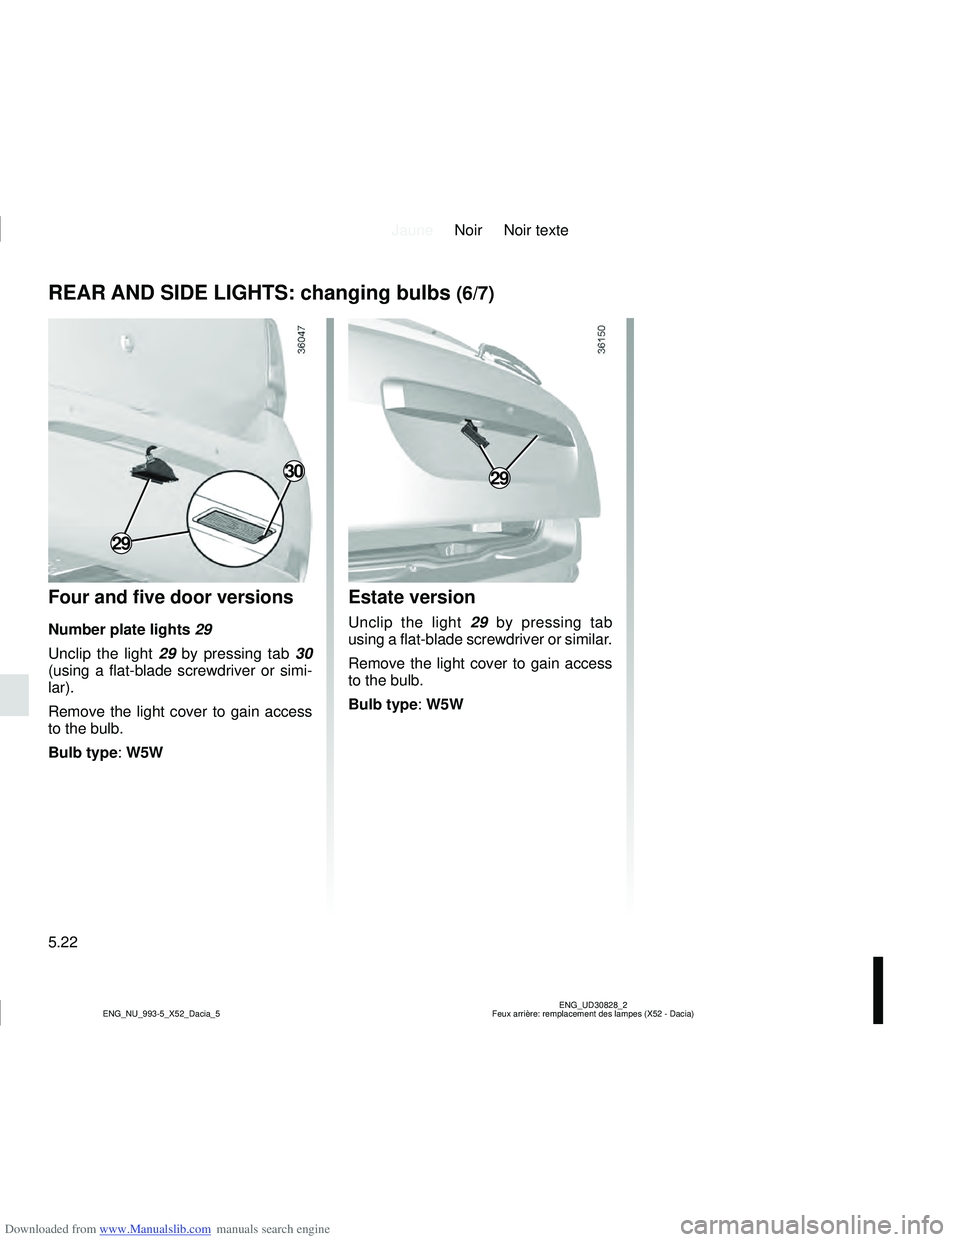
REAR AND SIDE LIGHTS: changing bulbs (6/7)
Four and five door versions
Number plate lights 29
Unclip the light 29 by pressing tab 30
(using a flat-blade screwdriver or simi-
lar).
Remove the light cover to gain access
to the bulb.
Bulb type: W5W
29
30
Estate version
Unclip the light 29 by pressing tab
using a flat-blade screwdriver or similar.
Remove the light cover to gain access
to the bulb.
Bulb type: W5W
29
Page 187 of 238
Downloaded from www.Manualslib.com manuals search engine JauneNoir Noir texte
5.23
ENG_UD30828_2
Feux arrière: remplacement des lampes (X52 - Dacia)
ENG_NU_993-5_X52_Dacia_5
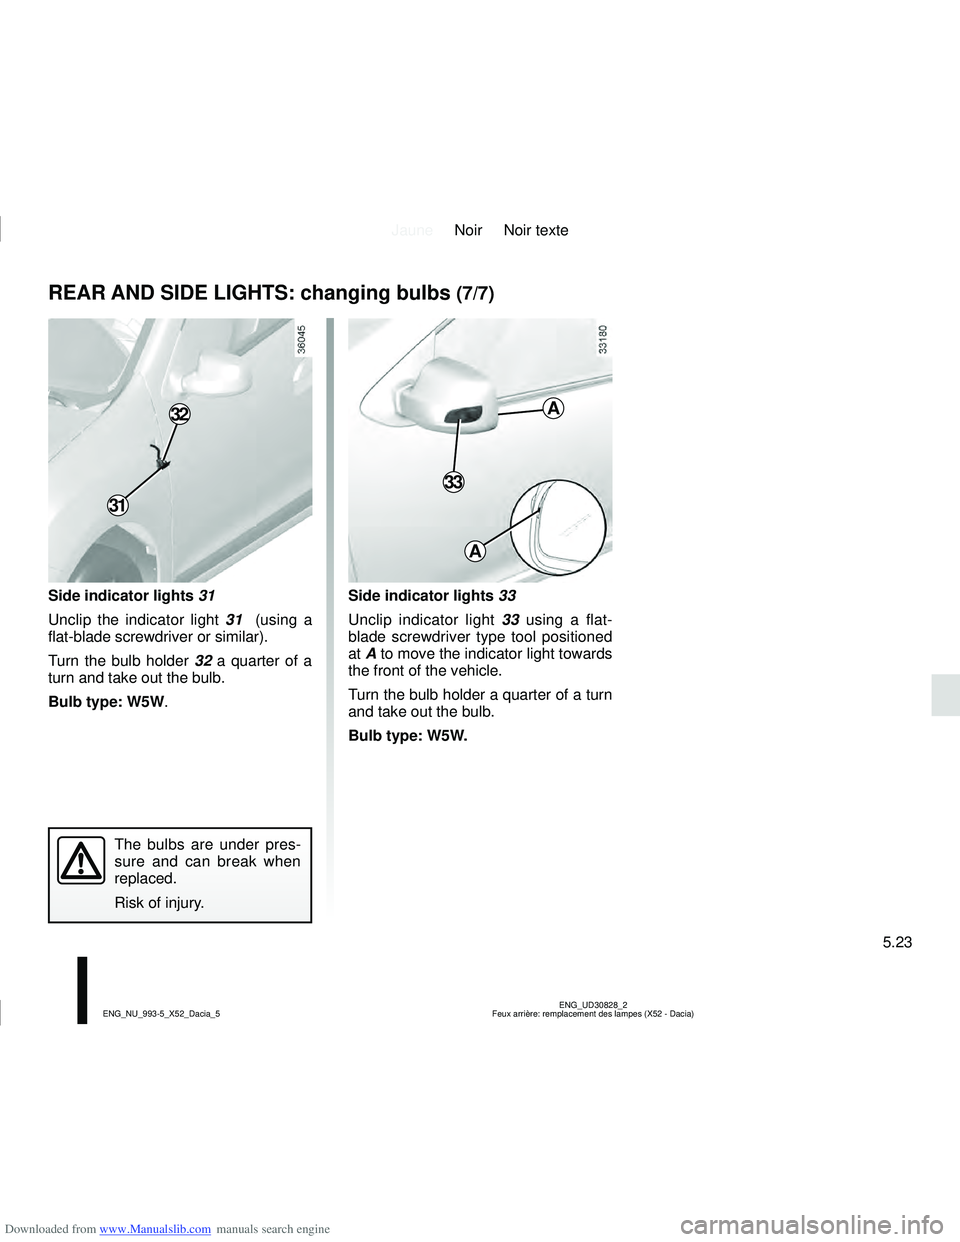
Side indicator lights 31
Unclip the indicator light 31 (using a
flat-blade screwdriver or similar).
Turn the bulb holder 32 a quarter of a
turn and take out the bulb.
Bulb type: W5W.
31
32
The bulbs are under pres-
sure and can break when
replaced.
Risk of injury.
Side indicator lights 33
Unclip indicator light 33 using a flat-
blade screwdriver type tool positioned
at A to move the indicator light towards
the front of the vehicle.
Turn the bulb holder a quarter of a turn
and take out the bulb.
Bulb type: W5W.
33
A
A
REAR AND SIDE LIGHTS: changing bulbs (7/7)
Page 188 of 238
Downloaded from www.Manualslib.com manuals search engine JauneNoir Noir texte
5.24
ENG_UD26986_1
Eclaireurs intérieurs: remplacement des lampes (X52 - Dacia)
ENG_NU_993-5_X52_Dacia_5
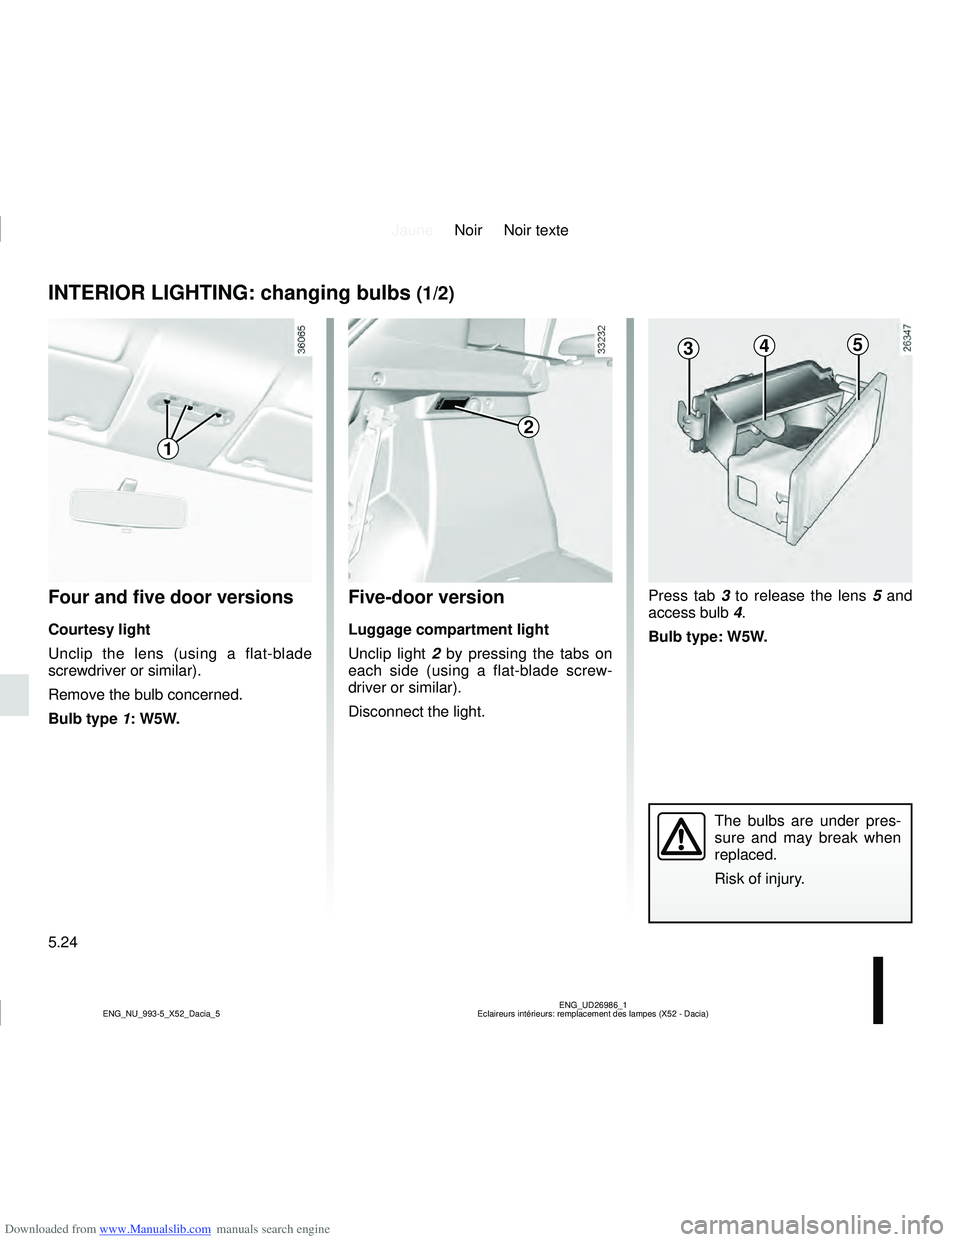
Press tab 3 to release the lens 5 and
access bulb 4.
Bulb type: W5W.
INTERIOR LIGHTING: changing bulbs (1/2)
Four and five door versions
Courtesy light
Unclip the lens (using a flat-blade
screwdriver or similar).
Remove the bulb concerned.
Bulb type 1: W5W.
The bulbs are under pres-
sure and may break when
replaced.
Risk of injury.
Five-door version
Luggage compartment light
Unclip light 2 by pressing the tabs on
each side (using a flat-blade screw-
driver or similar).
Disconnect the light.
345
2
1
Page 189 of 238
Downloaded from www.Manualslib.com manuals search engine JauneNoir Noir texte
5.25
ENG_UD26986_1
Eclaireurs intérieurs: remplacement des lampes (X52 - Dacia)
ENG_NU_993-5_X52_Dacia_5
INTERIOR LIGHTING: changing bulbs (2/2)
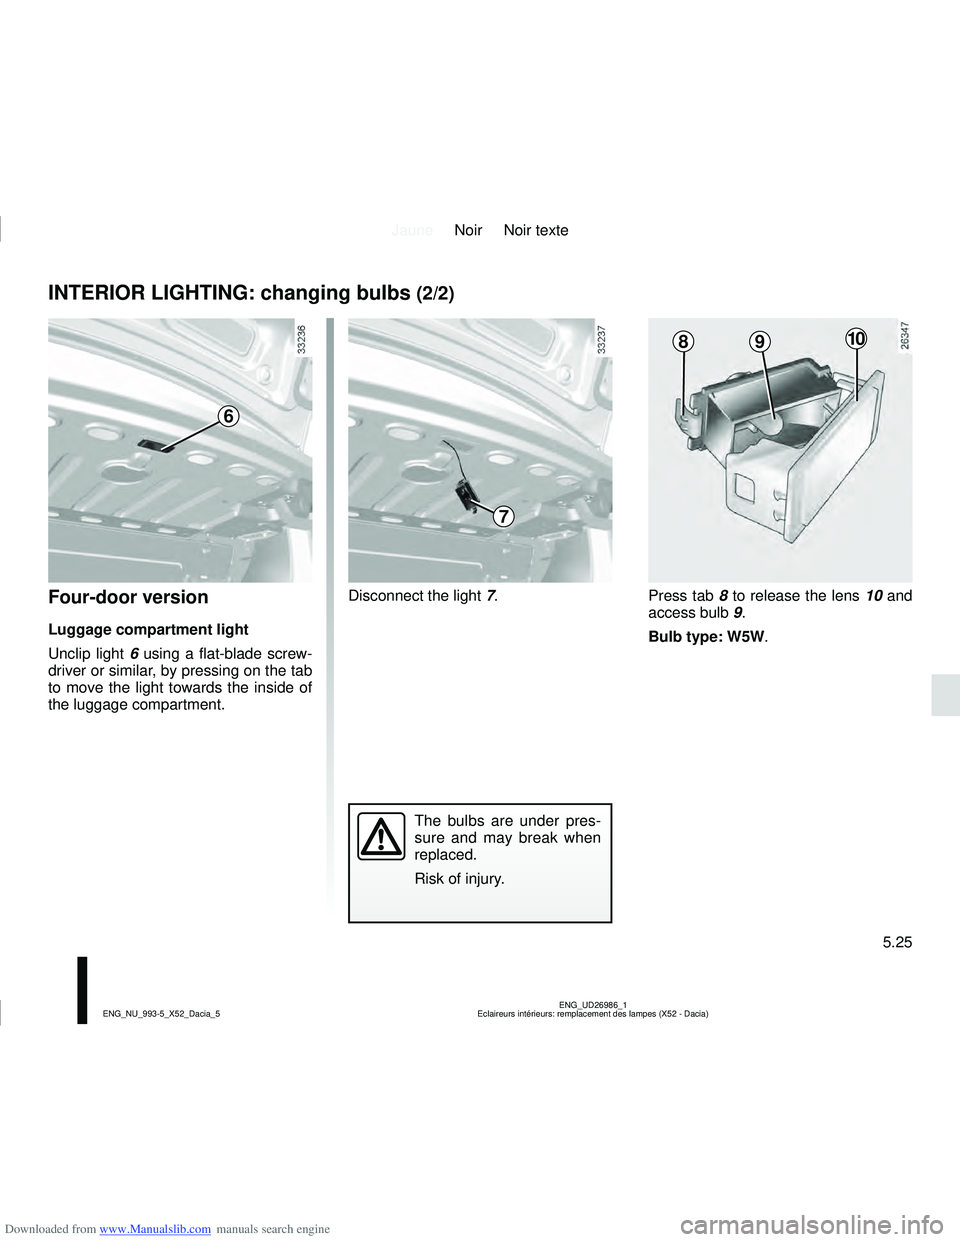
Four-door version
Luggage compartment light
Unclip light 6 using a flat-blade screw-
driver or similar, by pressing on the tab
to move the light towards the inside of
the luggage compartment. Press tab 8 to release the lens 10 and
access bulb
9.
Bulb type: W5W.
The bulbs are under pres-
sure and may break when
replaced.
Risk of injury.
8910
6
Disconnect the light 7.
7
Page 193 of 238
Downloaded from www.Manualslib.com manuals search engine JauneNoir Noir texte
5.29
ENG_UD34867_5
Fusibles GPL X52 (X52 - Dacia)
ENG_NU_993-5_X52_Dacia_5
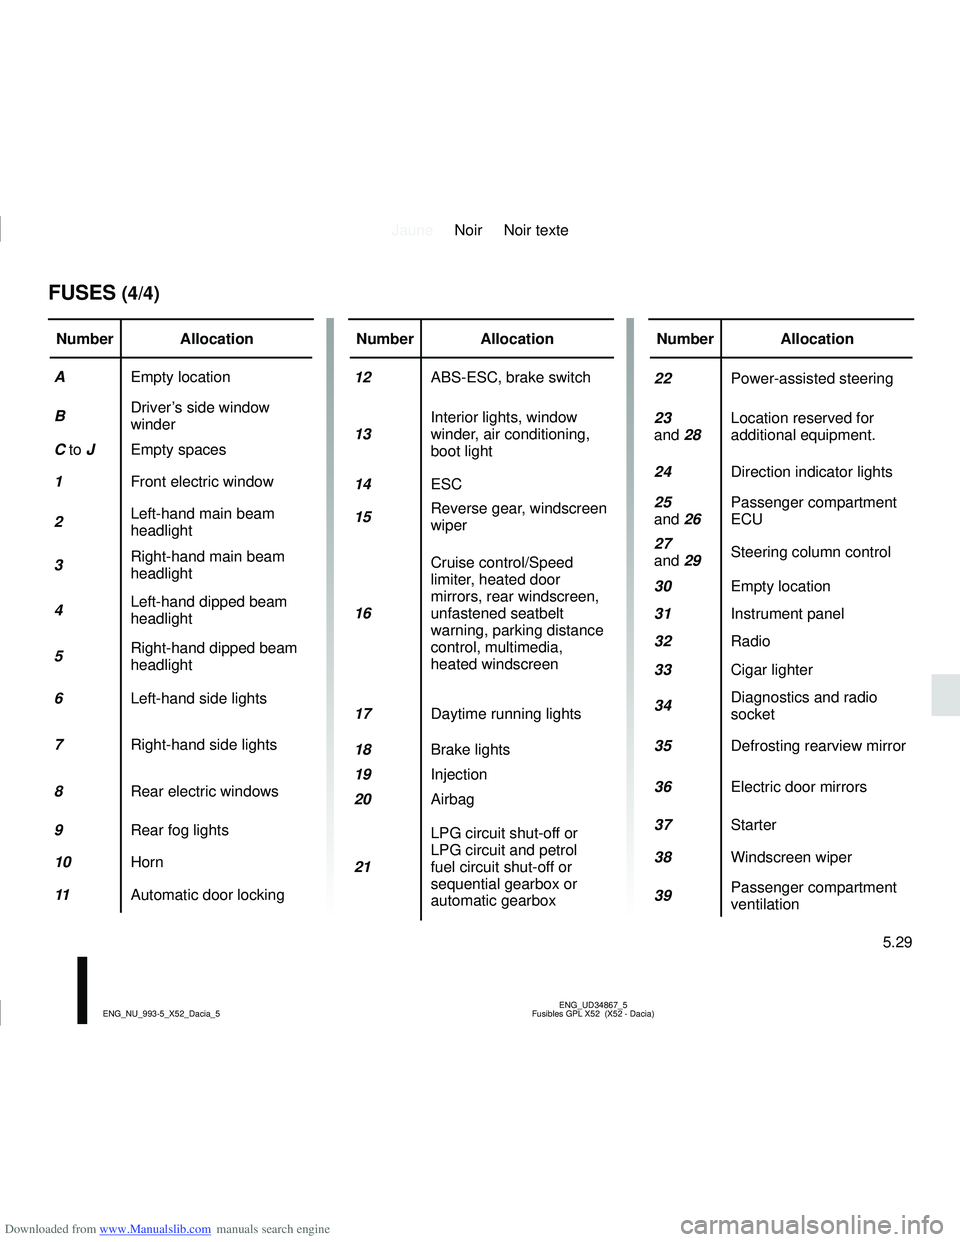
Number Allocation
A Empty location
B Driver’s side window
winder
C to J Empty spaces
1 Front electric window
2 Left-hand main beam
headlight
3 Right-hand main beam
headlight
4 Left-hand dipped beam
headlight
5 Right-hand dipped beam
headlight
6 Left-hand side lights
7 Right-hand side lights
8 Rear electric windows
9 Rear fog lights
10 Horn
11 Automatic door lockingNumber Allocation
12 ABS-ESC, brake switch
13 Interior lights, window
winder, air conditioning,
boot light
14 ESC
15 Reverse gear, windscreen
wiper
16 Cruise control/Speed
limiter, heated door
mirrors, rear windscreen,
unfastened seatbelt
warning, parking distance
control, multimedia,
heated windscreen
17 Daytime running lights
18 Brake lights
19 Injection
20 Airbag
21 LPG circuit shut-off or
LPG circuit and petrol
fuel circuit shut-off or
sequential gearbox or
automatic gearbox
FUSES (4/4)
Number Allocation
22 Power-assisted steering
23
and 28 Location reserved for
additional equipment.
24 Direction indicator lights
25
and 26 Passenger compartment
ECU
27
and 29 Steering column control
30 Empty location
31 Instrument panel
32 Radio
33 Cigar lighter
34 Diagnostics and radio
socket
35 Defrosting rearview mirror
36 Electric door mirrors
37 Starter
38 Windscreen wiper
39 Passenger compartment
ventilation
Page 195 of 238
Downloaded from www.Manualslib.com manuals search engine JauneNoir Noir texte
5.31
ENG_UD26989_1
Batterie : dépannage (X52 - Dacia)
ENG_NU_993-5_X52_Dacia_5
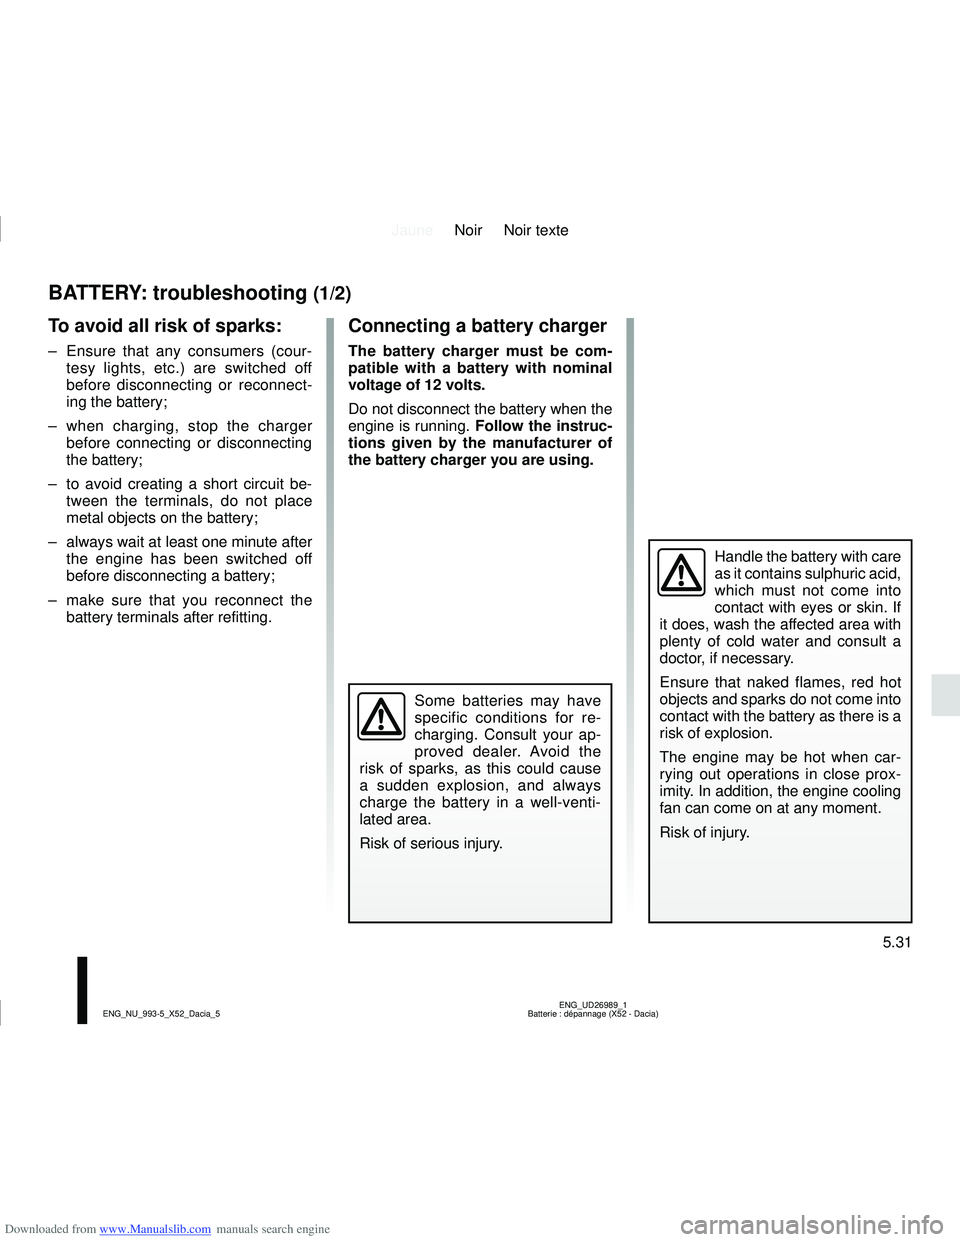
BATTERY: troubleshooting (1/2)
To avoid all risk of sparks:
– Ensure that any consumers (cour- tesy lights, etc.) are switched off
before disconnecting or reconnect-
ing the battery;
– when charging, stop the charger before connecting or disconnecting
the battery;
– to avoid creating a short circuit be- tween the terminals, do not place
metal objects on the battery;
– always wait at least one minute after the engine has been switched off
before disconnecting a battery;
– make sure that you reconnect the battery terminals after refitting.
Handle the battery with care
as it contains sulphuric acid,
which must not come into
contact with eyes or skin. If
it does, wash the affected area with
plenty of cold water and consult a
doctor, if necessary.
Ensure that naked flames, red hot
objects and sparks do not come into
contact with the battery as there is a
risk of explosion.
The engine may be hot when car-
rying out operations in close prox-
imity. In addition, the engine cooling
fan can come on at any moment.
Risk of injury.
Connecting a battery charger
The battery charger must be com-
patible with a battery with nominal
voltage of 12 volts.
Do not disconnect the battery when the
engine is running. Follow the instruc-
tions given by the manufacturer of
the battery charger you are using.
Some batteries may have
specific conditions for re-
charging. Consult your ap-
proved dealer. Avoid the
risk of sparks, as this could cause
a sudden explosion, and always
charge the battery in a well-venti-
lated area.
Risk of serious injury.