light DACIA LOGAN 2021 Owner's Manual
[x] Cancel search | Manufacturer: DACIA, Model Year: 2021, Model line: LOGAN, Model: DACIA LOGAN 2021Pages: 238, PDF Size: 3.19 MB
Page 61 of 238
Downloaded from www.Manualslib.com manuals search engine JauneNoir Noir texte
1.55
ENG_UD34537_4
Ordinateur de bord (X52 - Dacia)
ENG_NU_993-5_X52_Dacia_1
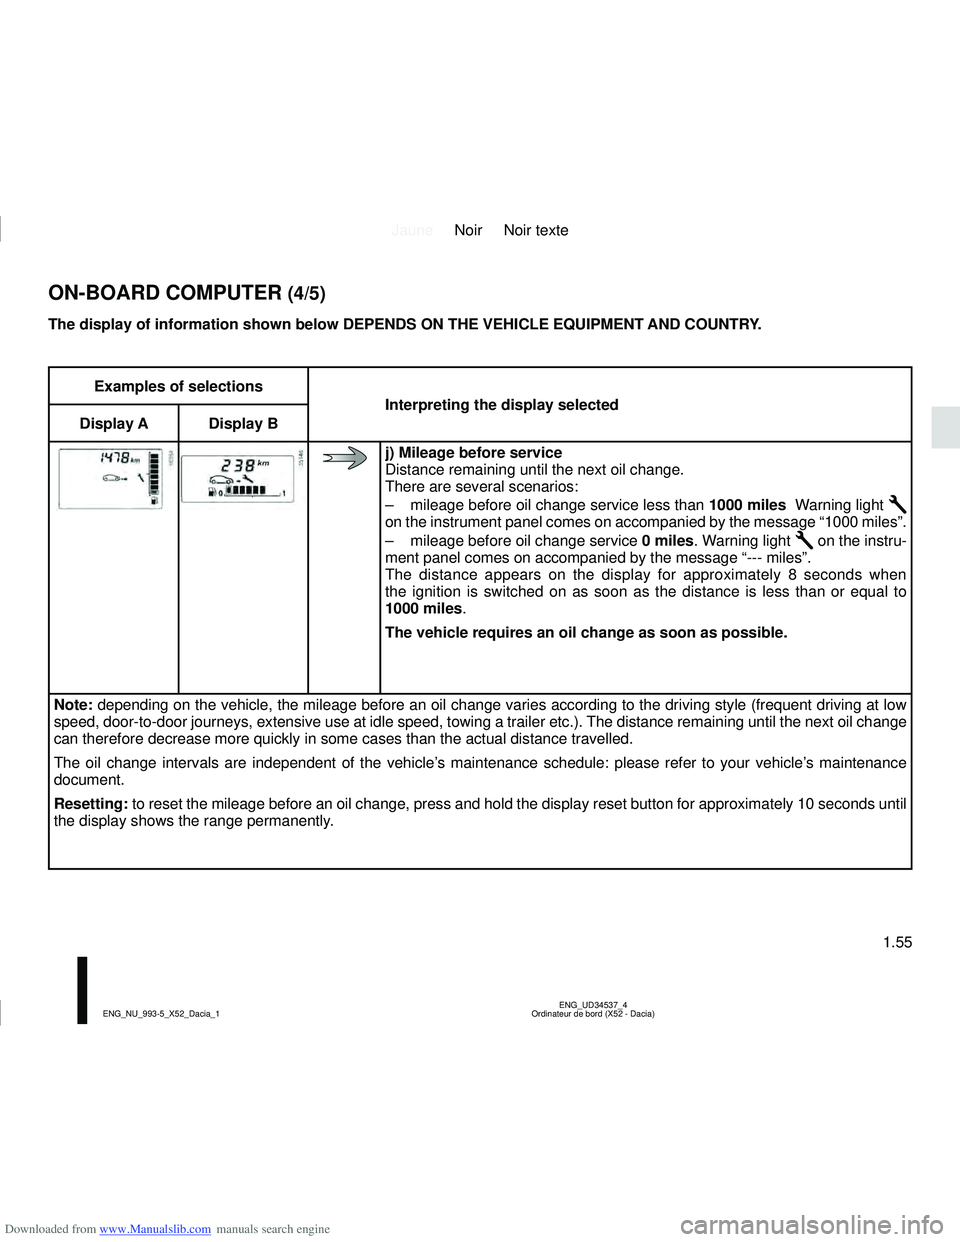
Examples of selections
Interpreting the display selected
Display A Display B
j) Mileage before service
Distance remaining until the next oil change.
There are several scenarios:
– mileage before oil change service less than 1000 miles Warning light
Ê
on the instrument panel comes on accompanied by the message “1000 mil\
es”.
– mileage before oil change service 0 miles. Warning light
Ê on the instru-
ment panel comes on accompanied by the message “--- miles”.
The distance appears on the display for approximately 8 seconds when
the ignition is switched on as soon as the distance is less than or equa\
l to
1000 miles .
The vehicle requires an oil change as soon as possible.
Note: depending on the vehicle, the mileage before an oil change varies accor\
ding to the driving style (frequent driving at low
speed, door-to-door journeys, extensive use at idle speed, towing a trailer etc.). The distance remaining until the next oil ch ange
can therefore decrease more quickly in some cases than the actual distan\
ce travelled.
The oil change intervals are independent of the vehicle’s maintenance schedule: please refer to your vehicle’s maintenance
document.
Resetting: to reset the mileage before an oil change, press and hold the display r\
eset button for approximately 10 seconds until
the display shows the range permanently.
The display of information shown below DEPENDS ON THE VEHICLE EQUIPMENT \
AND COUNTRY.
ON-BOARD COMPUTER (4/5)
Page 63 of 238
Downloaded from www.Manualslib.com manuals search engine JauneNoir Noir texte
1.57
ENG_UD30981_2
Éclairages et signalisations extérieures (X52 - Dacia)
ENG_NU_993-5_X52_Dacia_1
EXTERIOR LIGHTING AND SIGNALS (1/2)
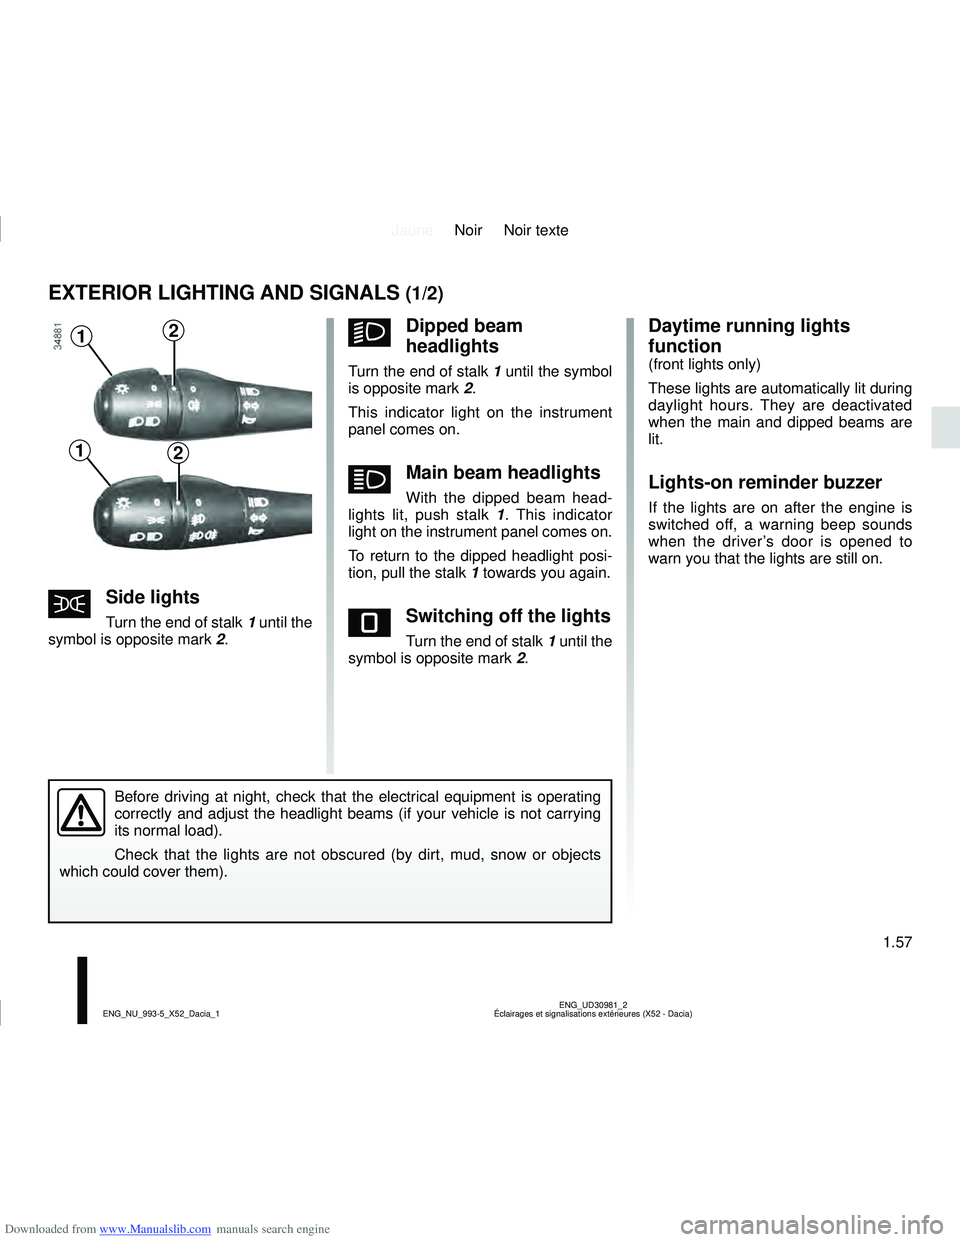
šSide lights
Turn the end of stalk 1 until the
symbol is opposite mark 2.
kDipped beam
headlights
Turn the end of stalk 1 until the symbol
is opposite mark 2.
This indicator light on the instrument
panel comes on.
áMain beam headlights
With the dipped beam head-
lights lit, push stalk 1 . This indicator
light on the instrument panel comes on.
To return to the dipped headlight posi-
tion, pull the stalk 1 towards you again.
eSwitching off the lights
Turn the end of stalk 1 until the
symbol is opposite mark 2.
Daytime running lights
function
(front lights only)
These lights are automatically lit during
daylight hours. They are deactivated
when the main and dipped beams are
lit.
Lights-on reminder buzzer
If the lights are on after the engine is
switched off, a warning beep sounds
when the driver’s door is opened to
warn you that the lights are still on.
Before driving at night, check that the electrical equipment is operatin\
g
correctly and adjust the headlight beams (if your vehicle is not carryi\
ng
its normal load).
Check that the lights are not obscured (by dirt, mud, snow or objects
which could cover them).
21
12
Page 64 of 238
Downloaded from www.Manualslib.com manuals search engine JauneNoir Noir texte
1.58
ENG_UD30981_2
Éclairages et signalisations extérieures (X52 - Dacia)
ENG_NU_993-5_X52_Dacia_1
EXTERIOR LIGHTING AND SIGNALS (2/2)
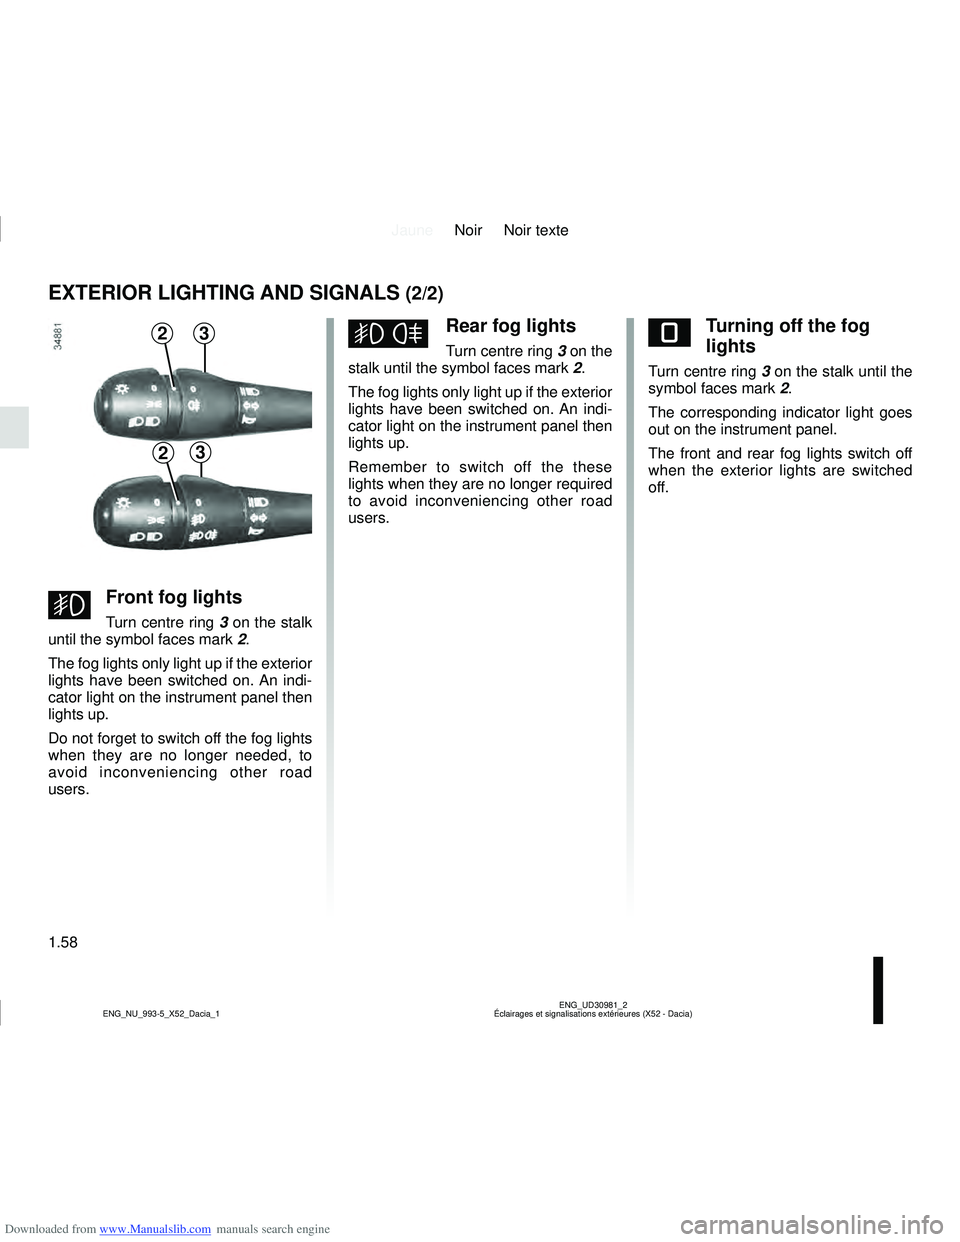
eTurning off the fog
lights
Turn centre ring 3 on the stalk until the
symbol faces mark 2.
The corresponding indicator light goes
out on the instrument panel.
The front and rear fog lights switch off
when the exterior lights are switched
off.
gFront fog lights
Turn centre ring 3 on the stalk
until the symbol faces mark 2.
The fog lights only light up if the exterior
lights have been switched on. An indi-
cator light on the instrument panel then
lights up.
Do not forget to switch off the fog lights
when they are no longer needed, to
avoid inconveniencing other road
users.
hRear fog lights
Turn centre ring 3 on the
stalk until the symbol faces mark 2.
The fog lights only light up if the exterior
lights have been switched on. An indi-
cator light on the instrument panel then
lights up.
Remember to switch off the these
lights when they are no longer required
to avoid inconveniencing other road
users.32
23
Page 65 of 238
Downloaded from www.Manualslib.com manuals search engine JauneNoir Noir texte
1.59
ENG_UD30998_2
Réglage de la hauteur des faisceaux (X52 - Dacia)
ENG_NU_993-5_X52_Dacia_1
HEADLIGHT BEAM ADJUSTMENT
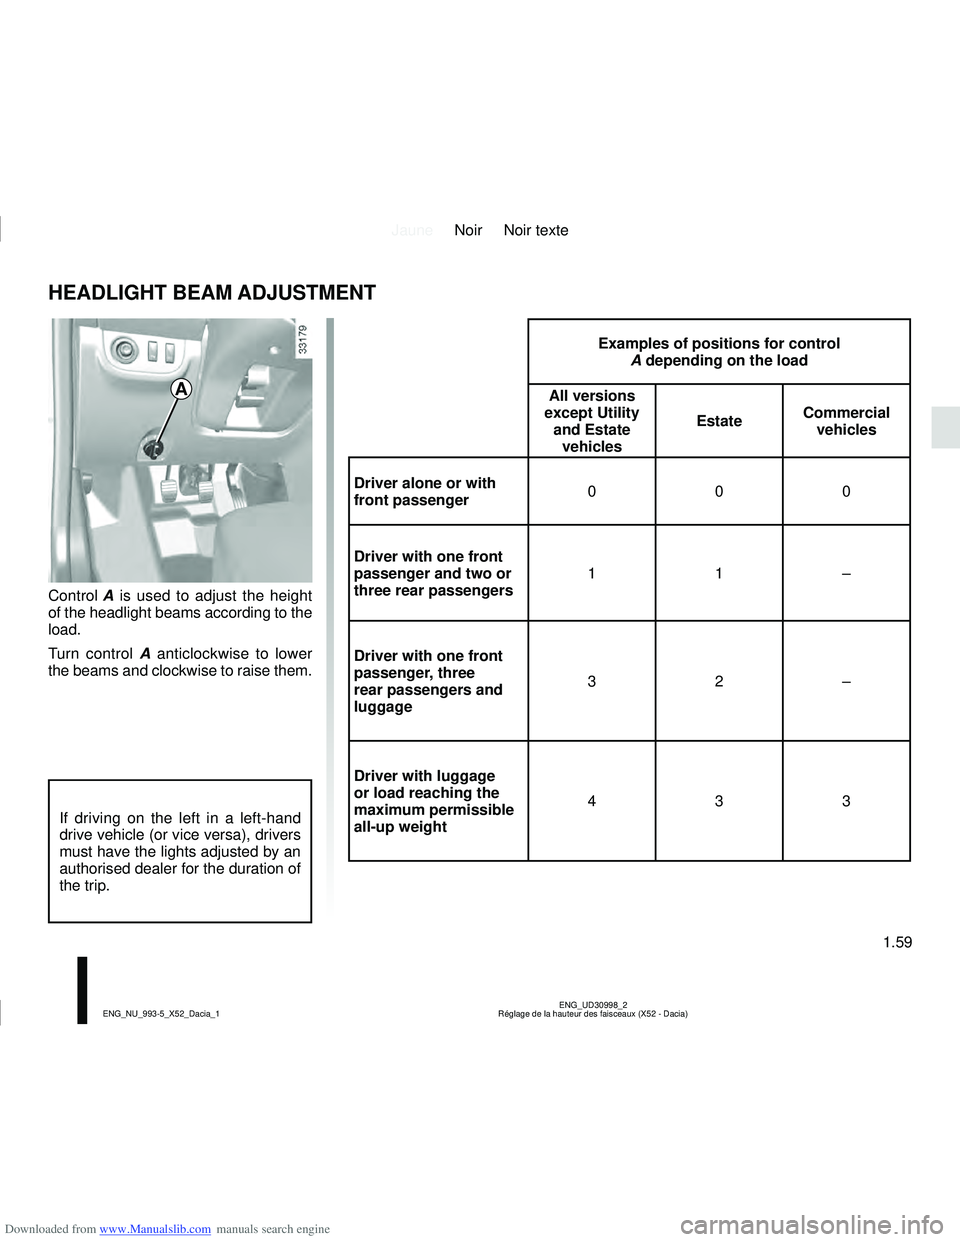
Control A is used to adjust the height
of the headlight beams according to the
load.
Turn control A anticlockwise to lower
the beams and clockwise to raise them.
A
If driving on the left in a left-hand
drive vehicle (or vice versa), drivers
must have the lights adjusted by an
authorised dealer for the duration of
the trip.
Examples of positions for control
A depending on the load
All versions
except Utility and Estate vehicles Estate
Commercial
vehicles
Driver alone or with
front passenger 000
Driver with one front
passenger and two or
three rear passengers 11–
Driver with one front
passenger, three
rear passengers and
luggage 32–
Driver with luggage
or load reaching the
maximum permissible
all-up weight 433
Page 66 of 238
Downloaded from www.Manualslib.com manuals search engine JauneNoir Noir texte
1.60
ENG_UD26922_1
Rétroviseurs (X52 - Dacia)
ENG_NU_993-5_X52_Dacia_1
REAR VIEW MIRRORS
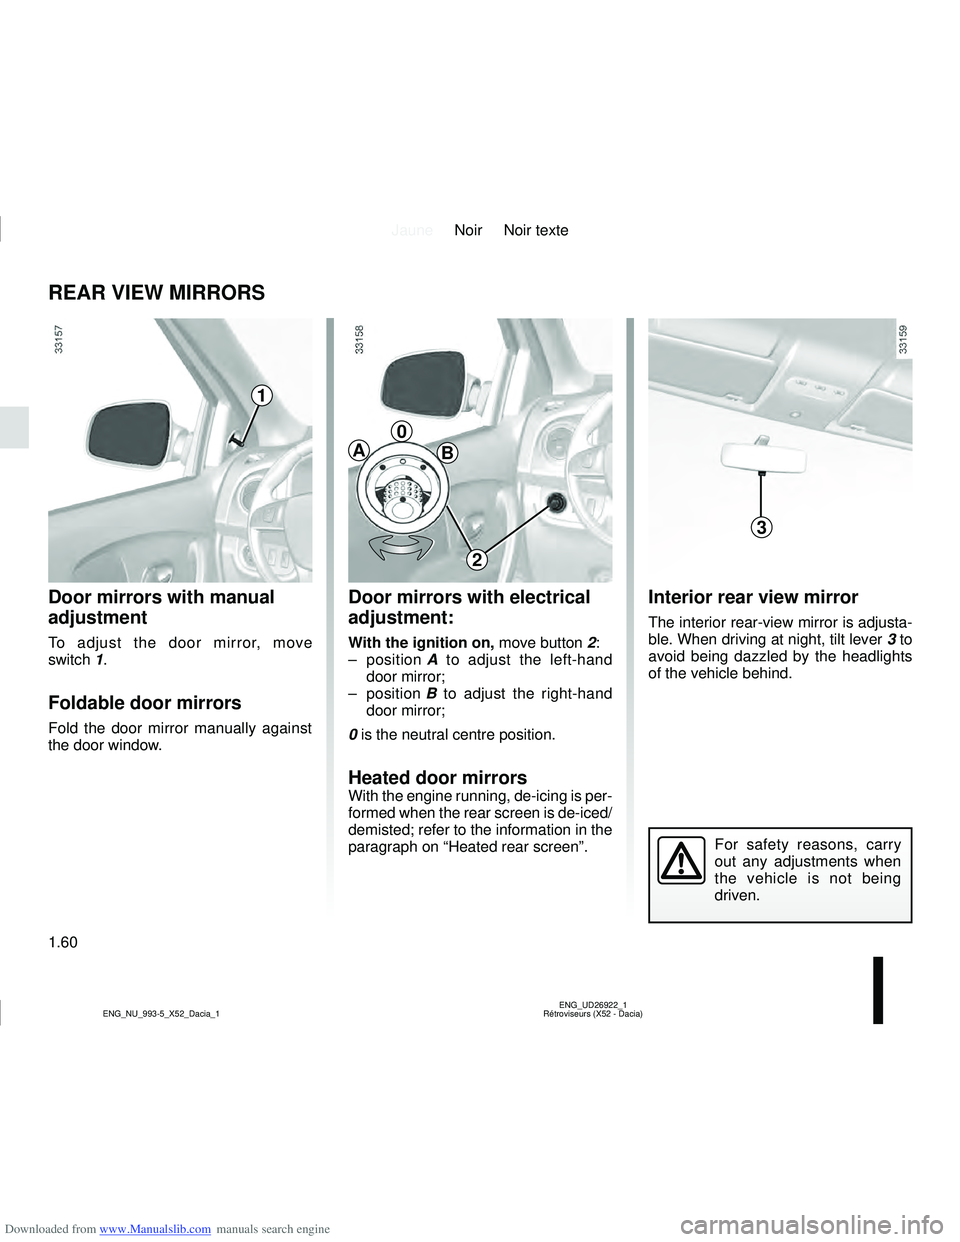
Door mirrors with manual
adjustment
To adjust the door mirror, move
switch 1.
Foldable door mirrors
Fold the door mirror manually against
the door window.
Door mirrors with electrical
adjustment:
With the ignition on, move button 2:
– position A to adjust the left-hand
door mirror;
– position B to adjust the right-hand
door mirror;
0 is the neutral centre position.
Heated door mirrors
With the engine running, de-icing is per-
formed when the rear screen is de-iced/
demisted; refer to the information in the
paragraph on “Heated rear screen”.
Interior rear view mirror
The interior rear-view mirror is adjusta-
ble. When driving at night, tilt lever 3 to
avoid being dazzled by the headlights
of the vehicle behind.
A
0
B
3
1
For safety reasons, carry
out any adjustments when
the vehicle is not being
driven.
2
Page 67 of 238
Downloaded from www.Manualslib.com manuals search engine JauneNoir Noir texte
1.61
ENG_UD32475_4
Avertisseurs sonore et lumineux (X52 - Dacia)
ENG_NU_993-5_X52_Dacia_1
AUDIBLE AND VISUAL SIGNALS
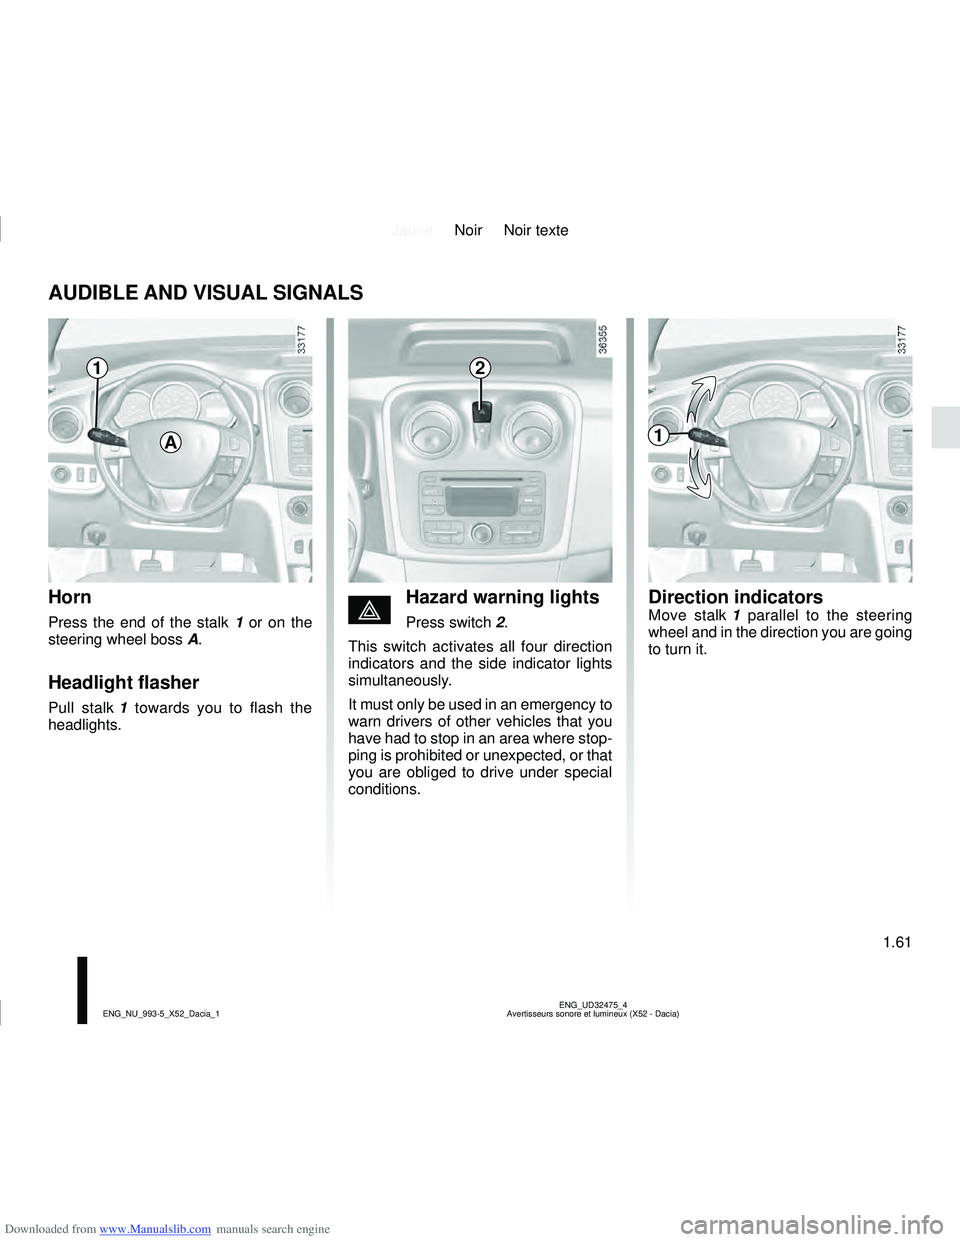
Horn
Press the end of the stalk 1 or on the
steering wheel boss A.
Headlight flasher
Pull stalk 1 towards you to flash the
headlights.
Direction indicatorsMove stalk 1 parallel to the steering
wheel and in the direction you are going
to turn it.éHazard warning lights
Press switch 2.
This switch activates all four direction
indicators and the side indicator lights
simultaneously.
It must only be used in an emergency to
warn drivers of other vehicles that you
have had to stop in an area where stop-
ping is prohibited or unexpected, or that
you are obliged to drive under special
conditions.
12
1A
Page 71 of 238
Downloaded from www.Manualslib.com manuals search engine JauneNoir Noir texte
1.65
ENG_UD33183_4
Réservoir carburant (X52 - Dacia)
ENG_NU_993-5_X52_Dacia_1
Petrol version
It is essential to use unleaded petrol.
The octane rating (RON) should match
the information given on the label B lo-
cated inside the fuel filler flap.
Vehicles running on ethanol-based
fuel
Always use unleaded petrol or fuel
containing a maximum of 85 percent
ethanol (E85).
In very cold conditions it may be difficult
or even impossible to start the engine.
To avoid this problem, use unleaded
petrol.
Note: you may notice an increase in
fuel consumption with this type of fuel.
When the fuel is changed the engine
must adjust, which may cause minor in-
conveniences for a few minutes (longer
starting times, cutting out, etc.).
FUEL TANK (2/5)
Filling up with petrol or dieselWith the ignition off, insert the nozzle to
open the valve and insert it fully before
turning it on to fill the fuel tank (risk of
splashing).
Keep the nozzle in this position
throughout the entire filling operation.
When the pump cuts out automatically
at the end of the filling procedure, a
maximum of two further filling attempts
may be made, as there must be suffi-
cient space in the fuel tank to allow for
expansion.
Make sure that no water enters the fuel
tank during filling. The valve and its sur-
round must remain clean.
Petrol versions
Using leaded petrol will damage the
antipollution system and may lead to a
loss of warranty.
To ensure that the fuel tank is not filled
with leaded petrol, the fuel tank filler
neck contains a restrictor fitted with a
foolproof system which only allows
the nozzle for unleaded petrol to be
used (at the pump).
Persistent fuel odour
If you notice a persistent
fuel odour you should:
– stop the vehicle as soon as traf- fic conditions allow and switch off
the ignition;
– switch on the hazard warning lights and ask your passengers to
leave the vehicle and stay clear
of the traffic;
– contact an approved Dealer.
Page 72 of 238
Downloaded from www.Manualslib.com manuals search engine JauneNoir Noir texte
1.66
ENG_UD33183_4
Réservoir carburant (X52 - Dacia)
ENG_NU_993-5_X52_Dacia_1
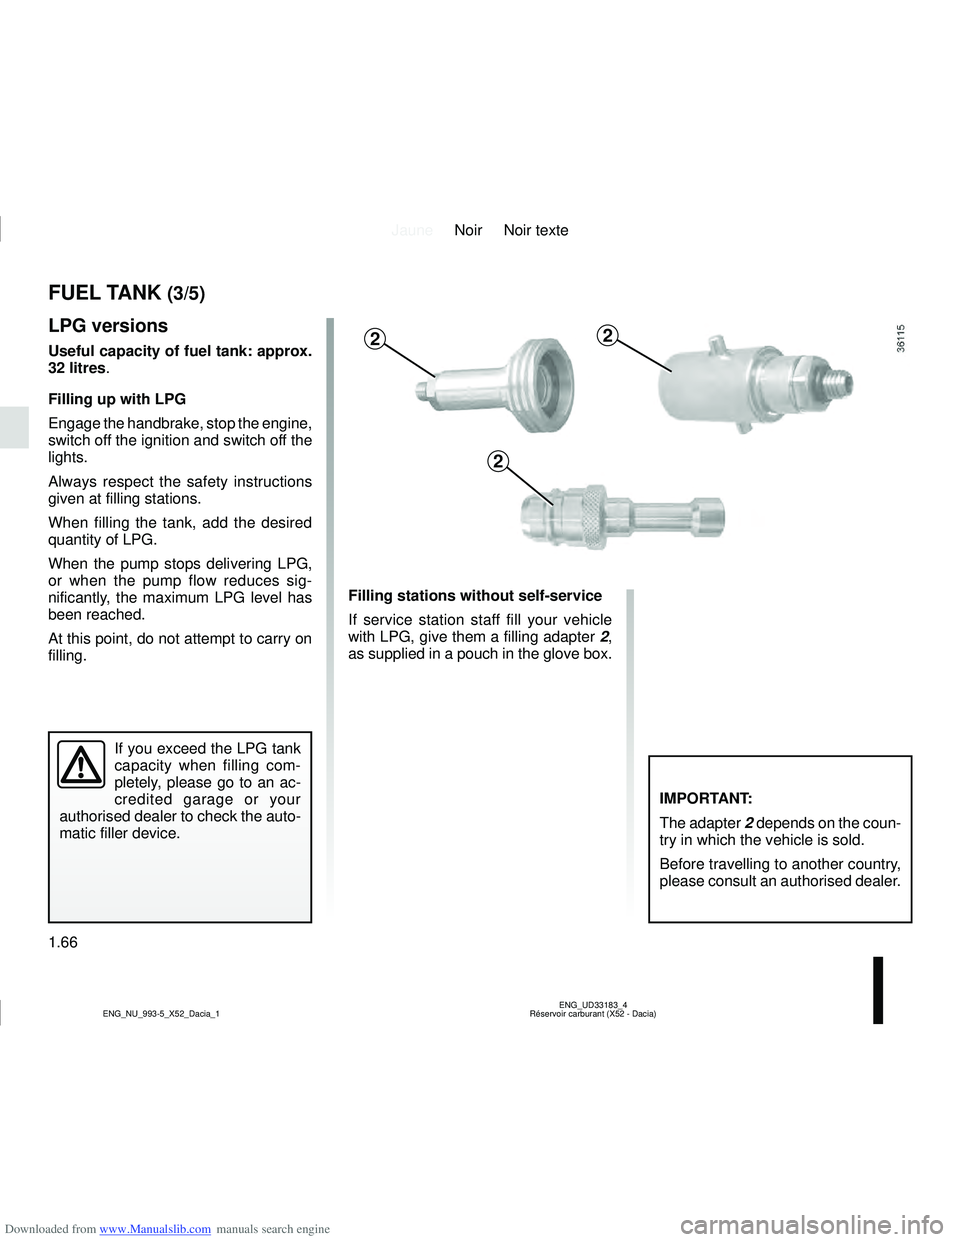
Filling stations without self-service
If service station staff fill your vehicle
with LPG, give them a filling adapter 2,
as supplied in a pouch in the glove box.
FUEL TANK (3/5)
IMPORTANT:
The adapter 2 depends on the coun-
try in which the vehicle is sold.
Before travelling to another country,
please consult an authorised dealer.
LPG versions
Useful capacity of fuel tank: approx.
32 litres.
Filling up with LPG
Engage the handbrake, stop the engine,
switch off the ignition and switch off the
lights.
Always respect the safety instructions
given at filling stations.
When filling the tank, add the desired
quantity of LPG.
When the pump stops delivering LPG,
or when the pump flow reduces sig-
nificantly, the maximum LPG level has
been reached.
At this point, do not attempt to carry on
filling.
If you exceed the LPG tank
capacity when filling com-
pletely, please go to an ac-
credited garage or your
authorised dealer to check the auto-
matic filler device.
22
2
Page 76 of 238
Downloaded from www.Manualslib.com manuals search engine JauneNoir Noir texte
2.2
ENG_UD32714_3
Rodage / Contacteur de démarrage (X52 - Dacia)
ENG_NU_993-5_X52_Dacia_2
RUNNING IN, IGNITION SWITCH
Petrol version
For the first 600 miles (1,000 km), do
not exceed 78 mph (130 km/h) in the
highest gear, or 3,000 to 3,500 rpm.
You may only expect top performance
from your vehicle after approximately
1,800 miles (3,000 km).
Oil change frequency: please refer to
your vehicle’s maintenance document.
Diesel version
For the first 1,000 miles (1,500 km),
do not exceed 80 mph (130 km/h) in
the highest gear, or 2,500 rpm. After
completing this mileage you may drive
faster, although you may only expect
top performance after approximately
3,600 miles (6,000 km).
During the running in period, do not ac-
celerate hard while the engine is still
cold and do not let the engine over-rev.
Service intervals: refer to the
Maintenance Document for your vehi-
cle.
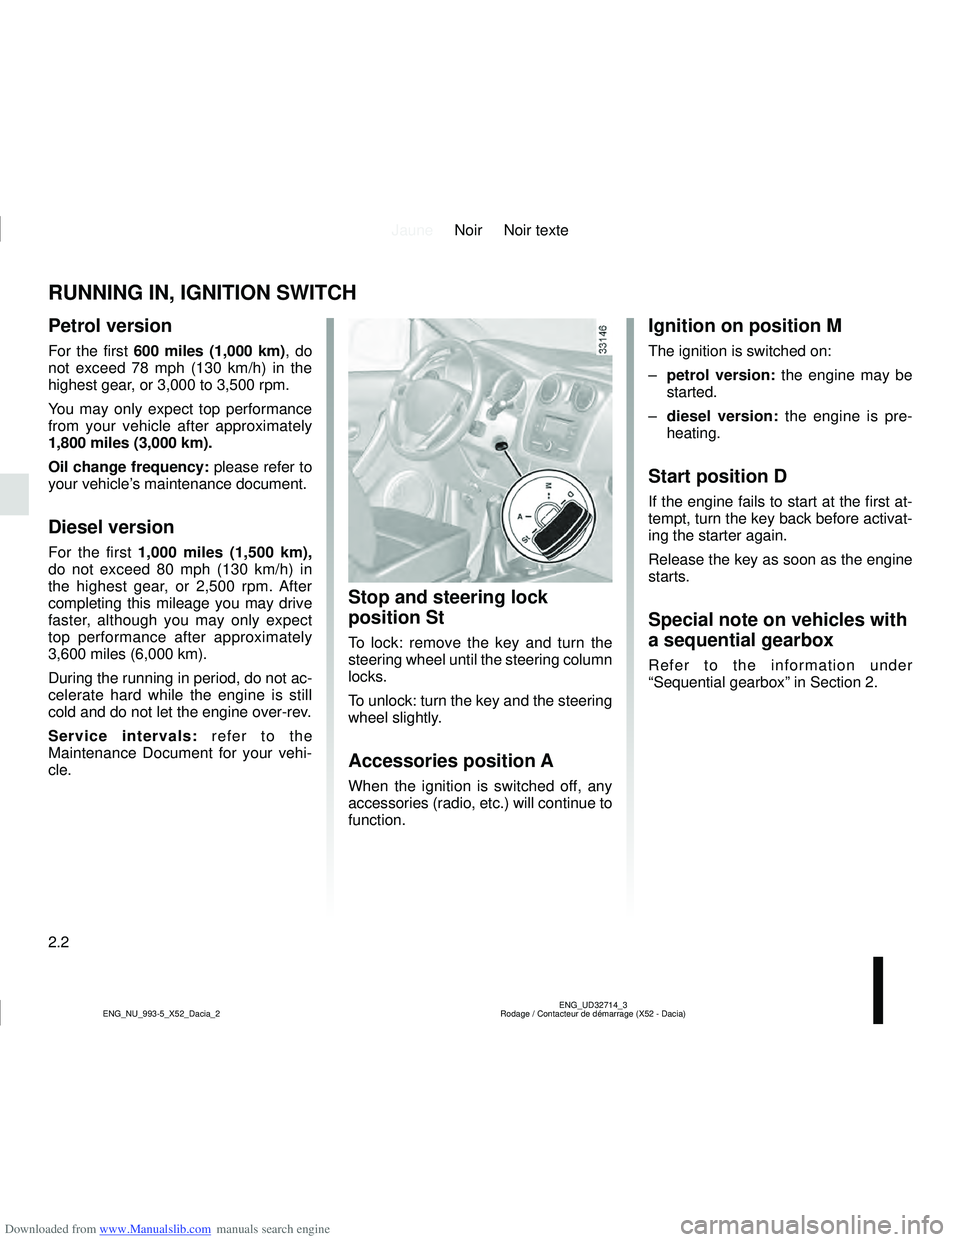
Stop and steering lock
position St
To lock: remove the key and turn the
steering wheel until the steering column
locks.
To unlock: turn the key and the steering
wheel slightly.
Accessories position A
When the ignition is switched off, any
accessories (radio, etc.) will continue to
function.
Ignition on position M
The ignition is switched on:
– petrol version: the engine may be
started.
– diesel version: the engine is pre-
heating.
Start position D
If the engine fails to start at the first at-
tempt, turn the key back before activat-
ing the starter again.
Release the key as soon as the engine
starts.
Special note on vehicles with
a sequential gearbox
Refer to the information under
“Sequential gearbox” in Section 2.
Page 77 of 238
Downloaded from www.Manualslib.com manuals search engine JauneNoir Noir texte
2.3
ENG_UD32517_2
Démarrage, Arrêt du moteur GPL (X52 - Dacia)
ENG_NU_993-5_X52_Dacia_2
Special note
Depending on the vehicle, accessories
(e.g. radio) stop working either when
the engine is switched off or when the
doors are locked.
STARTING/STOPPING THE ENGINE
Starting the engine
In very cold conditions (temperatures
below –20°C): so that it is easier to
start the engine, switch on the ignition
for several seconds before starting the
engine.
Feature when starting the engine, if the
outdoor temperature is very low (below
- 10 ° C): hold down the clutch pedal
until the engine starts.
Petrol injection
– Activate the starter without de-
pressing the accelerator.
– Release the key as soon as the engine starts.
ÉDiesel injection
Turn the ignition key to ignition
“On” position M, and hold this position
until the preheating warning light goes
out.
Move the key to “Start” position D with-
out accelerating. Release the key as
soon as the engine starts. LPG versions
The engine is always started using
petrol:
– activate the starter without accelerat-
ing;
– release the key as soon as the engine starts.
The system will automatically deter-
mine the switchover from petrol to LPG.
When operating on LPG, the fuel gauge
may indicate a drop in the petrol level
and the on-board computer will not op-
erate.
Every 3,000 miles driven using LPG,
drivers are recommended to drive for
around 3 to 6 miles in petrol mode.
To enable the system to operate
smoothly and to prevent any wear to
the vehicle’s electric petrol pump, the
petrol tank should always be around
1/4 full.
Stopping the engine
With the engine idling, turn the key
back to “Stop” position St.
Never leave your vehicle
with the key or remote con-
trol inside and never leave
a child (or a pet) unsuper-
vised, even for a short while.
The reason for this is that the child
may endanger himself or others by
starting the engine, activating equip-
ment such as the window winders
for example, or locking the doors.
Risk of serious injury.
Never switch off the ignition
before the vehicle has stopped
completely . Once the engine has
stopped, the brake servo, power as-
sisted steering and passive safety
equipment such as air bags will no
longer operate.
The steering is locked when the key
is removed.