Valve DACIA SANDERO STEPWAY 2016 2.G Owners Manual
[x] Cancel search | Manufacturer: DACIA, Model Year: 2016, Model line: SANDERO STEPWAY, Model: DACIA SANDERO STEPWAY 2016 2.GPages: 174, PDF Size: 2.78 MB
Page 59 of 174
JauneNoirNoir texte
1.57
ENG_UD22575_7
Réservoir carburant (B90 - Dacia)
ENG_NU_817-10_B90_Dacia_1
FUEL TANK (2/3)
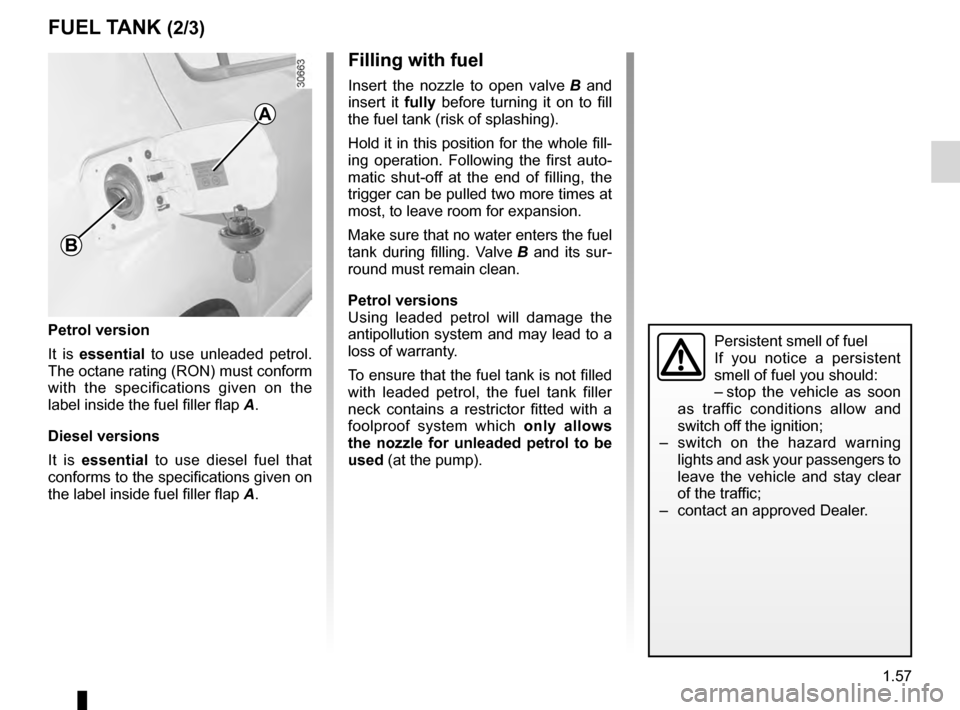
Petrol version
It is essential to use unleaded petrol.
The octane rating (RON) must conform
with the specifications given on the
label inside the fuel filler flap
A
.
Diesel versions
It is essential to use diesel fuel that
conforms to the specifications given on
the label inside fuel filler flap
A
.
Filling with fuel
Insert the nozzle to open valve B and
insert it fully before turning it on to fill
the fuel tank (risk of splashing).
Hold it in this position for the whole fill-
ing operation. Following the first auto-
matic shut-off at the end of filling, the
trigger can be pulled two more times at
most, to leave room for expansion.
Make sure that no water enters the fuel
tank during filling. Valve
B
and its sur-
round must remain clean.
Petrol versions
Using leaded petrol will damage the
antipollution system and may lead to a
loss of warranty.
To ensure that the fuel tank is not filled
with leaded petrol, the fuel tank filler
neck contains a restrictor fitted with a
foolproof system which only allows
the nozzle for unleaded petrol to be
used (at the pump).
Persistent smell of fuel
If you notice a persistent
smell of fuel you should:
–
s
top the vehicle as soon
as traffic conditions allow and
switch off the ignition;
–
s
witch on the hazard warning
lights and ask your passengers to
leave the vehicle and stay clear
of the traffic;
–
contact an approved Dealer
.
A
B
Page 119 of 174
JauneNoirNoir texte
5.5
ENG_UD22290_8
Kit de gonflage des pneumatiques (B90 - L90 Ph2 - F90 Ph2 - R90 Ph2 - D\
acia)
ENG_NU_817-10_B90_Dacia_5
TYRE INFLATION KIT (2/3)
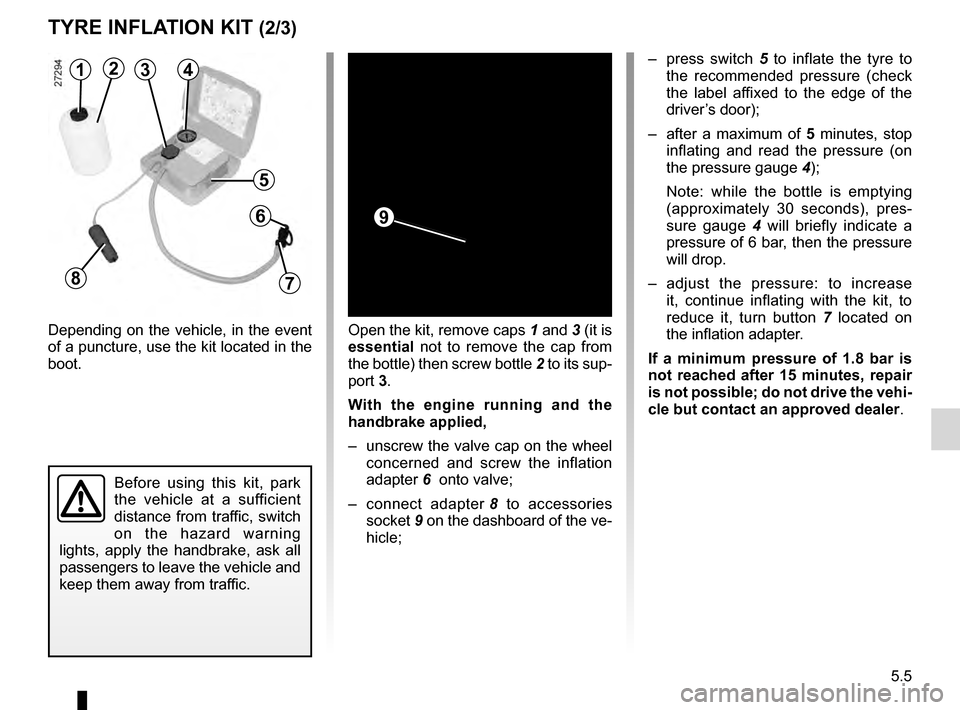
Depending on the vehicle, in the event
of a puncture, use the kit located in the
boot. –
p
ress switch
5
to inflate the tyre to
the recommended pressure (check
the label affixed to the edge of the
driver’s door);
–
after
a maximum of
5 minutes, stop
inflating and read the pressure (on
the pressure gauge
4
);
Note: while the bottle is emptying
(approximately 30 seconds), pres-
sure gauge
4
will briefly indicate a
pressure of 6 bar, then the pressure
will drop.
–
a
djust the pressure: to increase
it, continue inflating with the kit, to
reduce it, turn button 7 located on
the inflation adapter.
If a minimum pressure of 1.8 bar is
not reached after 15 minutes, repair
is not possible; do not drive the vehi-
cle but contact an approved dealer .
1234
5
6
Before using this kit, park
the vehicle at a sufficient
distance from traffic, switch
on the hazard warning
lights, apply the handbrake, ask all
passengers to leave the vehicle and
keep them away from traffic.
8
Open the kit, remove caps 1 and 3 (it is
essential not to remove the cap from
the bottle) then screw bottle
2
to its sup-
port 3.
With the engine running and the
handbrake applied,
–
unscrew
the valve cap on the wheel
concerned and screw the inflation
adapter
6 onto valve;
–
c
onnect adapter
8
to accessories
socket
9
on the dashboard of the ve-
hicle;
9
7
Page 120 of 174
5.6
ENG_UD22290_8
Kit de gonflage des pneumatiques (B90 - L90 Ph2 - F90 Ph2 - R90 Ph2 - D\
acia)
ENG_NU_817-10_B90_Dacia_5
TYRE INFLATION KIT (3/3)
Once the tyre is inflated correctly:
–
stop using the kit;
–
close
the integrated cap on the bottle
again;
–
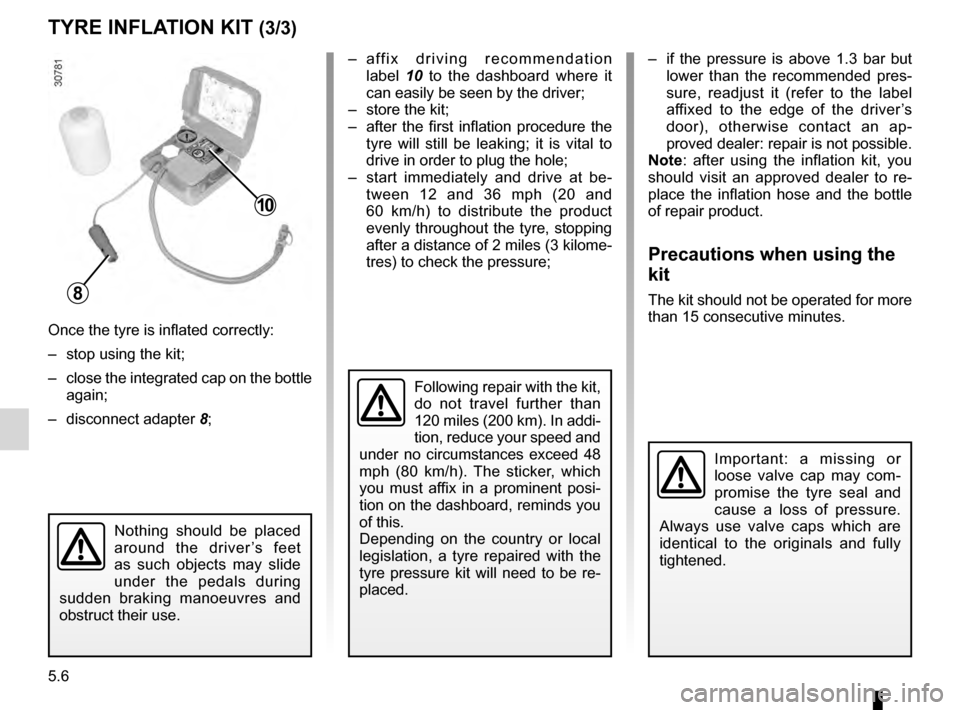
disconnect adapter
8;–
a
ff i x d r i v i n g r e c o m m e n d a t i o n
label
1
0
to the dashboard where it
can easily be seen by the driver;
–
store the kit;
–
after
the first inflation procedure the
tyre will still be leaking; it is vital to
drive in order to plug the hole;
–
s
tart immediately and drive at be-
tween 12 and 36
m
ph (20 and
60
k
m/h) to distribute the product
evenly throughout the tyre, stopping
after a distance of 2 miles (3 kilome-
tres) to check the pressure; –
i
f the pressure is above 1.3 bar but
lower than the recommended pres-
sure, readjust it (refer to the label
affixed to the edge of the driver ’s
door), otherwise contact an ap-
proved dealer: repair is not possible.
Note : after using the inflation kit, you
should visit an approved dealer to re-
place the inflation hose and the bottle
of repair product.
Precautions when using the
kit
The kit should not be operated for more
than 15 consecutive minutes.
Important: a missing or
loose valve cap may com-
promise the tyre seal and
cause a loss of pressure.
Always use valve caps which are
identical to the originals and fully
tightened.
Following repair with the kit,
do not travel further than
120 miles (200 km). In addi-
tion, reduce your speed and
under no circumstances exceed 48
mph (80 km/h). The sticker, which
you must affix in a prominent posi-
tion on the dashboard, reminds you
of this.
Depending on the country or local
legislation, a tyre repaired with the
tyre pressure kit will need to be re-
placed.
Nothing should be placed
around the driver ’s feet
as such objects may slide
under the pedals during
sudden braking manoeuvres and
obstruct their use.
8
10
Page 121 of 174
practical advice ..................................... (up to the end of the DU)
trims ...................................................... (up to the end of the DU)
lifting the vehicle changing a wheel ............................ (up to the end of the DU)
5.7
ENG_UD20461_5
Enjoliveurs - Jantes (B90 - Dacia)
ENG_NU_817-10_B90_Dacia_5
Wheel trim/Wheels
WHEEL TRIM/WHEELS (1/2)
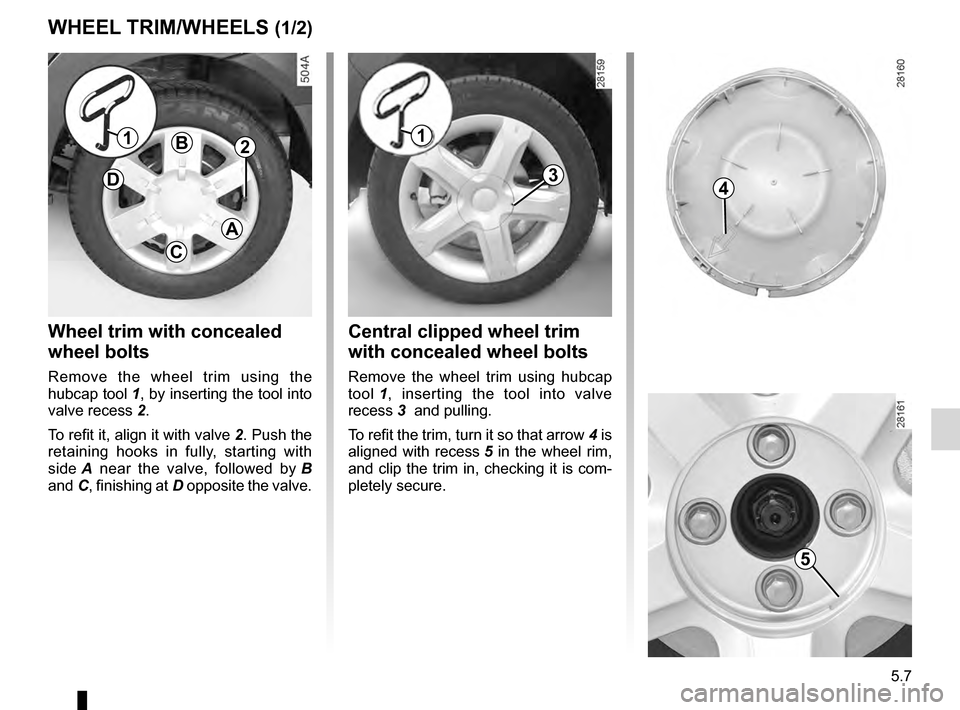
Wheel trim with concealed
wheel bolts
Remove the wheel trim using the
hubcap tool
1, by inserting the tool into
valve recess
2.
To refit it, align it with valve
2. Push the
retaining hooks in fully, starting with
side
A
near the valve, followed by
B
and
C, finishing at D opposite the valve.
B
D
C
A
121
3
Central clipped wheel trim
with concealed wheel bolts
Remove the wheel trim using hubcap
tool 1,
inserting the tool into valve
recess
3 and pulling.
To refit the trim, turn it so that arrow
4 is
aligned with recess
5 in the wheel rim,
and clip the trim in, checking it is com-
pletely secure.
5
4
Page 122 of 174
5.8
ENG_UD20461_5
Enjoliveurs - Jantes (B90 - Dacia)
ENG_NU_817-10_B90_Dacia_5
WHEEL TRIM/WHEELS (2/2)
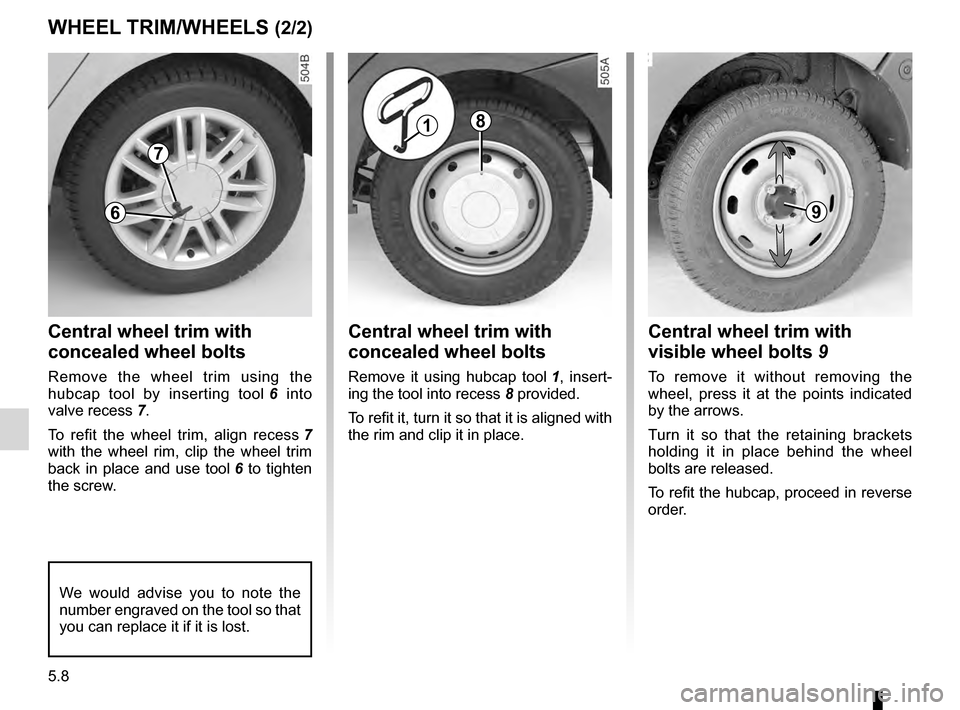
Central wheel trim with
concealed wheel bolts
Remove it using hubcap tool 1 , insert-
ing the tool into recess 8 provided.
To refit it, turn it so that it is aligned with
the rim and clip it in place.
Central wheel trim with
visible wheel bolts
9
To remove it without removing the
wheel, press it at the points indicated
by the arrows.
Turn it so that the retaining brackets
holding it in place behind the wheel
bolts are released.
To refit the hubcap, proceed in reverse
order.
18
9
Central wheel trim with
concealed wheel bolts
Remove the wheel trim using the
hubcap tool by inserting tool 6
into
valve recess
7.
To refit the wheel trim, align recess
7
with the wheel rim, clip the wheel trim
back in place and use tool
6 to tighten
the screw.
7
We would advise you to note the
number engraved on the tool so that
you can replace it if it is lost.
6
Page 126 of 174
tyre pressure.......................................................... (current page)
5.12
ENG_UD19769_10
Pneumatiques (B90 - U90 - L90 Ph2 - F90 Ph2 - R90 Ph2 - Dacia)ENG_NU_817-10_B90_Dacia_5
Jaune NoirNoir texte
Changing wheels around
This practice is not recommended.
Emergency spare wheel
Refer to the information on the
“ E m e r g e n c y s p a r e w h e e l ” a n d
“Changing a wheel” in Section 5.
Fitting new tyres
TYRES (2/3)
Tyre pressures
Adhere to the tyre pressures (including
the emergency spare wheel). The tyre
pressures should be checked at least
once a month and additionally before
any long journey (refer to the label af-
fixed to the edge of the driver’s door).
Incorrect tyre pressures
lead to abnormal tyre wear
and unusually hot running.
These are factors which
may seriously affect safety and lead
to:
–
poor roadholding;
–
r
isk of blowouts or throwing a
tread.
The tyre pressure depends on the
load and speed of use; adjust the
pressures according to the condi-
tions of use (refer to the information
on “Tyre pressures” in Section 4).
Pressures should be checked when the
tyres are cold; ignore higher pressures
which may be reached in hot weather
or following a fast journey.
If tyre pressures cannot be checked
when the tyres are cold, assume an in-
crease of 0.2 to 0.3 bar.
Never deflate a hot tyre.
Special note
Depending on the vehicle, there may
be an adapter which needs to be posi-
tioned on the valve before air is added.
For safety reasons, this op-
eration must be carried out
by a specialist.
Fitting different tyres may
change your vehicle as follows:
–
it
may mean that your vehicle no
longer conforms to current regu-
lations;
–
It
may change the way it handles
when cornering;
–
I
t may cause the steering to be
heavy;
–
i
t may affect the use of snow
chains.
Important: a missing or
loose valve cap may com-
promise the tyre seal and
cause a loss of pressure.
Always use valve caps which are
identical to the originals.