sensor DATSUN B110 1973 Service Repair Manual
[x] Cancel search | Manufacturer: DATSUN, Model Year: 1973, Model line: B110, Model: DATSUN B110 1973Pages: 513, PDF Size: 28.74 MB
Page 325 of 513
ENGINE
Caution
lock
the
front
and
rear
wheels
by
fully
pulling
the
parking
brake
lever
before
con
ducting
this
test
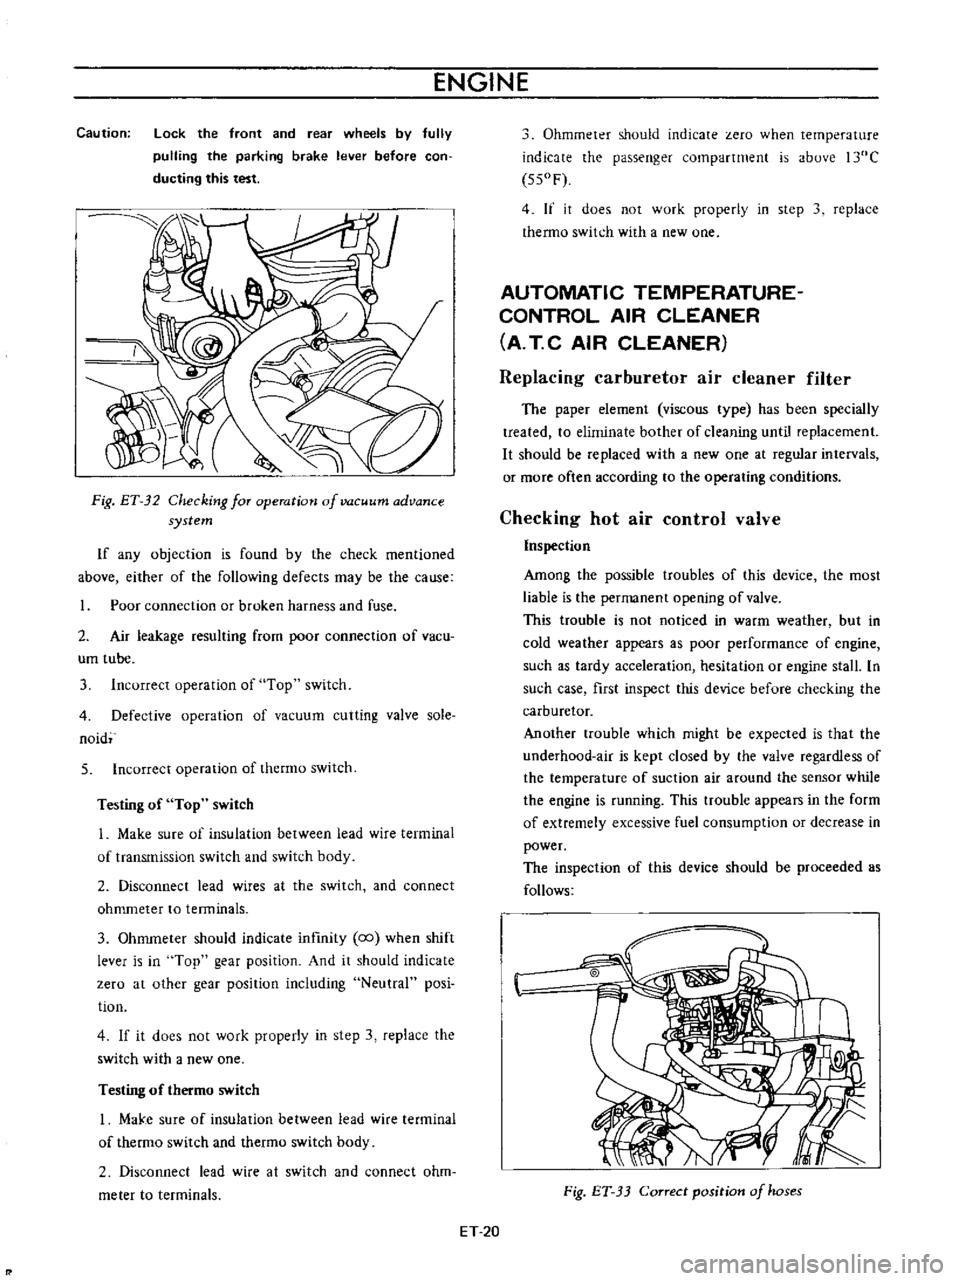
Fig
ET
32
Checking
for
operation
of
vacuum
advance
system
If
any
objection
is
found
by
the
check
mentioned
above
either
of
the
following
defects
may
be
the
cause
Poor
connection
or
broken
harness
and
fuse
2
Air
leakage
resulting
from
poor
connection
of
vacu
um
tube
3
Incorrect
operation
of
Top
switch
4
Defective
operation
of
vacuum
cutting
valve
sole
naid
5
Incorrect
operation
of
thermo
switch
Testing
of
Top
switch
1
Make
sure
of
insulation
between
lead
wire
terminal
of
transmission
switch
and
switch
body
2
Disconnect
lead
wires
at
the
switch
and
connect
ohmmeter
to
tenninals
3
Ohmmeter
should
indicate
infmity
co
when
shift
lever
is
in
Top
gear
position
And
it
should
indicate
zero
at
other
gear
position
including
Neutral
posi
tion
4
If
it
does
not
work
properly
in
step
3
replace
the
switch
with
a
new
one
Testing
of
thermo
switch
I
MaJ
e
sure
of
insulation
between
lead
wire
terminal
of
thermo
switch
and
thetmo
switch
body
2
Disconnect
lead
wire
at
switch
and
connect
ohm
meter
to
terminals
Ohmmeter
should
indicate
zero
when
temperature
indicate
the
passenger
compartment
is
above
l30C
550F
4
If
it
does
not
work
properly
in
step
3
replace
thermo
switch
with
a
new
one
AUTOMATIC
TEMPERATURE
CONTROL
AIR
CLEANER
A
T
C
AIR
CLEANER
Replacing
carburetor
air
cleaner
filter
The
paper
element
viscous
type
has
been
specially
treated
to
eliminate
bother
of
cleaning
until
replacement
It
should
be
replaced
with
a
new
one
at
regular
intervals
or
more
often
according
to
the
operating
conditions
Checking
hot
air
control
valve
Inspection
Among
the
possible
troubles
of
this
device
the
most
liable
is
the
permanent
opening
of
valve
This
trouble
is
not
noticed
in
warm
weather
but
in
cold
weather
appears
as
poor
performance
of
engine
such
as
tardy
acceleration
hesitation
or
engine
stall
In
such
case
first
inspect
this
device
before
checking
the
carburetor
Another
trouble
which
might
be
expected
is
that
the
underhood
air
is
kept
closed
by
the
valve
regardless
of
the
temperature
of
suction
air
around
the
sensor
while
the
engine
is
running
This
ttOuble
appears
in
the
form
of
extremely
excessive
fuel
consumption
or
decrease
in
power
The
inspection
of
this
device
should
be
proceeded
as
follows
Fig
ET
33
Correct
position
of
hoses
ET
20
Page 326 of 513
EMISSION
CONTROL
AND
TUNE
UP
Appearance
1
First
inspect
whether
vacuum
hoses
are
connected
to
correct
positions
2
Inspect
hoses
for
cracks
distortion
or
plugging
Checking
of
vacuum
motor
I
With
engine
shut
down
inspect
the
position
of
valve
placing
a
mirror
at
the
end
of
inlet
pipe
for
inspec
tion
The
correct
condition
of
valve
is
that
it
keeps
the
inlet
of
underhood
air
open
and
that
of
hot
air
closed
Otherwise
inspect
the
linkage
of
valve
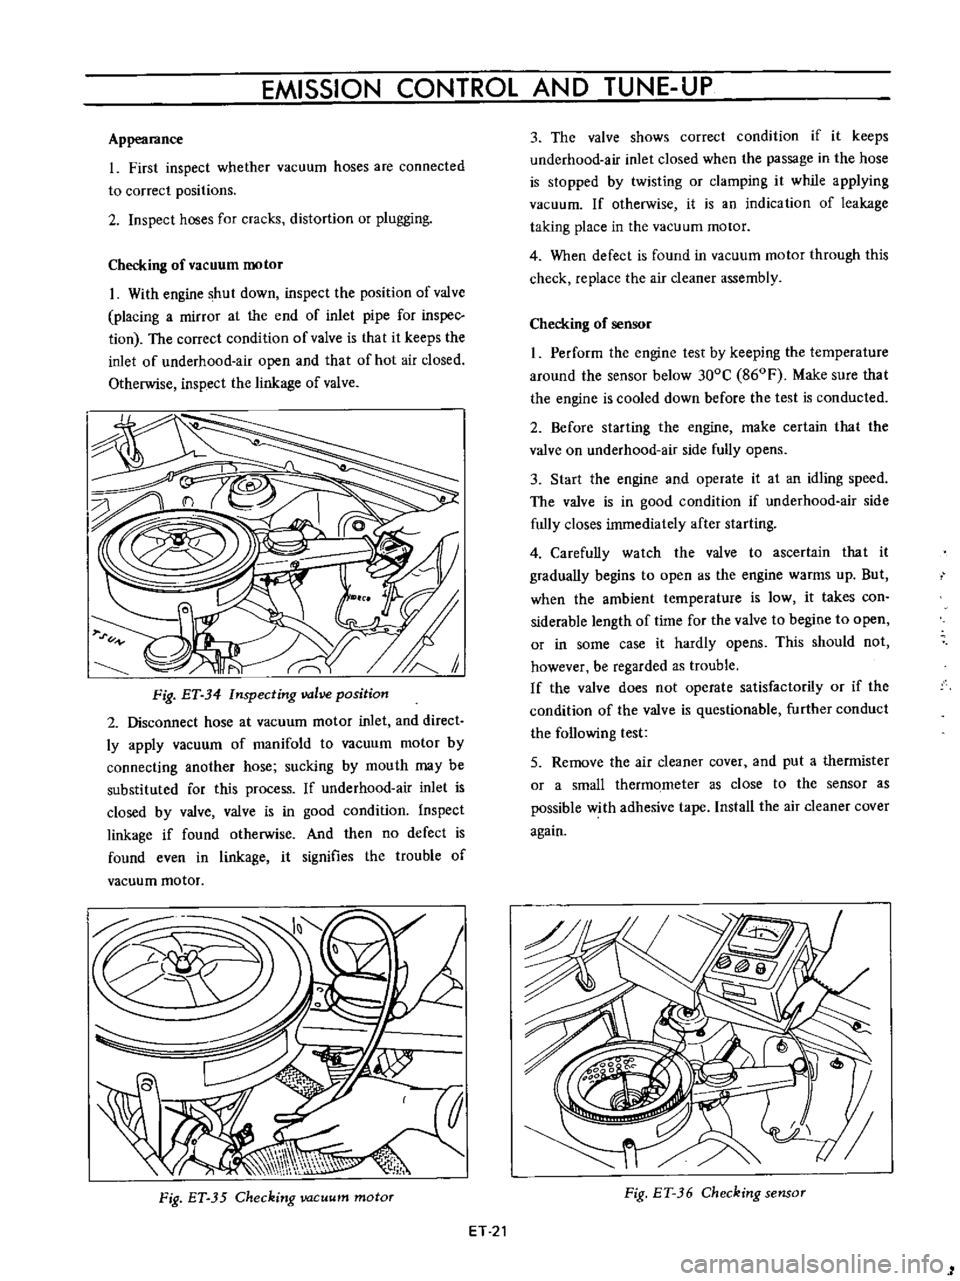
Fig
ET
34
Inspecting
valve
position
2
Disconnect
hose
at
vacuum
motor
inlet
and
direct
ly
apply
vacuum
of
manifold
to
vacuum
motor
by
connecting
another
hose
sucking
by
mouth
may
be
substituted
for
this
process
If
underhood
air
inlet
is
closed
by
valve
valve
is
in
good
condition
Inspect
linkage
if
found
otherwise
And
then
no
defect
is
found
even
in
linkage
it
signifies
the
trouble
of
vacuum
motor
Fig
ET
35
Checking
vacuum
motor
ET
21
3
The
valve
shows
correct
condition
if
it
keeps
underhood
air
inlet
closed
when
the
passage
in
the
hose
is
stopped
by
twisting
or
clamping
it
while
applying
vacuum
If
otherwise
it
is
an
indication
of
leakage
taking
place
in
the
vacuum
motor
4
When
defect
is
found
in
vacuum
motor
through
this
check
replace
the
air
cleaner
assembly
Checking
of
sensor
I
Perform
the
engine
test
by
keeping
the
temperature
around
the
sensor
below
300C
860F
Make
sure
that
the
engine
is
cooled
down
before
the
test
is
conducted
2
Before
starting
the
engine
make
certain
that
the
valve
on
underhood
air
side
fully
opens
3
Start
the
engine
and
operate
it
at
an
idling
speed
The
valve
is
in
good
condition
if
underhood
air
side
fully
closes
immediately
after
starting
4
Carefully
watch
the
valve
to
ascertain
that
it
gradually
begins
to
open
as
the
engine
warms
up
But
when
the
ambient
temperature
is
low
it
takes
con
siderable
length
of
time
for
the
valve
to
begine
to
open
or
in
some
case
it
hardly
opens
This
should
not
however
be
regarded
as
trouble
If
the
valve
does
not
operate
satisfactorily
or
if
the
condition
of
the
valve
is
questionable
further
conduct
the
following
test
5
Remove
the
air
cleaner
cover
and
put
a
thermister
or
a
small
thermometer
as
close
to
the
sensor
as
possible
with
adhesive
tape
Install
the
air
cleaner
cover
again
Fig
ET
36
Checking
sensor
1
Page 327 of 513
ENGINE
6
Start
the
engine
and
continue
idling
as
described
under
paragraphs
I
2
and
3
above
When
several
minutes
have
passed
and
the
valve
is
partially
opened
read
the
thermister
indication
It
is
correct
if
the
reading
falls
between
380C
1000
F
and
550C
1300
F
If
the
reading
is
abnormal
replace
the
sensor
7
On
the
engine
equipped
with
an
idle
compensator
as
service
option
do
as
follows
before
replacing
the
sensor
Clog
hose
on
idle
compensator
side
by
twisting
or
clamping
it
and
check
the
temperature
as
given
in
paragraphs
5
and
6
above
If
the
thermometer
shO
vs
correct
temperature
replace
the
idle
compensa
tOf
if
the
reading
is
abnormal
replace
the
sensor
CRANKCASE
EMISSION
CONTROL
SYSTEM
This
system
returns
blow
by
gas
to
both
the
intake
manifold
and
carburetor
air
cleaner
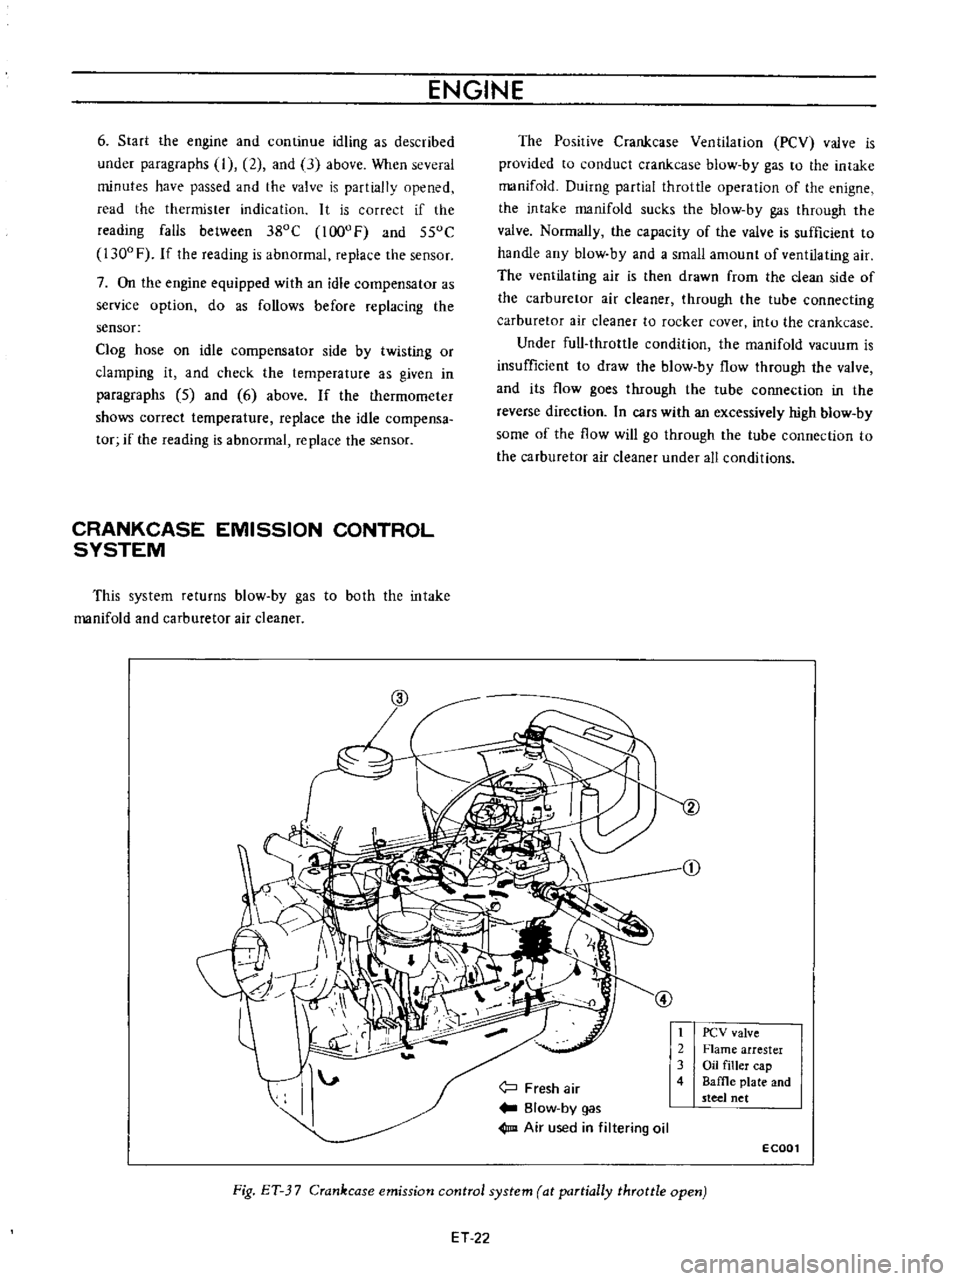
The
Posirive
Crankcase
Ventilation
PCV
valve
is
provided
to
conduct
crankcase
blow
by
gas
to
the
intake
manifold
Duirng
partial
throttle
operation
of
the
enigne
the
intake
manifold
sucks
the
blow
by
gas
through
the
valve
Normally
the
capacity
of
the
valve
is
sufficient
to
handle
any
blow
by
and
a
small
amount
of
ventilating
air
The
ventilating
air
is
then
drawn
from
the
clean
side
of
the
carburetor
air
cleaner
through
the
tube
connecting
carburetor
air
cleaner
to
rocker
cover
intu
the
crankcase
Under
full
throttle
condition
the
manifold
vacuum
is
insufficient
to
draw
the
blow
by
flow
through
the
valve
and
its
flow
goes
through
the
tube
connection
in
the
reverse
direction
In
cars
with
an
excessively
high
blow
by
some
of
the
flow
will
go
through
the
tube
connection
to
the
carburetor
air
cleaner
under
all
conditions
j
Fresh
air
Blow
by
gas
1m
Air
used
in
filtering
oil
t
2
3
4
PCV
valve
Flame
arrester
Oil
filler
cap
Baffle
plate
and
steel
net
ECOOl
Fig
ET
3
7
Crankcase
emission
control
system
at
partially
throttle
open
ET
22
Page 392 of 513
FUEl
SYSTEM
AUTOMATIC
TEMPERATURE
CONTROL
AIR
CLEANER
A
T
C
AIR
CLEANER
CONTENTS
DESCRIPTION
Air
cleaner
element
Automatic
temperature
control
air
cleaner
EF
1
EF
1
EF
2
TEMPERATURE
SENSOR
Removal
and
installation
EF
4
EF
4
DESCRIPTION
Air
cleaner
element
This
air
cleaner
element
is
of
a
viscous
paper
type
and
does
not
require
any
cleaning
regardless
of
contamination
until
it
is
replaced
with
a
new
one
Note
Never
treat
element
by
brushing
or
air
blasting
before
the
time
for
replacement
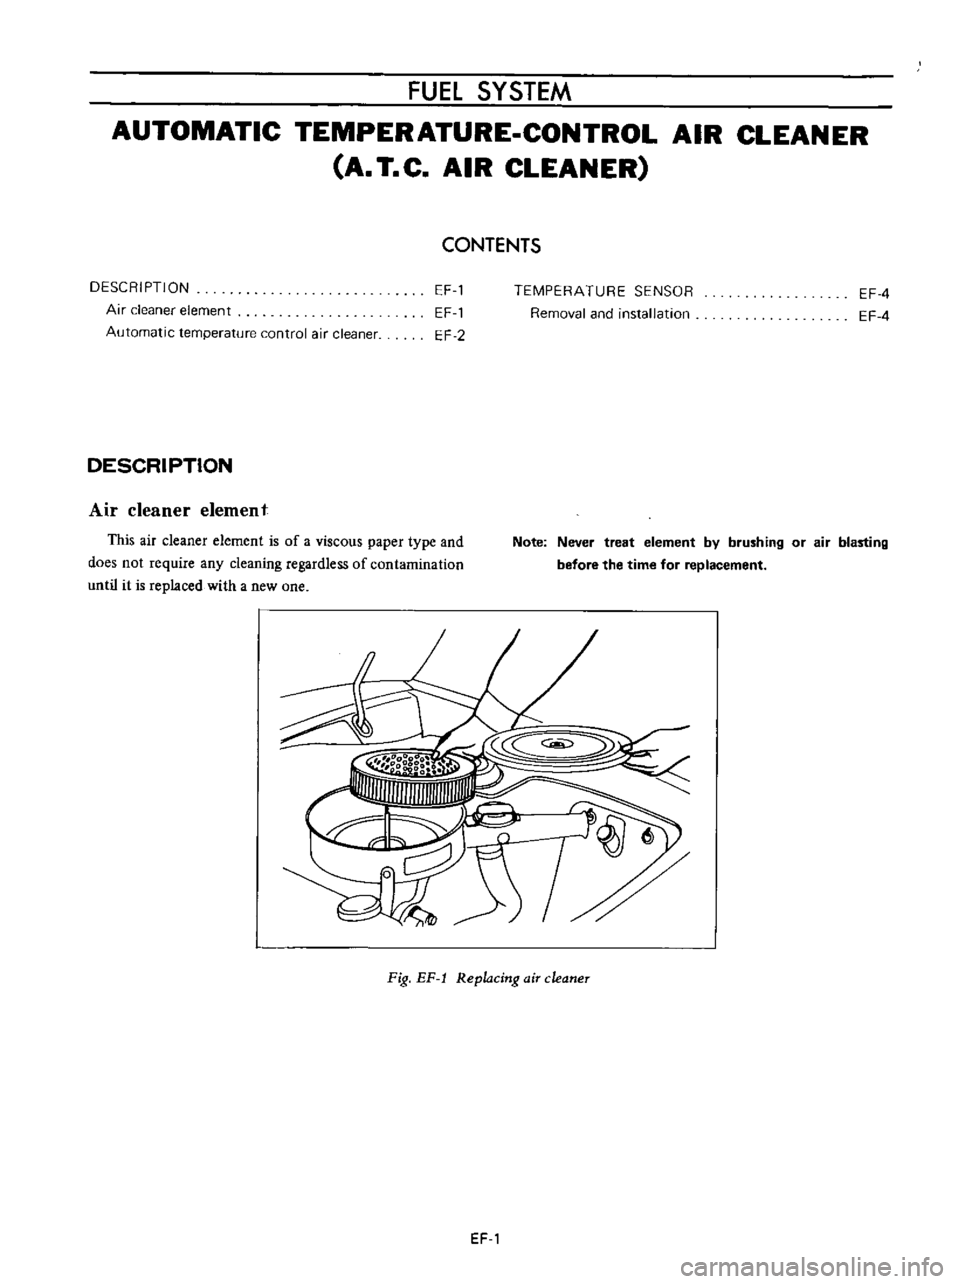
Fig
EF
l
Replacing
air
cleaner
EF
1
Page 393 of 513
ENGINf
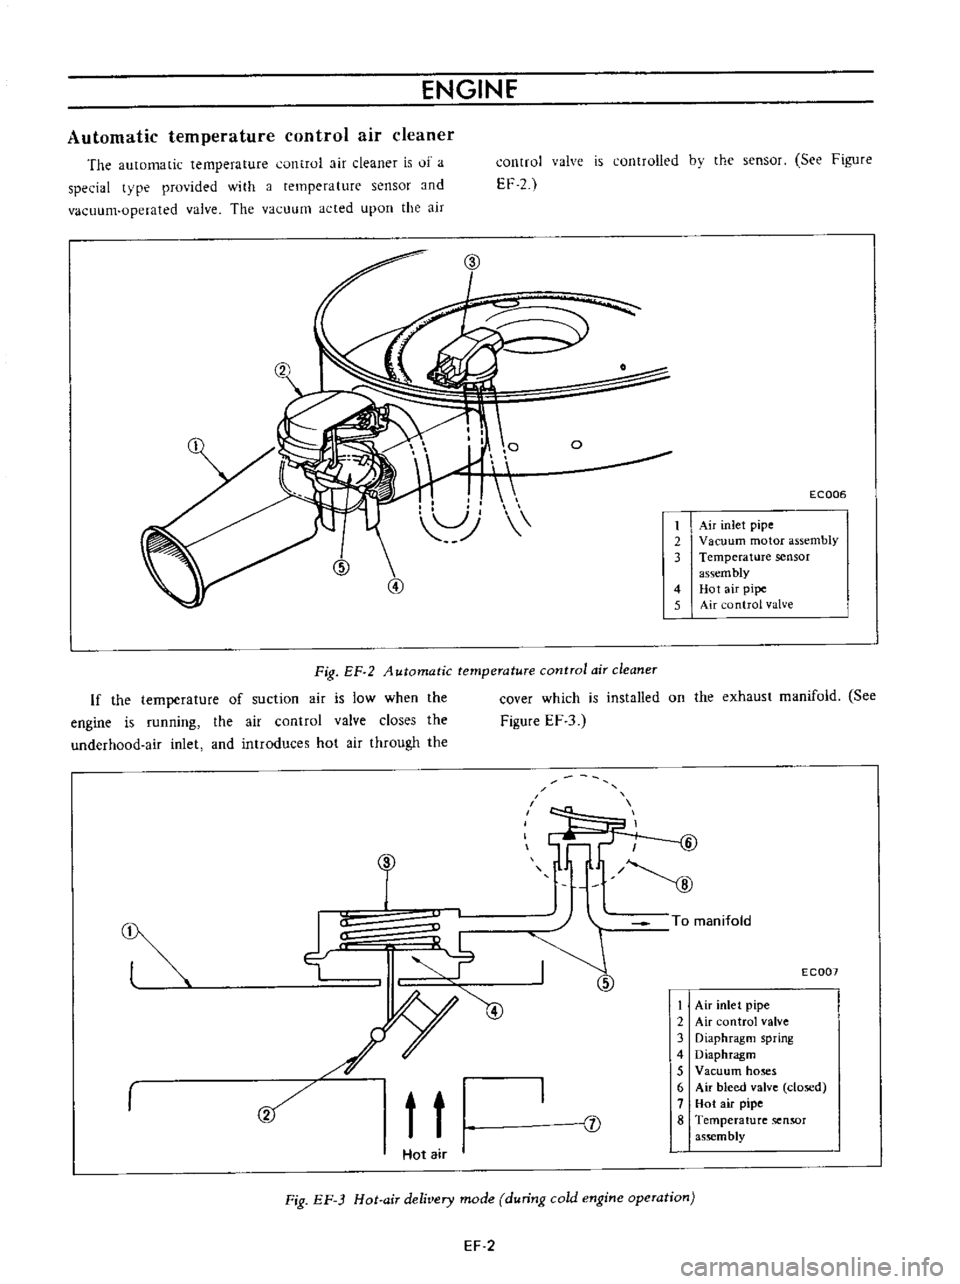
Automatic
temperature
control
air
cleaner
The
automatic
temperature
cuntrol
air
cleaner
is
of
a
special
tvpe
provided
with
a
temperature
sensor
and
vacuum
operated
valve
The
vacuum
acted
upon
the
air
2
I
control
valve
is
controlled
bv
the
sensor
See
Figure
EF
2
J
o
ECQ06
Air
inlet
pipe
2
Vacuum
motor
assembly
3
Temperature
sensor
assem
bly
4
Hot
air
pipe
5
Air
ontrol
valve
Fig
EF
2
Automatic
temperature
control
air
cleaner
If
the
temperature
of
suction
air
is
low
when
the
engine
is
running
the
air
control
valve
closes
the
underhoad
air
inlet
and
introduces
hot
air
through
the
j
I
a
0
Ej
If
f
7
@
t
t
1
Hot
air
I
cover
which
is
installed
on
the
exhaust
manifold
See
Figure
EF
3
I
@
To
manifold
EC007
J
I
Air
inlet
pipe
2
Air
control
valve
3
Diaphragm
spring
4
Diaphragm
5
Vacuum
ho
s
6
Air
bleed
valve
closed
7
Hot
air
pipe
8
Temperature
sensor
as
mbly
Fig
EF
3
Hot
air
delivery
mode
during
cold
engine
operation
EF
2
Page 394 of 513
FUEL
SYSTEM
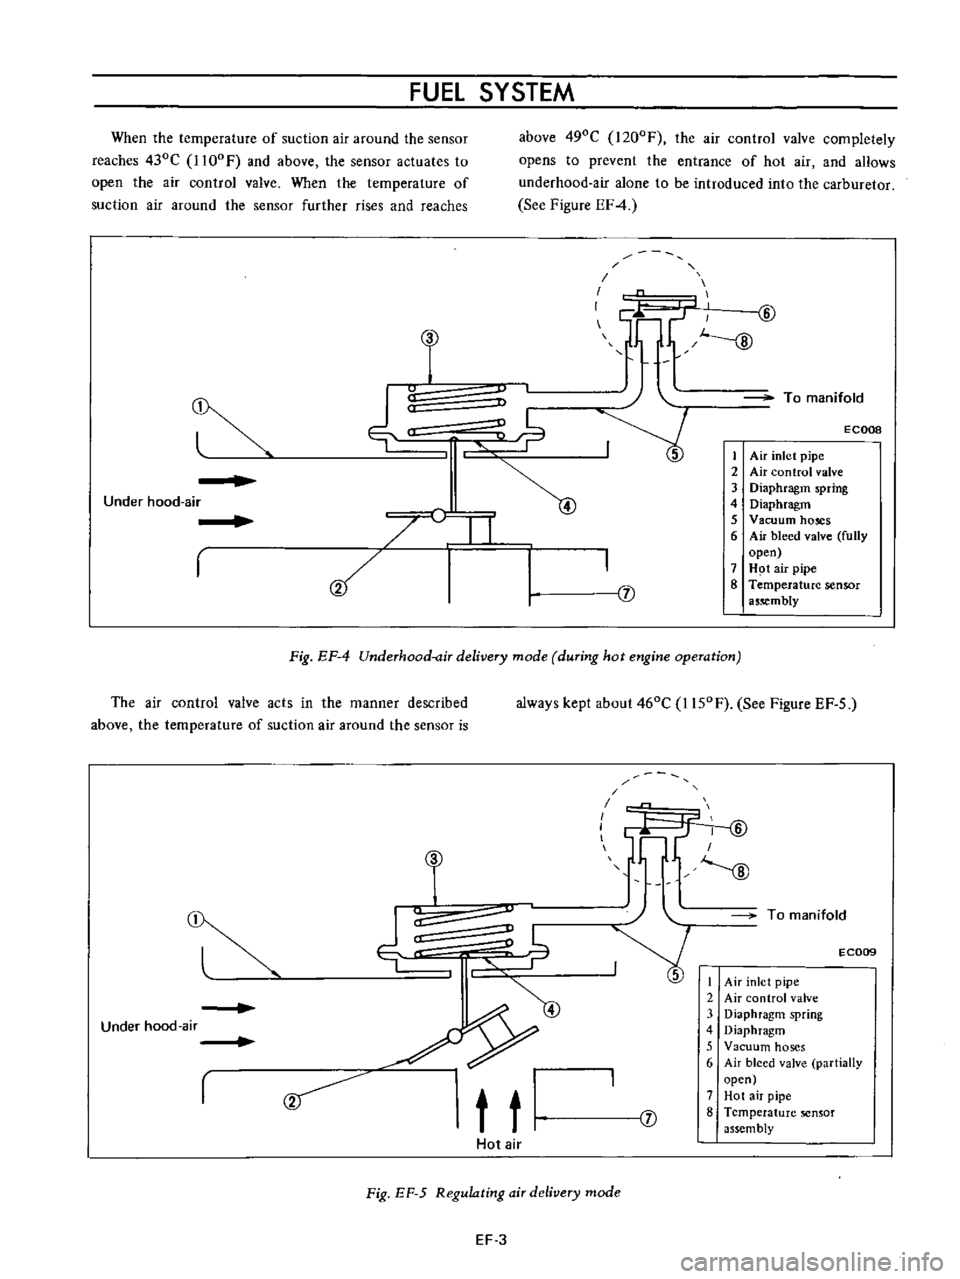
When
the
temperature
of
suction
air
around
the
sensor
reaches
430C
1l00F
and
above
the
sensor
actuates
to
open
the
air
control
valve
When
the
temperature
of
suction
air
around
the
sensor
further
rises
and
reaches
above
490C
I200F
the
air
control
valve
completely
opens
to
prevent
the
entrance
of
hot
air
and
aHows
underhood
air
alone
to
be
introduced
into
the
carburetor
See
Figure
EF4
u
C
I
1f1
lL
GJ
J
To
manifold
ECOOB
j
1
Air
inlet
pipe
2
Air
control
valve
3
Diaphragm
spring
4
Diaphragm
5
Vacuum
hoses
6
Air
bleed
valve
fully
open
7
H
t
air
pipe
8
Temperature
sensor
a5
mbly
Under
hood
air
I
I
Fig
EF
4
Underhood
air
delivery
mode
during
hot
engine
operation
The
air
control
valve
acts
in
the
manner
described
above
the
temperature
of
suction
air
around
the
sensor
is
always
kept
about
460C
I150F
See
Figure
EF
5
r
9
t
t
T
I
I
I
fY
ID
I
J
To
manifold
E
C009
I
Air
inlet
pipe
2
Air
control
valve
3
Diaphragm
spring
4
Diaphragm
5
Vacuum
hoses
6
Air
bleed
valve
partially
open
7
Hot
air
pipe
8
Temperature
sensor
assembly
Under
hood
air
J
Hot
air
Fig
EF
5
Regulating
air
delivery
mode
EF
3
Page 395 of 513
ENGINE
When
the
engine
is
operating
under
heavy
load
the
air
control
valve
fully
opens
the
underhood
air
inlet
to
obtain
full
power
regardless
of
the
temperature
around
sensor
TEMPERATURE
SENSOR
Removal
and
installation
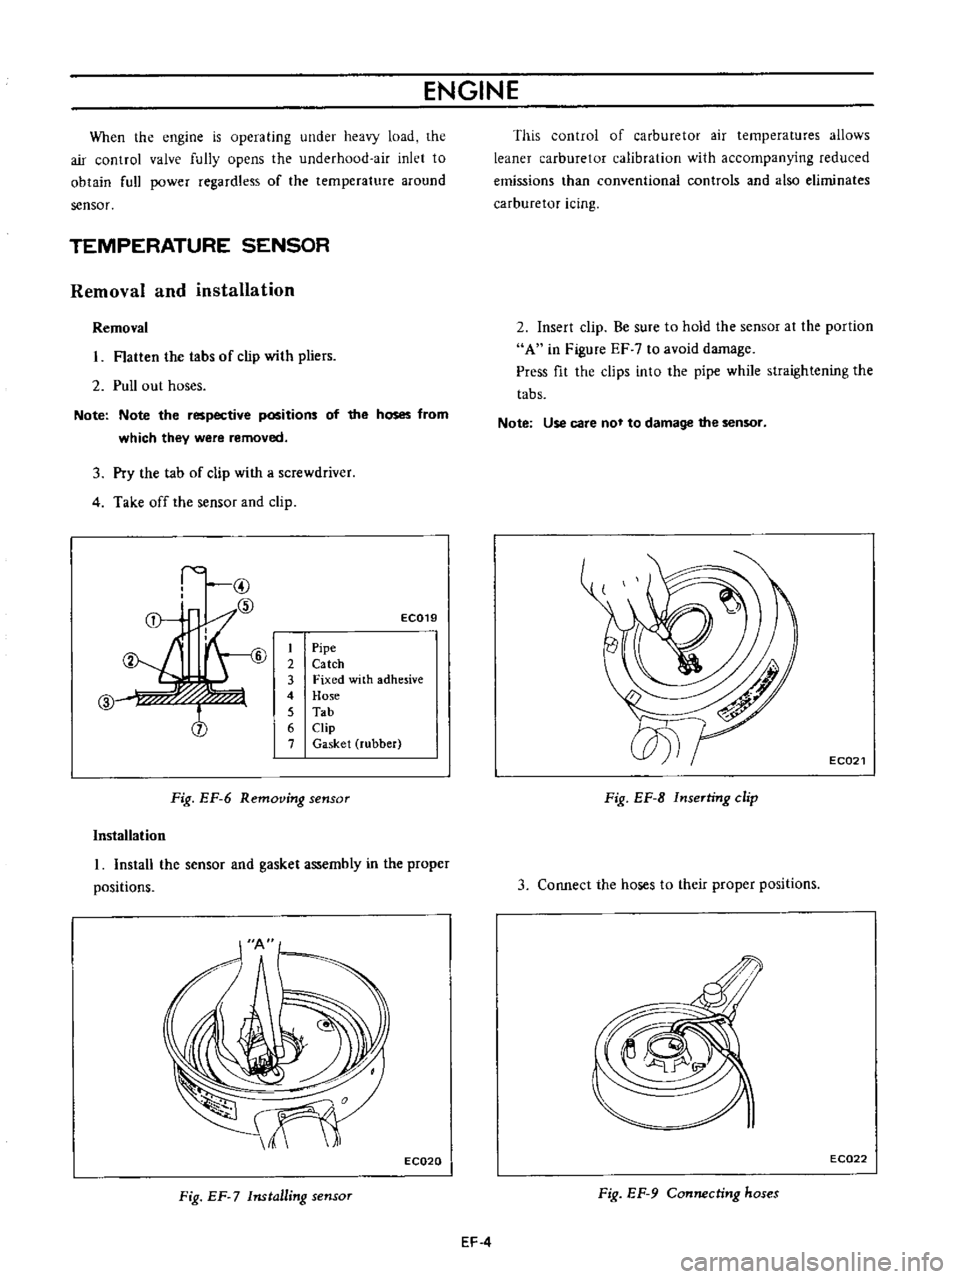
Removal
Hatten
the
tabs
of
clip
with
pliers
2
Pull
out
hoses
Note
Note
the
respective
positions
of
the
hoses
from
which
they
were
removed
3
Pry
the
tab
of
clip
with
a
screwdriver
4
Take
off
the
sensor
and
clip
I
@
f
6
7
CID
f
j
EC019
1
Pipe
2
Catch
3
Fixed
with
adhesive
4
Hose
5
Tab
6
Clip
7
Gasket
rubber
Fig
EF
6
Removing
sensor
Installation
I
Install
the
sensor
and
gasket
assembly
in
the
proper
positions
EC020
Fig
EF
7
Installing
sensor
This
control
of
carburetor
air
temperatures
allows
leaner
carburetor
calibration
with
accompanying
reduced
emissions
than
conventional
controls
and
also
eliminates
carburetor
icing
2
Insert
clip
Be
sure
to
hold
the
sensor
at
the
portion
A
in
Figure
EF
7
to
avoid
damage
Press
fit
the
clips
into
the
pipe
while
straightening
the
tabs
Note
Use
care
not
to
damage
the
sensor
EC021
Fig
EF
B
InseTting
clip
3
COIUlect
the
hoses
to
their
proper
positions
EC022
Fig
EF
9
Connecting
hoses
EF
4