parking brake DATSUN PICK-UP 1977 Service Manual
[x] Cancel search | Manufacturer: DATSUN, Model Year: 1977, Model line: PICK-UP, Model: DATSUN PICK-UP 1977Pages: 537, PDF Size: 35.48 MB
Page 9 of 537
Fig
GI
9
Manual
trammiuion
number
location
Automatic
transmission
number
The
transmission
serial
number
is
attached
to
the
right
hand
side
of
transmission
case
Numbering
system
X
XXXXX
I
Serial
number
monthly
Month
of
manufacture
I
2
9
X
Y
Z
last
figure
of
year
of
manufacture
AT344
Fig
01
10
Automatic
trammi
sion
number
location
LIFTING
POINTS
AND
TOWING
LIFTING
POINTS
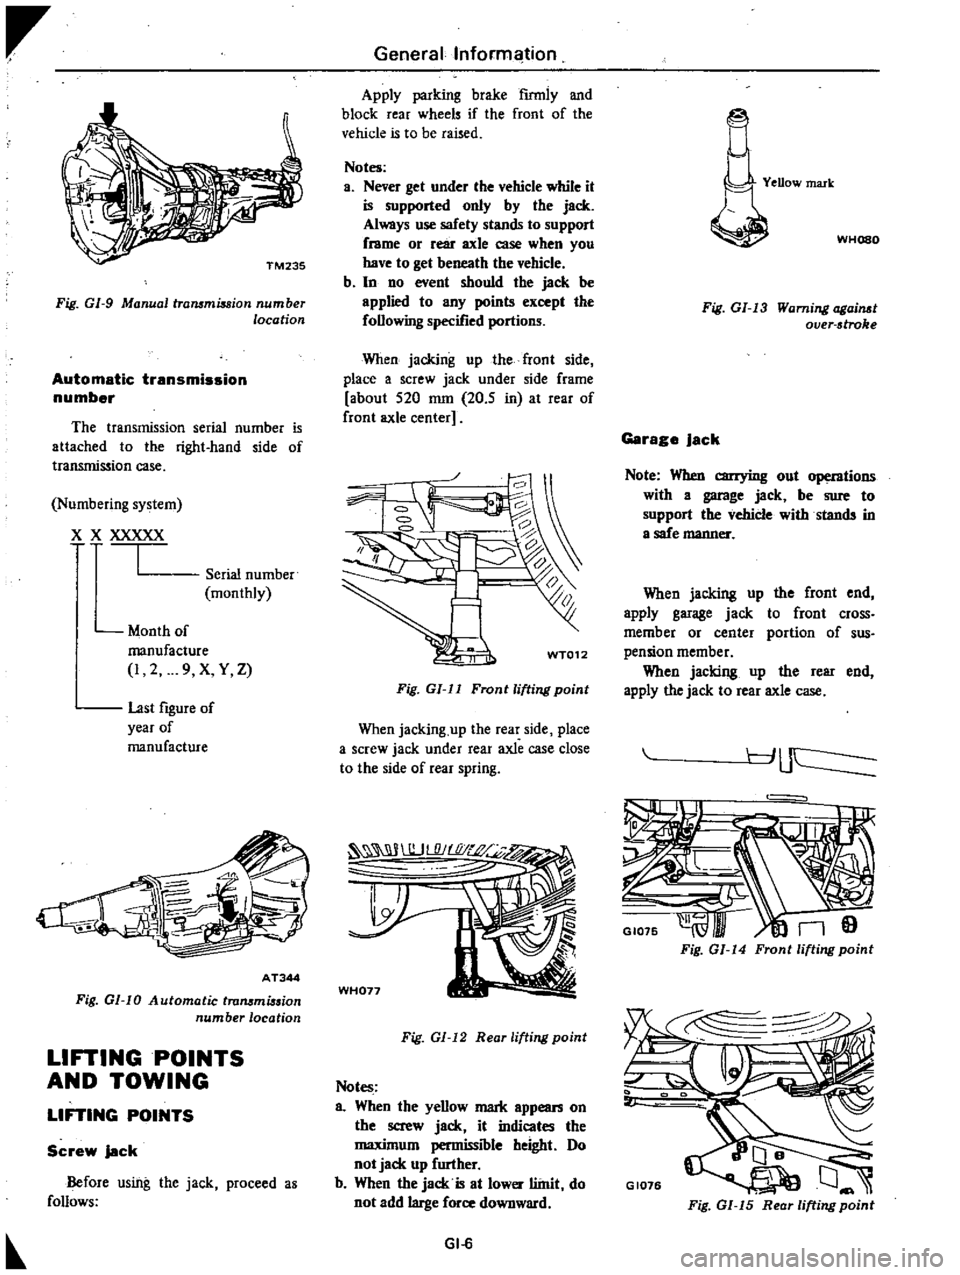
Screw
jack
Before
using
the
jack
proceed
a
follows
Generallnforml
ition
Apply
parking
brake
firmly
and
block
rear
wheels
if
the
front
of
the
vehicle
is
to
be
raised
Notes
a
Never
get
under
the
vehicle
while
it
is
supported
only
by
the
jack
Always
use
safety
stands
to
support
frame
or
rear
axle
case
when
you
have
to
get
beneath
the
vehicle
b
In
no
event
should
the
jack
be
applied
to
any
points
except
the
following
specified
portions
When
jacking
up
the
front
side
place
a
screw
jack
under
side
frame
about
520
nun
20
5
in
at
rear
of
front
axle
center
WT012
Fig
GI
ll
Front
lifting
point
When
jacking
up
the
rear
side
place
a
screw
jack
under
rear
axle
case
close
to
the
side
of
rear
spring
WH077
Fig
GI
12
Reor
lifting
point
Notes
a
When
the
yellow
mark
appean
on
the
screw
jack
it
indicates
the
maximum
permissible
height
Do
not
jack
up
further
b
When
the
jack
is
at
lower
llinit
do
not
add
large
force
downward
GI
6
YeDow
mark
WHOSO
Fig
GI
13
Warning
ogai
t
over
stroke
Garage
Jack
Note
When
carrying
out
operntions
with
a
garage
jack
be
sure
to
support
the
vehicle
withstands
in
a
safe
manner
When
jacking
up
the
front
end
apply
garage
jack
to
front
cross
member
or
center
portion
of
sus
pension
member
When
jacking
up
the
rear
end
apply
the
jack
to
rear
axle
case
r
J
uc
I
GI075
n9
Fig
GI
14
Front
lifting
point
GI076
Fig
GI
15
Rear
lifting
point
Page 10 of 537
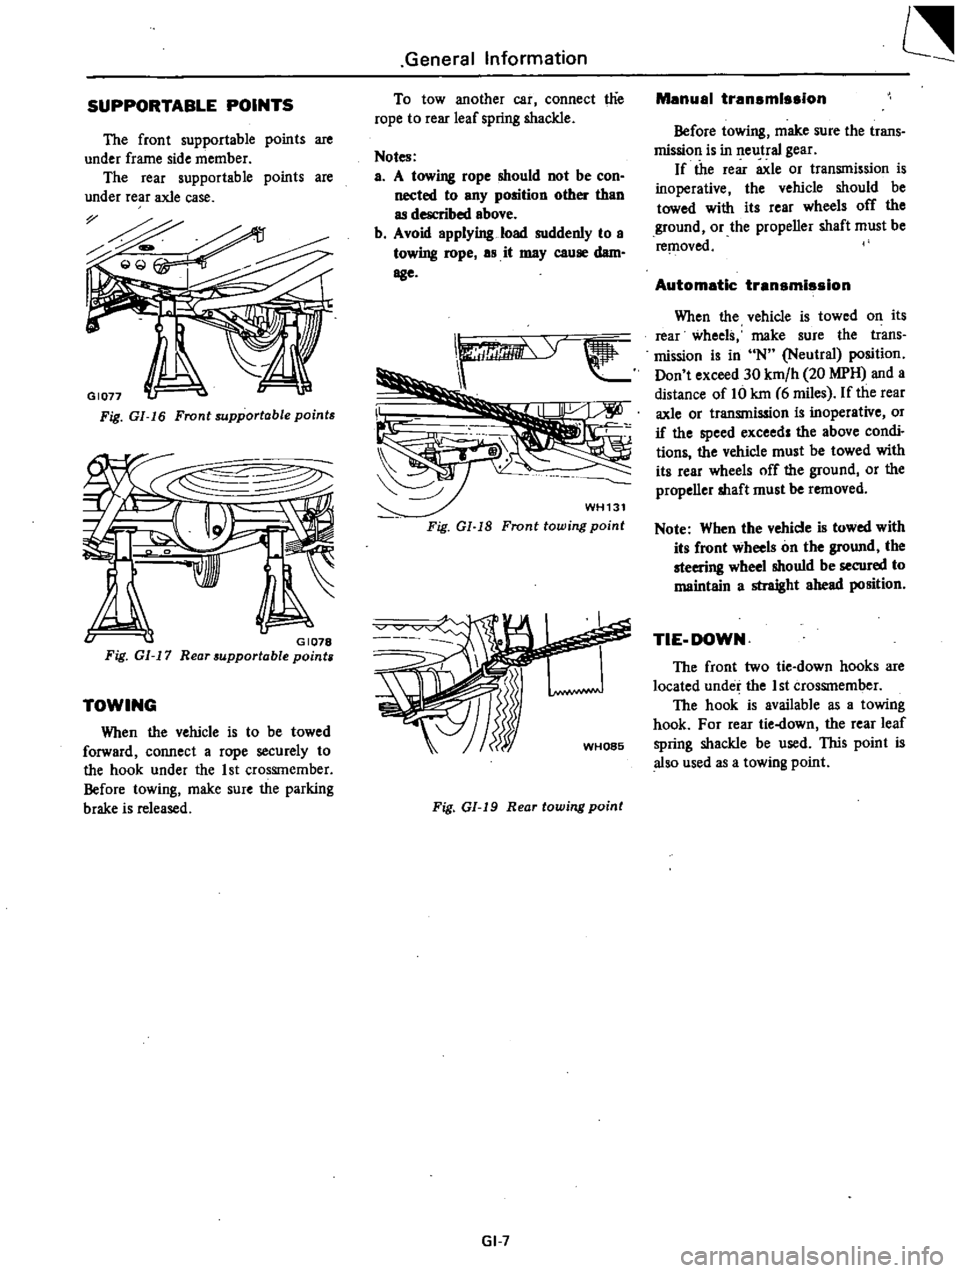
SUPPORTABLE
POINTS
The
front
supportable
points
are
under
frame
side
member
The
rear
supportable
points
are
under
rear
axle
case
Fig
GI
16
Front
supportable
points
v
GI078
Fig
GI
17
Rear
supportable
points
TOWING
When
the
vehicle
is
to
be
towed
forward
connect
a
rope
securely
to
the
hook
under
the
1st
CrosSIn
ember
Before
towing
make
sure
the
parking
brake
is
released
General
Information
To
tow
another
car
connect
t1ie
rope
to
rear
leaf
spring
shackle
Notes
a
A
towing
rope
should
not
be
con
nected
to
any
position
other
than
as
described
above
b
Avoid
applying
load
suddenly
to
a
towing
rope
as
it
may
cause
dam
age
WH131
Fig
Gl
18
Fronttowing
point
Fig
01
19
Rear
towing
point
GI
7
Manual
transmission
Before
towing
make
sure
the
trans
mission
is
in
neutral
gear
If
the
rear
axle
or
transmission
is
inoperative
the
vehicle
should
be
towed
with
its
rear
wheels
off
the
ground
or
the
propeller
shaft
must
be
re
l1oved
Automatic
transmission
When
the
vehicle
is
towed
on
its
rear
wheels
make
sure
the
trans
mission
is
in
N
Neutral
position
Don
t
exceed
30
km
h
20
MPH
and
a
distance
of
Hi
kin
6
miles
If
the
rear
axle
or
transmission
is
inoperative
or
if
the
speed
exceed
the
above
condi
tions
the
vehicle
must
be
towed
with
its
rear
wheels
off
the
ground
or
the
propeller
shaft
must
be
removed
Note
When
the
vehicle
is
towed
with
its
front
wheels
on
the
ground
the
steering
wheel
shouId
be
secured
to
maintain
a
straight
ahead
position
TIE
DOWN
The
front
two
tie
down
hooks
are
located
under
the
1st
crosSInember
The
hook
is
available
as
a
towing
hook
For
rear
tie
down
the
rear
leaf
spring
shackle
be
used
lIDs
point
is
also
used
as
a
towing
point
Page 23 of 537
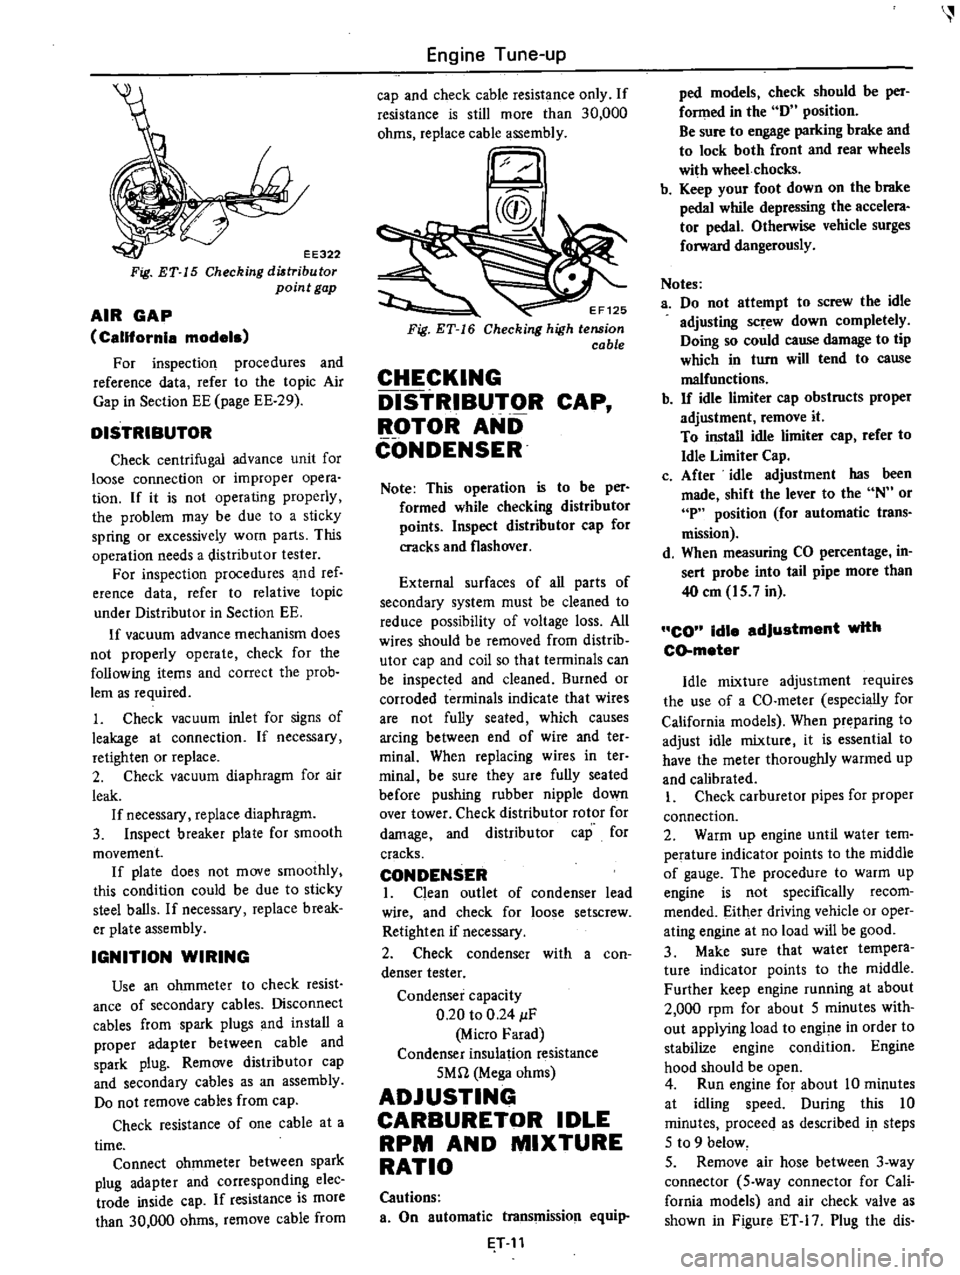
EE322
Fig
ET
15
Checking
diltribu
tor
point
gap
AIR
GAP
California
models
For
inspection
procedures
and
reference
data
refer
to
the
topic
Air
Gap
in
Section
EE
page
EE
29
DISTRIBUTOR
Check
centrifugal
advance
unit
for
loose
connection
or
improper
opera
tion
If
it
is
not
operating
properly
the
problem
may
be
due
to
a
sticky
spring
or
excessively
worn
parts
This
operation
needs
a
distributor
tester
For
inspection
procedures
and
ref
erence
data
refer
to
relative
topic
under
Distributor
in
Section
EE
If
vacuum
advance
mechanism
does
not
properly
operate
check
for
the
following
items
and
correct
the
prob
lem
as
required
1
Check
vacuum
inlet
for
signs
of
leakage
at
connection
If
necessary
retighten
or
replace
2
Check
vacuum
diaphragm
for
air
leak
If
necessary
replace
diaphragm
3
Inspect
breaker
plate
for
smooth
movement
If
plate
does
not
move
smoothly
this
condition
could
be
due
to
sticky
steel
balls
If
necessary
replace
break
er
plate
assembly
IGNITION
WIRING
Use
an
ohmmeter
to
check
resist
ance
of
secondary
cables
Disconnect
cables
from
spark
plugs
and
install
a
proper
adapter
between
cable
and
spark
plug
Remove
distributor
cap
and
secondary
cables
as
an
assembly
Do
not
remove
cables
from
cap
Check
resistance
of
one
cable
at
a
time
Connect
ohmmeter
between
spark
plug
adapter
and
corresponding
elec
trade
inside
cap
If
resistance
is
more
than
30
000
ohms
remove
cable
from
Engine
Tune
up
cap
and
check
cable
resistance
only
If
resistance
is
still
more
than
30
000
ohms
replace
cable
assembly
EF125
Checking
high
tension
cable
CHECKING
DISTRIBUTOR
CAP
ROTOR
AND
CONDENSER
Note
This
operation
is
to
be
per
formed
while
checking
distributor
points
Inspect
distributor
cap
for
cracks
and
flashover
External
surfaces
of
all
parts
of
secondary
system
must
be
cleaned
to
reduce
possibility
of
voltage
loss
All
wires
should
be
removed
from
distrib
utor
cap
and
coil
so
that
terminals
can
be
inspected
and
cleaned
Burned
or
corroded
terminals
indicate
that
wires
are
not
fully
seated
which
causes
arcing
between
end
of
wire
and
ter
minal
When
replacing
wires
in
ter
minai
be
sure
they
are
fully
seated
before
pushing
rubber
nipple
down
over
tower
Check
distributor
rotor
for
damage
and
distributor
cap
for
cracks
CONDENSER
I
Clean
outlet
of
condenser
lead
wire
and
check
for
loose
setscrew
Retighten
if
necessary
2
Check
condenser
with
a
con
denser
tester
Condenser
capacity
0
20
to
0
24
IF
Micro
Farad
Condenser
insulation
resistance
5Mn
Mega
ohms
ADJUSTING
CARBURETOR
IDLE
RPM
AND
MIXTURE
RATIO
Cautions
a
On
automatic
transmission
equip
T
11
ped
models
check
should
be
per
fonned
in
the
D
position
Be
sure
to
engage
parking
brake
and
to
lock
both
front
and
rear
wheels
with
wheel
chocks
b
Keep
your
foot
down
on
the
brake
pedal
while
depressing
the
accelera
tor
pedal
Otherwise
vehicle
surges
forward
dangerously
Notes
a
Do
not
attempt
to
screw
the
idle
adjusting
sc
ew
down
completely
Doing
so
could
cause
damage
to
tip
which
in
turn
will
tend
to
cause
malfunctions
b
If
idle
limiter
cap
obstructs
proper
adjustment
remove
it
To
install
idle
limiter
cap
refer
to
Idle
Limiter
Cap
c
After
idle
adjustment
has
been
made
shift
the
lever
to
the
N
or
P
position
for
automatic
trans
mission
d
When
measuring
CO
percentage
in
sert
probe
into
tail
pipe
more
than
40
em
15
7
in
CO
idle
adjustment
with
CD
meter
Idle
mixture
adjustment
requires
the
use
of
a
CO
meter
especially
for
California
models
When
preparing
to
adjust
idle
mixture
it
is
essential
to
have
the
meter
thoroughly
warmed
up
and
calibrated
I
Check
carburetor
pipes
for
proper
connection
2
Warm
up
engine
until
water
tem
perature
indicator
points
to
the
middle
of
gauge
The
procedure
to
warm
up
engine
is
not
specifically
recom
mended
Either
driving
vehicle
or
oper
ating
engine
at
no
load
will
be
good
3
Make
sure
that
water
tempera
ture
indicator
points
to
the
middle
Further
keep
engine
running
at
about
2
000
rpm
for
about
5
minutes
with
out
applying
load
to
engine
in
order
to
stabilize
engine
condition
Engine
hood
should
be
open
4
Run
engine
for
about
10
minutes
at
idling
speed
During
this
10
minutes
proceeq
as
described
i
steps
5
to
9
below
5
Remove
air
hose
between
3
way
connector
5
way
connector
for
Cali
fornia
models
and
air
check
valve
as
shown
in
Figure
ET
17
Plug
the
dis
Page 35 of 537
3
If
there
is
a
leak
remove
top
cover
from
purge
contiol
valve
and
check
for
dislocated
or
cmcked
dia
phragm
If
necessary
replace
dia
phmgm
kit
which
is
made
up
of
a
retainer
diaphragm
and
spring
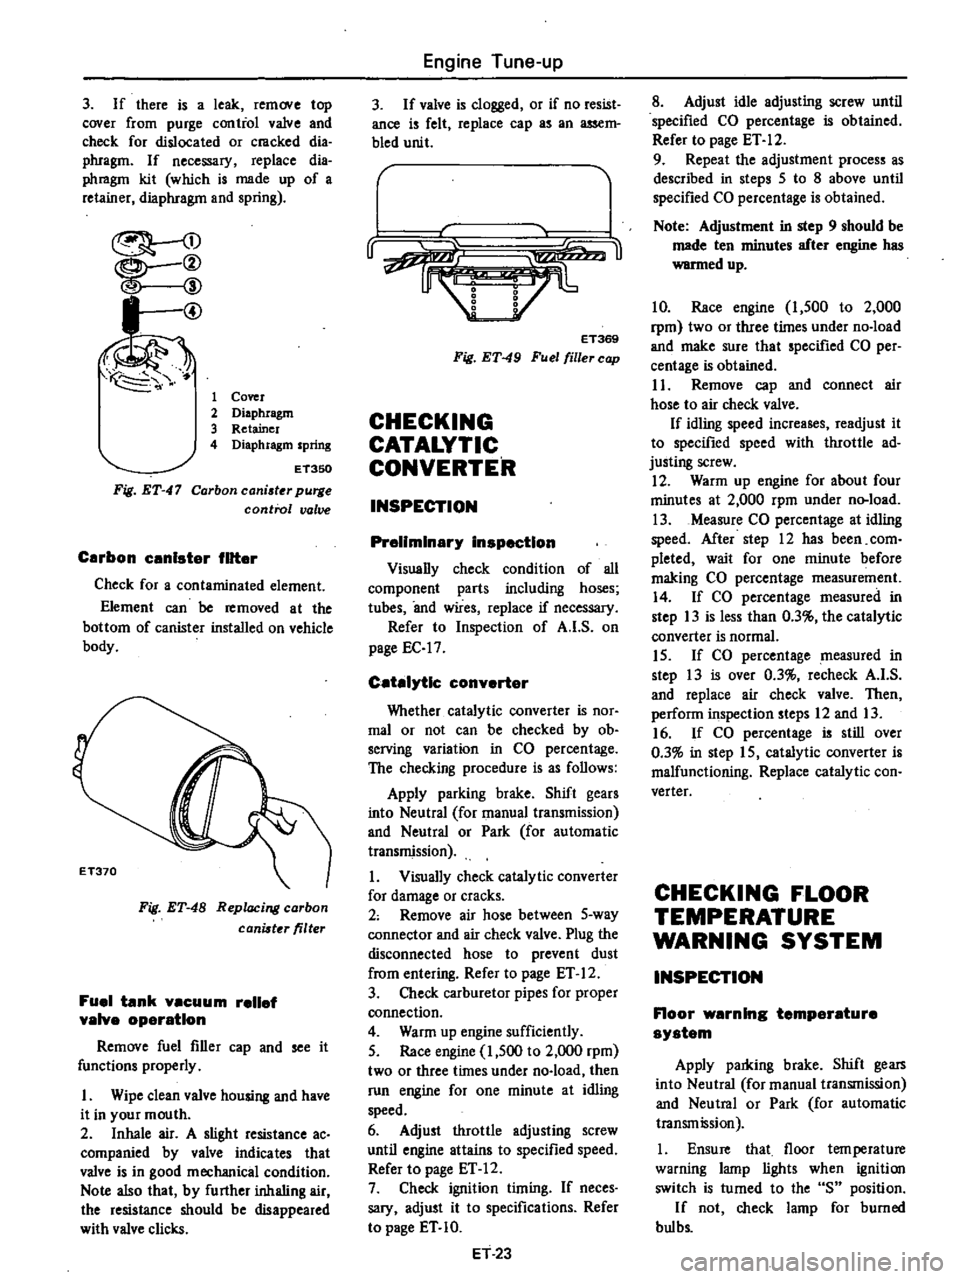
I
@
1
Cover
2
Diaphragm
3
Retainer
4
Diaphragm
spring
Fig
ET
47
ET350
Carbon
caniater
purge
control
valve
Carbon
unlster
filter
Check
for
a
contaminated
element
Element
can
be
removed
at
the
bottom
of
canister
installed
on
vehicle
body
Fig
ET
48
Replacing
carbon
canister
filter
Fuel
tank
vacuum
relief
valve
operation
Remove
fuel
filler
cap
and
see
it
functions
properly
I
Wipe
clean
valve
housing
and
have
it
in
your
mouth
2
Inhale
air
A
slight
resistance
ac
companied
by
valve
indicates
that
valve
is
in
good
mechanical
condition
Note
also
that
by
further
inhaling
air
the
resistance
should
be
disappeared
with
valve
clicks
Engine
Tune
up
3
If
valve
is
clogged
or
if
no
resist
ance
is
felt
replace
cap
as
an
assem
bled
unit
r
u
ET369
Fig
ET
49
Fuel
filler
cap
CHECKING
CATALYTIC
CONVERTER
INSPECTION
Preliminary
inspection
Visually
check
condition
of
all
component
parts
including
hoses
tubes
and
wires
replace
if
necessary
Refer
to
Inspection
of
A
I
S
on
page
EC
17
Catalytic
converter
Whether
catalytic
converter
is
nOf
mal
or
not
can
be
checked
by
ob
serving
variation
in
CO
percentage
The
checking
procedure
is
as
follows
Apply
parking
brake
Shift
gears
into
Neutral
for
manual
transmission
and
Neutral
or
Park
for
automatic
transmission
1
Visually
check
catalytic
converter
for
damage
or
cracks
2
Remove
air
hose
between
5
way
connector
and
air
check
valve
Plug
the
disconnected
hose
to
prevent
dust
from
entering
Refer
to
page
ET
12
3
Check
carburetor
pipes
for
proper
connection
4
Warm
up
engine
sufficiently
5
Race
engine
1
500
to
2
000
rpm
two
or
three
times
under
no
load
then
run
engine
for
one
minute
at
idling
speed
6
Adjust
throttle
adjusting
screw
until
engine
attains
to
specified
speed
Refer
to
page
ET
12
7
Check
ignition
timing
If
neces
sary
adjust
it
to
specifications
Refer
to
page
ET
10
ET
23
8
Adjust
idle
adjusting
screw
until
specified
CO
percentage
is
obtained
Refer
to
page
ET
12
9
Repeat
the
adjustment
process
as
described
in
steps
5
to
8
above
until
specified
CO
percentage
is
obtained
Note
Adjustment
in
step
9
should
be
made
ten
minutes
after
engine
has
warmed
up
10
Race
engine
1
500
to
2
000
rpm
two
or
three
times
under
no
load
and
make
sure
that
specified
CO
per
centage
is
obtained
I
1
Remove
cap
and
connect
air
hose
to
air
check
valve
If
idling
speed
increases
readjust
it
to
specified
speed
with
throttle
ad
justing
screw
12
Warm
up
engine
for
about
four
minutes
at
2
000
rpm
under
n
load
13
Measure
CO
percentage
at
idling
speed
After
step
12
has
been
com
pleted
wait
for
one
minute
before
making
CO
percentage
measurement
14
If
CO
percentage
measured
in
step
13
is
less
than
0
3
the
catalylic
converter
is
normal
15
If
CO
percentage
measured
in
step
13
is
over
0
3
recheck
A
I
S
and
replace
air
check
valve
Then
perform
inspection
steps
12
and
13
16
If
CO
percentage
is
still
over
0
3
in
step
15
catalytic
converter
is
malfunctioning
Replace
catalytic
con
verter
CHECKING
FLOOR
TEMPERATURE
WARNING
SYSTEM
INSPECTION
Floor
warning
temperature
system
Apply
parldng
brake
Shift
gears
into
Neutral
for
manual
transmission
and
Neutral
or
Park
for
automatic
transmission
1
Ensure
that
floor
tern
perature
warning
lamp
lights
when
ignition
switch
is
turned
to
the
S
position
If
not
check
lamp
for
burned
bul
bs
Page 117 of 537
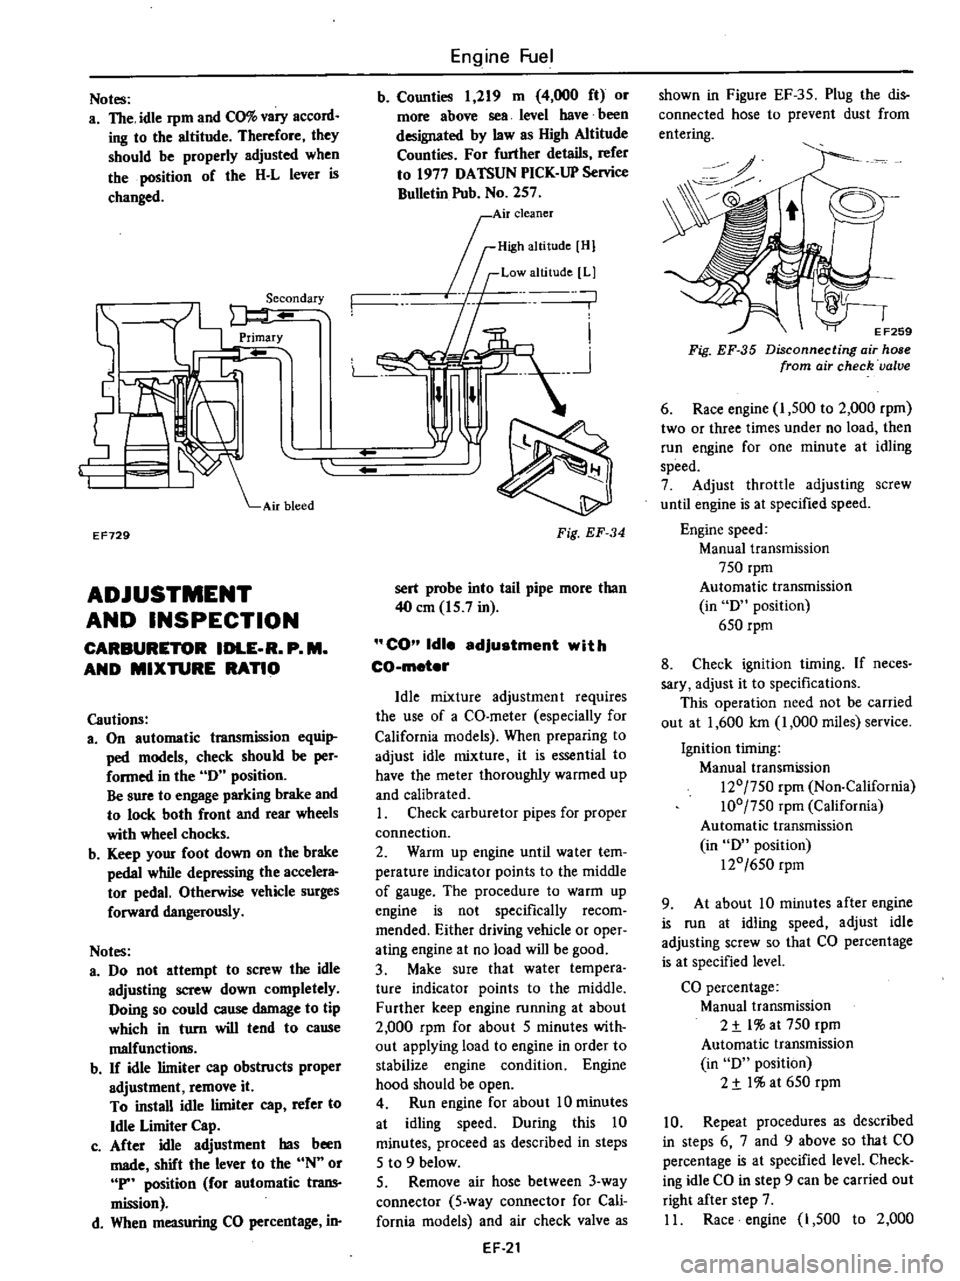
Notes
a
The
idle
rpm
and
CO
vary
accord
ing
to
the
altitude
Therefore
they
should
be
properly
adjusted
when
the
position
of
the
H
L
lever
is
changed
EF729
ADJUSTMENT
AND
INSPECTION
CARBURETOR
IDLE
R
P
M
AND
MIXTURE
RATIO
Cautions
3
On
automatic
transmission
equi
ped
models
check
should
be
per
formed
in
the
0
position
Be
sure
to
engage
parking
brake
and
to
lock
both
front
and
rear
wheels
with
wheel
chocks
b
Keep
your
foot
down
on
the
brake
pedal
while
depressing
the
accelera
tor
pedal
Otherwise
vehicle
surges
forward
dangerously
Notes
a
00
not
attempt
to
screw
the
idle
adjusting
screw
down
completely
Ooing
so
could
cause
damage
to
tip
which
in
turn
will
tend
to
cause
malfunctio11ll
b
If
idle
limiter
cap
obstructs
proper
adjustment
remove
it
To
install
idle
limiter
cap
refer
to
Idle
Limiter
Cap
c
After
idle
adjustment
has
been
made
shift
the
lever
to
the
N
or
P
position
for
automatic
trans
mission
d
When
measuring
CO
percentage
in
Engine
Fuel
b
Counties
1
219
m
4
000
ft
or
more
above
sea
level
have
been
designated
by
law
as
High
Altitude
Counties
For
further
details
refer
to
1977
OATSUN
PICK
UP
Service
Bulletin
Pub
No
257
0
I
Air
cleaner
rID
mOl
If
Low
altitude
Ll
n
n
L
n
Fig
EF
34
sert
probe
into
tail
pipe
more
than
40
em
15
7
in
CO
Idle
adjustment
with
CO
meter
Idle
mixture
adjustment
requires
the
use
of
a
CO
meter
especially
for
California
models
When
preparing
to
adjust
idle
mixture
it
is
essential
to
have
the
meter
thoroughly
warmed
up
and
calibrated
I
Check
carburetor
pipes
for
proper
connection
2
Warm
up
engine
until
water
tem
perature
indicator
points
to
the
middle
of
gauge
The
procedure
to
warm
up
engine
is
not
specifically
recom
mended
Either
driving
vehicle
or
oper
ating
engine
at
no
load
will
be
good
3
Make
sure
that
water
tempera
ture
indicator
points
to
the
middle
Further
keep
engine
running
at
about
2
000
rpm
for
about
5
minutes
with
out
applying
load
to
engine
in
order
to
stabilize
engine
condition
Engine
hood
should
be
open
4
Run
engine
for
about
10
minutes
at
idling
speed
Ouring
this
10
minutes
proceed
as
described
in
steps
5
to
9
below
5
Remove
air
hose
between
3
way
connector
5
way
connector
for
Cali
fornia
models
and
air
check
valve
as
EF
21
shown
in
Figure
EF
35
Plug
the
dis
connected
hose
to
prevent
dust
from
entering
0
o
EF259
Fig
EF
35
Disconnecting
air
hose
from
air
check
valve
6
Race
engine
I
500
to
2
000
rpm
two
or
three
times
under
no
load
then
run
engine
for
one
minute
at
idling
speed
7
Adjust
throttle
adjusting
screw
until
engine
is
at
specified
speed
Engine
speed
Manual
transmission
750
rpm
Automatic
transmission
in
0
position
650
rpm
8
Check
ignition
timing
If
neces
sary
adjust
it
to
specifications
This
operation
need
not
be
carried
out
at
1
600
Ian
1
000
miles
service
Ignition
timing
Manual
transmission
120
750
rpm
Non
California
100
750
rpm
California
Automatic
transmission
in
0
position
120
650
rpm
9
At
about
10
minutes
after
engine
is
run
at
idling
speed
adjust
idle
adjusting
screw
so
that
CO
percentage
is
at
specified
level
CO
percentage
Manual
transmission
2
t
l
at
750
rpm
Automatic
transmission
in
0
position
2
t
I
at
650
rpm
10
Repeat
procedures
as
described
in
steps
6
7
and
9
above
so
that
CO
percentage
is
at
specified
level
Check
ing
idle
CO
in
step
9
can
be
carried
out
right
after
step
7
II
Race
engine
1
500
to
2
000
Page 160 of 537
REMOVAL
AND
INSPECTION
Removal
and
inspection
can
be
done
as
follows
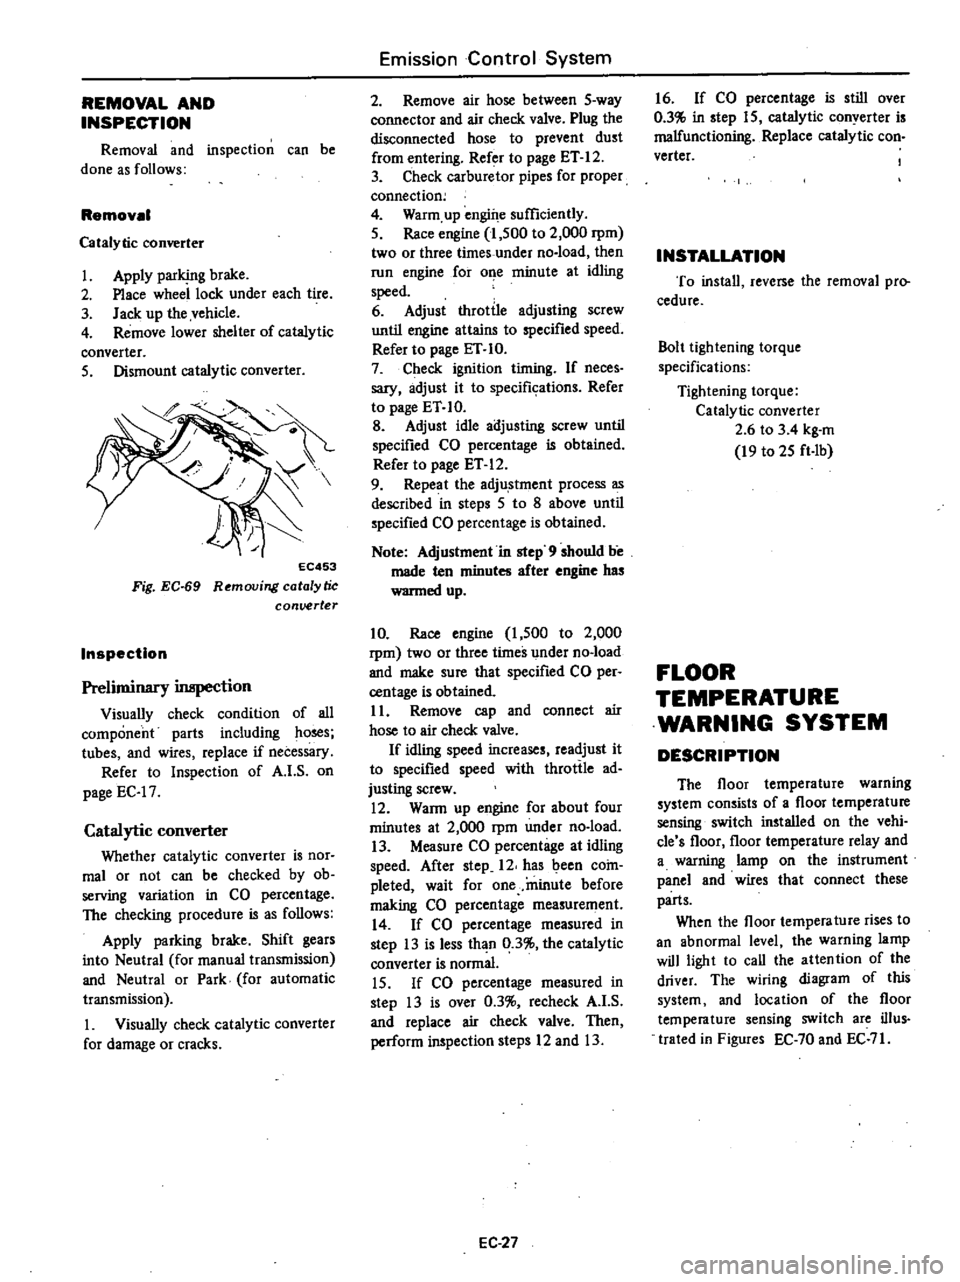
Removal
Catalytic
converter
1
Apply
parking
brake
2
Place
wheel
lock
under
each
tire
3
Jack
up
the
vehicle
4
Remove
lower
shelter
of
catalytic
converter
5
Dismount
catalytic
converter
EC453
Fig
EC
69
Removing
catalytic
conuerter
Inspection
Preliminary
inspection
Visually
check
condition
of
all
component
parts
including
ho
s
tubes
and
wires
replace
if
necessary
Refer
to
Inspection
of
A
I
S
on
page
EC
17
Catalytic
converter
Whether
catalytic
converter
is
nor
mal
or
not
can
be
checked
by
ob
serving
variation
in
CO
percentage
The
checking
procedure
is
as
follows
Apply
parking
brake
Shift
gears
into
Neutral
for
manual
transmission
and
Neutral
or
Park
for
automatic
transmission
1
Visually
check
catalytic
converter
for
damage
or
cracks
Emission
Control
System
2
Remove
air
hose
between
5
way
connector
and
air
check
valve
Plug
the
disconnected
hose
to
prevent
dust
from
entering
Refer
to
page
ET
12
3
Check
carburetor
pipes
for
proper
connection
4
Warm
up
engine
sufficiently
5
Race
engine
1
500
to
2
000
rpm
two
or
three
times
under
no
load
then
run
engine
for
o
e
minute
at
idling
speed
6
Adjust
throttle
adjusting
screw
until
engine
attains
to
specified
speed
Refer
to
page
ET
10
7
Check
ignition
timing
If
neces
sary
adjust
it
to
specifkations
Refer
to
page
ET
10
B
Adjust
idle
adjusting
screw
until
specified
CO
percentage
is
obtained
Refer
to
page
ET
12
9
Repeat
the
adju
stment
process
as
described
in
steps
5
to
8
above
until
specified
CO
percentage
is
obtained
Note
Adjustment
in
step
9
should
be
made
ten
minutes
after
engine
has
wanned
up
10
Race
engine
1
500
to
2
000
rpm
two
or
three
times
under
no
load
and
make
sure
that
specified
CO
per
centage
is
obtained
11
Remove
cap
and
connect
air
hose
to
air
check
valve
If
idling
speed
increases
readjust
it
to
specified
speed
with
throttle
ad
justing
screw
12
WaRn
up
engine
for
about
four
minutes
at
2
000
rpm
under
no
load
13
Measure
CO
percentage
at
idling
speed
After
step
12
has
been
coin
pleted
wait
for
one
minute
before
making
CO
percentage
measurement
14
If
CO
percentage
measured
in
step
13
is
less
than
0
3
the
catalytic
converter
is
normal
15
If
CO
percentage
measured
in
step
13
is
over
0
3
recheck
A
I
S
and
replace
air
check
valve
Then
perform
inspection
steps
12
and
13
EC
27
16
If
CO
percentage
is
still
over
0
3
in
step
15
catalytic
conyerter
is
malfunctioning
Replace
catalytic
con
verter
INSTALLATION
To
install
reverse
the
removal
pro
cedure
Bolt
lightening
torque
specifications
Tightening
torque
Catalytic
converter
2
6
to
3
4
kg
m
19
to
25
ft
Ib
FLOOR
TEMPERATURE
WARNING
SYSTEM
DESCRIPTION
The
floor
temperature
warning
system
consists
of
a
floor
temperature
sensing
switch
installed
on
the
vehi
cle
s
floor
floor
temperature
relay
and
a
warning
lamp
on
the
instrument
panel
and
wires
that
connect
these
parts
When
the
floor
tempera
ture
rises
to
an
abnormal
level
the
warning
lamp
will
light
to
call
the
attention
of
the
driver
The
wiring
diagram
of
this
system
and
location
of
the
floor
temperature
sensing
switch
are
ilIus
trated
in
Figures
EC
70
and
EC
71
Page 162 of 537
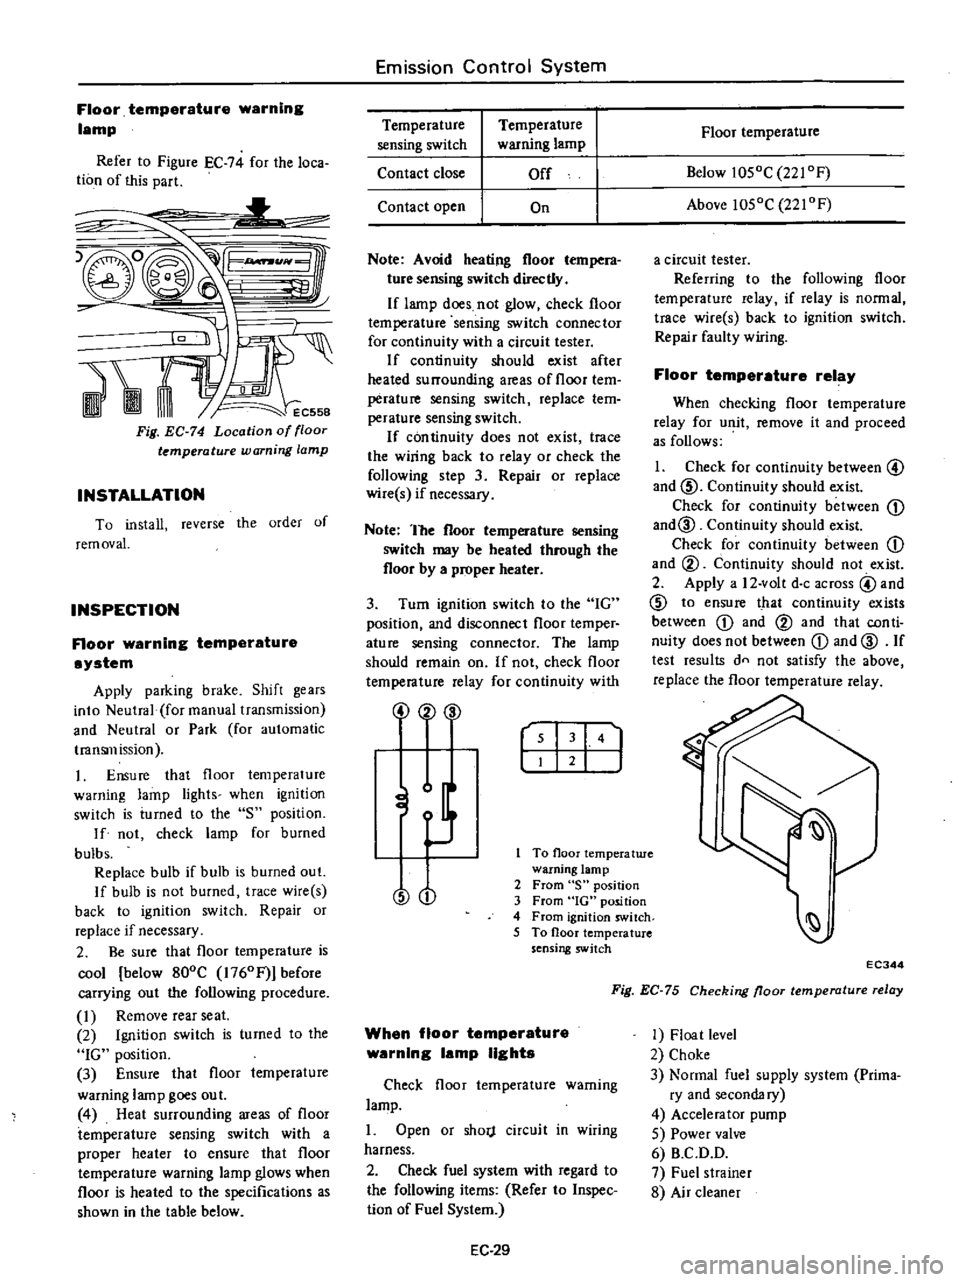
Floor
temparature
warning
lamp
Refer
to
Figure
EC
74
for
the
loca
tion
of
this
part
L
1t
1
RAt
Fig
EC
74
Location
of
floor
temperature
warning
lamp
INSTALLATION
To
install
reverse
the
order
of
rem
ovaL
INSPECTION
Floor
warning
temperature
system
Apply
parking
brake
Shift
gears
into
Neutral
foI
manual
transmission
and
Neutral
or
Park
for
automatic
transmission
1
Ensure
that
floor
temperature
warning
lamp
lights
when
ignition
switch
is
iumed
to
the
S
position
If
not
check
lamp
for
burned
bulbs
Replace
bulb
if
bulb
is
burned
out
If
bulb
is
not
burned
trace
wire
s
back
to
ignition
switch
Repair
or
replace
if
necessary
2
Be
sure
that
floor
temperature
is
cool
below
800C
1760Fj
before
carrying
out
the
following
procedure
I
Remove
rearseat
2
Ignition
switch
is
turned
to
the
IG
position
3
Ensure
that
floor
temperature
warning
lamp
goes
out
4
Heat
surrounding
areas
of
floor
temperature
sensing
switch
with
a
proper
heater
to
ensure
that
floor
temperature
warning
lamp
glows
when
floor
is
heated
to
the
specifications
as
shown
in
the
table
below
Emission
Control
System
Temperature
sensing
switch
Contact
close
Temperature
warning
lamp
Off
Contact
open
On
Note
Avoid
heating
floor
tempera
ture
sensing
switch
directly
If
lamp
does
not
glow
check
floor
temperature
sensing
switch
connector
for
continuity
with
a
circuit
tester
If
continuity
should
exist
after
heated
surrounding
areas
of
floor
tem
perature
sensing
switch
replace
tem
perature
sensing
switch
If
con
tinuity
does
not
exist
trace
the
wiring
back
to
relay
or
check
the
following
step
3
Repair
or
replace
wire
s
if
necessary
Note
The
floor
temperature
sensing
switch
may
be
heated
through
the
floor
by
a
proper
heater
3
Turn
ignition
switch
to
the
IG
position
and
disconnect
floor
temper
ature
sensing
connector
The
lamp
should
remain
on
If
not
check
floor
temperature
relay
for
continuity
with
2
00
r
I
141
J
To
floor
temperatwe
warning
lamp
2
From
S
position
3
From
IG
position
4
From
ignition
switch
5
To
floor
temperature
sensing
switch
O
When
floor
temperature
warning
lamp
lights
Check
floor
temperature
warning
lamp
1
Open
or
shorj
circuit
in
wiring
harness
2
Check
fuel
system
with
regard
to
the
following
items
Refer
to
Inspec
lion
of
Fuel
System
EC
29
Floor
temperature
Below
1050C
221
OF
Above
1050C
221
OF
a
circuit
tester
Referring
to
the
following
floor
temperature
relay
if
relay
is
normal
trace
wire
s
back
to
ignition
switch
Repair
faulty
wiring
Floor
temperature
relay
When
checking
floor
temperature
relay
for
unit
remove
it
and
proceed
as
follows
1
Check
for
continuity
between
@
and
ID
Continuity
should
exist
Check
for
continuity
between
CD
and@
Continuity
should
exist
Check
for
continuity
between
CD
and
@
Continuity
should
not
exist
2
Apply
a
12
volt
doc
across
@
and
ID
to
ensure
that
continuity
exists
between
CD
and
@
and
that
con
ti
nuity
does
not
between
CD
and
@
If
test
results
dn
not
satisfy
the
above
replace
the
floor
temperature
relay
EC344
Fig
EC
75
Checking
floor
temperature
relay
1
Float
level
2
Choke
3
Normal
fuel
supply
system
Prima
ry
and
secondary
4
Accelerator
pump
5
Power
valve
6
B
C
D
D
7
Fuel
strainer
8
Air
cleaner
Page 264 of 537

Automatic
Transmission
HYDRAULIC
CONTROL
SYSTEM
FUNCTIONS
OF
HYDRAULIC
CONTROL
UNIT
AND
VALVES
OIL
PUMP
MANUAL
LINKAGE
VACUUM
DIAPHRAGM
DOWNSHIFT
SOLENOID
GOVERNOR
VALVE
CONTROL
VALVE
ASSEMBLY
HYDRAULIC
SYSTEM
AND
MECHANICAL
OPERATION
FUNCTIONS
OF
HYDRAULIC
CONTROL
UNIT
AND
VALVES
The
hydraulic
control
system
con
CONTENTS
P
RANGE
PAR
K
R
RANGE
REVERSE
N
RANGE
NEUTRAL
D1
RANGE
LOW
GEAR
D2
RANGE
2ND
GEAR
D3
RANGE
TOP
GEAR
D
RANGE
KICK
DOWN
2
RANGE
2ND
GEAR
t
RANGE
LOW
GEAR
12
RANGE
2ND
GEAR
AT
4
AT
4
AT
4
AT
5
AT
5
AT
5
AT
6
AT13
tains
an
oil
pump
for
packing
p
oil
from
the
oil
pan
through
the
oil
strainer
A
shift
control
is
provided
by
two
centrifugally
operated
hydraulic
governors
on
the
output
shaft
vacuum
control
diaphragm
and
downshift
AT14
AT16
AT18
AT
20
AT
22
AT
24
AT
26
AT
28
AT
30
AT
32
solenoid
These
parts
work
in
conjunc
tion
with
valves
in
the
valve
body
assembly
located
in
the
base
of
the
transmission
The
valves
regulate
oil
pressure
and
direct
it
to
appropriate
transmission
components
Oil
pump
I
I
Control
valve
I
Torque
converter
1
I
I
I
Manual
linkage
Front
clutch
Vacuum
diaphragm
I
Rear
clutch
I
Low
and
reverse
brake
Downshift
solenoid
I
Band
brake
Governor
valve
r
I
Lubrication
OIL
PUMP
The
oil
pump
is
the
source
of
control
medium
i
e
oil
for
the
control
system
The
oil
pump
is
of
an
internal
involute
gear
type
The
drive
sleeve
is
a
part
of
the
torque
converter
pump
impeller
and
serves
to
drive
the
pump
inner
gear
with
the
drive
sleeve
direct
ly
coupled
with
the
engine
operation
The
oil
flows
through
the
following
route
Oil
pan
Oil
strainer
bottom
of
the
control
valve
Control
valve
lower
body
suction
port
Transmission
case
suction
port
Pump
housing
suction
port
Pump
gear
space
Pump
housing
delivery
port
Transmission
case
delivery
port
Lower
body
delivery
port
Control
valve
line
pressure
circuit
AT071
I
Housin
4
Inner
gear
2
Cover
5
Crescent
3
Ouler
gear
Fig
AT
3
Oil
pump
AT
4
MANUAL
LINKAGE
The
hand
lever
motion
the
hand
lever
is
localed
in
the
driver
s
compart
ment
mechanically
transmitted
from
lhe
remote
control
linkage
is
further
transmitted
to
the
inner
manual
lever
in
the
transmission
case
from
the
range
selector
lever
in
the
right
center
par
tion
of
the
transmission
case
through
the
manual
shaft
The
inner
manual
lever
is
thereby
turned
A
pin
installed
on
the
bottom
of
the
inner
manual
lever
slides
rhe
manu
al
valve
spool
of
the
conlrol
valve
thus
positioning
the
spool
opposite
rhe
appropriate
select
posilion
The
parking
rod
pin
is
held
in
rhe
groove
on
the
top
of
Ihe
inner
manual
Page 274 of 537

Automatic
Transmission
P
RANGE
PARK
The
operation
of
clutches
and
band
are
functionally
the
same
as
in
Neu
tral
In
parking
however
when
the
parking
pawl
meshes
in
a
gear
which
is
splined
to
the
output
shaft
the
output
shaft
is
mechanically
locked
from
rotating
Free
Lock
AT086
Fig
AT
24
Parlling
mechanum
The
oil
discharged
from
the
oil
Low
Band
ervo
On
pump
is
fed
to
each
part
in
a
similar
Gw
Clutch
Parkin
Range
atia
Il
Yer5e
r
pawl
manner
to
that
of
the
N
range
The
Fron
Rear
brakt
Operation
Release
clutch
oil
having
the
line
pressure
7
which
Park
on
has
been
introduced
into
the
manual
valve
Il
reaches
the
I
st
2nd
shift
Re
er
2
132
on
on
on
valve
CID
through
the
line
pressure
circuit
5
As
the
1st
2nd
shift
Neutral
valve
s
force
to
th
right
hand
ide
PI
L
w
2
3
on
by
the
spring
the
line
pressure
5
and
Drive
P2
Second
14S3
on
on
12
actuates
the
low
and
reverse
brake
through
the
groove
Also
Ihe
03
Top
1
000
on
on
parking
pawl
engages
with
the
outer
2
Second
1
458
teeth
of
the
oil
distributor
by
means
of
the
manual
lever
mechanically
12
Second
1458
on
on
locking
the
output
shaft
II
Low
2
453
on
AT
14
Page 284 of 537
D
RANGE
LOW
GEAR
Automatic
Transmission
The
low
gear
in
D
range
is
somewhat
different
from
that
in
I
range
The
rear
c1utdl
is
applied
as
III
I
range
but
the
one
way
clutch
holds
the
connecting
drum
The
power
now
is
the
same
as
in
1
J
range
That
is
the
power
now
takes
place
through
Ihe
input
shaft
and
into
the
rear
clutch
The
input
shaft
is
splined
to
the
rear
clutch
drum
and
drives
it
Rotation
of
Ihe
rear
clutch
drives
the
rear
clutch
hub
and
front
internal
gear
The
front
internal
gear
rotales
the
front
planetary
gears
clockwise
to
cause
the
sun
gear
to
rotate
counter
clockwise
Counterclockwise
rotation
of
the
sun
gear
turns
the
rear
planetary
gears
clockwise
With
the
rear
plane
tary
carrier
held
stationary
by
the
one
way
clutch
the
clockwise
rotation
of
the
rear
planetary
gears
rotates
the
rear
internal
gear
and
drives
the
flange
clockwise
The
internal
drive
flange
is
splined
to
the
outpul
shaft
and
rotates
the
output
shaft
clockwise
When
the
manual
valve
is
posi
tioned
at
D
the
line
pressure
7
introduced
into
the
manual
valve
is
led
to
the
line
pressure
circuits
l
2
and
3
The
pressure
in
the
circuit
I
acluates
the
rear
clutch
and
the
gover
nor
and
al
the
same
time
operates
the
1st
2nd
shift
valve
CID
to
change
the
speed
The
circuit
2
leads
to
the
second
lock
valve
@
The
circuit
3
actuates
the
2nd
3rd
shift
valve
@
for
the
2nd
3rd
speed
change
and
at
the
same
lime
locks
the
second
lock
valve
@
The
throttle
pressure
16
which
changes
with
the
degree
of
accelerator
pedal
depression
presses
Ihe
pressure
regulator
valve
CD
and
increases
the
line
pressure
7
When
Ihe
speed
of
the
vehicle
has
increased
the
governor
pressure
15
introduced
from
the
line
pressure
circuit
I
actuates
the
I
SI
2nd
shift
valve
CID
2nd
3rd
shift
valve
@
and
pressure
modifier
valve
ID
When
the
governor
pressure
is
high
the
pressure
modifier
valve
ID
acls
in
such
a
direction
as
to
compress
the
spring
and
the
throttle
pressure
is
led
to
the
throttle
pressure
18
This
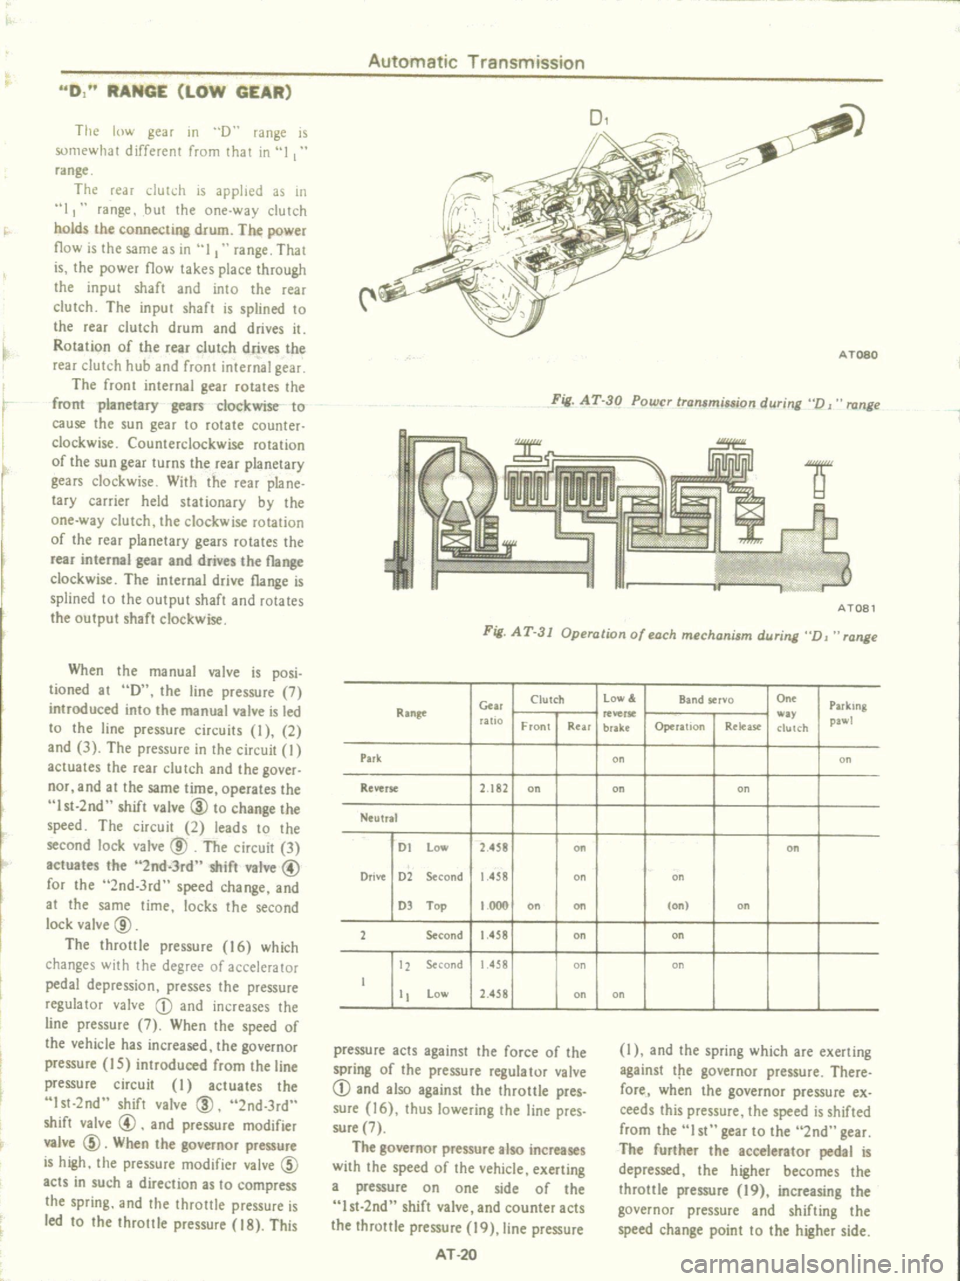
ATOSO
Fig
AT
30
Power
transmission
during
D
J
range
liIIl
I
IW
L
AT08l
Fig
AT
31
Operation
of
each
mechanism
during
VJ
range
Clutch
low
Band
servo
On
Parking
Cur
Ran
Rllelle
way
pawl
ratio
Front
Rur
brake
Operation
Rekase
ch
lch
Park
on
on
RellerK
2
t82
on
on
on
Neutral
01
low
2
S8
on
on
Orivt
02
Second
1
458
on
on
OJ
Top
1000
on
on
on
on
2
Second
1
458
on
00
t2
Second
1
458
on
on
t
tt
low
2
458
on
on
pressure
acts
against
the
force
of
the
spring
of
the
pressure
regulator
valve
CD
and
also
against
the
throttle
pres
sure
16
thus
lowering
the
line
pres
sure
7
The
governor
pressure
also
increases
with
the
speed
of
Ihe
vehicle
exerting
a
pressure
on
one
side
of
the
lst
2nd
shift
valve
and
counter
acts
the
Ihrottle
pressure
19
line
pressure
AT
20
l
and
the
spring
which
are
exerting
against
t
1e
governor
pressure
There
fore
when
the
governor
pressure
ex
ceeds
Ihis
pressure
the
speed
is
shifted
from
the
I
st
gear
to
the
2nd
gear
The
further
the
accelerator
pedal
is
depressed
the
higher
becomes
the
throttle
pressure
19
increasing
the
governor
pressure
and
shifting
the
speed
change
point
to
the
higher
side