trunk release DODGE AVENGER 2008 Owners Manual
[x] Cancel search | Manufacturer: DODGE, Model Year: 2008, Model line: AVENGER, Model: DODGE AVENGER 2008Pages: 467, PDF Size: 7.16 MB
Page 12 of 467
N Using The Express Down Windows Feature Ð
If Equipped ..........................25
N Using The Panic Alarm ..................25
N Programming Additional Transmitters ........26
N Battery Replacement ....................26
N General Information ....................27
m Remote Start System Ð If Equipped ..........28
N How To Use Remote Start ................29
m Door Locks ............................30
N Manual Door Locks .....................30
N Power Door Locks .....................32
N ªChild-Protectionº Door Lock System
(Rear Doors) ..........................34
m Power Windows ........................35 N Power Window Switches .................35
N Auto Window Down Ð If Equipped .........36
N Auto Window Up Ð If Equipped ...........37
N Reset Auto Up ........................37
N Window Lockout Switch .................38
N Wind Buffeting ........................38
m Trunk Release ..........................39
m Trunk Safety Warnin g.....................39
N Trunk Internal Emergency Release ..........40
m Occupant Restraints ......................40
N Lap/Shoulder Belts .....................42
N Adjustable Upper Shoulder Belt Anchorage ....47
N Rear Seat Belts ........................4810 THINGS TO KNOW BEFORE STARTING YOUR VEHICLE
Page 21 of 467
will automatically disarm. After 16 seconds, the Vehicle
Security Light will flash slowly. This shows that the
system is fully armed.
NOTE:
² During the 16 second arming period, if a door is
opened or the ignition switch is turned ON, the system
will automatically disarm.
² Once armed, the system disables the unlock switch on
the driver door trim panel and passenger door trim
panel, the trunk release button on the instrument
panel, and the HomeLink t /Garage Door Opener (if
equipped).
TO DISARM THE SYSTEM
Either press the UNLOCK button on the remote keyless
entry transmitter or insert a valid sentry key into the
ignition lock cylinder and turn the key to the ON/START
position. NOTE:
² The driver's door key cylinder and the trunk button on
the keyless entry transmitter cannot arm or disarm the
system.
² The system remains armed during trunk entry. Press-
ing the trunk button will not disarm the system. If
someone enters the vehicle through the trunk and
opens any door, the alarm will sound.
² When the system is armed, the interior power door
lock switches will not unlock the doors.
The Vehicle Security Alarm system is designed to protect
your vehicle; however, you can create conditions where
the system will give you a false alarm. If one of the
previously described arming sequences has occurred, the
system will arm regardless of whether you are in the
vehicle or not. If you remain in the vehicle and open a
door, the alarm will sound. If this occurs, disarm the
system. THINGS TO KNOW BEFORE STARTING YOUR VEHICLE 19
2
Page 27 of 467

NOTE: Pressing the LOCK button on the transmitter
while you are in the vehicle will activate the Security
Alarm. Opening a door with the Security Alarm activated
will cause the alarm to sound. Press the UNLOCK button
to deactivate the Security Alarm.
TO UNLATCH THE TRUNK
Press the TRUNK button on the transmitter two times to
unlatch the trunk.
USING THE EXPRESS DOWN WINDOWS
FEATURE Ð IF EQUIPPED
This feature allows you to remotely lower both front door
windows at the same time. To use this feature, press and
release the UNLOCK button on the transmitter and then
immediately press and hold the UNLOCK button until
the windows lower to the level desired or until they
lower completely. USING THE PANIC ALARM
To turn the PANIC alarm feature ON or OFF, press and
hold the PANIC button on the transmitter for at least one
second and release. When the PANIC alarm is on, the
headlights and park lights will flash, the horn will pulse
on and off, and the illuminated entry system (if
equipped) will turn on.
The PANIC alarm will stay on for three minutes unless
you turn it off by pressing the PANIC button a second
time or if the vehicle speed is 5 mph (8 km/h) or greater.
NOTE: You may need to be close to the vehicle when
using the transmitter to turn off the PANIC alarm due to
the radio frequency noises emitted by the system. THINGS TO KNOW BEFORE STARTING YOUR VEHICLE 25
2
Page 31 of 467
HOW TO USE REMOTE START
All of the following conditions must be met before the
engine will remote start:
² Shift the gear selector lever into PARK.
² Doors closed.
² Hood closed.
² Trunk closed.
² Hazard switch off.
² Brake switch inactive (brake pedal not pressed).
² Ignition key removed from ignition switch.
² Battery at an acceptable charge level.
² RKE PANIC button not pressed. To Enter Remote Start Mode
Press and release the Remote Start button on
the RKE transmitter twice. The engine will start
and the vehicle will remain in the Remote Start
mode for a 15±minute cycle.
NOTE:
² For security, power window operation is disabled
when the vehicle is in the Remote Start mode.
² The engine can be started two consecutive times (two
15±minute cycles) with the RKE transmitter. However,
the ignition switch must be cycled to the ON position
before you can repeat the start sequence for a third
cycle.
To Exit Remote Start Mode Without Driving The
Vehicle
Allow the engine to run for the entire 15-minute cycle. THINGS TO KNOW BEFORE STARTING YOUR VEHICLE 29
2
Page 41 of 467

TRUNK RELEASE
From inside the car the trunk lid
can be released by depressing the
Trunk Release Button located on
the instrument panel to the left of
the steering wheel. The transmis-
sion must be in Park before the
switch will operate.
NOTE: The gear selector lever must be in PARK for this
switch to operate.
To unlatch the trunk lid from outside the vehicle, press
and release the TRUNK button on the Remote Keyless
Entry (RKE) transmitter two times.
With the ignition ON, the word ªdeckº will display in
place of the odometer display indicating that the trunk is
open. The odometer display will reappear once the trunk
is closed or if the trip button is depressed. With the key in the lock position or with the key out, the
word ªdeckº will display until the trunk is closed.
On EVIC equipped vehicles, the words ªTrunk Ajarº will
display.
TRUNK SAFETY WARNING
WARNING!Do not allow children to have access to the trunk,
either by climbing into the trunk from outside, or
through the inside of the vehicle. Always close the
trunk lid when your vehicle is unattended. Once in
the trunk, young children may not be able to escape,
even if they entered through the rear seat. If trapped
in the trunk, children can die from suffocation or
heat stroke. THINGS TO KNOW BEFORE STARTING YOUR VEHICLE 39
2
Page 42 of 467
TRUNK INTERNAL EMERGENCY RELEASE
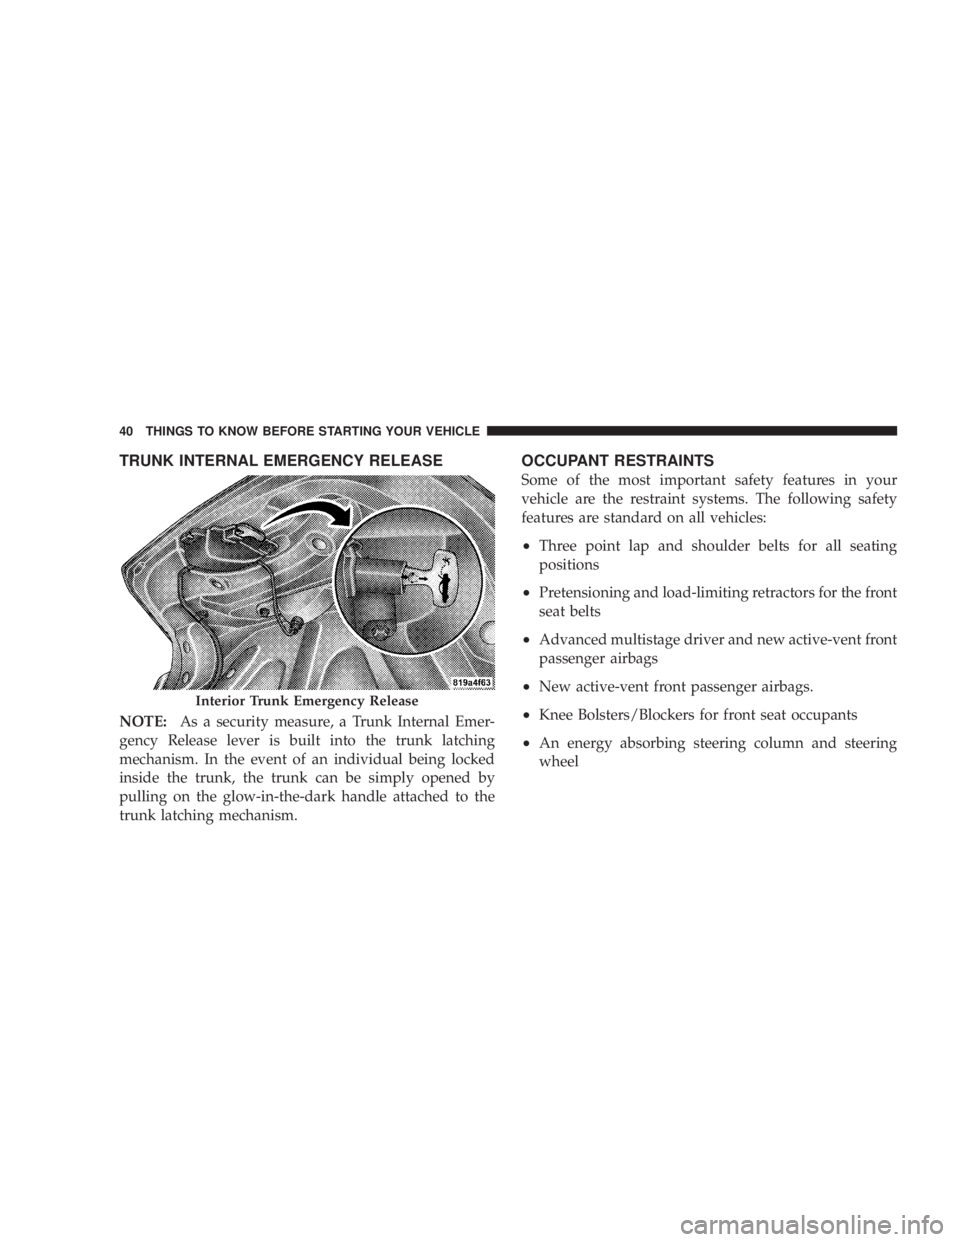
NOTE: As a security measure, a Trunk Internal Emer-
gency Release lever is built into the trunk latching
mechanism. In the event of an individual being locked
inside the trunk, the trunk can be simply opened by
pulling on the glow-in-the-dark handle attached to the
trunk latching mechanism. OCCUPANT RESTRAINTS
Some of the most important safety features in your
vehicle are the restraint systems. The following safety
features are standard on all vehicles:
² Three point lap and shoulder belts for all seating
positions
² Pretensioning and load-limiting retractors for the front
seat belts
² Advanced multistage driver and new active-vent front
passenger airbags
² New active-vent front passenger airbags.
² Knee Bolsters/Blockers for front seat occupants
² An energy absorbing steering column and steering
wheelInterior Trunk Emergency Release40 THINGS TO KNOW BEFORE STARTING YOUR VEHICLE
Page 175 of 467
The two trip odometers show individual trip mileage. To
switch from odometer to trip odometers, press and
release the Trip Odometer button. To reset a trip odom-
eter, display the desired trip odometer to be reset then
push and hold the button until the display resets (ap-
proximately 2 seconds). Refer to ªTrip Odometer Buttonº
for additional information.
Vehicle Warning Messages
When the appropriate conditions exist, ªDOOR AJAR,º
ªTRUNK AJAR,º or ªgASCAPº will display in the odom-
eter.
NOTE: If the instrument cluster is equipped with the
optional Electronic Vehicle Information Center (EVIC),
then all warnings including ªDOOR AJARº and
ªTRUNK AJARº will only display in the EVIC. (Refer to
ªElectronic Vehicle Information Center (EVIC)º in this
section for specific messages). gASCAP
If the vehicle diagnostic system detects a leak or change
in the evaporative system, or the fuel filler cap is loose,
improperly installed, or damaged, the words ªgASCAPº
will display in the odometer. If this occurs, tighten the
fuel filler cap properly and press the odometer reset
button to turn off the ªgASCAPº message. (Refer to
ªOnboard Diagnostic System Ð OBDIIº in Section 7 of
this manual for more information). If the problem con-
tinues, the message will appear the next time the vehicle
is started. See your authorized dealer service center as
soon as possible.
Change Oil
Your vehicle is equipped with an engine oil change
indicator system. The ªChange Oilº message will flash in
the instrument cluster odometer for approximately 12
seconds after a single chime has sounded to indicate the
next scheduled oil change interval. The engine oil change UNDERSTANDING YOUR INSTRUMENT PANEL 173
4
Page 185 of 467
Press and release the RESET button to accept a
selection. The RESET button also resets various
Trip Functions.
EVIC DISPLAYS
When the appropriate conditions exist, the Electronic
Vehicle Information Center (EVIC) displays the following
messages.
² Turn Signal On (with a continuous warning chime)
² Left Front Turn Signal Light Out (with a single chime)
² Left Rear Turn Signal Light Out (with a single chime)
² Right Front Turn Signal Light Out (with a single
chime)
² Right Rear Turn Signal Light Out (with a single chime) ² RKE (Remote Keyless Entry) Battery Low (with a
single chime)
² Personal Settings Not Available ± Vehicle Not In
PARK.
² Left/Right Door Ajar (one or more, with a single
chime if speed is above 1 mp h/1kmh)
² Door(s) Ajar (with a single chime if vehicle is in
motion)
² Trunk Ajar (with a single chime)
² Headlights On
² Key In Ignition
² Speed Too High (with a single chime)
² Oil Change Required (with a single chime)RESET
Button UNDERSTANDING YOUR INSTRUMENT PANEL 183
4
Page 235 of 467
Selecting Satellite Mode
Press the SAT button until 9 SAT 9 appears in the display. A
CD may remain in the radio while in the Satellite radio
mode.
Satellite Antenna
To ensure optimum reception, do not place items on the
roof around the rooftop antenna location or strap items to
the trunk lid around the trunk lid antenna (if equipped).
Metal objects placed within the line of sight of the
antenna will cause decreased performance. Larger lug-
gage items such as bikes should be placed as far rearward
as possible, within the loading design of the rack. Do not
place items directly on or above the antenna.
Reception Quality
Satellite reception may be interrupted due to one of the
following reasons:
² The vehicle is parked in an underground parking
structure or under a physical obstacle. ² Dense tree coverage may interrupt reception in the
form of short audio mutes.
² Driving under wide bridges or along tall buildings can
cause intermittent reception.
² Placing objects over or too close to the antenna can
cause signal blockage.
Operating Instructions - Satellite Mode
NOTE: The ignition switch must be in the ON or ACC
position to operate the radio.
SEEK Buttons
Press and release the SEEK buttons to search for the next
channel in Satellite mode. Press the right switch to seek
up and the left switch to seek down. The radio will
remain tuned to the new channel until you make another
selection. Holding either button will bypass channels
without stopping until you release it. UNDERSTANDING YOUR INSTRUMENT PANEL 233
4
Page 388 of 467
STEERING LINKAGE
The tie rod end ball joints should be inspected for
external leakage and damage when other maintenance is
performed.
BODY LUBRICATION
Locks and all body pivot points, including seat tracks,
door hinges, trunk hinges, and hood hinges, should be
lubricated periodically to assure quiet, easy operation
and to protect against rust and wear. Prior to the appli-
cation of any lubricant, the parts concerned should be
wiped clean to remove dust and grit. After lubricating,
excess oil and grease should be removed. Particular
attention should also be given to hood latching compo-
nents to ensure proper function. When performing other
underhood services, the hood latch, release mechanism,
and safety catch should be cleaned and lubricated.
The external lock cylinders should be lubricated twice a
year, preferably in the fall and spring. Apply a small amount of a high quality lubricant such as Mopar t Lock
Cylinder Lubricant or equivalent directly into the lock
cylinder.
WINDSHIELD WIPER BLADES
Clean the rubber edges of the wiper blades and the
windshield periodically with a sponge or soft cloth and a
mild non-abrasive cleaner or use the washer solvent. This
will remove accumulations of salt, waxes, or road film
and help reduce streaking and smearing.
Operation of the wipers on dry glass for long periods
may cause deterioration of the wiper blades. Always use
washer fluid when using the wipers to remove salt or dirt
from a dry windshield.
Avoid using the wiper blades to remove frost or ice from
the windshield. Make sure that they are not frozen to the
glass before turning them on to avoid damaging the
blade.386 MAINTAINING YOUR VEHICLE