key DODGE AVENGER 2011 2.G Owner's Manual
[x] Cancel search | Manufacturer: DODGE, Model Year: 2011, Model line: AVENGER, Model: DODGE AVENGER 2011 2.GPages: 84, PDF Size: 3.81 MB
Page 36 of 84
Entering a Destination/Finding a Point of Interest• Touch the NAV soft-key in the upper-right corner of your radio screen, to access the Navigation system.
• Touch the Where To?soft-key to program a destination.
• Next touch one of the subcategories to search for your destination. Address, Points of Interest, Recently Found, Favorites and Intersection are a few of the options.
• After touching one of the subcategories, follow the on-screen steps to complete the process and be routed to your destination.
Setting a Home Location • Touch the NAV soft-key in the upper-right corner of your radio screen, to access the Navigation system.
• Touch the Where To?soft-key, then touch Go Home.
• Next, select from: • Enter My Address – enter an address for the location using the on-screenkeyboard.
• Use my current location – sets your current location as your Home Location.
• Choose from Recently Found – select a location from your recently found locations.
• After you set your Home Location, touch Where To?, then touch Go Home.
Editing Home Location • Touch the NAV soft-key in the upper-right corner of your radio screen, to access the Navigation system.
• Touch the Where To?soft-key, then touch Favorites.
• Touch the location you want to edit.
• Next, touch Press for More.
• Touch Edit.
• Follow the on-screen steps for editing the Home Location.
Go Home • Touch the NAV soft-key in the upper-right corner of your radio screen, to access the Navigation system.
• Touch Where To? , then touch Go Home.
SIRIUS Travel Link – Media Center 730N (RHR) & Media Center 430N (RHB) Only
• To access SIRIUS Travel Link, press the MENU hard-key, then touch the Travel
Link soft-key.
NOTE: SIRIUS Travel Link requires a subscription, sold separately after trial
subscription included with vehicle purchase.
ELECTRONICS
34
Page 39 of 84
Receiving A Call – Accept (And End)
• When an incoming call rings/is announced on Uconnect™, press the Phonebutton.
• To end a call, press the Phone button
.
Mute (Or Unmute) Microphone During Call
• During a call, press the Voice Command button.
• (After the BEEP), say “mute” (or “mute off”).
Transfer Ongoing Call Between Handset And Vehicle
• During a call, press the Voice Command button.
• (After the BEEP), say “transfer call”.
Changing The Volume
• Start a dialogue by pressing the Phone button, then adjust the volume during
a normal call.
• Use the radio ON/OFF VOLUME rotary knob to adjust the volume to a comfortable level while the Uconnect™ system is speaking. Please note the volume setting for
Uconnect™ is different than the audio system.
NOTE: To access the tutorial, press the Uconnect™ hard-key. After the BEEP, say
“tutorial”. Press any hard-key/button or touch the display (Touch-Screen radio) to
cancel the tutorial.
WARNING!
• Any voice commanded system should be used only in safe driving conditions following local laws and phone use. All attention should be kept on the
roadway ahead. Failure to do so may result in a collision causing you and
others to be severely injured or killed.
• In an emergency, to use Uconnect™ Phone, your mobile phone must be: • turned on,
• paired to Uconnect™ Phone,
• and have network coverage.
Uconnect™ VOICE COMMAND
• The Uconnect™ Voice Command system allows you to control your AM, FM radio,satellite radio, disc player, HDD, Uconnect™ Phone, a memo recorder, and
supported portable media devices.
• When you press the Voice Command button
located on the radio faceplate
or steering wheel, you will hear a beep. The beep is your signal to give a command.
If you do not say a command within a few seconds, the system will present you
with a list of options. If you ever wish to interrupt the system while it lists options,
press the Voice Command button
, listen for the BEEP, and say your
command.
ELECTRONICS
37
Page 40 of 84
Voice Command for Text Messaging
• If equipped with Uconnect™ Voice Command, your Media Center 430N radio maybe able to play incoming SMS messages through the vehicle sound system.
• It also allows you to respond by selecting from various pre-defined phrases.
• Not all phones are compatible with this feature. Refer to the phone compatibility list at www.dodge.com/uconnect. Connected mobile phones must be
bluetooth-compatible, and paired with your radio.
Changing The Volume
• Start a dialogue by pressing the Voice Command button, then say a
command (for example, “tutorial”).
• Use the radio ON/OFF VOLUME rotary knob to adjust the volume to a comfortable level while the Voice Command system is speaking. The volume setting for Voice
Command is different than the audio system.
• For vehicles equipped with Video Entertainment System (VES)™, refer to the Uconnect™ Voice Command section of the Uconnect™ User's Manual on the DVD
for further details.
• For vehicles not equipped with VES™, refer to your vehicle Owner's Manual on the DVD for Uconnect™ Voice Command information.
NOTE: To access the tutorial, press the Voice Command button
. After the
BEEP, say “tutorial”. Press any hard-key/button or touch the display (Touch-Screen
radio) to cancel the tutorial.
WARNING!
Any voice commanded system should be used only in safe driving conditions
following local laws and phone use. All attention should be kept on the roadway
ahead. Failure to do so may result in a collision causing you and others to be
severely injured or killed.
iPod®/USB/MP3 CONTROL
• There are many ways to play music from iPod®players or other portable
devices through your vehicle's
speakers. Your choices depend on what
radio your vehicle is equipped with.
• The radio sales code is located on the lower right side of the radio faceplate.
ELECTRONICS
38
Page 41 of 84
If Equipped With Media Center 130 with Satellite Radio (Sales Code RES + RSC) Or
Media Center 430/430N (Sales Code RBZ/RHB)
• The USB port, located within the instrument panel storage bin, allows you to plugan iPod®into the vehicle's sound system.
• To hear audio from devices connected to this port from a non-touch-screen radio, press the AUX button on the radio faceplate. From a touch-screen radio, press the
MEDIA hard-key, then touch the AUX or iPod
®soft-key.
• When connected to this feature: • The iPod
®can be controlled using the radio buttons to Play, Browse, and List
the iPod®or external devices contents. Refer to the Owner's Manual on the DVD
for details.
• The iPod
®battery charges when plugged into the USB port (if supported by the
specific audio device).
• Compatible iPod
®devices may also be controllable using voice commands.
Refer to the Owner's Manual on the DVD for details.
NOTE:
• The USB port supports certain Mini, Classic, Nano, Touch, and iPhone
®devices. The
USB port also supports playing music from compatible external USB Mass Storage
Class memory devices. For supported audio file formats, refer to the USB Port
section in the Owner's Manual on the DVD. Refer to www.dodge.com/uconnect
website for a list of tested iPod
®s. Some iPod®software versions may not fully
support the USB port features. Please visit Apple’s website for iPod®software
updates.
Bluetooth®Streaming Audio
• If equipped with Uconnect™ Voice Command, your Bluetooth-equipped iPod®
devices, cell phones or other media players, may also be able to stream music to
your vehicle's speakers. Your connected device must be Bluetooth-compatible, and
paired with your Media Center radio (see Uconnect™ Phone for pairing
instructions). Press the AUX button on the radio faceplate until "BT" is displayed
on the radio screen.
WARNING!
Do not plug in or remove the iPod®or external device while driving. Failure to
follow this warning could result in a collision.
ELECTRONICS
39
Page 43 of 84
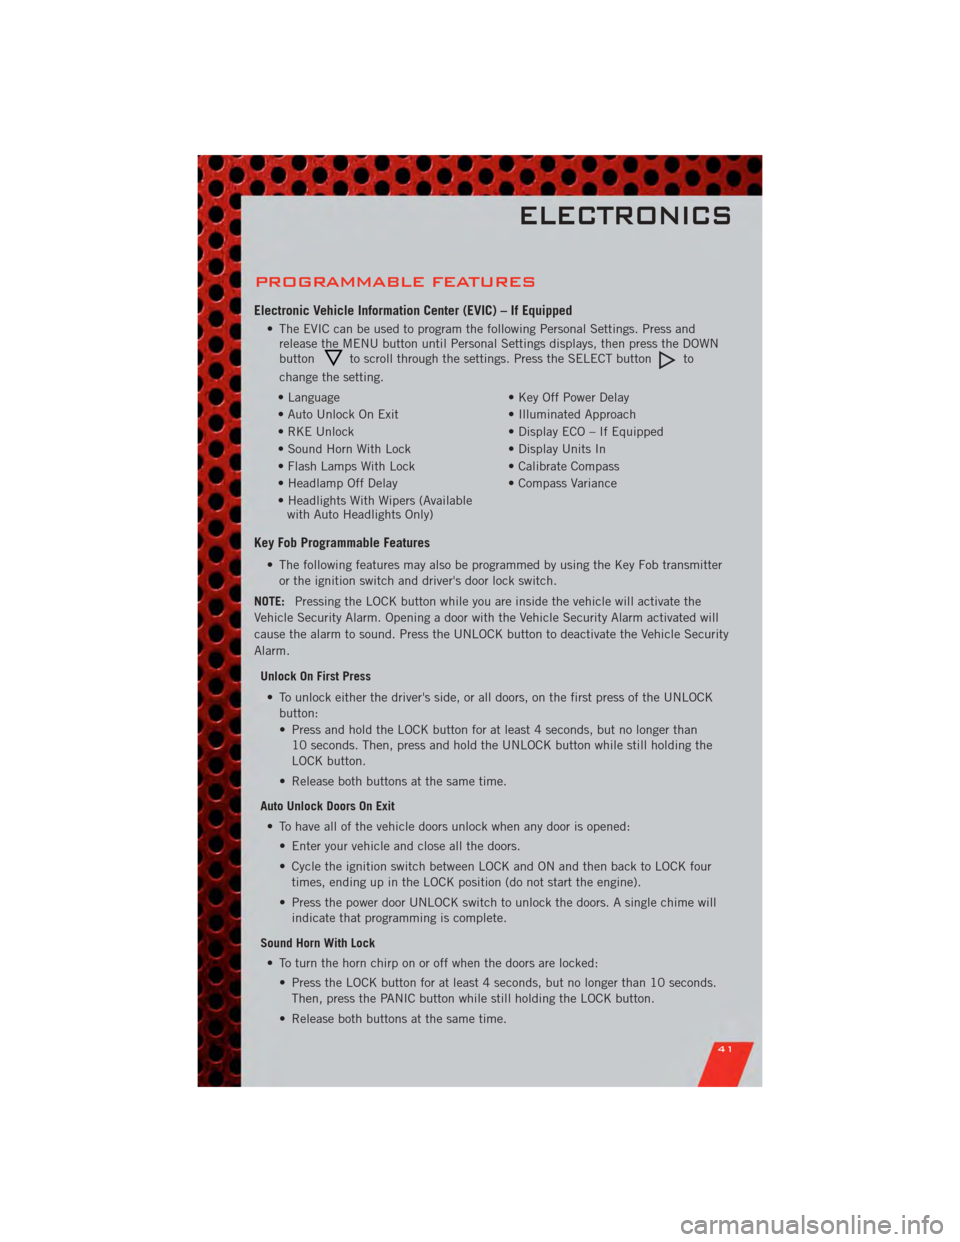
PROGRAMMABLE FEATURES
Electronic Vehicle Information Center (EVIC) – If Equipped
• The EVIC can be used to program the following Personal Settings. Press andrelease the MENU button until Personal Settings displays, then press the DOWN
button
to scroll through the settings. Press the SELECT buttonto
change the setting.
• Language • Key Off Power Delay
• Auto Unlock On Exit • Illuminated Approach
• RKE Unlock • Display ECO – If Equipped
• Sound Horn With Lock • Display Units In
• Flash Lamps With Lock • Calibrate Compass
• Headlamp Off Delay • Compass Variance
• Headlights With Wipers (Available with Auto Headlights Only)
Key Fob Programmable Features
• The following features may also be programmed by using the Key Fob transmitter
or the ignition switch and driver's door lock switch.
NOTE: Pressing the LOCK button while you are inside the vehicle will activate the
Vehicle Security Alarm. Opening a door with the Vehicle Security Alarm activated will
cause the alarm to sound. Press the UNLOCK button to deactivate the Vehicle Security
Alarm.
Unlock On First Press• To unlock either the driver's side, or all doors, on the first press of the UNLOCK button:
• Press and hold the LOCK button for at least 4 seconds, but no longer than10 seconds. Then, press and hold the UNLOCK button while still holding the
LOCK button.
• Release both buttons at the same time.
Auto Unlock Doors On Exit • To have all of the vehicle doors unlock when any door is opened: • Enter your vehicle and close all the doors.
• Cycle the ignition switch between LOCK and ON and then back to LOCK fourtimes, ending up in the LOCK position (do not start the engine).
• Press the power door UNLOCK switch to unlock the doors. A single chime will indicate that programming is complete.
Sound Horn With Lock • To turn the horn chirp on or off when the doors are locked: • Press the LOCK button for at least 4 seconds, but no longer than 10 seconds.Then, press the PANIC button while still holding the LOCK button.
• Release both buttons at the same time.
ELECTRONICS
41
Page 60 of 84
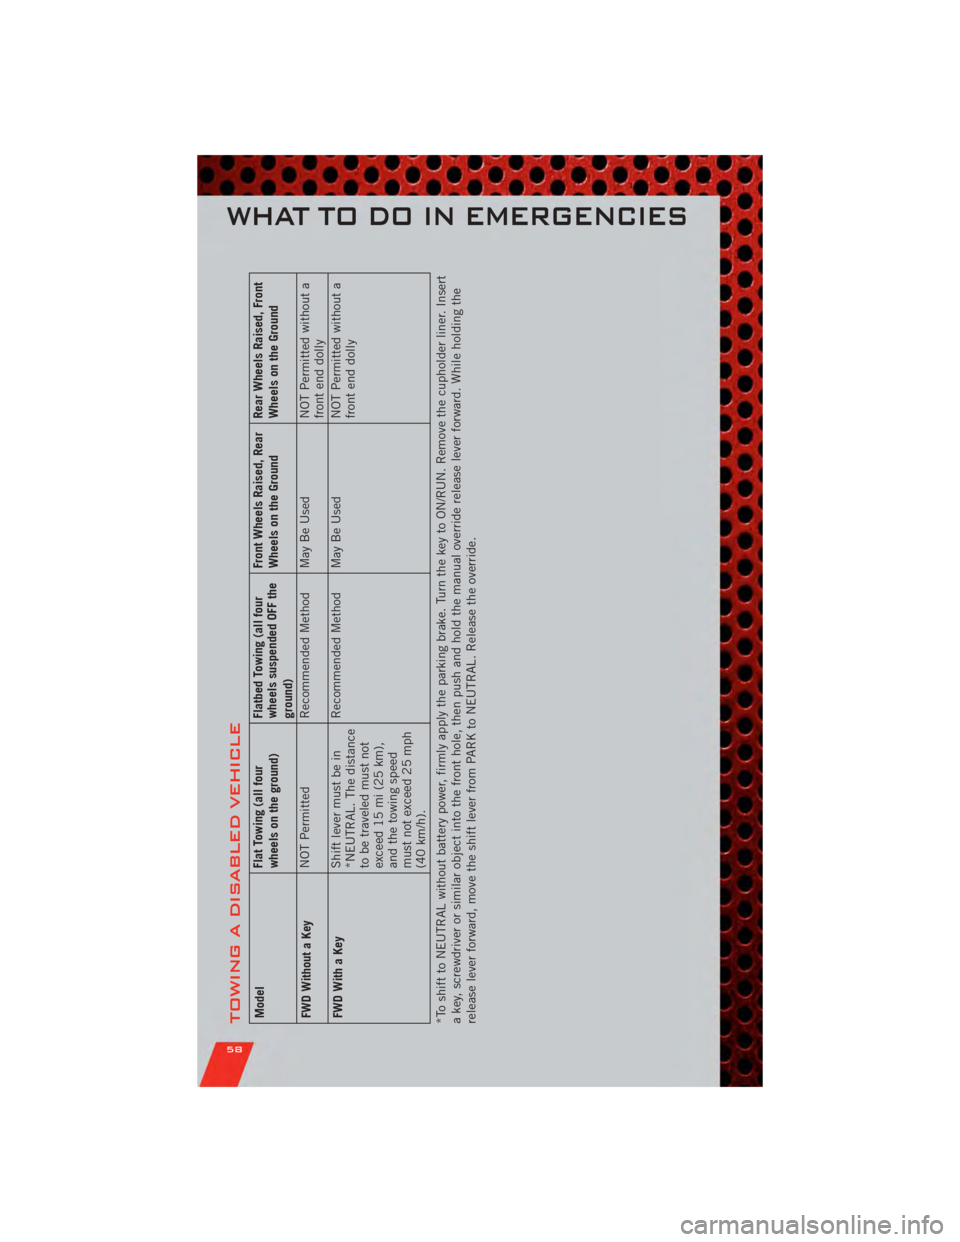
TOWING A DISABLED VEHICLEModelFlat Towing (all four
wheels on the ground)Flatbed Towing (all four
wheels suspended OFF the
ground)Front Wheels Raised, Rear
Wheels on the Ground
Rear Wheels Raised, Front
Wheels on the Ground
FWD Without a Key NOT Permitted
Recommended Method May Be Used NOT Permitted without a
front end dolly
FWD With a Key Shift lever must be in
*NEUTRAL. The distance
to be traveled must not
exceed 15 mi (25 km),
and the towing speed
must not exceed 25 mph
(40 km/h).Recommended Method May Be Used
NOT Permitted without a
front end dolly
*To shift to NEUTRAL without battery power, firmly apply the parking brake. Turn the key to ON/RUN. Remove the cupholder liner. Insert
a key, screwdriver or similar object into the front hole, then push and hold the manual override release lever forward. While holding the
release lever forward, move the shift lever from PARK to NEUTRAL. Release the override.
WHAT TO DO IN EMERGENCIES
58
Page 78 of 84
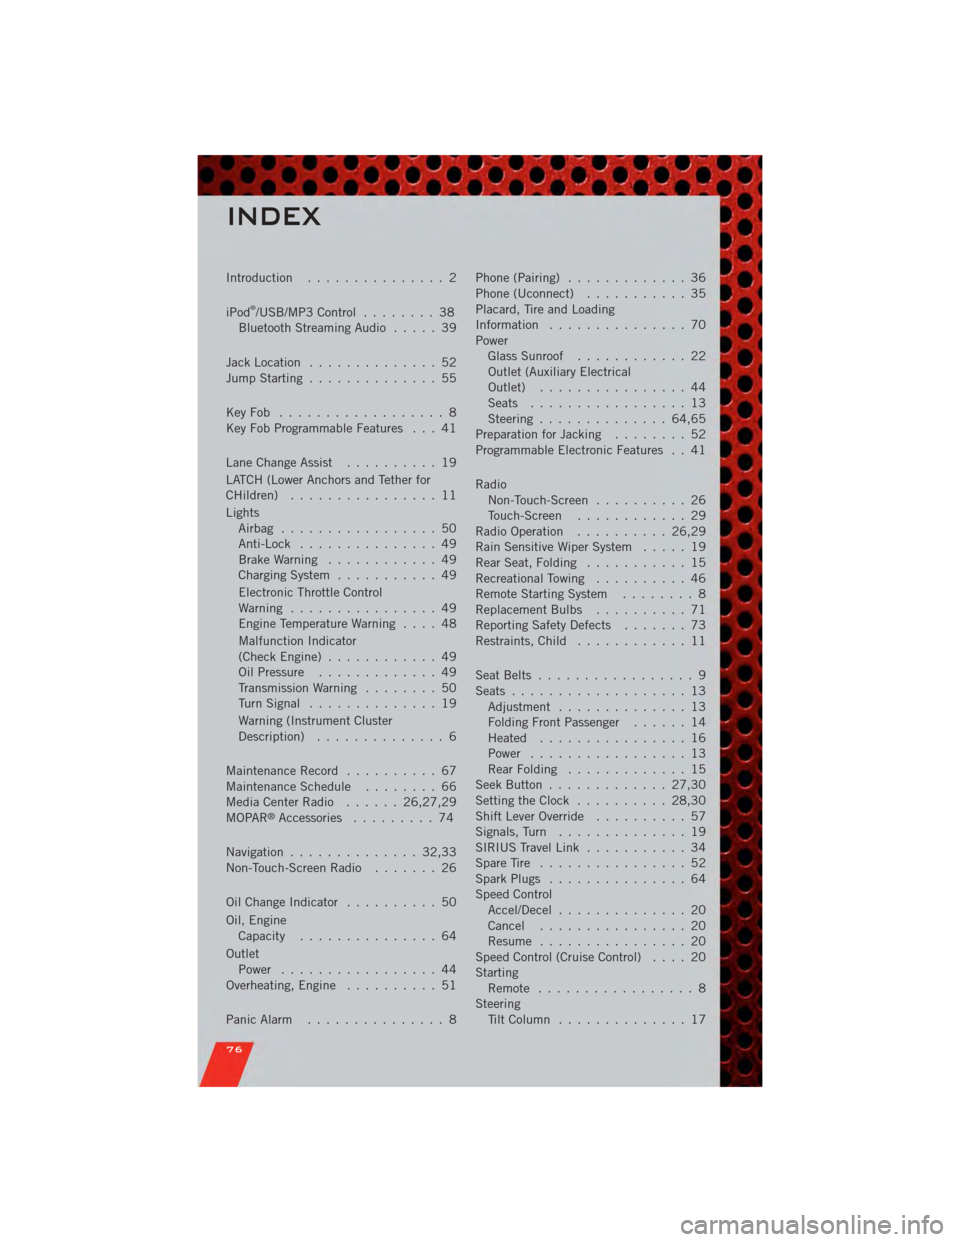
Introduction............... 2
iPod
®/USB/MP3 Control ........ 38
Bluetooth Streaming Audio ..... 39
Jack Location .............. 52
Jump Starting .............. 55
KeyFob .................. 8
Key Fob Programmable Features . . . 41
Lane Change Assist .......... 19
LATCH (Lower Anchors and Tether for
CHildren) ................ 11
Lights Airbag ................. 50
Anti-Lock ............... 49
BrakeWarning ............ 49
Charging System ........... 49
Electronic Throttle Control
Warning ................ 49
EngineTemperatureWarning .... 48
Malfunction Indicator
(Check Engine) ............ 49
Oil Pressure ............. 49
Transmission Warning ........ 50
TurnSignal .............. 19
Warning (Instrument Cluster
Description) .............. 6
Maintenance Record .......... 67
MaintenanceSchedule ........ 66
Media Center Radio ...... 26,27,29
MOPAR
®Accessories ......... 74
Navigation .............. 32,33
Non-Touch-Screen Radio ....... 26
Oil Change Indicator .......... 50
Oil, Engine Capacity ............... 64
Outlet Power ................. 44
Overheating, Engine .......... 51
Panic Alarm ............... 8 Phone (Pairing)
............. 36
Phone (Uconnect) ........... 35
Placard, Tire and Loading
Information ............... 70
Power Glass Sunroof ............ 22
Outlet (Auxiliary Electrical
Outlet) ................ 44
Seats ................. 13
Steering .............. 64,65
Preparation for Jacking ........ 52
Programmable Electronic Features . . 41
Radio Non-Touch-Screen .......... 26
Touch-Screen ............ 29
Radio Operation .......... 26,29
Rain Sensitive Wiper System ..... 19
Rear Seat, Folding ........... 15
Recreational Towing .......... 46
Remote Starting System ........ 8
Replacement Bulbs .......... 71
Reporting Safety Defects ....... 73
Restraints, Child ............ 11
Seat Belts ................. 9
Seats ................... 13
Adjustment .............. 13
Folding Front Passenger ...... 14
Heated ................ 16
Power ................. 13
RearFolding ............. 15
Seek Button ............. 27,30
Setting the Clock .......... 28,30
Shift Lever Override .......... 57
Signals, Turn .............. 19
SIRIUS Travel Link ........... 34
SpareTire ................ 52
Spark Plugs ............... 64
Speed Control Accel/Decel .............. 20
Cancel ................ 20
Resume ................ 20
Speed Control (Cruise Control) .... 20
Starting Remote ................. 8
Steering Tilt Column .............. 17
INDEX
76