wheel DODGE CALIBER 2010 1.G User Guide
[x] Cancel search | Manufacturer: DODGE, Model Year: 2010, Model line: CALIBER, Model: DODGE CALIBER 2010 1.GPages: 76, PDF Size: 12.18 MB
Page 3 of 76
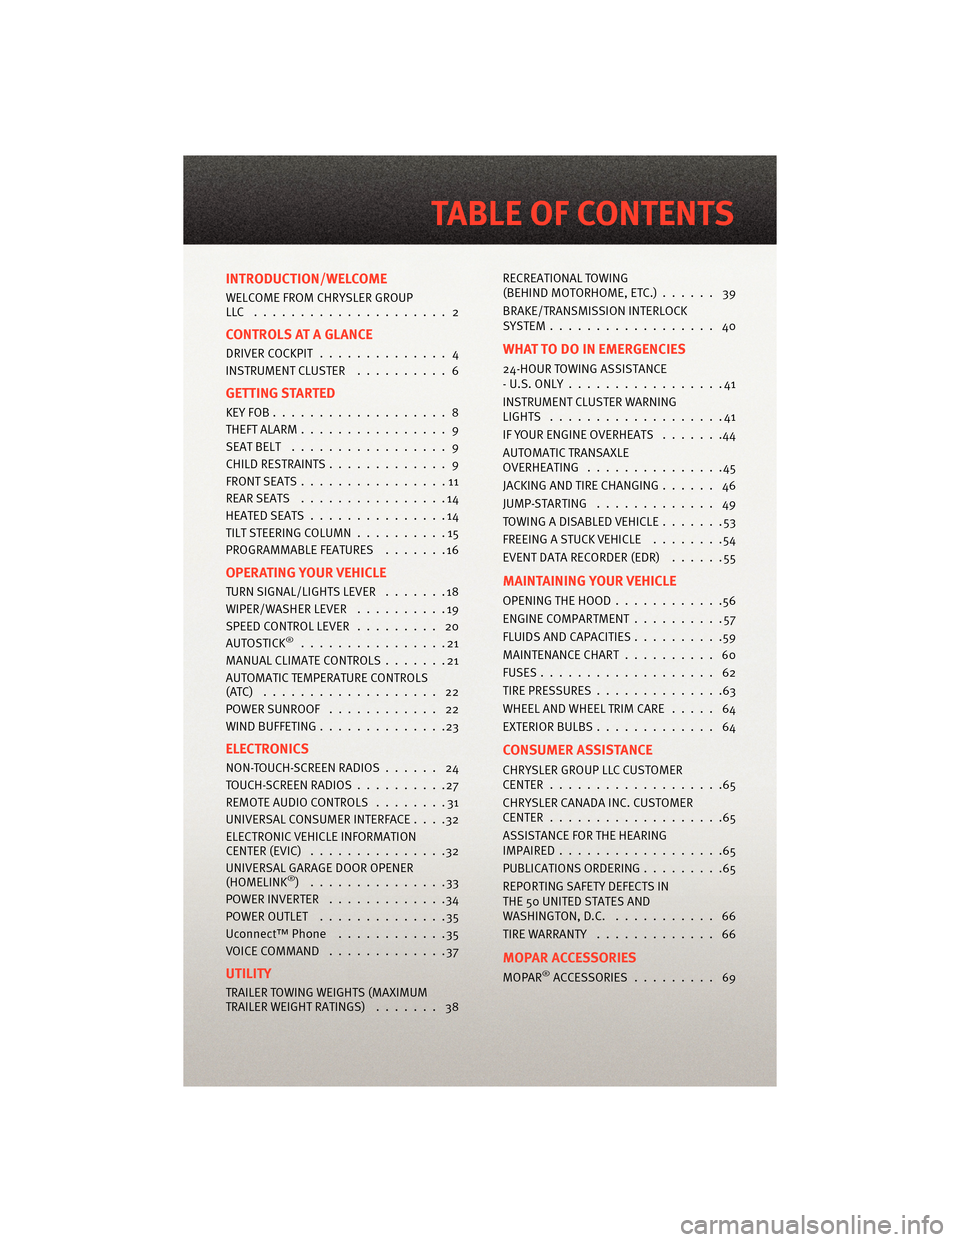
INTRODUCTION/WELCOME
WELCOME FROM CHRYSLER GROUP
LLC ..................... 2
CONTROLS AT A GLANCE
DRIVER COCKPIT.............. 4
INSTRUMENT CLUSTER ..........6
GETTING STARTED
KEYFOB...................8
THEFT ALARM................ 9
SEATBELT ................. 9
CHILD RESTRAINTS ............. 9
FRONTSEATS................11
REARSEATS ................14
HEATEDSEATS...............14
TILT STEERING COLUMN ..........15
PROGRAMMABLEFEATURES .......16
OPERATING YOUR VEHICLE
TURN SIGNAL/LIGHTS LEVER .......18
WIPER/WASHER LEVER ..........19
SPEED CONTROL LEVER ......... 20
AUTOSTICK
®................21
MANUAL CLIMATE CONTROLS .......21
AUTOMATIC TEMPERATURE CONTROLS
(ATC) ................... 22
POWERSUNROOF ............ 22
WIND BUFFETING ..............23
ELECTRONICS
NON-TOUCH-SCREENRADIOS...... 24
TOUCH-SCREENRADIOS..........27
REMOTE AUDIO CONTROLS ........31
UNIVERSAL CONSUMER INTERFACE ....32
ELECTRONIC VEHICLE INFORMATION
CENTER (EVIC) ...............32
UNIVERSAL GARAGE DOOR OPENER
(HOMELINK
®) ...............33
POWERINVERTER .............34
POWER OUTLET ..............35
Uconnect™ Phone ............35
VOICECOMMAND .............37
UTILITY
TRAILER TOWING WEIGHTS (MAXIMUM
TRAILER WEIGHT RATINGS) ....... 38RECREATIONAL TOWING
(BEHIND MOTORHOME, ETC.)
...... 39
BRAKE/TRANSMISSION INTERLOCK
SYSTEM.................. 40
WHAT TO DO IN EMERGENCIES
24-HOUR TOWING ASSISTANCE
- U.S. ONLY .................41
INSTRUMENT CLUSTER WARNING
LIGHTS ...................41
IF YOUR ENGINE OVERHEATS .......44
AUTOMATIC TRANSAXLE
OVERHEATING ...............45
JACKINGANDTIRECHANGING...... 46
JUMP-STARTING ............. 49
TOWINGADISABLEDVEHICLE.......53
FREEING A STUCK VEHICLE ........54
EVENT DATA RECORDER (EDR) ......55
MAINTAINING YOUR VEHICLE
OPENING THE HOOD............56
ENGINE COMPARTMENT ..........57
FLUIDS AND CAPACITIES ..........59
MAINTENANCE CHART .......... 60
FUSES................... 62
TIREPRESSURES..............63
WHEEL AND WHEEL TRIM CARE ..... 64
EXTERIOR BULBS ............. 64
CONSUMER ASSISTANCE
CHRYSLER GROUP LLC CUSTOMER
CENTER...................65
CHRYSLER CANADA INC. CUSTOMER
CENTER...................65
ASSISTANCE FOR THE HEARING
IMPAIRED..................65
PUBLICATIONS ORDERING .........65
REPORTING SAFETY DEFECTS IN
THE 50 UNITED STATES AND
WASHINGTON, D.C. ........... 66
TIRE WARRANTY ............. 66
MOPAR ACCESSORIES
MOPAR®ACCESSORIES......... 69
TABLE OF CONTENTS
Page 17 of 76
CAUTION!
Repeated overheating of the seat could damage the heating element and/or degrade
the material of the seat.
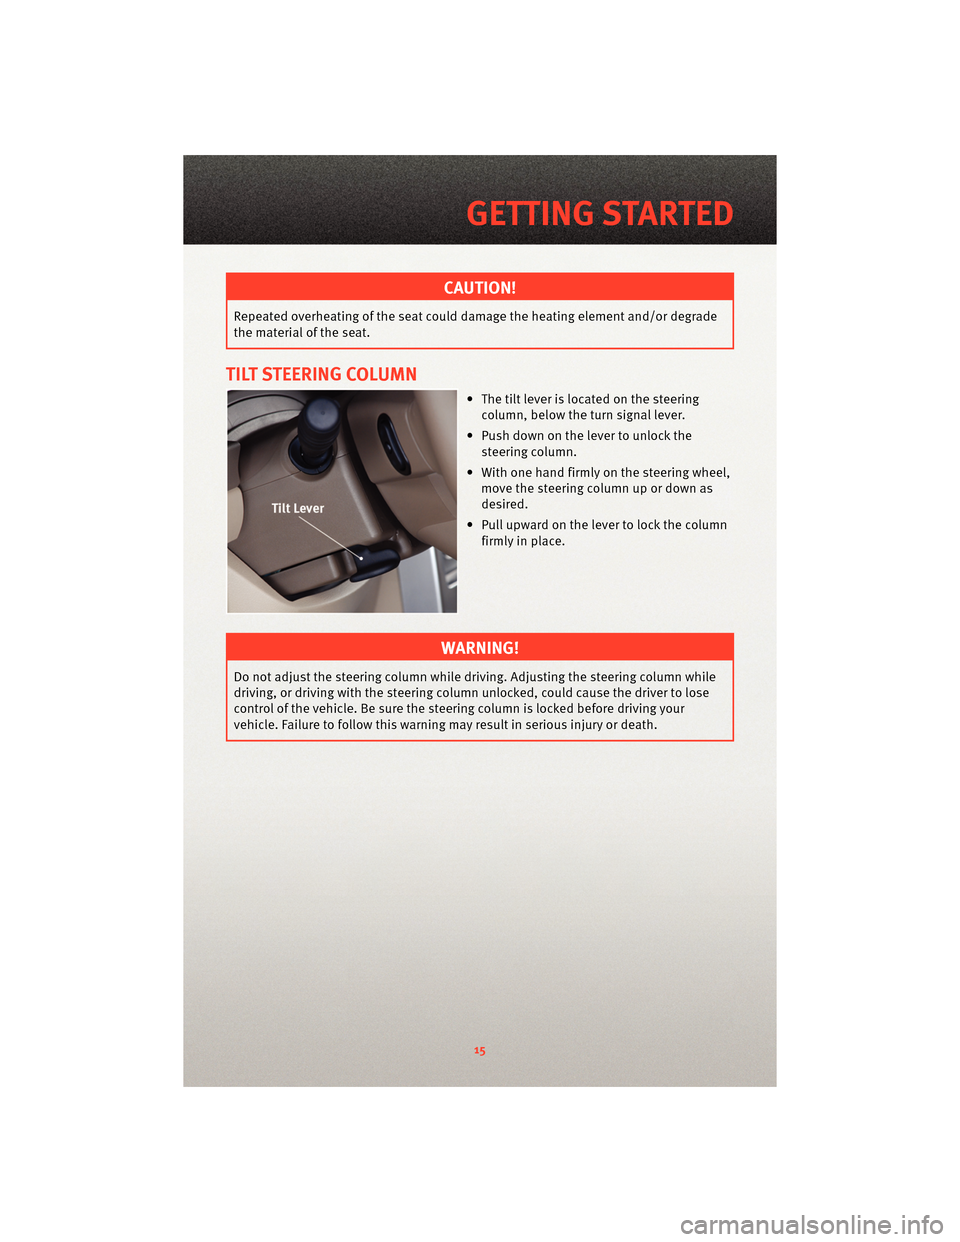
TILT STEERING COLUMN
• The tilt lever is located on the steeringcolumn, below the turn signal lever.
• Push down on the lever to unlock the steering column.
• With one hand firmly on the steering wheel, move the steering column up or down as
desired.
• Pull upward on the lever to lock the column firmly in place.
WARNING!
Do not adjust the steering column while driving. Adjusting the steering column while
driving, or driving with the steering column un locked, could cause the driver to lose
control of the vehicle. Be sure the steerin g column is locked before driving your
vehicle. Failure to follow this warning may result in serious injury or death.
15
GETTING STARTED
Page 33 of 76
Change Stored Home Address
• Press the MENU hard-key, then touch the MY FILES soft-key.
• Touch the MY ADDRESS BOOK soft-key, then touch the HOME soft-key.
• In the Home Address Information screen, touch the EDIT CONTACT soft-key, then touchthe CHANGE ADDRESS soft-key in the next screen.
• Touch the INPUT STREET NAME soft-key and enter your street name into the speller.
• Touch the CONTINUE soft-key and enter your address into the speller; touch the CONTINUE soft-key again.
• Touch the city name and touch the SAVE soft-key to complete programming.
Guide Me Home
• Press the NAV hard-key to access the Navigation Main Menu.
• Touch the GUIDE ME HOME soft-key to route you back to your home destination from your current location. Touch the GO soft-key to start your trip.
Map
• Press the NAV hard-key to access the Navigation Main Menu.
• Touch the MAP soft-key to display a map of your current position.
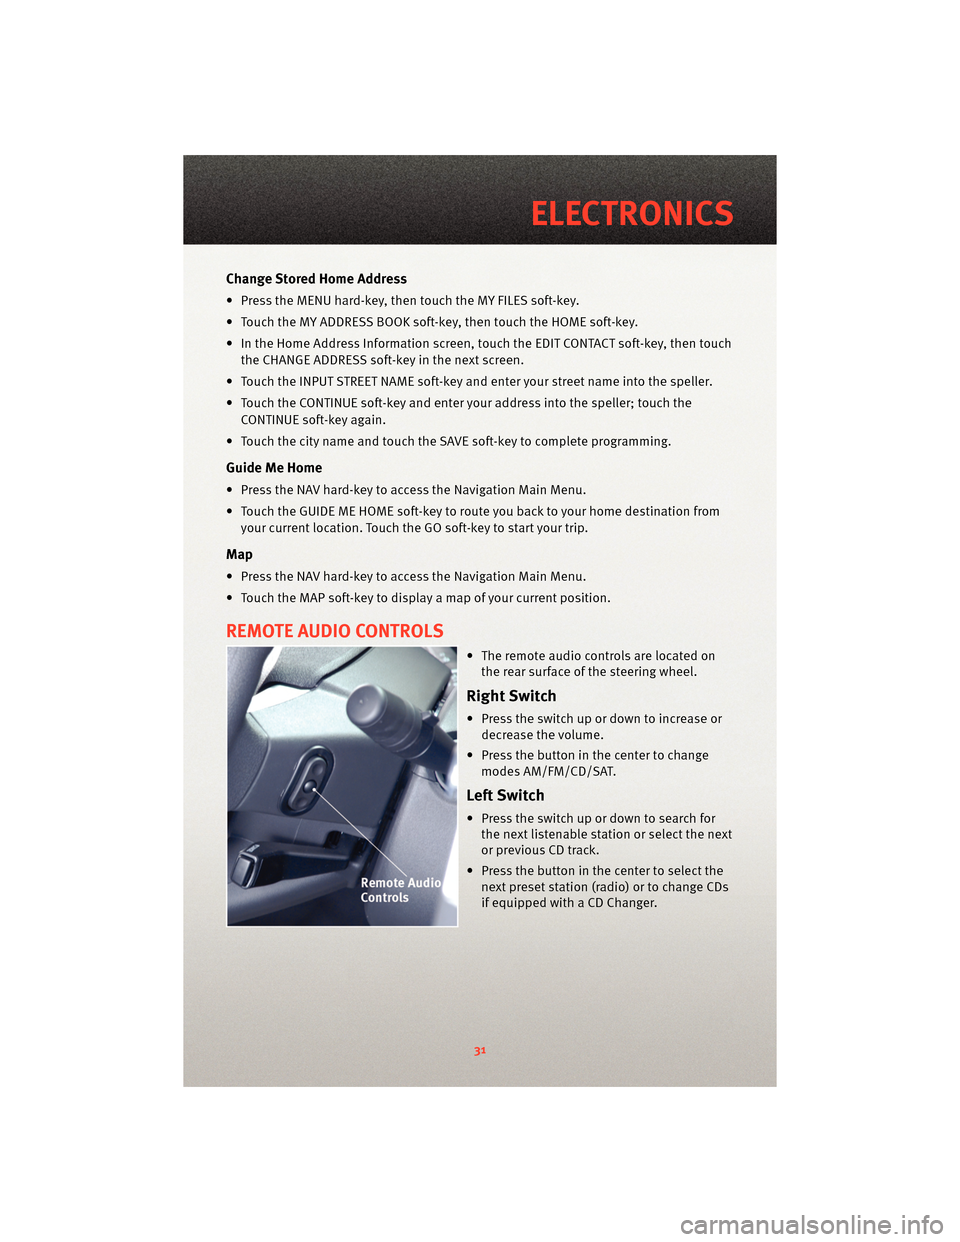
REMOTE AUDIO CONTROLS
• The remote audio controls are located onthe rear surface of the steering wheel.
Right Switch
• Press the switch up or down to increase ordecrease the volume.
• Press the button in the center to change modes AM/FM/CD/SAT.
Left Switch
• Press the switch up or down to search forthe next listenable station or select the next
or previous CD track.
• Press the button in the center to select the next preset station (radio) or to change CDs
if equipped with a CD Changer.
31
ELECTRONICS
Page 41 of 76
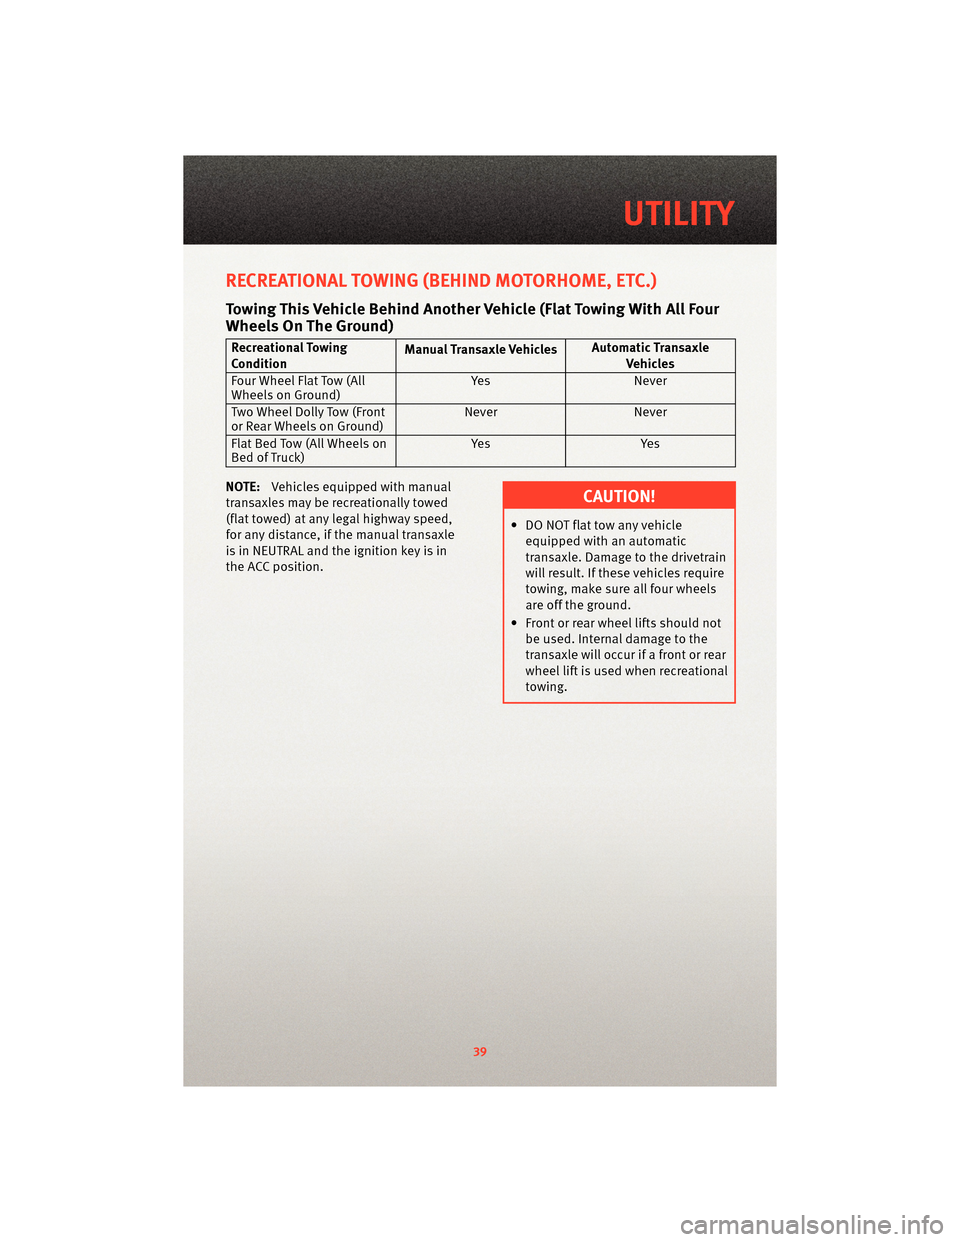
RECREATIONAL TOWING (BEHIND MOTORHOME, ETC.)
Towing This Vehicle Behind Another Vehicle (Flat Towing With All Four
Wheels On The Ground)
Recreational Towing
ConditionManual Transaxle Vehicles
Automatic Transaxle
Vehicles
Four Wheel Flat Tow (All
Wheels on Ground) Yes
Never
Two Wheel Dolly Tow (Front
or Rear Wheels on Ground) Never
Never
Flat Bed Tow (All Wheels on
Bed of Truck) Ye s
Ye s
NOTE: Vehicles equipped with manual
transaxles may be recreationally towed
(flat towed) at any legal highway speed,
for any distance, if the manual transaxle
is in NEUTRAL and the ignition key is in
the ACC position.
CAUTION!
• DO NOT flat tow any vehicle equipped with an automatic
transaxle. Damage to the drivetrain
will result. If these vehicles require
towing, make sure all four wheels
are off the ground.
• Front or rear wheel lifts should not be used. Internal damage to the
transaxle will occur if a front or rear
wheel lift is used when recreational
towing.
39
UTILITY
Page 48 of 76
JACKING AND TIRE CHANGING
WARNING!
• Do not attempt to change a tire on the side of the vehicle close to moving traffic.Pull far enough off the road to avoid the danger of being hit when operating the jack
or changing the wheel.
• Getting under a jacked-up vehicle is dangerous. The vehicle could slip off the jack and fall on you. You could be crushed. Never get any part of your body under a
vehicle that is on a jack. If you need to get under a raised vehicle, take it to a
service center where it can be raised on a lift.
• The jack is designed to use as a tool for changing tires only. The jack should not be used to lift the vehicle for service purposes. The vehicle should be jacked on a firm,
level surface only. Avoid ice or slippery areas.
WARNING!
• The compact spare tire is for emergency use only. Installation of this compact sparetire affects vehicle handling.
• Do not drive more than 50 mph (80 km/h) with a compact spare tire.
• Keep the compact spare tire inflated to the cold tire inflation pressure, listed on either your tire placard or limited use spare tire and wheel assembly.
• Replace (or repair) the original tire at the first opportunity and reinstall it on your vehicle. Failure to do so could result in loss of vehicle control.
• A loose tire or jack, thrown forward in a collision or hard stop, could endanger the occupants of the vehicle. Always stow the jack parts and spare tire in the places
provided.
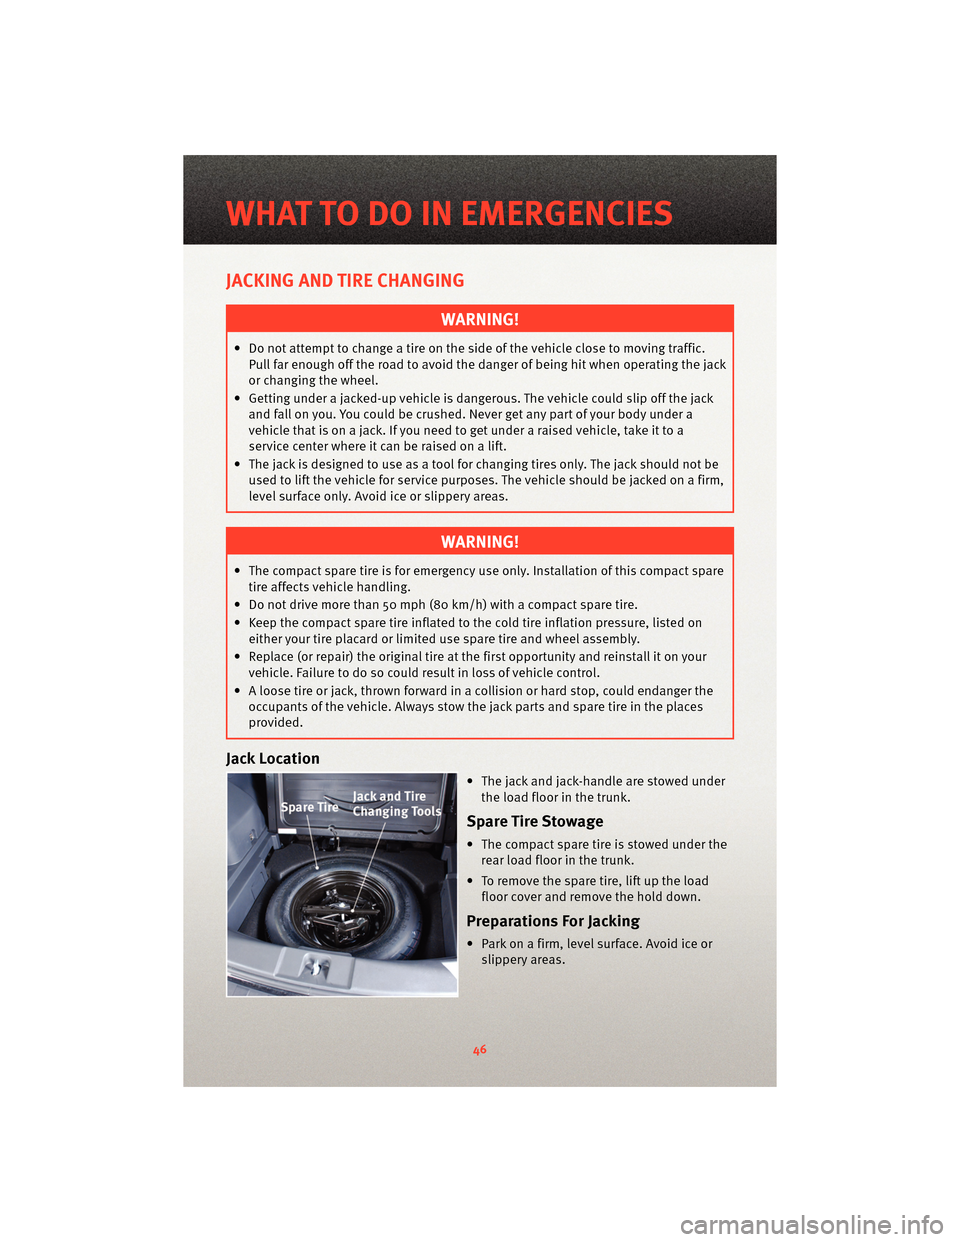
Jack Location
• The jack and jack-handle are stowed underthe load floor in the trunk.
Spare Tire Stowage
• The compact spare tire is stowed under therear load floor in the trunk.
• To remove the spare tire, lift up the load floor cover and remove the hold down.
Preparations For Jacking
• Park on a firm, level surface. Avoid ice orslippery areas.
WHAT TO DO IN EMERGENCIES
46
Page 49 of 76
WARNING!
Do not attempt to change a tire on the side of the vehicle close to moving traffic. Pull
far enough off the road to avoid being hit when operating the jack or changing the
wheel.
• Set the parking brake and shift the aut omatic transmission into P ARK, or a manual
transmission into REVERSE.
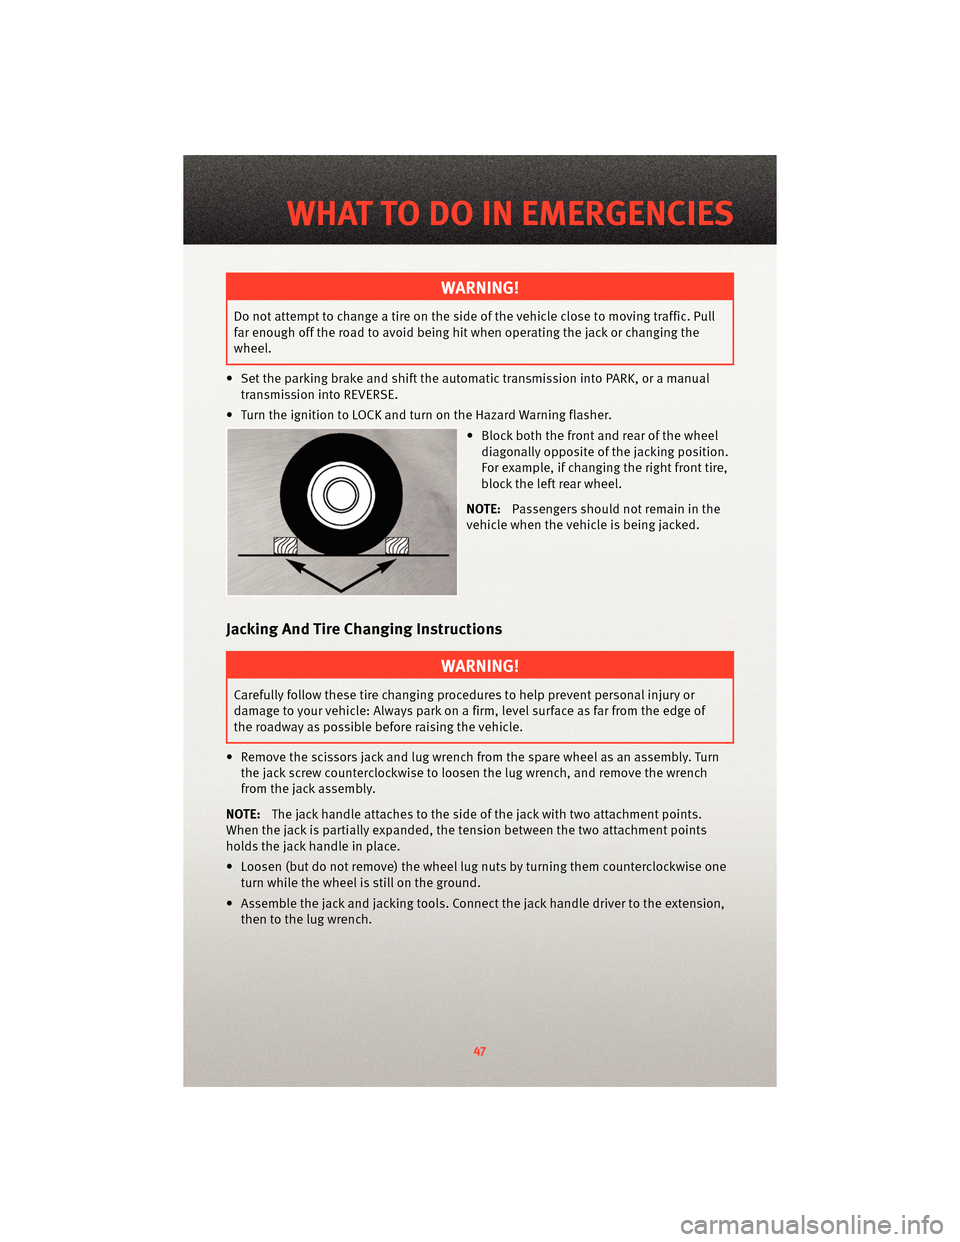
• Turn the ignition to LOCK and turn on the Hazard Warning flasher. • Block both the front and rear of the wheeldiagonally opposite of the jacking position.
For example, if changing the right front tire,
block the left rear wheel.
NOTE: Passengers should not remain in the
vehicle when the vehicle is being jacked.
Jacking And Tire Changing Instructions
WARNING!
Carefully follow these tire changing p rocedures to help prevent personal injury or
damage to your vehicle: Always park on a firm, level surface as far from the edge of
the roadway as possible before raising the vehicle.
• Remove the scissors jack and lug wrench from the spare wheel as an assembly. Turn the jack screw countercloc kwise to loosen the lug wrench, and remove the wrench
from the jack assembly.
NOTE: The jack handle attaches to the side of the jack with two attachment points.
When the jack is partially expanded, the tension between the two attachment points
holds the jack handle in place.
• Loosen (but do not remove) the wheel lug nuts by turning them counterclockwise one
turn while the wheel is still on the ground.
• Assemble the jack and jacking tools. Connect the jack handle driver to the extension, then to the lug wrench.
47
WHAT TO DO IN EMERGENCIES
Page 50 of 76
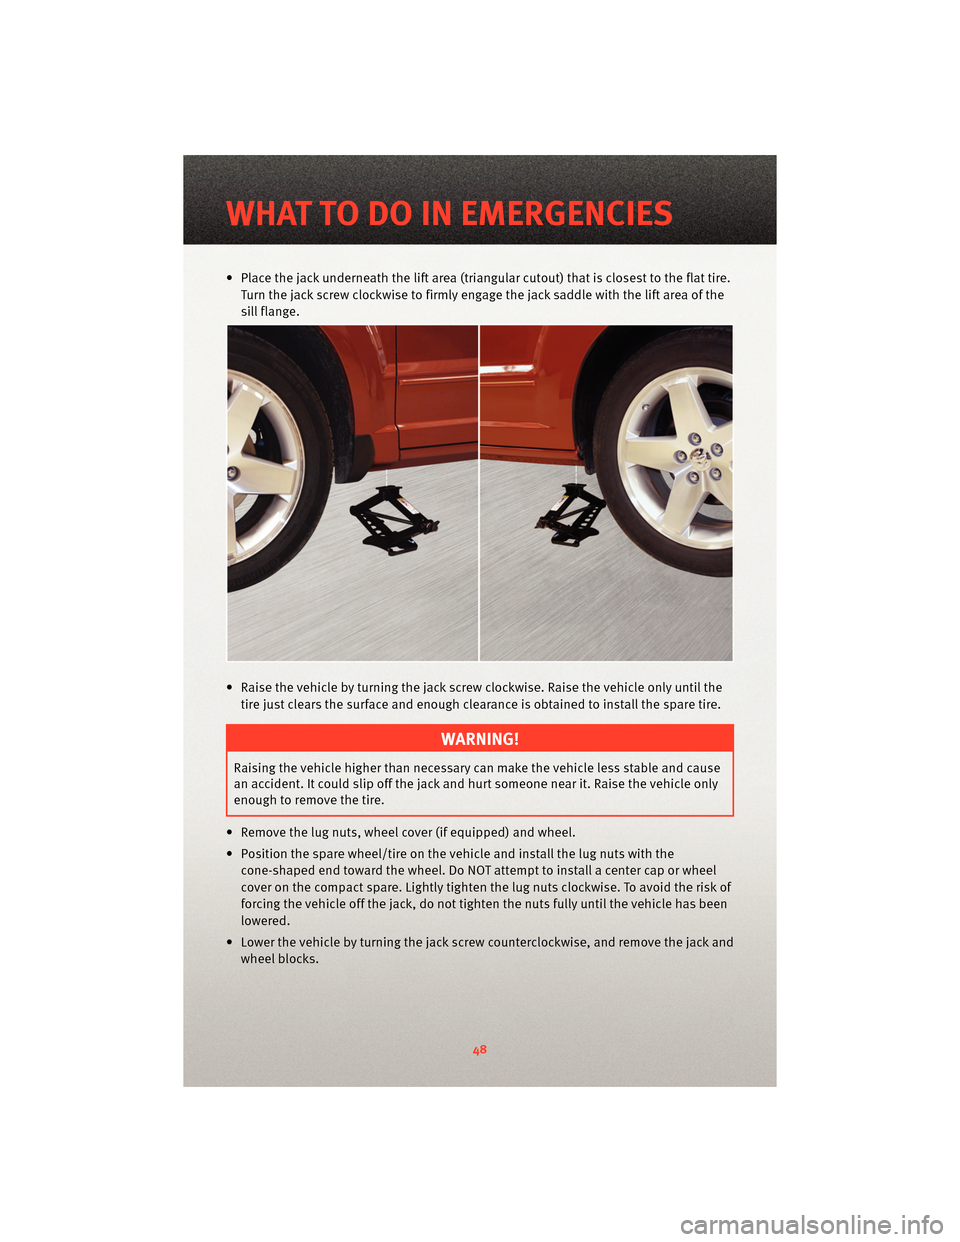
• Place the jack underneath the lift area (triangular cutout) that is closest to the flat tire.Turn the jack screw clockwise to firmly engage the jack saddle with the lift area of the
sill flange.
• Raise the vehicle by turning the jack screw clockwise. Raise the vehicle only until the tire just clears the surface and enough clearance is obtained to install the spare tire.
WARNING!
Raising the vehicle higher than necessary can make the vehicle less stable and cause
an accident. It could slip off the jack and hurt someone near it. Raise the vehicle only
enough to remove the tire.
• Remove the lug nuts, wheel cover (if equipped) and wheel.
• Position the spare wheel/tire on the vehicle and install the lug nuts with the cone-shaped end toward the wheel. Do NOT attempt to install a center cap or wheel
cover on the compact spare. Lightly tighten the lug nuts clockwise. To avoid the risk of
forcing the vehicle off the jack, do not tighten the nuts fully until the vehicle has been
lowered.
• Lower the vehicle by turning the jack screw counterclockwise, and remove the jack and wheel blocks.
WHAT TO DO IN EMERGENCIES
48
Page 51 of 76
• Finish tightening the lug nuts. Push down on the wrench while tightening for
increased leverage. Alternate nuts until each one has been tightened twice. The
correct wheel nut tightness is 100 ft lbs (135 N•m). If in doubt about the correct
tightness, have them checked with a tor que wrench by your authorized dealer or at a
service station.
WARNING!
A loose tire or jack, thrown forward in a collision or hard stop, could endanger the
occupants of the vehicle. Always stow the jack parts and the spare tire in the places
provided.
• Secure the tire, jack, and tools in their proper locations.
JUMP-STARTING
• If your vehicle has a discharged battery it can be jump-started using a set of jumper cables and a battery in another vehicle or by using a portable battery booster pack.
• Jump-starting can be dangerous if done improperly so please follow the procedures in this section carefully.
NOTE: When using a portable battery booster pack follow the manufacturer’s operating
instructions and precautions.
CAUTION!
Do not use a portable battery booster pack or any other booster source with a system
voltage greater than 12 Volts or damage to the battery, starter motor, alternator or
electrical system may occur.
WARNING!
When temperatures are below the freezing point, electrolyte in a discharged battery
may freeze. Do not attempt jump-starting because the battery could rupture or
explode and cause personal injury. Battery temperature must be brought above the
freezing point before attempting a jump-start.
49
WHAT TO DO IN EMERGENCIES
Page 55 of 76
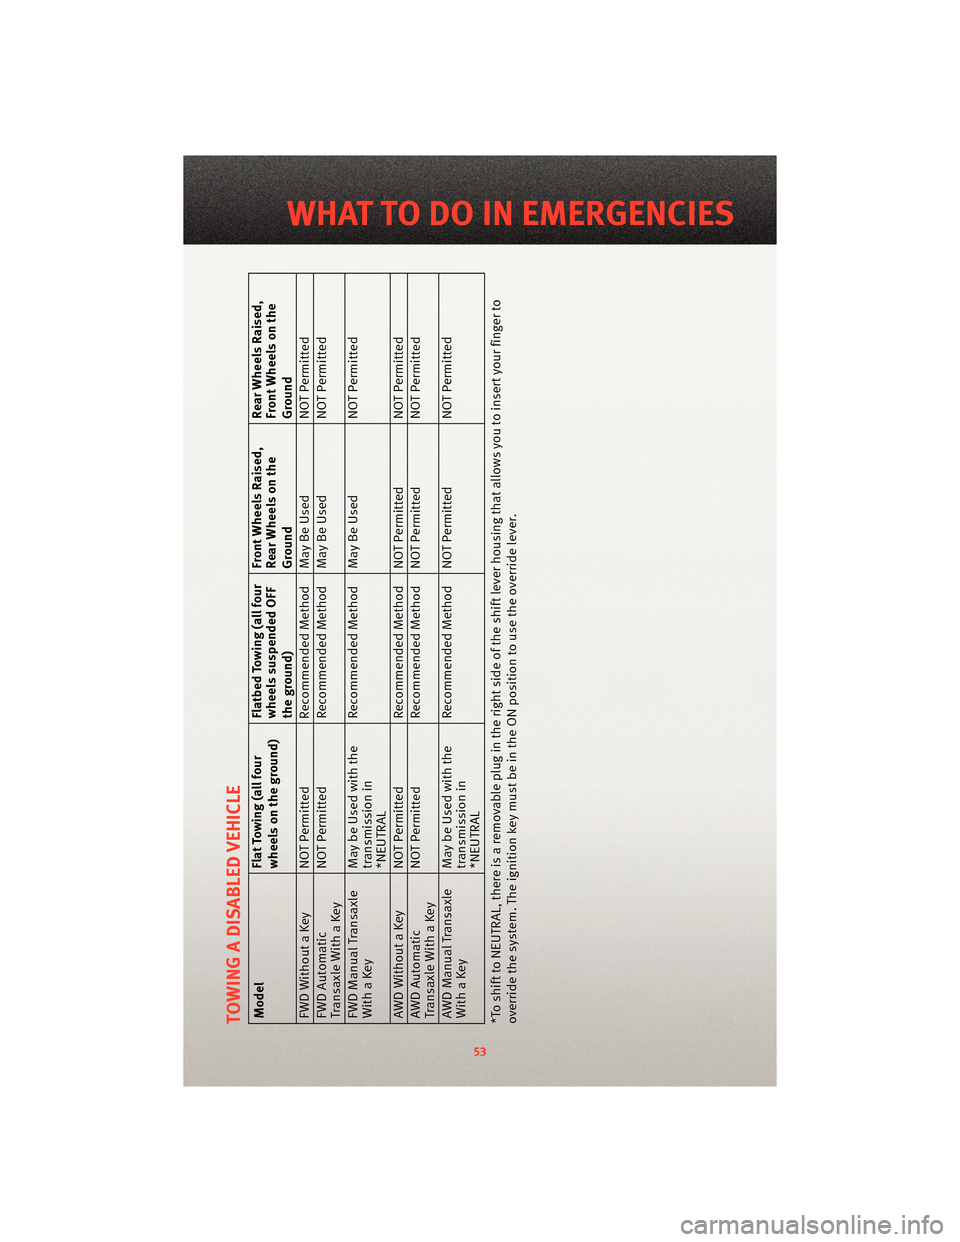
TOWING A DISABLED VEHICLEModelFlat Towing (all four
wheels on the ground)Flatbed Towing (all four
wheels suspended OFF
the ground)Front Wheels Raised,
Rear Wheels on the
GroundRear Wheels Raised,
Front Wheels on the
Ground
FWD Without a Key NOT Permitted Recommended Method May Be Used NOT Permitted
FWD Automatic
Transaxle With a Key NOT Permitted
Recommended Method May Be Used NOT Permitted
FWD Manual Transaxle
With a Key May be Used with the
transmission in
*NEUTRALRecommended Method May Be Used
NOT Permitted
AWD Without a Key NOT Permitted Recommended Method NOT Permitted NOT Permitted
AWD Automatic
Transaxle With a Key NOT Permitted
Recommended Method NOT Permitted NOT Permitted
AWD Manual Transaxle
With a Key May be Used with the
transmission in
*NEUTRALRecommended Method NOT Permitted
NOT Permitted
*To shift to NEUTRAL, there is a removable plug in the right side of the shif t lever housing that allows you to insert your finger to
override the system. The ignition key must be in the ON position to use the override lever.
53
WHAT TO DO IN EMERGENCIES
Page 56 of 76
FREEING A STUCK VEHICLE
• If your vehicle becomes stuck in mud, sand or snow, it can often be moved by arocking motion. Turn your steering wheel right and left to clear the area around the
front wheels. Then move the shift lever back and forth between REVERSE and DRIVE.
Using minimal accelerator pedal pressure to maintain the rocking motion, without
spinning the wheels, is most effective.
NOTE: To improve the vehicle's traction when starting off in deep snow, sand or gravel,
it may be desirable to switch the Electronic Stability Control (ESC) to “Partial Off” mode
by momentarily pressing the ESC Off
switch. For further information on ESC, refer to
the Owner's Manual on the DVD.
WARNING!
Fast spinning tires can be dangerous. Forces generated by excessive wheel speeds
may cause tire damage or failure. A tire could explode and injure someone. Do not
spin your vehicle's wheels faster than 30 mph (48 km/h) when you are stuck. Do not
let anyone near a spinning wheel, no matter what the speed.
CAUTION!
• When “rocking” a stuck vehicle by moving between 1st and REVERSE, do not spin the wheels faster than 15 mph (24 km/h), or drivetrain damage may result.
• Revving the engine or s pinning the wheels too fast ma y lead to transmission
overheating and failure. It can also damage the tires. Do not spin the wheels above
30 mph (48 km/h) while in gear (no transmission shifting occurring).
WHAT TO DO IN EMERGENCIES
54