window DODGE CALIBER 2010 1.G User Guide
[x] Cancel search | Manufacturer: DODGE, Model Year: 2010, Model line: CALIBER, Model: DODGE CALIBER 2010 1.GPages: 76, PDF Size: 12.18 MB
Page 10 of 76
KEY FOB
Locking And Unlocking The
Doors/Liftgate
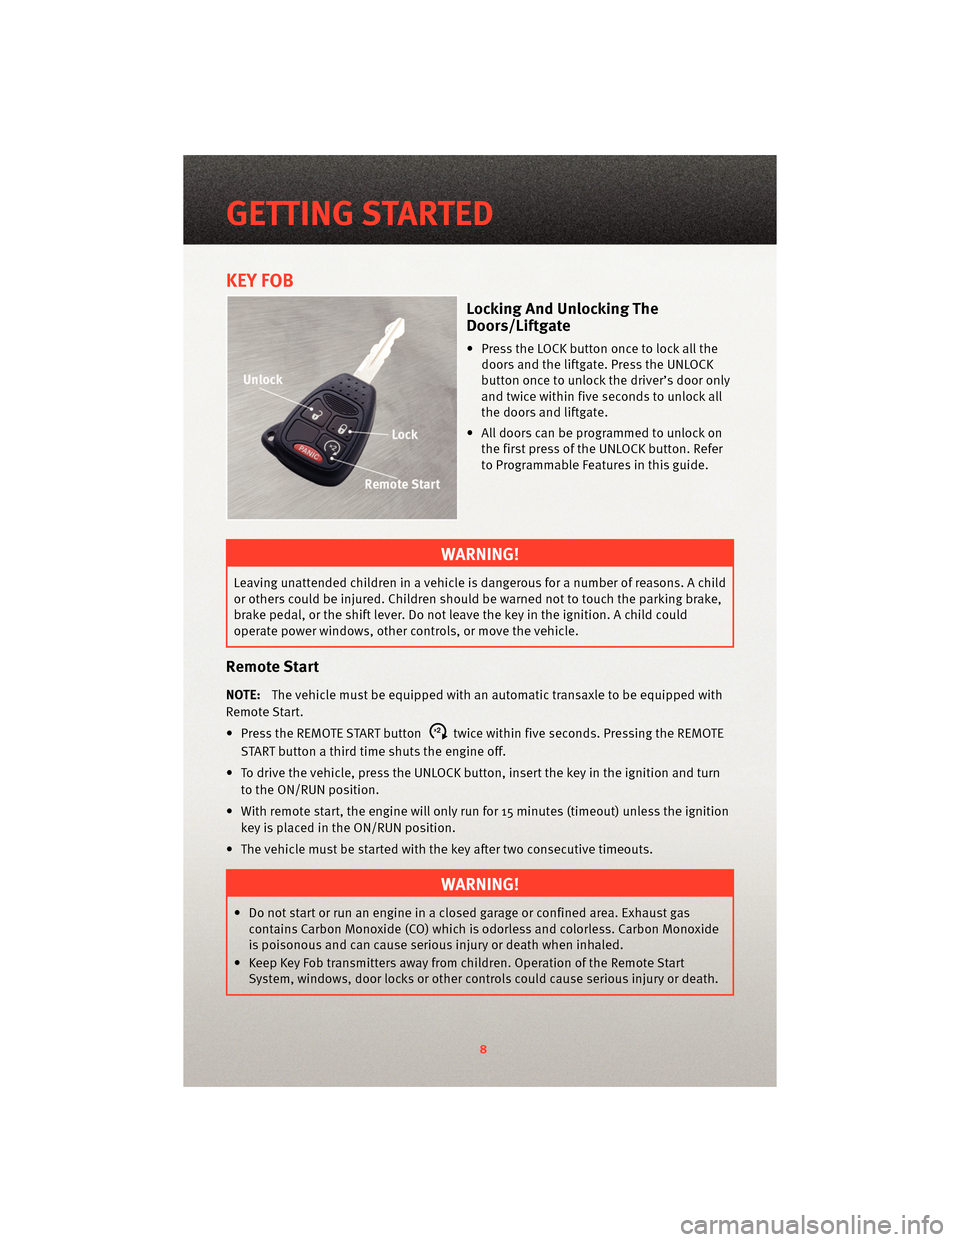
• Press the LOCK button once to lock all thedoors and the liftgate. Press the UNLOCK
button once to unlock the driver’s door only
and twice within five seconds to unlock all
the doors and liftgate.
• All doors can be programmed to unlock on the first press of the UNLOCK button. Refer
to Programmable Features in this guide.
WARNING!
Leaving unattended children in a vehicle is dangerous for a number of reasons. A child
or others could be injured. Children should be warned not to touch the parking brake,
brake pedal, or the shift lever. Do not leave the key in the ignition. A child could
operate power windows, other controls, or move the vehicle.
Remote Start
NOTE: The vehicle must be equipped with an automatic transaxle to be equipped with
Remote Start.
• Press the REMOTE START button
x2twice within five seconds. Pressing the REMOTE
START button a third time shuts the engine off.
• To drive the vehicle, press the UNLOCK button, insert the key in the ignition and turn to the ON/RUN position.
• With remote start, the engine will only run for 15 minutes (timeout) unless the ignition key is placed in the ON/RUN position.
• The vehicle must be started with the key after two consecutive timeouts.
WARNING!
• Do not start or run an engine in a closed garage or confined area. Exhaust gas contains Carbon Monoxide (CO) which is odorless and colorless. Carbon Monoxide
is poisonous and can cause serious injury or death when inhaled.
• Keep Key Fob transmitters away from children. Operation of the Remote Start System, windows, door locks or other controls could cause serious injury or death.
GETTING STARTED
8
Page 23 of 76
AUTOSTICK®
• AutoStick®is a driver-interactive transaxle thatoffers six manual ratio changes to
provide you with more control. The system is activated in the DRIVE position by
moving the shift lever side-to-side.
• Moving the shift lever to the right (+) side will activate AutoStick
®and shift up to the
next higher manual ratio, unless you are alr eady operating in or near Overdrive, in
which case sixth gear ratio will be selected. The transaxle will automatically shift up
when maximum engine speed is reached while Autostick
®is engaged.
• Moving the shift lever to the left (-) will activate AutoStick
®and shift to the next lower
manual ratio. If a downshift would cause the engine to over-speed, that shift will not
occur until it is safe for the engine.
NOTE: AutoStick
®is not functional until the CVT warms up in cold weather.
AutoStick®is deactivated:
• By holding the shift lever to (+) momentarily.
• When the shift lever is shifted out of DRIVE.
• When in sixth position, touching the shift lever to the right.
• When heavy Anti-Lock Brake System (ABS) application is detected.
• Refer to the Owner's Manual on the DVD for complete details.
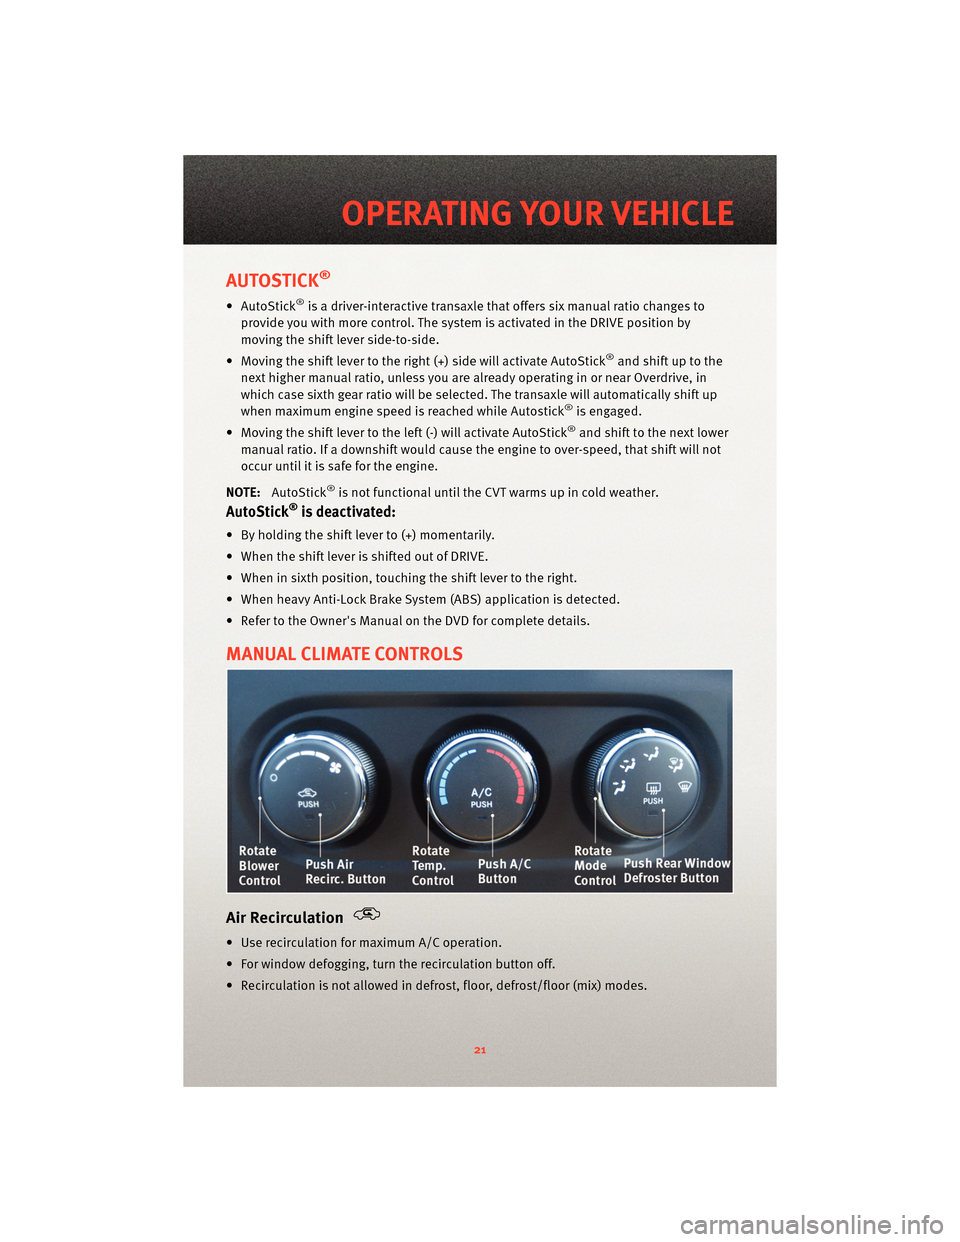
MANUAL CLIMATE CONTROLS
Air Recirculation
• Use recirculation for maximum A/C operation.
• For window defogging, turn the recirculation button off.
• Recirculation is not allowed in defrost, floor, defrost/floor (mix) modes.
21
OPERATING YOUR VEHICLE
Page 24 of 76
AUTOMATIC TEMPERATURE CONTROLS (ATC)
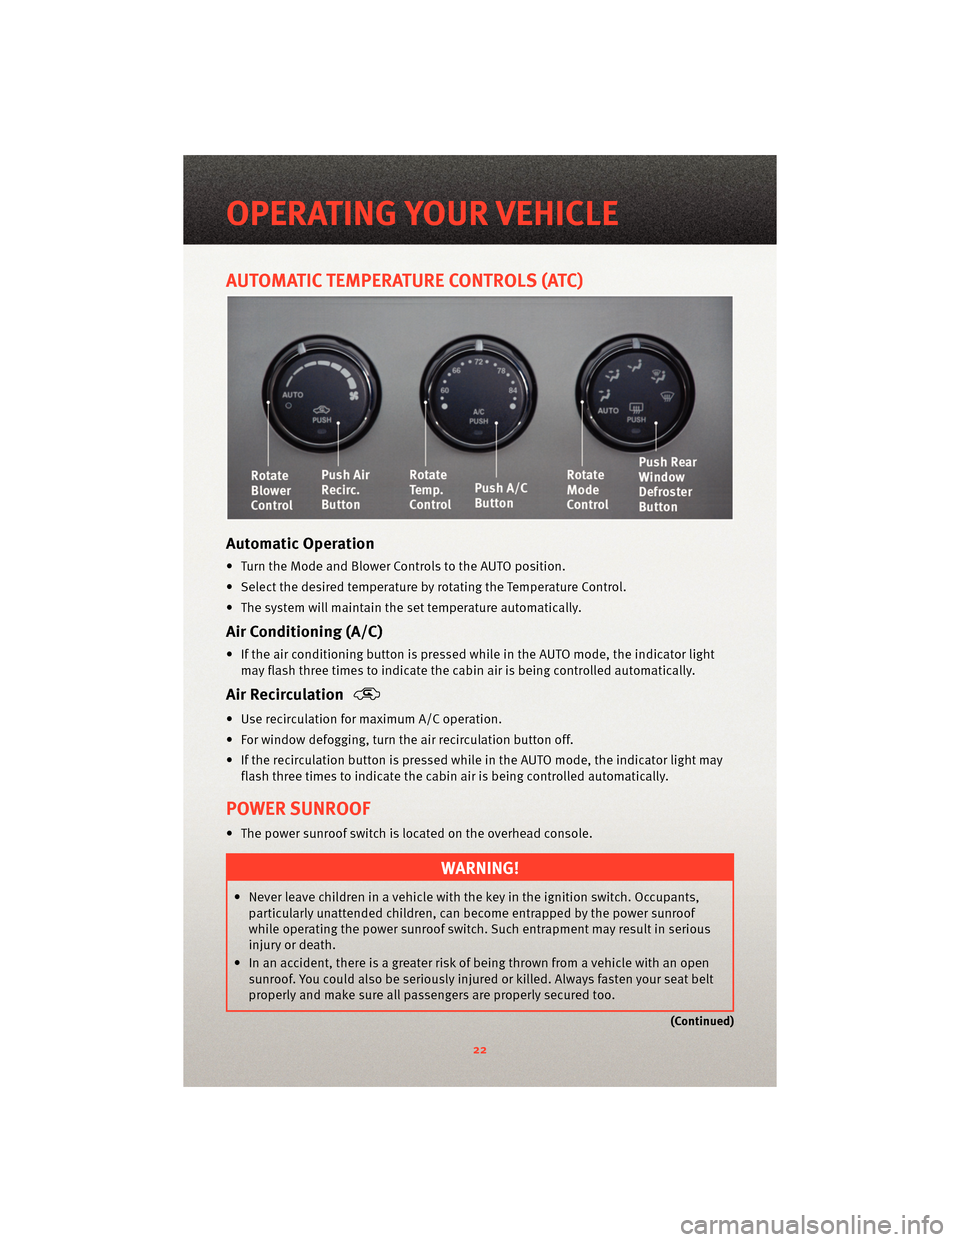
Automatic Operation
• Turn the Mode and Blower Controls to the AUTO position.
• Select the desired temperature by rotating the Temperature Control.
• The system will maintain the set temperature automatically.
Air Conditioning (A/C)
• If the air conditioning button is pressed while in the AUTO mode, the indicator lightmay flash three times to indicate the cabin air is being controlled automatically.
Air Recirculation
• Use recirculation for maximum A/C operation.
• For window defogging, turn the air recirculation button off.
• If the recirculation button is pressed while in the AUTO mode, the indicator light may flash three times to indicate the cabin air is being controlled automatically.
POWER SUNROOF
• The power sunroof switch is located on the overhead console.
WARNING!
• Never leave children in a vehicle with the key in the ignition switch. Occupants,particularly unattended children, can become entrapped by the power sunroof
while operating the power sunroof switch. Such entrapment may result in serious
injury or death.
• In an accident, there is a greater risk of being thrown from a vehicle with an open sunroof. You could also be seriously injured or killed. Always fasten your seat belt
properly and make sure all passengers are properly secured too.
(Continued)
OPERATING YOUR VEHICLE
22
Page 25 of 76
WARNING!(Continued)
• Do not allow small children to operatethe sunroof. Never allow your fingers, other
body parts, or any object to project through the sunroof opening. Injury may result.
Opening Sunroof
Express
• Press the switch rearward and release. The sunroof will fully open and stop
automatically.
Closing Sunroof
Express
• Press the switch forward and release. The sunroof will close automatically from anyposition.
Manual Open/Close
• Press and hold the switch rearward to open or forward to close the sunroof. Anyrelease of the switch will stop the movement, and the sunroof will remain in a partially
open or closed position until the switch is pressed again.
Venting Sunroof
• Press and release the "VENT" button, and the sunroof will open to the vent position.
This is called “Express Vent” and will occur regardless of sunroof position. During
Express Vent operation, any movement of the switch will stop the sunroof.
Pinch Protection Feature
• This feature will detect an obstruction in the opening of the sunroof during Express Close operation. If an obstruction in the path of the sunroof is detected, the sunroof
will automatically return to the open position.
NOTE: Pinch protection is disabled while the switch is pressed and held during manual
opening and closing of the sunroof.
WIND BUFFETING
• Wind buffeting can be described as a helicopter-type percussion sound. If buffeting occurs with the rear windows open, adjust the front and rear windows together.
• If buffeting occurs with the sunroof open, adjust the sunroof opening, or adjust any window. This will minimize buffeting.
23
OPERATING YOUR VEHICLE
Page 34 of 76
UNIVERSAL CONSUMER INTERFACE
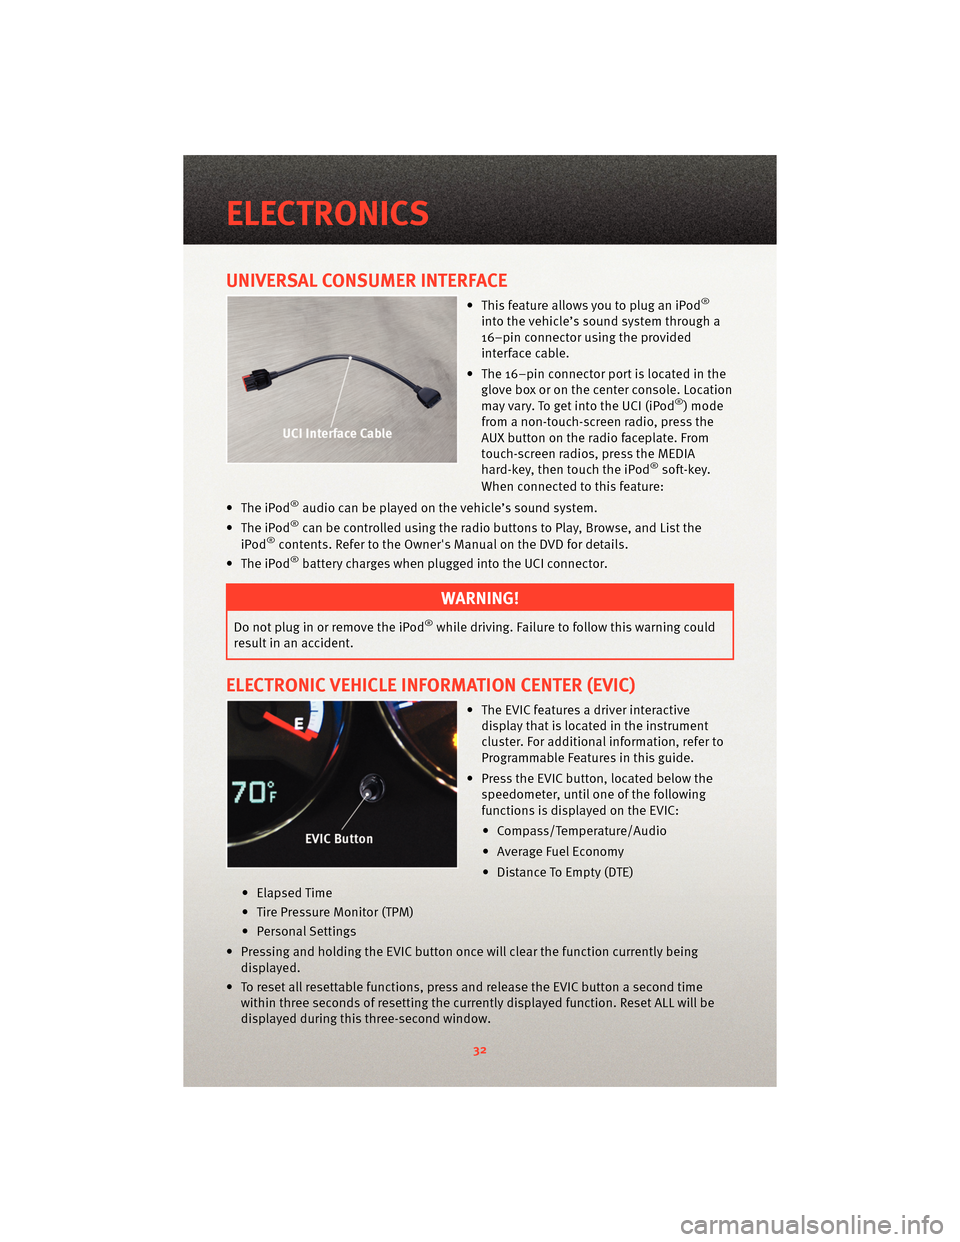
• This feature allows you to plug an iPod®
into the vehicle’s sound system through a
16–pin connector using the provided
interface cable.
• The 16–pin connector port is located in the glove box or on the center console. Location
may vary. To get into the UCI (iPod
®) mode
from a non-touch-screen radio, press the
AUX button on the radio faceplate. From
touch-screen radios, press the MEDIA
hard-key, then touch the iPod
®soft-key.
When connected to this feature:
• The iPod
®audio can be played on the vehicle’s sound system.
• The iPod®can be controlled using the radio buttons to Play, Browse, and List the
iPod®contents. Refer to the Owner's Manual on the DVD for details.
• The iPod®battery charges when plug ged into the UCI connector.
WARNING!
Do not plug in or remove the iPod®while driving. Failure to follow this warning could
result in an accident.
ELECTRONIC VEHICLE INFORMATION CENTER (EVIC)
• The EVIC features a driver interactive display that is located in the instrument
cluster. For additional information, refer to
Programmable Features in this guide.
• Press the EVIC button, located below the speedometer, until one of the following
functions is displayed on the EVIC:
• Compass/Temperature/Audio
• Average Fuel Economy
• Distance To Empty (DTE)
• Elapsed Time
• Tire Pressure Monitor (TPM)
• Personal Settings
• Pressing and holding the EVIC button once will clear the function currently being
displayed.
• To reset all resettable functions, press and release the EVIC button a second time within three seconds of resetting the curr ently displayed function. Reset ALL will be
displayed during this three-second window.
ELECTRONICS
32
Page 71 of 76
MOPAR®ACCESSORIES
• The following highlights just some of the authentic Dodge Accessories by MOPAR®
that have been engineered to customize your Dodge Caliber.
• To see the full line of accessories, sto p by your Dodge dealer or visitMOPAR.com.
CHROME:
• Chrome Bodyside Moldings • 17 Inch Chrome Wheel • Chrome Fuel Filler Door
EXTERIOR:
• Fog Lights • Side Window Air Deflector • Rear Spoiler
• Decal Kit • Front End and Hood Cover • Molded Splash Guards
INTERIOR:
• Premium Carpet Floor Mats • Door Sill Guards • Bright Pedal Kit
• Slush Mats • Shift Knob• Heated Seats
ELECTRONICS:
• Portable Navigation Systems • Uconnect™ Web (WiFi) • DVD Rear Seat Video
•iPod
®Adapter • Uconnect™ Phone • Media Center 730N (RER
Navigation Radio)
CARRIERS:
• Hitch-mount Bike Carrier • Roof Mount Bike Carrier • Roof Box Cargo Carrier
• Roof Mount Ski and Snowboard Carrier • Roof Mount Water Sports
Carrier • Roof Mount Canoe Carrier
•iPod
®is a registered trademark of Apple, Inc.
69
MOPAR ACCESSORIES