manual transmission DODGE CALIBER 2011 1.G User Guide
[x] Cancel search | Manufacturer: DODGE, Model Year: 2011, Model line: CALIBER, Model: DODGE CALIBER 2011 1.GPages: 80, PDF Size: 3.66 MB
Page 3 of 80
INTRODUCTION/WELCOMEWelcome From Chrysler Group LLC....2
CONTROLS AT A GLANCEDriver Cockpit...............4
Instrument Cluster .............6
GETTING STARTEDKeyFOB ..................8
Remote Start................8
Theft Alarm .................9
Seat Belt ..................9
Supplemental Restraint System (SRS) —
Airbags ..................10
Child Restraints .............11
Front Seats ................13
Rear Seats ................15
Heated Seats ...............15
Tilt Steering Column ...........16
OPERATING YOUR VEHICLETurn Signal/Lights Lever .........17
Wiper/Washer Lever ...........18
Speed Control Lever ...........19
AutoStick
®................20
Manual Climate Controls .........20
Automatic Temperature Controls
(ATC) ...................21
Power Sunroof ..............22
Wind Buffeting ..............23
ELECTRONICSYour Vehicle's Sound System ......24
Non-Touch-Screen Radios ........26
Touch-Screen Radio ...........29
Steering Wheel Audio Controls ......33
Uconnect™ Phone ............33
Uconnect™ Voice Command .......35
iPod
®/USB/MP3 Control .........36
Electronic Vehicle Information Center
(EVIC) ...................37
Programmable Features .........38
Universal Garage Door Opener
(HomeLink
®) ...............40 Power Inverter
..............41
Power Outlet ...............42
UTILITY
Trailer Towing Weights (Maximum Trailer
Weight Ratings) ..............43
Recreational Towing (Behind Motorhome,
Etc.) ....................44
WHAT TO DO IN EMERGENCIES
24-Hour Towing Assistance .......45
Instrument Cluster Warning Lights . . . 45
If Your Engine Overheats .........48
Automatic Transmission Overheating . . 49
Jacking And Tire Changing ........50
Jump-Starting ..............52
Shift Lever Override ...........55
Towing A Disabled Vehicle ........56
Freeing A Stuck Vehicle .........57
Event Data Recorder (EDR) .......58
MAINTAINING YOUR VEHICLEOpening The Hood............59
Engine Compartment ...........60
Fluids And Capacities ..........62
Maintenance Chart ............63
Fuses ...................66
Tire Pressures ...............67
Wheel And Wheel Trim Care .......68
Exterior Bulbs ..............68
CONSUMER ASSISTANCEChrysler Group LLC Customer Center . . 69
Chrysler Canada Inc. Customer Center . 69
Assistance For The Hearing Impaired . . 69
Publications Ordering ..........69
Reporting Safety Defects In The
50 United States And
Washington, D.C. .............70
MOPAR ACCESSORIESAuthentic Accessories By MOPAR®...71
INDEX..................72
TABLE OF CONTENTS
Page 22 of 80
AUTOSTICK®
• AutoStick®is a driver-interactive transmission that offers six manual ratio changes
to provide you with more control. The system is activated in the DRIVE position by
moving the shift lever side-to-side.
• Moving the shift lever to the right (+) side will activate AutoStick
®and shift up to
the next higher manual ratio, unless you are already operating in or near Overdrive,
in which case sixth gear ratio will be selected. The transmission will automatically
shift up when maximum engine speed is reached while Autostick
®is engaged.
• Moving the shift lever to the left (-) will activate AutoStick®and shift to the next
lower manual ratio. If a downshift would cause the engine to over-speed, that shift
will not occur until it is safe for the engine.
NOTE: AutoStick
®is not functional until the CVT warms up in cold weather.
AutoStick®is deactivated:
• By holding the shift lever to (+) momentarily.
• When the shift lever is shifted out of DRIVE.
• When in sixth position, touching the shift lever to the right.
• When heavy Anti-Lock Brake System (ABS) application is detected.
• Refer to the Owner's Manual on the DVD for complete details.
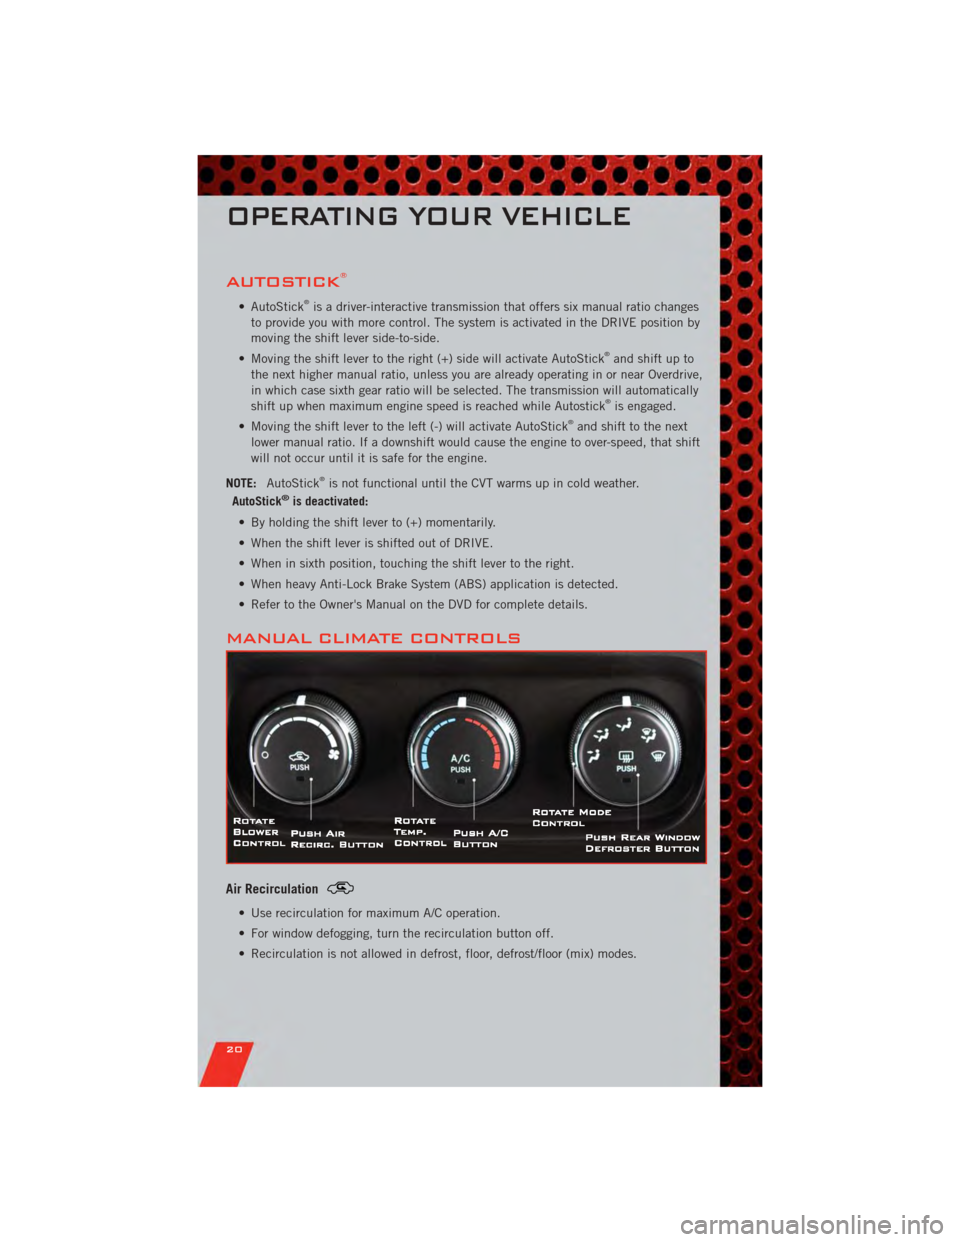
MANUAL CLIMATE CONTROLS
Air Recirculation
• Use recirculation for maximum A/C operation.
• For window defogging, turn the recirculation button off.
• Recirculation is not allowed in defrost, floor, defrost/floor (mix) modes.
OPERATING YOUR VEHICLE
20
Page 46 of 80
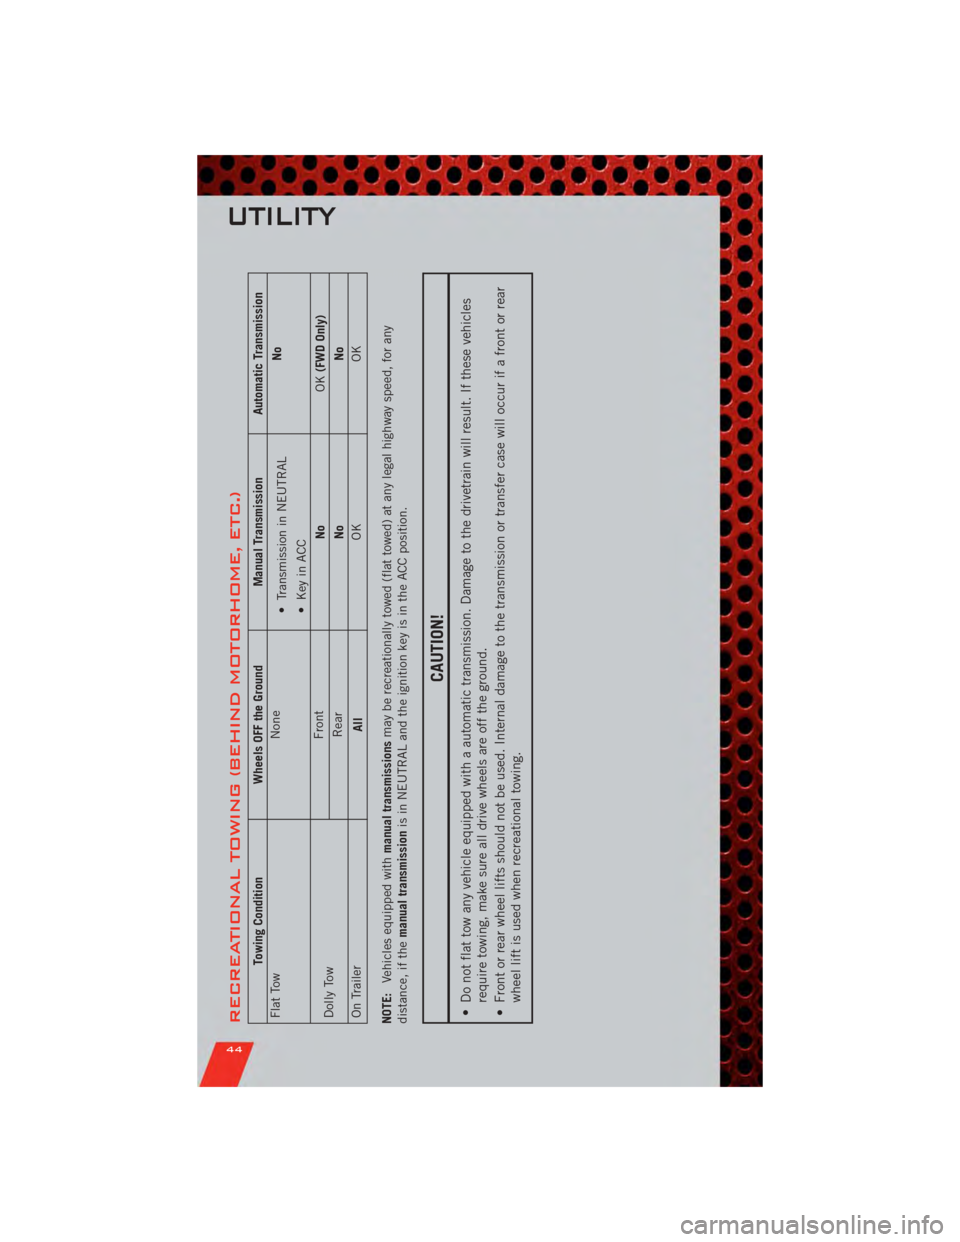
RECREATIONAL TOWING (BEHIND MOTORHOME, ETC.)
Towing ConditionWheels OFF the Ground Manual TransmissionAutomatic Transmission
Flat Tow None
• Transmission in NEUTRAL
• Key in ACC No
Dolly Tow Front
NoOK(FWD Only)
Rear NoNo
On Trailer AllOK
OK
NOTE: Vehicles equipped with manual transmissionsmay be recreationally towed (flat towed) at any legal highway speed, for any
distance, if the manual transmission is in NEUTRAL and the ignition key is in the ACC position.
CAUTION!
• Do not flat tow any vehicle equipped with a automatic transmission. Damage to the drivetrain will result. If these vehicles
require towing, make sure all drive wheels are off the ground.
• Front or rear wheel lifts should not be used. Internal damage to the transmission or transfer case will occur if a front or rear wheel lift is used when recreational towing.
UTILITY
44
Page 52 of 80
JACKING AND TIRE CHANGING
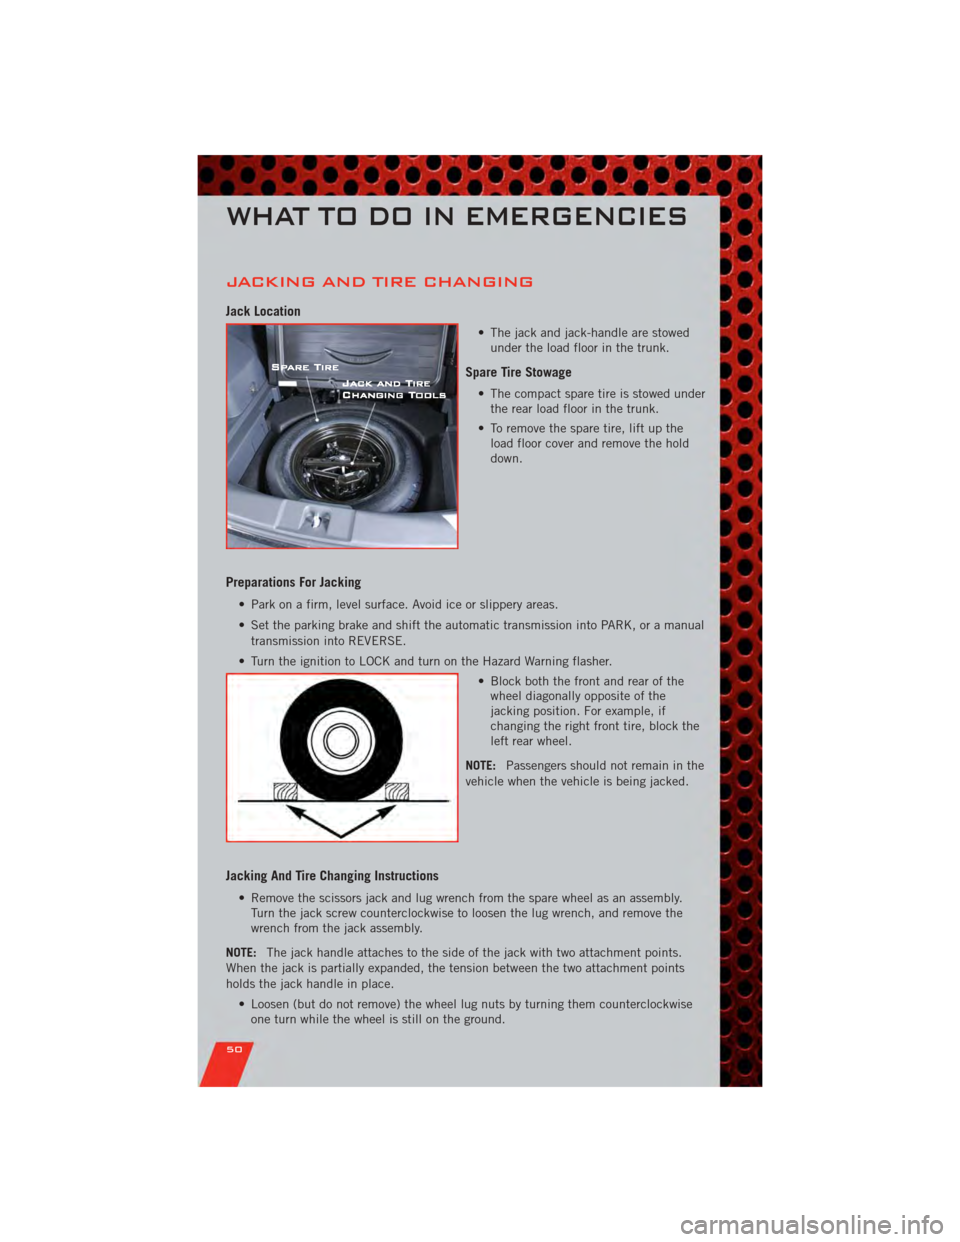
Jack Location
• The jack and jack-handle are stowedunder the load floor in the trunk.
Spare Tire Stowage
• The compact spare tire is stowed underthe rear load floor in the trunk.
• To remove the spare tire, lift up the load floor cover and remove the hold
down.
Preparations For Jacking
• Park on a firm, level surface. Avoid ice or slippery areas.
• Set the parking brake and shift the automatic transmission into PARK, or a manual
transmission into REVERSE.
• Turn the ignition to LOCK and turn on the Hazard Warning flasher. • Block both the front and rear of thewheel diagonally opposite of the
jacking position. For example, if
changing the right front tire, block the
left rear wheel.
NOTE: Passengers should not remain in the
vehicle when the vehicle is being jacked.
Jacking And Tire Changing Instructions
• Remove the scissors jack and lug wrench from the spare wheel as an assembly. Turn the jack screw counterclockwise to loosen the lug wrench, and remove the
wrench from the jack assembly.
NOTE: The jack handle attaches to the side of the jack with two attachment points.
When the jack is partially expanded, the tension between the two attachment points
holds the jack handle in place.
• Loosen (but do not remove) the wheel lug nuts by turning them counterclockwiseone turn while the wheel is still on the ground.
WHAT TO DO IN EMERGENCIES
50
Page 58 of 80
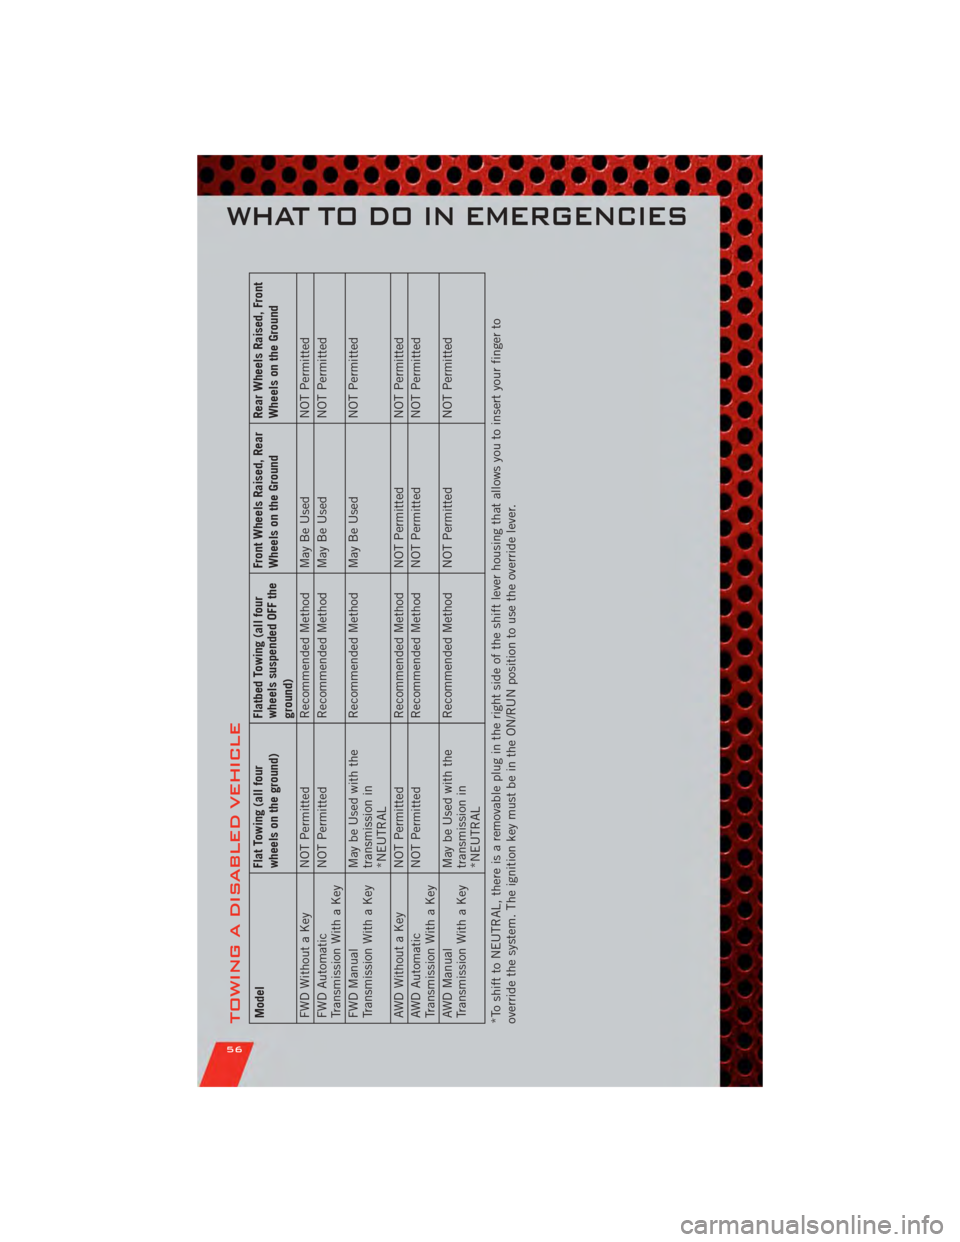
TOWING A DISABLED VEHICLEModelFlat Towing (all four
wheels on the ground)Flatbed Towing (all four
wheels suspended OFF the
ground)Front Wheels Raised, Rear
Wheels on the Ground
Rear Wheels Raised, Front
Wheels on the Ground
FWD Without a Key NOT Permitted Recommended Method May Be UsedNOT Permitted
FWD Automatic
Transmission With a Key NOT Permitted
Recommended Method May Be Used NOT Permitted
FWD Manual
Transmission With a Key May be Used with the
transmission in
*NEUTRALRecommended Method May Be Used
NOT Permitted
AWD Without a Key NOT Permitted Recommended Method NOT PermittedNOT Permitted
AWD Automatic
Transmission With a Key NOT Permitted
Recommended Method NOT Permitted NOT Permitted
AWD Manual
Transmission With a Key May be Used with the
transmission in
*NEUTRALRecommended Method NOT Permitted
NOT Permitted
*To shift to NEUTRAL, there is a removable plug in the right side of the shift lever housing that allows you to insert your finger to
override the system. The ignition key must be in the ON/RUN position to use the override lever.
WHAT TO DO IN EMERGENCIES
56
Page 59 of 80
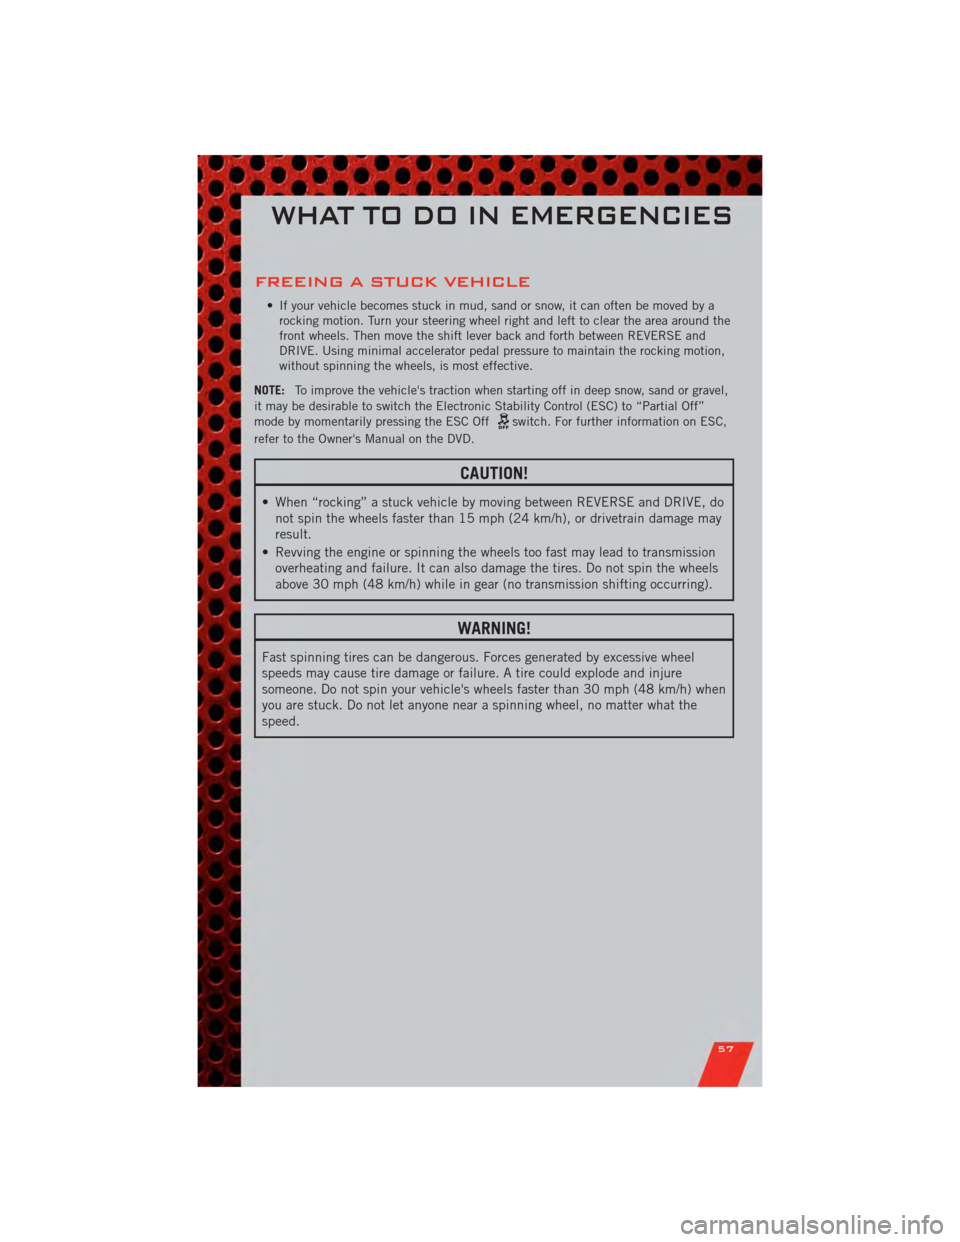
FREEING A STUCK VEHICLE
• If your vehicle becomes stuck in mud, sand or snow, it can often be moved by arocking motion. Turn your steering wheel right and left to clear the area around the
front wheels. Then move the shift lever back and forth between REVERSE and
DRIVE. Using minimal accelerator pedal pressure to maintain the rocking motion,
without spinning the wheels, is most effective.
NOTE: To improve the vehicle's traction when starting off in deep snow, sand or gravel,
it may be desirable to switch the Electronic Stability Control (ESC) to “Partial Off”
mode by momentarily pressing the ESC Off
switch. For further information on ESC,
refer to the Owner's Manual on the DVD.
CAUTION!
• When “rocking” a stuck vehicle by moving between REVERSE and DRIVE, do not spin the wheels faster than 15 mph (24 km/h), or drivetrain damage may
result.
• Revving the engine or spinning the wheels too fast may lead to transmission overheating and failure. It can also damage the tires. Do not spin the wheels
above 30 mph (48 km/h) while in gear (no transmission shifting occurring).
WARNING!
Fast spinning tires can be dangerous. Forces generated by excessive wheel
speeds may cause tire damage or failure. A tire could explode and injure
someone. Do not spin your vehicle's wheels faster than 30 mph (48 km/h) when
you are stuck. Do not let anyone near a spinning wheel, no matter what the
speed.
WHAT TO DO IN EMERGENCIES
57
Page 64 of 80
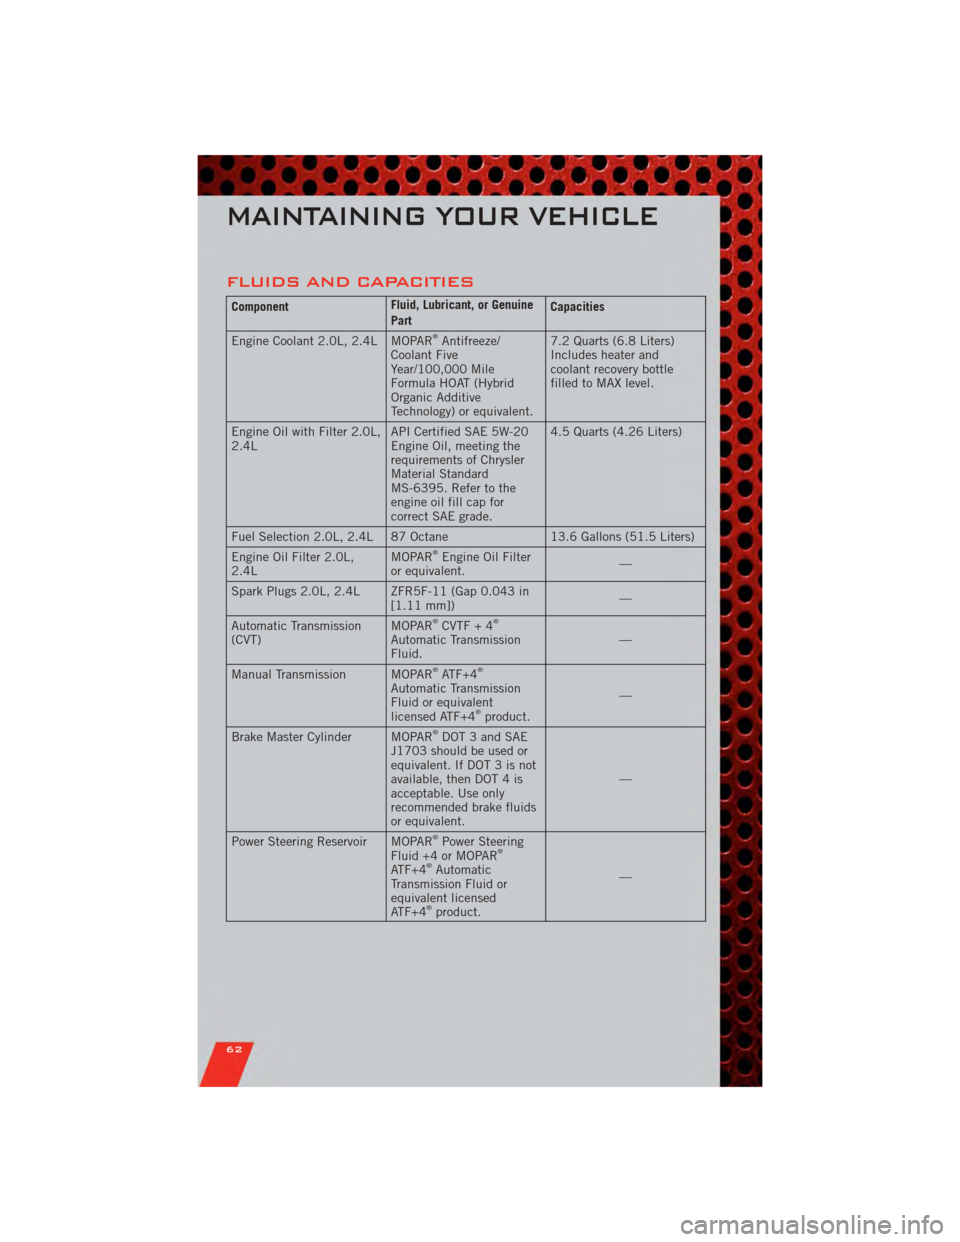
FLUIDS AND CAPACITIES
ComponentFluid, Lubricant, or Genuine
PartCapacities
Engine Coolant 2.0L, 2.4L MOPAR
®Antifreeze/
Coolant Five
Year/100,000 Mile
Formula HOAT (Hybrid
Organic Additive
Technology) or equivalent. 7.2 Quarts (6.8 Liters)
Includes heater and
coolant recovery bottle
filled to MAX level.
Engine Oil with Filter 2.0L,
2.4L API Certified SAE 5W-20
Engine Oil, meeting the
requirements of Chrysler
Material Standard
MS-6395. Refer to the
engine oil fill cap for
correct SAE grade.4.5 Quarts (4.26 Liters)
Fuel Selection 2.0L, 2.4L 87 Octane 13.6 Gallons (51.5 Liters)
Engine Oil Filter 2.0L,
2.4L MOPAR
®Engine Oil Filter
or equivalent. —
Spark Plugs 2.0L, 2.4L ZFR5F-11 (Gap 0.043 in [1.11 mm]) —
Automatic Transmission
(CVT) MOPAR
®CVTF + 4®
Automatic Transmission
Fluid. —
Manual Transmission MOPAR
®ATF+4®
Automatic Transmission
Fluid or equivalent
licensed ATF+4
®product. —
Brake Master Cylinder MOPAR®DOT 3 and SAE
J1703 should be used or
equivalent. If DOT 3 is not
available, then DOT 4 is
acceptable. Use only
recommended brake fluids
or equivalent. —
Power Steering Reservoir MOPAR
®Power Steering
Fluid +4 or MOPAR®
ATF+4®Automatic
Transmission Fluid or
equivalent licensed
ATF+4
®product. —
MAINTAINING YOUR VEHICLE
62
Page 65 of 80
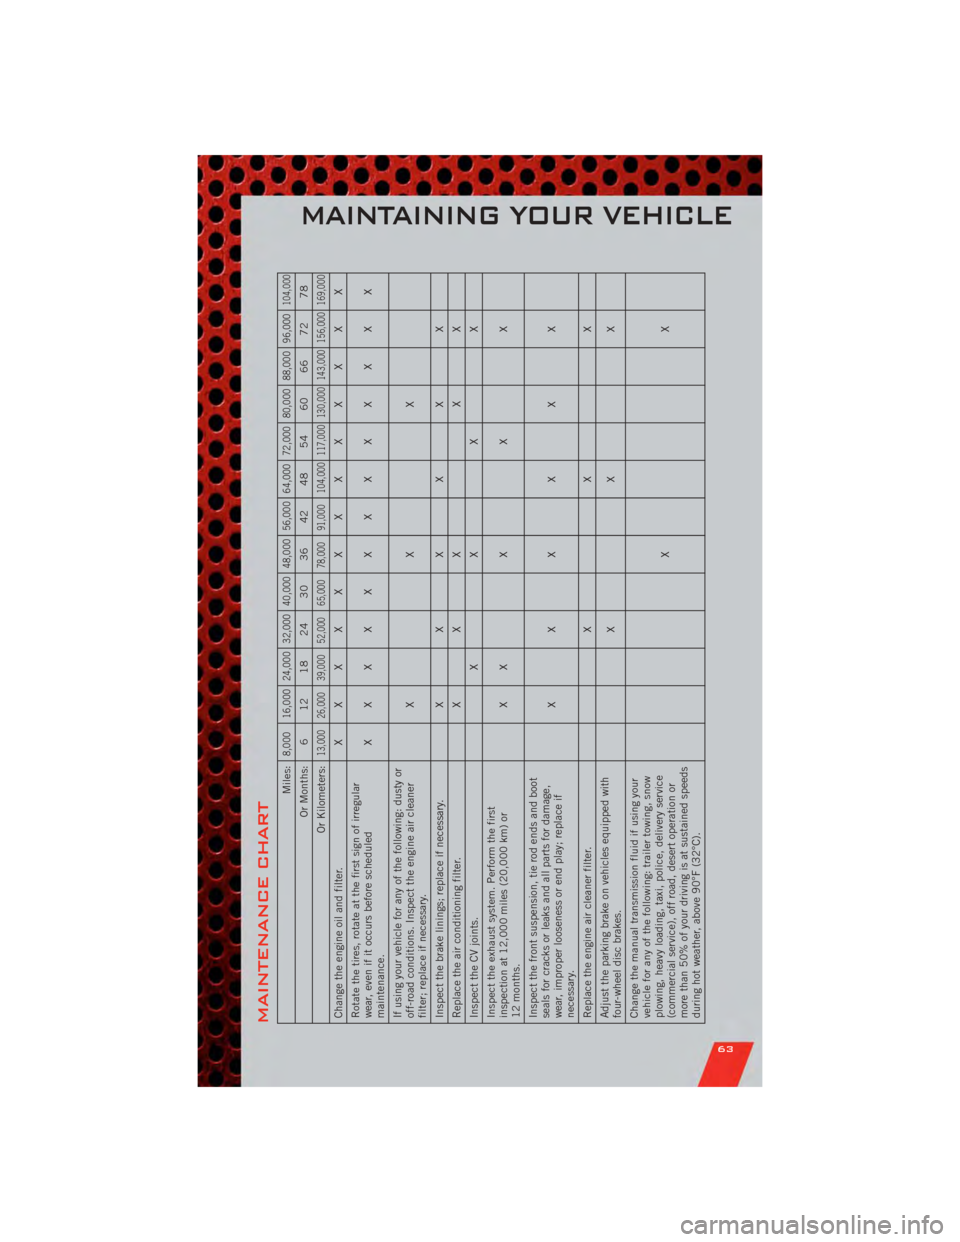
MAINTENANCE CHART
Miles:
8,000 16,000 24,000 32,000 40,000 48,000 56,000 64,000 72,000 80,000 88,000 96,000
104,000
Or Months: 6 12 18 24 30 36 42 48 54 60 66 72 78
Or Kilometers:
13,000 26,000 39,000 52,000 65,000 78,000 91,000 104,000 117,000 130,000 143,000 156,000 169,000
Change the engine oil and filter. XXXXXXXXXXXXX
Rotate the tires, rotate at the first sign of irregular
wear, even if it occurs before scheduled
maintenance. XXXXXXXXXXXXX
If using your vehicle for any of the following: dusty or
off-road conditions. Inspect the engine air cleaner
filter; replace if necessary. XXX
Inspect the brake linings; replace if necessary. X X XXXX
Replace the air conditioning filter. X X X X X
Inspect the CV joints. XXXX
Inspect the exhaust system. Perform the first
inspection at 12,000 miles (20,000 km) or
12 months. XXXXX
Inspect the front suspension, tie rod ends and boot
seals for cracks or leaks and all parts for damage,
wear, improper looseness or end play; replace if
necessary. XXXXXX
Replace the engine air cleaner filter. XXX
Adjust the parking brake on vehicles equipped with
four-wheel disc brakes. XXX
Change the manual transmission fluid if using your
vehicle for any of the following: trailer towing, snow
plowing, heavy loading, taxi, police, delivery service
(commercial service), off road, desert operation or
more than 50% of your driving is at sustained speeds
during hot weather, above 90°F (32°C). XX
MAINTAINING YOUR VEHICLE
63
Page 66 of 80
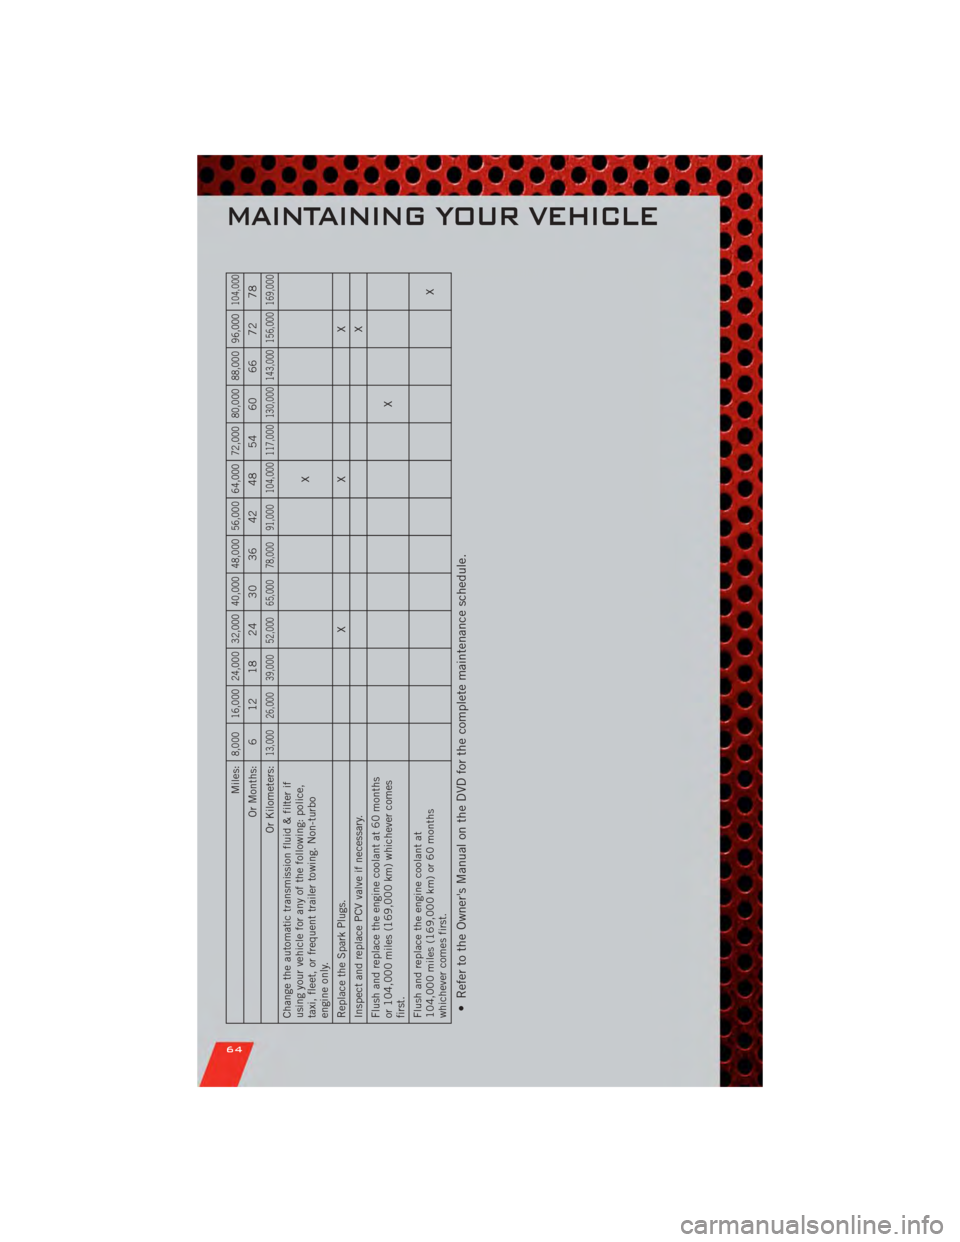
Miles:
8,000 16,000 24,000 32,000 40,000 48,000 56,000 64,000 72,000 80,000 88,000 96,000
104,000
Or Months: 6 12 18 24 30 36 42 48 54 60 66 72 78
Or Kilometers:
13,000 26,000 39,000 52,000 65,000 78,000 91,000 104,000 117,000 130,000 143,000 156,000 169,000
Change the automatic transmission fluid & filter if
using your vehicle for any of the following: police,
taxi, fleet, or frequent trailer towing. Non-turbo
engine only. X
Replace the Spark Plugs. XXX
Inspect and replace PCV valve if necessary. X
Flush and replace the engine coolant at 60 months
or 104,000 miles (169,000 km) whichever comes
first. X
Flush and replace the engine coolant at
104,000 miles (169,000 km) or 60 months
whichever comes first. X• Refer to the Owner's Manual on the DVD for the complete maintenance schedule.
MAINTAINING YOUR VEHICLE
64